Settings Hierarchy
You've built Skills (Lesson 9), used Subagents (Lesson 11), and connected MCP servers (Lesson 12). As your agent system grows, so does the complexity.
How do you control permissions for all these tools? How do you ensure your team uses the same safety rules? How do you switch models without editing every file?
What Are Settings?
Both Claude Code and OpenCode have a settings system that lets you customize how the agent behaves. These settings control things like:
- Permission modes (whether the agent asks before edits)
- Output preferences (how responses are formatted)
- Project-specific defaults (which tools the agent prioritizes)
- Team standards (shared rules for collaborative work)
Instead of having one global settings file, both tools use a layered hierarchy. This design lets you have personal preferences, project standards, and temporary overrides all at the same time. The two tools differ in file names, formats, and number of layers, but the mental model is the same: more specific scope wins over more general scope.
💬 AI Colearning Prompt
"Explain why applications use hierarchical configuration systems instead of a single global settings file. What problems does hierarchy solve?"
The Three Settings Levels
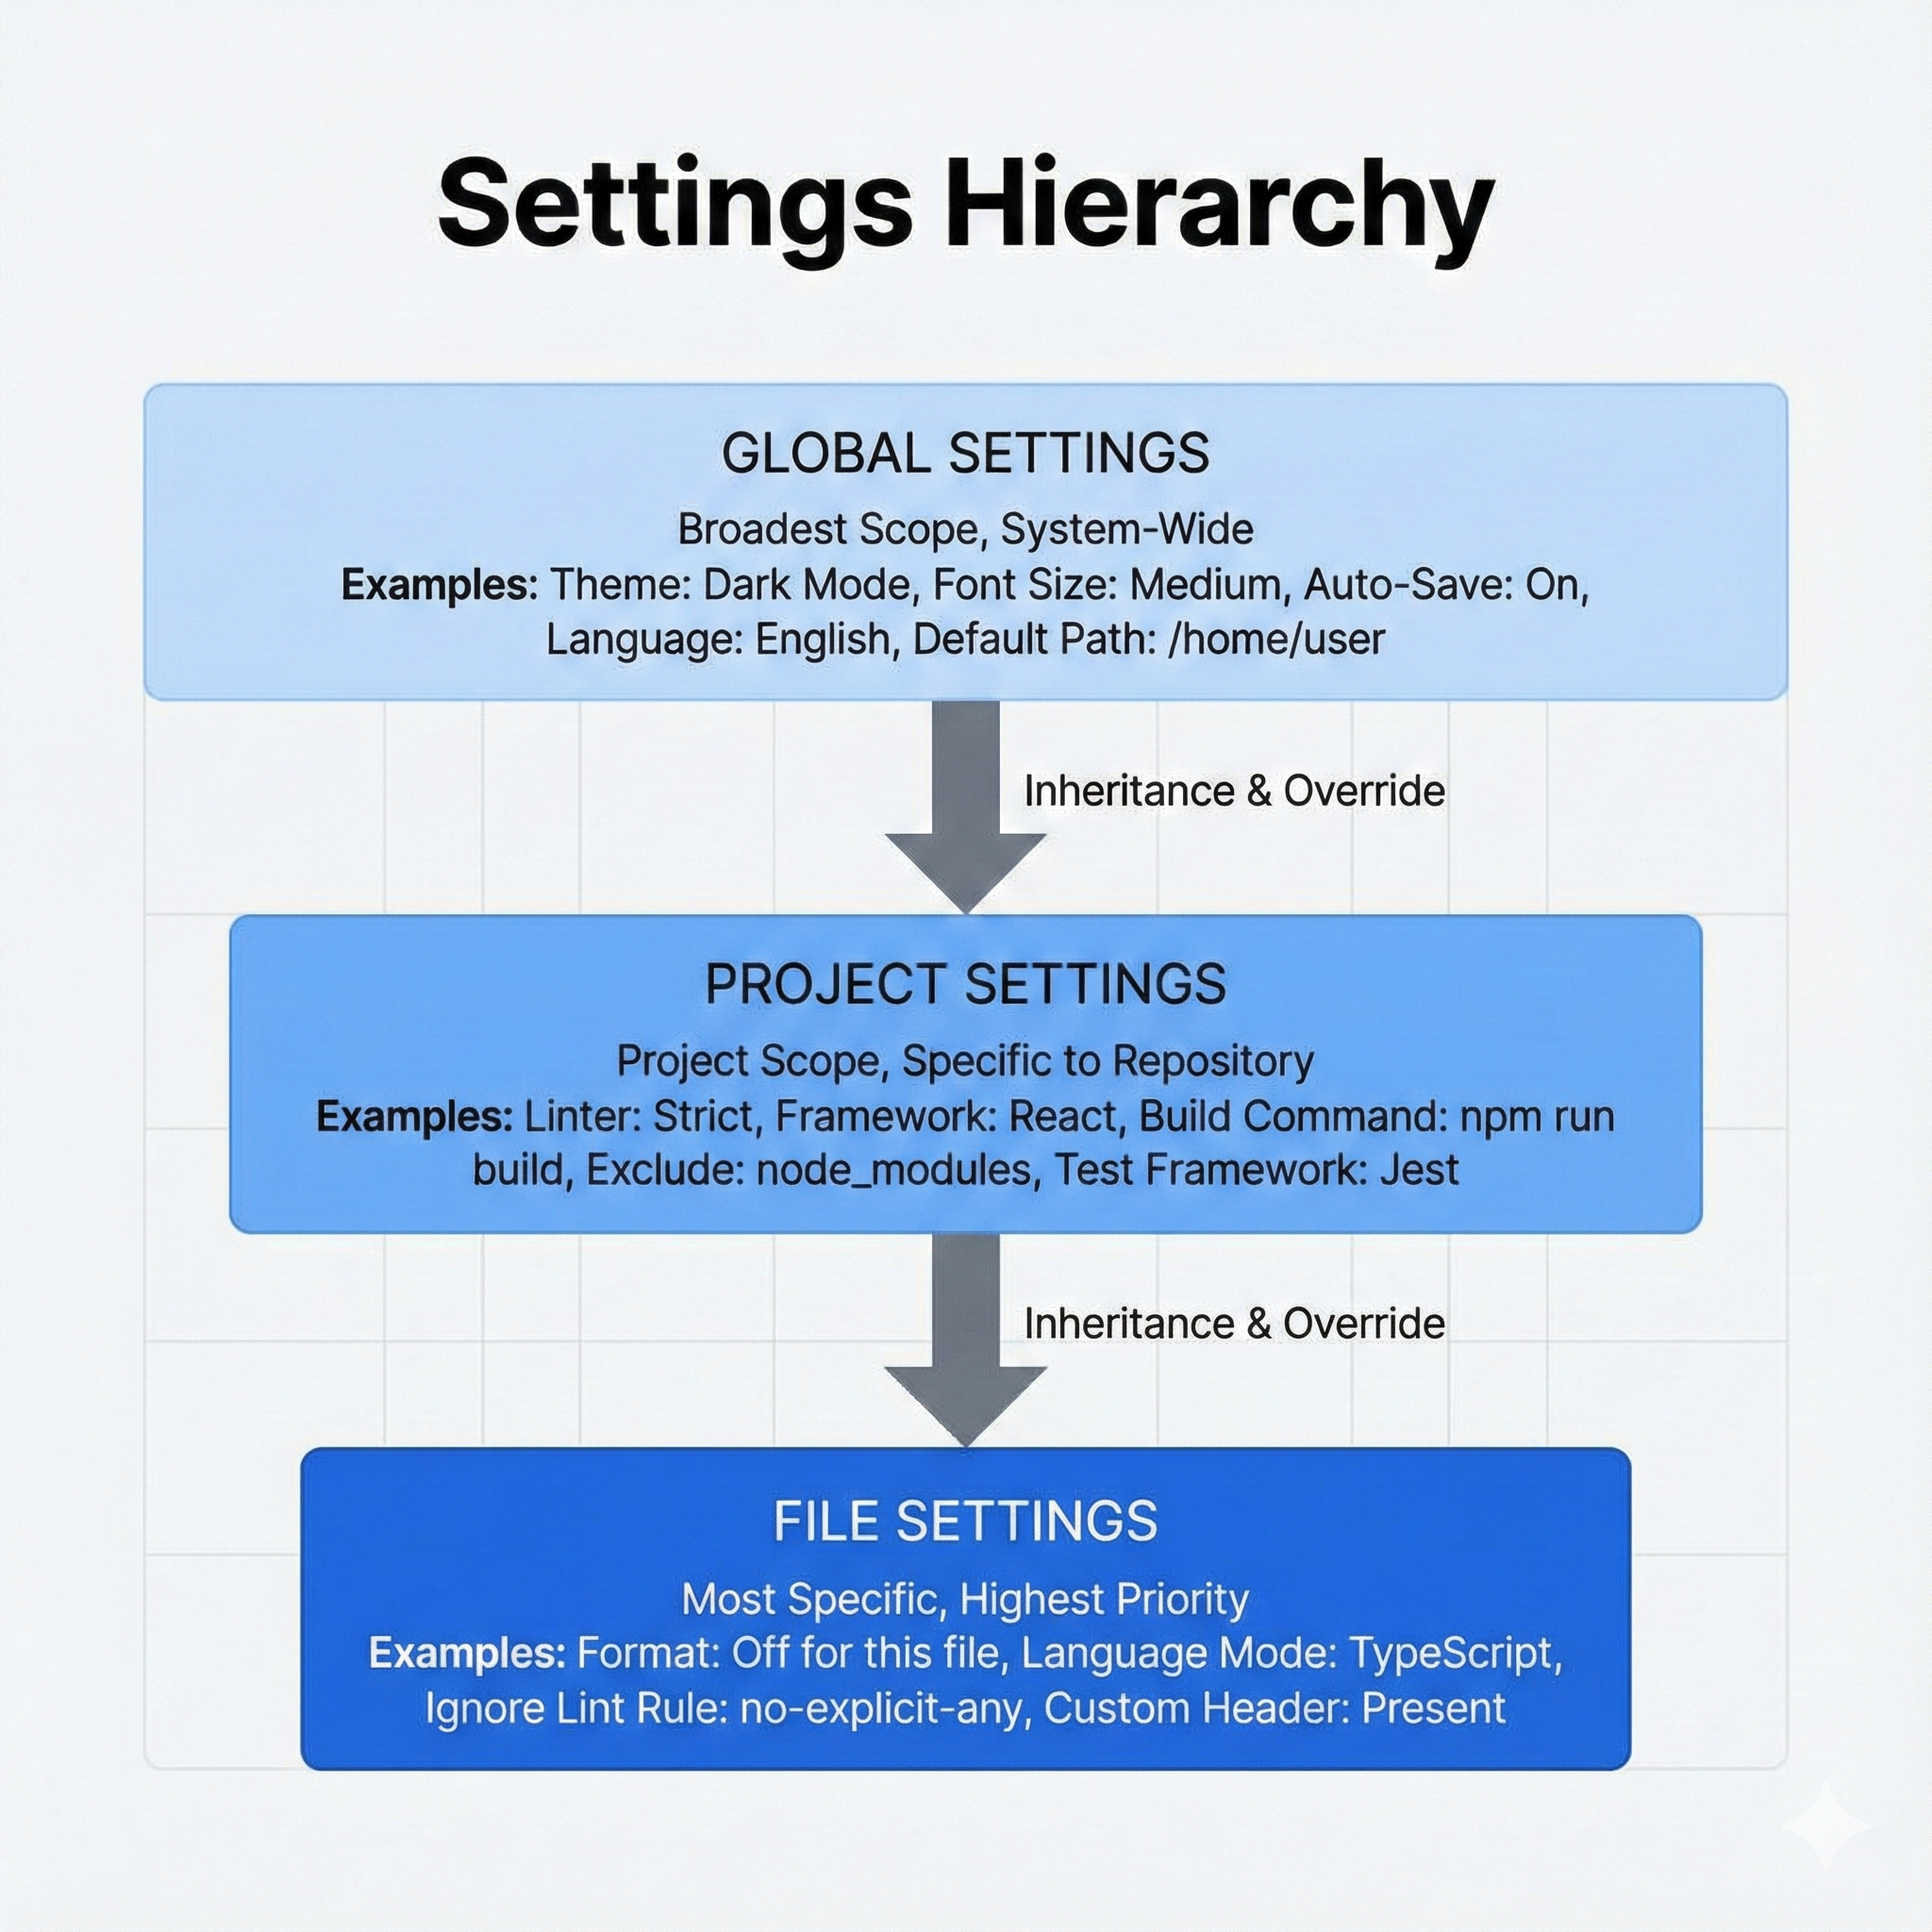
Settings in both Claude Code and OpenCode exist at three levels, from general to specific. The examples below show Claude Code's ~/.claude/settings.json; OpenCode's equivalents live at ~/.config/opencode/opencode.json (global) and ./opencode.json (project), with the same precedence rule: more specific wins.
Level 1: User Settings (Most General)
Scope: Applies to all your projects on your machine. This is where personal preferences, your default model, and workflow defaults live.
Example content:
Location: ~/.claude/settings.json
{
  "model": "sonnet",
  "outputStyle": "Concise",
  "attribution": true
}
Location: ~/.config/opencode/opencode.json (TUI settings live in ~/.config/opencode/tui.json)
{
  "$schema": "https://opencode.ai/config.json",
  "model": "anthropic/claude-sonnet-4-5",
  "small_model": "anthropic/claude-haiku-4-5",
  "autoupdate": true
}
Level 2: Project Settings (Middle)
Scope: Applies only when you are working in this specific project. This is where team standards live, and the file is checked into version control so everyone on the team gets the same defaults.
Example content:
Location: .claude/settings.json (inside your project directory)
{
  "permissions": {
    "defaultMode": "acceptEdits",
    "allow": ["Bash(npm run test:*)"],
    "deny": ["Read(./.env)"]
  },
  "env": {
    "PROJECT_ENV": "development"
  }
}
Location: opencode.json in the project root. OpenCode searches the current directory and walks up to the nearest Git directory. This file is safe to commit.
{
  "$schema": "https://opencode.ai/config.json",
  "permission": {
    "edit": "ask",
    "bash": {
      "*": "ask",
      "npm run test*": "allow"
    }
  }
}
Level 3: Local / Personal Project Settings (Most Specific)
Scope: Applies to this project, on your machine only. This is for temporary overrides, personal experiments, and machine-specific tweaks that should not be shared with the team. The two tools take different approaches here.
💬 AI Colearning Prompt
"Why use multiple levels of settings (user/project/local) instead of one global settings file? What flexibility does this hierarchy provide?"
Example content:
Location: .claude/settings.local.json (inside your project directory). Add this file to .gitignore so it stays personal.
{
  "outputStyle": "Verbose",
  "sandbox": {
    "enabled": true
  }
}
OpenCode does not ship a dedicated settings.local.json slot. Instead, it offers two primary mechanisms for personal overrides on top of the project config:
- The
OPENCODE_CONFIGenvironment variable points to a custom config file path (loaded between global and project configs). - The
OPENCODE_CONFIG_CONTENTenvironment variable provides inline JSON loaded at the highest user-tier priority.
# Personal override file (kept outside the repo):
export OPENCODE_CONFIG=~/personal/opencode-overrides.json

# Or inline overrides for a single session:
export OPENCODE_CONFIG_CONTENT='{"model":"anthropic/claude-haiku-4-5"}'

opencode
You can also keep a personal opencode.json outside the repo and point at it. Either way, the override stays on your machine and never leaks into the shared project config.
Why Settings Hierarchy Matters
The Organizational Intelligence Framework
Team Collaboration Without Conflicts: Settings hierarchy enables teams to share standards while allowing personal customization and local experimentation: all without stepping on each other's toes.
Three Layers of Context (from general to specific):
- User settings (
~/.claude/settings.json): Your personal AI preferences that follow you across ALL projects - Project settings (
.claude/settings.json): Team-agreed standards that everyone on the project shares (shared via git) - Local settings (
.claude/settings.local.json): Your private testing and experiments (gitignored, never committed)
This connects to earlier lessons:
- CLAUDE.md (Lesson 05) provides content context at the project level
- Skills (Lesson 09) can be enabled at any hierarchy level
- Plugins (Lesson 16) will use this same hierarchy to configure bundled capabilities
Practical Applications
1. Cross-Project Preferences (User Level)
You always prefer verbose output and specific model settings.
→ Set these in ~/.claude/settings.json
→ These preferences follow you across ALL projects
→ Project or local settings can override for specific needs
Example:
{
  "model": "opus",
  "outputStyle": "Verbose",
  "attribution": true
}
{
  "$schema": "https://opencode.ai/config.json",
  "model": "anthropic/claude-opus-4-5",
  "autoupdate": true
}
2. Team Standards (Project Level)
Your team decides: "All projects should deny access to .env files for security."
→ Set permissions.deny: ["Read(./.env)"] at project level (.claude/settings.json)
→ Everyone on the team gets this standard automatically
→ Overrides user-level settings for this project
Example:
{
  "permissions": {
    "defaultMode": "acceptEdits",
    "deny": ["Read(./.env)"]
  },
  "env": {
    "PROJECT_ENV": "development"
  }
}
{
  "$schema": "https://opencode.ai/config.json",
  "permission": {
    "edit": "ask",
    "read": {
      "*": "allow",
      ".env": "deny",
      ".env.*": "deny"
    }
  }
}
3. Personal Workflow Experiments (Local Level)
You want to test a new workflow without affecting the team.
→ Create .claude/settings.local.json with your experimental settings
→ Your changes stay private, invisible to the team
→ Local overrides take precedence over both project and user settings
→ Delete the file to revert to project/user standards
Example:
{
  "outputStyle": "Concise",
  "sandbox": {
    "enabled": true
  }
}
# Point OpenCode at a personal override file kept outside the repo:
export OPENCODE_CONFIG=~/personal/opencode-overrides.json
{
  "$schema": "https://opencode.ai/config.json",
  "model": "anthropic/claude-haiku-4-5",
  "share": "disabled"
}
Real-World Impact
Without this hierarchy, teams either enforce rigid standards (no personal customization) or descend into chaos (everyone's setup is different). The three-level system gives you both consistency AND flexibility.
🎓 Expert Insight
In AI-native development, configuration hierarchy mirrors organizational intelligence. User settings = your personal defaults. Project settings = team agreements. Local settings = safe experimentation space. Understanding WHEN to configure at each level is more valuable than memorizing settings syntax.
Precedence: Which Settings Win?
When the same setting exists at multiple levels, the agent follows a precedence order where more specific scope wins. Both tools share the mental model (local overrides project, project overrides user) but differ in how many tiers exist and how merging works.
Claude Code uses last-write-wins per key. The full precedence chain is five levels:
Managed > CLI args > Local > Project > User
- Managed settings are deployed by IT teams in enterprise environments and cannot be overridden.
- CLI arguments (flags passed when launching
claude) sit above local settings. - For day-to-day work, the three core levels (Local, Project, User) are what matter.
┌─────────────────────────────────┐
│   LOCAL SETTINGS                │
│   .claude/settings.local.json    │  <- Most Specific (Highest Priority)
│   (just your machine, temporary) │
└─────────────────┬───────────────┘
                  ^ Overrides
┌─────────────────────────────────┐
│   PROJECT SETTINGS              │
│   .claude/settings.json          │  <- Team/Project Level
│   (shared with team)             │
└─────────────────┬───────────────┘
                  ^ Overrides
┌─────────────────────────────────┐
│   USER SETTINGS                 │
│   ~/.claude/settings.json        │  <- Most General (Fallback)
│   (all projects on this machine) │
└─────────────────────────────────┘
OpenCode merges configs together rather than replacing them. Settings from each source are combined; later sources override earlier ones only for conflicting keys, while non-conflicting settings from all configs are preserved.
The full precedence chain (later sources override earlier ones):
- Remote config (
.well-known/opencode) - organizational defaults - Global config (
~/.config/opencode/opencode.json) - user preferences - Custom config (
OPENCODE_CONFIGenv var) - personal override file - Project config (
opencode.jsonin project root) - project-specific .opencode/directories - agents, commands, plugins- Inline config (
OPENCODE_CONFIG_CONTENTenv var) - runtime overrides - Managed config files (
/Library/Application Support/opencode/,/etc/opencode/,%ProgramData%\opencode) - admin-controlled - macOS managed preferences (MDM
.mobileconfig) - highest priority, not user-overridable
+-----------------------------------------+
| Managed (MDM / system dir)              |  <- Highest, not overridable
+--------------------+--------------------+
                     ^ overrides
+--------------------+--------------------+
| OPENCODE_CONFIG_CONTENT (inline env)    |
+--------------------+--------------------+
                     ^ overrides
+--------------------+--------------------+
| .opencode/ directories                  |
+--------------------+--------------------+
                     ^ overrides
+--------------------+--------------------+
| Project: opencode.json                  |  <- Shared via git
+--------------------+--------------------+
                     ^ overrides
+--------------------+--------------------+
| OPENCODE_CONFIG (custom path env var)   |  <- Personal override
+--------------------+--------------------+
                     ^ overrides
+--------------------+--------------------+
| Global: ~/.config/opencode/opencode.json|
+--------------------+--------------------+
                     ^ overrides
+--------------------+--------------------+
| Remote (.well-known/opencode)           |  <- Org defaults
+-----------------------------------------+
For most day-to-day work, three sources matter: Global (your preferences), Project (team standards in opencode.json), and either OPENCODE_CONFIG or OPENCODE_CONFIG_CONTENT for personal overrides.
Example: Settings Precedence in Action
Let's say you set an output style at the user level, then a different one at the project level.
User level (~/.claude/settings.json):
{
  "outputStyle": "Concise"
}
Project level (.claude/settings.json in your project):
{
  "outputStyle": "Explanatory"
}
Local level (.claude/settings.local.json in your project):
{
  // Empty or not set
}
Result: Claude Code uses outputStyle: "Explanatory" (from project level, since it overrides user level).
Global level (~/.config/opencode/opencode.json):
{
  "$schema": "https://opencode.ai/config.json",
  "model": "anthropic/claude-haiku-4-5"
}
Project level (opencode.json in project root):
{
  "$schema": "https://opencode.ai/config.json",
  "model": "anthropic/claude-sonnet-4-5"
}
Result: OpenCode uses model: "anthropic/claude-sonnet-4-5" (project overrides global for the conflicting model key). Non-conflicting keys from both files are merged, so any other global settings stay active.
What If a More Specific Override Is Set?
Now you add a temporary personal override on top.
Local level (.claude/settings.local.json):
{
  "outputStyle": "Verbose"
}
New Result: Claude Code uses outputStyle: "Verbose" (from local level, which overrides both project and user).
Inline override (set in your shell for one session):
export OPENCODE_CONFIG_CONTENT='{"model":"anthropic/claude-opus-4-5"}'
opencode
New Result: OpenCode uses model: "anthropic/claude-opus-4-5" (inline config sits at user-tier highest priority and overrides both project and global). Unset the env var to fall back to the project-level model.
Why this matters: You can temporarily change your workflow for this one session without affecting your project's standards or your personal preferences. Once the override is removed, you are back to the project-level setting.
🤝 Practice Exercise
Ask your AI: "I have outputStyle set to 'Concise' at user level and 'Explanatory' at project level. I'm working in this project. Which style is active? If I create a .claude/settings.local.json file with outputStyle: 'Verbose', what happens?"
Expected Outcome: AI explains that project level is active (Explanatory), and creating a local override would switch to Verbose: helping you understand how to temporarily override settings without changing team standards.
The .claude/ Directory: Don't Delete It
You might see a .claude/ directory in your project and wonder: "Is this important? Can I delete it?"
Short answer: Don't delete it.
What it contains:
settings.json; Project-level settingssettings.local.json; Your local, temporary overrides- Other configuration files Claude Code needs
The .claude/ directory is how Claude Code stores project customization. Deleting it would reset all your project settings to defaults.
What you should do: Treat .claude/settings.json like your .gitignore or package.json: it's part of your project configuration. Include it in version control (share with team). But .claude/settings.local.json should probably be in your .gitignore (keep it personal).
💬 AI Colearning Prompt
"Explain the difference between .claude/settings.json and .claude/settings.local.json. Which one should be in .gitignore? Why?"
Permission Modes: From Manual to Autonomous
Settings control not just what the agent can access, but how much freedom it has when using tools. Both tools expose this through their settings, but the model differs: Claude Code uses named modes, while OpenCode uses per-tool rules (allow, ask, deny).
Claude Code offers four permission modes, each giving Claude a different level of autonomy:
| Mode | What Happens | Best For |
|---|---|---|
| default | Claude asks permission before every tool use | Learning, sensitive projects |
| acceptEdits | Claude reads and edits files freely; still asks for Bash commands | Daily development |
| auto | A safety classifier screens each action; safe actions proceed, risky ones get blocked | Long-running tasks where constant interruptions slow you down |
| bypassPermissions | Claude runs everything without asking (use only in isolated environments) | CI/CD pipelines, containers |
You can cycle between modes during a session by pressing Shift+Tab.
Auto Mode: The Safety-First Middle Ground
Auto mode (released March 2026) sits between "ask every time" and "skip all checks." Instead of relying on you to approve every action, auto mode uses a classifier that evaluates each tool call before it runs:
- Safe actions (reading files, running tests, editing code) proceed automatically
- Risky actions (mass file deletion, accessing credentials, destructive commands) get blocked, and Claude tries an alternative approach
- Ambiguous actions: if Claude repeatedly attempts blocked actions, it falls back to asking you for permission
How to enable auto mode:
- CLI: Run
claude --enable-auto-mode, then press Shift+Tab to cycle to it - Settings: Toggle in Settings > Claude Code
- Enterprise admins: Disable organization-wide with
"disableAutoMode": "disable"in managed settings
Auto mode reduces risk compared to bypassPermissions but does not eliminate it entirely. Anthropic recommends using it in isolated environments for maximum safety. It works with both Sonnet 4.6 and Opus 4.6.
- Exploring a new codebase: default (you want to see everything Claude does)
- Active development session: acceptEdits (trust file changes, verify shell commands)
- Multi-hour refactoring or autonomous tasks: auto (minimize interruptions; the classifier guards the rails)
- CI/CD pipelines: bypassPermissions with
--allowedToolsrestrictions (no human present)
OpenCode does not ship named modes. Instead, you compose autonomy from per-tool rules, where each rule resolves to one of three actions:
| Action | What Happens | Best For |
|---|---|---|
"allow" | Run without approval | Trusted, low-risk tools |
"ask" | Prompt for approval before running | Daily development, mixed-risk actions |
"deny" | Block the action entirely | Destructive or sensitive operations |
You set these in opencode.json under the permission key. A single global setting acts like a Claude-style "mode," and per-tool overrides let you tune autonomy precisely:
{
  "$schema": "https://opencode.ai/config.json",
  "permission": "ask"
}
{
  "$schema": "https://opencode.ai/config.json",
  "permission": {
    "edit": "allow",
    "bash": "ask"
  }
}
{
  "$schema": "https://opencode.ai/config.json",
  "permission": {
    "bash": {
      "*": "ask",
      "git *": "allow",
      "npm *": "allow",
      "rm *": "deny"
    },
    "edit": "allow"
  }
}
For a fully autonomous CI/CD profile (the equivalent of bypassPermissions), set "permission": "allow" in a project-scoped or OPENCODE_CONFIG-pointed file used only in that environment. Pair it with explicit "deny" rules for anything destructive.
- Exploring a new codebase:
"permission": "ask"(review every action) - Active development session:
"edit": "allow"and"bash": "ask"(trust file changes, verify shell) - Long-running autonomous tasks: granular
bashrules with allowlists for the commands you trust and"deny"forrm *, credential paths, etc. - CI/CD pipelines:
"permission": "allow"in a pipeline-only config, withdenyrules as a safety net (no human present)
Not Configuring Yet: This Is Part 6 Content
This lesson teaches you that settings exist and how the hierarchy works. You don't need to configure them yet. Basic agent usage works perfectly fine with defaults.
Detailed settings configuration (what specific settings do, how to change them, team policies) is Part 4 content (Spec-Driven Development, team workflows). For now, just know the mental model.
- Settings exist at three levels (plus Managed and CLI args in enterprise/advanced contexts)
- Precedence is: local > project > user
- This hierarchy enables team collaboration + personal customization
When you are ready to adjust settings, type /config inside Claude Code. This opens an interactive menu for managing settings without manually editing JSON files.
That's enough to understand when you encounter .claude/settings.json references in documentation.
- Settings live in two everyday files: a global
~/.config/opencode/opencode.jsonand a projectopencode.jsonchecked into git - Precedence (the parts you will touch daily):
OPENCODE_CONFIG_CONTENT> projectopencode.json>OPENCODE_CONFIG(custom path) > global~/.config/opencode/opencode.json - Configs are merged: non-conflicting keys from every layer stay active; only conflicting keys get overridden
- Personal overrides ride on env vars (
OPENCODE_CONFIG,OPENCODE_CONFIG_CONTENT) instead of a*.local.jsonfile
You can edit opencode.json directly, or use OPENCODE_CONFIG=path/to/file opencode to swap configs without touching the project file.
That's enough to understand when you encounter opencode.json references in documentation.
Try With AI
Let's understand how a layered settings hierarchy enables both team collaboration and personal customization. Use the prompts that match the tool you have installed.
💡 Understand the Hierarchy:
"Claude Code has settings at three levels: user (~/.claude/settings.json), project (.claude/settings.json), and local (.claude/settings.local.json). Explain what each level is for and why having three levels is better than one global settings file. Give me concrete examples of what I'd put at each level."
What you're learning: Configuration architecture: how layered settings enable both personal customization and team standardization without conflict.
🔍 Verify Your Current Configuration:
"Help me check which settings files exist on my system. Walk me through the commands to check each level (user, project, local). Then, based on what exists, explain which settings are actually controlling my current Claude Code session and why."
What you're learning: Configuration debugging: knowing what's actually active vs. what you think is active. This skill prevents hours of "why isn't this working?"
🧪 Test Precedence Rules:
"Let's test precedence with a scenario: User level has outputStyle='Concise', Project level has outputStyle='Explanatory', and Local level is not set. Which outputStyle is active and why? Then, if I create a .claude/settings.local.json file with outputStyle='Verbose', what happens? Walk me through the precedence logic."
What you're learning: Precedence mental model: understanding which settings "win" when layers conflict. This applies to any layered configuration system.
🚀 Plan for Team Workflows:
"When I learn team workflows in Part 6, help me understand which settings level to use for different scenarios: personal preferences (my editor style, my default verbosity), team standards (shared coding conventions, security policies), and temporary experiments (testing new configurations). Explain the decision framework for choosing the right level."
What you're learning: Configuration strategy: deciding where settings belong before creating them. Planning prevents the mess of scattered configurations.
💡 Understand the Hierarchy:
"OpenCode loads config from several sources: global (~/.config/opencode/opencode.json), project (opencode.json in the repo), OPENCODE_CONFIG (custom path env var), and OPENCODE_CONFIG_CONTENT (inline JSON env var). Explain what each one is for and give concrete examples of what I'd put at each level. Why is OpenCode's merge behavior different from a last-write-wins design?"
What you're learning: Configuration architecture: how a merged hierarchy enables personal customization, team standards, and temporary overrides without conflict.
🔍 Verify Your Current Configuration:
"Help me check which OpenCode config files exist on my system. Walk me through the commands to check the global file, any project opencode.json, and whether OPENCODE_CONFIG or OPENCODE_CONFIG_CONTENT are set in my shell. Then explain which settings are actually controlling my current OpenCode session and why."
What you're learning: Configuration debugging: knowing what's actually active vs. what you think is active. This skill prevents hours of "why isn't this working?"
🧪 Test Precedence Rules:
"Let's test precedence with a scenario: my global ~/.config/opencode/opencode.json sets model to anthropic/claude-haiku-4-5, and a project opencode.json sets model to anthropic/claude-sonnet-4-5. Which model is active and why? Then, if I run
OPENCODE_CONFIG_CONTENT='{\"model\":\"anthropic/claude-opus-4-5\"}' opencode, what happens? Walk me through the merge logic."
What you're learning: Precedence mental model: understanding which settings win when layers conflict, plus how merging preserves non-conflicting keys.
🚀 Plan for Team Workflows:
"When I learn team workflows in Part 6, help me understand which OpenCode location to use for different scenarios: personal preferences (default model, autoupdate), team standards (permission rules, MCP servers committed to opencode.json), and temporary experiments (using OPENCODE_CONFIG to point at a personal override file outside the repo). Explain the decision framework for choosing the right location."
What you're learning: Configuration strategy: deciding where settings belong before creating them. Planning prevents the mess of scattered configurations.