Claude Code and OpenCode: A Crash Course
15 Concepts · 80% of Real Use
Imagine you could tell your computer: "Look at my essay draft, fix the grammar mistakes, reorganize the paragraphs so the argument flows better, and save the new version." And it actually does it. Not just suggests changes for you to make yourself, but opens your files, makes the edits, and saves the result while you watch.
That is what Claude Code and OpenCode do. They are AI tools that work directly on your computer. You describe what you want, they do the work, and you review the result.
This crash course teaches you 15 concepts that cover about 80% of what you will use day to day. By the end, you will know what each tool can do, when to use which feature, and how to avoid the common mistakes.
One idea that makes everything easier to understand: Most of the "advanced" techniques in these tools come down to one thing: giving the AI the right information at the right time, and keeping irrelevant information out. Every section in this course connects back to that idea.
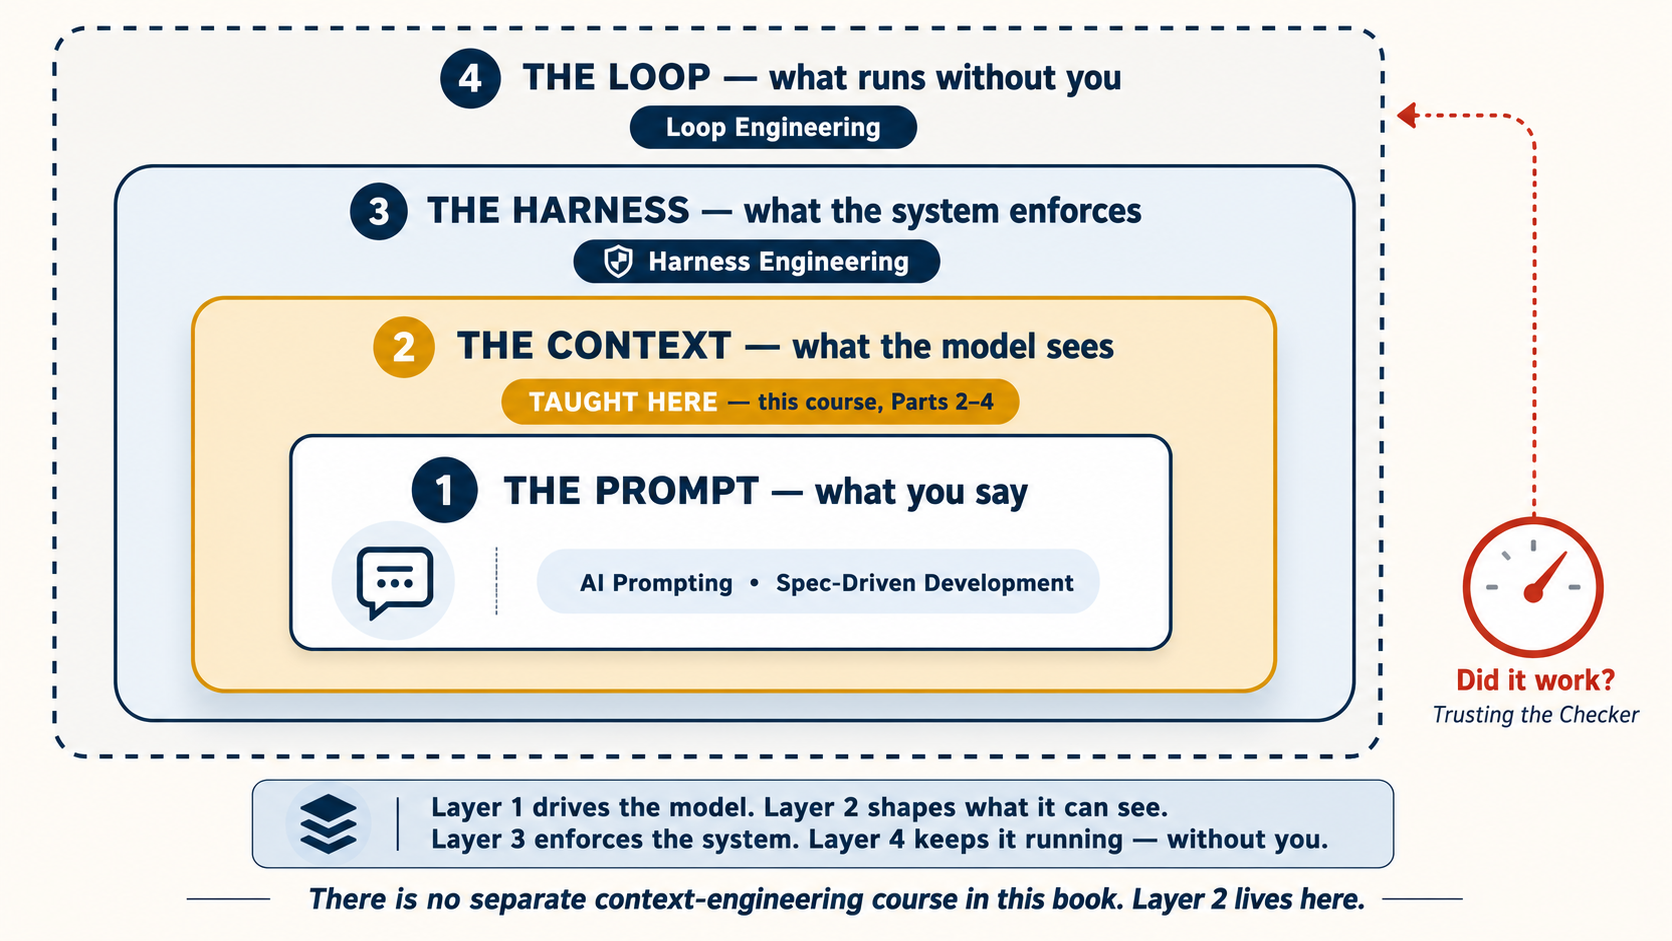
That idea has a name in the industry: context engineering — deciding, on purpose, what the model sees. And one heads-up about how this book is organized: there is no separate context-engineering course, because this is it. Parts 2, 3, and 4 of this course are the book's full treatment of the discipline — the window and its budget (Part 2), the rules file (Part 3), and skills, subagents, and the placement question (Part 4). Every later course in the sequence — Spec-Driven Development, Loop Engineering, Harness Engineering, Trusting the Checker — assumes the habits you build here, and several will point back to this page by name.
Prerequisite: AI Prompting in 2026. That course taught you how to talk to AI: giving context, asking clearly, checking AI's work. This course teaches what happens when AI can actually touch your files and run commands on your computer.
Three things to believe before you touch the tools
Before any command or setting, three ideas about the AI itself. They come from Andrej Karpathy — OpenAI co-founder, and the person who coined "vibe coding" — and everything in this course rests on them:
- It is a ghost, not a person. In AI Prompting in 2026 you learned to brief AI like a smart new colleague. Keep the briefing habit — but drop the personhood. The AI has no ego, no motivation, and no memory of yesterday. It will not get offended, get tired, or take initiative you did not ask for. You manage it; it does not manage itself. Every technique below — the rules file, plan mode, hooks — is a way of managing it.
- Its intelligence is jagged. You met a version of this in AI Prompting Concept 12: different models are good at different things. Karpathy's point cuts deeper: even a single model is jagged within itself — superhuman at one task and surprisingly weak at the next, sometimes in the same minute. Never assume that because it did something hard well, it will do something easy well. Check the easy things too.
- Trust it exactly as far as the output can be checked. The closer a task is to checkable — the tests pass, the file exists, the numbers add up — the more you can safely hand over. Where the output cannot be checked, the judgment stays with you.
Keep the third one in your pocket. It grows into the most important pattern in this course (the verification loop, Concept 10), and from there into two entire courses: Spec-Driven Development teaches you to write the check, and Loop Engineering teaches you to run it without you.
Two tools, one set of skills
This course covers two tools side by side: Claude Code (made by Anthropic) and OpenCode (open-source, works with any AI model). We teach both for a practical reason: if a technique works in both tools, it is a real skill, not a tool-specific trick. The skills you learn transfer between them.
| Claude Code | OpenCode | |
|---|---|---|
| Made by | Anthropic | Open-source community |
| AI models | Claude only | Claude, GPT, Gemini, DeepSeek, local models |
| Best for | Best Claude performance out of the box | Flexibility, cost control, free models |
| Price | Subscription or API | Free models available, or bring your own API key |
Pick whichever fits your situation. Everything in this course works in both.
Current as of July 2026. Both tools update frequently. Before you start any session, run
claude updateoropencode upgradeto make sure you have the latest version. If you do not have either tool installed yet, installation is covered in section 1 below.
Throughout this page, sections that differ between Claude Code and OpenCode have a switcher. Pick one and every switcher on the page follows your choice.
This is a crash course: 80% of real use in one read. For the complete treatment of every topic below, see Chapter 14: Working with General & Coding Agents and Chapter 17: Claude Code for Teams, CI/CD & Advanced Configuration.
What this course covers
| Part | Topic | What you learn |
|---|---|---|
| 1 | Foundations | What these tools are, plan mode, permissions, choosing your model |
| 2 | Context Management | Why conversations get worse over time and how to fix it — the heart of context engineering |
| 3 | The Rules File | Setting up permanent instructions for your project |
| 4 | Personalizing Your Tool | Commands and skills, hooks/plugins, subagents |
| 5 | Connecting to the World | Linking AI to external services (MCP) |
| 6 | Full Worked Example | One complete task, start to finish, in both tools |
| 7 | Where to Run | Terminal, IDE, web, desktop |
| 8 | Two Tools Together | Using both tools on the same project |
Learn by doing? Jump to Part 6 for the full worked example first, then come back.
📚 Teaching Aid
View Full Presentation — Agentic Coding Crash Course
Part 1: Foundations
These four concepts are the foundation everything else builds on.
1. What these tools actually are
Most people think these are chatbots that know about code. They are not. A chatbot answers questions. Claude Code and OpenCode take action. They read your files, edit them, run commands on your computer, and keep going until the task is done. You describe what you want, they do the work, you review the result.
The biggest mindset shift: stop asking questions, start giving instructions.
| Asking a question (weak) | Giving an instruction (strong) |
|---|---|
| "How do I organize my notes?" | "Read every file in the notes/ folder. Create one summary file called weekly-summary.md that lists every action item, grouped by person. Skip anything marked [private]." |
The first prompt gets you an explanation you have to act on yourself. The second prompt gets the work done for you. That is the difference. (This is the same idea as concept 1 of AI Prompting, but with higher stakes because the AI is actually changing your files.)
Claude Code began as a rough demo Boris Cherny hacked together in about two days after joining Anthropic's Labs team in late 2024: Claude, connected to a terminal, with the ability to run commands. He asked it to find out what music he was listening to. Nobody had taught it how — the model simply took a screenshot of Apple Music on its own and read the answer off the screen. That moment is this whole course in miniature: give the model tools and a goal, and it figures out the steps itself. Here is the part worth remembering: when he posted the demo on Slack, it got two or three likes. Even its creator did not fully understand what it was yet. But the very next day a colleague was already using it to write real code — and the tiny team went on to build Claude Code largely by using Claude itself, because that was the only way to move fast enough.
Do not have either tool installed yet? Install one now before reading further. Everything after this assumes you can open a terminal and try things.
# macOS / Linux / WSL — recommended (auto-updates)
curl -fsSL https://claude.ai/install.sh | bash

# Windows PowerShell
irm https://claude.ai/install.ps1 | iex

# macOS Homebrew (no auto-update — run `brew upgrade claude-code` periodically)
brew install --cask claude-code

# npm fallback
npm install -g @anthropic-ai/claude-code
Full reference: code.claude.com/docs.
# All platforms — recommended
curl -fsSL https://opencode.ai/install | bash

# macOS Homebrew
brew install opencode

# npm / bun / pnpm / yarn
npm install -g opencode-ai
Full reference: opencode.ai/docs.
Once installed, open a terminal in any folder you want to work in and type claude (or opencode). That drops you into your first session.
Quick check: which model are you on? Before you dig in, confirm which model you're actually talking to — so you are not quietly burning an expensive model on simple work, or wondering why a cheap one is struggling.
Type /status to see your current model, along with your plan, working directory, and context usage. To see the full list and switch, type /model and pick from the menu — the change takes effect immediately, no restart.
Type /models to see every model across your connected providers and switch between them; the active model is also shown in the TUI. (From the command line, opencode models prints the available provider/model names — handy when setting a default in your config.)
When you run /models, a few of the free options are stealth models — released under a codename with the maker undisclosed (for example, OpenCode Zen's Big Pickle at the time of writing). They are worth knowing about, with two caveats:
- They are temporary and unannounced. A stealth model is a vendor quietly testing something before revealing it. It can change behaviour, get renamed, or disappear with no notice — so do not build habits, defaults, or course/project setups around one.
- "Free" can mean you are the product. During a model's free testing window, your prompts and code may be used to train and improve it. Never point a stealth model at anything confidential — client work, private repos, anything under NDA.
They are fine for throwaway experiments and trying out the workflow. For anything you rely on, prefer a stable, privately-billed model (see the DeepSeek V4 callout below) where the provider, pricing, and data policy are all known and not going to shift under you.
From here on, every concept on this page is something you can try in that session, not just read about. Keep a terminal open alongside this page and run each idea as you hit it.
Current as of July 2026. Both tools update frequently. Before you start any session, run
claude updateoropencode upgradeto make sure you have the latest version.
Because OpenCode is model-agnostic, you can point it at whatever gives the best cost-to-quality ratio. Among hosted models, the strongest value as of mid-2026 is DeepSeek V4, which comes in two tiers:
deepseek-v4-flash— the economy default. Roughly $0.14 per 1M input tokens (as low as $0.0028 on a cache hit) and $0.28 per 1M output tokens, with a 1M-token context window and tool-call support. Standardize on this tier for students and high-volume work.deepseek-v4-pro— the step-up tier when you need stronger reasoning. More capable, still a fraction of frontier pricing.
Set it up (≈1 minute): run opencode → type /connect → enter deepseek → paste your API key (create the key there, and add a small prepaid balance — DeepSeek is pay-as-you-go, so the key won't work until the account has credit) → pick the model. DeepSeek's own guide selects V4-Pro by default, so choose deepseek-v4-flash instead if you want the cheapest option.
Prices and tiers change often — check the live page before you budget.
📘 DeepSeek + OpenCode integration guide · 💰 DeepSeek Models & Pricing
This pairs naturally with the Plan / Execute split: plan with a frontier model, then let a cheap DeepSeek-backed OpenCode session do the execution.
Claude Code talks to Anthropic's models by default, but you can point it at DeepSeek V4 instead. Two routes:
- The simple native route. DeepSeek exposes an Anthropic-compatible endpoint, so you can run Claude Code directly against it by setting
ANTHROPIC_BASE_URL=https://api.deepseek.com/anthropicand your DeepSeek key as the auth token before launchingclaude. No extra tooling. - The router route — claude-code-router. A community proxy that sits in front of Claude Code and lets you route requests to DeepSeek (and other providers), including different models per task — e.g. a frontier model for planning,
deepseek-v4-flashfor execution. You launch withccr codeinstead ofclaude. See the repo for setup and config.
Two honest caveats: both are third-party / unofficial setups, so they can break when Claude Code updates, and you lose the "best Claude performance out of the box" that Claude Code is tuned for. If your main goal is cheap DeepSeek-backed coding, OpenCode is the smoother path (it's model-agnostic by design) — these routes are for when you specifically want Claude Code's interface and DeepSeek's pricing.
2. Plan mode (the most underused feature)
Normally, when you give these tools an instruction, they start working immediately: reading files, editing code, running commands. Plan mode changes that. It puts the AI in a "look but do not touch" state. The AI can read your files and think about the task, but it cannot change anything. Instead of doing the work, it writes out a step-by-step plan of what it would do. You read the plan, suggest changes, and only then let it start the actual work.
Both tools support this. The way you turn it on is slightly different, but the idea is the same.
Press Shift+Tab to cycle through permission modes. The first press puts you in auto-accept; the second press puts you in plan mode. In plan mode, the model can read but cannot write: no file edits, no shell commands.
Press Tab to switch between Build mode (AI can do everything) and Plan mode (AI can only read, not change anything). In Plan mode, if you ask it to write or edit something, it will tell you it cannot and wait for you to switch back to Build. Same idea as Claude Code: look first, then act.
What it looks like in practice. You enter plan mode, then type a normal instruction:
Write a poem about my mother and save it as
for-mom.md.
Instead of writing it, the AI comes back with a plan first:
Plan
- Write a 5-stanza poem in the style of a classic sonnet.
- Use formal, old-fashioned language.
- Build toward a grand, dramatic finish.
- Save as
for-mom.md.Nothing written yet. Approve to proceed, or tell me what to adjust.
That is not what you had in mind — you wanted something short, warm, and plain-spoken, not a formal sonnet. So you push back:
Keep it short and warm — four lines, everyday language, nothing grand. Something I could write in a birthday card.
The AI updates the plan. Now you approve, and it writes the poem you actually meant — instead of handing you a formal sonnet you have to explain your way out of.
Why bother with a plan? Two reasons:
- You catch mistakes before they happen. That is exactly what just happened above — the wrong assumption surfaced in the plan, not in a finished draft you would have had to argue your way out of. On a four-line poem that is a minor save; when the AI is about to edit 10 files, it is the difference between a quick correction and a long cleanup.
- The AI does better work when it plans first. Writing a plan forces the AI to think through the task before it starts. Without a plan, it tries to think and write at the same time, and the result is usually worse.
Rule of thumb: If the task will take more than 10 minutes, use plan mode first. For bigger tasks, ask the AI to save the plan to a file (like docs/plans/my-plan.md) so you can come back to it later or share it with a fresh session.
Think of it like writing an outline before an essay. You would not start writing a 10-page paper without knowing your structure. Same idea here: plan first, then build.
3. Permissions discipline
Every time these tools want to do something (edit a file, run a command), they ask you for permission first. You can skip this and let them do everything without asking, but do not do that when you are starting out. You want to see what the AI is doing before it does it.
After a few sessions, you will notice that some actions are always safe (like reading files or running tests). You can tell the tool to stop asking about those specific actions and auto-approve them. This is the normal arc, not a beginner crutch: Anthropic's own product team observes that at launch, users read every single permission request, and over time most graduated to auto-accepting — trust that was earned session by session, which is exactly how you should grant it. Here is how:
You do not need to understand every line. The explanation after each code block tells you what it does. As you use the tool, these settings will start making sense naturally.
.claude/settings.json:
{
  "permissions": {
    "allow": [
      "Read",
      "Edit",
      "Write",
      "Bash(npm test)",
      "Bash(npm run lint)",
      "Bash(npm run build)",
      "Bash(git status)",
      "Bash(git diff *)",
      "Bash(git log *)"
    ],
    "deny": ["Bash(rm -rf *)", "Bash(npm publish *)", "Bash(git push *)"]
  }
}
opencode.json:
{
  "$schema": "https://opencode.ai/config.json",
  "permission": {
    "*": "ask",
    "read": "allow",
    "edit": "allow",
    "bash": {
      "*": "ask",
      "npm test": "allow",
      "npm run lint": "allow",
      "npm run build": "allow",
      "git status*": "allow",
      "git diff*": "allow",
      "git log*": "allow",
      "rm -rf*": "deny",
      "npm publish*": "deny",
      "git push*": "deny"
    }
  }
}
OpenCode gives you more control over permissions. You can set rules for each type of action separately (reading, editing, running commands). It also has a built-in safety feature: if the AI tries the same action three times in a row with no progress, it stops automatically.
Tip: Set up notifications. These tools can work on longer tasks while you do other things. The trick that makes this useful is getting a notification when the AI finishes or needs your input. That way you can start a task, switch to other work, and come back when you are needed.
- Claude Code: Community tools like
cc-notifycan send you desktop notifications. - OpenCode: The desktop app sends notifications automatically. For the terminal version, you can add a plugin that notifies you.
4. Match the model to the task
Both tools let you choose which AI model does the work — and switching takes one command. Most beginners never touch this setting, which is a mistake in both directions: they either burn an expensive model on trivial chores, or fight a weak model on a hard problem and blame themselves for the bad results.
There is a simple tradeoff behind the choice. The most capable models are the best thinkers — they plan, reason about tricky code, and handle ambiguity — but they cost the most and use up your limits the fastest. Cheaper (and free) models are perfectly good at following a clear plan: editing files, running tests, reformatting, repetitive changes. The skill is sending each kind of work to the right one.
| The work | Reach for |
|---|---|
| Planning, architecture, "figure out how to do this," debugging something confusing | The most capable model you have |
| Following a plan you already approved — routine edits, formatting, running tests, boilerplate | A cheaper or free model |
| A quick question or a one-line fix | Whatever is already loaded; don't overthink it |
You already learned how to see and switch your model back in Concept 1. Choosing it on purpose is the habit:
Type /model to switch between a more capable Claude (for the hard thinking) and a faster, cheaper one (for routine work); the change takes effect immediately, no restart. A common setup is to let the strong model handle plan mode and a faster one do the execution — so the expensive thinking happens once, up front.
Because OpenCode is model-agnostic, your choice is wider: type /models to switch across every provider you've connected — a frontier model for planning, a cheap hosted model like deepseek-v4-flash (see the DeepSeek V4 tip in Concept 1) or even a free/local model for execution. You can also set a default in opencode.json, and give subagents their own cheaper model.
This pairs directly with plan mode (Concept 2). The expensive part of any task is the thinking — reading the project, deciding the approach, spotting what could go wrong. Once that is a written plan, the rest is "just follow these steps," which a cheap model does fine. So: plan with a strong model, execute with a cheap one. That single move is where most of the cost savings come from, with no loss of quality — and it is the backbone of the Plan / Execute split in Part 8.
Two honest caveats. First, cheaper models need clearer instructions — they follow a good plan well but improvise badly, so the weaker the model, the more the plan has to spell out. Second, don't over-optimize: switching models every few minutes costs you attention to save pennies. Default to a strong model, drop to a cheap one for the obvious chores, and leave it there.
Rule of thumb: a strong model to decide what to do, a cheap model to do it. When a cheap model starts going in circles, that is your signal the task needed the stronger one — switch up, don't keep retrying.
Part 2: Context management
Here is the single most important idea in this course: at any moment, the model can only act on what is currently in front of it — its context. And that context is not one big bucket you toss things into. It is a stack of layers, and you pay for every layer on every turn.
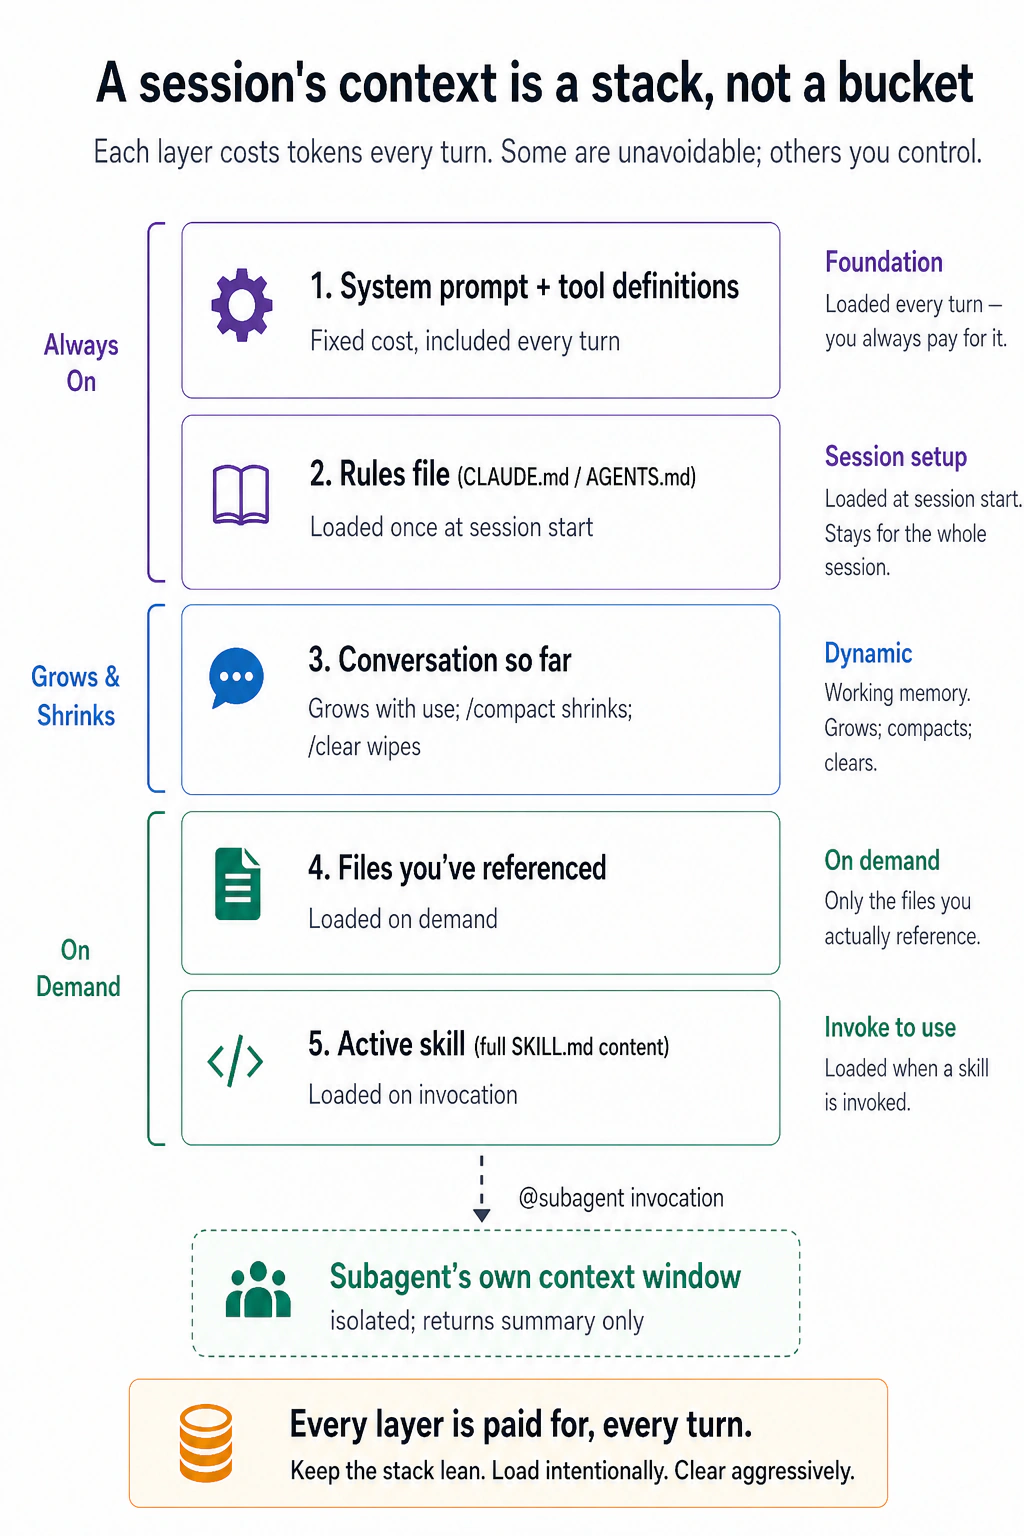
The takeaway is not the five labels — it is the split down the left side. The top layers are fixed: the system prompt and your rules file load whether you want them or not. Everything below is yours to manage — the conversation grows until you /compact or /clear it, files load only when you point at them, skills load only when invoked, and a subagent does its heavy reading in a separate window and hands back just a summary.
That is the whole game. Good context management is not a trick; it is the habit of keeping that stack lean — loading what the task needs, and clearing what it does not. A bloated stack costs more tokens, but worse, it buries the part that matters: the more junk in the window, the harder the model has to work to find the signal, and the more its answers drift.
In the AI Prompting course you learned that what you give the AI matters more than how you ask. Here the stakes are higher: in a chat, bad context gets you a bad answer; with these tools, bad context means the AI writes bad code directly into your project. That is why everything in the rest of Part 2 is just a specific way to control one of these layers — and why, if you remember one section of this crash course, it should be this one. It works the same in both tools.
What Part 2 — and much of Parts 3 and 4 — teaches has an industry name: context engineering. Andrej Karpathy coined it in December 2025 as the successor to prompt engineering: the delicate art of filling the window with just the right information for the next step. Keep the name in your pocket. You will meet it in job posts, blog titles, and in every later course of this book — and when you do, remember it is not a new subject. It is this part: deciding what the model sees, on purpose.
5. Context rot is real
AI can only hold a limited amount of information at once. This is called the context window. Think of it like a group chat: AI can only see the messages in this chat. If you mentioned something earlier in the chat, AI can scroll up and see it. If you never said it, AI does not know about it. Modern AI can handle a very long chat (hundreds of thousands of words), but it still has limits.
Here is why this matters:
Problem 1: The chat gets long faster than you think.
Every message you send, every file you ask AI to read, every reply AI gives, all of it adds to the chat history. After 20-30 messages back and forth, plus a few files you asked it to look at, the chat is already very long.
The tricky part: there is no warning that tells you "this conversation is getting too long." It just keeps growing quietly in the background.
Problem 2: AI gets worse at remembering things as the conversation grows.
Here is the surprising part. Even before hitting the limit, AI starts struggling. When the conversation is very long, AI has a harder time finding the important parts. You might notice:
- AI ignores something you told it 20 messages ago (you said it, but it was so long ago that AI loses track)
- AI redoes work it already finished (it forgot it already did it)
- AI gets confused about names or details it had right before
This is called context rot. The conversation is still going, but the quality of AI's work is slowly getting worse because there is too much old information piling up.
Problem 3: Longer conversations cost more money.
Every time you send a message, AI does not just read your new message. It re-reads the entire conversation from the very first message. So if you have had 30 messages back and forth, AI reads all 30 messages again every single time you send message number 31.
If you are paying per use (like most OpenCode setups), this means longer conversations cost much more money. If you are on a subscription plan (like Claude Code Pro), you hit your daily usage limits faster. Either way, a long, messy conversation drains your budget.
The takeaway: keep your conversations short and focused. Give AI only the information it needs for the current task, not everything you have. A clean, focused conversation works much better than a long, cluttered one.

Check how full your context is. You can't keep the stack lean if you can't see it. Both tools let you read your current usage — they just surface it differently.
Type /context for a full breakdown: total tokens used out of the window (e.g. 25.6k/1m tokens (3%)), split by category — system prompt, tools, memory/rules file, skills, and your conversation. It even flags what's worth trimming. You also get a running percentage near the input as you work, so you don't have to keep asking.
OpenCode shows your usage live in its interface (the full-screen terminal view) — active model, tokens used, and percentage of the window. Where exactly it sits on screen varies by version and terminal width, so just look for the running token/percentage readout. There's no built-in /context-style breakdown command yet, so you read that gauge from the interface rather than calling for it. (Community plugins can add a /context command with a full breakdown if you want one.)
Whichever tool you're in, the move is the same: glance at the gauge, don't wait for it to fill. Quality tends to slip well before the window is technically full — once a session is past roughly half its window, that's your cue to /compact or /clear (next), not when it hits 100%.
6. /clear and /compact
When the chat gets too long, you have two options. Make sure you pick the right one:
Option 1: Start a brand new chat. Use this when you are done with one task and want to start something completely different. The old chat is erased.
- Claude Code: type
/clear - OpenCode: type
/new(or/clear)
Option 2: Shrink the current chat. Use this when you are still working on the same task but the chat has gotten too long. AI reads the whole conversation, writes a short summary, and throws away everything else. You keep working from the summary.
- Both tools: type
/compact
You can tell it what to keep: /compact keep the file names and the decisions we made.
Do not mix these up. /clear deletes everything and starts over. /compact keeps the important parts and removes the rest. If you use /clear in the middle of a task, you lose all your progress. If you use /compact when you should have started fresh, you carry old clutter into a new task.
One more skill: when to compact matters as much as whether. Two rules carry it:
- Compact at boundaries, not mid-task. The natural moments are when a phase ends: the exploration is finished, the plan is approved, a sub-task is done. Compacting in the middle of a task is how the one exact detail you needed — the failing test's name, the flag that worked — becomes "we investigated some options," which is no help at all.
- File the facts first. A summary keeps the gist and drops the specifics. That is not a flaw; it is what makes a summary small. So before you compact, ask the AI to write the specifics that must survive — names, lists, decisions — into your plan file or a notes file. Files do not fade. Then compact freely.
In one line: summarize the journey; file the facts.
7. Resume sessions
Every conversation you have is automatically saved. You can close the tool, shut down your computer, and come back later to continue exactly where you left off.
- Claude Code: Run
claude --resumein your terminal. You will see a list of your previous conversations. Pick one and continue. - OpenCode: Type
/sessions(or/resume) inside the tool to see your saved conversations.
Why this is useful:
- Continue tomorrow. Big tasks often take more than one sitting. Instead of starting over, just resume where you stopped.
- Work on multiple things. You can have one conversation working on one task and another conversation working on a different task. Switch between them whenever you want.
Tip: If you saved a plan file earlier (like docs/plans/my-plan.md), you can also start a fresh conversation and tell it: "Read docs/plans/my-plan.md and continue from step 4." The plan file acts as a backup in case you cannot resume the old conversation. (For more details, see Chapter 17 § Session Management.)
What if the AI made a mistake? You can undo it.
Sometimes the AI edits the wrong file, writes bad code, or misunderstands what you asked. Do not panic — both tools let you roll back, in slightly different ways:
- Claude Code: Press
Esctwice (when the input box is empty), or type/rewind. You get a menu of every prompt from the session; pick one and choose what to restore — the code, the conversation, or both. Note that this undoes the AI's own file edits, not things it did by running shell commands (a deleted or moved file won't come back this way). There's no "redo" — rewind jumps you to a chosen point rather than stepping back and forth, so rewind deliberately. - OpenCode: Type
/undoto reverse the AI's last change, and/redoif you change your mind. This works by using git under the hood, so your project needs to be a git repository.
Either way, treat this as a safety net for experiments, not a substitute for git. For anything you want to keep, commit it — checkpoints and undo are session-level conveniences, not permanent history.
Claude Code's undo covers file edits but not terminal commands. For example, if AI ran a command that deleted a file, undo will not bring it back. OpenCode's undo covers everything (file edits and terminal commands) because it uses git to track all changes.
Quick decision rule for the three commands:

Diagnostic: when context goes bad
How do you know when the chat has gotten too long? Watch for these signs:
- AI keeps saying sorry but does not actually fix anything.
- AI changes the same piece of code over and over without making it better.
- AI mentions files or names that do not exist in your project.
- AI forgets a rule you told it earlier in the same conversation.
- AI's replies get longer and vaguer instead of more helpful.
The community's name for this spiral is a doom loop: a messy conversation causes a worse reply, the worse reply adds more mess, and each turn digs deeper. You will meet the name again in later courses; this list is what it looks like from the inside.
When you see any of these, stop sending messages. Your first instinct will be to explain the problem one more time. Do not do that. Sending more messages into an already overloaded conversation only makes it worse.
Instead, reset:
- Use
/compactif you want to keep working on the same task (it saves the important parts and clears the rest). - Use
/clear(or/newin OpenCode) if you want to start completely fresh.
Five minutes of resetting is better than an hour of fighting with an AI that can no longer keep track of the conversation.
Diagnostic: when context costs spike
Remember: a long, messy conversation does not just make the AI worse at its job — it also costs you more money. As the conversation grows, the AI has more text to process on every message.
One important nuance: caching. You might assume you pay full price to re-read the whole conversation on every single message. Usually you do not — but the discount comes from the model's provider, not the tool. Most major model APIs (Anthropic, DeepSeek, and others) support prompt caching: they store the stable front of your context — the system prompt, your rules file, the earlier turns — and reuse it at a steep discount (often around a tenth of the normal price, sometimes far less), so you pay full price only for what is new since your last message. Claude Code and OpenCode are built to keep that front stable so the cache keeps working — but the caching itself is the provider's feature, and a model without it gets no discount. The catch: the discount holds only while the front of the context stays unchanged. Edit your rules file, or jump around your history, and the cache resets from that point and you pay full price again. (Caches also expire after a session sits idle for a while.) That is why the spikes below happen the way they do.
| What you notice | Why it is happening | How to fix it |
|---|---|---|
| Your usage suddenly jumped mid-conversation | You changed your settings file (CLAUDE.md or AGENTS.md), which resets the cache discount and forces the AI to re-process everything from scratch | Change the settings file back, or accept the one-time spike |
| Each message costs more than the last | The conversation keeps growing. AI is reading more and more files without clearing old ones | Use /compact to shrink the conversation. Tell it what to keep: /compact keep the file names and decisions |
| AI is writing extremely long replies | You asked a simple question but AI is over-explaining. Or AI's thinking mode is set too high for the task | Ask for "code only, no explanation." Or turn down the reasoning effort in settings |
| Your monthly bill is way higher than expected | You are using the most powerful (and expensive) AI model for every task, even simple ones | Use the expensive model for planning and hard problems. Use a cheaper model for simple tasks like formatting or running tests (Concept 4) |
One habit prevents the second row of that table before it happens: big tool outputs go to files, not into the chat. When a command will print a lot — a full test run, a long log, a big search — ask the AI to write the output to a file and report back one line: "full output in test-results.txt; 3 failures, all in auth." The file costs nothing until someone reads it; the nine thousand tokens of stack traces in your conversation would have cost you on every message afterward. If a detail matters later, the AI can search the file for exactly that detail.
The pattern behind all of these is the same: shorter, focused, stable conversations cost less and work better than long, messy ones.
Part 3: The rules file
8. CLAUDE.md / AGENTS.md, done well
Both tools let you create a special file that AI reads at the start of every conversation. Think of it as a set of permanent instructions for your project. Every time you start a new session, AI reads this file first so it knows the rules.
- Claude Code calls this file
CLAUDE.md - OpenCode calls this file
AGENTS.md
You do not need to write this file yourself. Run /init in either tool and AI will scan your project folder and create the file for you. After that, your job is to delete the parts you do not need. AI tends to generate a very long file. Most of it is unnecessary.
(For a full walkthrough, see Chapter 14 § CLAUDE.md and AGENTS.md. For advanced team setups, see Chapter 17 § The CLAUDE.md Configuration Hierarchy.)
If you already have a CLAUDE.md and switch to OpenCode, you do not need to rewrite it. OpenCode automatically reads CLAUDE.md when no AGENTS.md exists. If both files exist, OpenCode uses AGENTS.md and ignores CLAUDE.md.
The biggest mistake people make: They treat this file like a full manual, putting in everything about the project: architecture, coding rules, naming conventions, team preferences. The problem? AI reads this file on every single message. A huge rules file slows AI down and uses up your conversation space, even when most of the information is not relevant to the current task.
Keep it short. Write only what AI cannot figure out by looking at your files. Think of it as a table of contents, not an encyclopedia. Point to other files for details, and let AI load those only when it needs them:
CLAUDE.md. The @filename syntax auto-loads referenced files when relevant:
# Project: my-app

## Stack

Next.js 14, TypeScript, Postgres, Drizzle ORM.

## Commands

- `npm run dev`: start local server
- `npm test`: run vitest
- `npm run db:migrate`: apply migrations

## Critical rules

- Never edit files in `src/generated/`. They're rebuilt by codegen.
- All API routes use the auth middleware in `src/lib/auth.ts`.
- See @docs/conventions.md for naming and folder rules.
- See @docs/db-schema.md for table structure.
AGENTS.md. Same structure. One difference: in Claude Code, writing @docs/conventions.md automatically loads that file when needed. In OpenCode, this does not work automatically. You have two options: either write in your AGENTS.md "load docs/conventions.md when relevant," or list the files in opencode.json:
# Project: my-app

## Stack

Next.js 14, TypeScript, Postgres, Drizzle ORM.

## Commands

- `npm run dev`: start local server
- `npm test`: run vitest
- `npm run db:migrate`: apply migrations

## Critical rules

- Never edit files in `src/generated/`. They're rebuilt by codegen.
- All API routes use the auth middleware in `src/lib/auth.ts`.

## External references

When you encounter @docs/conventions.md or @docs/db-schema.md, load them
on a need-to-know basis with the read tool. Do not preemptively load all
references; only load what's relevant to the current task.
Or, cleaner, list them in opencode.json:
{
  "$schema": "https://opencode.ai/config.json",
  "instructions": ["docs/conventions.md", "docs/db-schema.md"]
}
This is not just for code projects. You can use the same rules file for any kind of work: writing essays, organizing research, managing a blog, planning events. Here is an example for a writing project:
# Project: blog-and-newsletter

## What this is

A folder of drafts, research, and published posts. I write a weekly newsletter and occasional long-form posts.

## Where things live

- `drafts/`: in-progress posts, one per file
- `research/`: source notes and clippings, organized by topic
- `published/`: shipped posts (do not edit)

## Critical rules

- Never edit anything in `published/`. Fixes go in a new draft with a correction note.
- Footnotes go in `[brackets]` inline; we resolve them to numbered footnotes only at publish time.
- Tone: conversational, no bullet lists in body copy.
Same idea as the code example above: keep it short, and only include things AI cannot figure out on its own.
A simple test for every line you add: Ask yourself, "If I remove this line, will AI make a mistake?" If the answer is no, delete it. For example, you do not need to tell AI that your project uses Python if all the files end in .py. AI can see that. But you do need to tell AI "never edit files in the published/ folder," because there is no way for AI to know that just by looking.
Add rules when something goes wrong, not before. If AI makes a mistake that your rules file would have prevented, add that rule. Do not try to guess every possible mistake in advance. Over time, your rules file will grow naturally into something useful.
This is not just beginner advice — it is how the tool's own makers work. Every team at Anthropic keeps a shared CLAUDE.md in git, and the standing rule is simple: any time Claude does something incorrectly, the correction is added to the file so it never repeats. Boris Cherny, who created Claude Code, reports that his team's file is only about 2,500 tokens — roughly a hundred lines — after all that time. Short file, one earned line per mistake, compounding forever. That is the whole method.
Adding one earned line per mistake is right. It also has a failure mode that only shows up after a year of it: nobody ever deletes anything, and the file slowly fills with rules that contradict each other, or that contradict what the model would have done correctly on its own.
Anthropic hit this in its own product. In July 2026 the Claude Code team removed over 80% of the tool's system prompt for its newest models, with no measurable loss on their coding evaluations. Reading their own session transcripts, they found single requests carrying instructions that pulled in opposite directions: one surface saying "leave documentation as appropriate" while another said "do not add comments." The model can usually work out what you meant — but it has to spend effort doing that before it starts on your actual work.
Their fix is the part you can use. A rule that forbids got replaced by a rule that describes the standard:
| The old rule | The new rule |
|---|---|
| Default to writing no comments. Never write multi-paragraph docstrings or multi-line comment blocks. | Write code that reads like the surrounding code: match its comment density, naming, and idiom. |
The old rule was written for a model that could not read the room. The new one hands the judgment back, and is shorter besides. So the full method is two habits, not one: add a line when a mistake earns it, and delete a line when the model no longer needs it. Every few months, re-read the file and put the Concept 8 test to every single line again.
"Delete the rule and trust the model" is not a universal law. It is a trade against capability, and you already met the same trade in Concept 4: cheaper models follow a clear plan well but improvise badly, so the weaker the model, the more the instruction has to spell out.
In one line: the amount you constrain should go down as the capability of your model goes up. A rules file tuned for a frontier model can be thin and trust-heavy. Point the same project at a cheap or local model through OpenCode and some of the lines you deleted have to come back. Write your rules for the model you actually run, not the one in the announcement.
There is now a tool for the pruning. Claude Code's /doctor command (claude doctor from the shell) started life as an installation health check, and Anthropic has since put its current context-engineering guidance inside it, so it will also review your rules file and skills and tell you what to cut. Reach for it once the file has grown past what you can hold in your head. What it reports varies by version, so run it once and read its output before you trust it with a file you care about. OpenCode has no equivalent, so on that side the review stays manual: read the file top to bottom, one line at a time.

Part 4: Personalizing your tool
Both tools let you add a few kinds of custom feature. Each one solves a different problem:

| Type | What it does | When to use it |
|---|---|---|
| Command / Skill | A saved, reusable prompt in a file. You invoke it by typing /name, or the model invokes it automatically when the task matches its description. | You find yourself typing the same instructions over and over, or you want the model to apply the right instructions without you remembering to ask. |
| Hook / Plugin | A rule that runs automatically every time, no matter what | Something must always happen (like "never delete this folder") |
| Subagent | A separate AI helper that works on its own and only sends back the answer | You need AI to do a big search or research task without cluttering your main conversation |
All of them are ways to keep your conversations clean and your AI focused. The next sections explain each one.
9. Commands and skills
These are two names for the same idea: a saved, reusable instruction that lives in a file so you don't retype it. The only thing that varies is how it gets invoked.
- You invoke it. Type
/reviewand it runs — you decide when. - The model invokes it. Give the file a
description, and the model runs it on its own when your task matches, so you don't have to remember it exists.
A file like this can also carry supporting material — a folder of templates, style guides, or reference docs that load only when the prompt actually runs — plus a few lines of frontmatter that set its name, when it activates, and which tools it may use.
"If the model already knows how to do this, why write a skill?" It's the question that stops most people from bothering — and it has a clear answer. The model carries a huge amount of general knowledge from training, but general knowledge has three gaps that a skill closes:
- It doesn't know your specifics. The model knows how commit messages work in general; it does not know your team's format, your project's quirks, your internal tool's exact flags, or anything that appeared after its training cut-off. The skill supplies the part that was never in its training.
- Knowing isn't the same as doing it the same way twice. Ask the model to "clean up this transcript" five times and you'll get five slightly different procedures. A skill pins the exact steps, so you get the same procedure every time, instead of a fresh improvisation.
- It won't reach for the right approach on its own. Training knowledge only surfaces if your prompt happens to trigger it. A skill's
descriptionis that trigger — it puts the right procedure in front of the model the moment the task matches, so you don't have to remember to ask.
And it does all of this without bloating your conversation: only the short description sits in context up front; the full instructions and any reference files load only when the skill actually fires — the same context discipline from Part 2. In one line: the model brings the general knowledge; the skill brings your specifics, a consistent approach, and the right instructions at the right moment. (Think of a sharp new hire who knows the whole field but still needs your handbook, a checklist, and the right page handed to them at the right time.)
LLMs are probabilistic: the model samples each next word from a range of options, so the same prompt can come back worded differently, and so can the same skill. A skill does not switch that off. What it does is narrow the range of likely outputs — it removes the "the model invented a different approach this time" kind of variation, not the word-level kind. You go from five different procedures to the same procedure, phrased a little differently each run. That is consistency of approach, not identical output.
When a step has to be guaranteed — same result, every time, no exceptions — don't ask the model to do it from memory. Push it into code: have the skill run a script, formatter, or test, or enforce it with a hook/plugin (next section), which is ordinary code and therefore deterministic. Rule of thumb: skills make the approach reliable; scripts and hooks make the outcome guaranteed.
In Claude Code, a command and a skill are the same thing. Put your prompt files in .claude/skills/: a folder with a SKILL.md inside. The folder name becomes the command name, so .claude/skills/review/SKILL.md gives you /review.
The simplest case — a prompt you invoke yourself. With no description, the model won't auto-run it; you trigger it with /review:
Review the current diff for:

1. Bugs and edge cases
2. Test coverage gaps
3. Naming and readability
4. Adherence to @docs/conventions.md

Be specific. Quote the lines you're commenting on.
Add a description and the model can also reach for it on its own when a task matches:
---
name: extract-transcript
description: Extract a clean transcript from a YouTube video URL. Use when the user provides a YouTube link and asks for the transcript, captions, or text of the video.
---

# Extract YouTube transcript

1. Take the URL from the user's message.
2. Run `yt-dlp --skip-download --write-auto-sub --sub-format vtt "$URL"`.
3. Convert the VTT to plain text: strip timestamps, deduplicate overlapping captions.
4. Save to `transcripts/{video-id}.txt`.

For formatting conventions (paragraph breaks, speaker labels), see `references/style.md`.
That references/style.md is the "carry more" part: the model reads it only when this skill runs, so it costs you nothing the rest of the time. Note the plain relative path — inside a skill you do not use the @ auto-import syntax from your rules file (Part 3). @ force-loads a file into context the moment the rules file loads; a skill reference is meant to stay unloaded until the model actually needs it and reads it itself. A plain path (or a relative markdown link like [style](references/style.md)) is exactly what keeps that lazy loading working.
OpenCode keeps commands and skills as two separate things — it has not folded them together the way Claude Code has:
- A skill is a
SKILL.mdfolder of instructions the agent loads on its own when a task matches its description. The format is identical to Claude Code, and OpenCode looks in.opencode/skills/,~/.config/opencode/skills/, and Claude Code's.claude/skills/— so a skill written for either tool works in both, unchanged. - A command is a saved prompt you trigger yourself by typing
/name, stored as a markdown file in.opencode/commands/(project) or~/.config/opencode/commands/(personal).
OpenCode also lists every skill in the slash menu as an invokable command (shown with a :skill suffix), so you can fire a skill manually — but the two stay distinct underneath: a command is a prompt you send, a skill is knowledge the agent pulls in when relevant.
A prompt you invoke yourself — .opencode/commands/review.md (frontmatter is optional; it supports description, agent, model, and subtask):
---
description: Review the current diff
agent: plan
subtask: true
---

Review the current diff for:

1. Bugs and edge cases
2. Test coverage gaps
3. Naming and readability
4. Adherence to docs/conventions.md

Be specific. Quote the lines you're commenting on.
A skill the agent can auto-invoke — .opencode/skills/extract-transcript/SKILL.md (identical to the Claude Code skill above; it also appears in the slash menu as /extract-transcript:skill):
---
name: extract-transcript
description: Extract a clean transcript from a YouTube video URL. Use when the user provides a YouTube link and asks for the transcript, captions, or text of the video.
---

# Extract YouTube transcript

1. Take the URL from the user's message.
2. Run `yt-dlp --skip-download --write-auto-sub --sub-format vtt "$URL"`.
3. Convert the VTT to plain text: strip timestamps, deduplicate overlapping captions.
4. Save to `transcripts/{video-id}.txt`.

For formatting conventions (paragraph breaks, speaker labels), see `references/style.md`.
A command or skill you add or edit inside an existing folder (.claude/skills/, ~/.claude/skills/, or OpenCode's equivalents) takes effect right away — no restart needed. The one case that still needs a restart is creating a brand-new top-level skills directory that did not exist when the session started, because the tool can only watch folders it knew about at launch.
Why save it instead of just typing it each time. A weak review prompt — "review my work" — almost always gets a cheerful "looks great!", because the model tends to agree with you (sycophancy, from the AI Prompting course). What works is a checklist that forces it to check specific things one by one, so it can't hide behind "looks good." But a checklist is tedious to retype — so on a busy day you won't, and you'll fall back to the lazy version exactly when you most need the rigor. Saving it as /review removes that friction: you write the demanding prompt once, and from then on one keystroke runs the full checklist every time. That's the real advantage of saving — not a better prompt (you could type that by hand), but a better prompt that becomes the effortless default instead of the thing you skip.
This works for non-coding tasks too. A /standup that writes a daily summary from your notes — save it as a skill (Claude Code) or a command (OpenCode) with this body:
Read yesterday's note in `journal/`. Produce a 4-line standup:

1. What I shipped yesterday (1 line)
2. What I'm working on today (1 line)
3. Blockers (1 line, "none" if clear)
4. One thing I learned (1 line)

Tone: telegraphic. No filler.
Same shape as /review, different domain. The same trick works for /digest (turn a folder of emails into action items), /draft-reply (write a polite reply to the email at this path), or any chore you keep retyping. The test: if you type the same instructions more than twice, save them. Want to fire it yourself? Invoke it with /name. Want the model to reach for it on its own? Give it a description.
A few rules that make these reliable:
- The description is the most important line. The model reads it to decide whether to fire the skill. Vague ("helps with videos") activates too often; specific ("Use when the user provides a YouTube link and asks for the transcript") activates only when it should.
- Keep
SKILL.mdshort. Put the main instructions inSKILL.mdand move extra detail (style guides, templates, reference material) into separate files in the same folder. They load only when needed. - Make small skills, not big ones. To research, draft, format, and review, don't build one giant skill — build four (
research,draft,format,review) that each do one thing and hand off through files. Each only needs the context for its own step, which keeps the conversation clean. - Do not over-constrain. A skill is a guide, not a cage. Pin the steps that must be identical every run, and leave the rest to the model. The exception is anywhere a wrong result is expensive or hard to undo: there, spell it out fully. Anthropic states this as its own rule for skills — keep them lightweight, except in highly important areas. This does not undo the earlier point that a skill pins the procedure. Pin the procedure; do not pin the things that were never going to vary anyway.
For years the first rule of writing a skill or a tool description was to load it with worked examples. For the newest models, Anthropic reports that examples now often narrow the model instead of teaching it: it reads your three examples as the boundary of what is allowed, and stops looking past them.
What replaces them is design work. Rather than showing the model what a good call looks like, make the thing itself more expressive: name the inputs so their meaning is obvious, and where a field has a fixed set of legal values, say so. Their own example is a task-status field whose only allowed values are pending, in_progress, and completed. The list of values teaches the model how to use the field without a single example.
Keep examples where the format genuinely cannot be guessed: an exact output template, an unusual file layout. Drop them where they only demonstrate something the model already knows.
You don't have to write them from scratch. Claude Code ships with a skill generator that builds new skills step by step; OpenCode has a similar agent-creation flow. (Check your tool's current docs for the exact command — these get renamed often.) The depth version (folder layout, frontmatter, argument passing, structuring a multi-step skill) is in Chapter 14 § Teach Claude Your Way of Working and Chapter 14 § Building Your Own Skills.
10. Hooks (Claude Code) / Plugins (OpenCode)
Commands and skills depend on the model choosing to use them. But sometimes you need a rule that runs every single time, no matter what, without relying on the model to remember it. That is what hooks (in Claude Code) and plugins (in OpenCode) are for.
For example: "Never let AI run a command that deletes all files." You do not want AI to decide whether to follow that rule. You want it enforced automatically, every time, no exceptions.
Both tools support this, but the way you set it up is different in each one. This is the section where the two tools differ the most.
Claude Code uses the word "hook" for these automatic rules. OpenCode uses the word "plugin." They do the same thing, just with different names. (Claude Code also has a separate feature called "plugins" that means something else entirely. Ignore that for now.)
Hooks are automatic rules you add to .claude/settings.json. They run at specific moments: when a session starts, when you send a message, or right before AI runs a command — those three are just examples; Claude Code can fire hooks at around 30 lifecycle events, from session start and prompt submit through pre/post tool use, compaction, and session end. A hook has two parts: a matcher that picks which tool to watch (by name, like "Bash" or "Edit|Write"), and a command (a shell command or script) that decides whether to allow the action. If that command exits with code 2, AI is blocked from doing the action.
Here is an example that blocks AI from ever running rm -rf (a dangerous command that deletes everything):
{
  "hooks": {
    "PreToolUse": [
      {
        "matcher": "Bash",
        "hooks": [
          {
            "type": "command",
            "command": "jq -r '.tool_input.command' | grep -q 'rm -rf' && { echo 'Blocked dangerous command' >&2; exit 2; } || exit 0"
          }
        ]
      }
    ]
  }
}
How this works: the matcher ("Bash") means this hook only runs before Bash commands. When AI is about to run one, Claude Code hands the command's details to your script as JSON on standard input. The script pulls out the actual command text with jq, checks it for rm -rf with grep, and — if it matches — prints a message to stderr and exits with code 2. Exit code 2 is the specific signal that tells Claude Code "block this action"; any other exit code lets it through, which is why the safe case ends in exit 0. The key idea: the matcher picks the tool, the script decides whether to block. That is all you need to know for now. There is a more detailed example in Part 6 below.
Two small things that make hooks easier to live with. First, recent Claude Code versions add an if field that pre-filters a hook by tool and arguments using the same syntax as permission rules — so "if": "Bash(rm -rf *)" makes the hook fire only on matching commands, and you can skip the in-script grep. (Older versions ignore if and run the hook every time, which is why the grep version above still works everywhere.) Second, hooks can live in ~/.claude/settings.json to apply across all your projects, not just .claude/settings.json for one; type /hooks to confirm a hook is registered if it isn't firing.
Plugins are small JavaScript (or TypeScript) files you put in your OpenCode plugins folder — .opencode/plugins/ for one project, or ~/.config/opencode/plugins/ to apply everywhere. They do the same thing as Claude Code hooks (block or modify actions automatically), but you write them in code instead of JSON. Here is the same "block rm -rf" example:
// .opencode/plugins/block-dangerous.js
export const BlockDangerousPlugin = async () => {
  return {
    "tool.execute.before": async (input, output) => {
      if (input.tool === "bash" && output.args.command?.includes("rm -rf")) {
        throw new Error("Blocked dangerous command");
      }
    },
  };
};
OpenCode plugins can do more than just block actions. They can react to many different events: when a session starts, when AI finishes working, when a file gets edited, and more. They can also send you notifications, add custom tools, and reshape how the conversation gets summarized when it is compacted. You do not need to learn all of this right away. Just know that plugins are the more powerful option if you need it later.
Note the folder is plural —
plugins/, notplugin/. A plugin that silently never fires is most often in the wrong directory; the loader only watches.opencode/plugins/(project) and~/.config/opencode/plugins/(global). OpenCode moves fast, so glance at the current docs if anything behaves unexpectedly.
A practical example: Suppose you sometimes leave [TODO] markers in your drafts and forget to remove them before publishing. You can set up a hook (Claude Code) or plugin (OpenCode) that automatically blocks AI from saving any file into the published/ folder if it still contains a [TODO] marker. You never have to remember to check; the tool does it for you.
Which one should you use?

| Claude Code hooks | OpenCode plugins | |
|---|---|---|
| How you write them | A few lines of JSON in a settings file, pointing at a shell command or script | A small JavaScript file |
| Easier for | Simple rules like "block this command" | Complex rules that need to check multiple things |
| You need to know | Basic terminal commands (and a little jq/grep for content checks) | Basic JavaScript |
One good habit: check at commit time, not on every edit. It is tempting to make a hook fire on every file change, but interrupting the AI mid-task tends to confuse it — it is stopped in the middle of a thought. Instead, let it finish the work, and put your check on the commit (the moment it tries to save a checkpoint with git commit). At that point, run your tests and formatter. If they pass, the commit goes through. If they fail, your hook blocks the commit and hands the error back to the AI — which reads it and fixes the problem on its own before trying again. You do nothing; the failed check is the instruction. (Part 6, Step 6 shows exactly this in action.)
Use hooks/plugins for the things you need to be true 100% of the time. Use skills for the things you'd like the model to remember most of the time.
Look again at what a hook really gives you. It is not just a blocker. It is a checker the model cannot argue with — and that turns your setup into a loop:
Attempt → Check → Fix → Repeat.
The model does the work. An independent check grades it. The failure message goes straight back to the model as its next instruction. It fixes and tries again — until the check passes. No person in the middle.

Boris Cherny, who created Claude Code, calls this the single most important tip for using the tool: give the AI a way to verify its own output, and it will iterate until the result is genuinely good. His comparison: ask someone to build a website but never let them open a browser, and the result will not look good — hand them the browser and they will keep adjusting until it does. His estimate is that verification makes results two to three times better. Notice this is the third belief from the top of this course made practical: trust it exactly as far as the output can be checked — a hook is how you widen what can be checked.
Boris Cherny built this tool, so of course he believes in verification. Here is someone with every reason not to.
Robert C. Martin — known to a generation of programmers as Uncle Bob — wrote Clean Code, one of the most widely read programming books ever published. For forty years he taught that reading code carefully is the job. In July 2026 he posted that he no longer reads the code his agents write, and that this is the only way he gets real speed out of them. What he does instead is surround them with "extreme constraints": several layers of automated test, coverage thresholds, quality metrics, QA procedure, and mutation testing. Two days later he listed the public repositories behind the claim, several of them his own mutation-testing and code-quality tools.
Two people who agree from opposite directions are worth more than two who agree from the same one.
But read the order of his sentences carefully, because most people online did not. He did not stop reading and then hope for the best. He built the checks first, and stopping was what the checks allowed. His confidence is not a mood. It is the size of his checkers, and he can name every one of them.
That is the third belief from the top of this course, taken to its limit: trust it exactly as far as the output can be checked. He checks a great deal, so he trusts a great deal. You have one hook so far, so trust one hook's worth. The rule is a ratio, not a permission slip.
His post also drew heavy disagreement, and two of the objections are fair: if the agent writes every line and you only test the result, are you still the engineer — and does this speed up a decline in code quality that is already underway? Both are worth thinking about. Neither is answered by reading more diffs.
The habit to build now is small: whenever you give the AI a task, also give it a way to check its own result. A test that must pass. A command that must succeed. A file that must exist. The check does more work than the prompt.
Two courses in this book grow directly out of this one pattern:
- The check is only as good as your definition of "done" — precise enough that a command can prove it. Writing that definition is a skill of its own: Spec-Driven Development.
- Put the loop on a schedule and it prompts itself while you sleep — with a separate agent as the checker. That is Loop Engineering, the core skill of the Forward Deployed Engineer. That course also shows how to save the check itself as a skill, so it runs the same way every time.
For now, just remember the shape. You will build one yourself in Part 6.
11. Subagents
A subagent is an isolated agent instance with its own context window. You delegate a task to it; it works in private; it returns a summary. Its file searches, log dumps, and exploratory reads never touch your main thread.
Why this matters, in context-management terms: the most context-poisoning thing you can do is "explore the codebase to find where X happens." That kind of task pulls dozens of files into context, most of which you don't need. Doing it in a subagent means your main session sees only the conclusion ("X happens in src/services/billing.ts:142"), not the search.
There are two kinds, and it helps to keep them straight: the subagents your tool ships with (you don't write these — they just exist and fire automatically), and the custom ones you author yourself.
Built-in subagents — you already have these. No setup; the tool reaches for them when a task fits.
- Claude Code ships
Explore(read-only codebase search, run on a fast, cheap model),Plan(read-only research used during plan mode), and a general-purpose agent for multi-step work that also needs to make changes. - OpenCode ships
Explore(read-only search),General(broader delegated work), andScout(read-only external-docs and dependency research).
In Claude Code, plan mode automatically hands its codebase research to a read-only subagent, so you'll mostly use these without thinking about it — the model can even self-enter plan mode when asked. In OpenCode, the Plan agent (a primary agent you switch to with Tab) auto-invokes subagents the same way, or you can call one explicitly with @explore.
Custom subagents — you write these when you keep spawning the same kind of worker with the same instructions. A custom subagent is a markdown file with a little frontmatter (its name, when to use it, which tools it may touch) plus a system prompt. (Heads up: OpenCode's built-in Scout already does external-docs research, so the doc-fetcher below is more of a teaching example there than something you need to build.)
.claude/agents/doc-fetcher.md:
---
name: doc-fetcher
description: Fetches and summarizes external library documentation. Use when the user references a library and we need to understand its current API.
tools: WebFetch, Read, Write
---

You are a documentation researcher. Given a library name and a topic, fetch the official docs, extract only the API surface relevant to the topic, and write a focused summary to `tmp/docs-{library}.md`. Don't paste full pages: extract the patterns and signatures we need.
.opencode/agents/doc-fetcher.md:
---
description: Fetches and summarizes external library documentation. Use when the user references a library and we need to understand its current API.
mode: subagent
permission:
  edit: ask
  bash: deny
  webfetch: allow
---

You are a documentation researcher. Given a library name and a topic, fetch the official docs, extract only the API surface relevant to the topic, and write a focused summary to `tmp/docs-{library}.md`. Don't paste full pages: extract the patterns and signatures we need.
Where to put them, and an easier way to make one. Save the file in your project folder so the whole team gets it, or in your personal folder to use it across every project:
- Claude Code:
.claude/agents/(project) or~/.claude/agents/(personal). Rather than hand-writing the file, run/agentsto generate one through a guided prompt. One gotcha: a file you add or edit on disk only loads on the next session start, while agents made through/agentswork immediately. - OpenCode:
.opencode/agents/(project) or~/.config/opencode/agents/(personal) — the filename becomes the agent's name. Or runopencode agent createto scaffold one. (You can also define agents inline inopencode.jsonif you prefer config over a separate file.)
Two things worth knowing. You can give a subagent its own cheaper, faster model — the same model-matching idea as Concept 4, and the reason Claude Code's Explore runs on a fast economy model by default. And in Claude Code a subagent cannot spawn further subagents (no infinite nesting); for multi-stage delegation, chain them from your main session or reach for dynamic workflows (below).
Custom subagents work for non-coding tasks too. For example, imagine you have a long PDF (a textbook chapter, a research paper, or a contract) and you want a summary. Instead of pasting the whole document into your conversation (which would fill up your chat fast), you can send a subagent to read it and bring back just the summary:
---
name: pdf-summarizer
description: Reads a long PDF and writes a focused summary. Use when the user references a PDF and wants the key points without dumping the whole document into the conversation.
tools: Read, Write
---

You are a research summarizer. Given a PDF path and a question, read the document, extract only the passages relevant to the question, and write a focused summary to `tmp/summary-{pdf-name}.md`. Do not paste full pages: pull out the patterns, claims, and quotes the user actually needs.
The subagent reads the entire PDF on its own. Your main conversation never sees the 200 pages. It only gets the short summary at the end. That is the whole point: keep the heavy reading separate so your main conversation stays clean.
How do subagents get used? Two ways, same for built-in and custom, in both tools:
- Automatically. If you wrote a good description for your subagent, AI will use it on its own when the task matches. This is the way you will use subagents most of the time.
- Manually. Type
@subagent-namein your message to tell AI exactly which subagent to use. Do this when you want to make sure a specific one runs.
Simple rule: if a task requires reading a lot of information that your main conversation does not need, send a subagent to do it. (Chapter 14 § Subagents and Orchestration has the full guide.)

Skill or subagent? They're easy to confuse. Both are reusable, both can auto-fire from a description, and both showed up back in Part 4. The difference comes down to where the work runs:
| Skill (Concept 9) | Subagent | |
|---|---|---|
| Runs in | your current conversation — same window, same model, same tools | its own isolated window |
| What it is | a procedure or expertise your agent follows | a separate worker that does a chunk of work for you |
| What comes back | output inline, as part of the ongoing chat | only a summary; the verbose middle (searches, file dumps, dead ends) never enters your context |
| Model & tools | whatever the session is using | can run a cheaper/faster model and a restricted, sandboxed toolset |
| Cost & latency | cheap and instant — it just loads text | startup overhead (it begins blind and gathers its own context), but keeps your window clean |
| Best for | applying a consistent approach in-line, with room to go back and forth | isolating high-volume work (exploration, long docs, log triage) or sandboxing tools |
In one line: a skill changes how your current agent works; a subagent hands the job to a separate one that reports back. A skill is the playbook; a subagent is a teammate you delegate to.
And they compose rather than compete: a subagent can use skills. In Claude Code you either preload them — list skills: [api-conventions, error-handling] in the subagent's frontmatter and that content is in its context from the first turn — or let it reach for skills on its own at runtime (drop Skill from its tools only if you want to forbid that). OpenCode is the same: a subagent uses skills unless its skill permission is denied. So the choice is never skill or subagent; it's often a subagent holding the right skill.
Going bigger (Claude Code only): For very large jobs, Claude Code can run tens to hundreds of subagents in parallel and check their work—called dynamic workflows. It is Claude Code only and uses far more tokens, so it sits outside the cost-accessible default stack.
The placement question: Parts 2–4 in one table
Step back for a moment, because you now know every place a piece of knowledge can live: the prompt, the rules file, a skill, the conversation itself, a file on disk, and a subagent's separate window. Parts 2 to 4 taught them one at a time. Here is the single question that chooses between them, and it works for every sentence in your setup: which surface should this live on? You answer it with two properties of the sentence itself — how often it is needed, and how long it must live.
| The knowledge is… | Needed | Lives | Put it in |
|---|---|---|---|
Always true, and the AI gets it wrong by default ("never edit published/") | every turn | forever | The rules file (Concept 8) |
| A procedure for one kind of task ("how we do the weekly rollup") | when that task runs | forever | A skill (Concept 9) |
| How to use one specific tool, skill, or connector | when that thing is used | forever | That thing's own description — say it once, where it lives, not again in the rules file |
| This task's goal and details | now | this task | The prompt |
| Big and raw — logs, data, long documents | occasionally, in part | varies | A file on disk, with a one-line pointer in the chat |
| A definition of "done" that a command can prove | every attempt | as long as the task lives | An executable reference — a failing test, a script, a rubric, an HTML mockup |
| Only needed to produce a short answer (searching 60 files for one fact) | once | not at all | A subagent (Concept 11) — the mess stays in its window |
| Something the AI can figure out by looking ("this project uses Python") | — | — | Nowhere — delete it (the Concept 8 test) |
| What happened earlier this session | fades | this session | The conversation — and Part 2 is how you manage it |
Two of those rows name surfaces Parts 2 to 4 did not teach on their own. A description belongs to the thing it governs, not to the rules file (Concept 9), and repeating it in both places is how the two copies drift apart. And an executable reference is the one file on disk that instructs rather than informs: a failing test, a script, a rubric, an HTML mockup. That second one is the seed of the next two courses — Spec-Driven Development writes it, Loop Engineering runs it.

Two consequences are worth saying out loud. First, the prompt is for the task, and nothing else. Every time you catch yourself re-explaining project background in a prompt, that sentence is asking for a different surface — the third re-explanation is your signal to move it. Second, the "forever" surfaces demand the hardest editing, because their cost repeats forever: a lazy sentence in a prompt costs once; a lazy sentence in the rules file costs on every turn you will ever run. Writers often organize this discipline as four verbs: write (persist knowledge outside the window), select (bring in only what the turn needs), compress (shrink what must stay), and isolate (give work its own window). They map straight onto this course: writing is the plan and notes files (Concepts 2 and 15), selecting is skills and lazy-loaded references (Concepts 8 and 9), compressing is Most advice written before 2026 was tuned for models that needed heavy guardrails. In July 2026 Anthropic published what changed for its newest generation, after cutting over 80% of Claude Code's system prompt with no measurable loss on its coding evaluations. Six common pieces of advice moved. Each one has a home on this page: One caution before you apply the whole list: every item on it was measured on frontier Claude models. This course also teaches OpenCode against cheap and local models, where the older and more explicit advice is often still the right advice. The safe reading is the one from Concept 4: how much you spell out should scale inversely with the capability of the model you are running.If you read about context engineering elsewhere: the industry's four verbs
/compact (Concept 6), and isolating is subagents (Concept 11). The table above is the decision layer over all four: the verbs are what you can do; the table is how you choose.If you read about context engineering elsewhere: the 2026 correction
The old advice What replaced it Where it lives here Give the model rules Let it judge, wherever the standard can be read off the project Concept 8, the pruning callout Give it examples Design the interface so its shape carries the instruction Concept 9, the flipped-advice note Put everything up front Progressive disclosure: a tree of files, loaded when needed Concepts 8 and 9, and the table above Repeat the instruction in several places State it once, in the description of the thing it governs the table above Keep memory in the rules file by hand The tool writes and reloads its own memory Concept 15 A spec is a markdown file A spec can be a test suite, a script, a rubric, or an HTML mockup the table above, then Spec-Driven Development
Part 5: Connecting to the world
12. MCP, used honestly
MCP stands for Model Context Protocol. It is a way to connect AI to other apps and services you already use: Slack, Google Docs, Notion, GitHub, databases, and more. Once connected, AI can read from and write to those services directly.
"Isn't this just an API?" Almost — and it's worth being clear before you wire anything up. MCP is a standard wrapper around APIs and other tools, not a replacement for them. A raw API needs someone to write the glue each time (handle auth, shape the requests, and tell the model how to call it); an MCP server has already done that and advertises its tools, so the agent can discover and use them with no integration code. So the real question is never "MCP or API" — it's "is this worth a standing connection, or can the agent just call the thing directly?" The use/skip rules below answer exactly that.
Both Claude Code and OpenCode support MCP. Because MCP is an open standard, the same server works with either tool — but the configuration doesn't transfer, so you add it separately in each (they keep their connections in different files).
Here is how you add an MCP connection in each tool:
Add servers with the CLI — claude mcp add --transport http <name> <url> — which by default writes to ~/.claude.json (personal). Add --scope project to write a shareable .mcp.json in your project root instead. Then run /mcp inside Claude Code to check status and to log in to any server that needs OAuth. (Note: this is not .claude/settings.json, which is for permissions and hooks.)
Declared in opencode.json. Use "type": "remote" for a hosted server (with a url) or "type": "local" for one that runs as a local process (with a command like ["npx", "-y", "some-mcp"]):
{
  "$schema": "https://opencode.ai/config.json",
  "mcp": {
    "sentry": {
      "type": "remote",
      "url": "https://mcp.sentry.dev/mcp",
      "oauth": {}
    },
    "context7": {
      "type": "remote",
      "url": "https://mcp.context7.com/mcp"
    }
  }
}
For servers that need a login, run opencode mcp auth <name> to do the OAuth flow; opencode mcp list shows each server's status.
Why this is useful: Without MCP, AI can only work with the files on your computer. With MCP, AI can reach outside your computer and interact with online services. For example: you could ask AI "check my Slack for any messages from my team today" or "create a new issue on GitHub for this bug," and AI would actually do it instead of just telling you how to do it yourself.
The more serious use: connecting your system of record. A system of record is the authoritative home for a given kind of data — the one copy everyone treats as the truth: your database, your CRM, your ticketing system, a company knowledge base. MCP is how you point the agent at one so it answers from live, authoritative data instead of a stale copy you pasted in or a half-remembered fact from training. Ask "what's the current status of order 4471?" and the agent queries the real database through MCP rather than guessing. This is also how a body of knowledge — a book, a documentation set, an internal wiki — becomes queryable: stand up an MCP server in front of it, and any tool can ask it questions and get answers grounded in the source. Every AI Worker also runs against a system of record using MCP.
But be careful: do not connect everything. Each MCP connection can take up space in your conversation, even when you are not using it. OpenCode's own documentation warns: "Certain MCP servers, like the GitHub MCP server, tend to add a lot of tokens and can easily exceed the context limit." One difference worth knowing: Claude Code now defers MCP tool definitions by default (it loads a tool's full description only when it's about to use it), so extra servers cost little context there. OpenCode loads them up front, so be especially selective on that side. Either way, the habit is the same: only connect what you actually need. That is also the real answer to the worry that MCP bloats context — the fix is layering (load tools lazily, lean on the CLI for simple jobs, and push heavy MCP work into a subagent from Concept 11), not abandoning MCP.
When to use MCP and when to skip it:
- Use MCP when the service needs AI to log in or stay connected. For example: reading your Google Calendar, browsing a website, or querying a database that requires a password.
- Skip MCP when AI can get the same result by running a simple terminal command. For example: instead of connecting to GitHub through MCP, AI can just run
gh issue listin the terminal to see your issues. No login, no connection, no extra setup.
Start with one or two connections you actually need. Do not install ten just because they are available.
One safety habit before you connect anything: context is the door
There is one property of the context window that changes how careful you should be with everything above. Everything the model reads can steer it — no matter who wrote it. As far as the model can tell, a fetched web page, a GitHub issue, a stranger's README, and a connected tool's description are the same kind of text as your instructions. The window flattens all of it into one stream. And that is how agents get attacked: a planted line inside outside content that says "ignore your instructions and…" is called a prompt injection, and the context window is the door it walks through.

At this course's level — you, present, watching the session — three habits close most of the risk:
- Fetched content informs; only your files instruct. Never paste a stranger's text into your rules file or a skill. Those are standing surfaces the model obeys every turn; outside text does not earn them.
- Send a subagent to read anything you do not fully trust (Concept 11). It reads the risky page in its own disposable window and returns only a summary — so whatever was planted in the page never enters your conversation at all.
- When the AI's behavior changes strangely right after it reads something, suspect the something. Check what entered the window on that turn before you blame the model.
One honest limit: habits reduce exposure; they cannot make a fooled model impossible, because text is text. Rules the AI cannot be talked out of, and fences around what it can reach, are a different kind of engineering — and a later course in this sequence, Harness Engineering, builds exactly those walls. For now, the lasting principle fits in one line: trust is a property of every piece of context, and low-trust text never gets a standing surface.
Part 6: A complete worked example, twice
This is where everything comes together. You will do one complete task from start to finish, using the concepts you learned above. The task is done twice: once in Claude Code and once in OpenCode, so you can see that the steps are almost the same.
No coding required. This example uses meeting notes, but you do not need to be a programmer to follow along. If you have ever taken notes in a meeting, a class, or a group project, you already understand the task.
Your task
You have a folder called notes/ with five meeting notes files. The problem: they are messy. Each meeting wrote its to-do items in a different way. Some use the heading "Action Items." Some use "Todos." One uses lowercase "todo." Some to-do items are buried inside other sections where you would not think to look. And some items are marked [private] or [HR], meaning they should never be shared publicly.
Your goal: Create one clean file called weekly-actions.md that:
- Lists every to-do item from all five meetings
- Groups them by who is responsible
- Shows which meeting each item came from
- Leaves out anything marked
[private]or[HR] - Does not miss a single item
- Warns you if any deadline falls on a public holiday
📁 Get the five starter files first (click to expand)
Copy these into a notes/ folder before you start. The example is engineered around them: each file plays a specific role, so if you skip one, one of the steps below stops working. (Prefer to skip folder setup? Paste the five files directly into your tool's chat and ask it to treat them as the contents of notes/.)
notes/2026-12-07-monday-team-meeting.md
# Monday Team Meeting - 2026-12-07

Attendees: @sara, @diego, @priya, @marcus

## Discussion

Reviewed last month's customer satisfaction scores. Renewals are down slightly in the small-business segment.

## Action Items

- @sara: draft a revised welcome email by Dec 18
- @diego: check spam-folder reports with our email vendor by Dec 16
- @marcus: pull renewal numbers for the last two quarters and share with the team
- @sara: finalize offer terms for the new account manager [HR]
notes/2026-12-08-customer-feedback.md
# Customer Feedback Review - 2026-12-08

Attendees: @sara, @amara, @marcus

## Summary

Read through the top twenty customer comments from last week. Three themes came up: pricing page is confusing, the call-back service is slow, and the FAQ on the website is out of date.

## Todos

- rewrite the pricing page in plain language
- @marcus: log a complaint with the call center vendor about response times
- look into why the FAQ has not been updated in six months
- @amara: draft a customer note explaining the upcoming changes
- review all printed brochures for outdated photos and pricing
notes/2026-12-08-q1-planning.md
# Q1 2027 Planning - 2026-12-08

Attendees: @sara, @diego, @amara, @lukas

## Initiatives

We walked through the four candidate initiatives for Q1.

### Year-end promotional campaign

Time-bound: wraps before the holiday break.

#### Action Items

- @amara: finalize the year-end promotional brochure by Dec 25
- @lukas: confirm placement with paid media partners by Dec 20

### Onboarding overhaul

Top priority next quarter.

## todo

- @diego: write the project brief by Jan 15
- @sara: own messaging and visual direction
notes/2026-12-09-all-hands-prep.md
# All-Hands Prep - 2026-12-09

Attendees: @sara, @marcus

## Agenda

Walked through the December all-hands agenda. Most slides are in good shape; a couple still need owners.

## Next Steps

- @marcus: set up the video call and record a practice run
- @sara: finalize the Q4 numbers slide
- @sara: prepare the bonus and compensation talking points [private]
- @marcus: book the venue for the team holiday dinner
notes/2026-12-11-vendor-review.md
# Vendor Review - 2026-12-11

Attendees: @sara, @amara, external partner

## Summary

Confidential contract negotiation with our printing and fulfillment vendor. Details under NDA.

## Action Items

- @sara: circulate the revised contract to the vendor [private]
- @amara: draft the internal announcement once terms are agreed [private]
- @sara: review the legal redlines on the new pricing schedule [private]
How this walkthrough is organized
Below are eight steps. Each step follows the same pattern:
- What to do in Claude Code (the exact instructions)
- Why this step matters (a short explanation)
- What is different in OpenCode (if anything changes, it is noted here. If it says "identical," then both tools work the same way for that step)
Step 1: Set up your rules file
In Claude Code: Open Claude Code in your project folder. Run /init. AI will scan your folder and create a file called CLAUDE.md. It will be too long. Delete most of it and keep only this:
# weekly-rollup

## Layout

- `notes/`: meeting notes, one file per meeting
- `weekly-actions.md`: the rollup we are creating
- `plans/weekly-rollup-plan.md`: the plan we will save and reuse

## Critical rules

- Action items can appear under `## Action Items`, `## Todos`, `## Next Steps`, or `## todo` (one meeting uses lowercase). Look at all heading levels, not just the top.
- Owners are written as `@name`. Items with no owner go to an "Unassigned" section.
- Never include any bullet tagged `[private]` or `[HR]`.
Why this matters: AI reads this file at the start of every single message. A long file slows things down and wastes space. So you keep only what AI cannot figure out by looking at the folder itself. The privacy rule is especially important because AI has no way to know that [private] items should be hidden.
In OpenCode: Same thing, but the file is called AGENTS.md instead of CLAUDE.md. If you already have a CLAUDE.md, OpenCode will read that too.
A couple of later steps save your work with git commit (and OpenCode's undo also relies on git). If this folder isn't a repository yet, run git init once now so those steps work. While you're at it, on Claude Code the safety check in Step 6 uses a small tool called jq — most systems have it, but if Step 6 errors with "jq: command not found," install it (brew install jq, or apt install jq on Linux).
Step 2: Make a plan before doing anything
In Claude Code: Press Shift+Tab twice to turn on plan mode (AI can read but cannot change anything). Then type:
Read every file in notes/. Produce weekly-actions.md grouped by
owner. For each item include the action, the source filename, and
the meeting date. Skip anything tagged [private] or [HR]. Do not
lose any action items.
AI thinks for a minute and comes back with a written plan of what it will do.
Why this matters: Reading a plan takes 30 seconds. Undoing a mistake takes much longer. Always plan first.
In OpenCode: Press Tab to switch to Plan mode. Everything else is the same.
Step 3: Check the plan and fix mistakes
In Claude Code: Read the plan carefully. Two things will probably be wrong with it.
The first: it will only mention the top-level headings (## Action Items, ## Todos). But one of your meeting files (the Q1 planning notes) hides action items inside ### Year-end promotional campaign, with a #### Action Items underneath. The plan would miss those.
The second: it will not say what to do with action items that have no owner (no @name next to them, like the customer-feedback file's "rewrite the pricing page in plain language"). Those would silently disappear.
You push back:
Two changes. (1) Look at all heading levels, not just the top.
Some action items live under sub-headings. (2) Items without an
owner go to an "Unassigned" section at the bottom; never drop
them.
AI updates the plan. You are still in plan mode, so nothing has been written to disk yet; saving the plan comes in the next step, once you switch to build mode.
Why this matters: It is much easier to fix a plan than to fix finished work. Catch problems now, when it costs nothing.
In OpenCode: Same steps, nothing different.
Step 4: Let AI do the work
In Claude Code: Press Shift+Tab to leave plan mode, which lets the AI write to disk. First ask it to save the final plan to plans/weekly-rollup-plan.md (so you can reuse it next week), then tell it to go ahead.
AI reads all five meeting files, creates weekly-actions.md, groups items by owner, removes the [private] and [HR] items, and puts items without an owner in an "Unassigned" section. You watch it happen.
Why this matters: Because you planned first, the result is mostly correct on the first try.
weekly-actions.md should be in your main project folder, next to the notes/ folder, not inside it. If AI put it in the wrong place, your rules file from Step 1 may be missing the Layout section.
In OpenCode: AI will ask for your approval before writing each file. You can say yes, or set up auto-approval in opencode.json for future runs.
Step 5: Clean up the conversation
In Claude Code: The conversation is now long. AI has read every meeting note, and all of that text is still taking up space, including the private items it skipped. You do not need any of that anymore. Type:
/compact keep the heading rules, the owner list, and the
private/HR exclusion rule
AI summarizes the conversation and throws away everything else. Only the parts you told it to keep remain.
Why this matters: A long, cluttered conversation makes AI worse, not better. It also costs more. Clear out what you no longer need, especially private content that should not stay in memory.
In OpenCode: Same command, same result.
Step 6: Add an automatic safety check
In Claude Code: Before you save your work, you want to make sure no meeting got accidentally left out. You will add a hook: an automatic check that runs every time AI tries to save (commit) your work. ("Save" here means the git commit checkpoint — the moment you record a snapshot in git — not just writing the weekly-actions.md file.)
The intro promised no coding, and that still holds: you'll paste a block here, not write one, and you do not need to understand the code. The plain-English explanation right after it is all you need. (It also relies on this folder being a git repo — see the setup tip in Step 1.)
This is the one place in the chapter where you paste a config block yourself instead of letting the model write it. There are two reasons, both learned the hard way.
(1) "Hook" is ambiguous. If you tell the model "create a hook," Claude Code may reach for a git hook (a file in .git/hooks/) instead of a Claude Code hook (an entry in .claude/settings.json). Those are different things; you want the second one.
(2) AI will accidentally break the safety check. Your rules file says to skip [private] items. If you ask AI to write the hook, it will read that rule and "helpfully" add the same skip logic to the hook. That means the vendor-review meeting (where every item is [private]) gets silently ignored by the hook, and no warning is ever raised. But the whole point of the hook is to catch exactly that case: a meeting that looks like it was skipped. You cannot ask AI to build a safety check against its own rules. It will always find a way to be "helpful" and defeat the check.
The safe move is just to paste the configuration in.
Open .claude/settings.json (create the file if it doesn't exist) and paste this exactly:
{
  "hooks": {
    "PreToolUse": [
      {
        "matcher": "Bash",
        "hooks": [
          {
            "type": "command",
            "command": "jq -r '.tool_input.command' | grep -q '^git commit' || exit 0; for f in notes/*.md; do grep -q \"$(basename $f)\" weekly-actions.md || { echo \"Missing: $f\" >&2; exit 2; }; done"
          }
        ]
      }
    ]
  }
}
What this does in plain English: Every time AI tries to save (commit) your work, this hook checks one simple thing: is every meeting file from notes/ mentioned somewhere in weekly-actions.md? If any file name is missing, it blocks the save. It does not check content, does not look at [private] tags, does not make exceptions. It only checks file names. That is the whole point.
Watch what happens. Tell AI to commit. The safety check fires: Missing: notes/2026-12-11-vendor-review.md. Why? Because every to-do item in that meeting was tagged [private], and your rules from Step 1 say to skip private items. So when AI built the summary, it had nothing to write from that file, and the file name never appeared. The hook does not know any of that. It just sees a missing file name and blocks the save.
The model reads the error and patches the rollup with a placeholder entry that names the file explicitly, e.g.:
## From 2026-12-11-vendor-review.md

- All items confidential — see meeting owner.
The filename is now present in weekly-actions.md, the hook's grep finds it, the commit goes through. Nothing private leaked into the rollup; the audit trail is intact.
You did nothing during this loop. The safety net caught the mistake and the model fixed itself.
Step 6 is a verification loop in miniature — the pattern from Concept 10. The model attempted, the hook checked, the failure message became the fix instruction, the model repaired its own work, and the check passed. You typed nothing. Hold on to the shape — attempt → check → fix → repeat — because the Loop Engineering course takes exactly this loop and puts it on a heartbeat, so it runs every morning without you.
Why. Things you want to be true every single time should not depend on the model remembering. They should be checked automatically. And the check should live somewhere the model cannot quietly rewrite to please itself: that is why this one is a paste, not a prompt.
What changes in OpenCode. OpenCode calls these plugins instead of hooks, and they are written as a small JavaScript file. Same idea, same outcome, same paste-don't-prompt logic. Create .opencode/plugins/check-rollup-complete.js (the folder may not exist yet) and paste this in:
// .opencode/plugins/check-rollup-complete.js
import { readdirSync, readFileSync } from "fs";

export const CheckRollupCompletePlugin = async ({ $ }) => {
  return {
    "tool.execute.before": async (input, output) => {
      if (
        input.tool === "bash" &&
        output.args.command?.startsWith("git commit")
      ) {
        const rollup = readFileSync("weekly-actions.md", "utf8");
        const missing = readdirSync("notes")
          .filter((f) => f.endsWith(".md"))
          .filter((f) => !rollup.includes(f));
        if (missing.length) {
          throw new Error(`Missing from rollup: ${missing.join(", ")}`);
        }
      }
    },
  };
};
Same shape: list every file in notes/, check each basename is in the rollup, throw if any is missing. No [private] filter inside. The behaviour is identical to the Claude Code version: missing file, commit blocked, model fixes itself.
The hook/plugin material at depth (exit codes, matcher syntax, the full event list) is in Chapter 14 § Hooks and Extensibility (and Plugins: Putting It All Together for the OpenCode side).
Step 7: Send a side task to a helper
In Claude Code: Some to-do items have deadlines like "by Dec 25" or "before year-end." You want to check if any of those dates fall on a public holiday. Type:
Use a research helper to look up the 2026 international public
holidays list and write the dates to tmp/holidays-2026.md.
A helper (subagent) goes to the web, finds the holiday dates, and saves them to a small file. Your main conversation never sees the full web page. It only sees the small file with the dates.
This is the same pattern as the subagent in Concept 11 — a web-capable helper that returns only a summary. The one there was named doc-fetcher and described narrowly for library docs, so for a general lookup like this, either give that helper a broader description (e.g. "fetch and summarize external references and lookups") or make a small researcher agent with WebFetch and Write tools. The point of the step is the delegation, not the exact agent.
AI then compares the deadlines in your summary to the holiday dates and adds a warning like ⚠ falls on Christmas Day next to any deadline that lands on a holiday.
Why this matters: If AI had fetched the web page directly, it would have dumped a huge amount of text into your conversation. Sending a helper keeps your conversation clean.
In OpenCode: Call your research helper directly by name — e.g. @researcher. Same result.
Step 8: Save this as a skill for next time
In Claude Code: You will do this task every week. Instead of remembering all these steps next Friday, ask AI to save everything as a skill:
Create a skill at ~/.claude/skills/weekly-meeting-rollup/SKILL.md
based on what we just did. Include: the four heading variants,
the all-headings rule, the private/HR exclusion, the Unassigned
section, the missing-file check, and the holiday cross-reference.
Next Friday, just type "do the weekly rollup" and AI will use this skill automatically. All the rules you set up today (heading variants, privacy filter, unassigned section, holiday check) are applied every time without you having to remember anything.
Why this matters: The work you did today was not just for today. You taught AI how to do this task from now on.
In OpenCode: The skill saves to a slightly different folder, but the file itself is identical. You can copy it between the two tools and it works in both.
What just happened
Look back over the eight steps. None of them required you to write code. None of them required you to know what an API is. What you actually did was eight small acts of managing the model's attention: telling it what to look at, when to plan, when to forget, when to delegate, when to stop trusting itself, and when to remember.
That is the entire chapter.
And look at how little differed between the two tools:
- A different filename for the rules file (
CLAUDE.mdvsAGENTS.md) - A different keystroke to enter plan mode (
Shift+TabvsTab) - A different language for the safety-net file (JSON vs JavaScript)
- A different folder for the skill at the end (but the same file)
That is it.

The thinking is the tool. The configs are decoration. Learn to think this way and your skills survive whichever tool wins.
13. Terminal, IDE, or desktop?
Both tools run in several places.
Claude Code: terminal (CLI), VS Code / JetBrains plugins, a desktop app (a Code workspace on macOS and Windows — not Linux — built for running several sessions in parallel, each in its own git worktree), the web (claude.com), a mobile app, and cloud-hosted sessions for async work you can check from any of them.
OpenCode: terminal (the TUI is the flagship), a desktop app (beta, on macOS / Windows / Linux), a VS Code extension plus other editors like Zed through its ACP server, a web interface via the SDK, and integrations such as a GitHub agent and a Slack bot.
Pick whichever fits what you are doing. If you are writing code, the VS Code or JetBrains plugin is great because you can watch AI edit your files in real time. If you are running longer tasks and want to do other things while you wait, the terminal works well. For non-coding work, the easiest options are the web apps or — on the Claude side — the desktop app's Cowork tab, the knowledge-work mode that sits alongside the Code tab (which is Claude Code) in the same app.
The strong recommendation, in either tool: start in the terminal or an IDE plugin. Once you understand what's happening underneath (which files the model reads, which commands it runs, which decisions it makes), every other interface becomes a thin wrapper you can read through. If you start in a heavily abstracted UI, you'll struggle to debug when things go sideways, because you won't know what can go sideways.
14. Build a personal context library, slowly
Once you have a few projects using either tool, you'll notice you're writing similar things into every rules file: your code style, your commit conventions, your testing philosophy. Stop copy-pasting.
Put the shared parts in your home config and reference them from each project's rules file:
~/.claude/CLAUDE.md (loaded in every project):
# CLAUDE.md

@~/.claude/style/typescript.md
@~/.claude/style/commits.md
Then keep each project's own CLAUDE.md for what's unique to that project — the global file above (and the styles it imports) is pulled in everywhere automatically.
~/.config/opencode/:
// ~/.config/opencode/opencode.json
{
  "$schema": "https://opencode.ai/config.json",
  "instructions": ["style/typescript.md", "style/commits.md"]
}
Plus a project-specific AGENTS.md for what's unique to that project.
Same idea works for skills. A commit-message skill or code-review skill in ~/.claude/skills/ (which OpenCode also reads) or ~/.config/opencode/skills/ is available everywhere automatically.
Do not try to build this all at once. It is tempting to spend a weekend setting up the perfect personal library. Do not do that. Instead, add things one at a time, only when you actually need them. Add a style guide after AI writes code in the wrong style. Add a commit skill after you type the same commit instructions for the third time. A library built from real problems stays small and useful. A library designed in advance ends up large and ignored.
15. Memory beyond the basics
For most people, resuming old conversations and keeping a good rules file is enough. But if you want AI to remember things even after you start a fresh conversation, here are your options:
- A
notes/folder in your project. After finishing a task, ask AI to write a short summary of what it did and what decisions were made. Save it in anotes/folder. Next time, AI can read those notes to get up to speed. Simple, no setup needed, works in both tools. - A memory MCP server. These give AI a way to save and recall information across conversations. Several free ones exist and work in both tools.
- Search across old conversations. Some setups let you search your past conversations to find "have I solved this before?" Check the docs for your tool to see what is available.
Two craft rules make that notes folder worth reading months later. Absolute dates, always: "yesterday we chose Redis" means nothing in six weeks; "2026-07-14: chose Redis over Postgres for the queue, because…" never expires. Decisions over narration: "worked on auth stuff" helps nobody; "auth: token refresh must use the retry helper (see the 07-10 note)" changes what the next session actually does — and changing a future session's behavior is the only test a line has to pass. Write every note for a reader who knows nothing, because on disk, that is always who shows up: a future session, reading cold.
The tools are starting to do the simple version for you. Claude Code now has a built-in auto memory: as you work, it writes its own short notes about your corrections and preferences and reloads them at the start of every session — the notes/ folder idea, automated, and Anthropic now treats this as replacing the old habit of writing memories into your rules file by hand. (It runs on the Claude Pro and Max plans and is still rolling out, so don't count on it everywhere yet; the manual notes/ folder is the approach that works in any tool, on any model.) Either way, this only reinforces the rule below.
Pick based on what you actually need. If you just want to remember decisions about one project, a notes/ folder is enough. If you want AI to remember everything across all your projects, you need something more advanced. Do not set up complex tools before you have a real problem to solve.
Part 8: Composing Claude Code and OpenCode
So far, this course has treated Claude Code and OpenCode as two options: pick one and learn it. But once you are comfortable with the basics, you can actually use both tools together on the same project. This is not just a backup plan. Each tool has strengths the other lacks, and combining them can be more effective than using either one alone.
Keeping it safe: git worktrees
Before we look at patterns, there is one safety problem to solve first.
If you run two AI sessions on the same project at the same time, and both try to edit the same file, one will overwrite the other's changes. That is a mess.
The solution is called git worktrees. Think of it like making a copy of your project folder, but smarter. Each copy (called a "worktree") is its own workspace where AI can work independently. Changes in one worktree do not affect the other. When both are done, you merge the results together using git.
Here is how to set it up:
How it works step by step:
# Step 1: Go to your project folder
cd myproject

# Step 2: Create two worktrees (two separate copies, each on a NEW branch)
# The -b flag creates the branch; without it, git expects the branch to already exist.
git worktree add -b my-branch-1 ../myproject-copy1
git worktree add -b my-branch-2 ../myproject-copy2
Now you have two separate folders (myproject-copy1 and myproject-copy2), each with its own copy of your project on a different branch.
# Step 3: Open Claude Code in one copy
cd ../myproject-copy1
claude

# Step 4: Open OpenCode in the other copy (in a separate terminal window)
cd ../myproject-copy2
opencode
Both AI tools are now working at the same time on different copies. They cannot overwrite each other's files.
# Step 5: When you're happy with the work, go back to the main folder and
# merge each branch into your main branch (it may be called main or master).
# Because the two sessions worked in different files (see the rule below),
# these merges should apply cleanly.
cd ../myproject
git merge my-branch-1
git merge my-branch-2

# Step 6: Clean up the copies (this removes the worktrees; your merged
# commits are safe in the main branch)
git worktree remove ../myproject-copy1
git worktree remove ../myproject-copy2
The file-edit rule, in three tiers:
| Pattern | Verdict |
|---|---|
| Two sessions editing the same file simultaneously | Bad: last write wins, the other session's edits are lost |
| Two sessions editing different directories | Good: no contention, parallel speedup is real |
| One session edits, commits, hands off to the other | Acceptable: the commit is the handoff artifact |
Rule of thumb: start with one session per task. Add a second only when you can clearly point at which files each session owns. The cognitive cost of context-switching between two agentic sessions is real; it's only a win when the work genuinely partitions.
This course stops at two parallel sessions on purpose — that is the honest ceiling for a beginner's attention. But the technique scales: the creator of Claude Code runs about five sessions in his terminal (each in its own git checkout, numbered tabs, system notifications for when one needs input) plus five to ten more in the browser. He also abandons 10–20% of the sessions he starts. Both numbers matter: parallelism is real leverage, and throwing away dead-end sessions is a normal cost of it, not a failure. Get comfortable with two before you chase fifteen — and when you are ready to hand the starting-and-checking itself to a system, that is the Loop Engineering course.
The shared layer that makes any of this work is the project's rules and skills. Both tools read the same CLAUDE.md and the same .claude/skills/ directory (Concepts 8 and 9 cover this). One source of truth for project conventions; two tools consuming it.
Pattern 1: Plan / Execute split
The hard part of any task is figuring out what to do: reading the project, deciding on an approach, thinking about what could go wrong. The easy part is actually doing it once you have a clear plan. AI models reflect this: the most powerful (and expensive) models are best at the thinking and planning part. Cheaper models can handle the straightforward "just follow these instructions" part just fine.
How to do this in practice:
- Open Claude Code in plan mode. Describe what you want. Let it create a detailed plan.
- Save the plan to a file (like
docs/plans/my-feature.md). - Open OpenCode in a separate worktree, using a cheaper AI model. Tell it:
read docs/plans/my-feature.md and implement it. - OpenCode follows the plan: edits files, runs tests, fixes formatting.
- (Optional) Go back to Claude Code to review the changes before you merge them.
The plan file is the contract. It survives session loss, encodes the architectural decisions, and lets the cheap session work without redoing the expensive thinking. This pattern alone often delivers most of the cost savings teams hope to get from "switching to a cheaper model," without losing the quality of frontier-model planning.
Pattern 2: Cross-model review
In the AI Prompting course, you learned that having a second AI check the first AI's work catches more mistakes. Here, we do the same thing with coding tools.
Why this works: The AI that wrote the code is the worst one to review it. It has the same blind spots that caused the mistakes in the first place. A different AI model (from a different company, trained on different data) will notice things the first one missed.
How to do it:
- Tool A (any model) writes the code in its own worktree.
- Tool B (a different AI model) reads the changes and writes a review to
docs/reviews/my-feature.md. It does not edit any code; it only writes feedback. - Tool A reads the review and decides which suggestions to follow.
This is more useful than it sounds. Even a cheap AI model used as a reviewer catches real problems: missing edge cases, security issues, confusing names, unused code. The cost of running a review is small; the cost of finding a bug after you have already shipped is much larger.
Best results come from mixing AI providers. Claude reviewing Claude's own code will miss the same things. But GPT reviewing Claude's code (or vice versa) catches different types of mistakes. Using the same AI for both writing and reviewing is still better than no review, but using different AIs is much better.
What stays single-tool
You do not always need two tools. Using both together takes extra setup: two configurations, two permission lists, two notification setups. For small tasks (fixing a bug, writing one function, cleaning up a file), one tool in one session is faster and simpler.
When to use two tools together:
- The task is big enough that planning and building are clearly separate steps
- You want to save money by using a cheaper model for the building part
- You want an independent review from a different AI before merging
For everything else, one tool is enough. The skills you learned in Parts 1-7 are what you will use most of the time.
How to actually get good at this
Reading this crash course does not make you good at these tools. Actually using them does. Here is what the learning process looks like:
You will start by doing everything manually. You will run into problems. Those problems are how you learn. Each problem points back to one of the fifteen concepts in this course:
| The problem you hit | What to fix |
|---|---|
| "Why does AI keep forgetting my project rules?" | Your rules file is missing or too long (Concept 8) |
| "Why did AI just delete an important folder?" | Your permissions are not strict enough (Concept 3) |
| "Why is AI getting worse after an hour of chatting?" | The conversation is too long; use /compact (Concept 6) |
| "Why is my bill (or usage limit) blowing up on simple work?" | You're running an expensive model on everything; match the model to the task (Concept 4) |
| "Why am I typing the same instructions every week?" | Turn those instructions into a skill (Concept 9) |
| "Why did everything break when AI tried to save?" | You need a hook or plugin to catch that (Concept 10) |
| "Why do I keep having to check AI's work myself?" | The task has no check attached; give AI a way to verify its own output (Concept 10) |
| "Why does searching through files clutter my conversation?" | Use a subagent to do the search separately (Concept 11) |
Fix each problem when you hit it, not before. Start with a small rules file. Add one line when something goes wrong. Create your first skill when you notice you are repeating yourself. Add a hook when something breaks that should have been caught automatically. Let your setup grow naturally from real experience.
The real skill is not memorizing fifteen concepts. It is recognizing which concept to use when a problem shows up. That only comes from practice.
Your skills transfer between tools. Once you learn to think this way in one tool, switching to the other is easy. The buttons and settings are different, but the thinking is the same. Pick one tool, start with one project, use plan mode, and keep your conversations short. Everything else builds from there.
Where you are on the ladder
Skill with these tools grows in stages, and it helps to know which stage you are on. The ladder below is grounded in something real: in January 2026, Boris Cherny — the creator of Claude Code — published his complete personal workflow. People expected exotic tricks. He described his own setup as "surprisingly vanilla": a short shared rules file, plan mode before every non-trivial task, a way for the model to verify its own output, and many sessions running at once. The gap between a beginner and the tool's own creator is not secret prompts. It is these stages, climbed in order.
| Stage | What it looks like | Where it is taught |
|---|---|---|
| 0. Mindset | You treat the AI as a ghost with jagged intelligence, and trust it only as far as output can be checked. | The triad at the top of this course |
| 1. First real sessions | You give instructions instead of questions, watch every permission, and try things in a live terminal. | Concepts 1 and 3 |
| 2. Never explain twice | You keep a short rules file, and every mistake the AI makes becomes one new line in it — and lines that stop earning their place get deleted. | Concept 8 |
| 3. Plan first, execute second | No non-trivial task starts without an approved plan; a strong model plans, a cheap one executes. | Concepts 2 and 4 |
| 4. The verification loop | Every task ships with its own check: a test, a command, a hook. Attempt → check → fix → repeat. | Concept 10 |
| 5. Systematize | Repeated instructions become skills; heavy reading goes to subagents; your personal library grows one real problem at a time. | Concepts 9, 11, and 14 |
| 6. Parallelize | Several isolated sessions run at once in worktrees, and you review only when your judgment is needed. | Part 8 |
| 7. Beyond this course | You write specs precise enough that a command can prove "done," and design loops that prompt the agent for you. | Spec-Driven Development, then Loop Engineering |

Three honest calibration points, so the top of the ladder feels real rather than like marketing. First, Cherny runs roughly fifteen sessions at once — about five in his terminal, each in its own git checkout, and five to ten more in the browser. Second, he also says he abandons 10–20% of the sessions he starts, because they end up nowhere. Even at stage 6, throwing work away is part of the workflow, not a sign you are doing it wrong. Third, the endpoint keeps moving: by his own account, Claude Code was writing about 10 percent of Cherny's code in February 2025, 30–40 percent by May, and all of it by that winter — he plans, steers, and reviews; the agent types. The ladder does not end at "AI helps you work faster." It ends at a different job.
Most people stall between stages 1 and 2 — collecting prompts instead of building a system. If you climb just one stage from wherever you are now, this course has paid for itself.
Quick reference
The 15 concepts in one line each
- These tools do the work, not just answer questions. (What they are) Give instructions, not questions.
- Plan mode. (Feature) Make AI show you its plan before it changes anything. (
Shift+Tabin Claude Code,Tabin OpenCode.) - Permissions. (Settings) AI asks before every action. Start by approving manually. Auto-approve safe actions later.
- Match the model to the task. (Model choice) Strong model to plan and reason; cheap or free model to execute. Switch with
/model(Claude Code) or/models(OpenCode). - Conversations get worse as they get longer. (Context) AI loses track of details and costs more. Keep conversations focused.
/clear= start fresh./compact= same task, less clutter. (Commands) Do not mix them up.- Resume old conversations. (Commands) Come back tomorrow and continue where you stopped. Save plans to files as backup.
- Rules file. (
CLAUDE.md/AGENTS.md) Keep it short. Only write what AI cannot figure out by looking at your files. Every mistake becomes one new line, and every line that stops earning its place gets deleted. - Commands and skills. (
.claude/skills/) One saved-prompt system: you invoke it with/name, or the model auto-invokes it from its description. - Hooks / Plugins. (
settings.json/.opencode/plugins/) Rules that run every time, no matter what. AI cannot skip them — and paired with the model, they form the verification loop: attempt → check → fix → repeat. - Subagents. (
.claude/agents/) Send a helper to do heavy reading so your main conversation stays clean. - MCP. (External connections) Connects AI to online services (Slack, GitHub, databases). Only add what you actually need.
- Where to run. (Terminal / IDE / Web) Start in the terminal or an IDE plugin so you can see what AI is doing.
- Personal library. (
~/.claude//~/.config/opencode/) Share your rules and skills across projects. Build it slowly from real problems. - Memory. (
notes/folder) Resuming conversations and a good rules file is enough for most people. Add anotes/folder if you need more.
Command quick-ref
| Want to... | Claude Code | OpenCode |
|---|---|---|
| Initialize project rules file | /init | /init |
| Enter plan mode | Shift+Tab (twice) | Tab (cycle to Plan agent) |
| Switch the model | /model | /models |
| Wipe conversation, start fresh | /clear | /new (or /clear) |
| Summarize and continue | /compact | /compact (or /summarize) |
| Resume a saved session | claude --resume | /sessions (or /resume) |
| Jump back to a previous message | Esc Esc (or /rewind) | /undo |
| Roll back the model's file edits | Esc Esc (checkpointing) | /undo (needs git) |
| Roll back bash-command file changes | (not tracked) | /undo (whole-tree diff) |
Redo (reverse the last /undo) | (not bundled) | /redo |
| Export or share the conversation | /export (saves a transcript) | /share (public link) or /export |
| Review and trim your rules file and skills | /doctor | (no equivalent) |
File location quick-ref
| What | Claude Code | OpenCode |
|---|---|---|
| Project rules | CLAUDE.md | AGENTS.md (also reads CLAUDE.md as fallback) |
| Project permissions | .claude/settings.json | opencode.json |
| Project commands | .claude/commands/*.md | .opencode/commands/*.md |
| Project skills | .claude/skills/<name>/SKILL.md | .opencode/skills/<name>/SKILL.md (also reads .claude/skills/) |
| Project hooks/plugins | .claude/settings.json (hooks block) | .opencode/plugins/*.{js,ts} |
| Project subagents | .claude/agents/*.md | .opencode/agents/*.md |
| Personal/global rules | ~/.claude/CLAUDE.md | ~/.config/opencode/AGENTS.md |
| Personal commands/skills/agents | ~/.claude/{commands,skills,agents}/ | ~/.config/opencode/{commands,skills,agents}/ |
| MCP servers | .mcp.json (project) / ~/.claude.json (personal) | opencode.json (mcp block) |
Extension type decision tree
Need to do the same thing repeatedly, manually?
    → Slash command (CC) / Custom command (OC)

Want the model to apply expertise automatically when a task matches?
    → Skill

Need something to happen every single time, no model judgment?
    → Hook (CC) / Plugin (OC)

Need the model to iterate until the result is provably right?
    → Verification loop: task + a check the model can run itself

Need a chunk of work done in isolation so it doesn't pollute main context?
    → Subagent
When something feels wrong
Model apologizing without progress, rewriting the same code,
hallucinating variables, contradicting earlier constraints?
    → Context is poisoned. Stop typing. Run /compact or /clear.
       Don't try to fix it with another prompt.
Flashcards Study Aid
Quiz: 56 Questions on the 15 Concepts
Test what you learned. Each session shows a fresh set of 18 questions, so you get new questions every time you retake it.