Your First Git Repository
Git as Your Safety Net
When you ask Claude Code, Gemini CLI, or ChatGPT to generate code, you're taking a risk. Will the code work? Will it break your project? How do you experiment fearlessly?
This is where Git comes in.
Git isn't about memorizing commands. It's about creating save points in your project. Imagine playing a video game where you can save before every boss fight, then reload if you die. That's what Git does for your code.
In this lesson, you'll create your first Git repository by executing commands and observing what happens. You won't write code yet—just create a simple project and watch Git build a safety net around it.
By the end, you'll understand:
- How to initialize Git (create that save point system)
- How to tell Git which files to protect
- How to create your first save point (commit)
- Why this matters for AI-assisted development
Prerequisites: Installing Git
Before we begin, you need Git installed on your computer. Let's check if you already have it.
Check if Git is Installed
Open your terminal and run:
git --version
If you see something like:
git version 2.39.0
✅ You're ready! Skip to Phase 1 below.
If you see an error like command not found: git, follow the installation steps for your operating system:
Installing Git
- macOS
- Windows
- Linux
Option 1: Using Homebrew (recommended)
brew install git
Option 2: Install Xcode Command Line Tools (includes Git)
xcode-select --install
- Download Git from git-scm.com/download/win
- Run the installer
- Use default settings (just keep clicking "Next")
- Restart your terminal after installation
# Ubuntu/Debian
sudo apt update
sudo apt install git

# Fedora
sudo dnf install git

# Arch Linux
sudo pacman -S git
Verify Installation:
After installing, close and reopen your terminal, then run:
git --version
You should see a version number. Now you're ready!
Phase 1: Execute - Initialize Your First Repository
Let's create a simple project folder and tell Git to protect it.
Activity 1.1: Create a Project Folder
Open your terminal and create a new folder for your first project:
mkdir my-first-project
cd my-first-project
You've just created a folder called my-first-project and navigated into it. Right now, Git doesn't know about this folder yet.
Activity 1.2: Initialize Git
Tell Git to start protecting this folder:
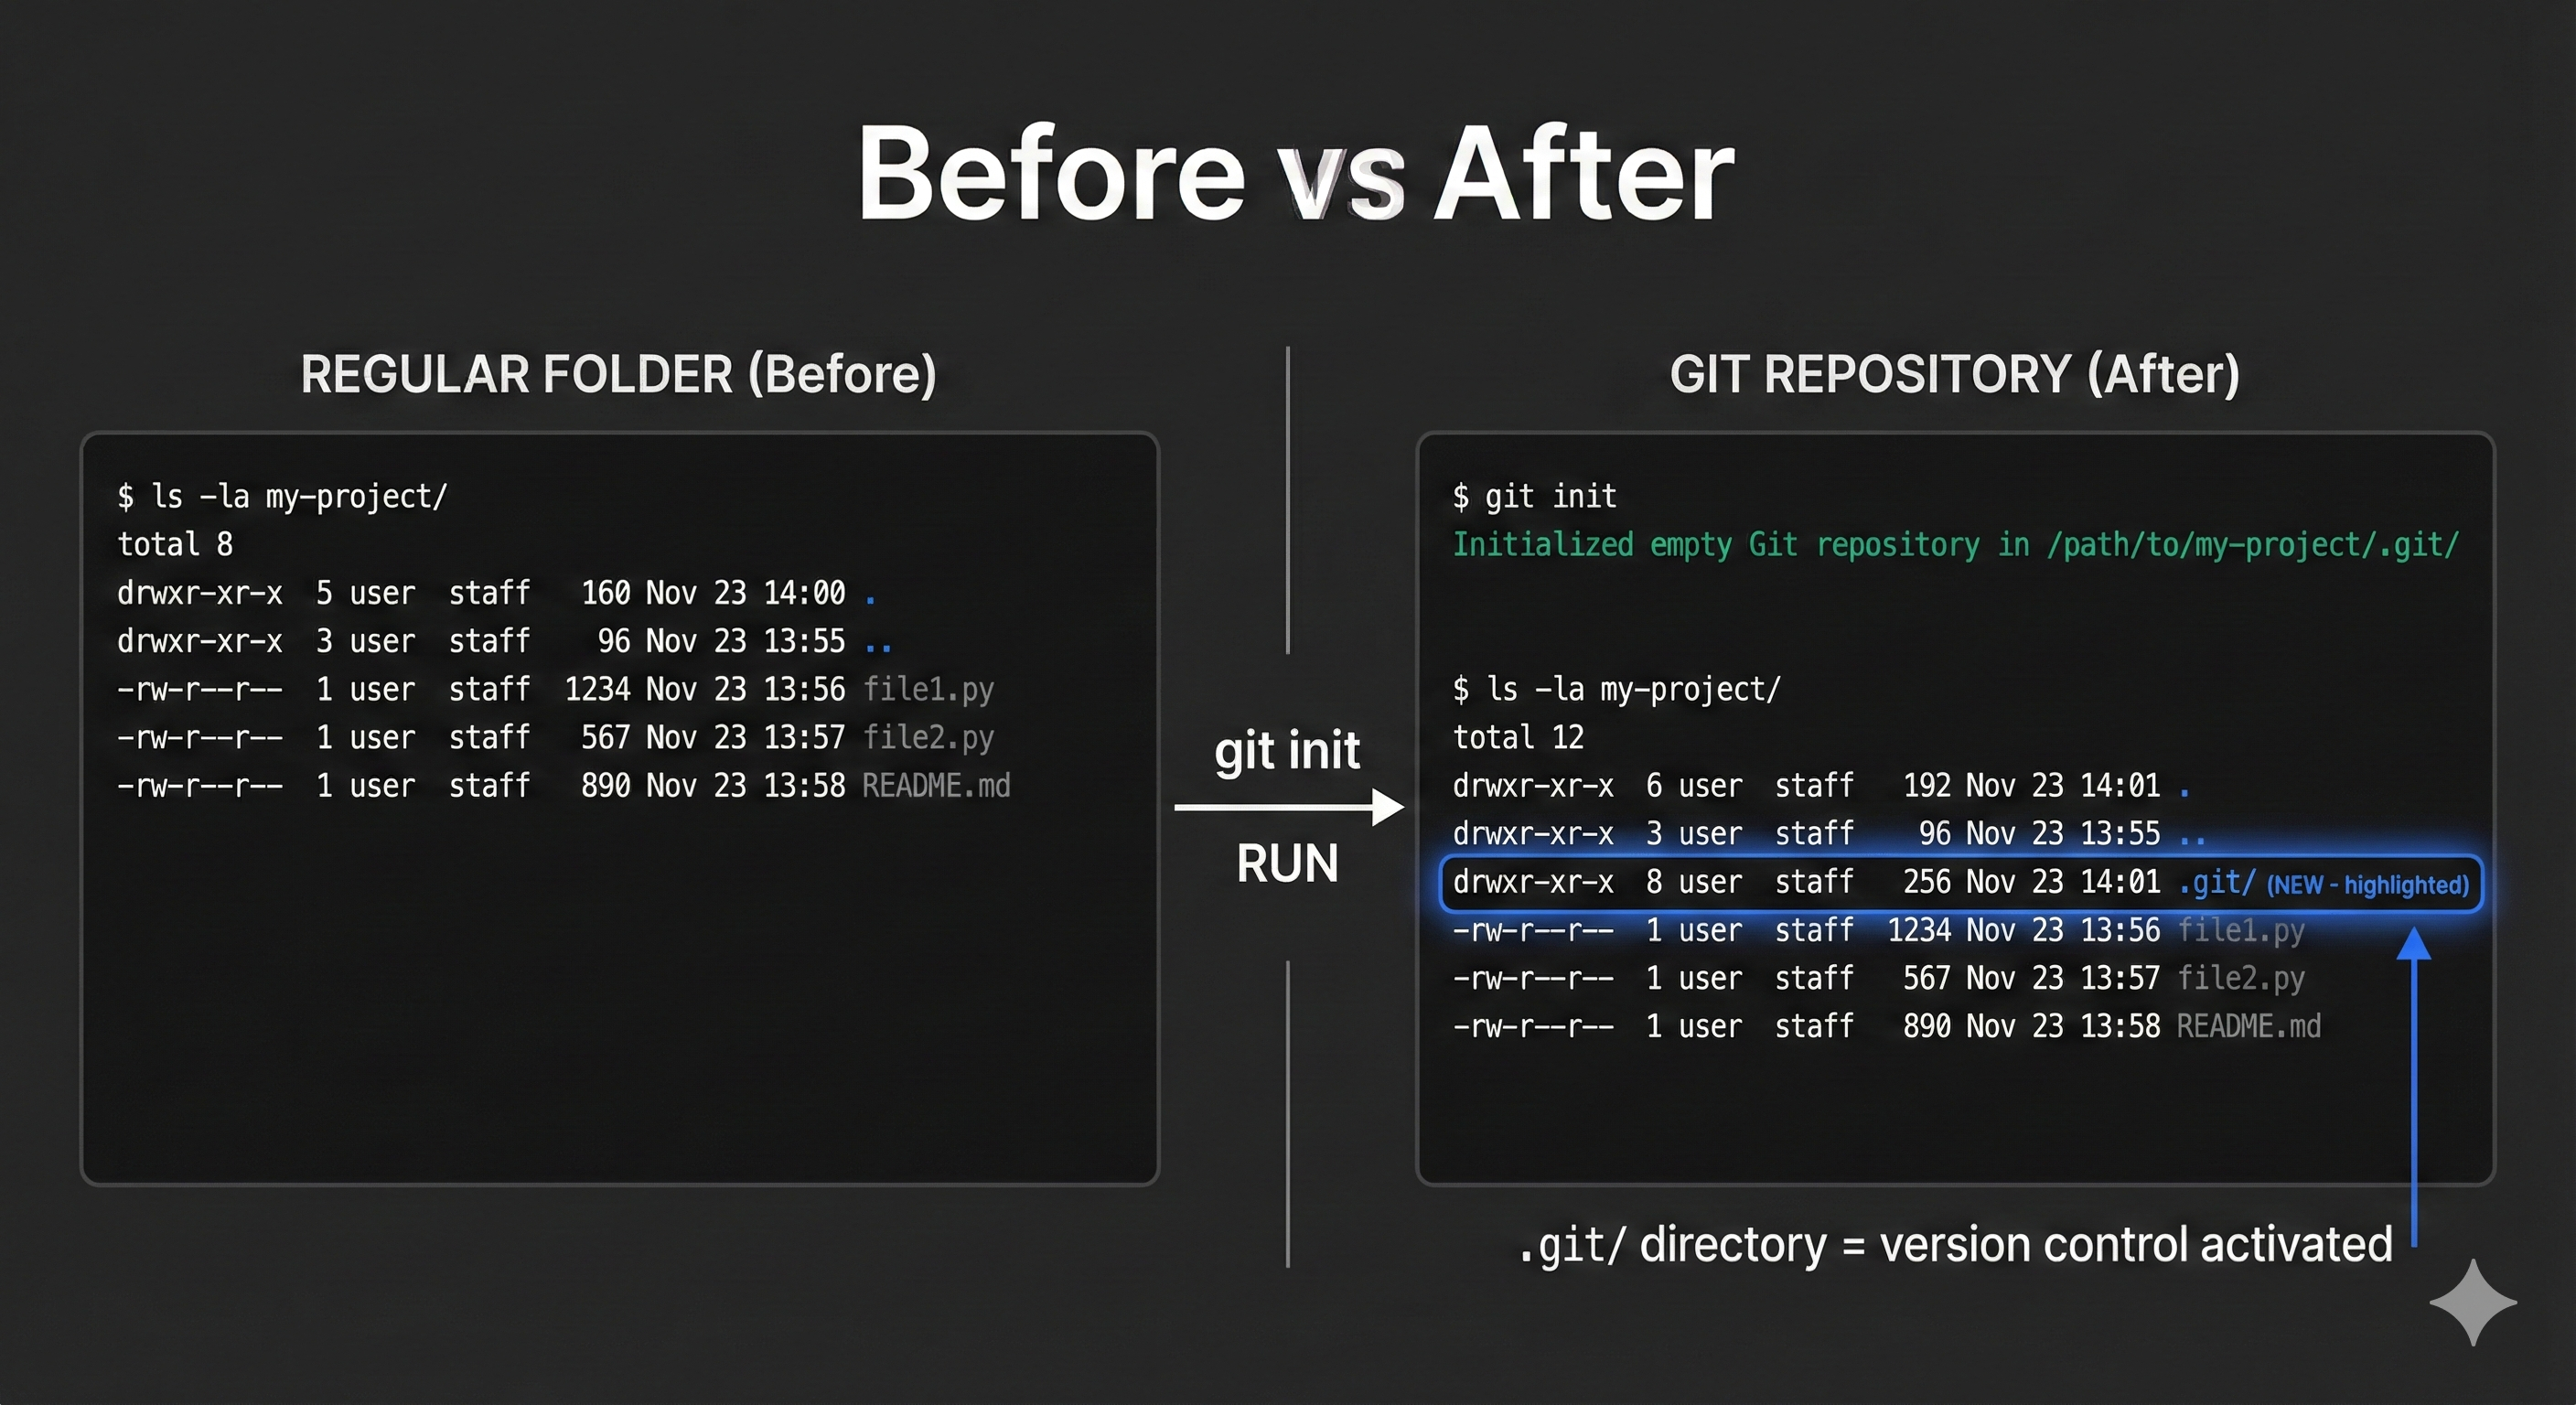
git init
What you should see:
Initialized empty Git repository in /Users/yourname/my-first-project/.git/
(The exact path will differ on your computer, but the message will be similar.)
What just happened? Git created a hidden folder called .git inside your project. This folder is Git's workspace—it will store your entire project history, save points, and metadata.
Observation Prompt
Look at your folder to see the hidden .git directory:
ls -la
What this command does:
ls= list files in current directory-l= show detailed information (permissions, size, date)-a= show all files, including hidden ones (those starting with.)
You should see:
total 0
drwxr-xr-x@  3 user   staff    96 Nov 17 14:48 .
drwxrwxrwt  39 root   wheel  1248 Nov 17 14:48 ..
drwxr-xr-x@  9 user   wheel   288 Nov 17 14:48 .git
💬 AI Colearning Prompt
"Explain what the
.gitdirectory contains and how Git uses it to track changes."
Discovery Question: "What does the .git folder represent?"
Answer: It's Git's repository database. Everything Git tracks—your entire project history—lives in that folder. Delete .git and you lose all your save points. Keep it safe.
Phase 2: Observe - Understand What Git Sees
Now let's create some project files and see how Git views them.
Activity 2.1: Create Sample Files
In your project folder, create two simple text files:
echo "Hello, World! This is my first project." > hello.txt
echo "My First Project - Experimenting with AI" > README.md
What these commands do:
echo= print text to the screen (or in this case, into a file)>= redirect the text into a new file (creates the file if it doesn't exist)hello.txtandREADME.md= the filenames we're creating
Result: You've created two files with text inside them. Git doesn't know about them yet.
Activity 2.2: Check Git Status
Ask Git what it sees in your project:
git status
You should see:
On branch main

No commits yet

Untracked files:
  (use "git add <file>..." to include in what will be committed)
        README.md
        hello.txt

nothing added to commit but untracked files present (use "git add" to track)
Breaking Down This Output:
| Section | What It Means |
|---|---|
On branch main | You're on the default branch (starting point) |
No commits yet | You haven't created any save points yet |
Untracked files: | Git sees these files, but hasn't started protecting them |
README.md, hello.txt | The files Git found but isn't protecting |
🎓 Expert Insight
In AI-native development, you don't memorize Git status codes—you understand the concept of "tracking" as Git's commitment to protect files. AI can explain status output, but you need to recognize when files need protection.
Discovery Question: "What does 'untracked' mean?"
Answer: Git sees these files but hasn't committed to tracking them. They're like a visitor at a hotel—Git noticed them, but hasn't given them a room key yet.
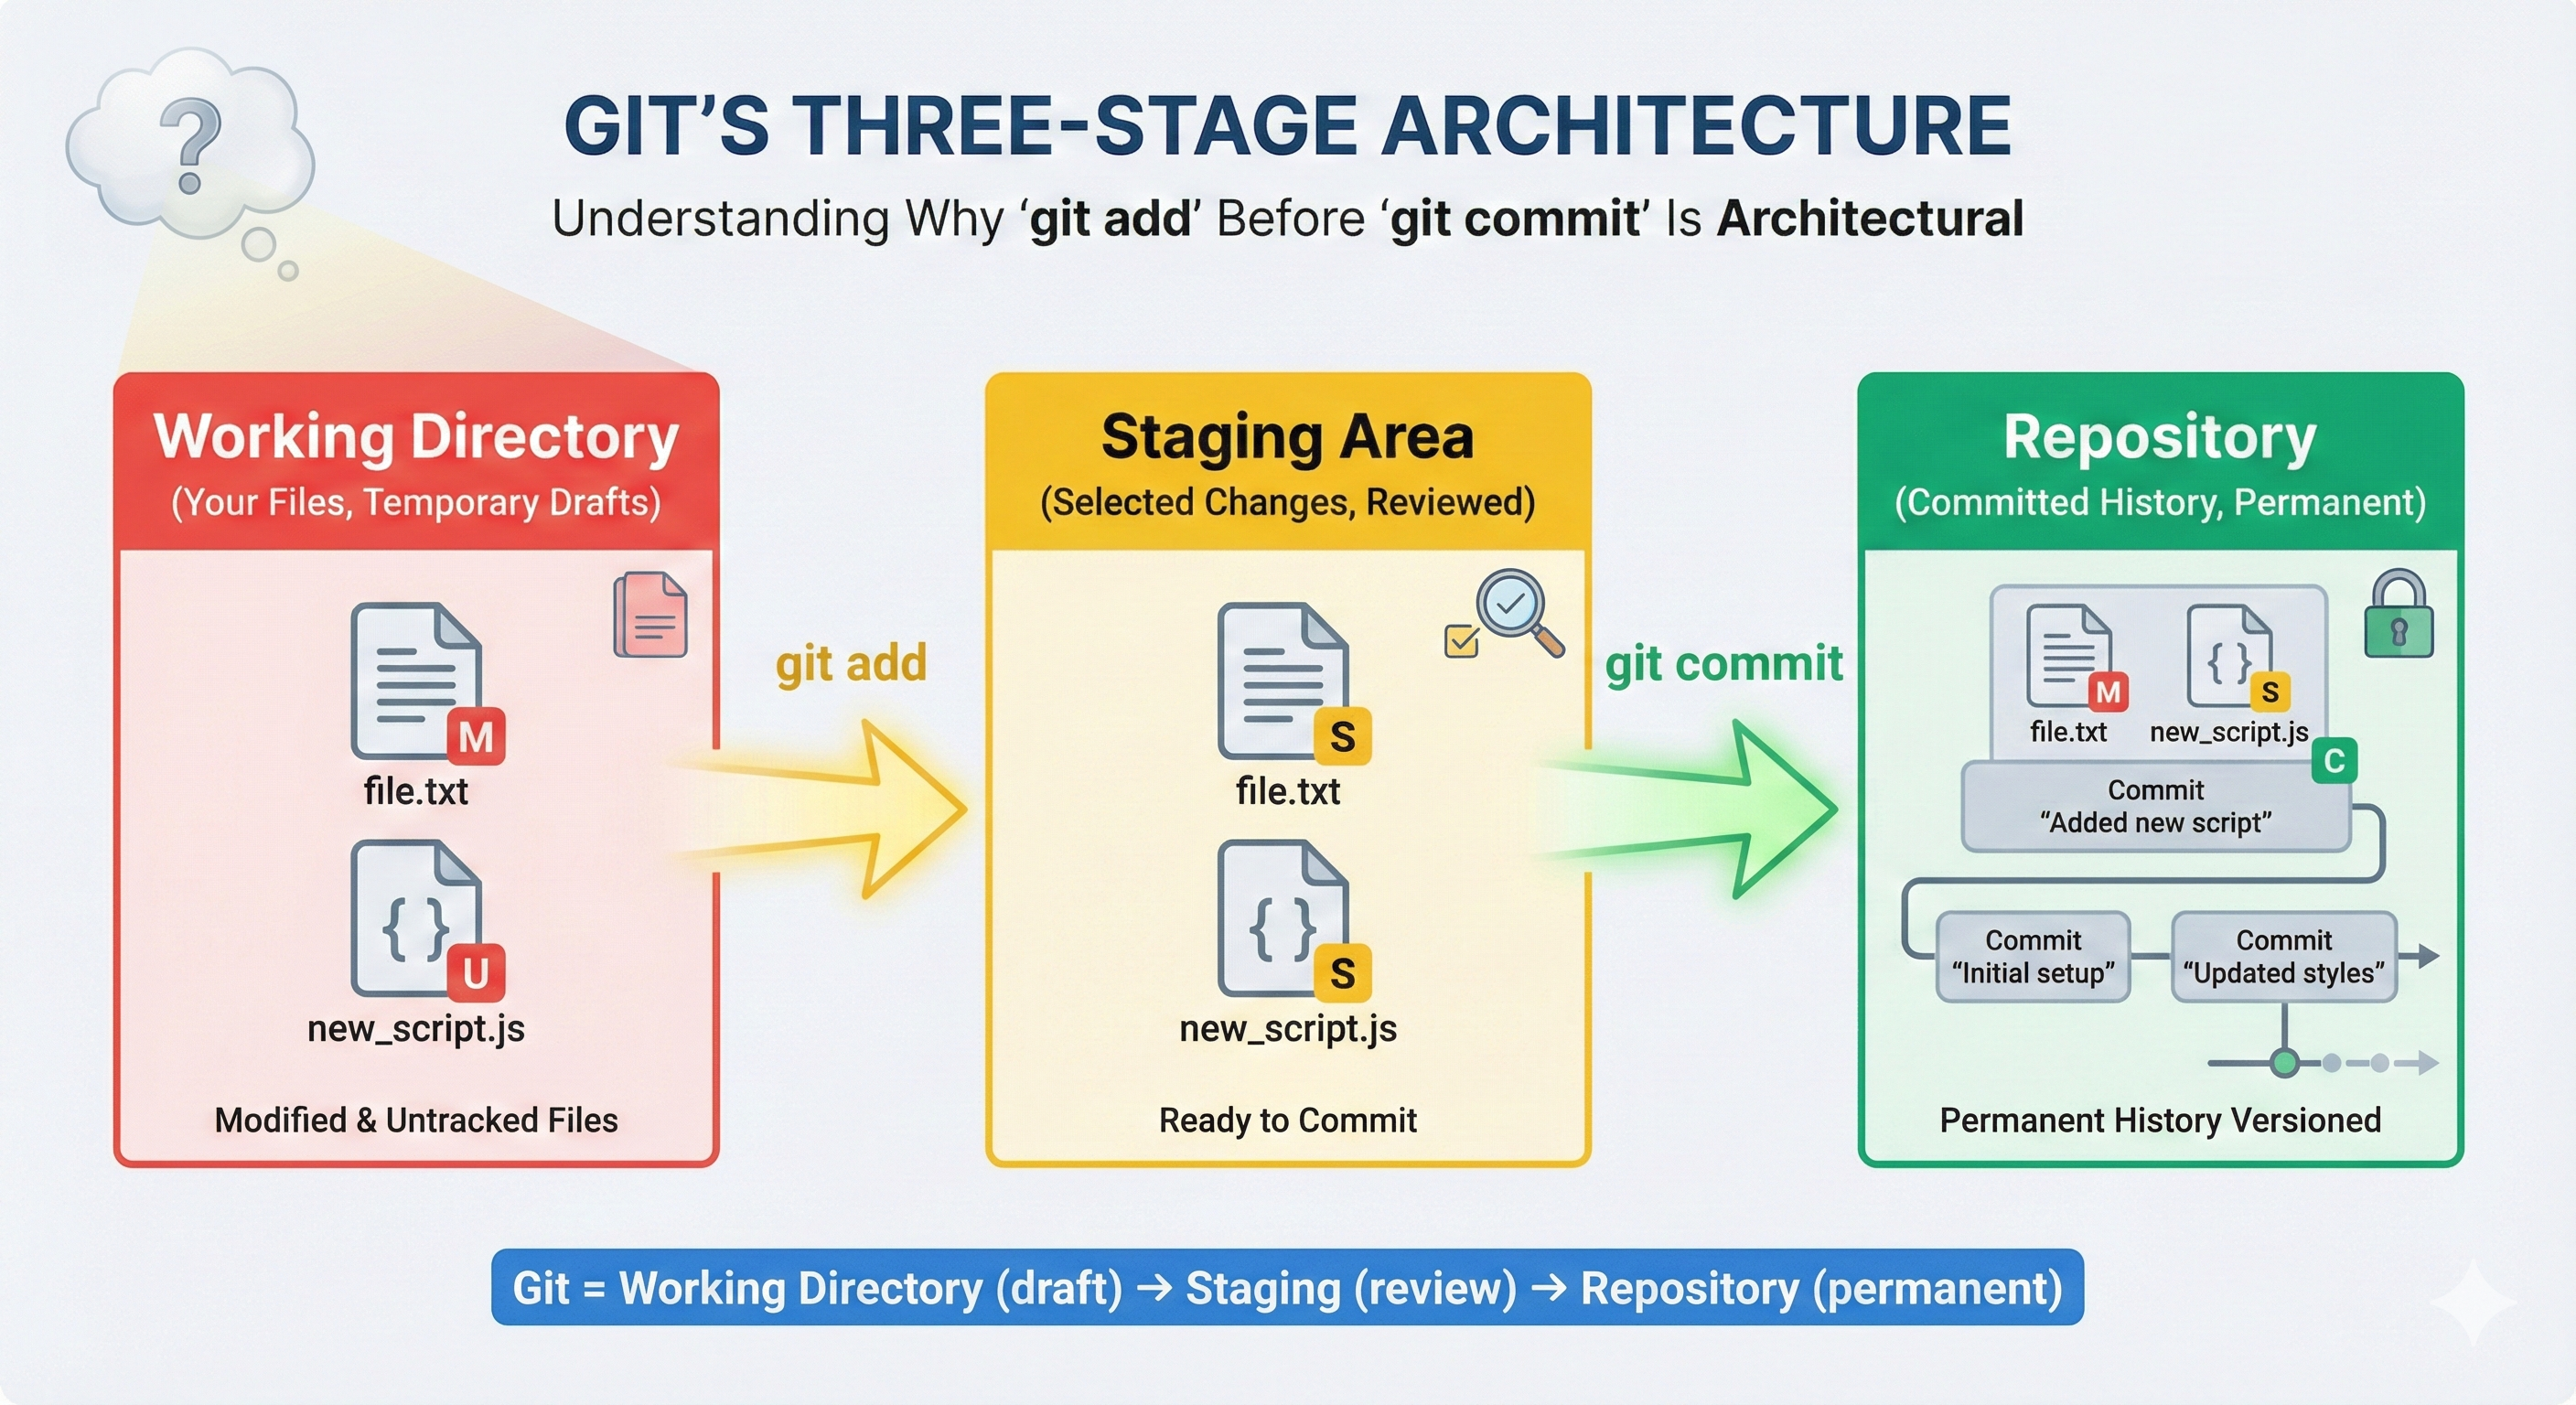
Phase 3: Understand - The Staging Area
Before creating a save point (commit), Git uses an intermediate zone called the staging area (sometimes called the "index"). Think of it as a checklist where you choose which files to include in your next save point.

Activity 3.1: Stage the First File
Tell Git to protect hello.txt:
git add hello.txt
No output means it worked. Now check status again:
git status
You should see:
On branch main

No commits yet

Changes to be committed:
  (use "git add <file>..." to include in what will be committed)
        new file:   hello.txt

Untracked files:
  (use "git add <file>..." to include in what will be committed)
        README.md
What Changed?
hello.txtmoved from "Untracked files" to "Changes to be committed" (shown in green)README.mdis still untracked
Discovery Question: "What does the green text mean?"
Answer: Green files are staged—they're ready to be included in your next save point. Red/untracked files aren't ready yet.
Activity 3.2: Stage the Second File
Add README.md to the staging area:
git add README.md
Check status again:
git status
You should see:
On branch main

No commits yet

Changes to be committed:
  (use "git add <file>..." to include in what will be committed)
        new file:   README.md
        new file:   hello.txt
🤝 Practice Exercise
Ask your AI: "Create a Git scenario where I have 3 files: one for production code, one for test data, and one with personal notes. Then explain which files I should stage and why selective staging matters."
Expected Outcome: You'll understand that staging gives you control over what gets committed, enabling you to separate production code from temporary files.
Discovery Question: "Why would you stage some files but not others?"
Answer: Imagine you have personal notes in notes.txt that you don't want on GitHub. You'd stage hello.txt and README.md but leave notes.txt unstaged. Staging gives you control over what's protected.
Phase 4: Apply - Create Your First Save Point
Now that both files are staged, you're ready to create your first save point.
Activity 4.1: Create First Commit
Create your first save point with a meaningful message:
git config user.name "Your Name"
git config user.email "your.email@example.com"
git commit -m "Initial commit: first project files"
(Replace "Your Name" and "your.email@example.com" with your actual details.)
You should see:
[main (root-commit) 00b5fe3] Initial commit: first project files
 2 files changed, 2 insertions(+)
 create mode 100644 README.md
 create mode 100644 hello.txt
What happened:
- ✅ Created your first save point (commit) on the
mainbranch - ✅ Git assigned it a unique ID:
00b5fe3 - ✅ Both files are now protected in this save point
Activity 4.2: Verify the Commit
Check your project's save point history:
git log
You should see:
commit 00b5fe326eb72875d854754e8cba6edf1ff3e5d6
Author: Your Name <your.email@example.com>
Date:   Mon Nov 17 14:48:46 2025 +0500

    Initial commit: first project files
Breaking Down the Log:
| Element | What It Shows |
|---|---|
commit 00b5fe32... | Unique identifier for this save point |
Author: Your Name | Who created this save point |
Date: | When the save point was created |
Initial commit:... | The message describing the save point |
Discovery Question: "What just happened?"
Answer: You created a save point. Git has taken a snapshot of your project at this moment. If you make mistakes later, you can return to this exact state.
Try With AI
Let's solidify your understanding of Git fundamentals by exploring what you just did.
💡 Understand Basic Commands:
"I just created my first Git repository and made my first commit. I ran:
git init,git add, andgit commit. Explain in simple terms what each command does and how they work together to track my project history."
🔍 Explore the Staging Area:
"I'm confused about the staging area concept. Why doesn't Git just commit everything automatically? Why do I need to run
git addfirst before committing? Give me a real-world analogy that makes this two-step process clear."
🎯 Practice Real Scenarios:
"I'm working on a project with multiple files. Help me understand when to commit: Should I commit after every file change? After completing a feature? How do I decide what's a 'good commit'? Give me 3 example scenarios with recommended commit strategies."
🚀 Apply to Your Project:
"I'm starting [describe your project]. Help me plan my Git workflow: How often should I commit? What should my commit messages say? How do I organize my changes into logical commits? Give me a beginner-friendly workflow I can follow from day one."
Expected Outcome: ChatGPT should explain that staging lets you choose which files go in each commit, enabling more control and better organization of your project history.
Prompt 3 (Connect to AI Safety):
How does creating commits help me when I'm working with AI-generated code?
Expected Outcome: ChatGPT should mention:
- Commits create save points before risky changes
- You can revert if AI-generated code breaks things
- Multiple commits allow you to experiment safely