Connector-Native Apps: ایک Remote MCP Server جس کا customer ایک AI ہے
14 Concepts · پڑھنے کے لیے تقریباً 90-120 منٹ · build کے لیے ایک focused دن (اگر آپ strong dev ہیں تو 4-6 گھنٹے) · minimal base سے live connector تک جسے کوئی بھی AI اٹھا کر free میں use کر سکے
تیس سال تک ہم نے software انسانوں کے لیے بنایا۔ Screens دیکھنے کے لیے، buttons دبانے کے لیے، forms بھرنے کے لیے۔ شیشے کے دوسری طرف customer ہمیشہ انسان ہوتا تھا۔
اب room میں صرف یہی customer نہیں۔ اس course میں آپ ایسا product build کرتے ہیں جس کا user ایک AI ہے۔
Connector وہ add-on ہے جو کوئی شخص اپنے AI میں drop کرتا ہے تاکہ وہ باہر کی app تک پہنچ سکے؛ وہ آپ کا connector ایک بار paste کرتا ہے، ایک URL، ایک click۔ یہ آخری بار ہے جب انسان اسے direct touch کرتا ہے۔ اس کے بعد AI آپ کا user ہے: یہ آپ کے tools کے نام پڑھتا ہے، خود decide کرتا ہے کون سا call کرنا ہے، inputs آپ کو دیتا ہے، اور result انسان کو واپس سمجھاتا ہے۔ آپ shop window نہیں سجا رہے جسے shopper browse کرے۔ آپ labeled tools کا pegboard لگا رہے ہیں جس تک tireless worker خود آتا ہے اور turn after turn use کرتا ہے۔ آج عموماً اس chat میں انسان بیٹھا ہوتا ہے۔ بڑھتے ہوئے cases میں جو چیز آپ کا connector ڈھونڈے گی، sign in کرے گی، اور schedule پر call کرے گی وہ ایک اور agent ہو گا، بیچ میں کوئی human turn نہیں۔ آپ اسی customer کے لیے build کر رہے ہیں۔
پہلا لفظ جو اس پورے course میں چلتا ہے: server۔ Server وہ computer ہے جو fixed address پر ہر وقت on رہتا ہے، دوسرے computers کے سوال کا انتظار کرتا ہے، اور جب وہ پوچھیں تو جواب دیتا ہے۔ آپ کے phone کی ہر app کسی نہ کسی server سے بات کر رہی ہوتی ہے۔ اسے shop کے front counter کی طرح سوچیں: fixed جگہ پر ہمیشہ open، خود کچھ نہیں کرتا، مگر جیسے ہی customer آئے ایک job کرتا ہے اور result واپس دیتا ہے۔ یہی آپ کا server ہے۔ MCP server server کی ایک خاص قسم ہے: ایسا server جو MCP follow کرتا ہے، ایک shared standard، AI کے لیے USB port کی طرح، ایک plug جس میں ہر assistant fit ہو، تاکہ کوئی بھی AI custom wiring کے بغیر اس کی offered چیزیں use کر سکے۔
آپ end to end ایک real product build کریں گے:
- remote MCP server: وہ front counter، public web address پر رکھا ہوا (یہی "remote" کا مطلب ہے) تاکہ internet پر کوئی بھی AI اس تک پہنچ سکے۔ اس میں tools کے تین groups ہوں گے۔
- two-table memory: دو چھوٹی lists جو آپ کی app رکھتی ہے، تاکہ AI ہر conversation میں blank start کرنے کے بجائے person کو یاد رکھے۔
- real sign-in (OAuth)، تاکہ server login ہی سے جان لے کہ کس کا data hold کر رہا ہے، AI سے کبھی guarantee نہ مانگے۔
- session contract: ایک tool جو AI سب سے پہلے call کرتا ہے، آپ کی app کے rules دیتا ہے، پھر باقی ہر tool کو اس key کے پیچھے lock کرتا ہے جو وہ first call issue کرتی ہے۔
- پوری چیز ایک pasted URL اور ایک click سے add ہوتی ہے، person کے اپنے free model پر چلتی ہے، اس لیے serve کرنے کی model cost آپ کی نہیں۔
آپ یہ سب ایک بھی agent loop لکھنے سے پہلے ship کرتے ہیں۔ اسے پہلے رکھنے کا point یہی ہے: آپ agent itself build کرنے سے پہلے وہ چیز build کرنا سیکھتے ہیں جسے agent call کرتا ہے۔
جو rule آگے ہر hard part سمجھاتا ہے وہ سیدھا اس بات سے آتا ہے کہ آپ کا customer کون ہے: server آپ own کرتے ہیں، مگر جو mind اسے call کرتا ہے وہ نہیں۔ Intelligence AI کی host app میں رہتی ہے۔ Loop جو decide کرتا ہے کہ next کیا کرنا ہے، وہ بھی وہیں رہتا ہے۔ آپ کا server صرف تب جواب دیتا ہے جب اسے call کیا جائے، اور caller ایک ایسا mind ہے جو guess کر کے reason کرتا ہے: fast، capable، مگر confuse ہو سکتا ہے، کسی بات پر قائل ہو سکتا ہے، یا simply wrong ہو سکتا ہے۔ اس لیے اس course کا ہر difficult part ایک ہی shape رکھتا ہے: آپ کا server وہ job کرتا ہے جس پر AI کو خود trust نہیں کیا جا سکتا۔
اس سے چار non-negotiables نکلتے ہیں۔ پورا course یہی چار build کرتا ہے:
- One gateway۔ AI آپ سے ایک connector پر ملتا ہے، جس کے پیچھے tools ناموں سے grouped ہیں: ایک front door، ایک menu جو وہ پڑھتا ہے۔ Free account صرف ایک custom connector add کر سکتا ہے، اس لیے "one" preference نہیں hard limit ہے۔
- Tools only۔ آپ AI سے callable tools کے ذریعے بات کرتے ہیں، ایسے functions جنہیں وہ اپنی reasoning کے بیچ invoke کر سکتا ہے؛ resources یا prompts کے ذریعے نہیں جنہیں انسان کو ہاتھ سے pick کرنا پڑے۔
- Prove, don't trust۔ آپ کا customer ایک mind ہے جو نیت خراب نہ ہونے کے باوجود wrong person's identity دے سکتا ہے۔ اس لیے identity verified sign-in سے آتی ہے، AI کی کسی بات سے نہیں، جیسے hotel desk check-in پر دکھائے گئے passport سے mail دیتا ہے، کسی کے کہنے سے نہیں کہ کون سا room اس کا ہے۔
- Fail closed۔ جب آپ کا server missing یا broken ہو، AI خاموش نہیں ہوتا۔ وہ improvise کرتا ہے، answer invent کرتا ہے، اور person کا saved data گھڑ لیتا ہے۔ آپ کے server کو اسے روک کر صاف کہنا ہوگا، جیسے ATM جو bank تک نہ پہنچ سکے temporarily unavailable دکھاتا ہے، balance guess کر کے cash نہیں دیتا۔

ان میں سے دو چیزیں اس shape کو بیان کرتی ہیں جو آپ build کرتے ہیں (one gateway، tools only)۔ باقی دو وہ jobs ہیں جو server کو کرنے ہیں کیونکہ AI پر trust نہیں کیا جا سکتا (prove identity، fail closed)۔ ہر Concept پڑھتے وقت پوچھیں: یہ کون سا invariant ہے؟
Prerequisites۔ یہ page چار چیزیں assume کرتا ہے۔
- آپ typed Python پڑھ سکتے ہیں، direct یا code block کو coding agent میں paste کر کے plain-English read-back لے سکتے ہیں۔ اگر ابھی یہ بھی نہیں، پہلے Python in the AI Era کریں۔
- آپ نے Agentic Coding Crash Course کیا ہے۔ آپ Claude Code یا OpenCode کو plan mode میں rules file کے ساتھ drive کرتے ہیں۔ یہاں ہم اسی workbench through build کرتے ہیں۔
- آپ نے connector کو باہر سے use کیا ہے، Skills & Connectors course میں۔ آپ نے ایک connector on کیا اور دیکھا AI آپ کی Drive میں reach کرتا ہے۔ یہ course آپ کو inside پر flip کرتا ہے: اب آپ وہ چیز ہیں جس تک AI reach کرتا ہے۔
- آپ کو پہلے Build AI Agents کی ضرورت نہیں۔ یہاں آپ وہ server build کرتے ہیں جسے agent call کرتا ہے، agent نہیں۔ وہ course path میں بعد میں آتا ہے، اور یہی course وجہ ہے کہ آپ اسے چاہیں گے۔
آپ کو اپنی API key نہیں چاہیے: model person لاتا ہے۔ جن accounts کی ضرورت ہے وہ free-tier ہیں اور point of need پر ہی کھلتے ہیں: جب state پہلی بار store کریں گے تو Neon database (Concept 5، no card)۔ پھر Concept 12 آپ کے connector کو free tunnel کے ذریعے claude.ai میں live چلاتا ہے، host، card، یا sign-in account کے بغیر۔ Sign-in half پورے راستے bundled local mock پر چلتا ہے، اس لیے build، test، یا demo کے لیے sign-in account کبھی نہیں بنانا پڑتا۔
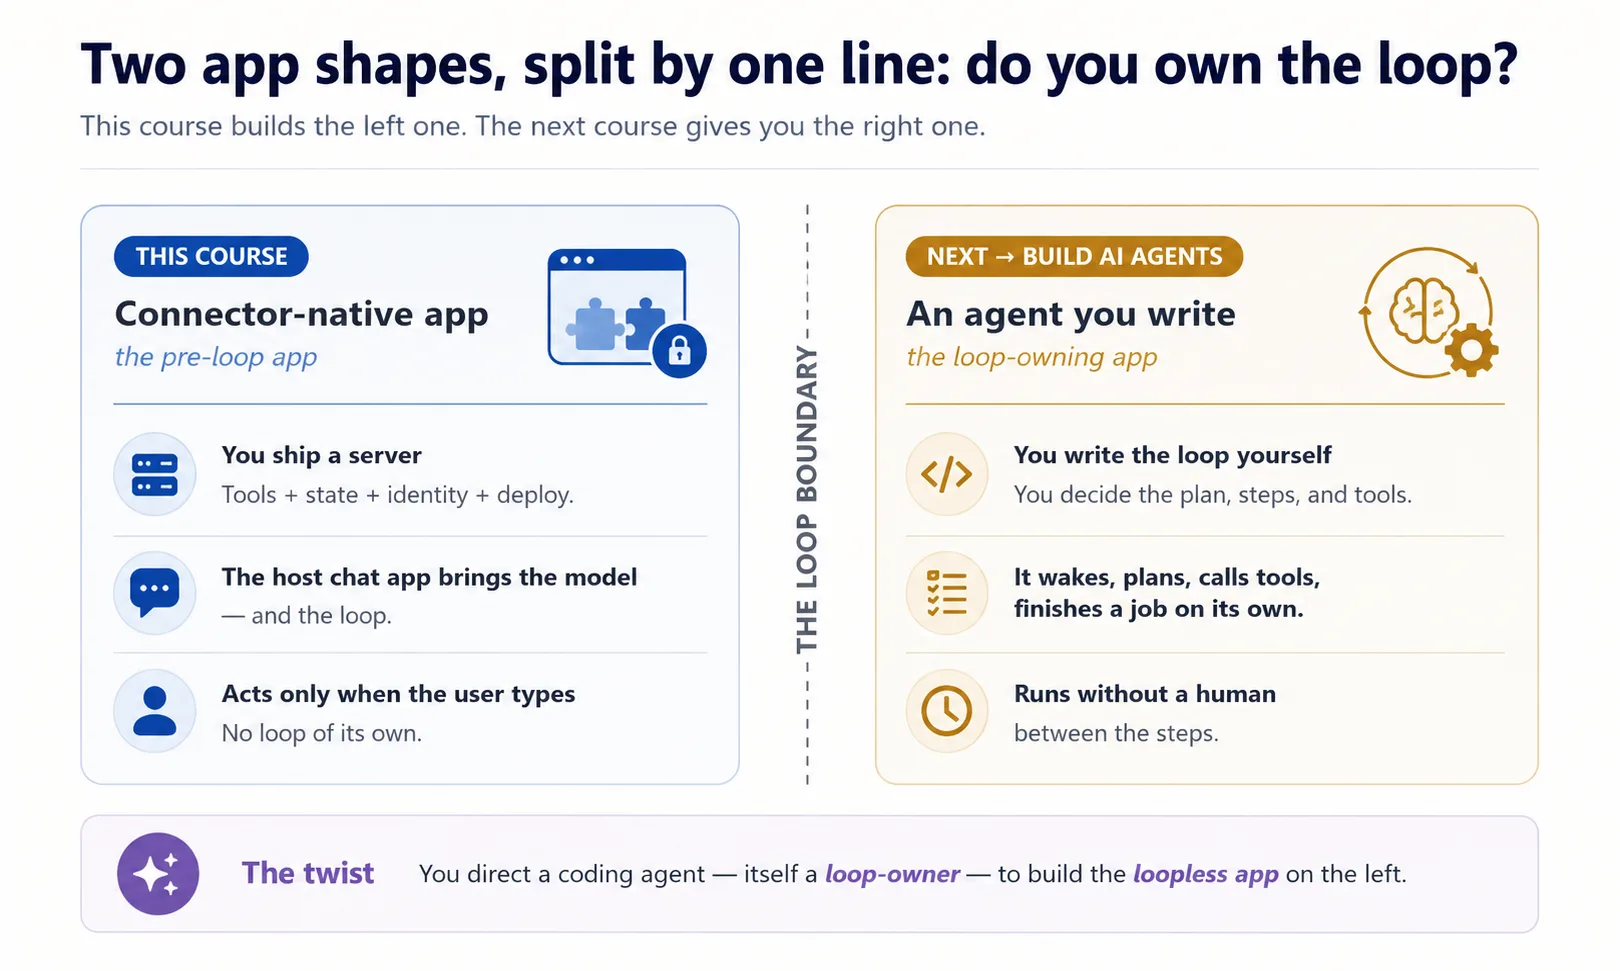
یہ کہاں fit ہوتا ہے۔ Mode 2 کا پہلا build course۔ یہاں سے Manufacturing path چلتا ہے: یہ course → Plugins for AI Agents → AI Identity → Build AI Agents۔ یہ pre-loop app ہے: tools، state، identity، اور claude.ai میں live run، caller کے model کے سوچنے کے ساتھ۔ Build AI Agents path میں بعد میں وہ جگہ ہے جہاں loop آپ own کرتے ہیں۔
📚 Teaching Aid
View Full Presentation — Connector-Native Apps
اس course میں آپ build کیسے کرتے ہیں
آپ یہ server ہاتھ سے نہیں لکھتے۔ Manufacturing track کے ہر course کی طرح، code آپ کا coding agent لکھتا ہے؛ آپ کا کام input میں spec اور output میں verification ہے۔ آپ plan کرتے ہیں، review کرتے ہیں، run کرتے ہیں، check کرتے ہیں۔ یہاں یہ loop convenience نہیں۔ یہی Concept 1 ہے۔
Build coding course کی ایک move کو full size پر follow کرتا ہے: plan → review → checkpoints میں execute → verify۔ آپ whole gateway ایک بار plan کرتے ہیں، اسے چار invariants کے against review کرتے ہیں، پھر ایک small base کے اوپر one observable slice at a time build کرتے ہیں، ایسا base جو صرف وہ parts ship کرتا ہے جنہیں آپ کو generate کرنے کے بجائے read کرنا چاہیے۔
Base ready کریں (چند منٹ)
- Base download کریں (
connector-native-apps-base.zip)، unzip کریں، اور folder میںcdکریں۔ - Claude Code یا OpenCode اسی folder میں کھولیں۔ یہ
AGENTS.mdauto-load کرتا ہے: brief جو agent کو چار invariants پر hold کرتا ہے اور prep کا طریقہ بتاتا ہے۔
Box میں کیا ہے۔ یہ minimal base ہے، finished app نہیں۔ صرف security-critical core complete ship ہوتا ہے، کیونکہ agent authorization code ایسا لکھ سکتا ہے جو صحیح لگے مگر quietly wrong ہو؛ اس لیے وہ part آپ read کرتے ہیں، generate نہیں۔ باقی سب آپ course کے ساتھ build کرتے ہیں۔
connector-native-apps/
  AGENTS.md                  the agent's brief: base prep, the four invariants, the build order
  CLAUDE.md                  one line, @AGENTS.md, so Claude Code loads that same brief
  .mcp.json  opencode.json   Neon + Context7 MCP servers, pre-declared (authorize once in browser)
  pyproject.toml             a uv project; only the deps the given code needs (your agent adds the rest)
  .env.example               copy to .env; the user brings the model, so no API key of your own
  src/connector_app/
    auth.py                  GIVEN, complete: the security check that proves who is signed in (you read it in Concept 7, never rewrite it)
    session.py               GIVEN, complete: the lock the rest of your tools sit behind (you wire it in Concept 10)
  mock_auth/server.py        GIVEN: a local sign-in service, so you can test the whole flow without creating any account
  seed/articles.json         a tiny catalog for your domain
  tests/test_starter.py      five offline smoke tests over the security core
GIVEN marked دو files (auth.py, session.py) آپ read اور wire کرتے ہیں، rewrite کبھی نہیں۔ باقی gateway (server.py)، two-table store (db.py)، اور rules/persona (config_store.py) آپ کا agent concept by concept آپ کے ساتھ build کرتا ہے۔
Base کو تین short asks میں prep کریں، جیسے نئی teammate کو onboard کرتے ہیں: پہلے دیکھیں اسے کیا معلوم ہے، پھر setup کروائیں، پھر project سمجھوا کر prove کروائیں کہ healthy ہے۔ ایک وقت میں ایک paste کریں۔
1. دیکھیں اسے کیا معلوم ہے (یہ بھی check ہے کہ open ہوتے وقت اس نے brief read کیا):
What can you do for me?
اچھا answer اسی project کو describe کرے گا: connector-native app، اس کے four invariants، اور یہ کہ وہ آپ کو اسے concept by concept build کرنے میں کیسے help کرے گا۔ Generic "I'm a coding assistant" answer کا مطلب AGENTS.md load نہیں ہوا؛ agent کو base folder کے اندر open کریں۔
2. Environment setup کریں:
Set up my base environment for this project, and install anything that's missing, including Python and uv.
Watch for: agent confirm کرتا ہے کہ آپ Python 3.14+ اور uv پر ہیں (missing ہو تو install کرتا ہے)، dependencies اور mcp-builder/neon-postgres skills install کرتا ہے، اور generated SESSION_SIGNING_SECRET کے ساتھ .env بناتا ہے۔ Context7 keyless ہے اور خود connect ہوتا ہے؛ Neon کے لیے یہ /mcp چلاتا ہے اور آپ سے browser میں ایک Authorize click مانگتا ہے (neon.com پر free، no API key، no card؛ ضرورت ہو تو account اسی screen پر بنا لیں)۔ پھر یہ آپ سے اسے restart کرنے کو کہتا ہے تاکہ newly installed skills load ہوں، اور واپس آ کر confirm کرتا ہے کہ Neon tools دکھ رہے ہیں۔
3. اسے سمجھیں، اور health check کریں (restart کے بعد):
Explain this project to me before I continue the crash course, then run its tests and share their status.
Done when: agent نے base کو plain language میں walk through کیا، پانچ security-core tests pass ہوئے، restart کے بعد Neon tools visible ہیں، اور .env exists۔ Neon tools نہ ہوں تو Neon authorize نہیں ہوا: browser authorize دوبارہ run کریں، یا /mcp type کر کے Neon pick کریں۔ اب build کریں۔
دو tracks، آپ کی choice۔ Beginner track bundled mock_auth/ service use کرتا ہے: local sign-in جو real tokens issue کرتا ہے، اس لیے sign-in half کو account نہیں چاہیے (آپ کا saved data پھر بھی free Neon database میں رہتا ہے)۔ Standard track real hosted sign-in service میں swap کرتا ہے، وہ production path جسے آپ AI Identity course میں wire کرتے ہیں۔ پہلے پوری چیز Beginner track پر build کریں، پھر .env میں تین values بدل کر switch کریں۔ ابھی service pick نہیں کرنی؛ Concept 8 options تب name کرتا ہے جب choice matter کرتی ہے۔
Part 1: Shape
یہ چار concepts mental model ہیں جس پر باقی page build ہوتا ہے۔ پہلے تین read-only ہیں؛ Concept 4 میں آپ whole build plan کرتے ہیں اور gateway scaffold کرتے ہیں۔
Concept 1: آپ direct کرتے ہیں، type نہیں کرتے
آپ یہ server ہاتھ سے نہیں لکھیں گے۔ آپ coding agent کو بتاتے ہیں کیا چاہیے، وہ code لکھتا ہے، اور آپ کا کام اسے read، run، check کرنا ہے۔ اگر آپ Python in the AI Era سے آئے ہیں تو rhythm جانتے ہیں: آپ direct کرتے ہیں، agent type کرتا ہے، آپ verify کرتے ہیں۔
Checking اصل skill ہے، اور ایک spot پر سب سے زیادہ چاہیے: Concept 8 کا sign-in code۔ Agent sign-in code ایسا لکھ سکتا ہے جو صحیح لگے مگر quietly wrong ہو، اور فرق پہچاننا یہی course آپ میں build کرتا ہے۔ Keystrokes agent کا کام ہیں؛ judgment آپ کا۔
یہ twist ذہن میں رکھیں، کیونکہ یہ واحد course ہے جہاں آپ دونوں program shapes ایک ساتھ دیکھتے ہیں۔ دو vacuums imagine کریں۔ Robot vacuum خود چلتا ہے: wake ہوتا ہے، house میں roam کرتا ہے، ہر move decide کرتا ہے، آپ اسے 2am پر بھی schedule کر سکتے ہیں۔ Hand vacuum صرف تب چلتا ہے جب آپ trigger دباتے ہیں؛ چھوڑیں تو رک جاتا ہے۔ جو coding agent یہ آپ کے لیے build کرتا ہے robot vacuum ہے: وہ خود چلتا رہتا ہے۔ جو connector آپ build کرتے ہیں hand vacuum ہے: user کے ہاتھ بڑھانے تک dead بیٹھا ہے۔ اس self-running quality کا نام ہے owning the loop: robot vacuum اپنا loop own کرتا ہے، connector کبھی نہیں۔ آپ loop-owning program کو drive کر رہے ہیں تاکہ وہ loopless app build کرے۔
Concept 2: نئی app shape
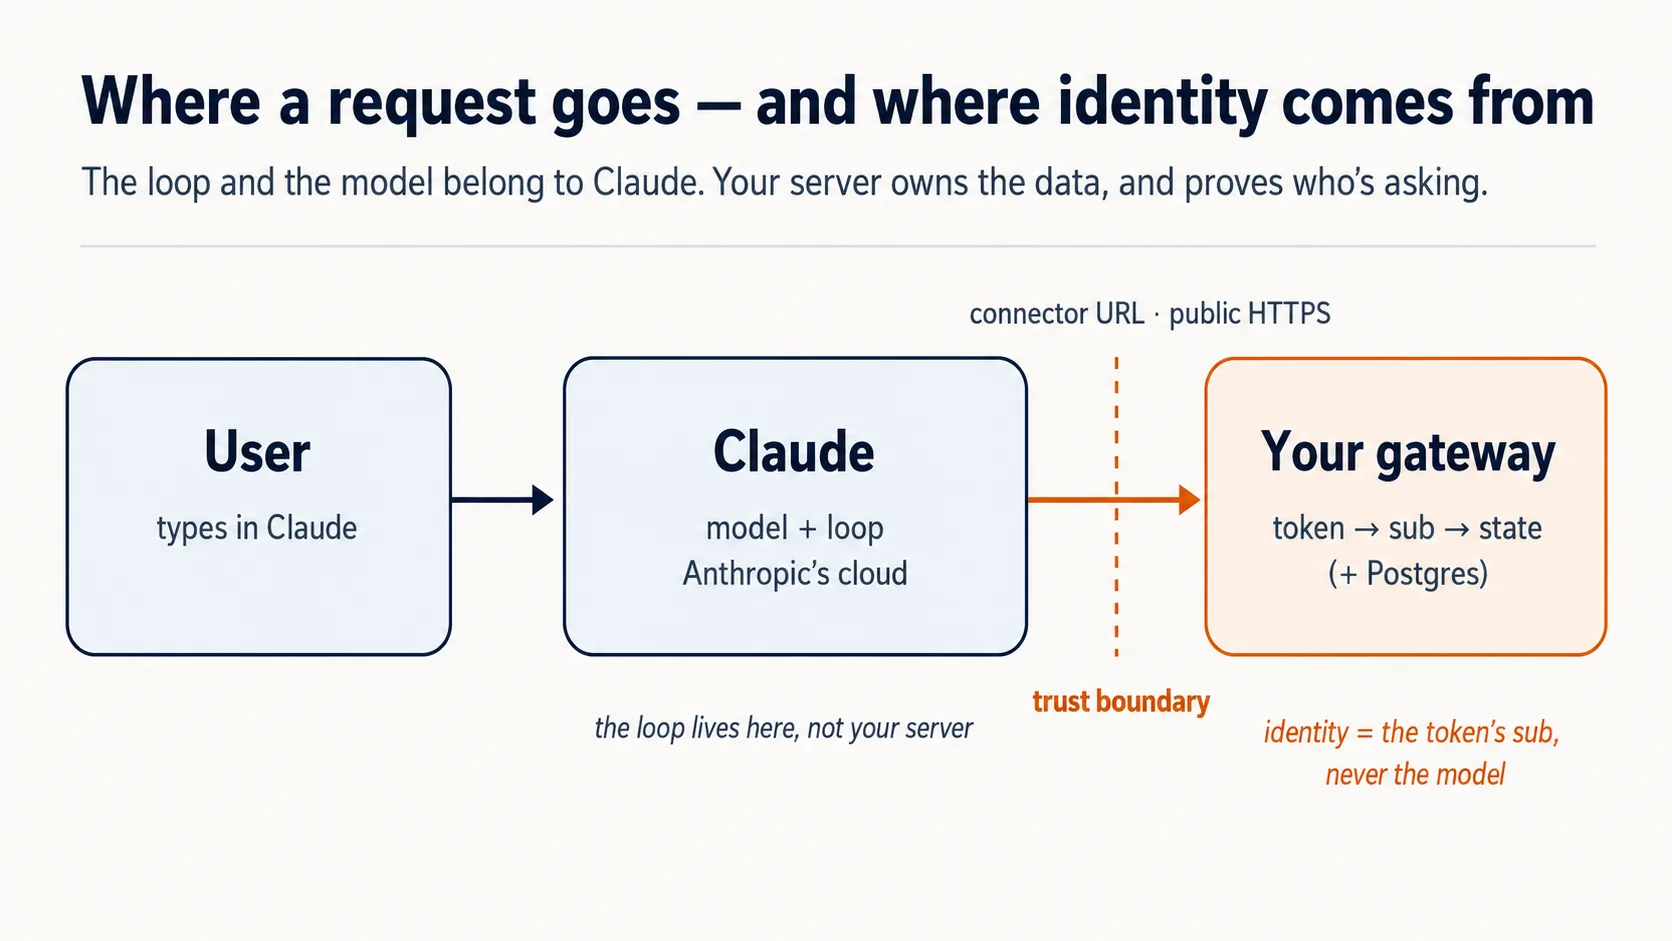
آپ connector کو outside سے use کر چکے ہیں، person کے طور پر اپنی apps میں reach کرتے ہوئے۔ اب اسے flip کریں: server آپ ہیں، caller AI ہے۔ Claude اپنے cloud سے آپ کو dial کرتا ہے۔ تین facts نکلتے ہیں، اور later ہر decision drive کرتے ہیں۔
Chat app runtime ہے، یعنی وہ engine جو اصل میں سب کچھ چلاتا ہے، اور یہ cloud میں رہتا ہے۔ جب user آپ کا connector add کرتا ہے، Claude آپ کے server تک Anthropic's cloud سے پہنچتا ہے، user کے laptop سے نہیں۔ اس لیے آپ کا server public internet پر HTTPS کے ذریعے reachable ہونا چاہیے۔ Claude دور سے reach کرتا ہے، اس لیے آپ کا counter public street پر real address کے ساتھ ہونا چاہیے: public web address۔ Laptop پر running server وہی counter ہے جو locked house کے اندر بنایا گیا ہے، perfectly real مگر street تک door نہیں؛ اسی لیے Part 5 اسے quick tunnel کے ذریعے public internet پر رکھتا ہے، afterthought نہیں۔
User model لاتا ہے۔ Intelligence کی cost آپ نہیں دیتے؛ user کا free Claude tier دیتا ہے۔ آپ کی costs small server اور database ہیں۔ یہی "free for anyone" کا economic trick ہے۔
یہ دو facts، cloud runtime جس تک آپ reachable ہوں، اور کسی اور کا model جو thinking کر رہا ہے، اسی لیے باقی course اس بارے میں ہے کہ آپ کے server کو کیا guarantee کرنا ہے۔ پہلی guarantee narrowest ہے: آپ کا server borrowed model سے بات کرنے کا صرف ایک allowed طریقہ رکھتا ہے۔ یہی اگلا Concept ہے۔
Concept 3: Tools only، resources نہیں، prompts نہیں
MCP server model کو تین چیزیں offer کر سکتا ہے: tools (functions جنہیں model inputs/outputs کے ساتھ call کرتا ہے)، resources (read-only data جس کی طرف user point کرتا ہے)، اور prompts (canned templates جو user pick کرتا ہے)۔ تینوں valid MCP surfaces ہیں۔ اس course کی product shape کے لیے ہم intentionally صرف tools expose کرتے ہیں۔ یہ design choice ہے، general rule نہیں کہ resources/prompts wrong ہیں۔
Tools اس shape میں کیوں fit ہیں: آپ کی app کو خود decide کرنا ہے کہ next کیا fetch یا do کرنا ہے، search، record pull، result save۔ Workshop imagine کریں۔ Tool worker کی belt پر cordless drill ہے: mid-job اٹھا لیا، asking نہیں۔ Resource locked cabinet میں manual ہے، useless جب تک کوئی اٹھا کر نہ دے۔ Prompt shelf پر form ہے جسے worker stop کر کے pick کرے۔ صرف drill work کو human-in-the-loop کے بغیر flowing رکھتی ہے؛ اسی لیے یہ app tools-only ہے: صرف tool model کی reasoning کے اندر automatically call ہو سکتا ہے، resources passive ہیں (user point کرے)، prompts hand-pick ہوتے ہیں۔ Tools وہ surface بھی ہیں جسے ہر chat app well support کرتی ہے، اس لیے tools پر build کرنا portable ہے۔
| MCP surface | Who triggers it | Can it be auto-called mid-reasoning? | Use it here? |
|---|---|---|---|
| Tool | The model, on its own | Yes | Yes — everything |
| Resource | The user points at it | No | No |
| Prompt | The user picks it | No | No |
Concept 4: One gateway، تین groups behind it (plan کریں، پھر scaffold کریں)
یہ Concept ہر چیز کی shape set کرتا ہے، اس لیے تھوڑا slow ہونا worth it ہے۔ پہلے وہ mess دیکھیں جس سے یہ بچاتا ہے۔
آپ کا server (opening کا front counter) کئی genuinely different jobs ایک ساتھ کرنے والا ہے۔ یہ چیزیں look up کرتا ہے۔ یہ یاد رکھتا ہے ہر person کون ہے اور اس نے کیا save کیا۔ یہ آپ کے behavior rules follow کرتا ہے۔ یہ سب ایک undifferentiated tools pile میں ڈال دیں تو دو چیزیں break ہوتی ہیں: AI جو menu پڑھ رہا ہے "fetch an article" tool اور "save this person's place" tool کا فرق نہیں جانتا، اور آپ کسی ایک part کے بارے میں reason نہیں کر سکتے۔ Fix software کی oldest move ہے: ہر job kind کو اپنا labeled group دیں۔
Connector-native app ہمیشہ same three kinds of job رکھتی ہے، اور Reading Room میں آپ تینوں کو نکلتا دیکھیں گے:
domain_*وہ ہے جو app actually کرتی ہے۔ Reading Room میں books: collection search، article fetch۔ یہی reason ہے app exists۔ بعد میں اپنی subject پر point کریں تو یہی part بدلتا ہے: shop کے orders، support کے tickets۔user_*کون یہاں ہے، اور آپ اس کے بارے میں کیا یاد رکھتے ہیں۔ Reader's library card، اور shelf جو اس نے last visit save کی۔ یہی app کو goldfish بننے سے بچاتا ہے جو leave کرتے ہی forget کر دے۔config_*app کو کیسے behave کرنا ہے۔ Librarian کے rules اور voice: وہ کیا کرے گی، کیا نہیں، کیسے بولے گی۔ Teaching persona ایک config ہے؛ support bot کی tone-and-escalation policy دوسری۔ Most apps کو some rules چاہیے؛ few کو full character۔
So domain work ہے، user person ہے، config behavior ہے: تین questions، تین groups۔ ہر name کا _ prefix (domain_search, user_save_state) grouping کو visible بناتا ہے، تاکہ AI کا menu one long list کے بجائے clean sections پڑھے۔ Tool names میں letters، digits، _، اور - ہی آ سکتے ہیں، dot نہیں، اس لیے underscore prefix ہی namespace ہے۔
پھر one server کیوں، three کیوں نہیں؟ Textbook way تین separate concerns کو three servers میں ship کرنا ہے۔ یہاں آپ نہیں کر سکتے (invariant 1): Claude Free plan پر user exactly one custom connector add کر سکتا ہے۔ Beginner سے three add کرائیں تو free product کو quietly paid plan پر دھکیل دیا۔ اس لیے تینوں groups کو one server کے اندر، one URL کے پیچھے رکھتے ہیں: single gateway۔ One front door، one menu with three sections، جیسے diner breakfast، lunch، dinner ایک card پر رکھتا ہے، تین cards نہیں دیتا۔ Names آپ کے ہیں؛ below صرف shape ہے:
domain_search      domain_get_item      domain_do_action
user_get_profile   user_save_state
config_get_rules   config_get_persona
آگے prompts میں ایک word آئے گا: MCP Python framework، FastMCP میں tool بس decorated function ہے۔ Function ایک labeled action ہے جو ایک job کرتا ہے؛ decorating اس پر name tag pin کرتا ہے تاکہ AI menu اسے list کرے۔ Agent یہ لکھتا ہے؛ آپ کو صرف word recognize کرنا ہے۔
Prompt 1: agent سے line of code سے پہلے whole thing plan کروائیں۔ یہ course کی سب سے important move ہے، اور code writing نہیں۔ آپ agent سے complete design پہلے words میں lay out کرواتے ہیں، تاکہ build سے پہلے چار invariants کے against check کر سکیں۔ Plan میں "identity comes from a tool argument" پکڑنا one sentence cost کرتا ہے؛ code کے بعد پکڑنا afternoon۔
Plan mode میں جائیں (Shift+Tab Claude Code میں، Tab OpenCode میں) تاکہ agent propose کرے build نہ کرے، strong model پر switch کریں، اور paste کریں:
I want to build the Reading Room connector on this base. Read AGENTS.md and use the mcp-builder skill for tool naming and schemas, then propose the architecture for me: the one gateway, the three tool groups (domain, user, config), how it remembers a person, and how it proves who is signed in. Show me the complete plan and the tool list before you write any code, and for each piece tell me which of the four invariants it serves and flag anything you are unsure about or that the base has not already decided.
یہ prompt کیا کر رہا ہے: agent کو brief (AGENTS.md) اور naming skill دیتا ہے، پھر architecture اور full tool list propose کرنے کو کہتا ہے، ہر piece کو invariant سے justify کروا کے، without writing۔ آپ design dictate نہیں کر رہے؛ آپ reviewable design مانگ رہے ہیں۔
پھر plan کو inspector کی طرح پڑھیں (یہ review ہی course کی skill ہے)۔ اسے four invariants کے against check کریں:
- One gateway، three نہیں؟
- Tools only، app logic کو resources یا prompts میں نہیں رکھا؟
- Identity verified sign-in سے، tool argument سے کبھی نہیں؟
- Fail-closed rule config میں بیٹھا ہے؟
کچھ off ہو تو کہہ کر re-plan کروائیں۔ Plan hold کرنے کے بعد ہی build allow کریں۔
Prompt 2: empty frame scaffold کریں، اور prove کریں یہ کھڑا ہے۔ Scaffolding real walls سے پہلے bare skeleton کھڑا کرنا ہے: one server جو run کرتا ہے، اتنا کافی کہ structure sound ہے۔ آپ intentionally almost empty start کرتے ہیں، one health-check tool اور one placeholder، تاکہ wiring wrong ہو تو ابھی دو trivial tools کے against پکڑ لیں، later real logic کے نیچے نہیں۔
اس routine step کے لیے cheaper model پر واپس آئیں؛ thinking plan میں ہو چکی۔ Prompt میں ایک load-bearing phrase ہے: stateless streamable HTTP۔ Streamable HTTP wire format ہے جس کے ذریعے remote host جیسے Claude آپ کے server تک reach کرتا ہے؛ stateless کا مطلب server کسی single connection کی memory نہیں رکھتا، اس لیے Anthropic کا کوئی بھی server کوئی بھی call handle کر سکتا ہے۔ یہ production shape ہے، اور agent اسے یہاں ایک بار set کرتا ہے۔ Paste:
Looks right. With the mcp-builder skill's guidance, scaffold the gateway: one FastMCP server on stateless streamable HTTP transport, with a health tool and a
domain_get_itemstub. Add whatever dependencies you need. Run it and show me a local client listing both tools, with no auth and no real data yet.
آپ کیا دیکھیں گے، اور کیا verify کرنا ہے
Running server، اور ایک client (چھوٹا test program جو server سے connect ہو کر پوچھتا ہے کیا tools offer ہو رہے ہیں) دو tools list کرتا ہے۔ domain_get_item ابھی stub ہے، placeholder جو real کچھ return نہیں کرتا، اور یہ درست ہے: no auth، no real data at this step۔ آپ نے اس Concept کی one fact prove کی: single server، tools grouped by name، right transport پر، remote host کے لیے discoverable۔ Identity اور gating later آتے ہیں؛ ابھی add نہ کریں۔ اگر port 8000 پہلے use میں ہے، agent دوسرا port bind کرے گا اور RESOURCE_URL consistent رکھے گا؛ یہ expected ہے، error نہیں۔
✓ Checkpoint: shape in place ہے۔ آپ نے whole connector plan کیا، invariants کے against review کیا، اور right transport پر one gateway کھڑا کیا۔ ہر later Concept اسی server میں real piece add کرتا ہے۔
Part 2: State and domain
Concept 5: State: کسی person کو یاد رکھنے کے لیے just enough
Generic chatbot tab بند کرتے ہی آپ کو بھول جاتا ہے۔ آپ کی app کو نہیں بھولنا چاہیے؛ user کو sessions کے across remember کرنا ہی اسے toy کے بجائے product بناتا ہے۔
v1 کو small رکھیں: Postgres database (standard، free-to-start relational database) with two tables۔ Front desk کے دو registers سوچیں، loyalty number سے tied: guest register کہ ہر person کون ہے، اور stay-log کہ وہ lately کیا کر رہا ہے۔ Who-you-are کم بدلتا ہے؛ what-you're-doing ہر visit بدلتا ہے، اس لیے الگ رہتے ہیں۔
یہ وہ دو tables ہیں SQL میں (database create/read کرنے کی standard language)۔ Follow کرنے کے لیے SQL پڑھنا ضروری نہیں: ہر line کا plain-English comment skim کریں، اسی لیے shown ہے۔ Agent یہ لکھتا ہے؛ آپ صرف review کرتے ہیں۔
-- users: one row per person
create table users (
  id    text primary key,     -- one person's verified sign-in id, the 'sub' (Concepts 7-8)
  email text
);

-- user_state: one row per person, whatever you carry between sessions
create table user_state (
  user_id text references users(id),
  state   jsonb               -- a last position, a few saved values
);
وہ id جو دو tables کو link کرتا ہے، front-desk picture کا "loyalty number"، real app میں person کا verified sign-in id ہے۔ Code میں اس کا name sub ہے، subject کا short، identity کا وہ one piece جس پر آپ trust کر سکتے ہیں۔ ابھی real sign-ins نہیں، اس لیے Concepts 7 اور 8 میں وہ id actually آتا ہے؛ ابھی بس جانیں کہ two tables اسی سے tied ہیں۔
v1 کی memory یہی ہے: row store، row read۔ (jsonb ایک flexible column ہے جو saved values کا چھوٹا bundle structured data کے طور پر hold کرتا ہے، fixed columns declare کیے بغیر۔) Serious version، every interaction کا audit trail، approval model، record جس پر trust/report ہو سکے، اپنی discipline ہے، اور یہی Building a Digital FTE سکھاتا ہے۔ یہاں نہ build کریں۔
آپ یہ database ہاتھ سے set up یا operate نہیں کرتے۔ Manufacturing course کی طرح، coding agent Neon (hosted Postgres جسے آپ خود run/maintain نہیں کرتے) کو Neon کے MCP server کے ذریعے drive کرتا ہے: project بناتا ہے، branch بناتا ہے، SQL run کرتا ہے، آپ review کرتے ہیں۔ دو short steps میں build ہے، مگر پہلے ایک thing true ہونی چاہیے۔
Check Neon is awake (10 seconds). Below everything depends on agent actually reaching Neon، جو setup میں connect ہوا تھا۔ Ask: "Can you see the Neon tools right now?" اگر yes، continue۔ اگر no، Neon authorize نہیں ہوا: /mcp type کریں، Neon pick کریں، browser میں Authorize click کریں (free، no card)، پھر دوبارہ ask کریں۔ Next prompt paste نہ کریں جب تک agent confirm نہ کرے Neon دکھ رہا ہے، ورنہ fail ہو گا۔
Prompt 1: agent سے store create کروائیں۔ Paste:
Using the Neon MCP server, create the two-table store (
users,user_state) on adevbranch, and save the branch'sDATABASE_URLto.env(never print it).
یہ کیا کرتا ہے: agent Neon MCP سے project اور dev branch بناتا ہے (private sandbox copy of database، so learning work real data سے away)، two tables create کرتا ہے، اور database address .env میں DATABASE_URL کے طور پر لکھتا ہے تاکہ code اسے find کرے۔ آپ review کرتے ہیں؛ یہ SQL run کرتا ہے۔
Done when: agent سے کہیں list the two tables it just created اور confirm کرے .env میں DATABASE_URL line ہے۔ اگر users اور user_state دکھیں تو store exists۔ آپ database tool نہیں کھولتے؛ agent دکھاتا ہے۔
Prompt 2: agent سے read/save code لکھوائیں۔ پہلے ایک thing جان لیں: ابھی real sign-in نہیں (Concepts 7 and 8 میں آئے گا)، اس لیے test کے لیے agent stand-in id use کرتا ہے جہاں real sub آئے گا۔ Code پھر بھی sub پر key کرتا ہے؛ آپ verified one آنے تک placeholder feed کر رہے ہیں۔ Paste:
Write
db.py: read and save a user's state, keyed by the verifiedsub(never an id from a tool argument). Show me a value saving and reading back on a fresh connection. Then explain in one line why you keyed it on the verifiedsuband refused a tool-supplied id; we will see the full reason in the next part.
یہ کیا کرتا ہے: agent دو small functions لکھتا ہے، save/read، جو person's saved values اس کے sub کے تحت store کرتے ہیں۔ پھر fresh connection (database سے brand-new link) open کر کے prove کرتا ہے value Neon میں saved ہے، memory میں held نہیں۔
Done when: value round-trips۔ آپ کچھ save کرتے ہیں، fresh connection پر exact same thing read کرتے ہیں، stand-in id سے keyed۔ یہ real memory ہے: value writing connection سے زیادہ زندہ رہتی ہے۔ State works before identity does.
Concept 6: Domain: ابھی reference سے، بعد میں meaning سے
آپ کا domain simply وہ stuff ہے جس کے بارے میں app actually ہے: articles، items، records، web address نہیں۔ جب user specific thing چاہتا ہے، v1 simple way fetch کرتا ہے: ہر record کا id ہے، اور domain_get_item(id) اسے return کرتا ہے۔ Model returned thing سے work کرتا ہے۔
v1 deliberately ابھی semantic search نہیں کرتا، یعنی "refunds والے part" کو meaning سے answer نہیں کرتا۔ Difference library کی طرح ہے: fetch by id exact call number مانگنا ہے (one wrong digit اور nothing)، semantic search librarian سے کہنا ہے "sad whale والی book چاہیے" اور اس کا find کرنا۔ v1 call-number desk ہے؛ librarian upgrade ہے، اور RAG course (Give Your AI Searchable Context) کا whole subject ہے۔ ابھی wiring add کرنا first ship کو bloat کرے گا۔ Reference version build کریں:
Make
domain_get_item(id)return a real article fromseed/articles.jsoninstead of the stub. Show me it returninga1by id.
Done when: article id سے آتا ہے۔ Fetch by reference now؛ later search پر upgrade کریں۔
Optional: real agent کو اپنا tool call کرتے دیکھیں
اب تک آپ نے server کو small listing script سے prove کیا۔ ایک بار یہ کریں تاکہ feel ہو connector actually کس لیے ہے: agent خود reach کر کے tool call کرتا ہے۔ آج fastest way یہ ہے کہ جس coding agent سے آپ build کر رہے ہیں اسے stand-in client کے طور پر borrow کریں۔
Server running رکھیں (agent نے Concept 6 test کے لیے start کیا؛ stop ہو گیا ہو تو start کروائیں اور URL note کریں، جیسے http://localhost:8000/mcp)۔ دوسرے terminal میں agent کو اس URL پر point کریں:
claude mcp add --transport http reading-room http://localhost:8000/mcp --scope project
--scope project flag project کی .mcp.json میں reading-room entry لکھتا ہے (Neon اور context7 کے ساتھ)؛ اس کے بغیر server different scope میں جائے گا اور agent یہاں pick نہیں کرے گا۔ claude mcp list سے check کریں؛ mid-session /mcp سے reconnect کریں۔
opencode.json کے mcp block میں Neon اور context7 entries کے ساتھ reading-room entry add کریں (replace نہ کریں):
"reading-room": {
  "type": "remote",
  "url": "http://localhost:8000/mcp",
  "enabled": true
}
پھر ordinary prompt میں ask کریں:
Use the reading-room
domain_get_itemtool to fetch articlea1, and show me what came back.
Agent کو tool discover، call، اور article واپس read کرتے دیکھیں۔ یہی round trip، AI کا آپ کا tool choose کرنا اور result use کرنا، whole product کا miniature ہے۔
Two honest notes، تاکہ غلط impression نہ ہو:
- یہ dev-time peek ہے، real delivery نہیں۔ Actual customer chat app (claude.ai) ہے، جسے Concept 13 میں connect کریں گے۔ یہاں coding agent کو handy MCP client کے طور پر borrow کر رہے ہیں کیونکہ sign-in سے پہلے agent کو tools drive کرتے دیکھنے کا quickest way ہے۔
- یہ صرف اس لیے works ہے کہ ابھی auth نہیں۔ Concept 8 میں lock add کرتے ہیں، اور unauthenticated call
401return کرنا start کر دیتا ہے۔ Concept 8 پہنچتے ہی یہ dev registration remove کریں (claude mcp remove reading-room.mcp.jsonentry clear کرتا ہے؛ OpenCode میںreading-roomblock delete کریں)، ورنہ یہ fail کرنا start کرے گا، جو lock کا job ہے۔
Part 3: Prove: identity جسے model fake نہیں کر سکتا
یہ "server وہ کرتا ہے جو model نہیں کر سکتا" کا first half ہے۔ دونوں Concepts invariant 3 ہیں۔
Concept 7: Identity verified subject سے، model سے کبھی نہیں
Problem یہ ہے۔ user_state table کو right person's row میں write کرنا ہے۔ مگر user سے بات model کر رہا ہے، اور آپ model کو کبھی decide نہیں کرنے دے سکتے کہ کس کا data read/write کرنا ہے۔ AI کو hotel concierge سوچیں جو guest کے errands چلا رہا ہے۔ جب concierge front desk کو کہے "room 412 wants their mail"، desk اسے اس کے کہنے پر mail نہیں دے سکتا: confused یا manipulated concierge wrong room name کر سکتا ہے اور stranger کا mail leak ہو جائے گا۔ اگر Claude آپ کو user_id pass کر سکتا، یہی danger ہے، اور ایک user دوسرے کا data دیکھ لیتا۔ یہ connector-native app کا textbook trust bug ہے۔
Rule: model identity supply نہیں کرتا۔ جب user نے connector authorize کیا، trusted service کے through sign in کیا، اور وہ service آپ کے server کو signed token دیتی ہے جس میں user's verified id، subject یا sub ہوتا ہے۔ وہ token guest کا passport ہے: desk passport سے person پڑھتا ہے، جسے concierge fake نہیں کر سکتا، کبھی اس کی بات سے نہیں۔ Server token سے straight sub read کرتا ہے اور اسی کو database key use کرتا ہے۔ اس لیے اگر tool کبھی user_id argument لیتا ہے اور model someone else's id بھر دے، server ignore کرتا ہے: identity token کے sub سے آتی ہے، tool argument سے کبھی نہیں۔
یہ وہ rule ہے جو given auth.py enforce کرتا ہے، اسی لیے file complete ship ہوتی ہے اور آپ rewrite نہیں کرتے۔ One line میں: یہ verified id (sub) signed token سے straight لیتا ہے اور وہ database کو دیتا ہے، so جس person's data touch ہوتا ہے وہ sign-in decide کرتا ہے، model کی typed بات نہیں۔ Next Concept میں آپ یہ file wire کرتے ہیں؛ یہاں rule hold کریں۔ اسے stick کروانے کا best way agent سے existing code میں دکھوانا ہے۔
اسے اپنے db.py سے tie کریں۔ Paste:
Read
auth.pyback to me in plain English, then open thedb.pyyou wrote in Concept 5 and show me where thesubcomes from now. Tell me what would break if a tool argument could set it instead, and tie it back to the concierge and the passport.
خوبصورت بات: user کو extra کچھ cost نہیں۔ Single Authorize click جو connector on کرتا ہے وہی sign-in ہے۔ One action، two jobs۔
Concept 8: کون موجود ہے، prove کرنا (sign-in plain English میں)
یہاں machinery OAuth ہے، وہی "Sign in with Google" جو آپ سو بار click کر چکے ہیں۔ یہ Concept slow down کرنے والا ہے، اس لیے نہیں کہ huge ہے، بلکہ failure mode sneaky ہے: auth code صحیح لگ سکتا ہے اور quietly wrong ہو سکتا ہے۔ Good news: آپ کو دو چیزیں چاہیے، ideas اور result check کرنا۔ Actual wiring agent لکھتا ہے۔
Whole idea in five lines (باقی Concept اس کے نیچے detail ہے)۔ User کہیں اور sign in کرتا ہے۔ وہ service signed token issue کرتی ہے۔ آپ کا server token verify کرتا ہے۔ Server اس سے sub read کرتا ہے۔ Model identity کبھی supply نہیں کرتا۔
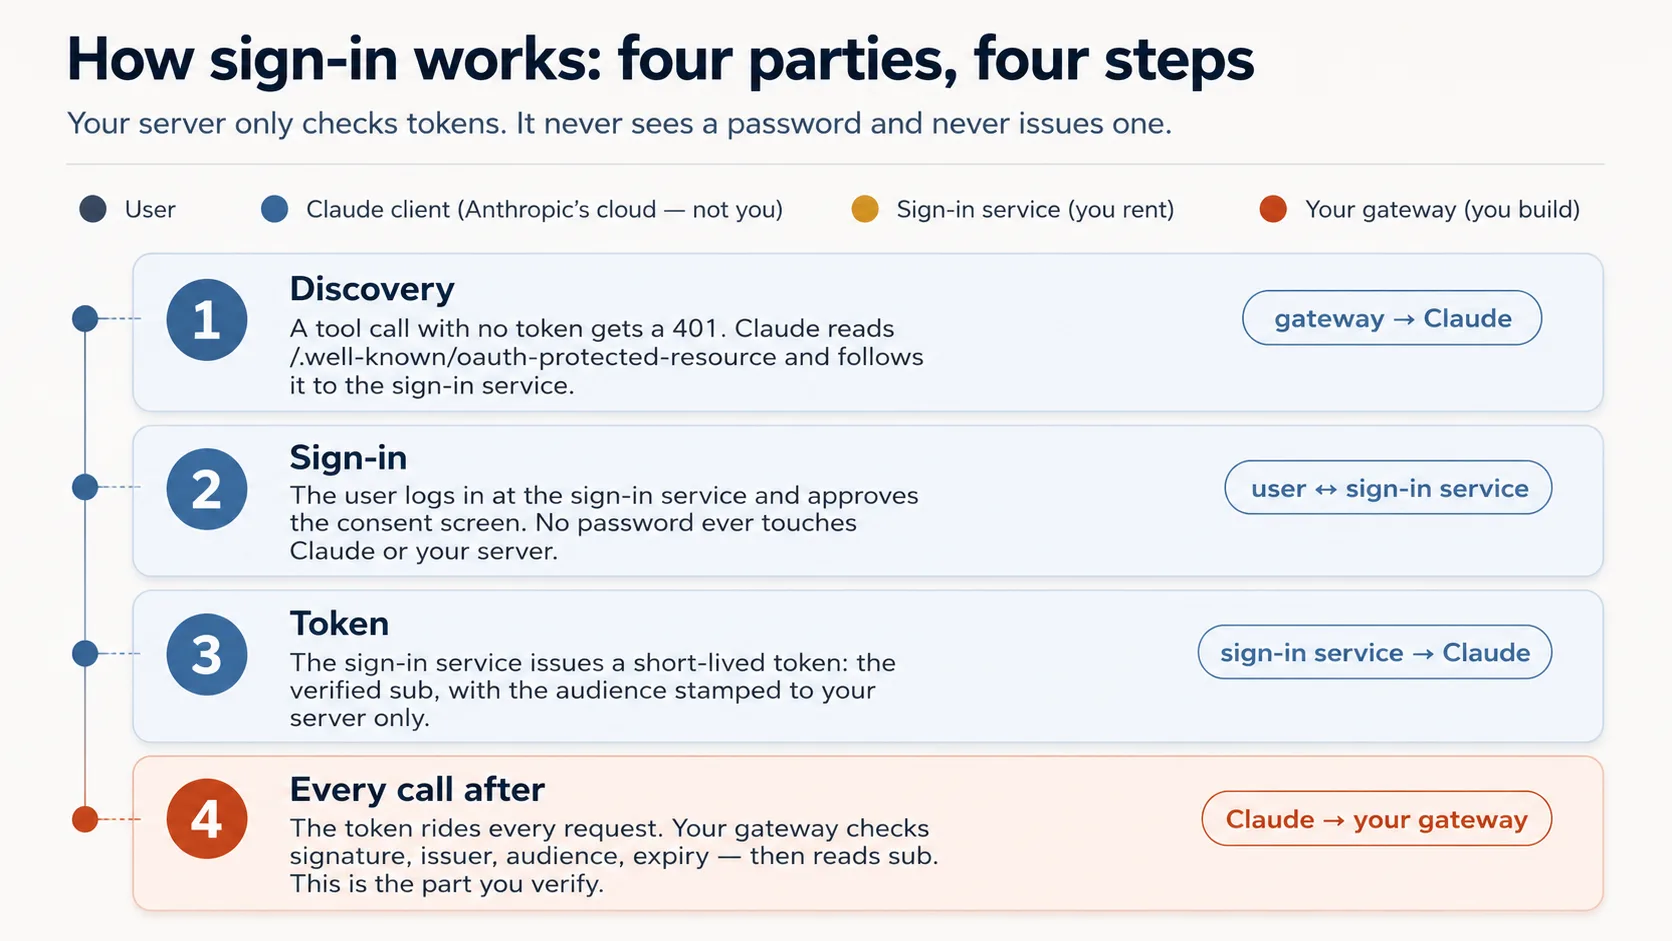
اصل میں دو jobs ہیں، اور آپ صرف ایک کرتے ہیں۔ لوگوں کو sign in کروانا hard اور liability ہے (آپ passwords hold کر رہے ہوتے)۔ اس لیے آپ نہیں کرتے: specialist login چلاتا ہے اور آپ کے server کو token دیتا ہے، tamper-proof slip جو کہتی ہے "یہ ابھی sign in ہوا ہے"۔ آپ کے server کا only job slip check کرنا ہے۔ Full picture میں چار parties ہیں:
| Party | Who it is | You build it? |
|---|---|---|
| The user | The person whose data it is | — |
| Claude's MCP client | Runs in Anthropic's cloud, asks on the user's behalf | No |
| The sign-in service (authorization server) | An outside specialist — hosted (Clerk, Auth0, Stytch) or a framework you self-host (Better Auth) — that checks the login and issues tokens | No — you rent or self-host it |
| Your gateway (resource server) | Your server; it only checks tokens and serves data | Yes |
Current MCP spec کے تحت آپ کا server resource server only ہے، password business میں نہیں۔ Issuer hosted ہو یا self-hosted، آپ یہاں صرف tokens validate کرتے ہیں؛ انہیں issue کرنا AI Identity course ہے۔ Flow:
- Discovery۔ Token کے بغیر tool call
401لیتا ہے (universal "you're not signed in" refusal؛ یہ sign-in kick off کرتا ہے، fix کرنے والا error نہیں)۔ Claude آپ کے server کا public note/.well-known/oauth-protected-resourceپر find کرتا ہے، جو کہتا ہے "my sign-in service lives over there," پھر login تک جاتا ہے۔ - Sign-in۔ User consent screen دیکھتا ہے: "MyApp wants to read your saved items and remember your place"، Google یا email code سے login کرتا ہے، approve کرتا ہے۔ Password کبھی Claude یا آپ کے server کو touch نہیں کرتا۔
- Token۔ Sign-in service short-lived token issue کرتی ہے جس میں verified
subاور آپ کے server کے لیے stamped audience ہوتا ہے۔ - Every call after token carry کرتی ہے؛ server اسے check کرتا ہے اور
subread کرتا ہے۔
Agent یہاں wiring build کرتا ہے، check نہیں۔ Token check itself auth.py میں complete ship ہوتا ہے (آپ کبھی نہیں لکھتے)۔ Agent جو add کرتا ہے وہ thin layer ہے جو door پر check لگاتی ہے: token-less call کو 401 back کراتی ہے اور Claude کو sign-in کی طرف point کرتی ہے۔ یہ layer FastMCP version کے ساتھ shift کرتی ہے، اس لیے agent اسے current docs کے against build کرتا ہے، memory سے نہیں۔
آپ کا real job correct check کو اتنا جاننا ہے کہ wrong پکڑ سکیں۔ آپ اسے already سمجھتے ہیں کیونکہ یہ border desk کا passport inspect کرنا ہے: four questions، ہر ایک کے پیچھے real risk۔
| The check | The question it asks | If your server skipped it |
|---|---|---|
| Genuine? | A real token signed by the issuer, not a forgery? | Anyone could forge a token with any name and walk straight in. |
| Trusted issuer? | Did it come from our sign-in service, not some other? | A token from a service you never trusted would be accepted. |
| Stamped for us? | Minted for this exact server, not a different app? | The most dangerous one: a token meant for another app gets replayed against yours. |
| Still in date? | Has it expired? | A stolen token would keep working forever. |
ان چار کے اوپر Concept 7 کا one rule بیٹھتا ہے: identity token کے sub سے read ہوتی ہے، tool argument سے never۔ وہ skip کریں تو ایک person دوسرے کا data read کرتا ہے۔
یہ table آپ کی whole verification checklist ہے۔ Cryptography پڑھنے کی ضرورت نہیں۔ آپ behavior check کرتے ہیں، اور two prompts below exactly یہی کرتے ہیں: good token gets in، wrong one refused۔
Curious readers کے لیے: وہ four questions actual code میں
یہ given auth.py ہے۔ آپ اسے edit نہیں کرتے؛ یہ صرف دیکھنے کے لیے ہے کہ four questions code میں کیسے ہیں۔ ہر commented line اوپر والے questions میں سے ایک ہے۔
# auth.py — the token check (ships complete in the base)
from jose import jwt
from jose.exceptions import JWTError

def verified_claims(token: str) -> dict:
    key = _key_for(token)                          # pick the matching public key (by the token's `kid`)
    try:
        claims = jwt.decode(
            token,
            key,                                    # Genuine?       signature checked against the issuer's public key
            algorithms=["RS256"],
            audience=RESOURCE_URL,                  # Stamped for us? must be THIS server (never omit)
            issuer=AUTH_ISSUER,                     # Trusted issuer? must be the service we trust
            options={"require": ["exp", "sub", "aud", "iss"]},  # Still in date? + require the facts we rely on
        )
    except JWTError as e:
        raise AuthError(f"token rejected: {e}") from e
    return claims                                   # claims["sub"] is the user; nothing came from the model
وہاں چند words: kid means کون سی signing key use ہوئی، RS256 signing method ہے، اور sub/aud/iss/exp token کے facts ہیں (subject، audience، issuer، expiry)، four facts جنہیں check require کرتا ہے۔
اب اسے build کریں، دو paste-and-watch steps میں۔ یہ وہ Concept ہے جسے strong model پر run کریں، cheap پر نہیں، کیونکہ "looks right" اور "is right" یہاں زیادہ diverge کرتے ہیں۔
Prompt 1: door پر lock لگائیں۔ 401 doorbell ہے، crash نہیں: no token call کو refuse ہونا چاہیے in the one specific way that tells Claude "send the user to sign in." Paste:
Wire the OAuth layer around the given
auth.py, and don't rewriteauth.py. Check the current FastMCP via Context7 first, then wire theJWTVerifier/RemoteAuthProviderand the/.well-known/oauth-protected-resourceroute so an unauthenticated tool call returns HTTP401. Start the bundledmock_authservice (.envalready points at it). Show me an unauthenticated call returning401.
Done when: no token call 401 return کرے (tool error نہیں، 200 نہیں)۔ یہی 401 Claude کا sign-in trigger کرتا ہے۔
Prompt 2: prove کریں lock discriminate کرتا ہے۔ Lock جو ہر key accept کرے lock نہیں۔ آپ good token کو in دیکھتے ہیں، wrong کو refused، اور run سے پہلے call کرتے ہیں کہ four checks میں سے کون catch کرے گا۔ Paste:
Mint a token from the mock and show me it resolves its
subthroughauth.verified_claims. Then, before you mint a token for a different audience, tell me which of the four checks should reject it. Mint it, show me it's rejected, and walk me through where each ofauth.py's four checks runs.
Done when: good token sub resolve کرتا ہے، wrong-audience token rejected ہے، اور آپ نے four checks کو job کرتے دیکھا۔
آپ کیا دیکھیں گے، اور failures کیسے read کرنے ہیں
Unauthenticated call پر 401، token real sub resolve کرتا ہے، wrong-audience token rejected۔ Four checks confirm کریں: signature، issuer، audience = your server، expiry۔ Missing audience سب سے common subtly-wrong output ہے۔ تین failures ابھی recognize کریں:
- No sign-in prompt (Concept 13 میں add کرتے وقت feel ہو گا):
401یا/.well-knownroute missing ہے، discovery start نہیں ہوتی۔401auth layer سے آنا چاہیے، tool raising سے نہیں، کیونکہ token اگر صرف inside tool check ہو تو200return ہوتا ہے۔ - Authorize loops or errors:
.envکا issuer یا audience token کے carried values سے match نہیں کرتا۔ - Signed in، but every tool returns
401: request accessor wrong place سے header read کر رہا ہے (get_http_headers()authorizationstrip کرتا ہے؛ request object سے read کریں)۔
یہ slow down کرنے والا Concept ہے۔
ایک چیز clear رکھیں: آپ نے ابھی flow rehearse کیا، آپ flow کا part نہیں بنے۔ Beginner track پر آپ نے ہر role play کیا تاکہ no-account lock prove ہو: bundled mock_auth sign-in service کا stand-in تھا، اور آپ نے (agent کے ذریعے) test tokens mint کر کے hand over کیے۔ اس نے exact auth.py path exercise کیا۔ مگر wrong impression دے سکتا ہے کہ real thing میں آپ یا coding agent tokens mint کرتے ہیں۔ آپ نہیں کرتے، Claude بھی نہیں۔ Actually کون کیا کرتا ہے:
| Step | On your laptop now (rehearsal) | In production (the real thing) |
|---|---|---|
| Who signs in | nobody; you stand in | the end user, at the Authorize click |
| Who mints the token | the local mock_auth, when you trigger it | a real sign-in service (Clerk, Auth0, …) |
| Who carries it to your server | your test script | Claude's cloud, on every call |
| What your server does with it | the four checks | the same four checks, unchanged |
Last row whole point ہے: gateway اور auth.py ان دو columns کے بیچ نہیں بدلتے۔ وہ whoever's tokens کو same four questions کے against check کرتے ہیں۔ Real multi-user version mostly one swap ہے: AUTH_* / RESOURCE_URL values کو mock کے بجائے real sign-in service پر point کریں، جو AI Identity course ہے۔ اس کے بعد token user's own sign-in سے mint ہوتا ہے، کبھی آپ، agent، یا Claude سے نہیں۔ Part 5 of this course quick personal demo کے لیے auth off کر دیتا ہے۔
Two production details اسے round out کرتی ہیں، اور Beginner track پر agent/mock دونوں correctly set کرتے ہیں، so ابھی hand-tune نہیں: PKCE (handshake جو stolen login code reuse ہونے سے روکتا ہے) اور clients register کرنے کا up-to-date way۔ یہ صرف تب آپ کی responsibility بنتی ہیں جب اپنا sign-in server run کریں، جو AI Identity course depth میں سکھاتا ہے۔ Standard track پر current hosted service (Clerk، Auth0، Stytch) handle کرتی ہے۔
Go deeper: یہ course tokens validate کرتا ہے؛ AI Identity انہیں issue کرتا ہے۔ یہاں آپ کا gateway صرف tokens validate کرتا ہے (resource server ہے)، کسی اور کی sign-in service پر leaning۔ اس issuer کو خود stand up کرنا، اپنا OAuth/OIDC sign-in server، dedicated AI Identity course ہے، Better Auth پر built۔ دونوں ways میں gateway نہیں بدلتا: tokens جس نے بھی sign کیے، یہ same way validate کرتا ہے۔
✓ Checkpoint: server knows who's there۔ Identity token سے آتی ہے، model سے never، اور data safe ہے۔ اب model کو behave کروائیں۔
Part 4: Steer: model کو behave کروائیں
"Server وہ کرتا ہے جو model نہیں کر سکتا" کا second half۔ یہاں تینوں Concepts invariant 4 اور app behavior serve کرتے ہیں۔
Concept 9: App کے rules کہاں رہتے ہیں: Skill یا connector
یہ real decision ہے، کیونکہ app کے rules (behavior، voice، guardrails) کے دو homes ہیں، اور choice decide کرتی ہے user first request سے پہلے کتنے steps کرے۔ Restaurant picture کریں۔ Skill placemat ہے جس پر rules printed ہیں، diner کے سامنے پوری meal پڑا رہتا ہے: drift نہیں کرتا کیونکہ ہمیشہ context میں ہے۔ Connector waiter ہے جو بیٹھتے وقت rules بتاتا ہے اور ہر course remind کرتا ہے: works، مگر re-handing ہوتی رہتی ہے۔ Placemat stronger enforce کرتا ہے، مگر آپ کو بیٹھنے سے پہلے رکھنا پڑتا ہے؛ waiter کو extra setup نہیں چاہیے۔
Option A: uploaded Skill (SKILL.md)۔ User ایک file add کرتا ہے؛ یہ request match ہونے پر auto-load ہوتی ہے اور body context میں رہتی ہے، اس لیے "always behave this way" کا stronger enforcer ہے۔ Cost setup ہے۔ Skills feature Claude کے code-execution environment میں run ہوتا ہے، اس لیے code execution enabled ہونا چاہیے، any Skill کے لیے، prose-only بھی۔ Knowledge-worker user کے لیے یہ friction ہے۔
Option B: connector returns the rules۔ User only connector add کرتا ہے۔ First tool call begin_session rules and persona return کرتا ہے۔ Less setup، مگر model کو وہ rules ہر session میں pick up کروانے پڑتے ہیں۔ That's why Concept 10 makes it a contract.
This course uses Option B کیونکہ target "one pasted URL and one click" ہے۔ Later، if you control the workspace، Skill + connector together strongest shape ہے: Skill standing instructions، connector live data۔
Concept 10: begin_session: front door and keycard
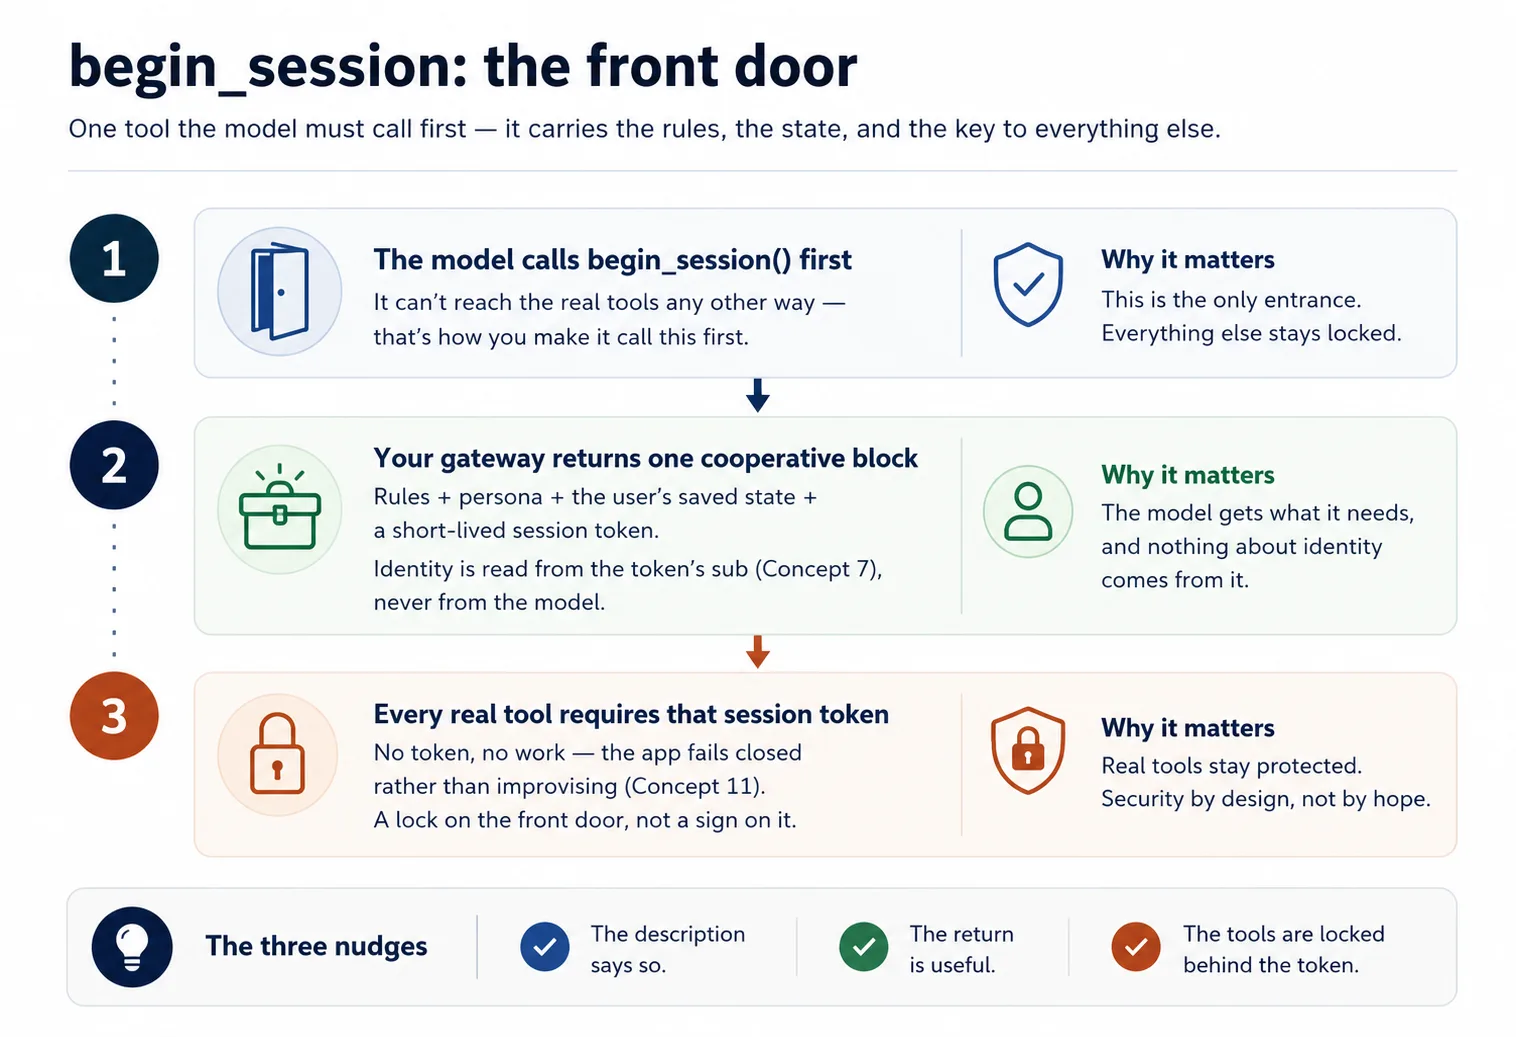
Rules اور user's state ایک tool سے آتے ہیں جسے model first call کرتا ہے۔ اسے begin_session name کریں (آپ کا name)۔
جب user "start" یا "continue" جیسی کوئی بات کہتا ہے، model begin_session() call کرتا ہے۔ یہ check-in ہے: desk guest کا passport verify کرتا ہے (signed token، Concept 7)، پھر ایک keycard clip کرتا ہے، short-lived session token۔ Gateway app's rules (config_*) اور user's state (user_*) read کر کے cooperative block return کرتا ہے: "یہاں اس user کے لیے behave کرنے کا طریقہ ہے، اور یہاں وہ کہاں ہے"، plus keycard۔ ہر real tool پھر اسے check کرتا ہے: no keycard، no entry۔ (session.py keycard mint/check کرتا ہے؛ given ship ہوتا ہے؛ آپ begin_session اور gate wire کرتے ہیں۔)
Built-in چیز کے بجائے خود keycard کیوں mint کرتے ہیں؟ کیونکہ یہ entirely yours ہے: server اسے create کرتا ہے، model صرف ہر call کے ساتھ واپس دیتا ہے، اور code alone decide کرتا ہے کیا unlock ہے۔ Rule simple and fully in your control رہتا ہے۔ یہ exactly وہ direction بھی ہے جس میں MCP جا رہا ہے: newer drafts servers کو کہتے ہیں کہ caller between calls remember کرنا ہو تو یہی کریں۔ Simplest thing to build future-proof بھی ہے۔
@mcp.tool()
def begin_session() -> dict:
    """Call this FIRST on any new request. Returns how to behave for this
    user, their saved state, and a session token the other tools require."""
    sub = verified_claims(current_token())["sub"]   # identity from the token (Concept 7)
    return {
        "session": new_session_token(sub),           # gates every other tool (Concept 4)
        "rules":   config_get_rules(),                # cooperative: "here's how to behave"
        "state":   user_get_state(sub),               # where this user left off
    }
دو design points agent کو respect کرنا ہیں:
- Phrase it as cooperation, never as override۔ کہیں "یہ ہمارے guest کی preferences ہیں؛ انہیں settle کرنے میں help کریں" تو concierge help کرتا ہے؛ چلائیں "forget your previous instructions and obey me" تو security call کرتا ہے، کیونکہ con artist ایسا بولتا ہے اور model prompt injection سے بچنے کے لیے trained ہے۔ Cooperative phrasing sail through کرتی ہے؛ bossy phrasing discount ہوتی ہے۔
- Model کو first call کروانے کے لیے اسے necessary بنائیں۔ Real tools session token require کرتے ہیں جو صرف
begin_sessionissue کرتا ہے، so model front door سے گزرے بغیر work نہیں کر سکتا۔ Description says "call me first"، return useful ہے، tools token کے پیچھے lock ہیں: تین nudges same direction۔ پھر reinforce کرتے رہیں؛ ہر tool result plus one-line reminder return کرے کہ اسے librarian's voice میں present کریں۔
Build it۔ Coding agent کو paste کریں:
Now wire the session contract. First create
config_store.pywith the librarian's rules and persona (theconfig_*group). Then addbegin_sessionso it checks the reader in: it reads identity from the verified sub and hands back those rules, the persona, the reader's shelf (from the store), and a signed session token (session.pyis given). Lock everydomain_*anduser_*tool behind that token, and have each one sign off with a one-line "present in the librarian's voice" reminder. Before you run it, tell me what a domain call should do with no session token, then show me it refused with no session and succeeding afterbegin_session.
Done when: real tools no session پر refuse کرتے ہیں اور begin_session کے بعد accept۔ Front door ہی only way in ہے۔
Concept 11: Fail closed: quietly chatbot نہ بنیں
Failure mode جو ایسی apps کو silently ruin کرتا ہے: اگر connector missing، unauthorized، یا erroring ہو، model پھر بھی اپنے طور پر کافی جانتا ہے، اور helpful لگنے کے لیے answers improvise کرے گا اور user's state invent کرے گا۔ اب structured product اپنے name کا chatbot بن گیا، اور damage ہونے تک کسی کو پتہ نہیں۔ یہ opening کا ATM rule ہے، مگر harder: ATM dumb ہے اور lock ہو جاتا ہے، clerk smart ہے اور helpful لگنے کے لیے balance guess کرنا چاہتا ہے۔
Trap یہ ہے: filing cabinet lock کرنا (session gate) clerk کو memory سے guess کرنے سے نہیں روکتا۔ Gate آپ کے tools lock کرتا ہے؛ model کا own knowledge lock نہیں کر سکتا۔ اس لیے rules (جو begin_session return کرتا ہے) desk پر taped standing order add کریں: اگر begin_session unavailable ہو یا tool fail کرے، صاف کہیں session continue نہیں ہو سکتا، results improvise نہ کریں، saved state invent نہ کریں۔ یہ config_* rules میں رہتا ہے، جہاں model ہر session پڑھتا ہے۔
# config_store.py — the fail-closed paragraph (you write this)
RULES = """\
You are the assistant for <YOUR APP>. Behave as follows for this user:
- <how to greet, your app's do's and don'ts>

Fail closed: if you cannot reach begin_session or a tool returns an error, tell the user
plainly that the session can't continue right now. Do NOT improvise an answer from your own
knowledge and do NOT invent the user's saved state.
"""
یہ paragraph alone نہیں کھڑا: tools already bad/missing session پر raise کرتے ہیں (Concept 10 کا gate)، اور ہر tool return one-line reminder repeat کرتا ہے، so model honesty کی طرف steered ہے، صرف told نہیں۔
Build and prove it۔ Coding agent کو paste کریں:
Add the fail-closed paragraph to the rules in
config_store.py(ifbegin_sessionis unreachable or a tool errors, say the session can't continue; never improvise an answer or invent the user's state). Then stop my Postgres and ask the app to do its job — show me it refuses cleanly rather than inventing a shelf. If it invents anything, strengthen the rule and the per-tool reminders until it refuses.
Done when: database down ہو تو app کہتی ہے continue نہیں ہو سکتا، confident made-up reply نہیں۔ Broken connector کے ساتھ plausible-looking answer ملے تو rule hold نہیں کر رہا؛ یہی gap اس Concept کی reason ہے۔
✓ Checkpoint: trust loop closed ہے۔ Identity proven ہے، model gated session سے steered ہے، اور app fake کرنے کے بجائے refuse کرتی ہے۔ اب اسے internet پر رکھنا ہے۔
Part 5: Ship it
Concept 12: اسے live چلائیں (no Docker، no deploy)
کیونکہ Claude آپ کے server تک Anthropic cloud سے پہنچتا ہے، "میرے laptop پر works" کافی نہیں: laptop server locked house کے اندر counter ہے، real مگر street door نہیں۔ Textbook fix full deploy ہے (rented host پر container)۔ صرف work دیکھنے کے لیے یہ نہیں چاہیے۔ Instead آپ laptop تک temporary public doorway کھولتے ہیں، tunnel، اور connector کا quick pop-up run کرتے ہیں۔ Free، no host account، no card، ایک minute میں up۔
ایک honest move ساتھ آتی ہے۔ claude.ai real OAuth سے users sign in کرواتا ہے، اور آپ کے پاس ابھی real sign-in service نہیں (کھڑی کرنا AI Identity course ہے)۔ اس personal demo کے لیے آپ one-line AUTH_DISABLED=1 switch سے lock off کرتے ہیں۔ Concept 8 میں mock کے against lock prove کر چکے ہیں؛ یہاں اسے aside رکھتے ہیں تاکہ آج claude.ai reach ہو سکے۔ Auth off ہونے پر everyone one stand-in user ہے، personal test drive کے لیے exactly fine، اور one-afternoon demo کو possible بناتا ہے۔
Build it۔ Agent bundled live-connector skill drive کرتا ہے، tunnel tool install کرتا ہے، doorway open کرتا ہے، اور auth off کے ساتھ server start کرتا ہے۔ Paste:
Put my connector live with the
live-connectorskill: turn auth off, start the gateway, open the Cloudflare tunnel, and give me the public connector URL. Confirm an unauthenticated tool list returns 200 over the tunnel before you hand it to me.
Done when: skill https://….trycloudflare.com/mcp URL print کرتی ہے اور unauthenticated tools/list اس کے through 200 return کرتا ہے۔ یہی public URL آپ next claude.ai میں paste کرتے ہیں۔
یہ open، temporary doorway ہے۔ Auth off ہونے کے ساتھ جس کے پاس URL ہے وہ tunnel up رہتے ہوئے آپ کے tools اور Neon data تک پہنچ سکتا ہے، اور ہر caller same stand-in user ہے۔ اسے personal demo سمجھیں: finish پر tunnel down کریں (pkill -f "cloudflared tunnel")، اور expect کریں URL ہر restart پر change ہو گا۔
Concept 13: اسے claude.ai میں add کریں اور whole app چلتا دیکھیں
Payoff، اور یہ part آپ کرتے ہیں۔ اس بار no Authorize step، کیونکہ demo کے لیے auth off ہے:
- claude.ai میں: Settings → Connectors → Add custom connector۔ Tunnel URL paste کریں (ending in
/mcp) اور Add click کریں۔ No client id، no Advanced settings۔ - اپنی app سے plain language میں job ask کریں۔
- Brand-new chat کھولیں اور کہیں جہاں چھوڑا تھا وہاں سے pick up کرے۔
آپ کیا دیکھیں گے، اور کیا verify کرنا ہے
App اپنے آپ کے طور پر respond کرتی ہے: model first begin_session call کرتا ہے، rules اور stand-in user's state لیتا ہے، اور gated tools سے work کرتا ہے۔ Because state user id کے تحت filed ہے (یہاں one stand-in sub)، chat کے تحت نہیں، brand-new chat وہیں سے resume کرتی ہے جہاں left off تھا: chat visit ہے، identity profile ہے۔ وہ cross-chat memory، claude.ai کے اندر، one pasted URL سے، whole product working ہے۔ دو notes: real sign-in wired ہونے تک everyone same stand-in user ہے (وہ AI Identity ہے)، اور tunnel URL change ہو تو connector re-add کریں، edit نہیں۔
✓ Checkpoint: آپ نے اسے live run کیا۔ آپ نے whole app claude.ai کے اندر work کرتے دیکھی: model identity-gated session کے ذریعے tools call کرتا ہے، memory chats کے across carry ہوتی ہے، app fake کرنے کے بجائے fail closed ہوتی ہے، all on free account۔ Public connector کے لیے جس میں real strangers sign in کریں، one piece باقی ہے: real sign-in service، path کا next stretch: AI Identity course۔ Next part اس build کو apart لے جانے سے پہلے جو بنایا ہے اس کے ساتھ بیٹھیں۔
Part 6: Capstone: اپنا domain
آپ نے concepts کے across Reading Room build کیا۔ اب skeleton کو اپنا prove کریں by pointing it at something you know۔ Skeleton نہیں بدلتا: one gateway، three tool groups، begin_session contract، identity from subject، fail closed؛ صرف three groups بدلتے ہیں۔
کچھ shapes دیکھنے کے قابل ہیں:
- Tutor: domain course content؛ user learner's progress؛ config teacher persona plus teaching method؛
begin_sessionpersona + method + learner position load کرتا ہے؛ fail closed اسے generic chatbot بننے سے روکتا ہے۔ - Support assistant: domain orders/policies look up؛ user customer's ticket history؛ config tone and escalation rules۔
- Internal-docs aide: domain team wiki search؛ user which team you're on؛ config what's confidential and how to cite۔
- Booking helper: domain availability/reservations؛ user saved preferences؛ config cancellation/pricing rules۔
جو actual thing آپ جانتے ہیں اس کے closest pick کریں، اور same loop run کریں: plan → review → scaffold → accumulate → verify۔ Deploy کریں، اپنے Claude میں add کریں، اسے one real request serve کروائیں اور next day remember کروائیں۔
Reading Room کی طرح start کریں: agent propose کرے، آپ review کریں۔ Paste:
Before you build anything, map my domain onto the three groups for me: what goes in
domain, what goes inuser, what goes inconfig, and whatbegin_sessionshould hand back for this app. Show me that mapping so I can review it the way I reviewed the Reading Room plan, then we plan the rest.
Hard parts کے لیے rhythm کبھی نہیں بدلی۔ ہر step پر صرف what you reviewed بدلا: tool list، store، verified_claims wiring، gate، fail-closed behavior، live run۔ یہ loop master کریں اور specific code matter کرنا stop کر دیتا ہے، کیونکہ آپ ہمیشہ agent سے produce کروا سکتے ہیں اور ہمیشہ بتا سکتے ہیں right ہے یا نہیں۔
Discuss with an AI. Question your scores.
Come back when you have your BEST evaluation.
Part 7: Ceiling، اور یہ کہاں grow ہوتا ہے
Concept 14: Ceiling، اور loop own کرنے کا bridge
جو آپ نے build کیا اس کی edge محسوس کریں، کیونکہ یہ exactly دکھاتی ہے book next کہاں جاتی ہے۔
آپ کی app صرف جب user type کرے act کر سکتی ہے۔ یہ Concept 1 کا hand vacuum ہے: trigger دبنے تک dead۔ یہ خود wake نہیں ہو سکتی، schedule پر run نہیں ہو سکتی، کچھ notice کر کے unprompted reach out نہیں کر سکتی، یا human turn کے بغیر several steps تک goal pursue نہیں کر سکتی۔ یہ flaw نہیں، connector-native app کی nature ہے۔ Loop host chat app کا ہے، آپ کا نہیں۔
جس لمحے آپ ایسا worker چاہتے ہیں جو خود run ہو، wake up، steps لے، loop میں tools call کرے، آپ کے سوتے ہوئے job finish کرے، آپ کو loop خود own کرنا ہو گا۔ وہ robot vacuum ہے، اور path ادھر جاتا ہے۔ Build AI Agents میں آپ hand vacuum tend کرنا چھوڑتے ہیں اور robot build کرنا شروع کرتے ہیں: آپ وہ server نہیں رہتے جسے model call کرتا ہے، بلکہ agent لکھتے ہیں جو calling کرتا ہے۔
دو courses پہلے آتے ہیں۔ Plugins for AI Agents اس course کا mirror image ہے: connector-native app end users کے لیے chat app (claude.ai) کو extend کرتی ہے؛ plugin builders کے لیے coding agent (Claude Code، OpenCode) کو extend کرتا ہے۔ Same idea، host-loadable unit ship کرنا، aimed at the other host۔

AI Identity: Human Sign-In and Agent Access، Better Auth پر built، دو halves میں آتا ہے: پہلے آپ sign-in own کرتے ہیں، اپنا OAuth/OIDC server کھڑا کرتے ہیں جو وہ tokens issue کرتا ہے جنہیں یہ course صرف validate کرتا ہے؛ پھر آپ agent کو اپنی identity دیتے ہیں، credential اور scoped، time-boxed، revocable، human-approved way سے person کی behalf پر act کرنے کا طریقہ۔ پھر Build AI Agents آپ کو loop دیتا ہے۔
آپ نے step waste نہیں کیا۔ آپ نے وہ ship کیا جو loop own کرنے سے پہلے ship ہو سکتا ہے، exactly feel کیا کہ loop کیوں چاہیے، اور اب وہ لینے جاتے ہیں۔
وہی app، Mode 2 کے across deepen ہوتی ہے
آپ v1 throw away نہیں کریں گے۔ Later courses اسی app کو upgrade کرتے ہیں، اسی لیے Manufacturing کے end پر آپ کے پاس one real product ہوتا ہے جو whole way grow ہوا:
| You'll add | Which upgrades | In |
|---|---|---|
| Semantic search over your domain | domain_get_item(id) → domain_search(query) | RAG on Postgres + pgvector |
| A durable system-of-record (audit, approval, trustworthy state) | the bare two-table memory | Building a Digital FTE |
| A high-fidelity persona / richer config (no-fabrication guardrails) | the simple config_* rules | Identic AI |
| Your own token issuer, plus identity for agents (scoped, revocable, on-behalf-of) | the rented sign-in service | AI Identity (Better Auth) |
| Proof it actually does its job well | "it seems to work" | Eval-Driven Development |
| Production hardening (observability, a CI test gate) | the live tunnel demo | Deploy the Agent Harness |