AI Era mein Python: Crash Course
17 Concepts · Likhne se Pehle Parhein
Aap Agentic Coding Crash Course mein AI coding agent chalana pehle seekh chuke hain. Aap session khol sakte hain, Claude Code ya OpenCode ko instruction de sakte hain, aur usay files edit aur commands run karte dekh sakte hain. To yeh woh honest sawal hai jiske jawab ke liye yeh course maujood hai:
Agar agent Python likhta hai, to aap ko Python seekhne ki zaroorat hi kyun hai?
Kyun ke kisi ko usay parhna hota hai. Agent seconds mein hundreds of lines working-looking code produce karta hai. Aur "working-looking" hi trap hai. AI plausible ke liye optimize karta hai, correct ke liye nahin. Jo code quietly ghalat number return karta hai, record drop karta hai, ya API key leak karta hai, woh exactly us code jaisa dikhta hai jo kaam karta hai. Farq sirf woh shakhs bata sakta hai jo agent ka likha parh sake aur prove kar sake ke woh usi kaam ko karta hai jo us ne mean kiya tha.
Ab poora job yahi hai. Blank page se loops type karna nahin. Woh agent karta hai. Aap ka job woh hissa hai jise ab bhi human chahiye: decide karna ke correct ka matlab kya hai, aur verify karna ke generated code us par poora utarta hai.
Yeh Programming in the AI Era ka gateway hai. Book ka woh part aik 3-5 month deep course hai jo aik project (SmartNotes) ke gird built hai. Yeh crash course 80%-in-one-read version hai: itni Python literacy ke aap aaj se agent code parhna shuru kar sakein. Yeh Agentic Coding ke baad aur Build AI Agents, Postgres for AI, aur Building a Digital FTE se pehle aata hai, kyun ke yeh teenon assume karte hain ke aap agent ka generated Python parh sakte hain. Yahan ke kisi topic ka full treatment us course mein linked hai.
Aik idea jo neeche sab kuch organize karta hai: purani duniya mein aap Python usay likh kar seekhte the. Yahan aap usay parh kar seekhte hain: code kya karta hai predict karna, chalana, kyun samajhna, phir usay change karna aur aakhir mein apna banana. Is loop ka naam hai, aur yeh poore course ki spine hai.
Is course ki har cheez woh hai jo aap Claude Code session ke andar karte hain, sirf parhte nahin. claude running rakh kar terminal khula rakhein aur har idea tak pohnchte hi try karein.
Is course ki har cheez woh hai jo aap OpenCode session ke andar karte hain, sirf parhte nahin. opencode running rakh kar terminal khula rakhein aur har idea tak pohnchte hi try karein. Agar cost dekh rahe hain, routine runs ke liye usay deepseek-v4-flash jaisay cheap model par point karein (Agentic Coding course dekhein).
Set up your environment (once)
Is course ka aik chhota companion hai jo aap aik dafa download karte hain: course base. Read along karne ke liye strictly zaroori nahin, lekin yeh sab kuch us tarah behave karwata hai jaisa course assume karta hai. Is mein aik short rules file, AGENTS.md, hoti hai jo aap ke agent ko disciplined tutor bana deti hai jis par yeh course rely karta hai: woh reveal karne se pehle predict karwata hai, answers ke bajaye hints deta hai, aur test ko pass karne ke liye chup kar weak nahin karta. Aap ka agent jab bhi start hota hai yeh file automatic parhta hai, isi liye yahan ke prompts short reh sakte hain. Base practice-project starters aur answer key bhi carry karta hai jisse aap apne tests compare kar sakte hain.
Download python-crash-course-base.zip
Unzip karein, phir folder ke andar agent kholein:
cd python-crash-course
claude
cd python-crash-course
opencode
Notice karein base jaan boojh kar abhi koi Python project nahin bhejta. Khud apna workbench zero se banana pehli real skill hai, aur yeh bilkul agla kaam hai jo aap Concept 3 mein karte hain. Abhi ke liye folder mein agent kholein aur confirm karein ke us ne rules load kar liye:
Aap is session ke liye kaun se rules follow kar rahe hain?
Usay read-before-you-write method aur tests run kar ke verify karne ki habit describe karni chahiye. Done when aap ka agent un rules ke saath jawab de. (Bare folder se start karna pasand hai? Woh bhi kaam karega; bas discipline aap khud set karenge.)
Part 1: The new mindset
1. You read code; the agent writes it
Traditional Python courses mein jo skill train hoti thi woh production thi: function type karo, loop type karo, class type karo. AI ne woh bottleneck hata diya. Ab jo skill matter karti hai woh direction and verification hai.
| The old job (mostly automated now) | The new job (still yours) |
|---|---|
| Type the implementation from a blank page | Describe precisely what you want, in words the agent can act on |
| Memorize syntax | Recognize syntax well enough to read it critically |
| Get the code to run | Prove the code is correct, not just runnable |
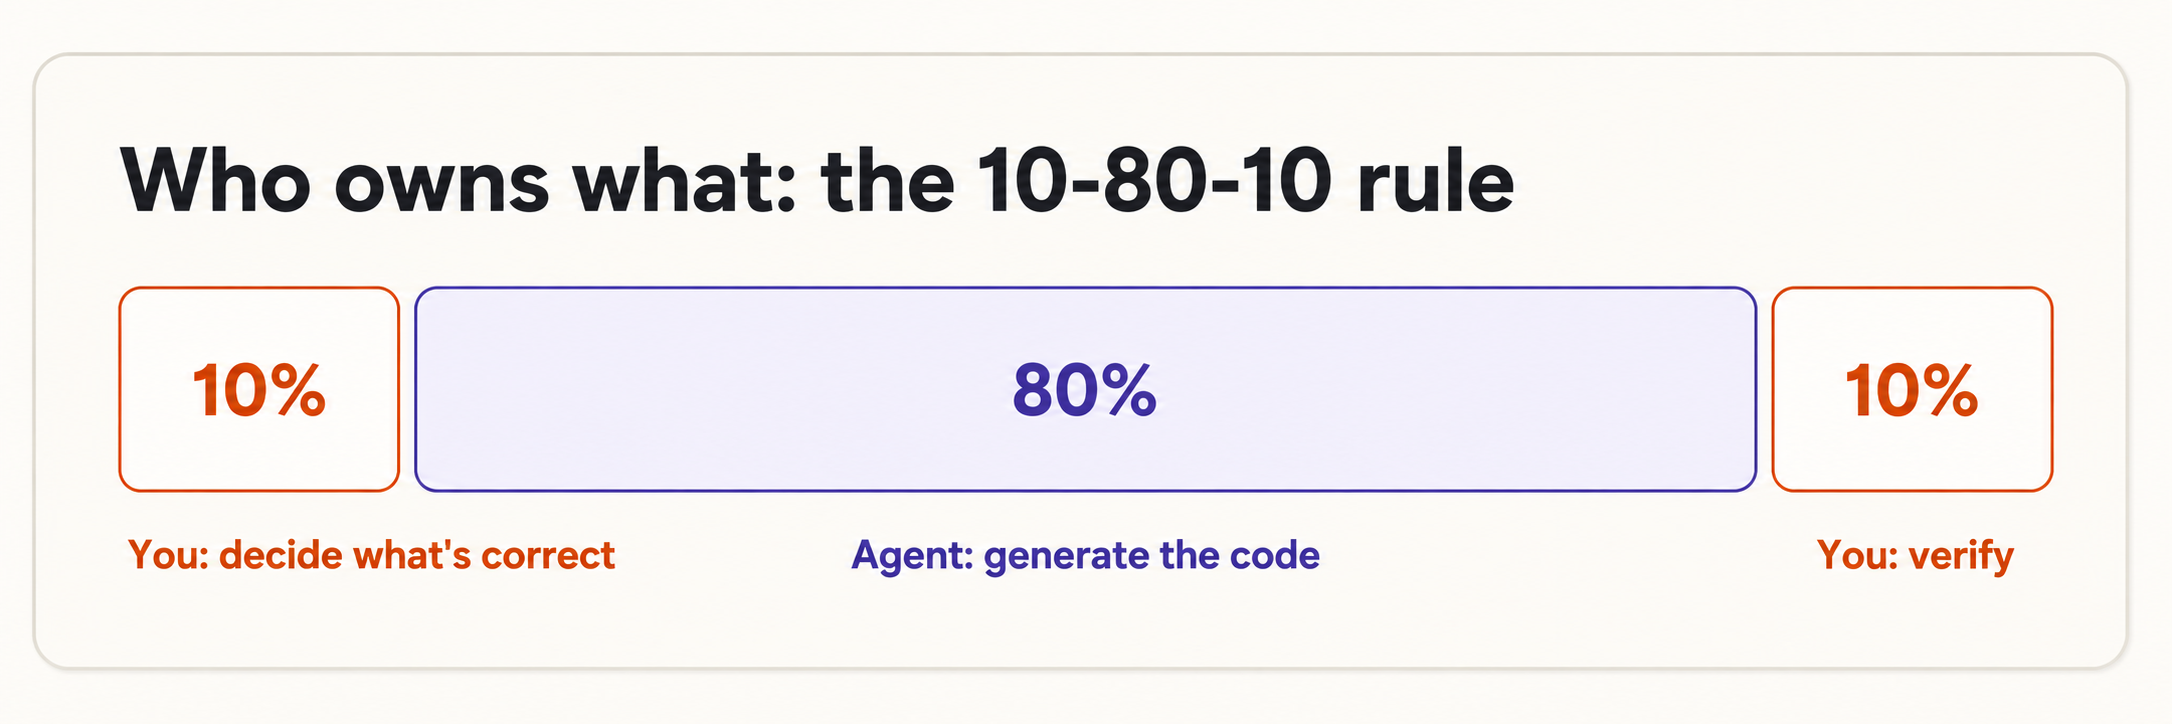
Yeh programming par apply hui 10-80-10 rule hai. Aap pehli 10% own karte hain (kya build karna hai aur "correct" ka matlab kya hai decide karna) aur aakhri 10% (verify karna). Beech ki 80% agent own karta hai (code generate karna). Fluently parhna hi aap ko dono human ends apne paas rakhne deta hai.
Reading writing se bohat asan hai. Aap ko blank page se yeh recall karne ki zaroorat nahin ke list square brackets use karti hai. Aap ko sirf ["a", "b"] ko dekh kar list recognize karna hai. Is poore course ka bar yahi hai: recognition, recall nahin.
2. The PRIMM-AI+ method
PRIMM-AI+ woh tareeqa hai jisse aap blank page ko takay baghair code parhna seekhte hain. Python ka har naya piece paanch steps se guzarta hai, aur agent har step mein aap ka partner hai:
| Step | Letter | What you do | The agent's role |
|---|---|---|---|
| Predict | P | Before anything runs, guess what the code will do | Stays quiet - this is your guess to make |
| Run | R | Run it and see the real output | Executes the code for you |
| Investigate | I | Compare your guess to reality; ask why | Explains line by line, on demand |
| Modify | M | Change one thing, predict again, run again | Makes the edit you describe |
| Make | M | Specify your own version from scratch; let the agent build it; verify | Generates against your spec |
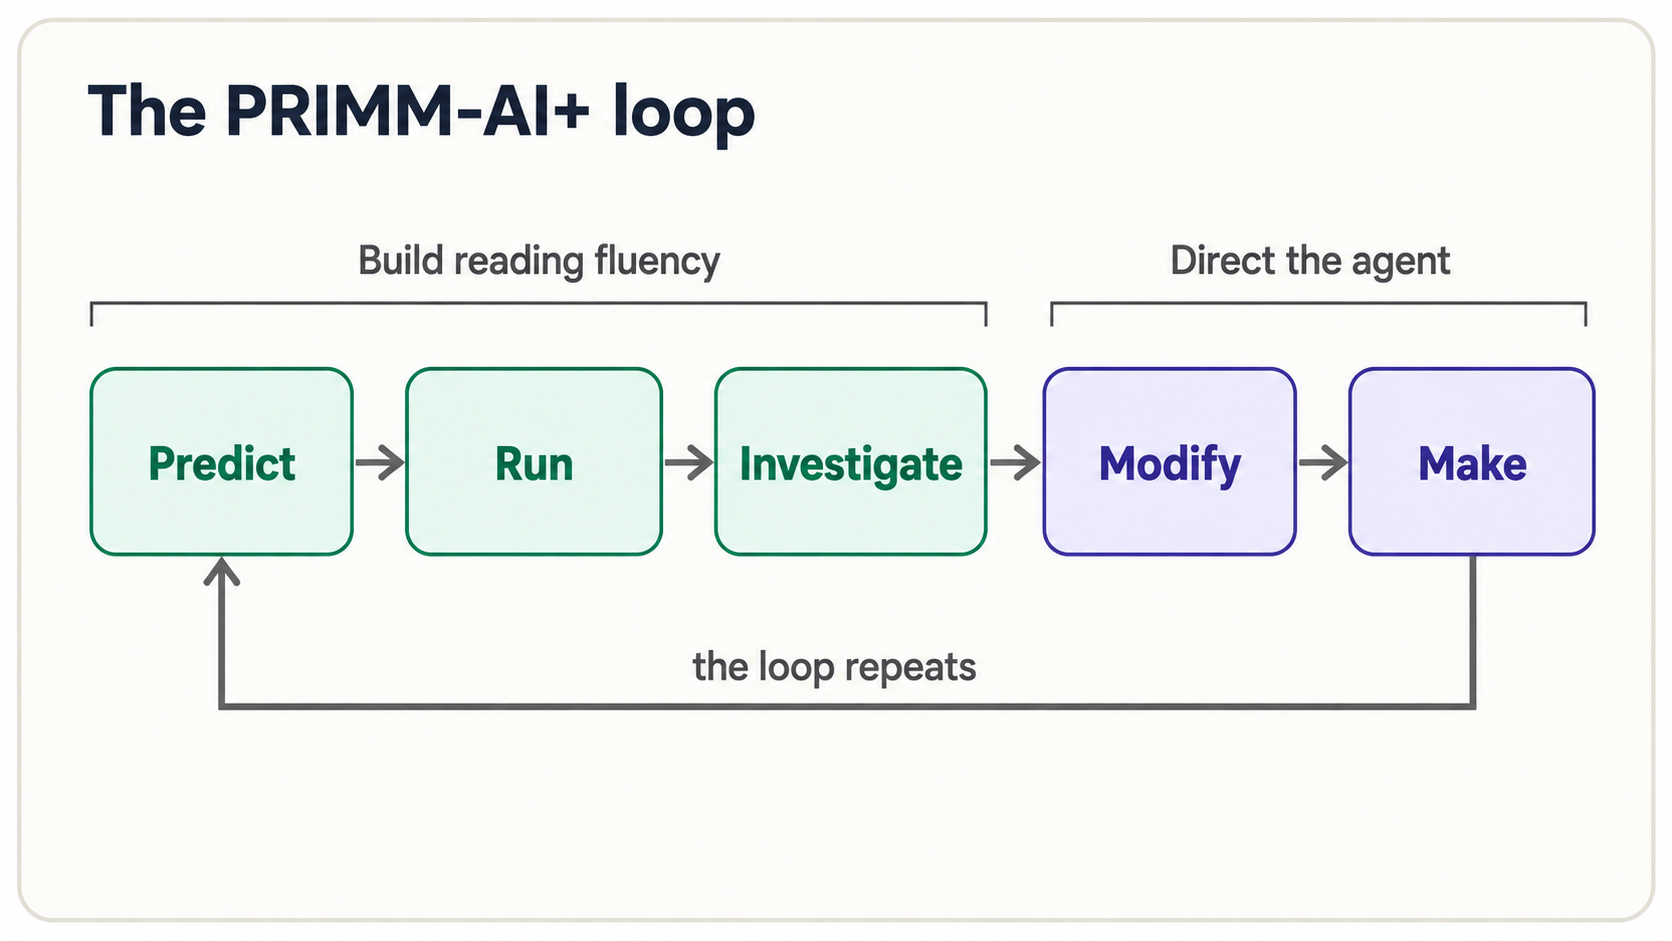 AI+ woh hissa hai jo isay purane teaching method ka AI-era version banata hai. Classic PRIMM ke upar do cheezein layer hoti hain: agent hamesha reading partner ke taur par available hai ("explain line 3," "what would break this?"), aur kuch bhi faith par accept nahin hota. Predict-Run-Investigate aap ki reading fluency banata hai; Modify-Make woh jagah hai jahan aap agent ko direct karna start karte hain. Aakhir tak Make bhi Predict jaisa natural mehsoos hota hai.
Testing kahan fit hoti hai: har jagah. Investigate, Modify, aur Make ko power dene wala engine test hai: aik chhota check jo "correct" ka matlab pin down karta hai, taake computer agent ke kaam ko verify kare, aap eyeballing na karein. Yeh koi step nahin jo aap end par aik dafa karte hain. Agli function se hi jo aap parhenge, chhota test saath chalega: pehle single assert line (Concept 5), phir objects (Concept 8) aur validation rules (Concept 11), aur aakhir mein full Test-Driven Generation loop jahan aap test pehle likhte hain aur agent usay pass karne ke liye code likhta hai (Concept 16). Agent jo bhi code de, usay untrusted treat karein jab tak aap ka likha test na keh de ke woh theek hai.
Instinct yeh hoti hai ke seedha Run par jump karein: bas answer dekh lein. Mat karein. Aap ki prediction aur real output ke darmiyan gap wahi jagah hai jahan learning hoti hai. Wrong prediction aap ko exactly batati hai mental model ka kaunsa hissa broken hai, sahi prediction se zyada. Predict loud, writing mein, ya agent ko. Phir run karein.
3. Your workbench in five minutes
Yeh course assume karta hai ke aap Agentic Coding Crash Course kar chuke hain, jahan aap agent install aur drive karna seekhte hain. Agar aap seedha yahan aa gaye aur abhi tak kuch bhi installed nahin, to aage barhne se pehle aik coding agent set up karein. Woh single tool baqi sab kuch aap ke liye install kar dega:
- Claude Code: official guide follow karein docs.claude.com/en/docs/claude-code (macOS, Linux, aur Windows via WSL par works).
- OpenCode (open-source alternative): opencode.ai.
- uv (Python itself + packages): docs.astral.sh/uv; ya next step mein agent se install karwa lein.
In tools ko deeply samajhne ki zaroorat nahin. Aik agent install karein, folder mein kholein, aur continue karein. Is section ka baqi setup agent se hota hai.
Aap ko teen cheezein chahiye: Python run karne ka tareeqa, kuch quality tools, aur aap ka agent. Pehli do cheezein aik installer cover karta hai: uv, fast package manager jo Python khud install karta hai aur project manage karta hai.
Inhein memory se haath se install na karein - yahi woh fiddly setup hai jismein agent acha hai. Jis folder mein agent khola hai, usay instruction dein:
Yahan
uvuse kar ke naya Python project set up karein. Tests ke liyepytest, type checking ke liyepyright, aur formatting ke liyeruffadd karein. Aikhello.pybanayein jo "ready" print kare. Phir usay run karein aur output dikhayein.
Agent uv commands run karega, files create karega, aur script run karega. Aap har step watch aur approve karte hain. Wahi aap ka workbench hai. Aap ne aik command bhi memorize nahin ki.
Inhein memory se haath se install na karein - yahi woh fiddly setup hai jismein agent acha hai. Jis folder mein agent khola hai, usay instruction dein:
Yahan
uvuse kar ke naya Python project set up karein. Tests ke liyepytest, type checking ke liyepyright, aur formatting ke liyeruffadd karein. Aikhello.pybanayein jo "ready" print kare. Phir usay run karein aur output dikhayein.
OpenCode uv commands run karega, files create karega, aur script run karega. Aap har step watch aur approve karte hain. Wahi aap ka workbench hai. Aap ne aik command bhi memorize nahin ki.
What that actually looks like
Aap silence mein watch nahin karte. Agent har step narrate karta hai aur kuch run karne se pehle poochta hai. Real session roughly aisa lagta hai (Claude Code shown; OpenCode nearly identical hai):
> Set up a new Python project here using uv. Add pytest, pyright, ruff.
  Create a hello.py that prints "ready", run it, and show the output.

● I'll initialize the project with uv.
  $ uv init .                       ← the agent proposes a command
  Allow? (y/n) y                    ← you approve
  Initialized project

● $ uv add --dev pytest pyright ruff
  Allow? (y/n) y
  + pytest  + pyright  + ruff

● Created hello.py:
      print("ready")

● $ uv run hello.py                 ← this is how a Python file gets run
  ready                             ← the output prints right here

  Done. Your workbench is ready.
Teen cheezein notice karein, kyun ke yahi physical loop hai jo aap poore course repeat karenge:
- Code file mein rehta hai (
hello.py), chat window mein nahin. - Aap file
uv run hello.pyse run karte hain: yahi command is course ki har script aur example execute karti hai. - Agent har command se pehle permission poochta hai, phir output neeche print karta hai. Aap approve karte hain, result parhte hain.
To jab neeche koi example kahe "run it," aap ke paas do easy options hain: code file mein paste karein aur agent se kahen "run this file and show me the output," ya snippet chat mein paste kar ke kahen "run this and show me what it prints." Dono tareeqon mein aap Python haath se type nahin karte.
Agar koi step red error throw kare, aap ko usay samajhna zaroori nahin. Red text copy karein, wapas paste karein, aur kahen: "this failed. Read the error and fix it." Agar agent report kare ke uv installed nahin, pehle us se uv install karne ko kahen. Unstuck hona agent ka job hai; stuck notice karna aap ka.
Har tool aik line mein kya karta hai:
| Tool | What it does for you |
|---|---|
| uv | Python aur project packages fast install karta hai |
| pytest | Aap ke tests run karta hai aur batata hai kaun pass/fail hua |
| Pyright | Code ke type labels parhta hai aur run se pehle mismatches flag karta hai |
| Ruff | Style aur formatting check karta hai - code ka spell-checker |
Pyright aur Ruff reading machines hain. Jab agent code generate karta hai, yeh tools usay aap ke liye parhte hain aur mistakes ki poori class instantly pakarte hain: wrong type, unused variable, typo'd name. Yeh aap ki first line of verification hain, is se pehle ke aap khud aik line parhein. (Full setup walkthrough: Programming in the AI Era, Phase 1: The Workbench.)
See your reading machines catch something
Yeh tools abstract nahin. Agent se chhoti function likhwaiye aur phir usay wrong kind ke value se call karwaiye:
def total_with_tax(price: float, tax_rate: float) -> float:
    return price + (price * tax_rate)

total_with_tax("100", 0.15)   # oops — "100" is text, not a number
Is par pyright run karein aur code execute hone se pehle yeh milta hai:
error: Argument of type "Literal['100']" cannot be assigned to
       parameter "price" of type "float"   (reportArgumentType)
Pyright ne type hints parhe, dekha ke jahan float promised tha wahan text pass hua, aur mismatch instantly pakar li. Ruff different class ki slip pakarta hai: leftover clutter jo agent kabhi kabhi chhor deta hai:
F401 `os` imported but unused
Aap in messages ko memorize nahin karte. Aap unhein spell-checker ke underline ki tarah parhte hain: yahan kuch fit nahin, aur yeh exact line par point kar raha hai. Jab agent hundred lines generate karta hai, yeh do tools aik second se kam mein sab parh lete hain, aur isi liye yeh aap ke khud parhna start karne se pehle run hote hain.
Part 2: The shapes you'll see everywhere
Yeh core shapes hain jo shayad us Python ka 70% banati hain jo aap kabhi parhenge. Har aik ko Predict -> Run -> Investigate ke saath move karein: parhein, output guess karein, phir session mein run kar ke check karein.
4. Values, variables, and the four types
Variable aik labeled box hai jo value hold karta hai. = sign ka matlab hai "right wali value ko left wale box mein daal do": yeh math sense mein "equals" nahin. Har value ki type hoti hai, aur abhi aap ko sirf chaar recognize karni hain. Hum type ko name ke baad name: type ke taur par likhte hain, taake aap aur agent dono glance mein dekh sakein ke har box kya hold karne ke liye meant hai:
name: str = "Ayesha"        # str   — text, always in quotes
age: int = 30               # int   — a whole number
price: float = 19.99        # float — a number with a decimal point
is_active: bool = True      # bool  — only ever True or False
: str, : int, : float, : bool parts type hints hain. Python mein optional hain, lekin is course mein hum hamesha include karte hain: partly kyun ke yeh code ko read karna asan banate hain, aur partly kyun ke, Concept 10 mein aap dekhenge, yahi tareeqa hai jis se aap agent ko exactly batate hain kya build karna hai. Abhi ke liye name: str ko plain English mein parhein: "box name text hold karta hai."
Predict: aap ke khayal mein yeh kya print karta hai?
age: int = 30
age = age + 1
print(age)
Run it. Output 31 hai. Investigate: line age = age + 1 impossible lagti hai agar aap = ko "equals" parhein: 30, 31 ke equal nahin ho sakta. Lekin = ka matlab assign hai: age ki current value (30) lo, 1 add karo, aur result (31) wapas box mein daal do. Right side pehle run hoti hai, phir box update hota hai. (Notice hum ne type hint : int sirf pehli dafa likha jab age appear hua; box ki type set hone ke baad har reassignment par repeat nahin karte.) Yeh idea start mein lag bhag sab ko trip karta hai, isi liye aap ne pehle predict kiya.
Jab x = something dekhein, right-to-left parhein: "something compute karo, phir usay x mein store karo." Left wala name sirf label hai.
5. Functions and their signatures
Function naam wala reusable code block hai. Aap usay inputs dete hain (jinhein arguments kehte hain), woh output wapas deta hai. Pehli line, signature, woh sab se important line hai jo aap parhna seekhenge, kyun ke yeh contract hai:
def total_with_tax(price: float, tax_rate: float) -> float:
    return price + (price * tax_rate)
Signature ko piece by piece parhein:
def: "Main function define kar raha hoon."total_with_tax: is ka name.(price: float, tax_rate: float): yeh do inputs leta hai, dono decimals.: floathissa type hint hai (Concept 10 mein zyada).-> float: yeh decimal wapas deta hai.
Aik saans mein: "mujhe price aur tax rate do, dono decimals, aur main tumhein decimal wapas dunga." Aap function ke body ki aik line parhe baghair samajh sakte hain ke function kya promise karta hai. Isi liye AI code verify karte waqt signatures itni matter karti hain. Body ghalat ho sakti hai; signature batati hai ke usay supposed kya karna tha.
Predict, then run:
def total_with_tax(price: float, tax_rate: float) -> float:
    return price + (price * tax_rate)

print(total_with_tax(100.0, 0.15))
Output: 115.0. Agar aap ne 115.0 predict kiya, aap already function parh sakte hain.
Pin it with a test
Function pehli cheez hai jise aap prove correct kar sakte hain, kyun ke us ka clear contract hai: in inputs par yeh output return karna zaroori hai. Aap isay assert se lock karte hain: aik one-line claim jo true hone par kuch nahin karta aur false hote hi loud crash karta hai:
assert total_with_tax(100.0, 0.15) == 115.0   # "I claim this must equal 115.0"
assert total_with_tax(0.0, 0.15) == 0.0        # a free item costs nothing
Yeh do lines run karein aur aap kuch nahin dekhenge. Silence ka matlab har claim held. 115.0 ko 999.0 se change karein aur woh instantly crash karta hai. Testing ka poora idea yahi hai: aap aik dafa likh dete hain ke correct ka matlab kya hai, aur computer har dafa aap ke liye re-check karta hai. Yeh do lines already tiny specification hain. Inhein hold rakhein. Concept 16 mein aap yahi exact asserts agent ko denge aur us se function likhwaenge jo unhein satisfy kare. (Yeh accident nahin: wahi tax function full TDG cycle ke taur par wahan dobara aata hai.)
6. Collections: grouping data
Real code mein single values rare hain. Zyada data groups mein aata hai, aur chaar containers aap baar baar dekhenge:
notes: list[str] = ["buy milk", "call Sara", "finish report"]   # list  — ordered, can change
note: dict[str, str | bool] = {"title": "Meeting", "done": False}  # dict — labeled pairs (key: value)
tags: set[str] = {"work", "urgent"}                             # set   — unique items, no duplicates
point: tuple[int, int] = (3, 5)                                 # tuple — ordered, cannot change
Hints container ke andar kya hai describe karte hain: list[str] "text ki list" hai, dict[str, str | bool] "aik dict jiske keys text hain aur values ya text hain ya true/false" (| ka matlab "or" hai), set[str] "text ka set" hai, aur tuple[int, int] "whole numbers ka pair" hai. Aap ko yeh memory se likhne ki zaroorat nahin. Aap ko inhein parhna hai.
Do jo aap sab se zyada milenge woh list (sequence jismein add aur reorder kar sakte hain) aur dict (labeled values ka set: lag bhag har data piece ki backbone jo AI agent pass karta hai, kyun ke yeh JSON se directly map karta hai).
Predict, then run:
note: dict[str, str | bool] = {"title": "Meeting", "done": False}
print(note["title"])
note["done"] = True
print(note)
Output:
Meeting
{'title': 'Meeting', 'done': True}
Investigate: note["title"] dict ke andar ja kar "title" label wali value nikalta hai. Doosri line "done" label wali value change karti hai. Dict woh tareeqa hai jis se agent aap ko note, user, API response hand karega: kuch bhi named fields ke saath.
7. Control flow and comprehensions
Code if se decisions karta hai, aur for se repeat karta hai. Indentation (line ke start par spaces) se Python jaanta hai kya if ya for ke andar belong karta hai. Yeh decoration nahin, structure hai.
prices: list[int] = [10, 250, 50, 400]

for price in prices:           # do this once for each price in the list
    if price > 100:            # decision
        print(f"{price} is expensive")
    else:
        print(f"{price} is fine")
Run karne se pehle Predict karein kaun si lines "expensive" print karengi. (Answer: 250 aur 400.)
In lines mein se do f-string use karti hain: text jiske aage f hai, jahan {...} ke andar ki cheez apni value se replace hoti hai. To f"{price} is expensive" current price ko sentence mein drop karta hai. Aap f-strings constantly dekhenge; bas recognize karein ke {name} ka matlab "is value ka text yahan daal do" hai.
Jab decision ke do se zyada outcomes hon, elif ("else if" ka short) chain banata hai. Python har branch top to bottom check karta hai aur pehli true branch run karta hai:
def grade_for(score: int) -> str:
    if score >= 90:
        return "A"
    elif score >= 70:
        return "B"
    elif score >= 50:
        return "C"
    else:
        return "F"
grade_for(72) Predict karein, phir run karein. Yeh "B" hai: 72 >= 90 false hai, to aglay branch par girta hai, 72 >= 70 true hai, aur wahan stop. if/elif/else chain ko is tarah parhein: "inhein order mein check karo; pehla match lo." Aap and aur or se combined conditions bhi dekhenge - if score >= 70 and attended: ka matlab dono true hon - aur "multiple criteria" decisions parhne ke liye itna kaafi hai.
Jab aap for loop parh sakte hain, aap Python ki sab se common one-liner parh sakte hain: comprehension. Yeh sirf for loop hai jo new list banane ke liye aik line mein folded hai:
prices: list[int] = [10, 250, 50, 400]

# The long way:
expensive: list[int] = []
for price in prices:
    if price > 100:
        expensive.append(price)

# The comprehension — exactly the same result:
expensive = [price for price in prices if price > 100]
Long version mein .append(price) price ko list ke end mein add karta hai; yeh thing.action() shape woh method call hai jo aap Concept 8 mein milenge. Comprehension ko left to right parhein: "mujhe price do, har price ke liye jo prices mein hai, agar price > 100." Dono [250, 400] produce karte hain. AI code mein comprehensions har jagah milenge kyun ke data cleaning aur reshaping zyada tar kaam hai. Is shape ko recognize karne mein comfortable ho jayein aur aap bohat real Python parh sakenge.
Koi bhi line jo samajh na aaye session mein paste karein: "Explain this line as if I've never coded: [n['text'] for n in notes if n['done']]." Yeh PRIMM-AI+ ka Investigate step hai, on demand. Isay constantly use karein. Yeh kisi bhi reference se fast hai.
8. Classes and objects - reading a blueprint
Ab tak aap ka data loose tha: note dict tha, price float tha. Class related data aur us se belong karne wale actions ko aik named shape mein bundle karti hai. Class ko blueprint samjhein aur object (jise instance bhi kehte hain) ko us blueprint se bani cheez: aik Note blueprint, us se bani bohat si actual notes.
Yeh class aik single note model karti hai:
class Note:
    def __init__(self, title: str, body: str) -> None:
        self.title = title        # an attribute — data this note carries
        self.body = body
        self.done = False

    def mark_done(self) -> None:  # a method — an action this note can perform
        self.done = True
Pieces mein parhein:
class Note:, blueprint define karta hai, namedNote.__init__: setup method. Nayi note build karte waqt automatically aik dafa run hota hai, aur starting data store karta hai. (-> Noneka matlab kuch back nahin deta; bas object configure karta hai.)self: yeh particular object. Blueprint ke andar,self.titleka matlab "is note ka title." Har method pehleselfleta hai taake usay pata ho kis object par kaam kar raha hai.self.title,self.body,self.done- attributes: har note jo data carry karti hai.mark_done, aik method: function jo class ke andar rehta hai aur object par act karta hai.
Ab aik build karein aur use karein. Run se pehle output Predict karein:
n: Note = Note(title="Groceries", body="milk, eggs")
print(n.done)
n.mark_done()
print(n.done)
Output:
False
True
Investigate: Note(title="Groceries", body="milk, eggs") __init__ run karta hai aur finished object wapas deta hai, jo n mein store hota hai. n.done attribute parhta hai; n.mark_done() method call karta hai jo usay change karta hai. Dot (.) hamesha yahi matlab rakhta hai: "is object ke andar jao aur dot ke baad named cheez nikalo."
Yeh aik pattern - data parhne ke liye object.attribute aur object se kaam karwane ke liye object.method() - zyada tar real Python unlock karta hai. Agent code mein lag bhag har cheez objects hai: Pydantic model class hai, agent object hai, database connection object hai. Jab agent.run(task) ya db.save(note) dekhein, aap parh rahe hain "is object se us ka method run karne ko kaho." (Full object model: Programming in the AI Era, Phase 5.)
Pin it with a test
Object ko aap exactly usi tarah verify karte hain jaisay Concept 5 mein function ko: assert karein method run hone se pehle aur baad us ki state kya honi chahiye:
n: Note = Note(title="Groceries", body="milk, eggs")
assert n.done is False      # a fresh note starts unfinished
n.mark_done()
assert n.done is True       # ...and is finished after mark_done()
Same move, new target: method sirf object se attached function hai, is liye wahi one-line assert prove karta hai ke woh behave karta hai. Jab agent aap ke liye class likhe, aap isi se check karte hain ke us ne aap ka meant kaam kiya.
Is course mein har cheez ki tarah, goal recognition hai. Jab agent class generate kare, aap point kar sakein: "woh setup method hai, woh attributes hain, woh method hai jo state change karta hai." Yeh verify karne ke liye kaafi hai ke kya woh aap ke ask ke mutabiq hai.
9. More shapes you'll meet in generated code: while, slicing, try/except, and input()
Aap in chaar ko rarely write karenge, lekin agent inhein constantly use karta hai, is liye reading aur verification ke waqt recognize karna zaroori hai. Har aik par quick Predict -> Run -> Investigate kaafi hai.
while: repeat until a condition changes. Jahan for loop collection ke har item par aik dafa run hota hai, while loop tab tak chalta rehta hai jab tak condition true rehti hai:
count: int = 3
while count > 0:          # keep looping while this is true
    print(count)
    count = count - 1
print("done")
Predict, then run. Output: 3, 2, 1, done. Isay parhein: "count > 0 hone tak yeh karte raho." Generated code mein aik hazard recognize karne layak hai: agar condition kabhi false na ho, loop forever chalta hai, is liye jab while dekhein to glance karein ke aakhir usay stop kaun karta hai.
Slicing: list ya string ka piece grab karna. Square brackets ke andar colon ka matlab "positions ka range" hai:
letters: list[str] = ["a", "b", "c", "d", "e"]
print(letters[1:3])       # from position 1 up to (not including) 3
print(letters[:2])        # the first two
print(letters[-1])        # the last one
Predict, then run. Output: ['b', 'c'], ['a', 'b'], e. Counting 0 se start hoti hai; [1:3] ka matlab "1 se 3 tak lekin 3 include nahin"; -1 ka matlab "last one." Wahi syntax text par bhi kaam karti hai: "hello"[:3] is "hel".
try / except: kuch aisa attempt karna jo fail ho sakta hai. Kuch operations blow up kar sakti hain: zero se divide karna, missing file parhna, network call timeout. try/except risky code run karta hai aur crash karne ke bajaye error catch karta hai:
def safe_divide(a: float, b: float) -> float:
    try:
        return a / b
    except ZeroDivisionError:        # if dividing by zero is attempted...
        return 0.0                   # ...do this instead of crashing
safe_divide(10.0, 2.0) aur safe_divide(10.0, 0.0) Predict karein, phir run karein. Outputs: 5.0 aur 0.0. Isay parhein: "yeh try karo; agar is specific tareeqe se fail ho, to woh instead karo." Agent code mein jo bhi fail ho sakta hai us ke gird aap try/except dekhenge.
input(): pause aur user jo type kare woh parhna. Interactive scripts aur command-line tools input() use karte hain taake person se sawal pooch kar answer ka wait karein:
name: str = input("What's your name? ")   # waits here until the user types and presses Enter
print(f"Hello, {name}!")
Recognize karne wali aik cheez, aur woh jagah jahan generated code aksar slip karta hai, yeh hai ke input() hamesha text return karta hai, chahe user number type kare. Math karne ke liye code ko pehle convert karna hota hai:
age_text: str = input("Your age? ")   # "30" comes back as text, not a number
age: int = int(age_text)              # int(...) converts text to a whole number
print(f"Next year you'll be {age + 1}")
Agar kabhi input() ko arithmetic mein seedha feed hota dekhein bina int(...) ya float(...), to yeh bug flag karein: program ya crash karega ya text glue karega instead of adding.
Pin it with a test
Error case exactly woh cheez hai jise pin karna worth hai: assert karein dangerous input handled hai, crash nahin:
def test_safe_divide() -> None:
    assert safe_divide(10.0, 2.0) == 5.0
    assert safe_divide(10.0, 0.0) == 0.0    # handled, not a crash
Har shape generated code mein subtle ghalti ki common jagah hai: while jo kabhi end nahin hota, slice jo off by one hai ([1:3] do items deta hai, teen nahin), except jo woh error silently swallow karta hai jo aap ko jaana chahiye tha, ya input() jiska text math se pehle number mein convert nahin hota. Shape recognize karna hi aap ko exactly un spots par ruk kar qareeb se dekhne deta hai.
Part 3: The AI-era power concepts
Yeh concepts "hello world" Python ko us Python se alag karte hain jo aap agent aur ML code mein waqai dekhenge. In mein se zyada tar aap abhi scratch se nahin likhenge; agent woh karta hai, aur aap ka goal pure recognition hai: jab koi shape appear ho, aap jaante hon woh kis ke liye hai aur roughly kya karti hai. Aik exception pehla hai, type hints (Concept 10): yeh aap likhna seekhte hain, kyun ke inhi se aap agent ko exactly batate hain kya build karna hai. (Kai concepts seedha production AI engineers ke daily use se liye gaye hain.)
Pace yahan jaan boojh kar jump karti hai. Do pages pehle aap age = age + 1 parh rahe the; ab generators, validators, aur async dekhenge. Theek hai. Aap se in mein se kuch likhna expected nahin. Concepts 11-15 ke liye aap ka sirf job har shape recognize karna aur plain English mein kehna hai yeh kis ke liye hai. Agar block dense lage, one-line "read it as..." summary parhein aur move on. Koi inhein memorize nahin karta; aap spot karna seekhte hain.
10. Type hints - the labels that steer the agent
Aap Concept 5 mein aik se mil chuke hain: price: float. Type hint woh label hai jo batata hai variable ya function kis qisam ka data expect karta hai. Python inhein require nahin karta, lekin AI era mein yeh aap ka sab se powerful tool hai, aik wajah se:
Type hints agent ko instructions hain. Jab aap agent se fill in karwane se pehle aisi signature likhte hain -
def summarize_notes(notes: list[dict], max_words: int) -> str:
    ...   # the agent writes this part
- aap ne usay precisely aur unambiguously bata diya ke input dicts ki list hai, word limit whole number hai, aur output single string hai. Agent ab right cheez zyada dafa generate karta hai, kyun ke aap ne guesswork hata diya. Aur Pyright in labels ko parh kar code run hone se pehle mismatch flag karta hai.
TDG terms mein (Programming in the AI Era mein fully covered), types likhna specification likhne ka hissa hai. Yeh pehli 10% hai jo aap ki hai.
Kyun ke types instructions hain, sab se strong code requests agent ko teen cheezein deti hain aur fourth maangti hain:
- Signature, with types:
summarize_notes(notes: list[dict], max_words: int) -> str. Yeh inputs aur output pin kar deta hai taake guesswork na rahe. - Input -> output ki aik ya do examples. (Yeh aap ke tests bhi ban jati hain.)
- Constraints: "must handle an empty list," "don't call the network," "keep it under 20 lines."
- Verify karne ko kahen: "then run
pytestandpyrightand show me the result."
Vague request ("write something to summarize notes") vague code deta hai. Typed signature plus example aisa code deta hai jise aap waqai check kar sakte hain. Aur jab result ghalat ho, sirf retry mat hit karein: failing output paste karein aur batayein kya ghalat hai: "it crashes on an empty list. Handle that." Aik informed correction das blind re-rolls se behtar hai.
11. Dataclasses and Pydantic - structured, validated data
Raw dict ({"learning_rate": 0.001}) flexible lekin dangerous hai: typo'd key ya wrong type silently pass ho kar downstream sab corrupt kar sakti hai. Do tools isay fix karte hain.
Pydantic Python mein built in nahin, is liye neeche ke examples ke liye isay project mein aik dafa add karna hoga: agent se kahen "add pydantic to this project" (woh uv add pydantic run karega). dataclass built in hai aur kuch nahin chahiye.
Dataclass aap ke data ko defined shape deti hai. Yeh Concept 8 wali same Note hai. Lekin notice karein koi __init__ nahin: @dataclass line setup method aap ke liye likh deti hai, is liye aap sirf attributes aur un ki types list karte hain.
from dataclasses import dataclass

@dataclass
class Note:
    title: str
    body: str
    done: bool = False     # default value
Pydantic aur aage jata hai: yeh data ko runtime par validate karta hai aur jo fit na ho usay reject karta hai:
from pydantic import BaseModel, Field

class ModelConfig(BaseModel):
    learning_rate: float = Field(gt=0.0, lt=1.0)   # must be between 0 and 1
    batch_size: int = Field(gt=0)                   # must be positive
Agar aap learning_rate=-0.05 ke saath ModelConfig build karne ki koshish karein, Pydantic hours baad training run poison hone dene ke bajaye immediately clear error raise karta hai. Isi liye Pydantic agent code mein har jagah hai: yeh JSON schemas bhi auto-generate karta hai jo LLMs tool calling ke liye use karte hain. Aap building agents start karte hi isay phir milenge.
Pin it with a test
Pydantic model asal mein aik test hai jo program ke har run par chalta hai. Lekin phir bhi aap ko us behavior ko pin karna chahiye jo matter karta hai, error cases samait. Ab tak aap assert karte rahe ke kuch true hai; yahan aap assert karte hain ke bad input rejected hona chahiye, pytest.raises use kar ke:
import pytest
from pydantic import ValidationError

def test_rejects_negative_learning_rate() -> None:
    with pytest.raises(ValidationError):   # the block below MUST raise this error
        ModelConfig(learning_rate=-0.05, batch_size=32)
Yeh test sirf tab pass hota hai jab bad config reject ho. Failures test karna successes test karne jitna matter karta hai: agent happily aisi validation generate karega jo strict dikhti hai lekin bad data quietly andar jaane deti hai, aur "must raise" test hi usay pakarta hai.
@dataclass line is a decoratorFunction ya class ke upar @ symbol decorator hai: aik label jo us ke baad wali cheez par behavior add karta hai, bina aap ke woh behavior khud likhe. @dataclass class ko constructor aur readable printout automatic deta hai. Aap ko abhi decorators likhne ki zaroorat nahin; bas recognize karein ke @something ka matlab "next thing ko extra powers se wrap karo" hai.
12. Generators and yield - streaming without running out of memory
Jab code ko million records process karne hon, sab ko aik saath list mein load karna computer ki memory exhaust kar sakta hai. Generator isay solve karta hai items ko one at a time, on demand wapas de kar. Jo signal dhoondna hai woh return ke bajaye yield keyword hai:
from collections.abc import Iterator

def stream_notes(lines: list[str]) -> Iterator[str]:
    for line in lines:
        yield line.strip().lower()     # hand back one item, then pause
Return type Iterator[str] generator ki tell-tale sign hai: yeh list[str] (finished pile) promise nahin karta. Yeh iterator promise karta hai, stream jisse aap aik aik item pull karte hain.
Normal function return ke saath poora result build kar ke aik lump mein de deti hai. Generator yield ke saath har item ke baad pause karta hai aur next kaam sirf tab karta hai jab poocha jaye. Payoff real hai: large dataset ko generator se stream karna list mein load karne ke bajaye peak memory dramatically cut kar sakta hai, kyun ke aap kabhi poori cheez aik saath hold nahin karte. Jab yield dekhein, isay parhein: "yeh stream produce karta hai, pile nahin."
13. with - open and close things safely
Files, database connections, network sessions - jo bhi cheez open aur phir reliably close honi chahiye, chahe beech mein kuch crash ho - with statement use karti hai:
with open("notes.txt") as file:
    contents: str = file.read()
# the file is automatically closed here, even if an error happened above
Managed cheez (yahan file) guaranteed clean up hoti hai jab indented block end hota hai. AI code mein aap with ko GPU state, model evaluation mode, aur timers ke gird dekhenge. Jab with dekhein, parhein: "kuch set up karo, is block ke andar use karo, aur chahe kuch bhi ho safely tear down karo."
14. async / await - many things at once
Jab agent 20 API calls karta hai, unhein aik ke baad aik karna 20 dafa wait karna hai. Asynchronous code program ko tamam requests fire off karne aur responses aate hi handle karne deta hai: 20 queues mein aik aik kar ke kharay hone aur sab 20 mein aik saath join karne ka farq. Signals async aur await keywords hain:
async def query_llm(prompt: str) -> str:
    response = await call_the_api(prompt)   # pause here, let other work proceed
    return response
Illustration: agar 20 API calls har aik lag bhag 0.1 seconds le, unhein aik ke baad aik run karna roughly 2 seconds leta hai, jab ke async ke saath concurrently run karna slowest single call ke time ke qareeb finish ho sakta hai, kyun ke total slowest call se capped hota hai, sum se nahin. Aap ko abhi async code likhne ki zaroorat nahin. Bas recognize karein: async/await ka matlab "yeh code bohat si slow cheezein aik hi waqt karne ke liye built hai." build agents karte waqt aap is par heavily rely karenge.
15. Dunder methods - why model(x) works
Sab se strange-looking cheez jo aap parhenge woh method hai jiske dono sides par double underscores hote hain, jaisay __init__ ya __call__. Inhein "dunders" (double-underscore) nicknamed kiya jata hai, aur aap aik se mil chuke hain: Concept 8 ka __init__ setup method dunder hai. Yeh special methods hain jo aap ke apne objects ko built-in objects jaisa behave karne dete hain.
class Pipeline:
    def __init__(self, factor: float) -> None:    # runs when you create the object
        self.factor = factor

    def __call__(self, x: float) -> float: # runs when you "call" the object like a function
        return x * self.factor

pipeline = Pipeline(2.5)
print(pipeline(10.0))                       # prints 25.0 — the object is called like a function
__init__ naya object set up karta hai; __call__ woh cheez hai jo pipeline(10.0) ko function ki tarah kaam karwati hai. Isi liye PyTorch aur similar libraries mein aap model(x) likhte hain, model.forward(x) nahin: framework __call__ define karta hai taake run se pehle important setup ho. Jab dunders dekhein, parhein: "is object ko native Python cheez jaisa act karna sikhaya ja raha hai."
Ruk kar notice karein kya hua. Aap abhi generator ya async function blank page se likh nahin sakte. Aur zaroorat bhi nahin. Lekin ab aap agent ki generated file khol kar recognize kar sakte hain: "woh class hai attributes aur methods ke saath, woh type hint hai, woh tool schema define karta Pydantic model hai, woh data stream karta generator hai, woh with block resource manage karta hai, woh dunders custom dataset banate hain." Yeh recognition hi woh verification skill hai jis par poori book depend karti hai.
Part 4: The TDG loop, end to end
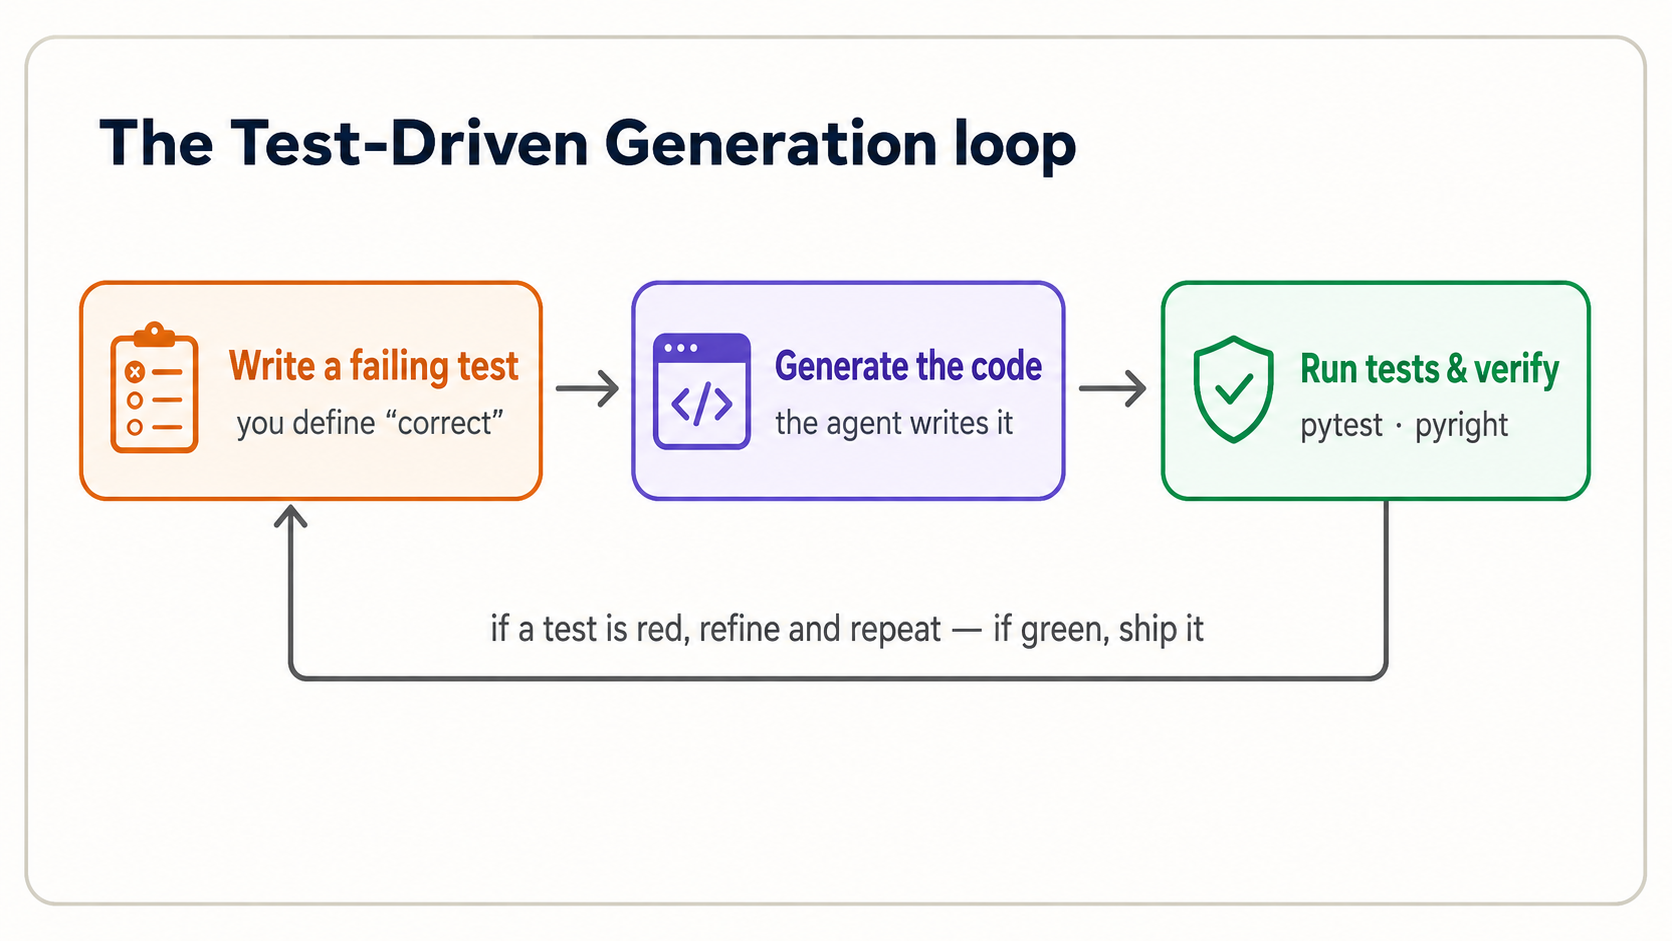
Aap Parts 2 aur 3 mein Predict-Run-Investigate kar chuke hain. Ab PRIMM-AI+ ke aakhri do letters, Modify aur Make, jo mil kar Test-Driven Generation (TDG) cycle hain: woh method jo AI era mein programming define karta hai.
16. One full cycle, in your tool
TDG old order invert karta hai. write code -> maybe test it ke bajaye aap karte hain: failing test likhna jo "correct" define kare -> agent ko code generate karne dena -> test run kar ke verify karna. Test afterthought nahin; woh specification hai. Aur woh aap se aana chahiye, kyun ke agar aap agent ko code aur test dono likhne dein, to aap AI ke kaam ko AI ki apni expectations ke against check kar rahe hain: independent signal bilkul nahin.
Yeh Concept 5 wali tax function par cycle hai. Apne session mein saath follow karein.
Step 1: Aap requirement ko failing tests ke taur par likhte hain. test_tax.py create karein:
from tax import total_with_tax

def test_basic() -> None:
    assert total_with_tax(100.0, 0.15) == 115.0

def test_zero_price() -> None:
    assert total_with_tax(0.0, 0.15) == 0.0
Aap yeh exact asserts pehle dekh chuke hain. Yeh Concept 5 ki do lines hain, ab test_*.py file mein move ki hui taake pytest inhein automatic run kare. assert X == Y ka matlab hai "main declare kar raha hoon ke X must equal Y; agar nahin to loudly fail." Yeh do lines code exist hone se pehle define karti hain ke correct ka matlab kya hai. Ab pytest run karein aur fail hota hai: abhi tax.py nahin. Yeh failure point hai. Aap ke paas precise, executable definition of done hai.
Yahan sirf order naya hai: Concepts 5, 8, aur 11 mein aap ne existing code ke liye test likha. True TDG mein aap failing test pehle likhte hain, phir agent se code generate karwate hain jo usay pass kare. Test baad mein run hone wala check rehna chhor kar agent ke build karne wali specification ban jata hai.
Step 2: Agent implementation generate karta hai. Ab apne tool ko instruction dein:
test_tax.pyparhein.tax.pycreate karein jismeintotal_with_tax(price: float, tax_rate: float) -> floatfunction ho jo dono tests pass kare. Phirpytestrun karein aur result dikhayein.
Claude Code aap ke tests parhta hai, tax.py likhta hai, aur pytest run karta hai. Kyun ke tests aap ne likhe, aap ke paas produced code par independent check hai.
test_tax.pyparhein.tax.pycreate karein jismeintotal_with_tax(price: float, tax_rate: float) -> floatfunction ho jo dono tests pass kare. Phirpytestrun karein aur result dikhayein.
OpenCode aap ke tests parhta hai, tax.py likhta hai, aur pytest run karta hai. Kyun ke tests aap ne likhe, aap ke paas produced code par independent check hai.
Step 3: Aap verify aur iterate karte hain. pytest output parhein. Do green checks (2 passed) ka matlab code us spec ko meet karta hai jo aap ne define ki. Agar red hai, failure parhein (next concept), phir refine karein. Aap blind re-prompt kar ke hope nahin karte. Aur aik cheez qareeb se dekhein: agar agent failing test ko code ke bajaye test edit kar ke pass karta hai, usay rokein. Test aap ki spec hai; usay weak kar ke green banana bug ko chhupa deta hai.
Yahi poora loop hai, aur yeh PRIMM-AI+ aur 10-80-10 rule par clean map hota hai:
| TDG step | Who leads | PRIMM-AI+ |
|---|---|---|
| Write requirement + failing tests | You (the first 10%) | Make |
| Generate the implementation | Agent (the 80%) | - |
| Run tests, verify, iterate | You (the last 10%) | Investigate / Modify |
Agent missed tests suggest karne mein acha hai, us se poochein, "what edge cases should I test for a tax calculation?". Lekin decision ke kaun se cases "correct" define karte hain aap ka rehta hai. Negative prices? Zero tax? Very large numbers? Har add ki hui case sharper specification hai.
TDG sirf badi features ke liye ceremony nahin. Isay har unit par run karein jo agent produce karta hai aur jiska checkable contract hai: har function, har method, har validation rule. Concepts 5, 8, aur 11 ke one-line asserts seed the; un se bharta hua tests/ folder hi aap ko project par trust karne deta hai jab agent usay change karta hai. Practical rule: agar aap kisi cheez ke liye test nahin likh sakte, to aap abhi nahin samajhte ke us ke liye "correct" ka matlab kya hai. Aur agent bhi nahin. Test likhna hi pata lagane ka tareeqa hai. Projects barhne par yahi aap ko regressions se protect karta hai: agent aik cheez fix kar ke dusri silently break kar de. Aap ka test suite alarm hai jo isay pakarta hai.
Reading a traceback (when it breaks)
Jab Python fail hota hai, woh traceback print karta hai: red text ki deewar jo scary lagti hai aur asal mein gift hai. Isay bottom-up parhein: last line error ka naam batati hai, aur upar wali lines trace karti hain ke kahan hua.
Traceback (most recent call last):
  File "tax.py", line 2, in total_with_tax
    return price + (price * tax_rate)
TypeError: can't multiply sequence by non-int of type 'float'
Bottom line poori story hai: kuch string (str) tha jab number hona chahiye tha: price "100" (text) ke taur par aaya instead of 100.0. Aap ko isay khud fix nahin karna; aap ko itna parhna hai ke agent ko precisely bata sakein kya ghalat hai: "the price is arriving as text, not a number. Handle that." Precise description precise fix laati hai. (Debugging ka apna phase hai: Programming in the AI Era, Phase 4.)
AI coding ki sab se mehngi habit us failure par "try again" hit karna hai jise aap ne parha nahin. Agent khushi se different wrong answer generate karega. Traceback parhein, actual problem samjhein, phir describe karein. Aik informed prompt das blind prompts se behtar hai.
The handful of errors you'll actually meet
Aap fixes memorize nahin karte. Aap last line se category recognize karte hain aur agent ko describe karte hain. Yeh six lag bhag har woh cheez cover karte hain jo beginner generated code run karte waqt dekhta hai:
| The last line says... | What it usually means | What to tell the agent |
|---|---|---|
ModuleNotFoundError / ImportError | Package installed nahin, ya name misspelled hai | "X installed nahin - uv se add karo" |
NameError | Aisa name use hua jo define nahin tha (aksar typo) | "y use hua lekin define nahin - typo?" |
TypeError | Value ki wrong kind - text jahan number expected tha, etc. | "number text ke taur par aa raha hai - convert karo" |
AttributeError | Object se woh cheez maangna jo us ke paas nahin (note.titel) | "is object ke paas titel attribute nahin - likely typo" |
KeyError | Dict se aisi key maangna jo us mein nahin | "key 'x' dict mein nahin - missing case handle karo" |
IndexError | List se us ke end ke baad wali position maangna | "list code ke assume se shorter hai" |
Meta-skill setup (Concept 3) jaisi hi hai: aap woh nahin jo error fix karta hai, aap woh hain jo usay parhta aur precisely naam deta hai. Precise name precise fix laata hai; "it broke" ek aur guess laata hai.
17. From a vague goal to specifiable pieces
Concept 16 ne dikhaya aik unit ko spec aur verify kaise karna hai. Lekin aap ke apne projects aik tidy function ke taur par nahin aate. Woh vague sentence ke taur par aate hain: "build me a tool that summarizes my notes." Is ke liye aap single test nahin likh sakte. Jo skill sentence ko generated code mein badalti hai woh decomposition hai: goal ko chhote pieces mein todna, har piece itna chhota ke typed signature aur test diya ja sake. Yeh woh hissa hai jo agent aap ke liye nahin kar sakta, kyun ke yahin aap decide karte hain ke cheez asal mein hai kya.
Move yeh hai, aur har dafa same:
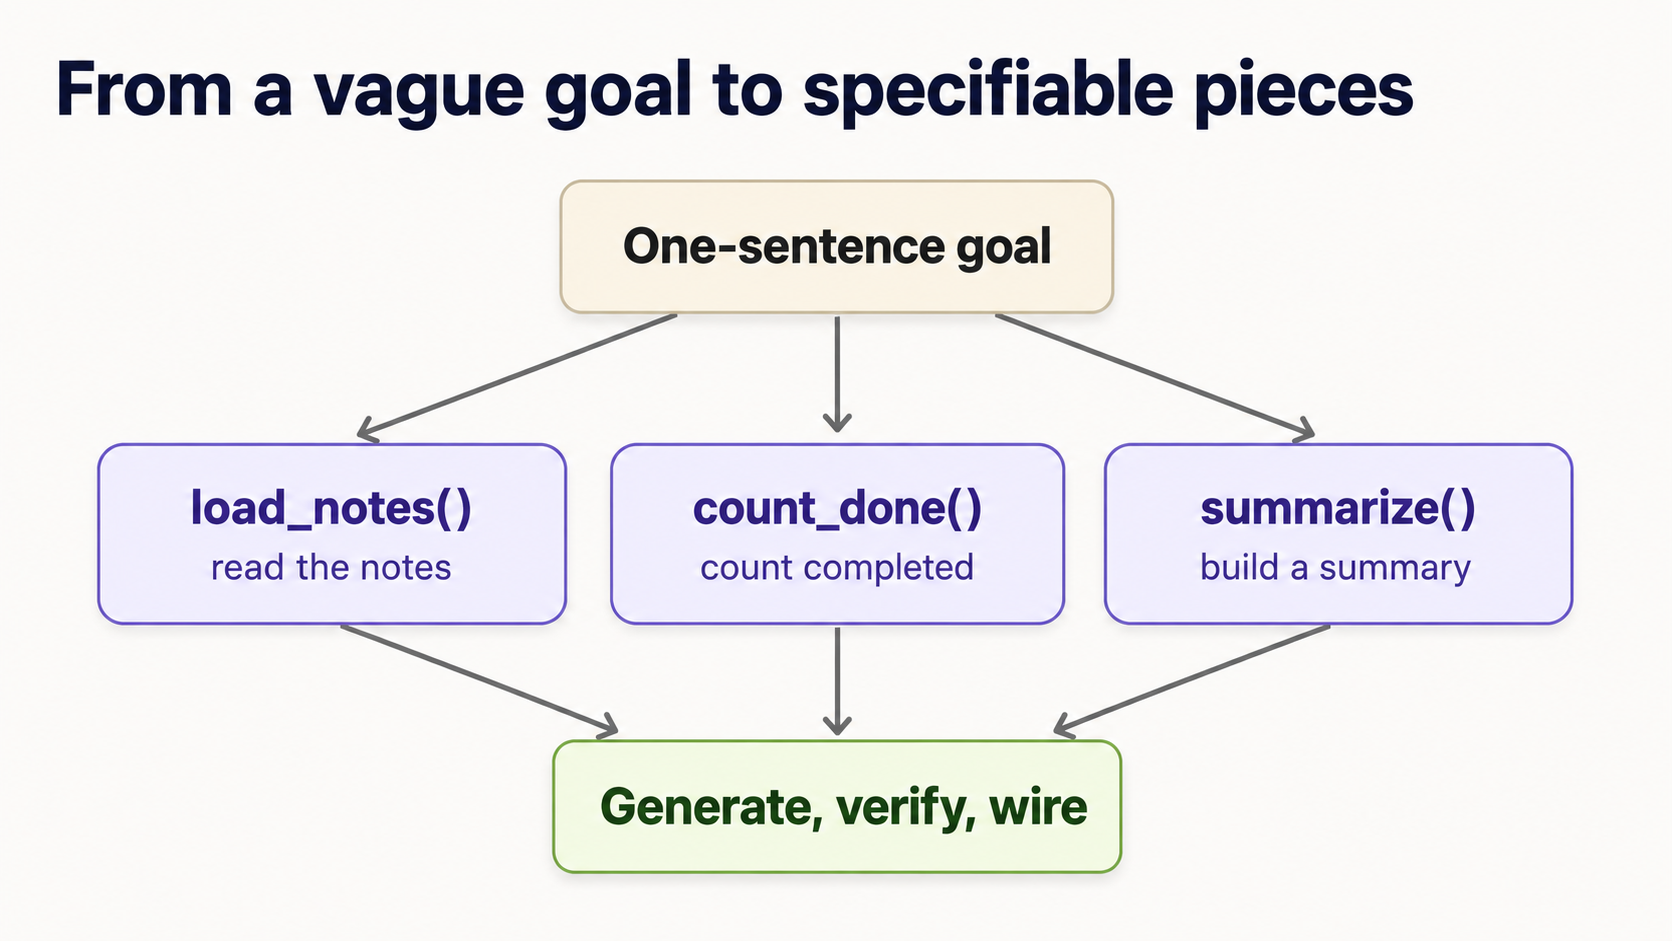 1. Goal ko aik sentence mein kahen. "Read my notes and print how many are done, and which aren't."
2. Woh steps list karein jo aap haath se karte. Verbs likhein: notes ko load karna -> done ones ko count karna -> pending titles find karna -> unhein line mein summarize karna -> usay print karna. Har verb candidate unit hai.
3. Har unit ko typed signature dein: input to output. Yeh spec hai. Bodies abhi nahin; agent woh likhta hai.
def load_notes(path: str) -> list[Note]: ...      # text file -> list of notes
def count_done(notes: list[Note]) -> int: ...      # notes -> how many are done
def pending_titles(notes: list[Note]) -> list[str]: ...  # notes -> titles not done
def summarize(notes: list[Note]) -> str: ...       # notes -> one summary line
4. Har unit ko order mein TDG karein. Upar ki har line ab exactly Concept 16 cycle hai: failing test likhein, agent se body generate karwayein, verify. Misal ke taur par, summarize small aur testable hai:
def test_summarize() -> None:
    notes = [Note(title="groceries", done=True), Note(title="call sara", done=False)]
    assert summarize(notes) == "1 of 2 done; pending: call sara"
5. Inhein wire together karein aur whole flow test karein. Agent se main() likhne ko kahen jo pieces ko order mein call karta hai, phir end-to-end result ke liye aik test likhein. Done.
Notice karein kya hua: vague sentence chaar chhote, independently verifiable contracts mein badal gaya. Agent ne actual code ki har line likhi. Lekin aap ne pieces dhoonde aur define kiya ke har aik kya promise karta hai. Yeh front-end decomposition human 10% hai jo agent ki 80% ko trustworthy banati hai.
Aap agent se units dhoondne mein help le sakte hain: "I want to build a tool that summarizes my notes. What 3-5 functions would I need, with their inputs and outputs?" Yeh great starting list hai. Lekin final signatures aap decide karte hain aur tests aap likhte hain. Agent ko problem decompose aur apna answer verify dono kabhi na karne dein, warna independent check kho dete hain.
Reliable heuristic: agar unit ke liye test likhna hard hai, woh bohat kuch kar raha hai. Usay split karein. Jis function ko test nahin kar sakte usay verify nahin kar sakte, aur iska matlab agent ke generated version par trust nahin kar sakte. Testability aur good decomposition same skill hain.
Yeh bridge hai "main aik function verify kar sakta hoon" se "main AI ke saath poori cheez build kar sakta hoon" tak. Book ka SmartNotes project exactly isi tarah grow karta hai: aik decomposed, tested piece at a time. Aap isay Project 5 mini-capstone mein practice karenge, phir Project 6 mein no scaffolding scratch se.
Jab aap goal decompose kar chuke hon, yeh template har dafa Claude Code ya OpenCode mein paste kar sakte hain. Is mein is course ki poori discipline baked hai: tests first, code se pehle aap ki approval, end par verification:
I want to build: [your one-sentence goal]

First, break it into 3–5 small functions or classes.
For each unit, propose ONLY:
  1. a typed signature (inputs and output)
  2. expected behavior in one line
  3. edge cases to consider
  4. pytest tests

Do NOT write any implementation yet. Wait for me to approve the tests.

After I approve, generate the implementation to pass those tests.
Then run pytest, pyright, and ruff, and show me only the
changed files and the test results.
Do load-bearing words ONLY aur NOT hain: yeh agent ko race ahead karne aur code (aur apne tests) likhne se rokte hain jab tak aap decide na kar lein ke "correct" kya hai. Spec ka control aap ke paas rehta hai; typing agent karta hai.
Part 5: Judgment
When NOT to lean on AI - and how to verify what you can't fully read
Reading fluency ki ceiling hoti hai, aur is par honest hona khud aik skill hai.
- Security-sensitive code non-negotiable hai. Passwords, API keys, payments, ya user data ko chhoone wali koi bhi cheez carefully parhi jaati hai aur ideally domain jaante shakhs se review hoti hai. AI confidently insecure code likhta hai. Agar aap verify nahin kar sakte, ship na karein. (Security review ke liye Programming in the AI Era, Phase 8 dekhein.)
- Jab aap waqai usay nahin parh sakte, faith par nahin tests par zyada lean karein. Agar generated function aap ke current level se aage hai, aap ke
pytestchecks zyada important hain, kam nahin: woh hissa hain jo aap verify kar sakte hain. Aap ke chosen inputs par green tests real evidence hain; "it looks right" nahin. - Tiny, obvious changes kabhi haath se faster hoti hain. Aik variable rename karna ya aik number fix karna describe karne se khud karna quicker ho sakta hai. In moments ko recognize karna practice ke saath aata hai.
Red-team your own tests
Aap ke tests wohi verification hain jo aap fully control karte hain, is liye weak test no test se bura hai, kyun ke false confidence deta hai. Jab agent aisa code generate kare jo aap fully nahin parh sakte (tricky Pydantic validator, async block), aap ke tests poora load carry karte hain. Unhein adversarial banayein:
- Agent ko kabhi woh tests likhne na dein jo us ke apne code ko pass karne hain. Yeh woh anti-pattern hai jo quietly is course ki har cheez ko defeat kar deta hai: agar AI code aur check dono likhta hai, aap ke paas independent signal nahin, sirf agent ka apne aap se agree karna hai. Tests aap likhein, ya minimum har assertion parh kar own karein. Bilkul poochein "what edge cases am I missing?". Phir khud decide karein kaun se matter karte hain.
- Agent ko test weak kar ke pass banane na dein. Jab test fail hota hai, agent kabhi kabhi code ke bajaye test change kar ke "fix" karta hai: assertion loose karna, edge case delete karna, expected value lower karna. Yeh red ko green bana deta hai aur bug chhupa rehta hai. Isay watch karein, aur allow na karein jab tak aap decide na kar lein ke test waqai ghalat tha. Test spec hai; agent ko apne code ke mutabiq spec rewrite karne ki ijazat nahin.
- Failures test karein, sirf happy path nahin. Har unit se poochein: kaunsa input isay tod dega? Empty list, zero, negative number, missing key, text jahan number expected tha. Project 4 ka bug exactly us case mein chhupa tha jise kisi ne test nahin kiya.
- Agar aap is ke liye aik bhi test nahin soch sakte, to aap abhi isay nahin samjhe. Aur certainly aap agent ka version verify nahin kar sakte. Yeh signal hai ke further decompose karein (Concept 17) ya accept karne se pehle agent se code line by line explain karwayein.
Rakhne layak vague heuristic: green tests prove karte hain ke aap ka code woh karta hai jo aap ke tests kehte hain. Bas itna. Aap ki verification ki quality exactly aap ke tests ki quality hai. (Files, standard library, package ecosystem, deeper debugging, aur real security review jaan boojh kar Programming in the AI Era ke liye chhode gaye hain. Yeh crash course aap ko judgment deta hai; woh part depth deta hai.)
Review the diff before you accept it
Jab aap Claude Code ya OpenCode mein kaam karte hain, agent sirf answer nahin deta. Woh files change karta hai. Code parhna job ka aadha hai; doosra aadha kya change hua parhna hai. Generated changes ke kisi batch ko accept karne se pehle yeh list run karein:
- Kaun si files changed? Aik function fix karne ki request five files quietly touch nahin karni chahiye.
- Kya tests change hue? Agar tests edit hue, sab se pehle kyun pata karein (upar wala anti-pattern dekhein).
- Kya dependencies add hui? New packages ka matlab naya code jo aap ne nahin likha aap ki machine par run ho raha hai. Ensure karein har aik real aur necessary hai.
- Kya sensitive cheez touch hui? Secrets, keys, auth, payments, user data: yeh carefully parhe jate hain ya domain jaante shakhs se review hote hain.
- Kya
pytest, Pyright, aur Ruff sab pass hue? Teenon green floor hai, ceiling nahin. - Kya aap main function ya class plain English mein explain kar sakte hain? Agar nahin, aap verify nahin kar sakte: accept karne se pehle agent se line by line walkthrough maangein.
Yeh quick habit hai, ceremony nahin. Lekin diff parhe baghair "accept all" woh tareeqa hai jisse chhoti wrong change working project mein unnoticed slip hoti hai.
Is poore course ki throughline: agent code laata hai; aap judgment laate hain ke kya woh correct hai. Yeh judgment fluent reading aur un tests par rest karti hai jo aap ne khud likhe. Dono optional nahin, aur loop practice karne ke baad dono hard nahin.
Part 6: Practice projects
Loop ke bare mein parhna usay chalane jaisa nahin. Yeh six projects aap ko PRIMM-AI+ mein order se move karte hain: code parhne se, usay test karne tak, apna banane tak, real agent-style code verify karne tak jismein hidden bug hai, aik small end-to-end tool build karne tak jo har concept use karta hai, aur aakhir mein no scaffolding aik one-sentence goal se build karne tak. Inhein Claude Code ya OpenCode session mein order se karein; har project pehle wale skills assume karta hai.
Har project goal aur exercised skills batata hai, phir starter deta hai. Pehle khud try karein: prediction likhein, tests likhein, agent ko prompt karein. Aur sirf phir solution kholein. Solutions copy karne ke liye nahin: agent code waise bhi generate kar sakta hai. Yeh is liye hain ke aap check kar sakein ke aap ki spec aur tests sahi the. Wahi skill grade ho rahi hai.
Reference code har solution ka least important hissa hai. Matter yeh karta hai: kya aap ke tests ne "correct" ka matlab capture kiya? Kya aap ne output correctly predict kiya? Kya aap result parh kar keh sakte the ke woh right hai? Agar aap ke tests reference code ke against pass karte hain, aap ne problem well specify ki. Wahi win hai.
Project 1 - Read and predict (Predict · Run · Investigate)
Skills: functions, comprehensions, aur len parhna; run se pehle output predict karna.
Starter. Abhi run na karein. Isay parhein aur likhein teen print lines kya produce karengi:
def shout(text: str) -> str:
    return text.upper() + "!"

names: list[str] = ["ada", "alan", "grace"]
greetings: list[str] = [shout(n) for n in names if len(n) > 3]

print(len(names))
print(greetings)
print(shout("hi"))
Ab session mein run karein aur compare karein. Jahan prediction ghalat thi, agent se poochein "why did line X produce that?". Wahi gap lesson hai.
Solution
3
['ALAN!', 'GRACE!']
HI!
len(names)->3: list mein teen items.greetings-> sirf 3 letters se lambe namesif len(n) > 3filter pass karte hain."ada"exactly 3 hai (fail),"alan"4 aur"grace"5 hain (pass). Har aik shouted hai, giving['ALAN!', 'GRACE!'].shout("hi")->"HI!": uppercased,!added.
Agar aap comprehension ko "shout each name, for each name in names, if it's longer than 3 letters," ke taur par parhte hain, aap ne theek parha.
Project 2 - Your first TDG cycle on a function (Make)
Skills: assert tests ko spec ke taur par likhna, agent ko prompt karna, pytest se verify karna.
Goal. Aik function initials(full_name: str) -> str build karein jo name ke uppercase initials return kare: "ada lovelace" -> "AL".
Starter. Implementation exist hone se pehle, test_initials.py mein tests pehle likhein. Normal case aur at least do edge cases cover karein (single name; extra spaces). Phir agent ko prompt karein:
test_initials.pyparhein.initials.pycreate karein jismeininitials(full_name: str) -> strfunction ho jo har test pass kare. Phirpytestrun karein aur result dikhayein.
Green checks trust karne se pehle generated code parhein.
Solution
Aap ke tests (important hissa) shayad aise lagte:
from initials import initials

def test_two_names() -> None:
    assert initials("ada lovelace") == "AL"

def test_many_names() -> None:
    assert initials("grace brewster murray hopper") == "GBMH"

def test_single_name() -> None:
    assert initials("alan") == "A"

def test_extra_spaces() -> None:
    assert initials("  extra   spaces  ") == "ES"
Reference implementation jo sab pass karti hai:
def initials(full_name: str) -> str:
    return "".join(part[0].upper() for part in full_name.split())
full_name.split() text ko spaces par break karta hai (aur extra ones ignore karta hai), part[0] har piece ka pehla letter leta hai, .upper() usay capitalizes karta hai, aur "".join(...) unhein glue karta hai. Agar aap ne extra_spaces test likha, aap ne tricky case khud verify kiya: exactly woh judgment jo agent supply nahin kar sakta.
Project 3 - TDG on a class (Make)
Skills: class parhna aur specify karna, methods jo object state change karte hain, object behavior test karna.
Goal. Aik tiny TaskList build karein: book ke SmartNotes jaisi cheez ka seed. Yeh tasks add kar sakti hai, aik complete mark kar sakti hai, aur report kar sakti hai kitni abhi unfinished hain.
Starter. Tests pehle likhein. Decide karein methods kya kehlayenge aur kya return karenge. Wahi design hai. Starting point:
def test_task_flow() -> None:
    tasks = TaskList()
    tasks.add("write tests")
    tasks.add("call agent")
    assert tasks.remaining() == 2
    tasks.complete("write tests")
    assert tasks.remaining() == 1
Phir agent ko TaskList class implement karne ko prompt karein jo test pass kare, aur verify karein.
Solution
Reference implementation:
class TaskList:
    def __init__(self) -> None:
        self.tasks: dict[str, bool] = {}      # task name -> done?

    def add(self, name: str) -> None:
        self.tasks[name] = False

    def complete(self, name: str) -> None:
        if name in self.tasks:                # only complete a task that exists
            self.tasks[name] = True

    def remaining(self) -> int:
        return sum(1 for done in self.tasks.values() if not done)
Class tasks ko dict mein store karti hai jo har name ko done flag se map karta hai. remaining() abhi False set tasks count karta hai. Notice karein test ne design drive kiya: method names aur remaining() kya return karega code exist hone se pehle decide hua.
Silent bug khud pakrein. complete("a task I never added") kya kare? Agent ka pehla version aksar if name in self.tasks guard ke baghair self.tasks[name] = True likhta hai, jo silently brand-new task add kar deta hai marked done, aisa data invent karta hai jo kisi ne nahin manga. Yeh exactly plausible-but-wrong behavior hai jise test expose karta hai:
def test_completing_unknown_task_does_nothing() -> None:
    tasks = TaskList()
    tasks.add("real task")
    tasks.complete("typo task")          # not a real task
    assert tasks.remaining() == 1        # still one; nothing was invented
Extension: agent se har task ko created_at timestamp ke saath Pydantic Task model banwane ko kahen, phir test add karein ke brand-new TaskList ka remaining() == 0 hai.
Project 4 - Find the bug in agent code (Investigate · Modify)
Skills: power concepts (Pydantic, generators) recognize karna, critically parhna, aisa test likhna jo real bug pakre.
Yeh aap ke actual job ke sab se qareeb hai: agent aap ko plausible-looking code hand karta hai, aur aap ko pakarna hai kya ghalat hai. Neeche wali function done notes ke sirf titles return karni chahiye. Lekin is mein bug hai.
from collections.abc import Iterator
from pydantic import BaseModel

class Note(BaseModel):
    title: str
    done: bool

def completed_titles(notes: list[Note]) -> Iterator[str]:
    for note in notes:
        yield note.title
Aap ka task, order mein:
- Investigate. Plain English mein kahen har line ka meant kaam kya hai. (
Notemodel kya hai?Iterator[str]kya batata hai?yieldkya karta hai?) - Test. Aik
pytesttest likhein jo intended behavior pin kare: sirf completed notes wapas aayen. Run karein. Isay fail hona chahiye, bug catch karte hue. - Modify. Ab jab aap ka test correct define karta hai, agent ko
completed_titlesfix karne ko prompt karein, aur re-run karein jab tak test green na ho.
Solution
Bug: function har note ka title yield karti hai, done ko entirely ignore karte hue. Flag check hi nahin hota.
Test jo isay pakarta hai:
def test_only_completed() -> None:
    notes = [Note(title="a", done=True), Note(title="b", done=False)]
    assert list(completed_titles(notes)) == ["a"]
Buggy code ke against yeh fail hota hai, kyun ke yeh ["a", "b"] return karta hai: proof ke bug real hai, hunch nahin.
Fix aik line hai: yielding se pehle done check:
def completed_titles(notes: list[Note]) -> Iterator[str]:
    for note in notes:
        if note.done:
            yield note.title
Is project ka point: bug glance se invisible tha aur test se obvious. "It looks right" isay ship kar deta. Aap ke likhe test ne pakar liya. Yeh poora course aik exercise mein hai.
Project 5 - Mini-capstone: a Notes tool, end to end (the whole loop)
Skills: sab kuch, Pydantic model, state wali class, generator, type hints, f-string summary, aur test suite, aik TDG cycle ke taur par built. Yeh book ke SmartNotes ka scaled-down rehearsal hai.
Goal. Aik chhota NoteBook build karein jo notes hold karta hai (har aik title, body, aur done flag ke saath), notes add aur complete mark karne deta hai, still-pending notes stream karta hai, aur one-line summary print karta hai jaisi 2 notes, 1 done, pending: call sara.
Starter: tests se design karein. Yeh real exercise hai: koi implementation likhne ya generate karne se pehle, test_notebook.py likhein jo desired behavior pin kare. Method names aur summary() kya kahe decide karein. React karne ke liye skeleton:
from notebook import NoteBook

def test_summary_flow() -> None:
    nb = NoteBook()
    nb.add("groceries", "milk, eggs")
    nb.add("call sara", "about the trip")
    assert nb.summary() == "2 notes, 0 done, pending: groceries, call sara"
    nb.complete("groceries")
    assert nb.summary() == "2 notes, 1 done, pending: call sara"

def test_pending_is_a_stream() -> None:
    nb = NoteBook()
    nb.add("a", "x")
    nb.add("b", "y")
    nb.complete("a")
    assert [n.title for n in nb.pending()] == ["b"]   # pending() yields, like a generator
Phir full loop run karein:
pytestrun karein. Fail hota hai (abhinotebook.pynahin). Acha: yeh aap ki spec hai, jaan boojh kar failing.- Agent ko prompt karein: "
test_notebook.pyparhein.notebook.pycreate karein jismeinNotePydantic model (title, body, done) aurNoteBookclass ho jo har test pass kare:add,complete,pending()generator, aursummary()exact string return kare jo tests expect karte hain. Phir pytest run karein aur result dikhayein." - Jo generate hua usay parhein. Kya aap Pydantic model, class state,
pending()meinyield, aursummary()mein f-string point kar sakte hain? Agar haan, aap ne real agent code ka piece parh liya. Is parpyrightaurruffbhi run karein. - Kisi bhi failure par iterate karein usay parh kar, blind re-prompting se nahin.
Solution
Reference implementation jo dono tests pass karti hai:
from collections.abc import Iterator
from pydantic import BaseModel

class Note(BaseModel):
    title: str
    body: str
    done: bool = False

class NoteBook:
    def __init__(self) -> None:
        self.notes: list[Note] = []

    def add(self, title: str, body: str) -> None:
        self.notes.append(Note(title=title, body=body))

    def complete(self, title: str) -> None:
        for note in self.notes:
            if note.title == title:
                note.done = True

    def pending(self) -> Iterator[Note]:          # a generator: yields one note at a time
        for note in self.notes:
            if not note.done:
                yield note

    def summary(self) -> str:
        total = len(self.notes)
        done = sum(1 for n in self.notes if n.done)
        pending_titles = [n.title for n in self.pending()]
        return f"{total} notes, {done} done, pending: {', '.join(pending_titles)}"
Course ka har concept yahan show up hota hai: Pydantic model (Note) type hints aur default ke saath, state hold karti class (NoteBook), object attribute mutate karta method (complete), yield karta generator (pending), comprehension aur sum(...), aur summary banati f-string.
Isay real CLI banayein (Programming in the AI Era course ka bridge). Upar tested core hard part hai; usay command-line tool banana top par thin shell hai. Agent se main() add karne ko kahen jo terminal se add, done, aur list jaisi commands parhta hai aur in methods ko call karta hai. Phir kisi bhi new logic ke liye aik aur test likhne ko kahen. Yeh last step, passing test suite ke peeche working CLI, exactly SmartNotes ki shape hai, bas chhoti.
Aik edge case khud decide karein. Jab kuch bhi pending na ho to summary() kya kahe? Reference trailing pending: chhor deta hai. Kya yeh correct hai? Apna decision encode karta test likhein, phir agent se usay satisfy karwayein. Yahan "correct" ka matlab decide karna aur usay test se pin karna hi poora job hai.
Project 6 - On your own: no starter, no tests (decompose it yourself)
Skills: Concept 17 training wheels ke baghair. Ab tak har project ne aap ko test skeleton ya signature diya. Yeh sirf aik sentence deta hai.
Goal. "Build a tool that takes a paragraph of text and prints the three most common words."
Bas itna. Na signatures, na tests, na pieces ke hints. Aap ka job poora front 10% hai:
- Decompose. Woh steps likhein jo aap haath se karte, aur har aik ko typed signature mein badlein. (Text ko words mein kaise split karenge? Punctuation strip? Count? Rank?)
- Spec. Har piece ke liye failing
pytesttest likhein jo "correct" define kare: kuch generate karne se pehle. - Generate and verify. Agent se har unit apne tests ke against implement karwayein;
pytest,pyright,ruffrun karein; iterate. - Wire it together into a
report()aur whole flow test karein.
Single right answer nahin: sirf woh decompositions jahan har piece small aur testable hai. Wahi skill grade ho rahi hai.
Solution (one valid decomposition - yours may differ)
Four small, independently testable units mein reasonable breakdown:
def clean(text: str) -> list[str]:
    # lowercase, drop punctuation, split into words
    cleaned = "".join(c.lower() if c.isalnum() or c.isspace() else " " for c in text)
    return cleaned.split()

def tally(words: list[str]) -> dict[str, int]:
    counts: dict[str, int] = {}
    for word in words:
        counts[word] = counts.get(word, 0) + 1
    return counts

def top_n(counts: dict[str, int], n: int) -> list[tuple[str, int]]:
    return sorted(counts.items(), key=lambda pair: pair[1], reverse=True)[:n]

def report(text: str, n: int) -> str:
    pairs = top_n(tally(clean(text)), n)
    return ", ".join(f"{word} ({count})" for word, count in pairs)
Aur woh tests jo aap ko pehle likhne chahiye the:
def test_clean_strips_punctuation() -> None:
    assert clean("Hi, hi! Bye.") == ["hi", "hi", "bye"]

def test_tally_counts() -> None:
    assert tally(["hi", "hi", "bye"]) == {"hi": 2, "bye": 1}

def test_report_picks_top_two() -> None:
    assert report("the cat sat on the mat the cat", 2) == "the (3), cat (2)"
Aik decision jo on purpose lena worth hai: jab do words ki same count ho, pehle kaunsa aaye? Python ka sorted stable hai, is liye ties yahan first-appearance order par fall back karte hain. Lekin aap ko yeh deliberately decide karna aur test se pin karna chahiye, accident se discover nahin. (Agar aap ne ties ke bare mein socha hi nahin, yeh gap hai jo aap ke tests surface karne chahiye the.)
Agar aap ki decomposition different pieces rakhti thi (maan lein single word_frequencies function) lekin har piece independently testable tha aur tests pass hue, aap ne sahi kiya. Grade is code ko match karna nahin: yeh hai ke kya aap one-sentence goal ko apne balboote testable contracts mein badal sake. Yeh exactly woh skill hai jis par aap AI ke saath har future project mein lean karenge.
Yeh warm-ups hain. Real practice project SmartNotes hai Programming in the AI Era mein. Aap isi exact loop se one application ko nine phases mein grow karte hain, phir doosri (QuizForge) scratch se no guidance build karte hain taake prove ho skill aap ki hai.
What's next
Ab aap most Python banane wali core shapes parh sakte hain (values, functions, collections, control flow, aur classes), agent aur ML code bharne wale five power concepts recognize kar sakte hain, Claude Code ya OpenCode mein full Test-Driven Generation cycle run kar sakte hain, vague goal ko specifiable pieces mein tod sakte hain, aur six projects par in sab ki practice kar chuke hain. Yeh woh literacy hai jo book ka baqi hissa assume karta hai.
Have you passed? A self-check
Yeh course kaam kar gaya hai agar aap ab notes ke baghair yeh saat cheezein kar sakte hain. Agar koi shaky lagay, aage barhne se pehle bracket mein concept revisit karein:
- Function signature parhein aur us ke inputs aur output plain English mein explain karein. (Concept 5)
- Kisi unit ke liye code exist hone se pehle kam az kam teen
pytesttests likhein. (Concepts 5, 16) - Typed signature use karte hue AI agent se un tests ke against code implement karwayein. (Concepts 10, 16)
pytest, Pyright, aur Ruff run karein, aur har tool kya batata hai parhein. (Concept 3)- Traceback bottom-up parhein aur problem precisely describe karein. (Concept 16)
- AI-generated code mein aik plausible-but-wrong bug pakrein. (Project 4)
- Aik vague, one-sentence goal ko testable units mein decompose karein. (Concept 17, Project 6)
Agar aap yeh saat kar sakte hain, aap Claude Code ya OpenCode ke saath baith kar chhota, tested Python program ship kar sakte hain jise aap waqai samajhte hain. Wahi poora goal hai.
Yahan se:
- Build AI Agents: jahan Pydantic models,
async/await, aur type hints jinko aap ne recognize karna seekha, agent code ka everyday material bante hain. - Postgres for AI: woh code parhna jo agents ka data store aur retrieve karta hai.
- Building a Digital FTE: sab kuch working AI worker mein assemble karna.
- Programming in the AI Era: full deep course. Aap SmartNotes nine phases mein build karte hain, reader se architect tak jate hue, har step par TDG cycle ka zyada hissa own karte hain.
Aap code type karna nahin seekh rahe. Aap un systems ko direct aur verify karna seekh rahe hain jo code likhte hain. Reading hamesha harder half thi. Aur aap ne bas start kiya.
60-second glossary
| Term | Plain English |
|---|---|
| PRIMM-AI+ | Predict · Run · Investigate · Modify · Make - is course ka read-first method, agent partner aur tests truth ke saath |
| TDD -> TDG | Test-Driven Development: failing test likhein, phir code likhein. AI era mein yeh Test-Driven Generation banta hai - aap failing test likhte hain, agent code likhta hai, aap verify karte hain ke pass hua |
| TDG | Test-Driven Generation - failing test pehle likhein, agent code generate karta hai, aap verify karte hain |
assert | Aik one-line claim jaisay assert x == 5 - true ho to kuch nahin, false ho to loud crash. Har test isi atom se banta hai |
| Type / type hint | Label ke data kis qisam ka hai (str, int, float, bool) - aur agent ke liye precise instruction |
| Function / signature | Named, reusable block; us ki pehli line inputs aur output ka contract hai |
| list / dict / set / tuple | Data group karne wale four containers; dict (labeled pairs) woh hai jo aap sab se zyada parhenge |
| Class / object | Class blueprint hai; object (instance) us se bani cheez. object.attribute data parhta hai; object.method() usay act karne ko kehta hai |
self / attribute / method | self class ke andar "yeh object" hai; attribute us ka data hai; method class mein rehta function hai jo object par act karta hai |
| Comprehension | New list banane ke liye aik line mein folded for loop |
| f-string | Aage f wala text; {...} ke andar ki cheez value se replace hoti hai (f"{name}") |
Generator / yield | Memory flat rakhne ke liye items aik aik kar ke deta hai - stream, pile nahin |
with (context manager) | Kuch open karta hai, use karta hai, aur error par bhi safely close karta hai |
async / await | Code jo bohat si slow cheezein (jaise API calls) aik waqt karne ke liye built hai |
Dunder (__call__, __init__) | Double-underscore methods jo objects ko native Python cheezon jaisa act karwate hain |
Decorator (@name) | Function ya class ke upar label jo us mein behavior add karta hai |
| Pydantic | Structured data validate karta hai aur LLMs ke tool calling JSON schemas auto-generate karta hai |
| pytest / Pyright / Ruff / uv | Aap ke verification tools: tests run / types check / style check / Python manage |
| Traceback | Python ka error report - bottom-up parhein; last line problem ka naam batati hai |