Apna Agent Harness Cloud par Deploy Karein: Multi-Track Crash Course
*17 Concepts • Chaar learning tracks. Reader track: 3-4 hours ki sirf conceptual reading (setup nahin, deployment nahin, engineering leaders aur architects ke liye jo decide kar rahe hain ke team ka time commit karna chahiye ya nahin). Beginner / Intermediate / Advanced tracks: har ek 1-2 din, 3-5 din, 7-10 din (conceptual reading ke saath paanch-component stack par barhti hui deployment depth, observability aur eval suite wired in). Lab se pehle apna track choose karein; neeche "Four learning tracks" section dekhein.*
Aap ne pehle courses mein agents banaye hain, lekin woh sab ab tak sirf aap ke laptop par chale hain. Yeh course aap ke design kiye hue agent ko real cloud service bana kar ship karta hai jahan users internet ke zariye us tak pahunch sakte hain. Aap agent ka brain managed cloud runtime par host karein ge, us ki memory database mein rakhein ge, us ki files object storage mein store karein ge, aur us ka risky code alag locked-down sandbox mein chalayein ge. Pura system aap ka coding agent banata aur boot karta hai, us companion brief se kaam le kar jo aap download karte hain. End tak harness live hota hai, aur aap har piece ko samajh chuke hote hain.
🔤 Aage parhne se pehle teen terms samajh lein (agar aap pehle courses kar chuke hain to shayad yeh pehle se jante hon; neeche plain-English version par skip kar sakte hain).
Yeh course pichhle courses ke muqablay mein zyada infrastructure-heavy hai. Yeh teen terms bar bar aati hain, is liye pehle inhein seedhi zabaan mein define karna madad karta hai:
- Harness. Agent ka "brain" aur controls: woh code jo agent loop chalata hai, decide karta hai kaunsa tool call karna hai, secrets rakhta hai, aur runs ke darmiyan state sambhalta hai. Yeh agent ka generated code khud nahin chalata. Is course mein harness cloud mein chalne wali FastAPI web app hai.
- Sandbox. Alag, locked-down workspace jahan agent ka generated code asal mein chalta hai. Yeh files parh sakta hai aur shell commands chala sakta hai, lekin harness ke secrets ya database tak is ki access nahin hoti. Sandboxes banana sasta hota hai, ek dafa use hote hain, phir delete ho jate hain.
- Manifest. Sandbox ko kya chahiye is ki choti si description: kaunsi files mount karni hain, kaunsi storage attach karni hai, kaunsi abilities (shell, filesystem) on karni hain. Aap workspace ko ek dafa describe karte hain, aur OpenAI Agents SDK usay kisi bhi supported sandbox provider par chala sakta hai.
Do aur terms bohat use hoti hain jinhein full glossary define karti hai: Azure Container Apps (managed cloud service jo aap ka container autoscale aur public web address ke saath chalati hai) aur Neon Postgres (cheap branching wali serverless Postgres database). Full glossary neeche ek section mein hai.
Seedhi zabaan wala version, agar pehle human version chahiye to yahan se shuru karein. (Technical readers neeche "Yeh course..." wale paragraph par skip kar sakte hain.)
Pehle courses ne concept mein AI-native company banayi. Aap ne agent design karna, usay knowledge dena, durably chalana, un mein se bohat se manage karna, unhein hire aur fire karna, owner ko delegate dena, aur yeh measure karna seekha ke koi cheez kaam karti hai ya nahin. Un sab courses ke dauran aik cheez aap ne kabhi nahin ki: in mein se kisi cheez ko waqai aise cloud par deploy karna jahan real users us tak pahunch sakein. Yeh course isi liye hai. Aap pehle courses se banaya hua agent, architecture, aur eval suite lete hain, aur unhein live cloud service ke taur par ship karte hain. Aap seekhein ge ke agent ka brain kahan chalta hai, memory kahan rehti hai, files kahan store hoti hain, aur risky code kahan safely run hota hai. Yeh aik complete path hai, end to end, jo kaam karta hai. Doosre paths bhi hain; lekin sab ko survey karne ke bajaye ek path ko completion tak chal kar aap zyada jaldi seekhte hain.
Yeh course cloud mein OpenAI Agents SDK harness ki production deployment sikhata hai. Pehle courses ne AI-native company ki architecture banayi aur phir usay us discipline mein wrap kiya jo usay measurably trustworthy banata hai. Yeh course poori cheez ship karta hai.
Pura course ek idea tak reduce hota hai. Harness woh control plane hai jise aap own karte aur running rakhte hain. Sandbox woh execution plane hai jise aap create karte, ek dafa use karte, aur phir delete kar dete hain. Harness keys, state, aur audit log rakhta hai; sandbox in mein se kuch bhi nahin rakhta aur risky kaam karta hai. Is course ka har concept aur har decision isi split ki tafseel hai. Agar ek sentence internalize karna ho to yahi karein.
🆕 April 2026 mein kya badla, aur yeh course ab kyun exist karta hai. OpenAI ne April 15, 2026 ko Agents SDK ki major update ship ki jis ne agent harness ko sandbox compute se SDK ke first-class hissa ke taur par alag kar diya. Is release se pehle production agents deploy karne wali teams ko model clients, container runtimes, credential isolation, state, aur tool routing khud jorna parta tha. April release harness/sandbox split ko built-in primitive bana deti hai, aisa pattern nahin jo teams dobara invent karein. Isi wajah se yeh course teachable hua: ek saal pehle yeh zyada tar speculative hota; ab yeh recipe hai.
Maakhaz: OpenAI, "The next evolution of the Agents SDK," April 15, 2026.
Jaldi Kamyabi: harness ko apne laptop par lagbhag 15 minutes mein boot karein
Cloud touch karne se pehle prove karein ke harness aap ki apni machine par chalta hai. Cloud touch karne se pehle harness aap ke laptop par chalta hai. Aap companion code download karein ge, usay apne coding agent mein open karein ge, aur usay boot hote aur health check ka jawab dete dekhein ge. Yahi poori win hai: control plane zinda hai aur report kar raha hai ke kaun se pieces wired hain.
Sab se pehle companion zip download karein aur unzip karein. Folder ko apne coding agent (Claude Code, OpenCode, ya similar) mein open karein. Agent root par AGENTS.md file parhta hai, jo batati hai ke project kaise build hota hai aur kaise boot hota hai. Phir neeche wala prompt paste karein.
Yeh apne coding agent ko paste karein. Pehle plan; approval par execute.
AGENTS.md parhein, phir Maya ka harness locally boot karein taake mein usay chalta hua dekh sakun.
- AGENTS.md ke end par SDK probe chalayein taake installed
openai-agentsversion confirm ho aur core imports kaam karein.- Dependencies install karein (
make install) aur.env.exampleko.envpar copy karein. Abhi koi keys add na karein; harness un ke baghair boot hona chahiye.- Harness start karein (
make run, johttp://localhost:8000par serve karta hai).- Doosre shell mein
GET /healthrequest karein aur mujhe exact response dikhayein.
Yeh tab mukammal hai jab:
- Aap ka coding agent installed
openai-agentsversion (0.17.x) report kare. - Harness start ho aur keys set kiye baghair running rahe.
GET /healthexactly yeh return kare:
{
  "status": "ok",
  "model": "gpt-5.4-mini",
  "backends": { "postgres": false, "sandbox": false, "r2": false }
}
Yeh response harness ka sach bolna hai: yeh alive hai ("status": "ok"), apna model janta hai, aur optional backends abhi wired nahin hain (sab false). Har later decision in flags mein se ek ko true karta hai. Harness sirf apne code ke saath boot hota hai, phir aap ek waqt mein ek piece add karte hain.
Four learning tracks, apna track choose karein
Yeh course chaar different depths ke liye kaam karta hai. Lab se pehle apna track explicitly choose karein; conceptual content chaaron tracks ke liye design hai, aur lab tracks 2-4 ke liye design hai.
| Track | Time commitment | Aap kya complete karte hain | Kis ke liye |
|---|---|---|---|
| Reader (pure conceptual) | ~3-4 hours, lab nahin | Jaldi Kamyabi, saare 17 concepts, aur closing. Cloud accounts nahin, Docker nahin, Python setup nahin. Architecture samajh aa jati hai; deployment baad ke liye defer hoti hai. | Engineering leaders, platform architects, aur ML platform owners jo decide kar rahe hain ke team ka time is deployment pattern par commit karna chahiye ya nahin. |
| Beginner | ~1-2 days (conceptual + local lab) | Reader track ke saath SDK probe, scaffold, aur containerizing. Harness Docker mein locally chalta hai, OpenAI aur local database se baat karta hai. Abhi cloud deployment nahin. | AI services ki cloud deployment mein naye engineers. Goal harness/sandbox split internalize karna aur laptop par end to end chalne wala containerized agent ship karna hai. |
| Intermediate | ~3-5 days | Beginner track ke saath cloud par deploy, durable state wire, file storage wire, aur observability wire. Harness real users serve karta hai; sandbox abhi stubbed hai; eval suite Advanced ke liye deferred hai. | Teams jinko harness deployed aur observable chahiye, lekin abhi code execution ya full eval discipline wire nahin kar rahe. |
| Advanced | ~7-10 days | Intermediate track ke saath sandbox wire, eval suite wire, aur production checklist. Complete discipline: harness deployed, sandbox wired, observability live, eval suite CI gate karti hai aur nightly chalta hai. | Production teams jo full discipline, complete end-to-end deployment, observability, aur quality-assurance path ship kar rahi hain. |
Track-fork guidance. Engineering leaders aur architects jo decide kar rahe hain ke is pattern mein invest karna hai ya nahin, Reader track se shuru karein: 3-4 hours, accounts nahin, paisa nahin, aur end tak aap jaan lein ge ke team ko higher track commit karna chahiye ya nahin. Beginners ko first pass par Advanced tak pahunchne ka pressure mehsoos nahin karna chahiye. Discipline iterative hai; teams aam tor par Reader se Beginner ek weekend mein, Beginner se Intermediate ek sprint mein, aur Intermediate se Advanced weeks mein graduate karti hain jab deployment mature hoti hai. Standalone readers (jo pehle courses se nahin aaye) default Reader track se shuru karein, phir decide karein ke lab ka Simulated mode right next step hai ya nahin.
Agar aap Advanced track ko focused two-week sprint ke taur par karte hain to cadence yeh hai. Yeh assume karta hai ke ek engineer roz 4-6 productive hours deta hai; teams compress kar sakti hain. Day 5 natural "shippable" checkpoint hai: harness deployed hai aur users serve kar raha hai. Days 6-10 woh hardening add karte hain jo deployment ko long-term operable banati hai.
| Day | Focus | Cumulative artifact |
|---|---|---|
| 1 | Concepts 1-4 + scaffold | Stubbed /runs endpoint wali local FastAPI app. |
| 2 | Containerize + deploy | Aap ke phone se public internet par reachable harness. |
| 3 | Wire Neon Postgres | Durable state jo container restart survive karti hai. |
| 4 | Wire Cloudflare R2 | File storage; agent inputs parh sakta hai aur outputs likh sakta hai. |
| 5 | ⭐ Shippable checkpoint | Deployed harness jise real users use kar sakte hain. Agar MVP hi goal hai to yahan ruk jaein. |
| 6 | Wire the sandbox | Code execution working; agent code safely run karta hai. |
| 7 | Wire observability | Infrastructure alert se agent behavior tak fast navigate karein. |
| 8-9 | Wire the eval suite | CI notice ke baghair koi agent regression ship nahin hoti; nightly behavior reports chalte hain. |
| 10 | Production checklist + handoff | Production-ready harness aur usay operate karne wali team. |
Is course mein milne wali vocabulary
Glossary, expand karne ke liye click karein
- Harness. Agent ka control plane: woh code jo agent loop chalata hai, secrets rakhta hai, aur state sambhalta hai. Is course mein yeh cloud mein FastAPI app hai. Yeh agent ka generated code nahin chalata.
- Sandbox. Agent ka execution plane: isolated workspace jahan agent ka generated code chalta hai, harness ke secrets ya database tak access ke baghair.
- Control plane / execution plane. Yeh principle ke agent ki orchestration (secrets, database access, model keys) us security boundary se alag rehti hai jahan agent ka generated code chalta hai. Is course ki foundation.
- Manifest. Sandbox workspace ki choti description: file mounts, attach karne wali storage, enable karne wali abilities. Supported sandbox providers ke across portable.
- Container. Aap ki app aur usay chalane ke liye zaroori har cheez ka sealed bundle, taake woh laptop aur cloud dono jagah same chale.
- FastAPI. Web APIs banane ke liye Python library. Harness ke HTTP layer ke liye is course ka choice, kyun ke yeh SDK ke async Python client ke saath naturally pair hoti hai.
- Azure Container Apps (ACA). Managed cloud service jo aap ka container autoscale, public address, secrets, aur revisions ke saath chalati hai. Is course ka harness runtime.
- Neon Postgres. Cheap branching wali serverless Postgres database. Is course ka durable state store.
- Cloudflare R2. S3-compatible object storage jahan apni files read karne ka egress free hai. Is course ka file aur artifact store.
- Presigned URL. Short-lived web link jo sandbox ko storage password rakhe baghair ek specific file read ya write karne deta hai.
- Durable state. Restart survive karne wali memory: sessions, run history, aur audit log, container ke bajaye database mein rakhe jate hain, kyun ke container stop hote hi sab bhool jata hai.
- Observability. Woh tools jo batate hain running harness kya kar raha hai, kab kuch toot raha hai, aur cause kaise dhoondna hai.
- OpenTelemetry (OTel). Services ke darmiyan move karte hue request ko trace karne ka open standard.
- Phoenix. Agent traces dekhne aur bad traces ko future tests mein badalne wala tool.
- Eval. Aisa test jo agent ka behavior measure karta hai (jawab sahi tha, tool correct tha, reasoning sound thi), sirf yeh nahin ke code chala ya nahin.
- Blue/green. Downtime ke baghair naya version ship karne ka tareeqa: naya version purane ke saath chalayein, phir traffic shift karein.
- Scale-to-zero. Jab traffic nahin hota to cloud app ki zero copies chalata hai aur aap kuch pay nahin karte; quiet spell ke baad pehli request ek copy wake hone ke liye chand seconds wait karti hai.
- Connection pooling. Open database connections ka shared set jo requests ke across reuse hota hai, taake database ek saath hazaron connections ke neeche na gir jaye.
Kya aap tayyar hain?
📦 Sab se pehle: companion download. Companion zip sab ke liye on-ramp hai, khaas taur par standalone readers ke liye jinhon ne pehle courses nahin kiye.
Download
deploying-agents-crash-course.zipaur unzip karein. Is mein harness ka booted scaffold hai (FastAPI plus SDK plus stubbed clients),AGENTS.mdbrief jo aap ka coding agent parhta hai, paanch database tables ke liyeschema.sql,Dockerfile, Azure deploy script, aur common commands ke liyeMakefile. Andar stub agent (Maya ka Tier-1 Support agent) lab ko kaam karwata hai chahe aap ne Maya khud na banayi ho, is liye Simulated track ke paas point karne ke liye kuch real hota hai.Agar aap Reader se aage kisi track ko follow karna chahte hain to aage parhne se pehle folder apne coding agent mein open karein. Reader track ke liye read-only browsing theek hai.
- Aap ne companion zip download kar li hai (upar callout dekhein). Agar aap Reader track par hain aur kuch run karne ka plan nahin to isay skip karein.
- Aap command line par comfortable hain. Aap packages install kar sakte hain, kuch commands run kar sakte hain, aur filesystem mein move kar sakte hain. Agar aap ne kabhi terminal use nahin kiya, Reader track sahi entry point hai.
- Aap Python code parh sakte hain. Harness Python mein hai; aap
async def,await, decorators, aur type hints dekhein ge. Expert hona zaroori nahin; parhna kaafi hai.- Aap ke paas Agents SDK access ke saath OpenAI API key hai (Beginner track aur up). Yeh model account hai, sirf chat account nahin. platform.openai.com check karein.
- Aap ke paas Azure account hai (Intermediate track aur up). Lab Azure Container Apps par deploy karti hai; free credits lab cover kar dete hain. portal.azure.com check karein.
- Aap ke paas Neon account hai (Intermediate track aur up). Free tier kaafi hai. console.neon.com check karein.
- Aap ke paas R2 enabled Cloudflare account hai (Intermediate track aur up). R2 free tier lab ke liye kaafi hai. Cloudflare sandbox ko paid Workers plan chahiye, is liye lab code execution ke liye realistic free path ke taur par E2B ka free tier use karti hai.
Agar cloud accounts missing hain, Reader track waqai right starting point hai: pehle parhein, baad mein sign up karein. Agar pehle courses missing hain, companion zip ka stub agent aap ka bridge hai, is liye aap Maya khud banaye baghair lab follow kar sakte hain.
Rough edges jo pehle se jaan leni chahiye
- Yahan ka code booted companion tak traceable hai. Is course ka SDK code download wale harness se match karta hai, jo course ship hone se pehle real
openai-agentspackage ke against installed aur booted tha. Yeh "illustrative, untested" code nahin.- SDK fast move karta hai. April 2026 release pehli release hai jo is pattern ko teachable banati hai, aur harness/sandbox APIs evolve hoti rahen gi. Is liye lab ka pehla step probe Decision hai: aap ka coding agent SDK install karta hai, installed version print karta hai, live docs fetch karta hai, aur companion brief ko un ke against reconcile karta hai. Jab brief aur live docs disagree karein, live docs win karte hain.
- Sirf Python. April 2026 release harness aur sandbox features sirf Python mein ship karti hai. TypeScript support planned hai lekin date nahin. Agar aap ki app TypeScript mein hai, Python harness ko alag service ke taur par chalayein jise aap ki TypeScript app HTTP par call karti hai.
- Ek cloud, ek sandbox, ek database, ek storage provider. Yeh course ek specific stack commit karta hai taake complete path sikha sake. Principles doosre clouds par obvious tareeqon se transfer hote hain; course substitutions ka survey nahin karta, halanke Concept 9 aur Concept 15 aham substitutions ka naam lete hain.
- Cost real hai. Fully deployed harness low-traffic personal use ke liye mahine ke kuch tens of dollars se moderate production traffic ke liye hundreds tak cost karta hai. Reader aur Beginner tracks free hain; cloud tracks ke real bills hain. Concept 13 breakdown deta hai.
- Multi-region nahin. Yeh course ek region mein deploy karta hai. Multi-region active-active operational complexity add karta hai jo apni alag treatment deserve karta hai; Concept 14 isay honestly name karta hai.
Jo aap bana rahe hain us ki shape
Yeh course 17 concepts introduce karta hai aur 9 deployment decisions se guzarta hai. Us sab se pehle, poori architecture ek picture mein yeh hai. Jab bhi concept ya decision abstract lage, is par wapas aayen.
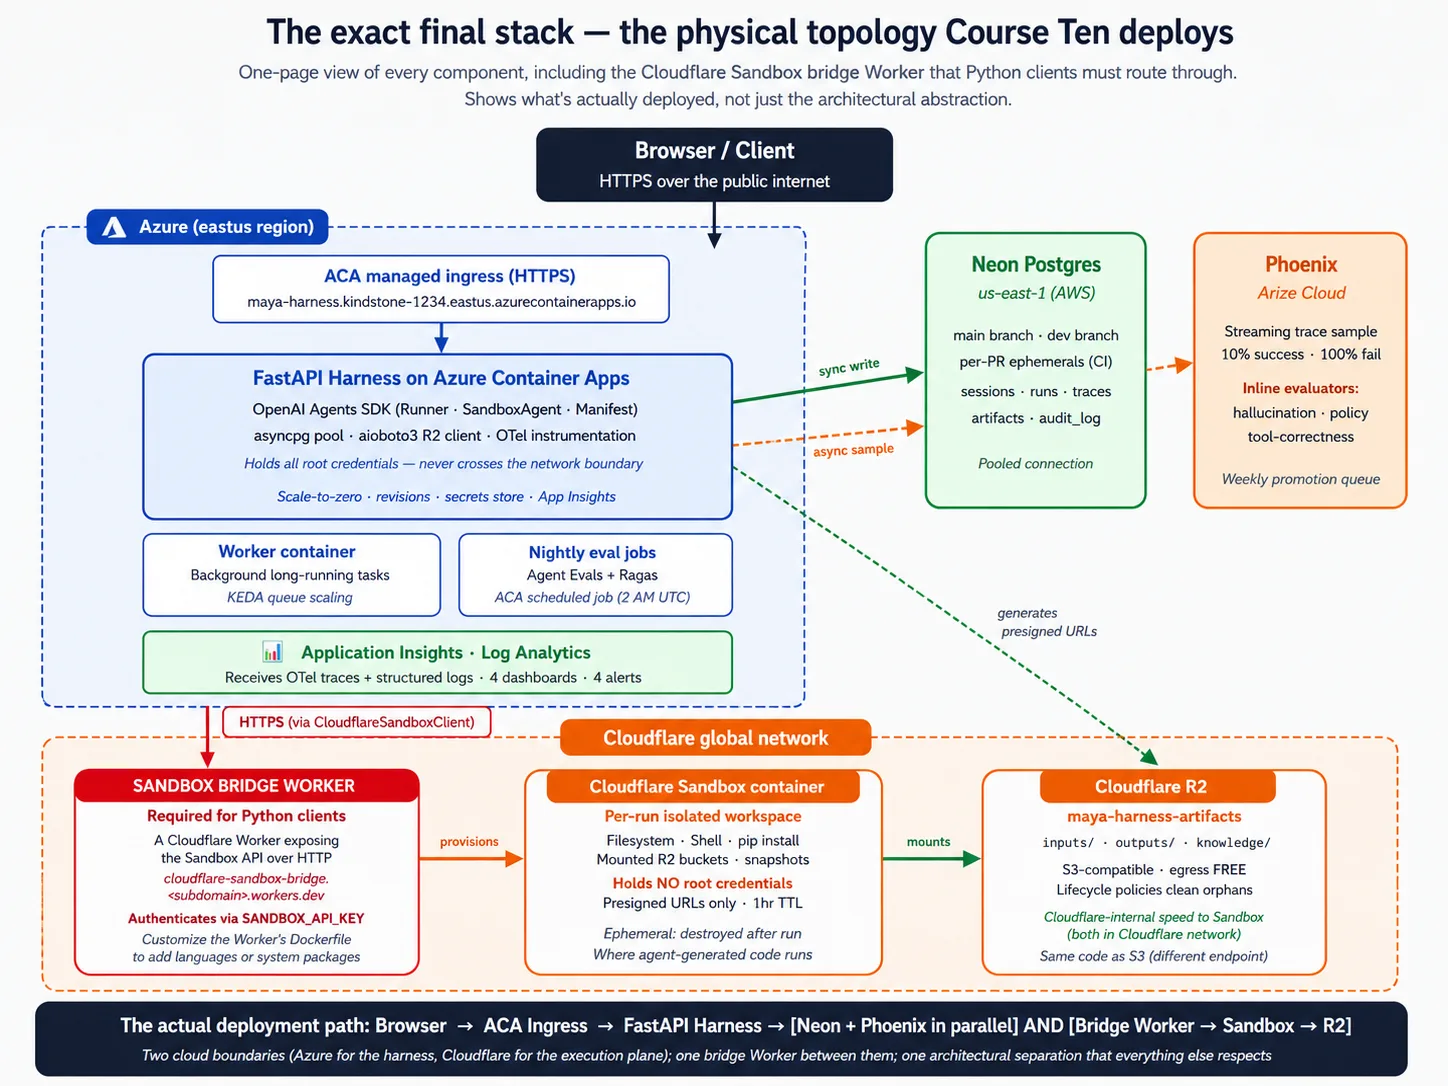
Stack ki bunyadi samajh: har component asal mein kya hai
Agar aap production web services pehle ship kar chuke hain to is section ko skip karein. Agar pehle courses aap ka ab tak ka sab se zyada infrastructure work hain to isay parhein. Yeh course us background par depend karta hai jo aksar beginners ne abhi build nahin kiya hota, aur lab us ke baghair incantations jaisi lage gi. Chaar short pieces: Docker, FastAPI, Neon, aur Cloudflare R2. Goal lab follow karne ke liye minimum mental model hai, deep mastery nahin.
Stack ki bunyadi samajh 1: Docker aur containers
Container aap ki app aur usay chalane ke liye zaroori har cheez ka sealed bundle hai: aap ka code, Python packages, system libraries, hatta ke operating-system ke woh pieces jin par yeh depend karta hai. Aap bundle ek dafa build karte hain, phir kahin bhi chalate hain. Wohi bundle jo aap ke laptop par chalta hai, cloud mein bhi unchanged chalta hai.
Yeh software ki sab se purani complaint solve karta hai: "mere machine par to chalta hai." Python script jo aap ke laptop par aap ke exact packages ke saath chalta hai, shayad colleague ke laptop ya cloud server par kaafi fiddling ke baghair na chale. Container yeh fiddling collapse karta hai: image ek dafa build karein, phir jahan container engine ho wahan run karein.
Lab mein aap yeh vocabulary dekhein ge:
- Dockerfile bundle build karne ki recipe hai: plain text file jo kehti hai "is base se shuru karo, yeh files copy karo, yeh commands run karo."
- Base image starting point hoti hai, aam tor par chota Linux system jisme language pre-installed hoti hai. Harness
python:3.12-slimse shuru hota hai. - Multi-stage build app build karne ke liye ek image use karta hai (compilers aur tools ke saath) aur usay run karne ke liye doosri, choti image (sirf result ke saath). Runtime image choti rehti hai kyun ke build tools us mein ship nahin hote.
- Registry woh jagah hai jahan built images store aur share hoti hain. Deploy flow hai: image build karein, registry par push karein, cloud usay pull kar ke run karta hai.
Minimum mental model: container ko working machine ka snapshot samjhein jisme aap ki app installed aur ready hai. Image build karna snapshot lena hai; usay run karna isolated copy boot karna hai. Jab copy shut down hoti hai to us ke andar sab kuch disappear ho jata hai. Isi liye durable state ko bahar database chahiye aur durable files ko bahar storage. Container throwaway hai; data nahin.
Stack ki bunyadi samajh 2: FastAPI
FastAPI web APIs banane ke liye Python library hai: aise programs jo network par requests sunte hain aur data se jawab dete hain, aam tor par JSON. Yeh "Fast" hai kyun ke concurrency ke liye Python ki async features use karta hai, aur "API" hai kyun ke web pages render karne ke bajaye request-and-response pattern ke liye built hai.
Yeh problem solve karta hai: aap ka agent server par chalta hai, lekin real users (ya doosri services) ko network ke zariye kisi aur jagah se us tak pahunchna hota hai. FastAPI aap ke Python code ko aisi cheez banata hai jisse network baat kar sake.
Lab mein aap yeh vocabulary dekhein ge:
- Endpoint aap ki API ka specific path hai, jaise task start karne ke liye
POST /runsya harness alive hai ya nahin check karne ke liyeGET /health. - Route handler woh Python function hai jo endpoint call hone par chalta hai. Aap usay decorator se mark karte hain, jaise
@app.post("/runs"). async defaurawaitwait karne wale code ke liye Python keywords hain. Harness inhein use karta hai kyun ke is ka zyada kaam wait karna hai: model par, database par, sandbox par. Async code ek process ko ek waqt mein hundreds waiting requests handle karne deta hai.- Pydantic models Python classes hain jo request aur response data ki shape describe karti hain. FastAPI unhein incoming requests automatically check karne aur malformed requests ko aap ke code se pehle reject karne ke liye use karta hai.
- Uvicorn woh program hai jo asal mein FastAPI app chalata hai aur network ko aap ke handlers se connect karta hai. Aap usay
uvicorn maya_harness.main:appjaisi command se start karte hain.
Minimum mental model: FastAPI app ek Python file hai jo app object banati hai aur functions ko endpoints ke taur par decorate karti hai. Har function checked data receive karta hai, apna kaam karta hai (aksar doosri async operations ka await karte hue), aur data return karta hai jise FastAPI JSON mein badal deta hai. Uvicorn us ke samne server hai.
Stack ki bunyadi samajh 3: Neon Postgres
Database data ko disk par store karti hai taake woh restarts survive kare, ek waqt mein bohat readers aur writers support kare, aur aap usay SQL naam ki language se query kar sakein. Postgres ek specific open-source database hai, duniya ki sab se widely used databases mein se ek. Neon Postgres ko service ke taur par chalata hai, do twists ke saath: yeh serverless hai (khud scale up aur down hota hai) aur branching support karta hai (aap apni database ki copy bana sakte hain jo parent ke saath storage share karti hai jab tak aap usay change na karein).
Yeh problem solve karta hai: harness ko requests aur container restarts ke across cheezein yaad rakhni hoti hain. Conversation state, run history, traces, audit log. Container ka local disk har restart par disappear ho jata hai, is liye harness ko data aisi jagah rakhna hota hai jahan woh survive kare. Neon specifically is liye, kyun ke us ka scale-up aur scale-down behavior harness se match karta hai: jab harness idle hai, Neon bhi scale down ho sakta hai, aur aap pay karna rok dete hain.
Lab mein aap yeh vocabulary dekhein ge:
- Table structured records ka named collection hai, jaise strict column types wali spreadsheet. Harness ke paas paanch tables hain: sessions, runs, traces, artifacts, aur audit log.
- Schema aap ki saari tables aur un ke columns ki definition hai.
- Primary key woh column hai jo har row ko uniquely identify karta hai; foreign key woh column hai jo doosri table ki primary key par point karta hai, aur isi se data relational banta hai.
- Migration versioned SQL script hai jo schema change karti hai, repo mein committed taake har change tracked rahe.
- Connection pooling open connections ka shared set hai jo requests ke across reuse hota hai. Is ke baghair har request naya connection kholti hai, aur Postgres ki limit hoti hai. Neon pooled endpoint deta hai jo yeh multiplexing aap ke liye karta hai.
Minimum mental model: Postgres data ko strict shapes wali tables mein store karta hai, aur aap usay SQL se query karte hain. Harness asyncpg Python library ke through us se baat karta hai. Neon database host karta hai aur upar serverless scaling aur branching add karta hai.
Stack ki bunyadi samajh 4: Cloudflare R2
Object storage internet par files store karne ki service hai. Aap usay name (ek "key") aur kuch bytes dete hain, aur woh unhein store karti hai; baad mein aap name se bytes mangte hain aur wapas mil jate hain. Is tarah ki pehli service AWS S3 thi, aur us ki API de facto standard ban gayi jise bohat providers implement karte hain. Cloudflare R2 Cloudflare ki object storage hai. Yeh S3 API implement karti hai, ek twist ke saath: apni files bahar read karna free hai. S3 se data bahar read karne ka cost lagbhag nine cents per gigabyte hota hai; R2 se zero.
Yeh problem solve karta hai: aap ka agent files parhta hai (uploaded documents, knowledge content) aur files likhta hai (generated reports, artifacts). Inhein aisi jagah rehna hota hai jahan harness aur sandbox dono pahunch sakein, aur yeh database ke liye bohat bari ya bohat zyada hoti hain. Database large files ke liye built nahin; container ka disk restarts survive nahin karta; object storage files ke liye right shape hai.
Lab mein aap yeh vocabulary dekhein ge:
- Bucket files ka named container hai, top-level folder jaisa. Harness ka bucket agent ke artifacts rakhta hai.
- Object ek stored file hai, jiske paas key (bucket mein us ka path) aur value (bytes) hoti hai.
- Prefix key ka woh hissa hai jo related files group karta hai, jaise
inputs/yaoutputs/. - S3-compatible ka matlab hai R2 wohi API bolta hai jo S3 ne invent ki, is liye S3 se baat karne wali koi bhi Python library sirf ek setting badal kar R2 se baat karti hai: endpoint URL.
- Presigned URL short-lived link hai jo ek specific object tak access deta hai. Harness root credentials rakhta hai; jab sandbox ko ek file chahiye hoti hai, harness usay short expiry wala presigned URL deta hai, aur sandbox sirf us file tak pahunch sakta hai.
- Lifecycle policy rule hai jo set age se purane objects delete karta hai, taake storage write-only graveyard na ban jaye.
Minimum mental model: R2 woh jagah hai jahan harness files rakhta aur parhta hai, S3 API ke through. Harness root credentials rakhta hai (sab kuch read aur write); sandbox ko sirf presigned URLs milte hain (ek file, chota waqt).
Jo aap ko nahin chahiye. Is course ko complete karne ke liye Kubernetes, infrastructure-as-code, service mesh, ya message broker ki zaroorat nahin. Upar wali managed services operational machinery handle karti hain. Deep SQL fluency bhi zaroori nahin; lab ka code kya kar raha hai yeh pehchan lena kaafi hai.
Part 1: Deployment problem
Teen concepts establish karte hain ke yeh course kyun exist karta hai aur "deployment problem" asal mein kya hai. Beginners yahan se grounding lete hain; advanced readers Part 2 tak skim kar sakte hain.
Concept 1: "Works on my machine" deployment nahin hota
Aap ke paas Python mein defined agent hai, maan lein Maya ka Tier-1 Support agent: woh tools call karta hai, specialists ko hand off karta hai, apni limits respect karta hai, aur eval suite pass karta hai. Aap usay laptop se run karte hain aur woh kaam karta hai.
"Aap ke laptop par kaam karta hai" ka asal matlab yeh hai. Agent Python process ke taur par chalta hai jise aap ne haath se start kiya. Yeh apni API keys project folder ki file se parhta hai. Yeh apni state usi folder mein local file par likhta hai. Yeh code ko same process mein libraries import kar ke chalata hai. Model internet par call hota hai, lekin baqi sab aap ki machine par rehta hai.
Production ka matlab yeh hai, aur har piece kaise different hai:
- Real users agent tak public internet ke zariye pahunchte hain. Sirf aap nahin, apne laptop se.
- Bohat se users ek saath agent ko hit karte hain. Single Python script ek waqt mein ek handle karti hai.
- Agent ki state host restart survive karti hai. Temp folder mein local file nahin karti.
- Agent ka generated code aisi jagah chalta hai jahan woh aap ke data ko nuksan nahin de sakta. Apne process mein, database credentials ke paas, usay chalana serious security mistake hai.
- Agent ke secrets agent ke generated code ki reach se bahar hote hain. Working directory mein key file nahin.
- Har run observable, auditable, aur recoverable hoti hai. Crash hone wala process in mein se kuch bhi nahin.
In chhe properties mein se kitni aap laptop script mein minor changes aur ek ya do din ke kaam se add kar sakte hain? Honest jawab ek ya zero hai. In mein se kisi ek ko bhi production survive karne wale tareeqe se add karna kam az kam ek week focused infrastructure work hai; saari chhe add karna woh poora body of work hai jo yeh course sikhata hai. Production deployment "mere laptop par chalta hai" ke gird thin wrapper nahin. Yeh different architecture hai.
AI services deploy karne mein naye teams ke liye temptation yeh hoti hai ke is realization ko skip kar dein. "Hum script bas server par chala dein ge." Do mahine baad team ke paas aisa server hota hai jo kabhi kabhi crash karta hai, aisa agent jo kabhi kabhi user-influenced code ko production database ki full access ke saath chalata hai, aisi state jo har reboot par vanish hoti hai, aur agent ne kya kiya is ka koi record nahin. Production ko script rakhne ki jagah samajhne ka predictable result yahi hai, different architecture nahin.
Deployment problem "script kahan chalayein?" nahin. Yeh hai "agent ko kaise re-architect karein taake us ka harness yeh chhe production properties de aur us ki execution safe rahe?" Yeh course ek complete answer sikhata hai.
Concept 2: Harness/sandbox split, control plane vs execution plane
Is course ka sab se important idea harness (control plane) aur sandbox (execution plane) ke darmiyan split hai. Har later concept aur decision is par rest karta hai.
Harness agent ka brain hai. Yeh users se network ke zariye requests receive karta hai. Yeh agent loop chalata hai: model call karna, decide karna ke next kaunsa tool call karna hai, specialist agents ko handoffs handle karna, guardrails lagana. Yeh bohat se runs ke across durable state rakhta hai: conversation history, run history, audit log. Yeh secrets rakhta hai: model key, database credentials, storage credentials. Aur yeh users ko results return karta hai.
Sandbox agent ke haath hain. Yeh harness se workspace description (Manifest) receive karta hai. Yeh us description se match karta hua isolated workspace provision karta hai. Yeh shell commands, file reads aur writes, aur code chalata hai jab agent request kare. Yeh results harness ko return karta hai. Aur is ke paas harness ke secrets, database, ya production systems tak access nahin hoti, siwaye us ke jo Manifest explicitly mount kare.
Un ke darmiyan boundary network aur security boundary hai. Harness sandbox credentials use kar ke network par sandbox se baat karta hai; apne secrets sandbox ke saath share nahin karta. Sandbox harness ka environment, database, ya filesystem read nahin kar sakta. Yeh production discipline hai jo April 2026 SDK release ne SDK ke andar daal di.
Yeh split kyun matter karta hai? Chaar reasons.
Security reason: agent code generate karta hai. Code ghalat ho sakta hai, ya subtle tareeqon se incorrect ho sakta hai jin ke side effects hon, ya adversarial setting mein malicious ho sakta hai. Aap nahin chahte ke woh code usi process mein chale jahan database credentials hain. Split generated code aur harness ke secrets ke darmiyan network aur OS boundary rakhta hai. Agar agent aisi request generate kare jo files delete kar de, sirf sandbox harmed hota hai, aur sandbox throwaway hai.
Durability reason: sandboxes frequently create aur destroy hone ke liye banay hain. Harness ko sandbox dying survive karna hota hai. Ek task sandbox provision kar sakta hai, ten minutes run kar sakta hai, hiccup se sandbox lose kar sakta hai, checkpoint se naye sandbox mein restore kar sakta hai, aur finish kar sakta hai. Harness yeh orchestrate karta hai. Agar harness sandbox ke andar hota to sandbox dying sab kuch lose kar deta.
Scalability reason: ek harness jo bohat se sandboxes coordinate karta hai, ek harness-plus-sandbox lump se kahin behtar scale karta hai. Harness ki needs modest hain (requests handle karna, model call karna, database se baat karna); sandbox ki needs spiky hain (code compile karna, tests chalana, files process karna). Split un dono ko apne apne hisab se scale karne deta hai.
Observability reason: harness record own karta hai. Agent ne kya decide kiya, kaun se tools call kiye, kya trace produce ki, sab harness ke saath rehta hai. Sandbox execution hai; harness audit log hai. Jab kuch ghalat hota hai, harness ka record woh cheez hai jo aap parhte hain.
Do anti-patterns jinhein yeh course avoid karta hai:
- Harness ko sandbox ke andar chalana. Prototype ke liye convenient, production ke liye ghalat. Sandboxes throwaway hain; harness ko persist karna hota hai. Sandboxes ko secrets trust nahin kiye ja sakte; harness ko unhein hold karna hota hai.
- Agent-generated code ko harness ke andar chalana. AI deployment ka original sin. Harness database credentials, model key, aur aap ke users ke data tak access rakhta hai. Aap agent-generated code ko is access surface ke saath nahin chala sakte. Aakhir kabhi na kabhi yeh ghalat hota hai, aur jab hota hai to damage unbounded hota hai.
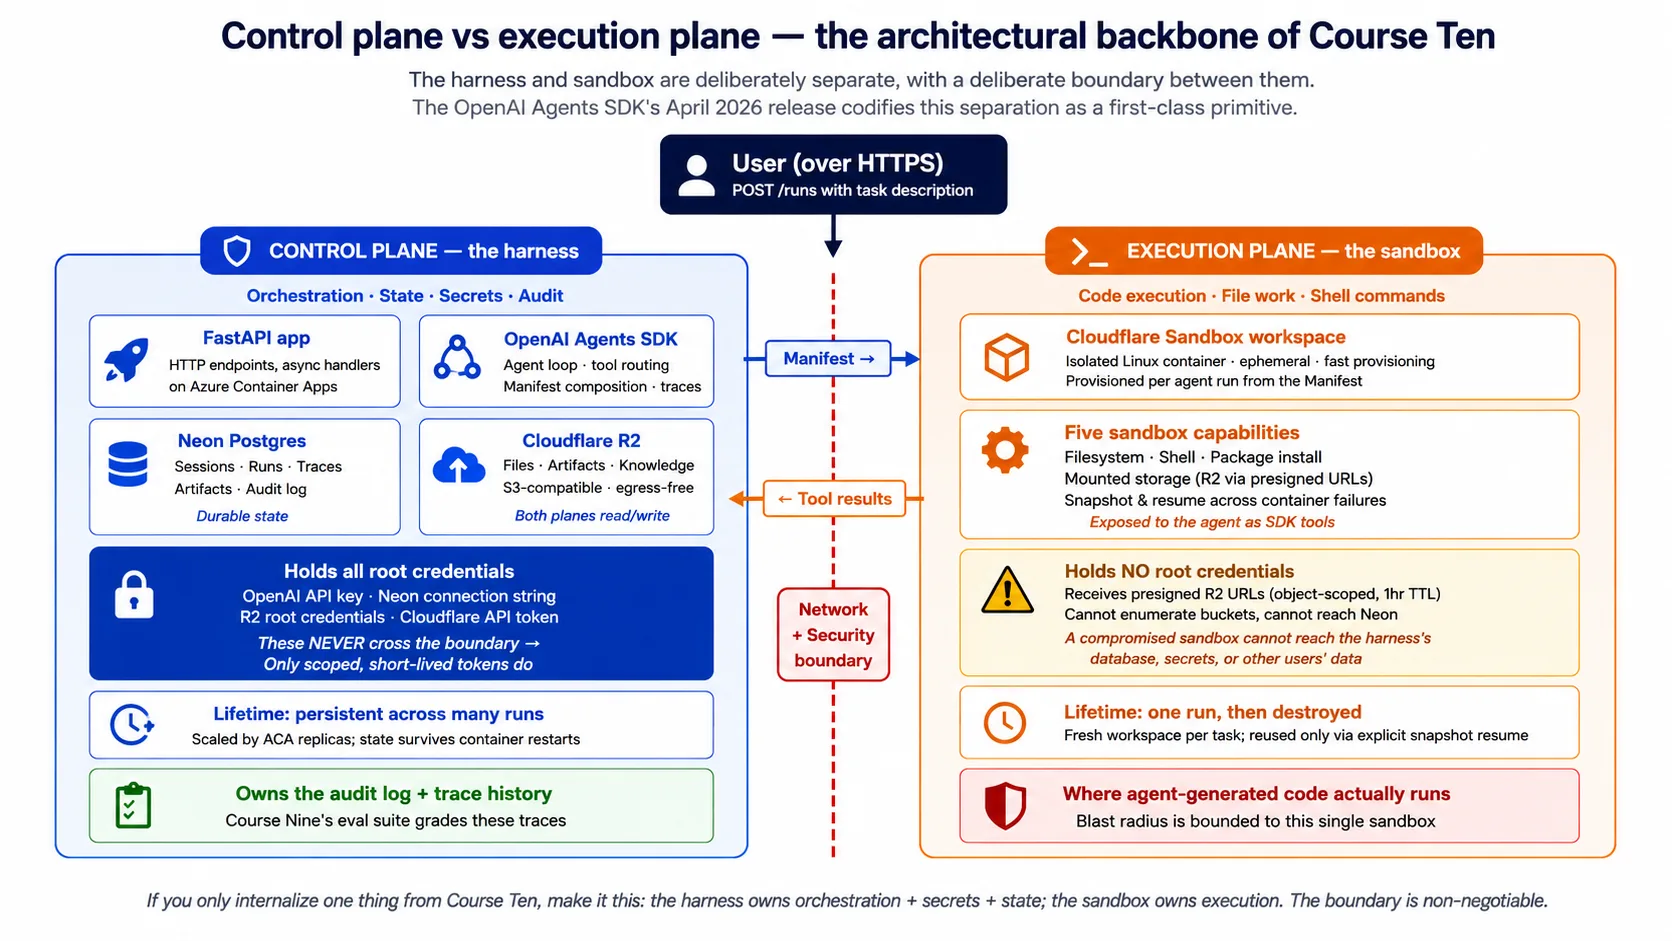
Concept 3: SDK ko cloud infrastructure se kya chahiye, paanch surfaces
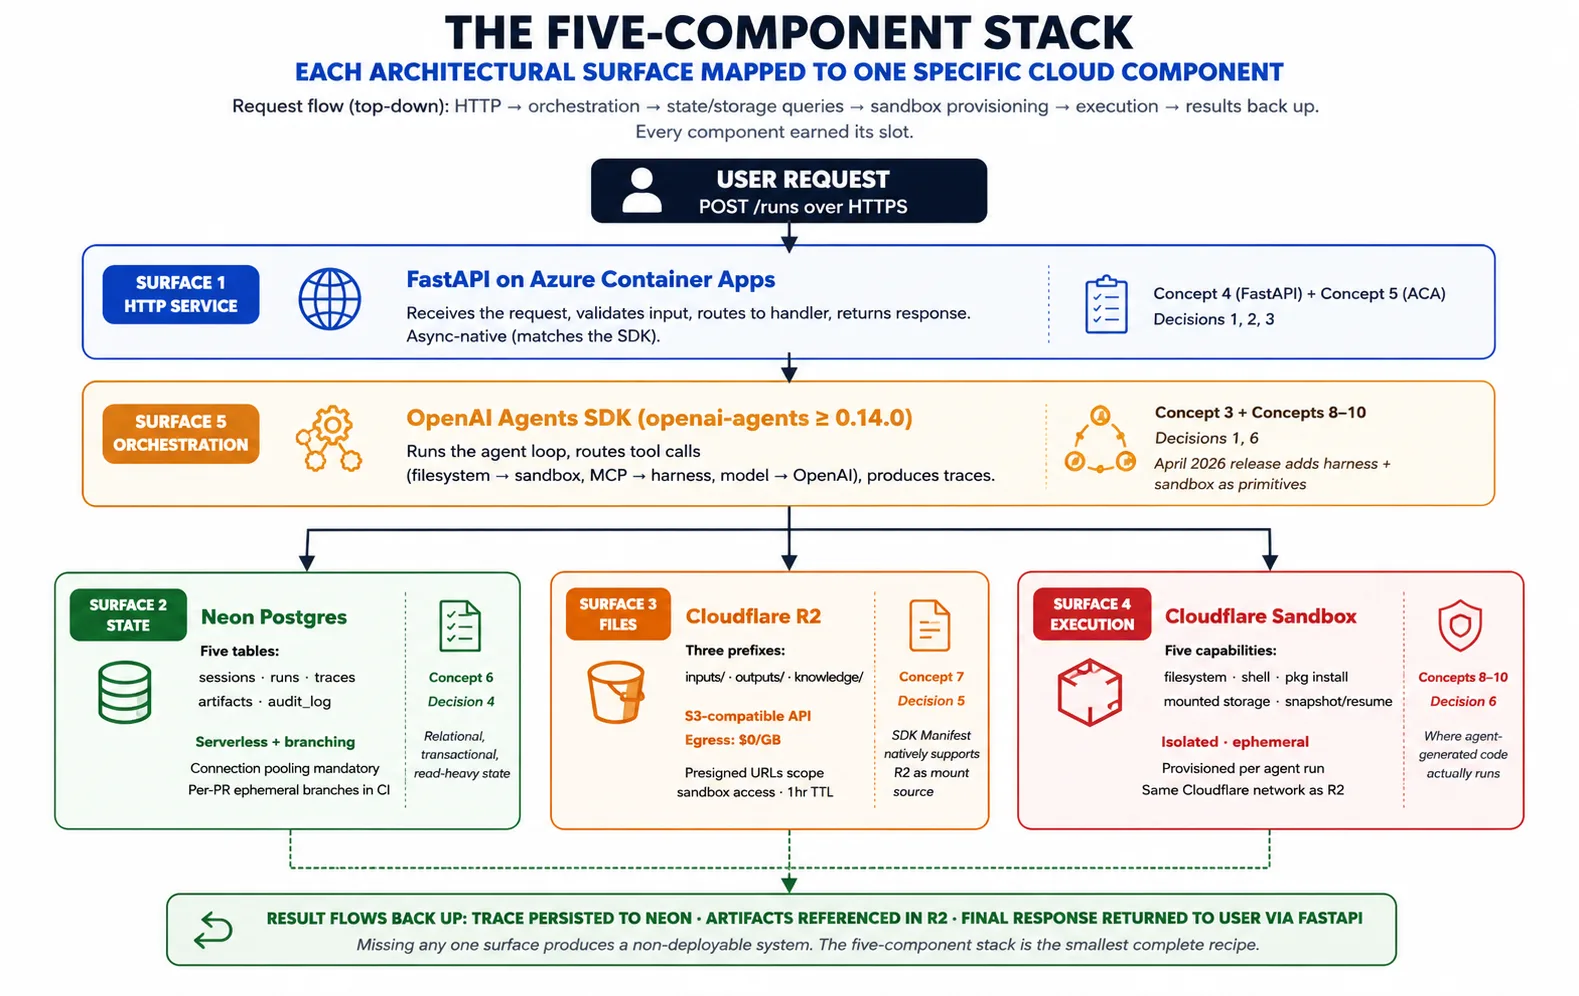
Concept 2 ne pattern name kiya. Concept 3 poochta hai: is pattern ko dekhte hue, OpenAI Agents SDK ko cloud infrastructure se asal mein kya chahiye taake isay realize kiya ja sake? Jawab paanch surfaces hai, aur five-component stack har surface ko ek component se map karta hai.
Surface 1: harness host karne ke liye long-running HTTP service. Harness Python process hai jise users se requests accept karni hoti hain, indefinitely running rehna hota hai (task seconds se hours tak le sakta hai), traffic barhne par scale out aur girne par scale back karna hota hai, aur host failing survive karna hota hai. Azure Container Apps par FastAPI yeh provide karta hai. Concept 4 FastAPI cover karta hai; Concept 5 Azure Container Apps cover karta hai.
Surface 2: runs ke across durable state. Harness sessions, runs, traces, approvals, aur audit log rakhta hai. Neon Postgres yeh provide karta hai: Postgres kyun ke yeh best-understood transactional database hai, Neon kyun ke us ki serverless scaling aur branching harness ke deployment patterns se match karti hai. Concept 6 Neon cover karta hai.
Surface 3: file aur artifact storage jahan dono planes pahunch sakein. Agents files produce karte hain (reports, code, exports) aur files consume karte hain (uploads, datasets, knowledge content). Inhein aisi jagah rehna hota hai jahan harness aur sandbox dono pahunch sakein. Cloudflare R2 yeh provide karta hai: S3-compatible API, apni files bahar free read, aur April 2026 SDK mein Manifest mount source ke taur par native support. Concept 7 R2 cover karta hai.
Surface 4: agent-generated code ke liye isolated execution. Jab agent shell command chalata hai, package install karta hai, ya code execute karta hai, us kaam ko aisa home chahiye jo harness ke secrets se isolated ho, demand par create ho, aur storage se inputs read aur outputs write kar sake. Code-execution sandbox yeh provide karta hai. Concepts 8-10 sandbox layer ko depth mein cover karte hain.
Surface 5: surfaces 1-4 ko jorne wali orchestration. Yeh SDK khud hai. Yeh agent loop chalata hai, tool calls route karta hai (filesystem aur shell sandbox ko, model calls OpenAI ko), Manifest manage karta hai, aur traces produce karta hai. Harness SDK import karta hai aur us ke primitives use karta hai; unhein reinvent nahin karta.
Composition: request Azure Container Apps par FastAPI tak aati hai. Harness agent aur prior state Neon se load karta hai. Yeh task ke liye workspace describe karta hua Manifest compose karta hai. Yeh sandbox provider se us workspace ko provision karne ko kehta hai. SDK agent loop chalata hai, tool calls sandbox ko bhejta hai aur trace record karta hai. Artifacts R2 mein jate hain; trace Neon mein jati hai. Result user ko return hota hai. Yeh composition poora course hai; har concept aur decision is ka ek piece elaborate karta hai.
🚫 Python par nahin? April 2026 release ke mutabiq harness aur sandbox features Python-only hain; TypeScript support planned hai lekin undated. Agar aap ki app TypeScript mein hai, Python harness ko alag service ke taur par chalayein aur apni TypeScript app se us ke endpoints HTTP par call karwayein. Is course ka harness exactly woh service hai.
Part 2: Five-component stack
Part 1 ne pattern establish kiya; Part 2 stack ke harness side (FastAPI, Azure Container Apps, Neon, R2) se guzarta hai aur batata hai ke har component ne apni slot kyun earn ki. Paanchwa component, sandbox, apna Part 3 leta hai.
Concept 4: Harness web layer ke taur par FastAPI
Harness ko long-running HTTP service hona hota hai, aur kai Python frameworks ek host kar sakte hain: Flask, Django, FastAPI, Starlette. Is course ka choice FastAPI hai, aise reasons ki wajah se jinhein name karna worth hai.
Async story: OpenAI Agents SDK Python ke asyncio ke gird built hai. Model, tools, aur sandbox tak calls sab await calls hain. FastAPI async-native hai, is liye aap async def handlers likhte hain jo thread-pool workarounds ke baghair SDK ko direct await karte hain. Sync-native framework ka matlab hota request per event loop spin up karna ya SDK ko thread pool mein chalana: dono kaam karte hain, dono friction add karte aur concurrency lose karte hain. Woh framework use karein jiska concurrency model aap ki dependencies se match karta ho.
Schema story: FastAPI aap ke handlers ke type hints se OpenAPI schema generate karta hai. Yahan yeh teen tareeqon se payoff deta hai. Eval suite checked requests ke saath harness endpoints hit kar sakti hai kyun ke schema machine-readable hai. TypeScript app samet kisi bhi language ke liye typed client libraries generate ho sakti hain. Aur schema aap ki team aur future self ke liye API document karta hai, alag doc-writing effort ke baghair.
Pydantic story: FastAPI request aur response data check karne ke liye Pydantic use karta hai, aur SDK bhi internally Pydantic use karta hai. Validation boundary par ek dafa hoti hai, usi library aur patterns ke saath jo SDK pehle se use karta hai. Doosre frameworks ko separate validation layer chahiye hoti hai; FastAPI woh mismatch hata deta hai.
Community story: May 2026 tak FastAPI AI services ke liye dominant Python framework hai. Is workload ke tutorials, examples, aur answers isay assume karte hain. Well-supported tool choose karna friction kam karta hai.
FastAPI kya nahin hai. Yeh har cheez ke liye general framework nahin; agar aap ko template-rendered HTML pages ya Django-style admin chahiye, FastAPI ghalat choice hai. Harness API server hai, web app nahin. Yeh queue ka replacement bhi nahin: agar task request ke reasonably open rehne se zyada lamba chalta hai, connection open nahin rakhte. Harness work queue karta hai aur client ko baad mein check back karne deta hai; lab yeh pattern set karti hai.
Lab mein aap harness ka POST /runs endpoint dekhein ge: async def handler jo session load karta hai, agent run karta hai, run persist karta hai, aur reply return karta hai. Yeh short function hai, kyun ke FastAPI aur Pydantic aap ko HTTP handling, validation, aur serialization free mein de dete hain, aur async def aap ko SDK direct await karne deta hai. Us code ka real, booted version companion download mein aur lab Decision mein hai, jahan yeh waqai chalne wale harness tak traceable hai.
Concept 5: Harness runtime ke taur par Azure Container Apps
Harness containerized FastAPI service hai jise continuously run karna, traffic ke saath scale karna, secrets safely hold karna, aur host failing survive karna hota hai. Is course ka choice Azure Container Apps (ACA) hai, jise Microsoft exactly is workload ke liye position karta hai.
Yeh kya hai: managed cloud service. Aap usay container image aur configuration dete hain; yeh container chalati hai, public address deti hai, autoscale handle karti hai, secrets store karti hai, aur revisions track karti hai. Aap servers manage nahin karte, Kubernetes manually nahin chalate, ya underlying compute ke liye infrastructure code nahin likhte. Aap declare karte hain ke kya chahiye; ACA usay bana deti hai.
Harness ko is se paanch capabilities chahiye:
- Public address. ACA har app ko managed certificates ke saath stable HTTPS address deti hai. Web-server config nahin, certificate setup nahin, DNS gymnastics nahin.
- Autoscale. ACA running copies ki tadaad aap ke set rules par scale karti hai, aam tor par in-flight requests ki count par. Scale-to-zero cost lever hai: traffic na ho to ACA zero copies chalati hai aur aap kuch pay nahin karte; quiet spell ke baad pehli request copy wake hone ke liye chand seconds wait karti hai.
- Secrets. ACA secrets store karti hai aur aap ko environment variables mein unhein naam se reference karne deti hai; actual values aap ki configuration ya image mein kabhi nahin aati. Yeh disk par key file se bohat behtar hai.
- Revisions. Har deploy immutable revision banata hai, aur ACA revisions ke darmiyan kisi bhi percentage mein traffic split kar sakti hai. Is se blue/green deploys aur rollback built-in ho jate hain: rollback traffic change hai, redeploy nahin.
- Observability. ACA logs, metrics, aur traces Azure ke monitoring tools mein feed karti hai, is liye request rate, error rate, aur latency free milte hain; harness upar agent ki apni traces add karta hai.
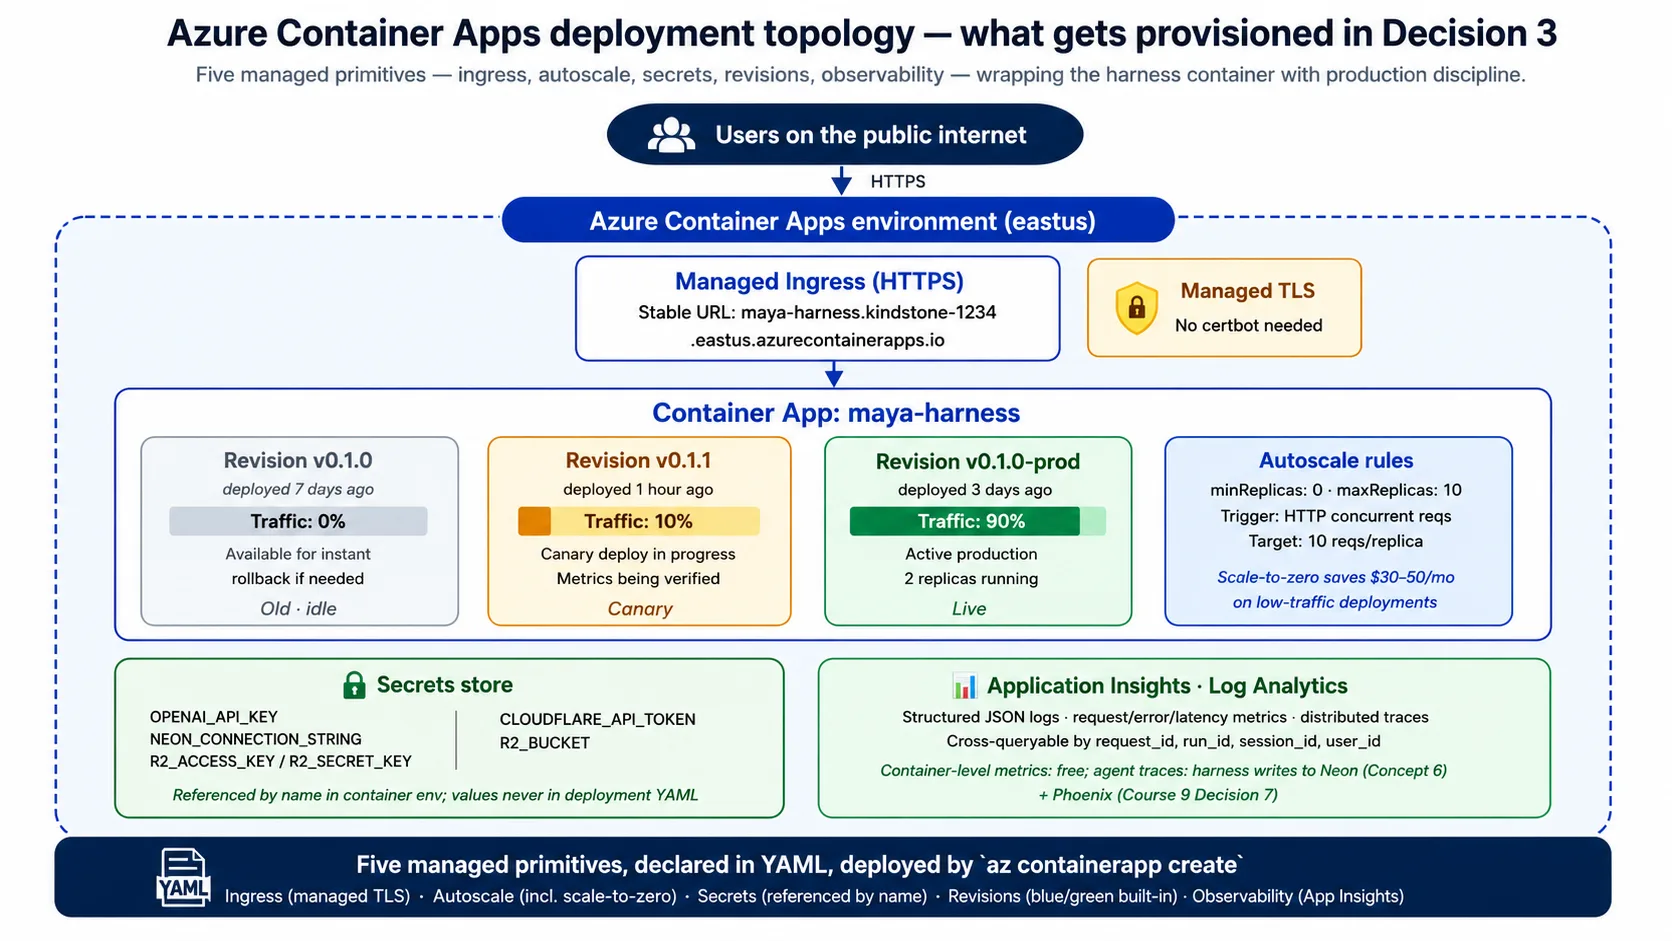
ACA specifically kyun, Cloud Run ya Fly.io ya raw Kubernetes kyun nahin? Teen honest reasons. Microsoft ACA ko exactly is profile ke liye position karta hai: containerized APIs, background jobs, aur microservices. Is ki revisions aur traffic splitting first-class hain, jahan kai services blue/green ko bolt-on treat karti hain. Aur is ka scale-to-zero honest hai: yeh waqai zero copies chalata hai aur aap ko kuch bill nahin karta, jab ke kuch "managed" services ek copy warm rakhti aur us ka bill leti hain. Doosre clouds ke clean equivalents hain (Google Cloud Run, AWS App Runner); architectural shape identical hai, aur Concept 9 aur Concept 15 substitutions cover karte hain.
ACA kab wrong choice hai: agar peak par roughly 25 copies se zyada chahiye hon to per-app limits awkward ho jati hain aur full Kubernetes better fit hota hai; agar active-active multi-region chahiye to is ki multi-region story kam mature hai (Concept 14 isay name karta hai). Harness deploy karne wala container chota hai, python:3.12-slim se multi-stage build ke saath built hai, uvicorn se start hota hai, aur usi GET /health endpoint se check hota hai jise aap ne Jaldi Kamyabi mein hit kiya.
Lab ka Decision 3 choti ACA configuration produce karta hai jo public address, naam se referenced secrets, resource size, aur scale rule (request volume par zero se kuch copies tak) declare karti hai. Aap usay parhein ge aur is concept se har line pehchan lein ge.
Concept 6: Durable state ke liye Neon Postgres
Harness ko runs ke across cheezein yaad rakhni hoti hain: conversation history, run records, traces, audit log. Yeh sab container restarting, scaling, ya replace hone ke baad bhi survive karna chahiye. Is course ka choice Neon Postgres hai.
Postgres hi kyun, Redis ya document store kyun nahin? Harness ki state ki teen properties relational, transactional database ki taraf point karti hain. Is ki shape relational hai: sessions ke many runs hain, runs ke traces aur artifacts hain, is liye foreign keys aur joins cleanly map karte hain. Isay transactional integrity chahiye: "is run ko complete mark karo aur us ki trace insert karo aur session ka timestamp update karo" ya to sab ho ya kuch bhi na ho, jo Postgres transactions free mein deti hain. Aur is ki reads relational hain: "is session ke last ten runs un ki traces ke saath do" textbook SQL query hai. Redis jaisa cache key lookups ke liye faster hai lekin system of record ke liye ghalat shape hai.
Neon specifically kyun, RDS ya VM par database kyun nahin? Serverless story: Neon apna compute khud up aur down scale karta hai, aur harness idle hone par near-zero tak scale kar sakta hai, baqi stack ke cost model se match karte hue. Traditional managed instance aap ko bill karti hai chahe aap query karein ya nahin. Branching story: Neon aap ko database ki branch banane deta hai, aisi copy jo parent ke saath storage share karti hai jab tak aap usay change na karein, jisse per-developer copies aur per-PR throwaway test databases seconds mein milte hain. Aur yeh Postgres hai, approximation nahin: wohi SQL, wohi client libraries, is liye Neon par ya Neon se move karna connection-string change hai.
Harness ka schema paanch tables hai: sessions (user ka ongoing context), runs (har agent task), traces (run ki full SDK trace), artifacts (R2 mein files ke pointers), aur audit log (kya hua is ka immutable record, eval suite aur compliance ke liye). Lab ka Decision 4 companion download ki schema.sql file se yeh schema create karta hai.
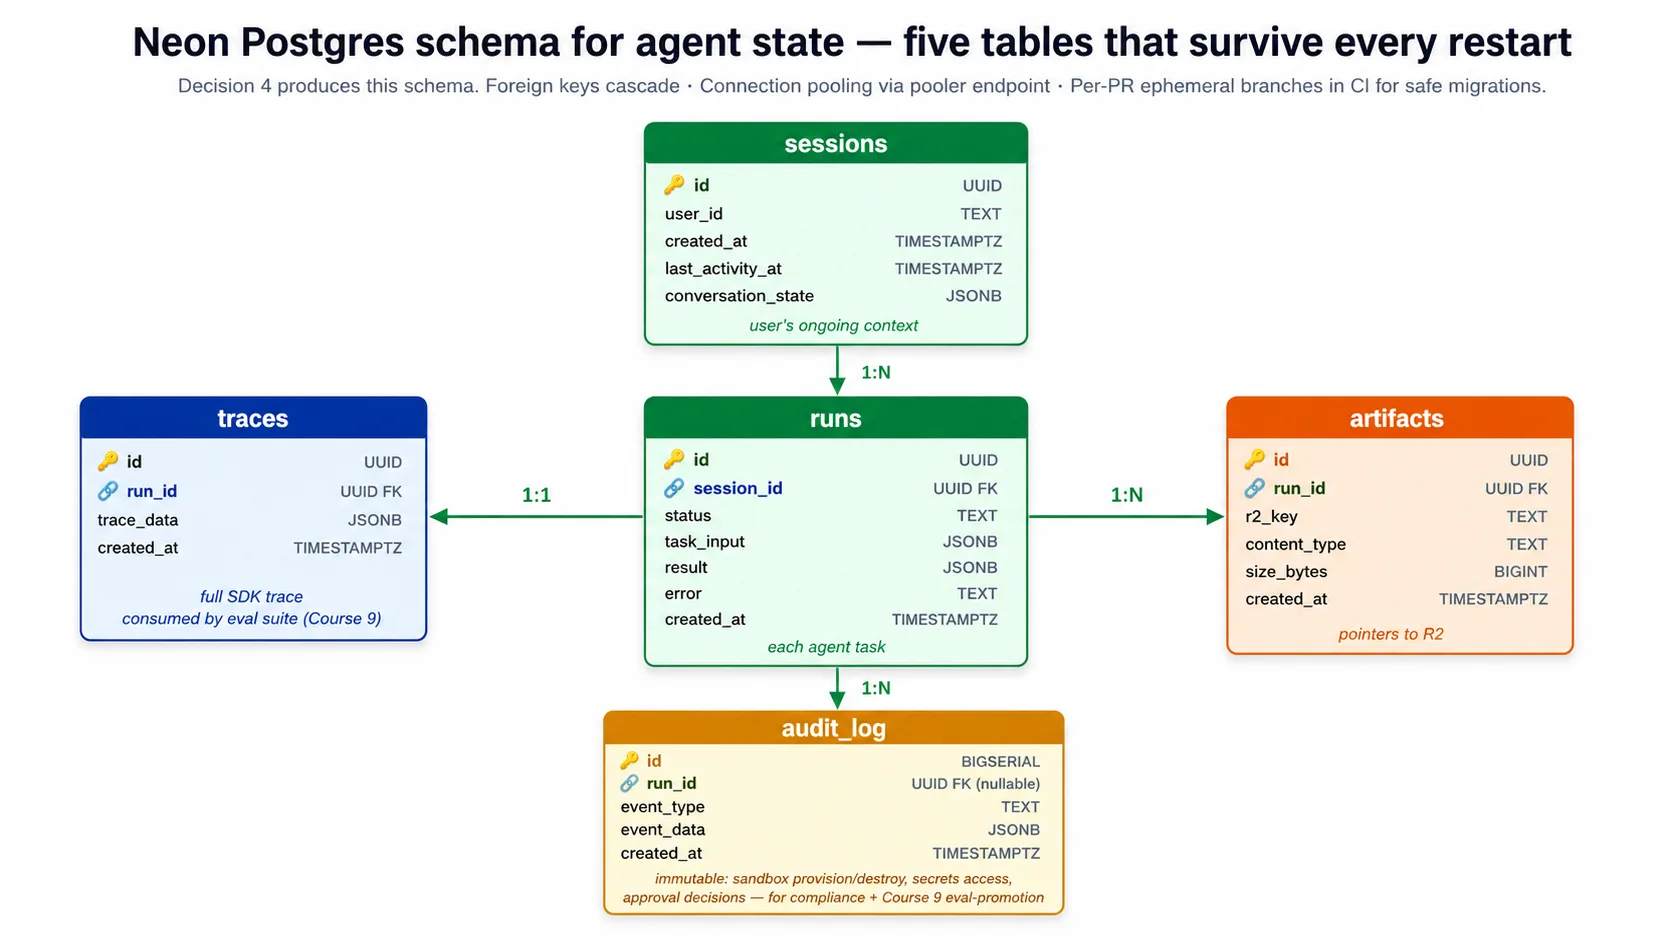
⚠️ Do Neon footguns jo lab aap ke liye fix karti hai. Neon ki copy-paste connection string mein
channel_binding=requirehota hai.asyncpgdriver usay recognize nahin karta aur pooled endpoint ke against fail hota hai, is liye harness connect karne se pehlechannel_bindingstrip karta hai (yehsslmode=requirerakhta hai). Alag se, pooled endpointsearch_pathserver settings silently drop karta hai, is liye harness har statement schema-qualify karta hai (public.runs,public.sessions), aur aap schema direct, non-pooled endpoint ke against run karte hain. Dono real footguns hain, aur companion code inhein handle karta hai; lab unhein explicit acceptance criteria ke taur par call out karti hai.
Connection pooling optional nahin. Harness bohat copies tak scale karta hai, har ek connections kholti hai, aur Postgres ek waqt mein kuch hundred se upar gir sakta hai. Neon pooled endpoint deta hai jo hazaron harness connections ko choti tadaad ke real Postgres connections mein multiplex karta hai. Harness normal work ke liye pooled endpoint se connect karta hai, aur schema changes ke liye sirf direct endpoint se.
Concept 7: Files aur artifacts ke liye Cloudflare R2
Harness aur sandbox dono ko files chahiye: input documents jo agent parhta hai, output artifacts jo woh produce karta hai, knowledge content jo woh retrieve karta hai. Is course ka choice Cloudflare R2 hai, teen specific reasons ki wajah se.
Object storage hi kyun, database ya container disk kyun nahin? Files relational database ke liye ghalat shape hain: Postgres large file column mein hold kar sakta hai, lekin backups balloon hon ge aur connection bottleneck ban jaye ga. Database ko relational state ke liye use karein aur files ke pointers store karein; file bytes object storage mein rehte hain. Files container ke local disk ke liye bhi ghalat hain, jo restart par disappear hota hai aur copies ke across easily share nahin hota. Jab files ko kisi ek container se zyada survive karna aur bohat se places se reachable hona ho, object storage right shape hai.
R2 specifically kyun, S3 ya GCS kyun nahin? Egress story asal reason hai. R2 se apni files bahar read karna free hai. S3, Google Cloud Storage, aur Azure Blob sab transferred-out data charge karte hain, aam tor par five se twelve cents per gigabyte ke aas paas. Agent jo files ko harness aur sandbox ke darmiyan repeatedly move karta hai us ke liye yeh jaldi add hota hai. Agar harness mahine mein kuch terabytes move kare, S3 par egress ke hundreds of dollars pay kare ga aur R2 par zero; storage aur request costs roughly comparable hain, is liye egress line simply disappear ho jati hai. Low-traffic harness ke liye difference chota hai, lekin real volume par free egress viable aur unviable cloud costs ke darmiyan farq ban jata hai.
R2 S3 API bhi bolta hai, is liye koi bhi Python S3 library sirf endpoint URL setting badal kar us se baat karti hai, client rewrite ke baghair agar kabhi migrate karna ho. Aur April 2026 SDK release R2 ko S3, GCS, aur Azure Blob ke saath supported Manifest mount source ke taur par list karti hai, is liye harness Manifest mein R2 buckets declare karta hai aur sandbox unhein custom bridging code ke baghair mount karta hai.
Harness apne bucket mein teen prefixes use karta hai: users ki uploaded files ke liye inputs/, agent ke produced files ke liye outputs/, aur long-lived knowledge content ke liye knowledge/. Lab ka Decision 5 yeh set up karta hai.
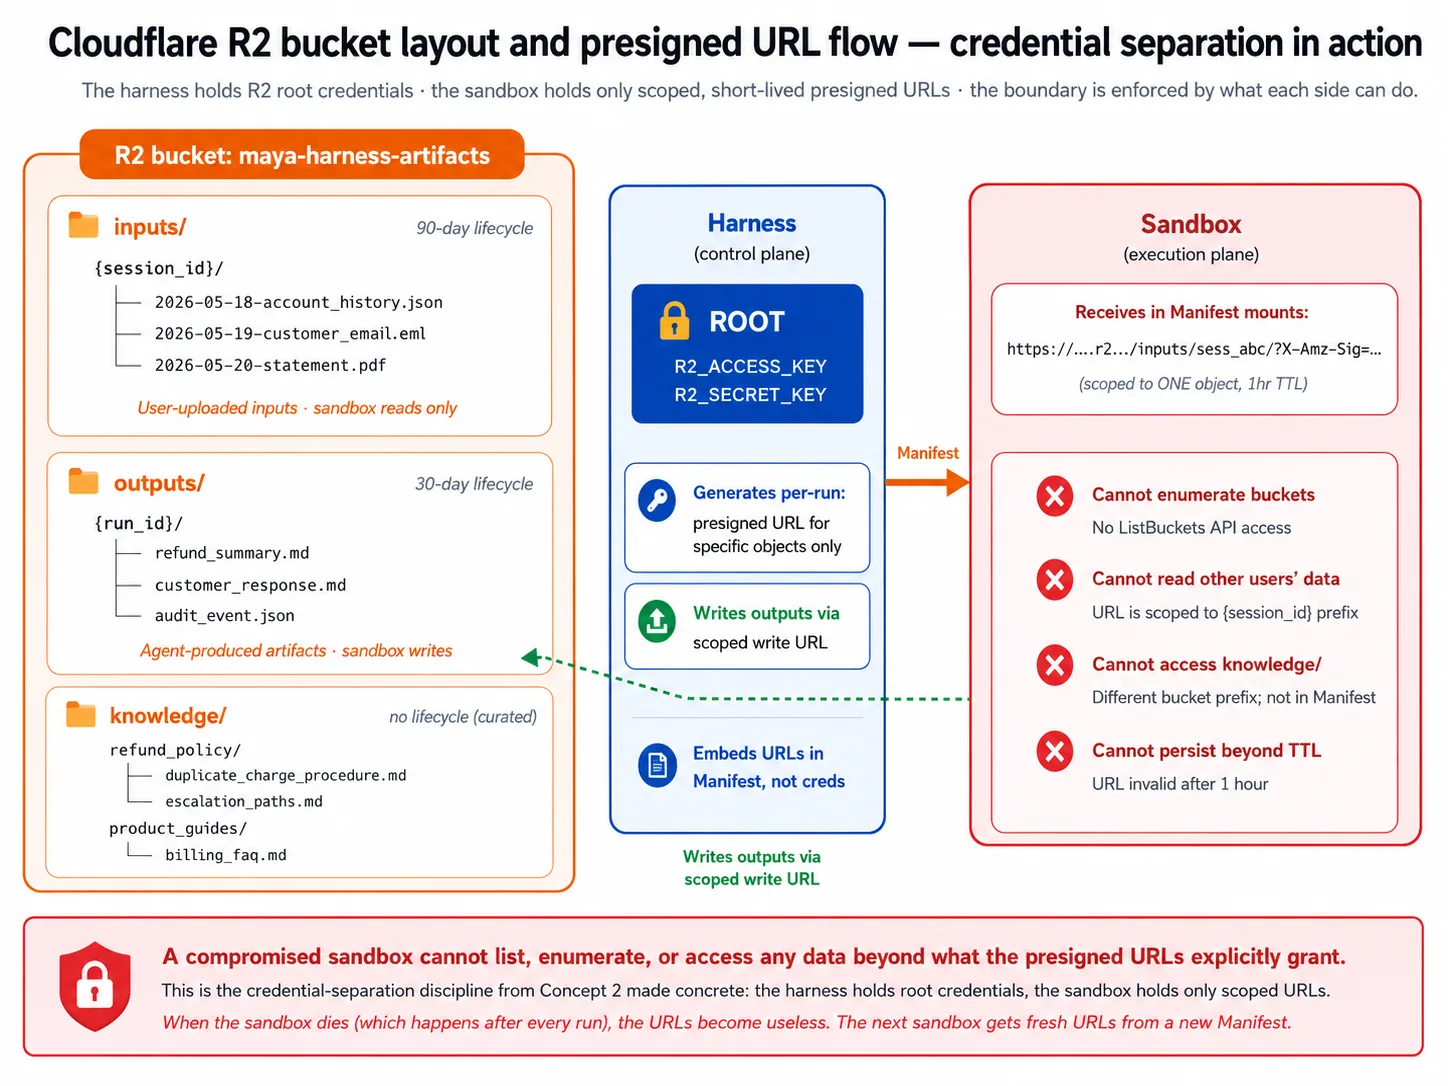
Presigned URLs woh tareeqa hain jisse sandbox root credentials ke baghair access leta hai. Harness root credentials rakhta hai jo kuch bhi read ya write kar sakte hain. Yeh unhein sandbox ke saath share nahin karta. Is ke bajaye, yeh ek specific object ke liye short expiry wala presigned URL mint karta hai aur sandbox ko de deta hai. Sandbox sirf wahi reach kar sakta hai jo URL allow karta hai; jab woh die hota hai, URL useless hota hai, aur next sandbox ko fresh URLs milte hain. Yeh Concept 2 ki credential separation concrete ban kar aati hai: compromised sandbox buckets list nahin kar sakta ya kisi aur user ke data tak nahin pahunch sakta.
Lifecycle policies storage ko write-only graveyard banne se rokti hain: lab outputs/ par 30-day cleanup set karti hai, aur curated knowledge/ par kuch nahin.
Part 3: Execution plane
Part 2 ne harness side cover ki: orchestration, state, aur storage. Part 3 execution side cover karta hai, woh sandbox jahan agent ka generated code asal mein chalta hai. Teen concepts: sandbox kya provide karta hai, kaunsa provider choose karna hai, aur harness aur sandbox ke darmiyan handoff kaise kaam karta hai.
Concept 8: Sandbox execution capabilities
Concept 2 ne sandbox ko execution plane ke taur par name kiya: woh jagah jahan code harness ke secrets tak access ke baghair chalta hai. Concept 8 isay concrete banata hai. Agent ko sandbox se asal mein kya chahiye?
Paanch capabilities:
- Filesystem. Agent files read aur write karta hai: inputs, intermediate artifacts, outputs. Sandbox Unix-like filesystem provide karta hai jahan read, write, edit, aur list operations tools ke taur par exposed hoti hain. Is ke baghair agent file work nahin kar sakta.
- Shell. Agent commands chalata hai: test runner, package install, clone, custom tool. Sandbox shell provide karta hai jahan yeh run hoti hain. Is ke baghair agent un cheezon tak limited hai jinhein harness explicitly wrap karta hai.
- Package install. Agent demand par packages install karta hai: "is library ko install karo, phir user ki uploaded file parho, phir summarize karo." Is ke baghair agent ki capability sirf base image mein shipped cheezon tak locked hai.
- Mounted storage. Agent ko local disk se bari files chahiye hoti hain: uploads, knowledge content, datasets. Sandbox external storage (R2, S3, GCS) ko normal paths ke taur par mount karta hai, aur Manifest declare karta hai ke kahan kya mount karna hai. Is ke baghair agent sirf image mein ship hone layak choti files touch kar sakta hai.
- Snapshot and resume. Sandboxes throwaway hain aur mid-run fail ho sakte hain. Sandbox apni state checkpoint kar sakta aur fresh workspace mein us checkpoint se resume kar sakta hai, aur isi se SDK long tasks ko workspace dying survive karwata hai. Is ke baghair sandbox lifetime se lamba koi bhi task failure waiting to happen hai.
Teen properties production-grade sandbox ko prototype se alag karti hain. Isolation: sandbox harness ka network, filesystem, ya doosre sandboxes reach nahin kar sakta, provider infrastructure ke zariye enforce hota hai trust ke zariye nahin, is liye compromised sandbox sirf khud ko harm karta hai. Ephemerality: har task ko fresh sandbox milta hai, task end hone par destroy hota hai, is liye compromised sandbox next task tak carry nahin hota. Fast provisioning: sandbox chand seconds mein start hota hai, kyun ke thirty-second start har task ko thirty-seconds-plus operation bana deta hai aur chat-style agents slow mehsoos hote hain.
Sandbox kya nahin hai. Yeh long-lived VM nahin jise aap tasks ke across running rakhte hain; woh problem reinvent karta hai, state accumulate karta hai aur harness ke secrets ke saath entanglement banata hai. Yeh serverless function nahin, jo ek function run kar ke return karti hai; sandbox woh workspace hai jo ek run ke andar many tool calls ke across persist karta hai, filesystem mein state hold karta hai, aur shell access deta hai. Aur yeh Kubernetes nahin; sandbox provider container orchestration ko entirely abstract karta hai, is liye aap cluster chalaye baghair isolation aur ephemerality lete hain.
Concept 9: Sandbox provider choose karna
Concept 8 ne capabilities name ki; Concept 9 provider choose karta hai. Yeh course choice aur realistic free path dono ke bare mein honest hai.
Us tradeoff se shuru karein jo zyada tar readers ke liye decision karta hai. Cloudflare ke sandbox ko paid Workers plan chahiye, aur Python harness aur sandbox ke darmiyan chota bridge Worker bhi chahiye. E2B ke paas free Hobby tier hai, SDK mein native client hai, aur deploy karne ke liye bridge nahin. Is liye agar aap paisa kharch kiye baghair lab complete karna chahte hain, E2B realistic free path hai; agar aap pehle se paid Cloudflare plan par hain aur R2 use kar rahe hain, Cloudflare sandbox apne proximity benefit ki wajah se worth hai. Lab aise likhi gayi hai ke dono kaam karte hain, aur companion code E2B default karta hai kyun ke yahi woh option hai jise aap waqai free test kar sakte hain.
Cloudflare sandbox ko course ka named primary kyun kaha gaya hai, jab aap usay choose karte hain: yeh Cloudflare ke network mein chalta hai, aur R2 bhi, is liye R2 buckets mount karna public internet ke bajaye Cloudflare-internal speeds par hota hai. Kisi aur provider ke paas R2 ke itni proximity nahin. Is ke paas first-class SDK support aur aisi cost structure bhi hai jo idle time bill nahin karti (aur agent model ka wait execution se zyada karta hai). Catch paid plan aur bridge Worker hai: Python harness jaise non-Worker clients Cloudflare sandboxes directly create nahin kar sakte, is liye chota separately-deployed Worker harness ke calls ko sandbox operations mein translate karta hai. E2B samet doosre providers direct Python API expose karte hain aur bridge nahin chahiye.
Honest alternatives, har ek ke saath woh use case jahan woh win karta hai:
- E2B. Realistic free-tier path aur polished general-purpose provider. Yeh S3, GCS, ya Azure Blob ke saath equally well kaam karta hai, aur SDK mein is ke liye native client hai. E2B use karein jab aap storage-agnostic hon, R2 par na hon, ya lab free complete karna chahte hon.
- Modal. Python ML workloads par strong; agent tasks ko GPU-backed inference ke saath chalana trivial. Agar aap ka agent custom model serving include karta hai to Modal use karein.
- Daytona. Aap ke apne cloud account mein chalta hai. Regulated industries ke liye use karein jahan data residency sandbox ko aap ke specific cloud mein rehne ka taqaza karti hai, higher operational complexity ke cost par.
- Vercel. Agar aap ki team Vercel ecosystem mein deep hai to use karein; non-JavaScript workloads ke liye kam mature.
- Bring-your-own. SDK apne container infrastructure ke against sandbox client implement karna support karta hai. Sirf tab worth hai jab aap ki security team require kare ke sandboxes aap ke cloud mein hi hon, period; operational complexity bohat barh jati hai.
Providers ke darmiyan substitution zyada tar mechanical hai. Manifest provider-agnostic hai, is liye aap same workspace shape declare karte hain chahe provider koi bhi ho. Provider client class badalti hai (ek ke liye Cloudflare client, doosre ke liye E2B client). Storage mounting network proximity ke hisab se differ karta hai (Cloudflare sandbox ke saath R2 fast hai; E2B ke saath R2 public internet par jata hai, phir bhi kaam karta hai). Aur credential pattern identical hai: harness provider credentials hold karta hai aur sandbox ko sirf short-lived access deta hai.
Recommendation ek line mein: agar aap paid Workers plan par hain aur R2 use kar rahe hain to Cloudflare sandbox use karein; warna E2B use karein, khaas taur par agar free path chahiye; ek choose karein aur saare survey karne ke bajaye ship karein.
Concept 10: Harness-to-sandbox handoff
Harness orchestrate karta hai; sandbox execute karta hai. Concept 10 handoff se guzarta hai: harness sandbox ko kya provision karna hai kaise batata hai, credentials boundary safely kaise cross karte hain, aur ek run ke across sandbox lifecycle kaise manage hota hai.
Manifest handoff contract hai. Harness Manifest compose karta hai jo describe karta hai ke workspace ko kya chahiye; provider usay receive kar ke matching workspace provision karta hai. April 2026 SDK mein Manifest entries ke set se banta hai: har entry workspace ka path hai jo batata hai wahan kya jata hai, file, directory, git repo, ya storage mount. Mounts (R2Mount, S3Mount, aur baqi) agents.sandbox.entries mein rehte hain aur un entries ke andar jate hain. Mounts ki separate list nahin aur Manifest par base-image ya resource-limit fields nahin; entries workspace describe karti hain.
from agents.sandbox import Manifest
from agents.sandbox.entries import R2Mount
from agents.sandbox.entries.mounts.base import DockerVolumeMountStrategy

# Mounts go inside entries, keyed by their path in the workspace. An R2Mount
# attaches a bucket; it has no per-prefix field, so object-level scoping is
# the harness's job (the presigned URLs it mints, from Concept 7), not a mount.
manifest = Manifest(
    entries={
        "/workspace/inputs": R2Mount(
            mount_path="/workspace/inputs",
            bucket="maya-harness-artifacts",
            account_id=R2_ACCOUNT_ID,
            mount_strategy=DockerVolumeMountStrategy(driver="rclone"),
        ),
        "/workspace/outputs": R2Mount(
            mount_path="/workspace/outputs",
            bucket="maya-harness-artifacts",
            account_id=R2_ACCOUNT_ID,
            mount_strategy=DockerVolumeMountStrategy(driver="rclone"),
        ),
    }
)
Capabilities SDK ke defaults se choose hoti hain, aur passed list unhein replace karti hai. Capabilities.default() standard set return karta hai (filesystem, shell, aur compaction). Agar aap apni list pass karte hain to woh default mein add hone ke bajaye usay replace karti hai, is liye defaults keep karne aur ek aur ability add karne ke liye concatenate karein:
from agents.sandbox.capabilities import Capabilities, Memory

# Keep the defaults and add one: a passed list REPLACES the default,
# so concatenate rather than passing [Memory()] alone.
capabilities = Capabilities.default() + [Memory()]
Yeh real footgun hai: capabilities=[Shell()] likhna silently filesystem aur compaction abilities drop kar deta hai jo default mein included the. Default rakhein aur us mein add karein.
Sandbox RunConfig ke through attach hota hai, Runner.run argument ke taur par nahin. Runner.run(..., sandbox=...) parameter nahin hai. Aap provider ke client aur us ke options object ke saath SandboxRunConfig banate hain, usay RunConfig par rakhte hain, aur RunConfig run ko pass karte hain. Har provider client apne options object se pair hota hai, aur options SandboxRunConfig mein ride karte hain, client constructor mein nahin:
from agents import Runner
from agents.run import RunConfig
from agents.sandbox import SandboxRunConfig
from agents.extensions.sandbox.e2b import E2BSandboxClient, E2BSandboxClientOptions

# The client reads E2B_API_KEY from the environment; the options carry the
# required sandbox_type. The sandbox rides on RunConfig, not a Runner kwarg.
sandbox = SandboxRunConfig(
    client=E2BSandboxClient(),
    options=E2BSandboxClientOptions(sandbox_type="e2b"),
)
result = await Runner.run(agent, message, run_config=RunConfig(sandbox=sandbox))
Cloudflare sandbox ke liye shape same hai; sirf client aur options change hote hain (ek CloudflareSandboxClient with CloudflareSandboxClientOptions(worker_url=...)). Yeh exactly companion download ke sandbox.py aur runner.py mein code hai, installed SDK ke against booted.
Credential discipline sab se important security point hai. Harness storage root credentials aur provider credentials hold karta hai. Yeh specific objects ke liye short expiry ke saath presigned URLs mint karta hai, aur woh workspace mein jate hain, root credentials nahin. Sandbox sirf woh scoped URLs receive karta hai: yeh buckets enumerate nahin kar sakta, harness ki database reach nahin kar sakta (koi connection string boundary cross nahin karti), aur harness ki doosri services reach nahin kar sakta (network policy usay sirf zaroori cheezon tak restrict karti hai, jaise model API aur package registries). Is ke ilawa kuch bhi, root credentials ya database string ko workspace mein embed karna, woh security mistake hai jise April 2026 release prevent karne ke liye design hui thi.
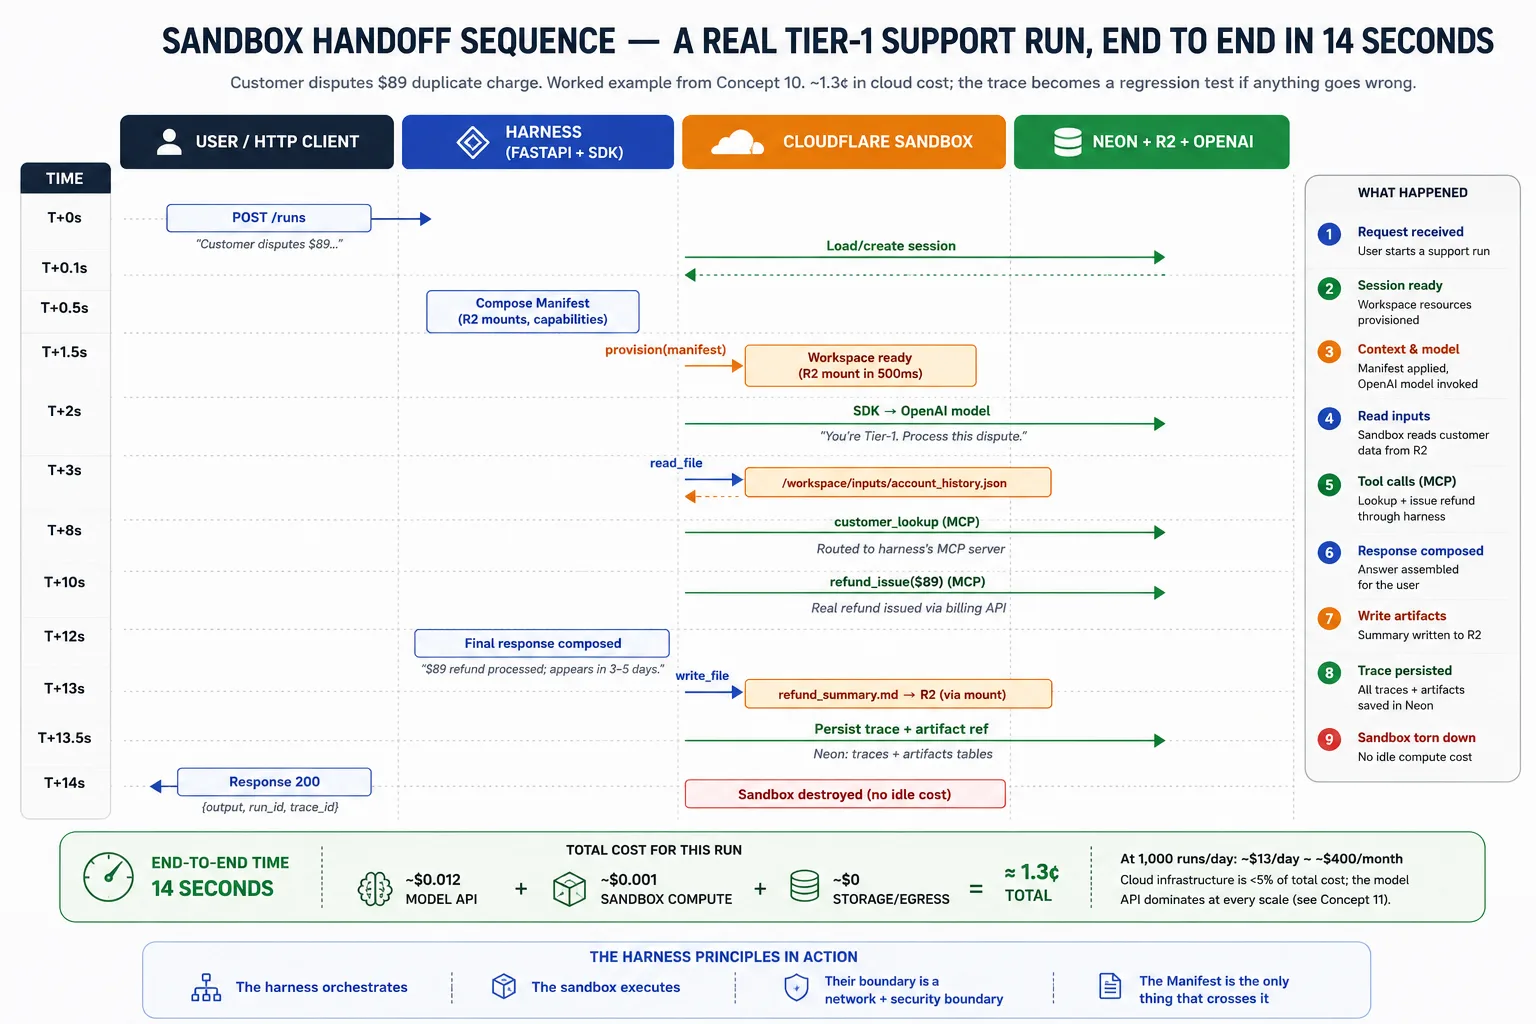
Ek single run ka lifecycle: harness request receive karta aur session state load karta hai; task ke liye Manifest compose karta hai; provider se workspace provision karne ko kehta hai; SDK agent loop chalata hai, filesystem aur shell calls sandbox ko route karta hai aur trace record karta hai; agar workspace fail ho aur snapshots enabled hon to SDK latest snapshot se naya workspace provision karta hai aur continue karta hai; completion par harness R2 se outputs read karta hai, trace aur artifact pointers Neon mein persist karta hai, sandbox destroy karta hai taake kuch idle na rahe, aur result user ko return karta hai.
Part 4: Observability aur Evals as Architectural Surfaces
Parts 1-3 ne harness deploy kiya. Part 5 ki lab usay build kare gi. Part 4 un ke darmiyan baith kar woh do surfaces name karta hai jo Part 1 ka harness/sandbox split ab bhi chahta hai: woh systems jo batate hain running harness kya kar raha hai, aur woh systems jo measure karte hain ke yeh ab bhi sahi cheez kar raha hai ya nahin. Jo teams inhein skip karti hain woh aisa harness ship karti hain jo day one par kaam karta hai aur baad mein quietly degrade hota hai. Do concepts, phir lab.
Concept 11: Observability architectural surface ke taur par
Observability: woh tools jo batate hain running harness kya kar raha hai, kab kuch toot raha hai, aur cause kaise dhoondna hai. Production AI failures zyada tar observability failures hote hain. Agent kuch ghalat karta hai, koi days tak notice nahin karta, aur delay ka cost barhta jata hai. Is liye observability aakhir mein bolt-on feature nahin. Yeh ek aur architectural surface hai, start se planned. Decision 7 usay wire karta hai.
Jab harness chalta hai, chaar surfaces usay ek saath watch karti hain. Woh similar lagti hain. Har ek ek different question own karti hai.
| Surface | Jo sawal yeh own karti hai |
|---|---|
| Application Insights | Kya harness ka infrastructure healthy hai? |
| OpenTelemetry traces | Ek request services ke through kaise flow hui? |
| OpenAI Agents SDK traces | Is run ke dauran agent ne kya kiya? |
| Phoenix | Waqt ke saath agent ka behavior kaise badal raha hai? |
Application Insights Azure ka built-in monitor hai. Yeh container view own karta hai: request rate, error rate, latency, CPU aur memory, restart counts, log streams. Jab replica crash karta hai, yeh pehle notice karta hai. Yeh agent ka behavior nahin dekh sakta. Is ke liye har request "POST /runs ne 12 seconds mein 200 return kiya" hai; answer sahi tha ya nahin invisible hai.
OpenTelemetry (OTel) ek request ko services ke across trace karne ka open standard hai. Trace ek run ka complete record hai. Jab single request model call, teen tool calls, aur chaar database queries mein fan out hoti hai, OTel un sab ki parent-child timing dikhata hai. Yeh tool calls ke darmiyan agent ki reasoning nahin dekhta; yeh record karta hai ke model call hua, kyun hua nahin.
OpenAI Agents SDK apni trace emit karta hai: kaun se model decisions huay, kaun se tools kis arguments ke saath call huay, handoffs kahan gaye. Yeh agent-behavior view own karta hai. Agent execution ke bahar kuch nahin dekhta.
Phoenix agent traces ko waqt ke saath watch karta hai aur bad traces ko future tests mein badalta hai. Yeh SDK traces sample karta, unhein score karta, aur worst ko eval suite mein promote karne ke liye flag karta hai. Yeh trend view own karta hai: sirf agent ne kya kiya nahin, balki kaun si runs kal ke regression tests banani chahiye. Yeh transient infrastructure outages nahin dekhta.
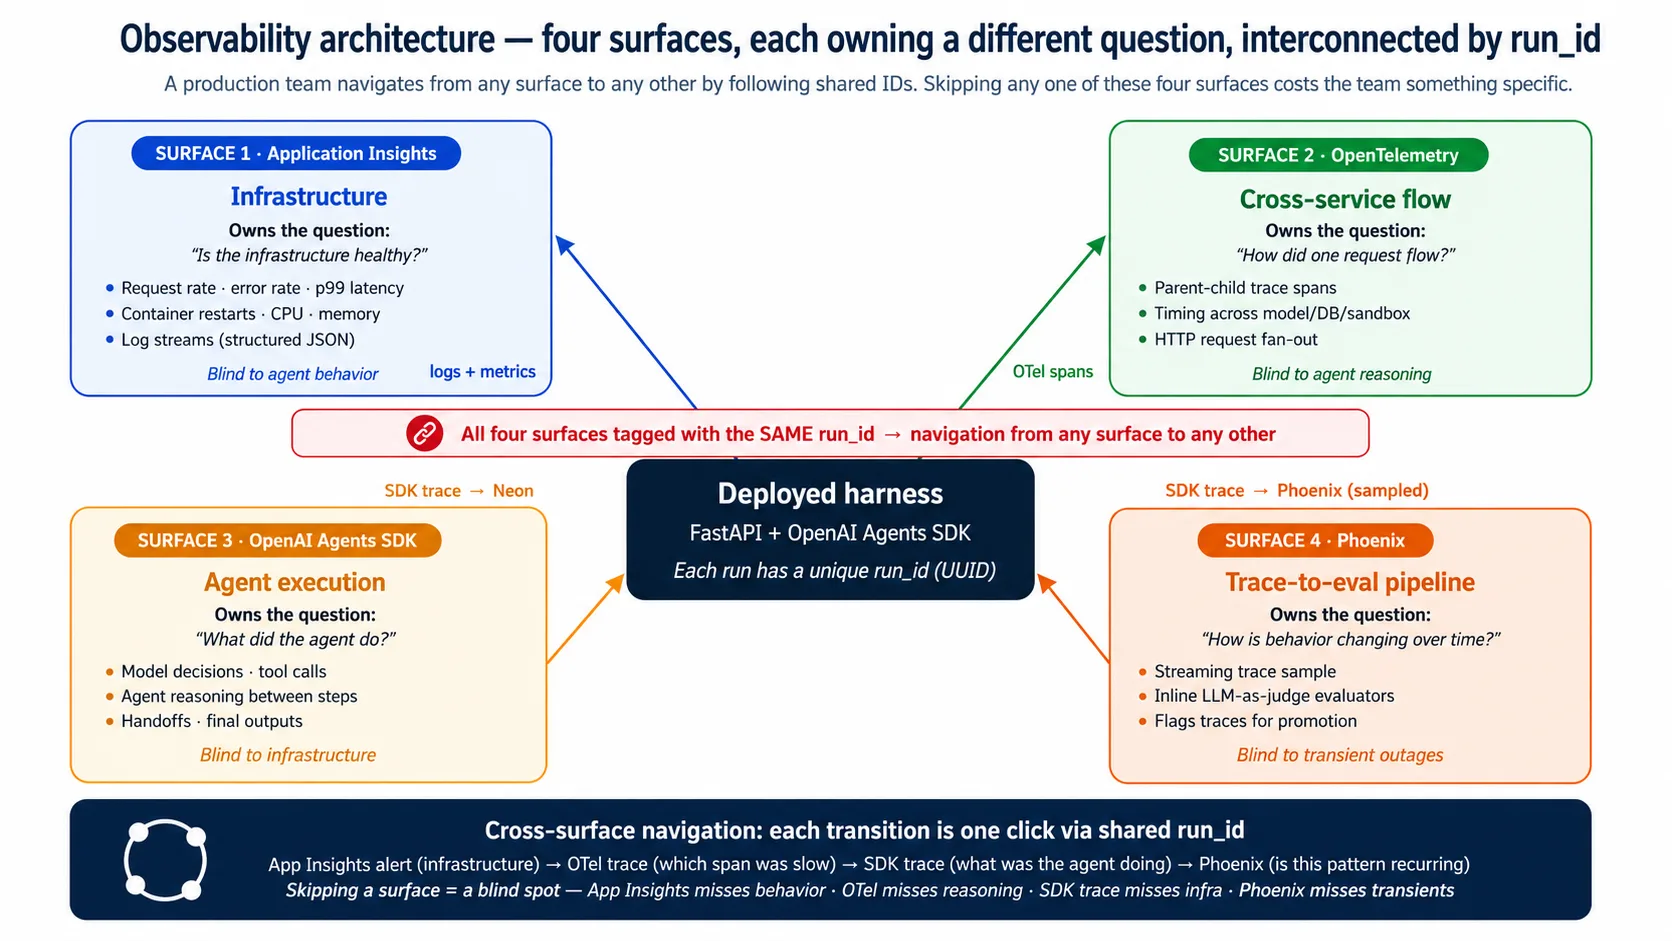
Surfaces overlap karti hain; ek doosri ko replace nahin karti. Woh shared run_id se interconnect hoti hain, taake team kisi bhi surface se start kar ke ek click mein kisi aur par jump kar sake. Application Insights alert infrastructure spike flag karta hai; OTel trace dikhati hai kaunsa span slow tha; SDK trace dikhati hai agent kya kar raha tha; Phoenix dikhata hai kya same pattern recurring hai. Ek surface skip karein aur in steps mein se ek lose ho jata hai: Application Insights skip karein to outages miss, OTel skip karein to slow span miss, SDK trace skip karein to agent decision miss, Phoenix skip karein to eval suite stale.
Agar aap runs ko durable-execution layer mein wrap karte hain to paanchwi surface sirf tab appear hoti hai. Us layer ka apna dashboard run-level operational lineage add karta hai (kaunsa step fail hua, retried hua, phir succeed hua). Yeh Production Worker course ka territory hai, is course ka nahin. Agar aap isay build karte hain to Production Worker with a Nervous System dekhein.
Concept 12: Evals architectural surface ke taur par
Eval: aisa test jo agent ka behavior measure karta hai (jawab sahi tha, tool correct tha, reasoning sound thi), sirf yeh nahin ke code chala ya nahin. Eval-Driven Development course ne chaar eval frameworks build kiye. Yeh concept name karta hai ke woh deployed harness se kahan attach hote hain. Attachment hi poora point hai: is ke baghair eval suite theory hai.
Boundary ek jagah hai: traces. Eval suite jo kuch grade karti hai woh trace se parhti hai, aur traces do stores mein rehti hain. Neon durable record hold karta hai, scheduled jobs aur audit ke zariye queried. Phoenix real-time sample hold karta hai, live dashboard par displayed. Agar is concept se ek cheez yaad rakhni ho to yeh rakhein ke integration traces se mediated hai, aur traces Neon aur Phoenix mein rehti hain.
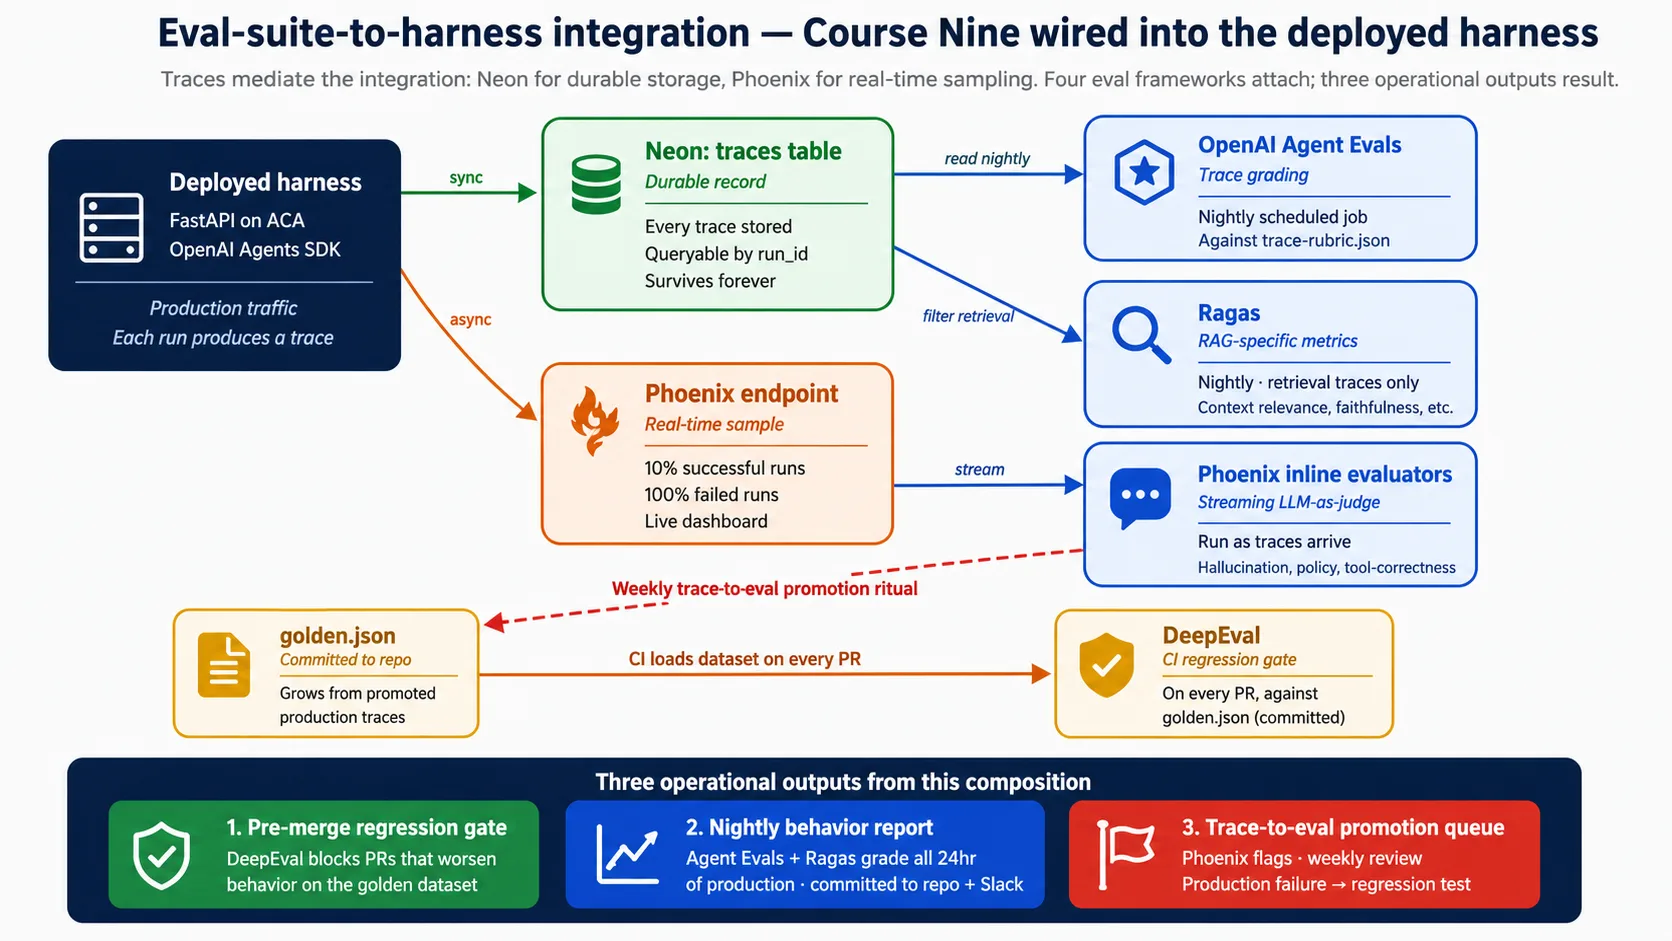
Jab run finish hoti hai, harness trace ko Neon mein synchronously likhta hai (durable record) aur Phoenix ko asynchronously sample stream karta hai (live view). Wahan se eval frameworks specific points par attach hoti hain: har pull request par CI gate chalta hai, scheduled jobs pichle din ki traces nightly grade karte hain, aur Phoenix inline checks traces aate hi chalte hain. Decision 8 yeh sab full wire karta hai. Ab plan karne ki wajah simple hai: observability wired hone se pehle produced traces gone hoti hain, aur eval suite sirf un traces se grow karti hai jo us ne waqai dekhi hon.
Part 5: Deployment ki lab
Parts 1-4 ne architecture aur surfaces cover ki. Part 5 poori cheez build karta hai: ten Decisions jo aap ko empty folder se deployed, observable, eval-gated harness tak le jate hain. Shape wohi hai jo pehle courses use karte hain. Aap coding agent ko direct karte hain; agent code likhta aur run karta hai. Har Decision ek short brief hai jo aap paste karte hain, ek "Yeh tab mukammal hai jab:" line hai jo aap observe kar sakte hain, aur un readers ke liye one-line note hai jo deploy kiye baghair follow karte hain.
Companion download shared context carry karta hai. Is ke andar AGENTS.md project rules, architecture, aur verified API shapes hold karta hai, is liye har brief short rehta hai: agent details ke liye AGENTS.md parhta hai aur aap sirf goal paste karte hain. Ab download lein: deploying-agents-crash-course.zip.
Kaam karte hue is diagram par wapas aayen. Har Decision ek labeled piece add karta hai.
Lab complete karne ke do tareeqe.
Mukammal build (Intermediate aur Advanced tracks): aap cloud par deploy karte hain. Har session ke baad resources tear down karein aur end-to-end bill chota rehta hai; unhein running chhor dein to bill barhta hai. Concept 13 cost breakdown deta hai.
Simulated (Reader aur Beginner tracks): aap kuch provision karne ke bajaye companion code parhte hain. Harness ab bhi sirf
OPENAI_API_KEYset hone par locally boot hota hai, is liye aap har woh step run kar sakte hain jise cloud account nahin chahiye. Har Decision mein Simulated note batata hai ke is ke bajaye kya parhna hai.
Decision 0: SDK probe karein aur brief reconcile karein
Ek line mein: SDK install karein, installed version print karein, live sandbox docs fetch karein, aur companion AGENTS.md ko un ke against reconcile karein. Live docs win karte hain.
OpenAI Agents SDK fast ship karta hai. Names, signatures, aur defaults releases ke darmiyan move karte hain. Companion AGENTS.md aaj ka known-good hai, forever ka nahin. Is liye pehla Decision probe hai: lab jis har symbol par depend karti hai usay apni machine par actually installed SDK ke against confirm karein, aur jo drift hua usay likh lein. Yahan five minutes baad mein "yeh attribute exist kyun nahin karta" wale hour bachate hain.
Yeh apne coding agent ko paste karein. Pehle plan; approval par execute.
Companion download open karein.
AGENTS.mdke bottom se SDK probe chalayein:uv sync, phiragents,agents.sandbox,agents.sandbox.entries, aur E2B client ke import checks. Installedopenai-agentsversion print karein. Official docs se live sandbox API reference fetch karein.AGENTS.mdmein named har SDK symbol ko us cheez ke against compare karein jo aap ne actually import ki. Agar kuch differ ho to live docs win karte hain:AGENTS.mdke top par short "What changed since the brief" note likhein jisme har difference list ho, aur us ke baad har jagah live name use karein. Abhi koi code change na karein.
Yeh tab mukammal hai jab:
- Agent installed
openai-agentsversion report kare (expect 0.17.x). - Agent woh SDK names report kare jo
AGENTS.mdse differ karte hain, aur har difference par live docs win karein. AGENTS.mdke top par short "What changed since the brief" note ho, ya agent state kare ke brief installed SDK se match karta tha.
Simulated track.
AGENTS.mdke end par SDK probe section parhein. Usay run karna zaroori nahin; point drift-resistance habit dekhna hai: kisi symbol par trust karne se pehle brief ko live SDK ke against confirm karein, aur live docs ko win karne dein.
Decision 1: harness scaffold karein
Ek line mein: agent, state layer, aur storage layer wali FastAPI app jo missing key par gracefully degrade karti hai aur sirf OPENAI_API_KEY par locally boot hoti hai.
Yeh Decision woh project set karta hai jis par next nine build karte hain. Agent (Maya ka Tier-1 Support) aur us ke do tools pehle courses se aate hain; yeh Decision unhein wrap karne wala harness hai, agent khud nahin.
Yeh apne coding agent ko paste karein. Pehle plan; approval par execute.
Companion
AGENTS.mdse harness scaffold karein. Is ke project rules aur architecture exactly follow karein.openai-agents>=0.17,<0.18pin karein. FastAPI app banayein jismeGET /health(active backends report karta hai) aurPOST /runs(session load karta hai, Maya ka agent run karta hai, run aur trace persist karta hai, optionally artifact likhta hai) ho. Graceful degradation wire karein: app sirfOPENAI_API_KEYset hone par import aur boot ho,DATABASE_URLunset ho to SQLite par fallback kare aur R2 keys na hon to local directory par fallback kare. Do tools (lookup_account,draft_reply) ko@function_toolfunctions ke taur par add karein jin ki bodies harness mein run hoti hain, sandbox mein nahin. Lockfile commit karein.
Yeh tab mukammal hai jab:
uv run uvicorn maya_harness.main:appharness ko errors ke baghair start karta hai.- Bare boot par
GET /health{"status": "ok", ...}return karta hai jismepostgres,sandbox, aurr2sabfalsereported hain jab sirfOPENAI_API_KEYset ho. GET /docsdono endpoints ke liye auto-generated API dikhata hai.
Simulated track. Companion mein yeh scaffold pehle se maujood hai.
src/maya_harness/main.py,agent.py, aursettings.pyparhein, aur dekhein ke har backend optional hai: har missing key ek component off karti hai aur harness phir bhi boot hota hai.
Yeh boot woh early win hai jo yeh poora course promise karta hai. Kisi cloud account, Docker, ya database se pehle, aap ke paas real agent harness hai jo aap ke laptop se /health par jawab de raha hai. Harness/sandbox split ab diagram nahin; aap ki machine par chal raha hai. Is ke baad har cheez ek waqt mein ek durable backend add karti hai.
Decision 2: harness containerize karein
Ek line mein: harness ki choti, reproducible container image jo laptop aur cloud mein same chalti hai.
Container: aap ki app aur usay chalane ke liye zaroori har cheez ka sealed bundle, taake woh har jagah same behave kare. Decision 3 is image ko deploy karta hai; Decision 2 isay build karta hai.
Yeh apne coding agent ko paste karein. Pehle plan; approval par execute.
Companion wali
Dockerfileshape se harness container build karein. Committed lockfile se reproducible install ke liyepython:3.12-slimkouvke saath use karein. Source copy karne se pehle dependencies cached layer mein install karein. Port 8000 expose karein auruvicorn maya_harness.main:app --host 0.0.0.0 --port 8000 --proxy-headersrun karein (--proxy-headersflag matter karta hai kyun ke cloud apne ingress par TLS terminate karta hai)..dockerignoreadd karein jo virtualenv, caches, aur.envfiles exclude kare. Image build karein aur apni.envmounted ke saath locally run karein.
Yeh tab mukammal hai jab:
- Image errors ke baghair build hoti hai.
- Container locally run karta hai aur us ke andar se
GET /healthokreturn karta hai. - Source file change kar ke rebuild fast hota hai (dependency layer cached rehti hai).
Simulated track. Companion
Dockerfileparhein. Exercise multi-stage idea hai: dependencies cached layer mein install hoti hain, source baad mein copy hota hai, aur image choti rehti hai. Docker installed hona zaroori nahin.
Decision 3: Azure Container Apps par deploy karein
Ek line mein: managed cloud runtime provision karein, image cloud mein build karein, aur harness deploy karein taake woh public internet se HTTPS par jawab de.
Azure Container Apps (ACA): managed service jo aap ka container autoscale aur ingress ke saath cloud mein chalati hai, taake aap servers khud na chalayein. Yeh Decision hai jahan harness aap ke laptop se bahar nikalta hai.
Yeh apne coding agent ko paste karein. Pehle plan; approval par execute.
Companion ki
infra/deploy.shshape use kar ke harness Azure Container Apps par deploy karein. Resource group aur container registry create karein.az acr buildse cloud mein image build karein (local Docker ki zaroorat nahin). Container Apps environment create karein, phir app ko--ingress external,--target-port 8000, aur scale-to-zero ke liye--min-replicas 0ke saath create karein.OPENAI_API_KEYko named secret ke taur par store karein aursecretref:se reference karein, image mein kabhi bake na karein. App ka public URL confirm karein aur/healthHTTPS par answer kar raha ho. Current environment subprocesses tak pass karein taake keys survive karein.
Yeh tab mukammal hai jab:
- Deploy script finish ho aur public
*.azurecontainerapps.ioURL print kare. - Aap ke phone se
https://<that-url>/healthopen karne par{"status": "ok", ...}return ho. - Quiet spell ke baad app zero tak scale ho, aur next request chand seconds mein ek copy wake kare (scale-to-zero cold start).
Simulated track.
infra/deploy.shaurinfra/containerapp.yamlparhein. Samajhne wali shape yeh hai: cloud mein build, external ingress aur scale-to-zero ke saath deploy, aur secrets naam se store. Azure account zaroori nahin.
Ab aap ke paas Decision 3 se deployed Container Apps app aur us ka public URL hai. Decisions 4 se 9 isi app par redeploy kar ke har backend add karte hain. Isay rakhein; lab finish karne tak ya session intentionally end karne tak az group delete na chalayein.
Decision 4: durable state ke liye Neon Postgres wire karein
Ek line mein: serverless Postgres database provision karein aur harness ko us par point karein, taake sessions, runs, aur traces restart survive karein.
Durable state: restart survive karne wali memory, container ke bajaye database mein rakhi hui, kyun ke container stop hote hi sab bhool jata hai. Neon Postgres: cheap branching wali serverless Postgres database. Is Decision ke baad container restart karein aur run history ab bhi wahan hoti hai.
Yeh apne coding agent ko paste karein. Pehle plan; approval par execute.
Companion
state.pyaurschema.sqlfollow karte hue Neon Postgres ko harness ki durable state ke taur par wire karein. console.neon.com par Neon project create karein. Paanch-table schema (sessions, runs, traces, artifacts, audit_log),public.*par schema-qualified, apply karein. Harness koasyncpgke through connect karein. Companion kenormalize_neon_dsnse do acceptance rules optional nahin aur pooler ke against silent failures prevent karte hain:
- Neon connection string ko asyncpg ko dene se pehle
channel_bindingstrip karein;sslmode=requirerakhein. asyncpgchannel_bindingrecognize nahin karta aur agar yeh left in ho to pooler ke against fail hota hai.- Running app ke liye pooled endpoint use karein, aur migrations ke liye direct (non-pooled) endpoint. Pooled endpoint silently
search_pathdrop karta hai, is liye har statement schema-qualified hai.
DATABASE_URLlocal.envvalue ke taur par aur ACA secret ke taur par add karein, phir redeploy karein. Confirm karein ke run restart ke across persist karti hai.
Yeh tab mukammal hai jab:
- Redeploy ke baad
/health"postgres": truereport karta hai. POST /runsaisi row likhta hai jo aap Neon kirunstable se read back kar sakte hain.- Container restart karne par run history rehti hai (state durable hai, container mein nahin).
- Connection string mein
channel_bindingnahin, aur migrations direct endpoint ke against run hui hain.
Simulated track.
state.pyaurschema.sqlparhein. Do cheezein notice karein:normalize_neon_dsnfunction jochannel_bindingstrip karta hai, aur yeh ke har tablepublic.runs,public.sessions, waghera ke taur par likhi gayi hai, kyun ke pooled endpointsearch_pathignore karta hai.
Ab aap ke paas Decision 4 se Neon project aur do connection strings hain: app ke liye pooled, migrations ke liye direct. Decision 6 ka sandbox aur Decision 7 ki observability dono is database mein write karte hain. Isay rakhein.
Decision 5: files aur artifacts ke liye Cloudflare R2 wire karein
Ek line mein: object storage provision karein aur harness ko specific files ke liye short-lived links hand karne dein, taake agent ke outputs storage password share kiye baghair downloadable hon.
Cloudflare R2: S3-compatible object storage jahan apni files bahar read karna free hai. Presigned URL: short-lived link jo kisi ko storage password rakhe baghair ek specific file read ya write karne deta hai. Is Decision ke baad agent reply file ke taur par save ho sakta hai aur download link ke taur par wapas aa sakta hai.
Yeh apne coding agent ko paste karein. Pehle plan; approval par execute.
Companion
storage.pyfollow karte hue Cloudflare R2 ko harness ke artifact store ke taur par wire karein. R2 bucket aur scoped API credentials create karein. Boto3 S3 client ko R2 endpointhttps://<account_id>.r2.cloudflarestorage.comparregion_name="auto"ke saath point karein. Jabsave_artifacttrue ho, reply bucket mein write karein aur one hour short expiry ke saath presigned download URL return karein. ChaarR2_*values.envaur ACA secrets mein add karein, phir redeploy karein.
Yeh tab mukammal hai jab:
- Redeploy ke baad
/health"r2": truereport karta hai. POST /runssave_artifacttrue ke saath aisaartifact_urlreturn karta hai jo reply download karta hai.- Presigned URL expiry ke baad kaam karna band kar deta hai (scoped aur short-lived hai, permanent password nahin).
Simulated track.
storage.pyparhein. Woh ek detail notice karein jo R2 ko boto3 ke saath kaam karwati hai: S3 client koregion_name="auto"ke saath R2 endpoint par point karein, aur baqi S3 API unchanged rehti hai. Local-directory fallback tab chalta hai jab R2 keys set nahin hoti.
Ab aap ke paas Decision 5 se R2 bucket aur scoped credentials hain. Decision 6 ka sandbox is bucket mein presigned URLs ke through files read aur write karta hai. Isay rakhein.
Decision 6: sandbox execution wire karein
Ek line mein: isolated workspace attach karein jahan agent ka code run ho sakta hai, harness ke secrets ya database tak access ke baghair.
Sandbox: alag, locked-down workspace jahan agent ka generated code chalta hai, harness ki keys mein se kuch hold kiye baghair. Manifest: sandbox ko kya chahiye is ki short description (kaunsi files mount karni hain, kaunsi abilities on karni hain). Yeh Decision execution plane add karta hai; agent ab bhi is ke baghair answer karta hai, is liye harness har step par useful rehta hai.
Build se pehle cost par note. Course ka primary sandbox provider, Cloudflare, paid Workers plan aur Python harness aur sandbox ke darmiyan chota bridge Worker chahta hai. E2B realistic free path hai: is ka free Hobby tier hai, SDK mein first-class client hai, aur bridge Worker nahin chahiye. Companion exactly isi wajah se E2B default karta hai. Jab tak aap specifically Cloudflare nahin chahte, E2B use karein.
Yeh apne coding agent ko paste karein. Pehle plan; approval par execute.
Companion
sandbox.pyaurAGENTS.mdmein verified shapes follow karte hue sandbox execution wire karein. E2B (free tier) default karein. Sandbox key set hone par hiSandboxRunConfigbuild karein, aur usayRunConfigke through attach karein, kabhiRunner.runkwarg ke taur par nahin. Companion se do verified shapes jo older draft ne ghalat kiye:
- E2B path
SandboxRunConfig(client=E2BSandboxClient(), options=E2BSandboxClientOptions(sandbox_type="e2b"))hai. Options object required hai aur requiredsandbox_typefield carry karta hai; client constructoroptions=nahin leta.- Agar aap kabhi Manifest build karein, yeh
Manifest(entries={...})hai jisme mounts (R2Mount,S3Mount)agents.sandbox.entriesse imported hain.base_image=,mounts=[], yaMountSpecnahin. Passed capabilities list default replace karti hai, is liyeCapabilities.default()rakhein ya us se concatenate karein.
E2B_API_KEY.envaur ACA secrets mein add karein, phir redeploy karein. Free-tier path: Cloudflare ko chhor dein, sirfE2B_API_KEYset karein, aur aap ko bridge Worker ya paid plan nahin chahiye.
Yeh tab mukammal hai jab:
- E2B key set karne aur redeploy ke baad
/health"sandbox": truereport karta hai. POST /runs"used_sandbox": truereturn karta hai.- Sandbox imports
agents.extensions.sandbox.e2bse hain, aur agent ab bhi answer karta hai jab sandbox key set nahin (harness sandbox disabled ke saath useful rehta hai).
Simulated track.
sandbox.pyparhein. Deferred imports notice karein (module sandbox extras installed na hon tab bhi load hota hai), E2B-first default with Cloudflare as paid alternative, aur yeh ke function no key set hone parNonereturn karta hai, jo sandbox disabled ke saath harness ko running rakhta hai.
Execution plane wire ho chuka hai (Decision 6), harness (Decision 1), us ke cloud runtime (Decision 3), state (Decision 4), aur storage (Decision 5) ke upar. Maya ka agent ab five-component stack par end-to-end deployed hai. Decisions 7 se 9 usay harden karte hain.
Decision 7: observability wire karein
Ek line mein: chaar observability surfaces wire karein aur unhein shared run_id se jorein, taake team kisi bhi symptom se cause tak navigate kar sake.
Concept 11 ne chaar surfaces name ki. Yeh Decision unhein wire aur reconcile karta hai. Is ke baad team Application Insights, OpenTelemetry, SDK trace, ya Phoenix mein se kahin se bhi start kar sakti hai, aur ek ID follow kar ke baqi teen tak pahunch sakti hai.
Yeh apne coding agent ko paste karein. Pehle plan; approval par execute.
Concept 11 se chaar observability surfaces wire karein. Harness ko OpenTelemetry se instrument karein (FastAPI, asyncpg, aur HTTP spans) aur Application Insights ko export karein. Har surface ko same
run_idse tag karein: usay OTel parent span se attach karein, har structured log line mein include karein, SDK trace par carry karein, aur Phoenix sample ke saath bhejein. Completed SDK traces ko Phoenix par fire-and-forget stream karein (agar Phoenix down ho to log karein aur continue karein; Neon durable record hai). Successful runs ka roughly 10% aur failed runs ka 100% sample karein,run_idpar deterministic taake sampling stable rahe. Observability keys ko ACA secrets ke taur par redeploy karein.
Yeh tab mukammal hai jab:
- Ek request ki OTel trace lagbhag ek minute mein Application Insights mein appear hoti hai.
- Kisi ek surface mein ek
run_idsearch karne par baqi surfaces mein matching record milta hai. - Phoenix recent traces dikhata hai, failures sab sample karte hue aur successes ka ek fraction.
Simulated track. Companion mein observability wiring parhein. Seekhne wala pattern shared
run_idhai: yahi thread infrastructure alert se agent reasoning aur waqt ke saath trend tak ek click mein move karne deta hai. Is ke baghair chaar surfaces chaar disconnected dashboards hain.
Decision 8: eval suite wire karein
Ek line mein: Eval-Driven Development course ki chaar frameworks ko harness ki traces se connect karein, jisse CI regression gate, nightly behavior report, aur weekly trace-to-eval promotion ritual banay.
Concept 12 ne boundary fix ki: Neon aur Phoenix mein traces. Yeh Decision chaar eval frameworks ko un do surfaces se wire karta hai. Full eval wiring yahin sikhai jati hai; agar aap ne eval suite khud build nahin ki, pehle Eval-Driven Development course karein, kyun ke yeh Decision us suite ko deployment se attach karta hai.
Yeh apne coding agent ko paste karein. Pehle plan; approval par execute.
Eval-Driven Development course ki chaar eval frameworks ko deployed harness ki traces se wire karein. Har ek ko us ke point par attach karein:
- DeepEval ko CI regression gate ke taur par. Har pull request par jo agent ya prompts touch karti hai, committed golden dataset ke against staging
POST /runshit kar ke DeepEval run karein, aur agar pehle passing case ab fail ho to merge block karein.- Nightly scheduled job (Container Apps Jobs) jo Neon se pichle 24 hours ki traces read kare, unhein team ki rubric ke against OpenAI Agent Evals se grade kare, retrieval use karne wali traces par Ragas chalaye, repo mein report likhe, aur summary Slack par post kare.
- Phoenix inline evaluators jo traces aate hi run hote hain (hallucination, policy, tool-correctness), runs block kiye baghair scores tag karte hain.
- Weekly ritual, runbook mein documented: Phoenix ki flagged traces review karein aur eval-worthy traces ko golden dataset mein promote karein, taake har ek future regression test ban jaye.
Yeh tab mukammal hai jab:
- Behavior intentionally worse karne wali pull request DeepEval gate se block hoti hai.
- Nightly job repo mein behavior report produce karta hai aur Slack par post karta hai.
- Phoenix recent traces par inline evaluator scores dikhata hai, aur promotion ritual documented hai aur ek dafa end-to-end run hua hai.
Simulated track. Companion mein eval pipeline configs aur CI workflows parhein. Internalize karne wali shape teen operational outputs hain: pre-merge gate jo regressions catch karta hai, nightly report jo drift catch karta hai, aur promotion queue jo production failures ko naye tests mein badalta hai.
Decision 9: production checklist
Ek line mein: operational discipline finish karein: secrets rotation, blue/green deploys, on-call runbook, backup and recovery, aur rate limits.
Harness observable (Decision 7) aur measured (Decision 8) hone ke baad, yeh Decision woh add karta hai jo usay chinta ke baghair running chhorne ke liye chahiye. Blue/green: downtime ke baghair naya version ship karna, usay purane ke saath chala kar phir traffic shift karna.
Yeh apne coding agent ko paste karein. Pehle plan; approval par execute.
Harness ke liye production discipline complete karein, runbook mein documented. Cover karein:
- Secrets rotation: new credential ko old ke saath add karne, redeploy karne, verify karne, phir old revoke karne ka procedure.
- Blue/green deploys: script jo 0% traffic par new revision create kare, us par
/healthcheck kare, 10% shift kare aur Application Insights watch kare, phir 100% shift kare aur rollback ke liye old revision ek din rakhe.- Paanch scenarios ke saath on-call runbook (high error rate, high latency, sandbox provider down, Neon unreachable, R2 unreachable), har ek ke investigation aur remediation steps ke saath.
- Backup and recovery: Neon point-in-time recovery, R2 versioning, aur ACA revision rollback.
- Middleware layer par per-user rate limits, limit exceed hone par 429 with
Retry-Afterreturn karte hue.- Cost alerts jo daily spend recent average se kaafi upar jump hone par fire hon.
Yeh tab mukammal hai jab:
- Saare secrets ka documented, tested rotation procedure hai.
- Ek blue/green deploy end-to-end run hota hai: new revision verified, traffic shifted, old revision rollback ke liye kept.
- Rate limiting kaam karta hai (limit ke baad wali request 429 return karti hai), aur cost alerts configured hain.
Simulated track. Companion mein runbook aur deploy aur rotation scripts parhein. Absorb karne wali discipline yeh hai ke har failure mode ka named, rehearsed response hota hai, aur rate limiting aur cost alerts optional nahin: traffic spike ke baad runaway bill aur aap ke darmiyan yahi khare hote hain.
Part 6: Haqeeqi sarhadein
Lab working deployment produce karti hai. Part 6 name karta hai ke yeh kya solve nahin karti, kahan expected se zyada cost karti hai, aur is ki boundary kahan hai. Chaar concepts aur paanch anti-patterns.
Concept 13: Cloud agent harness ki cost economics
Cloud cost woh dimension hai jo zyada tar courses skip karte hain. Is recipe ki specific economics hai, aur jo team is par commit kar rahi ho usay small, medium, aur large scale par unhein janna chahiye.
Bill ke paanch layers hain, har component ke liye ek, aur ek layer sab ko dominate karti hai.
| Layer | Bill ka share |
|---|---|
| Model API (OpenAI) | Har scale par 90-98% |
| Sandbox execution | High volume par baqi layers mein sab se bara |
| Harness compute (ACA) | Chota; scale-to-zero idle hone par near zero rakhta hai |
| Durable state (Neon) | Chota; free tier light use cover karta hai |
| File storage (R2) | Chota; egress free hai |
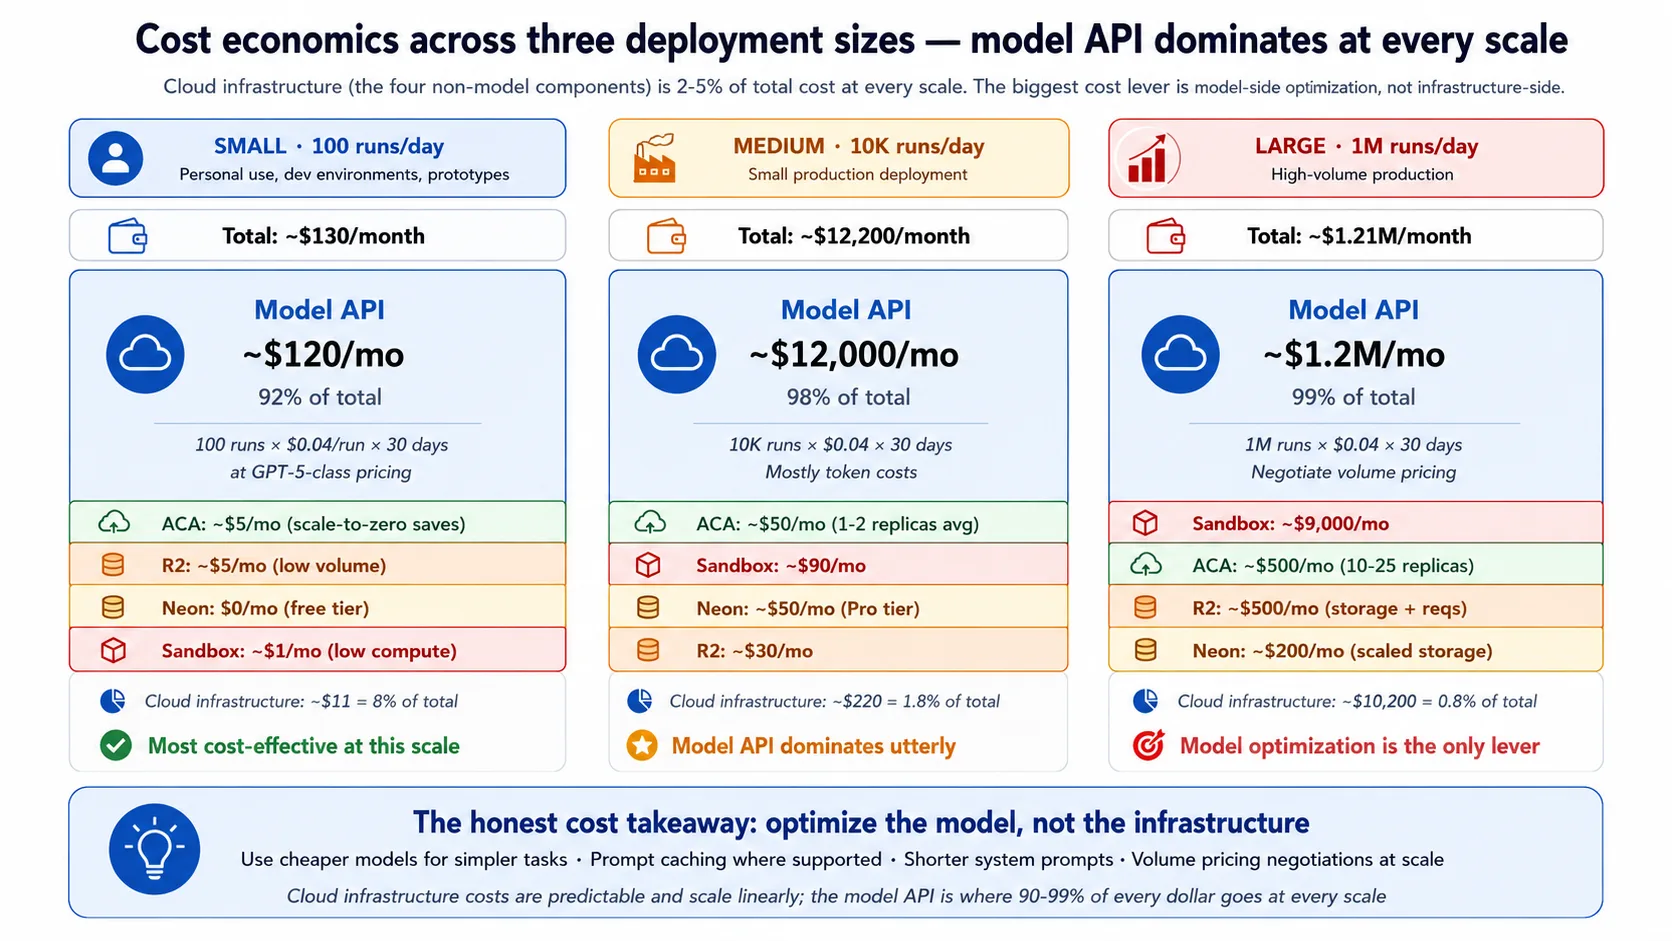
Figures ko rough ranges samjhein, precise numbers nahin. Small scale (lagbhag 100 runs a day) par whole bill mahine ke hundred-some dollars ke order ka hota hai, aur model API roughly nine-tenths hoti hai. Medium scale (lagbhag 10,000 runs a day) par bill low tens of thousands per month hota hai, aur model API lagbhag 98% hoti hai. Large scale (lagbhag million runs a day) par bill seven figures per month tak jata hai, takreeban sab model API. Infrastructure layers bhi grow karte hain, lekin poore time total ke 5% se neeche rehte hain.
Honest takeaways direct follow karte hain. Cloud infrastructure lagbhag hamesha bill ke 5% se neeche hoti hai, is liye sab se high-leverage cost lever model hai, infrastructure nahin: simple decisions ke liye sasta model use karein, jahan SDK support kare prompts cache karein, aur system prompts short rakhein. Infrastructure cost predictable hai aur traffic ke saath roughly linear hai; us se surprise bills nahin aate. R2 ka free egress file-heavy workloads ke liye sab se zyada matter karta hai aur Maya jaise text-heavy workloads mein mushkil se register hota hai. Sandbox cost active execution time ke saath scale karta hai, is liye compute-heavy agents wahan zyada cost karte hain jab ke zyada tar model par wait karne wale agents cheap rehte hain.
Concept 14: Multi-region considerations
Yeh recipe jaan boojh kar single region mein deploy karti hai. Multi-region active-active bohat harder problem hai, aur zyada tar deployments ko is ki zaroorat nahin. Aap ko yeh teen reasons mein se kisi ek ke liye chahiye: latency, jab users globe ke across hon aur single region noticeable round-trip delay add kare; availability, jab uptime commitment 99.99% ya higher ho aur single region outage unacceptable ho; ya compliance, jab data-residency rules user data ko specific region mein rakhne ka taqaza karein.
Components differ karte hain ke multi-region kitna hard hai. R2 aur sandbox Cloudflare network par pehle se global hain, is liye unhein extra work nahin chahiye. ACA environment per single-region hai, is liye multi-region ka matlab global load balancer ke peeche several environments. Neon doosre regions mein read replicas support karta hai, lekin writes ab bhi primary ko jati hain, is liye write-heavy agent state ko zyada complex database design chahiye. Honest recipe more environments, read replicas, aur global front door hai, jahan operational cost har region ke saath barhta hai. Agar aap ke users mostly ek region mein hain, uptime target 99.9% hai, aur ek region aap ke data rules satisfy karta hai, single-region right answer hai; jis complexity ki zaroorat nahin us ke liye pay na karein.
Concept 15: Recipe se kab migrate karna
Yeh recipe opinionated hai aur specific size aur shape fit karti hai. Paanch triggers batate hain ke kab is se move off karna hai. Architectural pattern (control plane execution plane se separate) in har migration ke across carry hota hai; sirf specific components change hote hain.
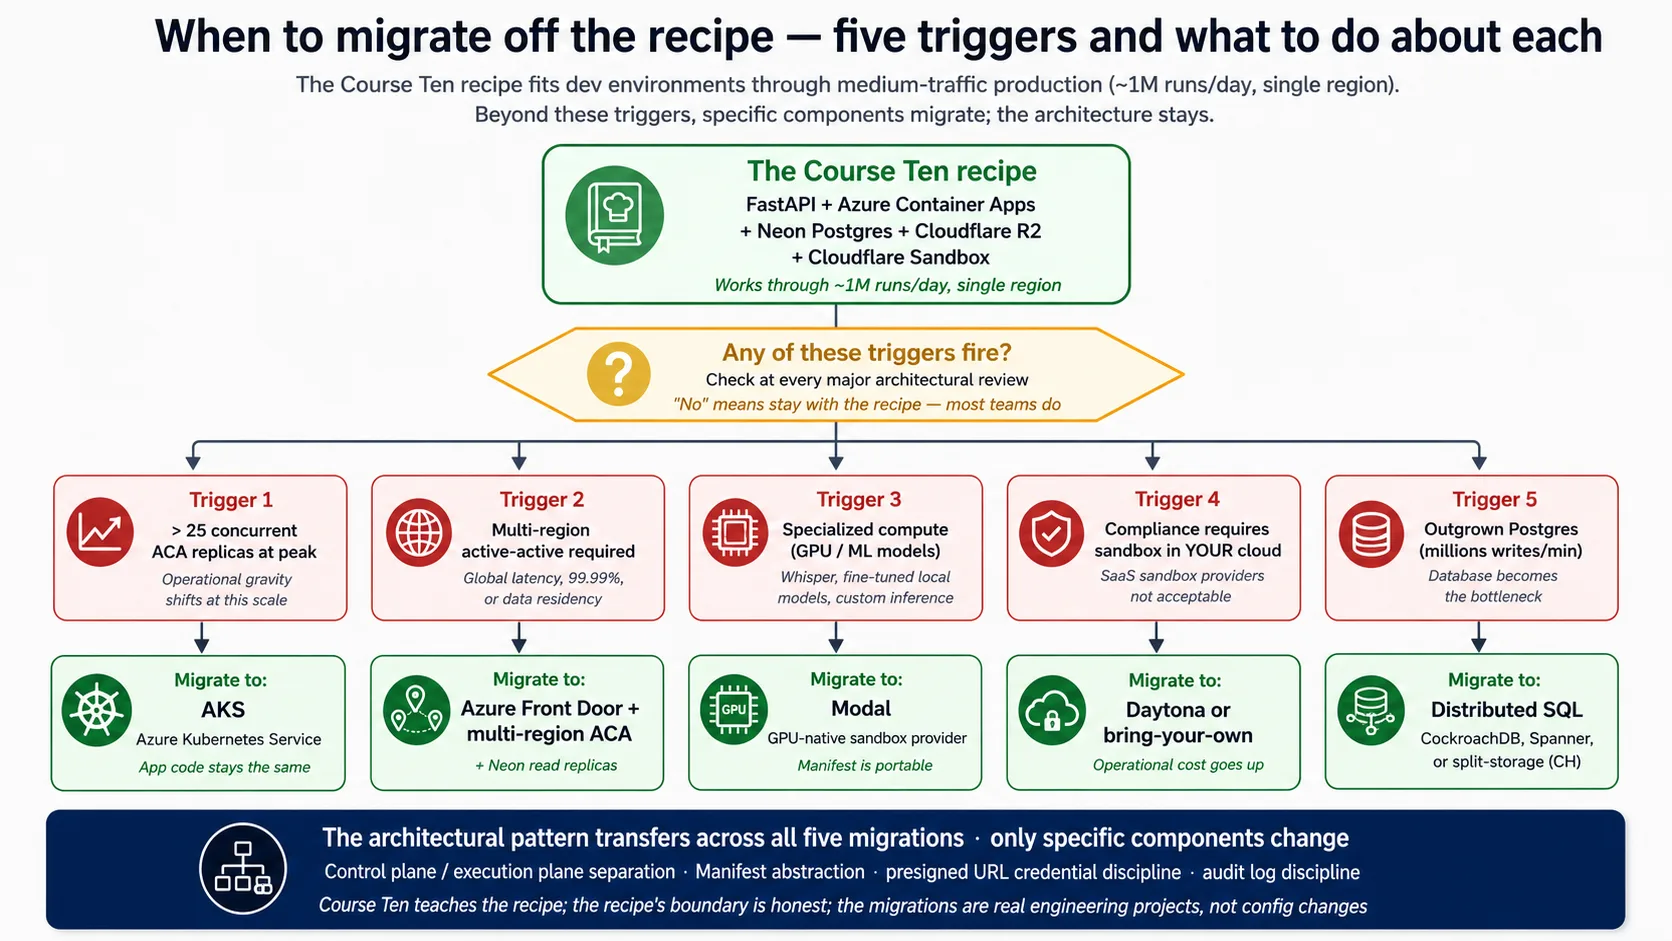
Triggers: roughly 25 ACA replicas se zyada sustained heavy concurrency, jahan economics aur connection math harness ko Kubernetes par move karne ke favor mein hoti hai (app code same rehta hai). Concept 14 ke mutabiq multi-region active-active. Specialized compute jaise GPU work, jahan GPU-native sandbox provider better fit hota hai aur portable Manifest aap ke saath move karta hai. Compliance rule ke sandbox aap ke apne cloud ke andar run hona chahiye, jo SaaS sandbox rule out karta hai aur bring-your-own provider ki taraf dhakelta hai. Aur bohat high write volumes par Postgres ko primary store ke taur par outgrow karna, jo distributed SQL ya split storage ki taraf point karta hai aur paanchon mein sab se invasive change hai.
Concept 16: Deployment kya solve nahin karti
Lab real production discipline produce karti hai, lekin sab kuch solve nahin karti. Gaps name karna aap ko false confidence se bachata hai aur batata hai ke unhein close karne ke liye kya work chahiye.
Yeh compliance certification produce nahin karti. Aap ko SOC2 jaisa framework expect karta hai woh technical controls milte hain, lekin certification ko third-party audit aur months of evidence chahiye; usay separate workstream ke taur par plan karein. Yeh incident-response program nahin deti. Runbook technical remediation cover karta hai, yeh nahin ke kaun paged hota hai, incidents kaise declare hote hain, ya post-mortems kaise run hote hain; woh people-and-process layer aap ko build karni hai. Yeh agent ke actions ke liye legal liability settle nahin karti. Audit log record karta hai kya hua, lekin agent decisions ke gird legal framework abhi form ho raha hai. Yeh behavior level par prompt injection stop nahin karti. Harness/sandbox split injected code ko aap ke secrets se door rakhta hai, lekin crafted message ko agent ke reply steer karne se nahin rokta; us ke liye guardrails, input checks, aur red-teaming chahiye, jiska bohat hissa eval suite ka job hai. Yeh aap ke liye model upgrades handle nahin karti; new model switch karne se pehle test karne ka discipline eval suite hai. Aur yeh cost runaway prevent nahin karti; monitoring hours mein spike catch karti hai, lekin daily caps aur kill switches extra defenses hain jo aap upar add karte hain.
Five things not to do
Recipe paanch anti-patterns avoid karti hai. Unhein name karna team ko deployment ship hone ke baad backslide se bachata hai.
- Agent-generated code harness ke andar na chalayein. Harness process mein
exec(model_output)jaisi call SQL injection se bhi badtar hai, kyun ke attack surface poore model ki reasoning hai. Sandbox boundary non-negotiable hai; harness keys hold karta hai, agent ka code unhein touch nahin kar sakta. - Manifest mein root credentials na rakhein. Manifest mein jo kuch hota hai woh sandbox mein cross karta hai. Boundary sirf presigned URLs aur short-lived tokens cross karte hain; database strings aur API keys harness mein rehte hain.
- Development mein scale-to-zero skip na karein. Dev app ko round the clock warm rakhna, logon aur services ke across multiply ho kar, idle compute ke liye mahine ke hundreds quietly cost karta hai. Dev mein cold start accept karein.
- Eval suite wired kiye baghair deploy na karein. Isay skip karna agent deployment ka sab se mehnga shortcut hai: aap changes ship karte hain jo code review pass karte hain, behavior regress karte hain, aur weeks baad complaints ke taur par surface hote hain. Eval gate deploying agents aur un agents ko deploy karne ke darmiyan farq hai jo good rehte hain.
- Rate limiting ke baghair harness na chalayein. Day-one deployments mein is ke baghair teams ek viral mention ke baad discover karti hain ke unhon ne single day mein model provider ko fortune pay kar diya. Generous limits theek hain; no limit dangerous setting hai.
Part 7: Closing
Concept 17: Deployed harness as the realization
Manufacturing track ne AI-native company build aur measure ki: agent loop, system of record, workforce layer, delegate, aur woh discipline jo behavior ko measurable banata hai. Yeh course usay ship karta hai. Deployed harness woh jagah hai jahan yeh sab real users tak reachable service ban jata hai, chaar surfaces ke across observed aur production traffic se seekhne wali eval suite ke against continuously graded.
Poora course ek idea par rest karta hai: harness control plane hai aur sandbox execution plane hai, aur yahi single separation deployment ko safe, durable, aur scalable banati hai. Lab mein aap ne jo kuch wire kiya woh isay serve karta hai. Harness keys, state, aur orchestration hold karta hai; sandbox risky code ko keys ke baghair chalata hai; presigned URLs boundary ke across file access scope karte hain; observability batati hai kya ho raha hai; eval suite batati hai kya yeh ab bhi sahi hai. Recipe se deviate karna theek hai. Architecture se deviate karna nahin. Harness aur sandbox ko separate planes mein chalayein, chaar surfaces ke across observe karein, aur production se grow hone wali eval suite ke against behavior grade karein, phir architecture kaam karti hai chahe aap kaun se cloud components choose karein.
Is ke baad woh design discipline aati hai jo build se pehle chalti hai: pehle yeh choose karna ke kaunsa agent shape task fit karta hai. Agar aap yeh chahte hain to Choosing Agentic Architectures parhein, agent design aur production deployment ke darmiyan connective tissue. Teen further frontiers honestly name karne layak hain, abhi un mein se koi shipped nahin: agent-to-agent commerce, jahan agents payment protocols ke through economic actors ke taur par act karte hain; owner-delegate agent ke deployment specifics, jahan signed delegation aur governance ledger worker ke muqablay mein heavier hain; aur deeper multi-cloud, active-active multi-region, jo apna substantial topic hai.
AI ke saath azmayein. Apna coding agent open karein. Paste karein:
"mein ne manufacturing track is deployment course tak complete kar liya hai. Woh teen cheezein batayein jo agents build karne ke agle saal ke dauran mein sab se zyada amal mein laun ga, aur woh teen jo mein kam use karun ga lekin jab karun ga to critical hon gi. Har ek ki mukhtasar wazahat karein. Phir is course ki wired composition ke liye (Eval-Driven Development course ki eval suite jo deployed harness se attached hai), batayein ke amal mein isay chalane ka sab se mushkil hissa aap ke mutabiq kya hoga: team jab deployment pressure mein ho to kaunsi discipline chhorne ki kashish hogi?"
Aap kya seekh rahe hain. Track wide hai, aur us ka zyada hissa aap unevenly use karein ge: kuch parts daily, kuch rarely lekin critically. Yeh reflection aap ko honestly parhne par force karti hai ke kaun se parts aap ke real work se match karte hain, aur sab se common production failure mode surface karti hai: eval discipline pressure ke neeche deprioritize hoti rehti hai jab tak harness drift na kar jaye.
One-day workshop variant
Isay one-day workshop ke taur par chalane par full concepts aur Decisions set single day ke liye bohat zyada hai. Yeh table course ko available time ke mutabiq fit karne ke liye use karein.
| Time available | Keep | Cut |
|---|---|---|
| 8 hours (1-day intensive) | Stack ki bunyadi samajh (sirf Docker aur FastAPI) · Concepts 1-3 (architectural backbone) · Decisions 0-5 (probe through R2) · Concept 13 (cost) · Part 7 closing | Stack ki bunyadi samajh Neon aur R2 (khud parhein) · Concepts 4-12 (reference ke taur par use) · Decision 6 (sandbox: demo, build nahin) · Decisions 7-9 (defer) · Concepts 14-16 (defer) |
| 2 days | Decisions 6-7 add karein (sandbox aur observability) · Concepts 8-11 | Decisions 8-9 deferred · Concepts 12, 14-16 deferred |
| 3-4 days | Decision 8 add karein (eval suite) · Concept 12 | Decision 9 deferred · Concepts 14-16 deferred |
| Full week (5-7 days) | Sab kuch: Advanced track full | Kuch nahin |
Short workshops ke liye architectural backbone (harness/sandbox split aur five-component stack) aur minimum deployment path (Decisions 0-5) rakhein. Hardening aur honest-frontiers material baad mein self-study ho sakta hai. Architectural understanding woh cheez hai jiske saath students ko leave karna chahiye; implementation depth woh cheez hai jisme woh grow karte hain.
Mukhtasar reference
| # | Concept | Key takeaway |
|---|---|---|
| 1 | "Works on my machine" deployment nahin | Production ka matlab agent ko harness (control plane) plus sandbox (execution plane) mein re-architect karna hai, laptop script wrap karna nahin |
| 2 | Harness/sandbox separation | Backbone: harness secrets aur state ke saath orchestrate karta hai; sandbox code execute karta hai; boundary network aur security hai |
| 3 | SDK ko infra se kya chahiye | Paanch surfaces (HTTP service, durable state, file storage, isolated execution, orchestration), har ek ek stack component se mapped |
| 4 | Harness web layer ke taur par FastAPI | SDK se match karne ke liye async-native, auto-generated API schemas, Pydantic models |
| 5 | Runtime ke taur par Azure Container Apps | Ingress, scale-to-zero samet autoscale, secrets, aur revisions managed primitives ke taur par |
| 6 | Durable state ke liye Neon Postgres | Relational state ke liye Postgres; serverless scaling aur cheap branching ke liye Neon |
| 7 | Files ke liye Cloudflare R2 | Egress-free, S3-compatible, presigned URLs ek waqt mein ek file tak access scope karte hain |
| 8 | Sandbox execution capabilities | Filesystem, shell, package install, mounted storage, sab isolated aur ephemeral |
| 9 | Sandbox provider choose karna | E2B free path hai; Cloudflare paid primary hai; baqi specific needs fit karte hain |
| 10 | Harness-to-sandbox handoff | Manifest workspace declare karta hai; presigned URLs files scope karte hain; root credentials kabhi cross nahin karte |
| 11 | Observability surface ke taur par | Chaar surfaces (Application Insights, OpenTelemetry, SDK trace, Phoenix), shared run_id se tied |
| 12 | Evals surface ke taur par | Neon (durable) aur Phoenix (real-time) mein traces se mediated; eval frameworks specific points par attach hoti hain |
| 13 | Cost economics | Infrastructure bill ka 5% se neeche hai; model API 90-98%; model optimize karein, infrastructure nahin |
| 14 | Multi-region | Default single-region; multi-region sirf global latency, 99.99%+ uptime, ya data residency ke liye |
| 15 | Recipe se kab migrate karna | Heavy concurrency, multi-region, GPU work, in-cloud-only sandbox, ya extreme write volume |
| 16 | Deployment kya solve nahin karti | Compliance certification, incident process, legal liability, behavior-level prompt injection, model upgrades, cost runaway |
| 17 | Deployed harness as the realization | Yeh course manufacturing track ki built cheez ko observability aur eval suite operationally wired ke saath ship karta hai |
| # | Decision | Deliverable |
|---|---|---|
| 0 | Probe the SDK | Installed version printed, brief live docs ke against reconciled, "What changed" note |
| 1 | Scaffold the harness | FastAPI app, agent, optional state aur storage, sirf OPENAI_API_KEY par boot |
| 2 | Containerize | Choti, reproducible image jo locally aur cloud mein same chalti hai |
| 3 | Deploy to Azure Container Apps | Public HTTPS URL, scale-to-zero, secrets naam se stored |
| 4 | Wire Neon Postgres | Five-table schema, app ke liye pooled aur migrations ke liye direct, channel_binding stripped |
| 5 | Wire Cloudflare R2 | Bucket, scoped credentials, short-lived presigned download URLs |
| 6 | Wire sandbox execution | RunConfig ke through E2B free-tier client attached; Cloudflare paid alternative |
| 7 | Wire observability | Shared run_id se tied chaar surfaces; fire-and-forget Phoenix sample |
| 8 | Wire the eval suite | CI regression gate, nightly behavior report, weekly trace-to-eval promotion |
| 9 | Production checklist | Secrets rotation, blue/green deploys, on-call runbook, backup and recovery, rate limits |
Deployment commands ka mukhtasar reference
# Local dev (Beginner track)
uv sync                                         # install from the lockfile
uv run uvicorn maya_harness.main:app --reload   # boot the harness locally
# Pin: openai-agents>=0.17,<0.18
# Cloud deployment (Intermediate / Advanced): Azure Container Apps
az group create --name maya-rg --location eastus
az acr create --resource-group maya-rg --name <acr-name> --sku Basic --admin-enabled true
az acr build --registry <acr-name> --image maya-harness:latest .   # build in the cloud
az containerapp env create --name maya-env --resource-group maya-rg --location eastus
az containerapp create --name maya-harness --resource-group maya-rg \
  --environment maya-env --image <acr-name>.azurecr.io/maya-harness:latest \
  --target-port 8000 --ingress external --min-replicas 0 --max-replicas 3 \
  --secrets "openai-api-key=$OPENAI_API_KEY" \
  --env-vars "OPENAI_API_KEY=secretref:openai-api-key"

# Tear-down (cost discipline)
az group delete --name maya-rg --yes
# Neon Postgres (console.neon.com)
# asyncpg ignores channel_binding (not a libpq client), so the DSN works with it left in.
# Use the pooled endpoint for the app; the direct (non-pooled) endpoint for migrations.
psql "$DIRECT_BRANCH_URL" -f schema.sql          # migrations on the direct endpoint
Companion download
Companion zip booted harness, AGENTS.md (brief, project rules, architecture, aur SDK probe), har backend ka verified code, Dockerfile, Azure deploy shapes, aur schema.sql carry karta hai: deploying-agents-crash-course.zip.
References
URLs May 2026 tak current hain; apne kaam mein cite karne se pehle verify karein.
Agent-factory track:
- Agent loop aur SDK: Build AI Agents.
- Eval suite jo yeh course harness se wire karta hai: Eval-Driven Development.
- Operational envelope (durable execution, fifth observability surface): Production Worker with a Nervous System.
- Build se pehle aane wali design discipline: Choosing Agentic Architectures.
- Track ke peeche thesis: /roman/docs/thesis.
Five-component stack:
- OpenAI Agents SDK (Python): package
openai-agents>=0.17,<0.18; docs https://openai.github.io/openai-agents-python par; Manifest aur sandbox-provider reference usi source mein rehte hain. Harness/sandbox separation April 15, 2026 release mein SDK ke built-in hissa ke taur par ship hui: https://openai.com/index/the-next-evolution-of-the-agents-sdk/. - FastAPI: async request handling aur auto-generated API schemas. https://fastapi.tiangolo.com
- Azure Container Apps: ingress, autoscale, secrets, revisions. https://learn.microsoft.com/en-us/azure/container-apps/
- Neon Postgres: branching ke saath serverless Postgres; pooled endpoint aur
channel_bindingfootgun Decision 4 ki key details hain. https://neon.com - Cloudflare R2: free egress ke saath S3-compatible storage; SDK R2 ko Manifest mount ke taur par support karta hai. https://developers.cloudflare.com/r2/
- Code-execution sandbox: E2B (https://e2b.dev, free Hobby tier, native SDK client) free path hai; Cloudflare Sandbox (Workers platform ka hissa) paid primary hai. Modal aur Daytona GPU aur in-your-cloud needs fit karte hain.
Operational aur security references:
- OpenTelemetry: tracing standard jise harness export karta hai. https://opentelemetry.io
- OWASP API Security Top 10: security checklist Decision 9 largely cover karta hai. https://owasp.org/API-Security/editions/2023/en/0x11-t10/
Getting-started track ka Course 41: agent-factory track ke liye end-to-end deployment crash course. Harness, sandbox, observability, aur eval suite composed, Docker, FastAPI, Neon, aur R2 mein naye readers ke liye stack primer ke saath.