Connector-Native Apps: Ek Remote MCP Server Jis Ka Customer AI Hai
14 Concepts · parhne ke liye taqreeban 90-120 min · build ke liye ek focused din (agar aap strong dev hain to 4-6 hr) · minimal base se live connector tak jise koi bhi AI pick up karke free mein use kar sake
Tees saal tak hum ne software logon ke liye build kiya. Dekhne ke liye screens, dabane ke liye buttons, bharne ke liye forms. Glass ke doosri taraf customer hamesha insan tha.
Ab room mein sirf woh customer nahin. Is course mein aap aisa product build karte hain jis ka user AI hai.
Connector woh add-on hai jo koi person apne AI mein drop karta hai taake AI kisi outside app tak pahunch sake; woh aap ka connector ek dafa paste karta hai, ek URL, ek click. Yeh aakhri dafa hai jab human use directly touch karta hai. Us ke baad AI aap ka user hai: woh aap ke tools ke names parhta hai, khud decide karta hai kis tool ko call karna hai, inputs aap ko deta hai, aur results person ko wapas bolta hai. Aap shopper ke browse ke liye shop window nahin saja rahe. Aap labeled tools ka pegboard latka rahe hain jahan ek thakne na wala worker khud aata hai aur turn after turn apni initiative par tools use karta hai. Aaj aam tor par us chat mein human baitha hota hai. Aage chal kar jo cheez aap ka connector find karegi, sign in karegi, aur schedule par call karegi, woh koi doosra agent ho sakta hai, beech mein human turn ke baghair. Aap us customer ke liye build kar rahe hain.
Pehla lafz jo is poore course mein chalta hai: server. Server woh computer hai jo fixed address par har waqt on rehta hai, doosre computers ke poochne ka wait karta hai, aur jab woh poochte hain to answer deta hai. Aap ke phone ki har app kisi server se baat kar rahi hoti hai. Isay shop ke front counter ki tarah sochen: fixed jagah par hamesha open, khud kuch nahin karta, magar jaise hi customer aata hai ek job karta hai aur result wapas deta hai. Yeh aap ka server hai. MCP server server ki ek khaas kind hai: aisa server jo MCP follow karta hai, shared standard, AI ke liye USB port ki tarah, ek plug jismein har assistant fit hota hai, taake koi bhi AI custom wiring ke baghair us ki offered cheezen use kar sake.
Aap end to end ek real product build karenge:
- Ek remote MCP server: woh front counter, public web address par rakha hua (yeh "remote" ka matlab hai) taake internet par koi bhi AI us tak pahunch sake. Is mein tools ke teen groups honge.
- Ek two-table memory (do choti lists jo aap ki app rakhti hai), taake AI har conversation mein blank start karne ke bajaye person ko yaad rakhe.
- Ek real sign-in (OAuth), taake server login se hi jaan le ke data kis ka hold kar raha hai, AI se guarantee na maange.
- Ek session contract: ek tool jo AI pehle call karta hai, aap ki app ke rules deta hai, phir baqi har tool ko us key ke peeche lock karta hai jo woh first call issue karta hai.
- Puri cheez ek pasted URL aur ek click se add hoti hai, person ke apne free model par chalti hai, is liye serve karne ki model cost aap ki nahin.
Aap yeh sab single agent loop likhne se pehle ship karte hain. Isi liye isay pehle rakha gaya hai: agent khud build karne se pehle woh cheez build karna seekhein jise agent call karta hai.
Ek rule aage ke har hard part ko explain karta hai, aur woh seedha is baat se aata hai ke aap ka customer kaun hai: server aap own karte hain, use call karne wala mind aap own nahin karte. Intelligence AI ke host app mein rehti hai. Next step decide karne wala loop bhi wahin rehta hai. Aap ka server sirf tab answer karta hai jab use call kiya jata hai, aur caller aisa mind hai jo guessing se reason karta hai: fast, capable, aur poori tarah confuse ho sakta hai, kisi baat par maan sakta hai, ya simple wrong ho sakta hai. Is liye is course ka har difficult part ek hi shape rakhta hai: aap ka server woh job karta hai jise AI par khud karne ke liye trust nahin kiya ja sakta.
Is se chaar non-negotiables nikalte hain. Pura course inhi chaar ko build karta hai:
- One gateway. AI aap se single connector par milta hai, peeche tools name se grouped hain: ek front door, ek menu jo woh parhta hai. Free account sirf ek custom connector add kar sakta hai, is liye "one" preference nahin, hard limit hai.
- Tools only. Aap AI se callable tools ke through baat karte hain, functions jinhein woh apni reasoning ke beech invoke kar sakta hai; resources ya prompts ke through nahin jinhein human ko haath se pick karna pade.
- Prove, don't trust. Aap ka customer aisa mind hai jo bina buri niyyat ke wrong person's identity de sakta hai. Is liye identity verified sign-in se aati hai, AI ki kisi baat se nahin; hotel desk ki tarah jo check-in par dikhaye passport se mail deta hai, kisi ke kehne se nahin ke kaunsa room us ka hai.
- Fail closed. Jab aap ka server missing ya broken ho, AI chup nahin hota. Woh improvise karta hai, answer invent karta hai, aur person ka saved data bana deta hai. Aap ke server ko use rok kar saaf kehna hoga, jaise ATM bank tak nahin pahunch pata to temporarily unavailable dikhata hai, balance guess karke cash nahin deta.

In mein se do aap ke build ki shape describe karte hain (one gateway, tools only). Baqi do woh jobs hain jo server ko karne hain kyun ke AI par trust nahin kiya ja sakta (prove identity, fail closed). Har Concept parhte hue poochein: yeh kaunsa invariant hai?
Prerequisites. Yeh page chaar cheezen assume karta hai.
- Aap typed Python parh sakte hain, directly ya code block ko coding agent ko paste karke plain-English read-back le kar. Agar abhi dono true nahin, pehle Python in the AI Era karein.
- Aap ne Agentic Coding Crash Course kiya hai. Aap Claude Code ya OpenCode ko plan mode mein rules file ke saath drive karte hain. Yahan hum us workbench ke through build karte hain, dobara explain nahin karte.
- Aap ne connector ko bahar se use kiya hai, Skills & Connectors course mein. Aap ne ek connector on kiya aur AI ko apni Drive mein reach karte dekha. Yeh course aap ko inside par flip karta hai: ab aap woh cheez hain jis tak AI reach karta hai.
- Aap ko pehle Build AI Agents ki zaroorat nahin. Yahan aap woh server build karte hain jise agent call karta hai, agent nahin. Woh course path mein baad mein aata hai, aur yeh course wajah hai ke aap usay chahenge.
Aap ko apni API key nahin chahiye: model person laata hai. Jin accounts ki zaroorat hai woh free-tier hain aur point of need par hi khulte hain: jab state pehli dafa store karenge to Neon database (Concept 5, no card). Phir Concept 12 aap ke connector ko free tunnel ke through claude.ai mein live chalata hai, host, card, ya sign-in account ke baghair. Sign-in half poore raaste bundled local mock par chalta hai, is liye build, test, ya demo ke liye sign-in account kabhi nahin banana padta.
Yeh kahan fit hota hai. Mode 2 ka pehla build course. Yahan se Manufacturing path chalta hai: yeh course -> Plugins for AI Agents -> AI Identity -> Build AI Agents. Yeh pre-loop app hai: tools, state, identity, aur claude.ai mein live run, caller ke model ke thinking ke saath. Build AI Agents path mein baad mein woh jagah hai jahan loop aap own karte hain.
Teaching Aid
Full Presentation dekhein - Connector-Native Apps
Is course mein aap build kaise karte hain
Aap yeh server haath se nahin likhte. Manufacturing track ke har course ki tarah, code aap ka coding agent likhta hai; aap ka kaam input mein spec aur output mein verification hai. Aap plan karte hain, review karte hain, run karte hain, check karte hain. Yahan yeh loop convenience nahin. Yeh Concept 1 hai.
Build coding course ki ek move ko full size par follow karta hai: plan -> review -> checkpoints mein execute -> verify. Aap whole gateway ek dafa plan karte hain, use chaar invariants ke against review karte hain, phir small base ke upar one observable slice at a time build karte hain, aisa base jo sirf woh parts ship karta hai jinhein aap ko generate karne ke bajaye read karna chahiye.
Base ready karein (kuch minutes)
- Base download karein (
connector-native-apps-base.zip), unzip karein, aur folder meincdkarein. - Claude Code ya OpenCode usi folder mein kholein. Yeh
AGENTS.mdauto-load karta hai: brief jo agent ko chaar invariants par hold karta hai aur prep ka tareeqa batata hai.
Box mein kya hai. Yeh minimal base hai, finished app nahin. Sirf security-critical core complete ship hota hai, kyun ke agent authorization code aisa likh sakta hai jo sahi lagta hai magar quietly wrong hota hai; is liye woh part aap read karte hain, generate nahin. Baqi sab aap course ke saath build karte hain.
connector-native-apps/
  AGENTS.md                  the agent's brief: base prep, the four invariants, the build order
  CLAUDE.md                  one line, @AGENTS.md, so Claude Code loads that same brief
  .mcp.json  opencode.json   Neon + Context7 MCP servers, pre-declared (authorize once in browser)
  pyproject.toml             a uv project; only the deps the given code needs (your agent adds the rest)
  .env.example               copy to .env; the user brings the model, so no API key of your own
  src/connector_app/
    auth.py                  GIVEN, complete: the security check that proves who is signed in (you read it in Concept 7, never rewrite it)
    session.py               GIVEN, complete: the lock the rest of your tools sit behind (you wire it in Concept 10)
  mock_auth/server.py        GIVEN: a local sign-in service, so you can test the whole flow without creating any account
  seed/articles.json         a tiny catalog for your domain
  tests/test_starter.py      five offline smoke tests over the security core
GIVEN marked do files (auth.py, session.py) aap read aur wire karte hain, rewrite kabhi nahin. Baqi gateway (server.py), two-table store (db.py), aur rules/persona (config_store.py) aap ka agent concept by concept aap ke saath build karta hai.
Base ko teen short asks mein prep karein, jaise nayi teammate ko onboard karte hain: pehle dekhein use kya maloom hai, phir setup karwayein, phir project samjha kar prove karwayein ke healthy hai. Ek waqt mein ek paste karein.
1. Dekhein use kya maloom hai (yeh bhi check hai ke open hote waqt us ne brief read kiya):
What can you do for me?
Achha jawab is project ko describe karta hai: connector-native app, us ke chaar invariants, aur kaise woh aap ko concept by concept build mein madad karega. Generic "I'm a coding assistant" answer ka matlab hai AGENTS.md load nahin hua; make sure agent base folder ke andar khula hai.
2. Environment set up karein:
Set up my base environment for this project, and install anything that's missing, including Python and uv.
Watch for: agent confirm karta hai ke aap Python 3.14+ aur uv par hain (missing ho to install karta hai), dependencies aur mcp-builder aur neon-postgres skills install karta hai, aur .env mein generated SESSION_SIGNING_SECRET banata hai. Context7 keyless hai aur khud connect hota hai; Neon ke liye woh /mcp run karta hai aur browser mein ek Authorize click maangta hai (neon.com par free, no API key, no card; account wahi screen par bana lein agar zaroorat ho). Phir woh aap se restart maangta hai taake newly installed skills load hon, aur back aane par confirm karta hai ke Neon tools dekh sakta hai.
3. Isay samjhein, aur health check karein (restart ke baad):
Explain this project to me before I continue the crash course, then run its tests and share their status.
Done when: agent base ko plain language mein walk through karta hai, five security-core tests pass hote hain, restart ke baad Neon tools visible hain, aur .env exists. Agar Neon tools nahin hain to Neon authorized nahin: browser authorize dobara karein, ya /mcp type karke Neon pick karein. Ab aap build karte hain.
Do tracks, aap ka choice. Beginner track bundled mock_auth/ service use karta hai: local sign-in jo real tokens issue karta hai, is liye sign-in half ko account nahin chahiye (saved data ab bhi free Neon database mein rehta hai). Standard track real hosted sign-in service swap karta hai, production path jo aap AI Identity course mein wire karte hain. Pehle Beginner track par sab build karein, phir .env mein teen values badal kar switch karein. Service abhi pick nahin karni; Concept 8 options tab name karta hai jab choice matter karti hai.
Part 1: Shape
Yeh chaar concepts mental model hain jis par baqi page build hota hai. Pehle teen read-only hain; Concept 4 mein aap whole build plan karte hain aur gateway scaffold karte hain.
Concept 1: Aap direct karte hain, type nahin karte
Aap yeh server haath se nahin likhenge. Aap coding agent ko batate hain kya chahiye, woh code likhta hai, aur aap ka kaam use read, run, check karna hai. Agar aap Python in the AI Era se aaye hain to rhythm jaante hain: aap direct karte hain, agent type karta hai, aap verify karte hain.
Checking asal skill hai, aur ek spot par sab se zyada chahiye: Concept 8 ka sign-in code. Agent sign-in code aisa likh sakta hai jo sahi lagta hai magar quietly wrong hota hai, aur farq pehchanana yahi course aap mein build karta hai. Keystrokes agent ka kaam hain; judgment aap ka.
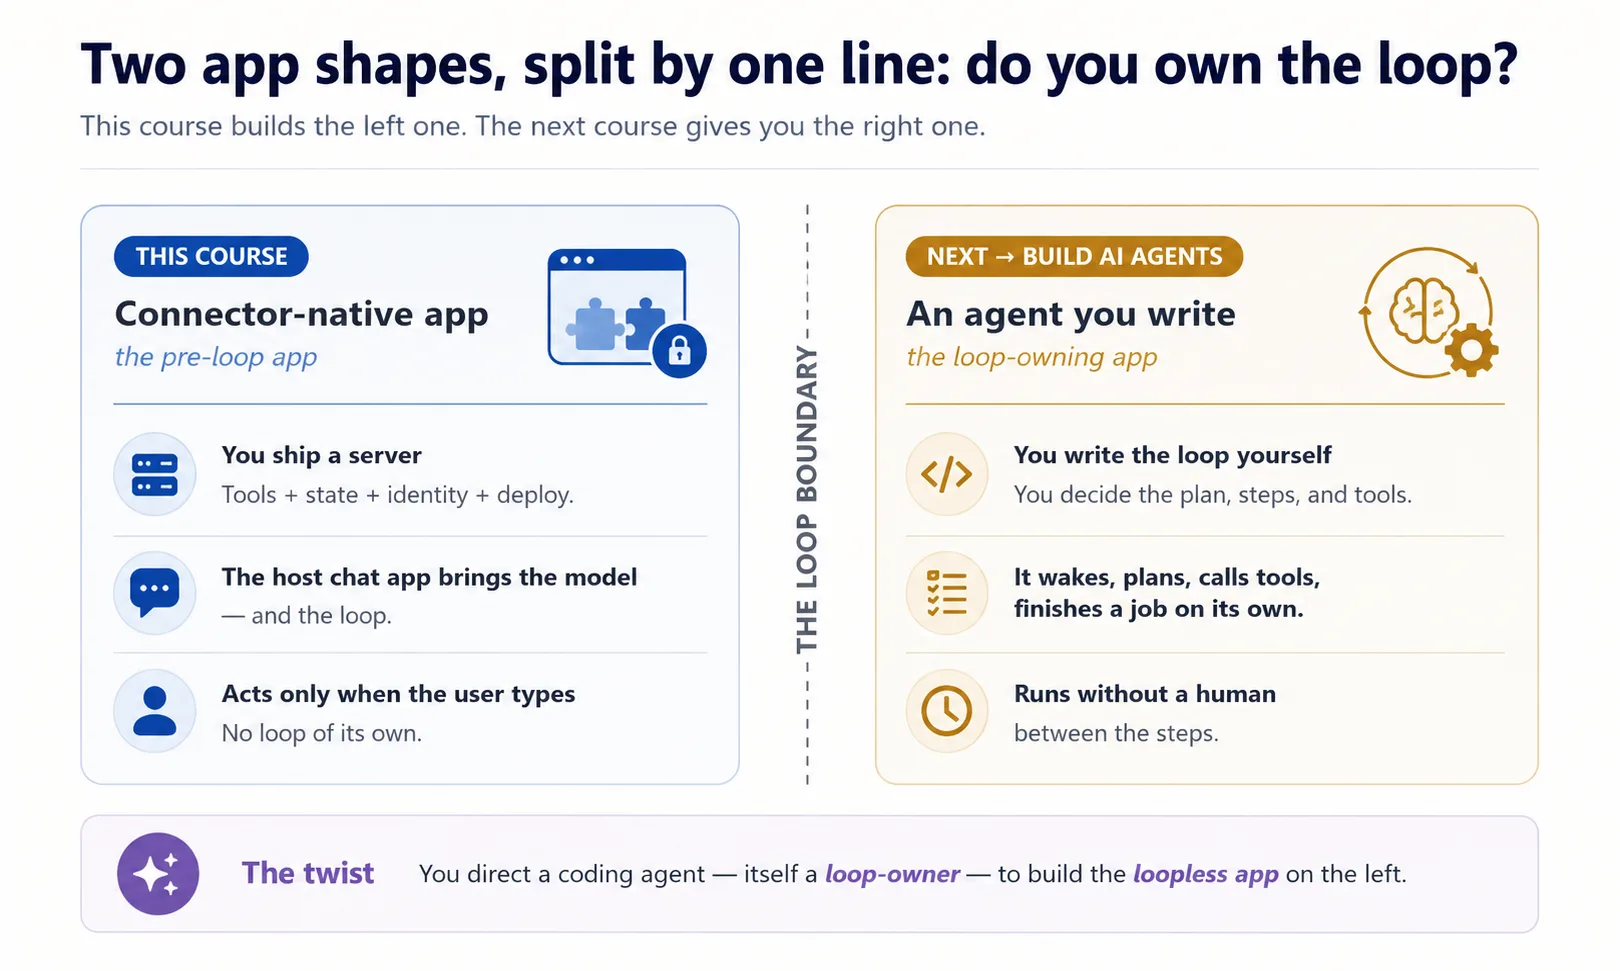
Yeh twist zehan mein rakhein, kyun ke yeh wahid course hai jahan aap dono program shapes ek saath dekhte hain. Do vacuums imagine karein. Robot vacuum khud chalta hai: wake hota hai, house mein roam karta hai, har move decide karta hai, aap usay 2am par bhi schedule kar sakte hain. Hand vacuum sirf tab chalta hai jab aap trigger dabate hain; chhorein to ruk jata hai. Jo coding agent yeh aap ke liye build karta hai robot vacuum hai: woh khud chalta rehta hai. Jo connector aap build karte hain hand vacuum hai: user ke haath barhane tak dead baitha hai. Is self-running quality ka naam hai owning the loop: robot vacuum apna loop own karta hai, connector kabhi nahin. Aap loop-owning program ko drive kar rahe hain taake woh loopless app build kare.
Concept 2: New app shape
Aap connector ko outside se use kar chuke hain, person ke tor par apni apps mein reach karte hue. Ab flip karein: server aap hain, caller AI hai. Claude apne cloud se aap ko dial karta hai. Teen facts nikalte hain, aur later har decision drive karte hain.
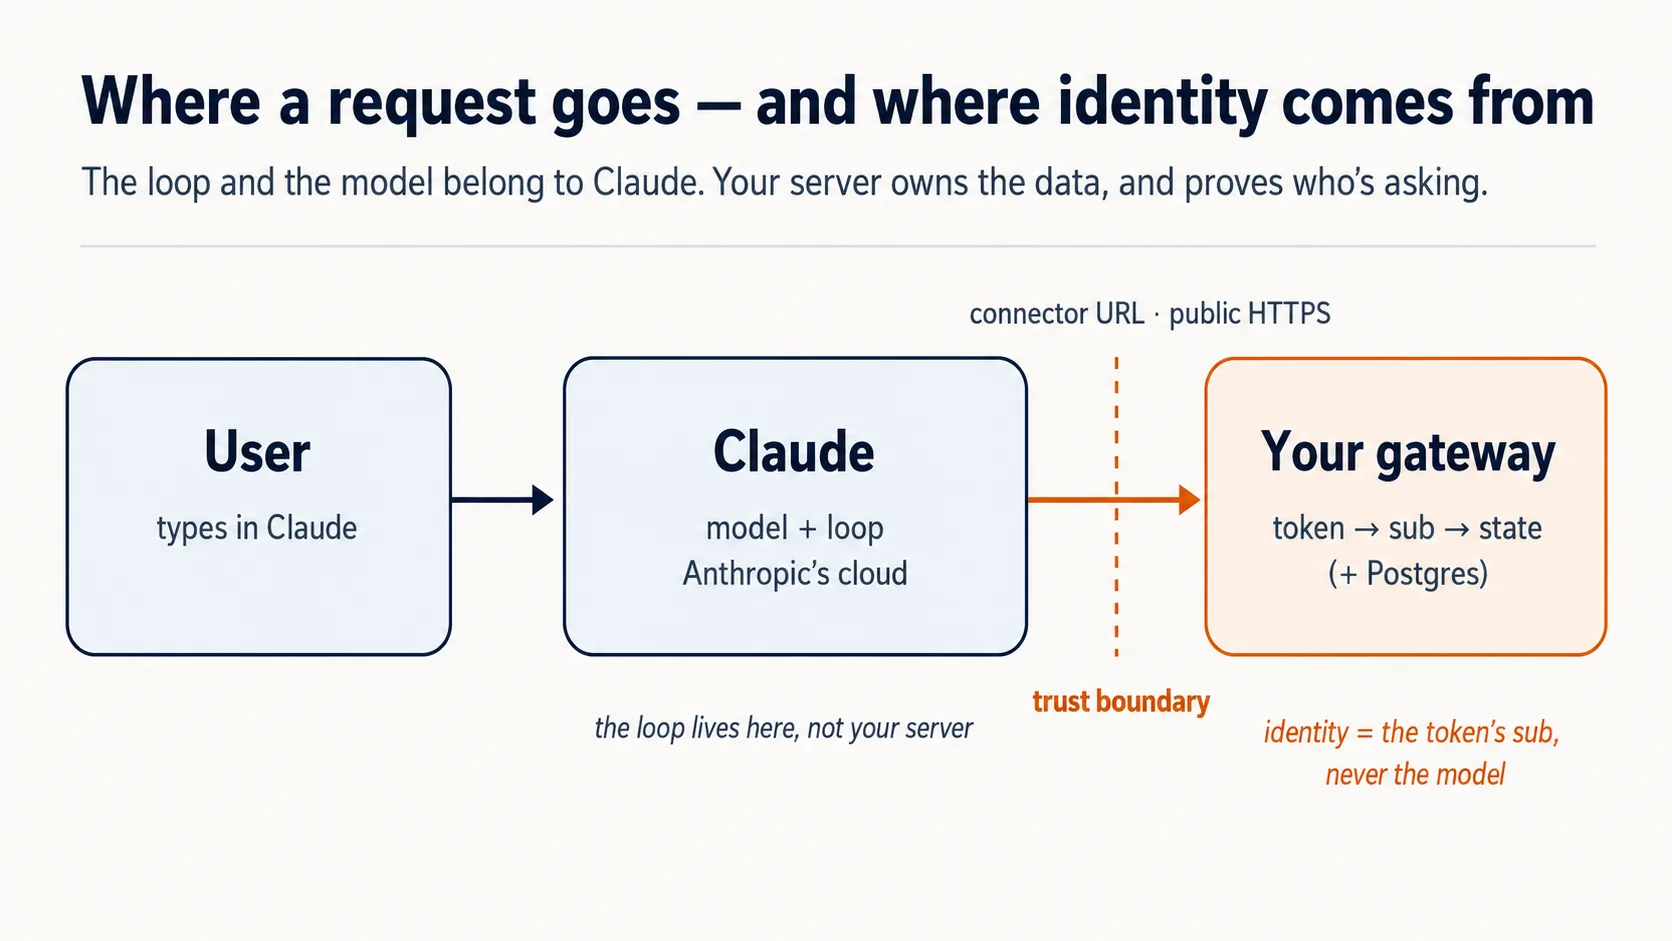
Chat app runtime hai, yani woh engine jo asal mein sab kuch chalata hai, aur yeh cloud mein rehta hai. Jab user aap ka connector add karta hai, Claude aap ke server tak Anthropic's cloud se pahunchta hai, user's laptop se nahin. Is liye server public internet par HTTPS ke through hona chahiye. Claude door se reach karta hai, is liye aap ka counter public street par real address ke saath hona chahiye: public web address. Laptop par running server wohi counter hai jo locked house ke andar bana hai, real magar street ka door nahin, so bahar koi us tak nahin aa sakta. Isi liye Part 5 isay quick tunnel ke through public internet par rakhta hai, afterthought ke tor par nahin.
User model laata hai. Aap intelligence ke paise nahin dete; user's free Claude tier supply karta hai. Aap ki costs sirf chota server aur database hain. "Free for anyone" ke peeche poori economic trick yahi hai.
Yeh do facts, cloud runtime jise aap tak reach chahiye aur kisi aur ka model jo thinking karta hai, reason hain ke baqi course aap ke server ki guarantees ke baare mein hai. Pehli guarantee sab se narrow hai: server borrowed model se sirf ek tareeqe se baat kar sakta hai. Next Concept wahi hai.
Concept 3: Tools only - resources nahin, prompts nahin
MCP server model ko teen cheezen offer kar sakta hai: tools (functions jo model call karta hai, inputs/outputs ke saath), resources (read-only data jise user point karta hai), aur prompts (canned templates jo user pick karta hai). Teeno valid MCP surfaces hain. Is course ke product shape ke liye hum intentionally sirf tools expose karte hain. Yeh is kind ki app ke liye design choice hai, general rule nahin ke resources/prompts wrong hain.
Tools is shape mein fit is liye hain: app ko khud decide karna hai ke next kya fetch ya do karna hai, search, record pull, result save. Workshop sochen. Tool worker ke belt par cordless drill hai: mid-job grabbed, no asking. Resource cabinet mein locked manual hai, jab tak koi chal kar de na de useless. Prompt form hai jo worker ko ruk kar shelf se pick karna padta hai. Sirf drill work ko human-in-loop ke baghair flowing rakhta hai; isi liye yeh app tools-only hai: sirf tool model reasoning ke andar automatically call ho sakta hai, resources passive hain aur prompts hand-picked. Tools woh surface bhi hain jise chat apps sab se achha support karti hain, so tools par build portable rehta hai.
| MCP surface | Who triggers it | Can it be auto-called mid-reasoning? | Use it here? |
|---|---|---|---|
| Tool | The model, on its own | Yes | Yes — everything |
| Resource | The user points at it | No | No |
| Prompt | The user picks it | No | No |
Concept 4: One gateway, peeche teen groups (plan karein, phir scaffold karein)
Yeh Concept har cheez ki shape set karta hai, is liye slow down karna worth hai. Us mess se start karein jise yeh prevent karta hai.
Aap ka server, opening ka front counter, ek saath kai genuinely different jobs karne wala hai. Cheezen look up karta hai. Har person kaun hai aur kya save kiya yaad rakhta hai. Aap ke behavior rules follow karta hai. In sab ko ek undifferentiated tool pile mein daal dein to do cheezen tootengi: AI jo menu parhta hai "fetch an article" tool ko "save this person's place" tool se alag nahin samajh sakta, aur aap kisi ek part ke baare mein reason nahin kar sakte. Fix software ki sab se purani move hai: har job kind ko apna labeled group dein.
Connector-native app ke same teen job kinds hotay hain, aur Reading Room mein teeno dikhte hain:
domain_*woh hai jo app actually karti hai. Reading Room mein yeh books hain: collection search, article fetch. Yeh app ke exist karne ki wajah hai.user_*yeh hai ke kaun yahan hai, aur aap us ke baare mein kya remember karte hain. Reader ka library card aur pichli visit ka saved shelf.config_*yeh hai ke app ko behave kaise karna hai. Librarian ke rules aur voice: kya karegi, kya nahin, kaise bolegi.
So domain work hai, user person hai, config behavior hai: teen different questions, teen groups. Har name mein _ prefix (domain_search, user_save_state) grouping ko visible banata hai, taake AI menu clean sections mein read ho. Tool names mein sirf letters, digits, _, aur - allowed hain, dot nahin, is liye underscore prefix hi namespace hai.
Phir one server kyun, three nahin? Textbook way teen concerns ship karne ka teen separate servers hai. Yahan nahin kar sakte (invariant 1): Claude Free plan par user exactly one custom connector add kar sakta hai. Beginner se teen add karwana free product ko paid plan ki taraf dhakelna hai. So teen groups inside one server rakhein, one URL ke peeche: single gateway. One front door, one menu with three sections. Neeche names aap ke hain; yeh shape hai:
domain_search      domain_get_item      domain_do_action
user_get_profile   user_save_state
config_get_rules   config_get_persona
Aage prompts mein ek word aaye ga: MCP Python framework, FastMCP, mein tool bas decorated function hai. Function ek labeled action hai jo one job karta hai; decorating us par name tag pin karta hai taake AI menu use list kare. Agent yeh likhta hai; aap ko sirf word recognize karna hai.
Prompt 1: agent se line of code se pehle whole thing plan karwayein. Yeh course ki sab se important move hai, code writing nahin. Aap agent se complete design words mein lay out karwate hain, taake build se pehle four invariants ke against check kar sakein.
Plan mode mein jayein (Shift+Tab Claude Code mein, Tab OpenCode mein), strong model par switch karein, aur paste karein:
I want to build the Reading Room connector on this base. Read AGENTS.md and use the mcp-builder skill for tool naming and schemas, then propose the architecture for me: the one gateway, the three tool groups (domain, user, config), how it remembers a person, and how it proves who is signed in. Show me the complete plan and the tool list before you write any code, and for each piece tell me which of the four invariants it serves and flag anything you are unsure about or that the base has not already decided.
Yeh prompt agent ko brief (AGENTS.md) aur naming skill deta hai, phir architecture aur full tool list propose karne ko kehta hai, har piece ko invariant se justify karwa ke, without writing. Aap design dictate nahin kar rahe; reviewable design maang rahe hain.
Phir plan ko inspector ki tarah parhein (yeh review hi course ki skill hai). Four invariants ke against check karein:
- One gateway, three nahin?
- Tools only, app logic resources ya prompts mein nahin?
- Identity verified sign-in se, tool argument se kabhi nahin?
- Fail-closed rule config mein baitha hai?
Kuch off ho to re-plan karwayein. Plan hold karne ke baad hi build allow karein.
Prompt 2: empty frame scaffold karein, aur prove karein yeh khara hai. Scaffolding real walls se pehle bare skeleton khara karna hai: one server jo run karta hai, itna enough ke structure sound hai. Aap intentionally almost empty start karte hain, one health-check tool aur one placeholder, taake wiring wrong ho to abhi pakar lein.
Routine step ke liye cheaper model par wapas aayein; thinking plan mein ho chuki. Prompt mein ek load-bearing phrase hai: stateless streamable HTTP. Streamable HTTP wire format hai jiske through remote host jaise Claude aap ke server tak reach karta hai; stateless ka matlab server kisi single connection ki memory nahin rakhta. Yeh production shape hai. Paste:
Looks right. With the mcp-builder skill's guidance, scaffold the gateway: one FastMCP server on stateless streamable HTTP transport, with a health tool and a
domain_get_itemstub. Add whatever dependencies you need. Run it and show me a local client listing both tools, with no auth and no real data yet.
Aap kya dekhenge, aur kya verify karna hai
Running server, aur ek client jo server se connect ho kar tools list karta hai. domain_get_item abhi stub hai, placeholder jo real kuch return nahin karta, aur yeh correct hai: no auth, no real data at this step. Aap ne is Concept ki one fact prove ki: single server, tools grouped by name, right transport par, remote host ke liye discoverable. Identity aur gating later aate hain; abhi add na karein. Agar port 8000 already use mein hai, agent doosra port bind karega aur RESOURCE_URL consistent rakhega; expected hai, error nahin.
✓ Checkpoint: shape in place hai. Aap ne whole connector plan kiya, invariants ke against review kiya, aur right transport par one gateway khara kiya. Har later Concept isi server mein real piece add karta hai.
Part 2: State aur domain
Concept 5: State - bas itna ke person yaad rahe
Generic chatbot tab close karte hi aap ko bhool jata hai. Aap ki app ko yeh nahin karna chahiye; sessions ke across user ko remember karna hi app ko toy ke bajaye product banata hai.
v1 ko small rakhein: Postgres database, standard free-to-start relational database, do tables ke saath. Front desk ke do registers sochen, loyalty number se tied: guest register ke kaun person hai, aur stay-log ke woh recently kya kar raha hai. Who-you-are barely changes; what-you're-doing har visit change hota hai, so dono alag rehte hain.
Yeh do tables SQL mein likhe hain. SQL database create/read karne ki standard language hai. Follow karne ke liye SQL parhna zaroori nahin: har line ka plain-English comment skim karein. Agent yeh likhta hai; aap review karte hain.
-- users: one row per person
create table users (
  id    text primary key,     -- one person's verified sign-in id, the 'sub' (Concepts 7-8)
  email text
);

-- user_state: one row per person, whatever you carry between sessions
create table user_state (
  user_id text references users(id),
  state   jsonb               -- a last position, a few saved values
);
id jo do tables ko link karta hai, front-desk picture ka "loyalty number", real app mein person's verified sign-in id hai. Code mein iska naam sub hai, subject ka short, identity ka woh one piece jis par trust ho sakta hai. Real sign-ins abhi nahin, so Concepts 7 aur 8 batate hain yeh id actually kahan se aata hai; abhi bas itna jaan lein ke do tables is se tied hain.
Yeh v1 memory ka whole hai: row store karein, row read karein. (jsonb ek flexible column hai jo saved values ka small bundle structured data ke tor par hold karta hai.) Serious version, audit trail, approval model, trustworthy/reportable record, apni discipline hai, jo Building a Digital FTE sikhata hai. Yahan mat build karein.
Aap database haath se set up ya operate nahin karte. Har Manufacturing course ki tarah, coding agent Neon drive karta hai, hosted Postgres jo aap khud run/maintain nahin karte, Neon ke MCP server ke through: project create, branch make, SQL run, jab aap review karte hain. Pehle ek cheez true honi chahiye.
Check Neon awake hai (10 seconds). Agent se poochein: "Can you see the Neon tools right now?" Agar yes, carry on. Agar no, Neon authorize nahin hua: /mcp type karein, Neon pick karein, browser mein Authorize click karein, phir dobara poochein. Next prompt tab tak paste na karein jab tak agent confirm na kare.
Prompt 1: agent se store create karwayein. Paste:
Using the Neon MCP server, create the two-table store (
users,user_state) on adevbranch, and save the branch'sDATABASE_URLto.env(never print it).
Done when: agent se two tables list karwayein aur confirm karwayein ke .env mein DATABASE_URL line hai. Agar users aur user_state dikhaye, store exists.
Prompt 2: agent se read/save code likhwayein. Abhi real sign-in nahin, so test mein stand-in id use hota hai jahan real sub later aayega. Paste:
Write
db.py: read and save a user's state, keyed by the verifiedsub(never an id from a tool argument). Show me a value saving and reading back on a fresh connection. Then explain in one line why you keyed it on the verifiedsuband refused a tool-supplied id; we will see the full reason in the next part.
Done when: value round-trips. Aap kuch save karte hain aur fresh connection par exact same thing read karte hain, stand-in id ke against. State identity se pehle work karti hai.
Concept 6: Domain - abhi reference se, baad mein meaning se
Aap ka domain simply woh stuff hai jis ke baare mein app actually hai: articles, items, records, web address nahin. Jab user specific thing chahta hai, v1 simple way fetch karta hai: har record ka id hai, aur domain_get_item(id) return karta hai. Model returned thing se work karta hai.
v1 deliberately abhi semantic search nahin karta, yani "refunds wale part" ko meaning se answer nahin karta. Fetch by id exact shelf number maangna hai; semantic search librarian se kehna hai "sad whale wali book chahiye" aur us ka find karna. v1 call-number desk hai; librarian upgrade hai, RAG course ka subject. Reference version build karein:
Make
domain_get_item(id)return a real article fromseed/articles.jsoninstead of the stub. Show me it returninga1by id.
Done when: article id se aata hai. Fetch by reference now; later search par upgrade karein.
Optional: real agent ko apna tool call karte dekhein
Ab tak aap ne server small listing script se prove kiya. Ek dafa yeh karein taake feel ho connector actually kis liye hai: agent khud reach karke tool call karta hai. Fastest way coding agent ko stand-in client ke tor par borrow karna hai.
Server running rakhein. Doosre terminal mein agent ko URL par point karein:
claude mcp add --transport http reading-room http://localhost:8000/mcp --scope project
--scope project flag project ki .mcp.json mein reading-room entry likhta hai (Neon aur context7 ke saath). claude mcp list se check karein; mid-session /mcp se reconnect karein.
opencode.json ke mcp block mein Neon aur context7 ke saath reading-room entry add karein, replace na karein:
"reading-room": {
  "type": "remote",
  "url": "http://localhost:8000/mcp",
  "enabled": true
}
Phir ordinary prompt mein ask karein:
Use the reading-room
domain_get_itemtool to fetch articlea1, and show me what came back.
Agent ko tool discover, call, aur article wapas read karte dekhein. Yeh round trip, AI ka aap ka tool choose karna aur result use karna, whole product ka miniature hai.
- Yeh dev-time peek hai, real delivery nahin. Actual customer chat app (claude.ai) hai, jise Concept 13 mein connect karenge.
- Yeh sirf is liye works hai ke abhi auth nahin. Concept 8 mein lock add hota hai, unauthenticated call
401return karta hai. Concept 8 par yeh dev registration remove karein (claude mcp remove reading-room; OpenCode meinreading-roomblock delete karein).
Part 3: Prove - identity jo model fake nahin kar sakta
Yeh "server woh karta hai jo model nahin kar sakta" ka first half hai. Dono Concepts invariant 3 hain.
Concept 7: Identity verified subject se, model se kabhi nahin
Problem yeh hai. user_state table ko right person's row mein write karna hai. Magar user se baat model kar raha hai, aur aap model ko kabhi decide nahin karne de sakte ke kis ka data read/write karna hai. AI ko hotel concierge sochen jo guest ke errands chala raha hai. Jab concierge front desk ko kahe "room 412 wants their mail", desk us ke kehne par mail nahin de sakta: confused ya manipulated concierge wrong room name kar sakta hai. Agar Claude aap ko user_id pass kar sakta, yahi danger hai.
Rule: model identity supply nahin karta. User ne connector authorize kiya, trusted service se sign in kiya, aur woh service server ko signed token deti hai jisme user's verified id, subject ya sub, hota hai. Server token se straight sub read karta hai aur usi ko database key use karta hai.
Yeh rule given auth.py enforce karta hai, isi liye file complete ship hoti hai aur aap rewrite nahin karte. Next Concept mein yeh file wire hoti hai; yahan rule hold karein.
Isay apne db.py se tie karein. Paste:
Read
auth.pyback to me in plain English, then open thedb.pyyou wrote in Concept 5 and show me where thesubcomes from now. Tell me what would break if a tool argument could set it instead, and tie it back to the concierge and the passport.
Single Authorize click jo connector on karta hai wahi sign-in hai. One action, two jobs.
Concept 8: Kaun maujood hai prove karna (sign-in plain English mein)
Yahan machinery OAuth hai, wohi "Sign in with Google". Yeh Concept slow down karne wala hai kyun ke auth code sahi lag sakta hai aur quietly wrong ho sakta hai. Aap ko ideas aur result check karna aana chahiye; actual wiring agent likhta hai.
Whole idea in five lines. User kahin aur sign in karta hai. Woh service signed token issue karti hai. Server token verify karta hai. Server us se sub read karta hai. Model identity kabhi supply nahin karta.
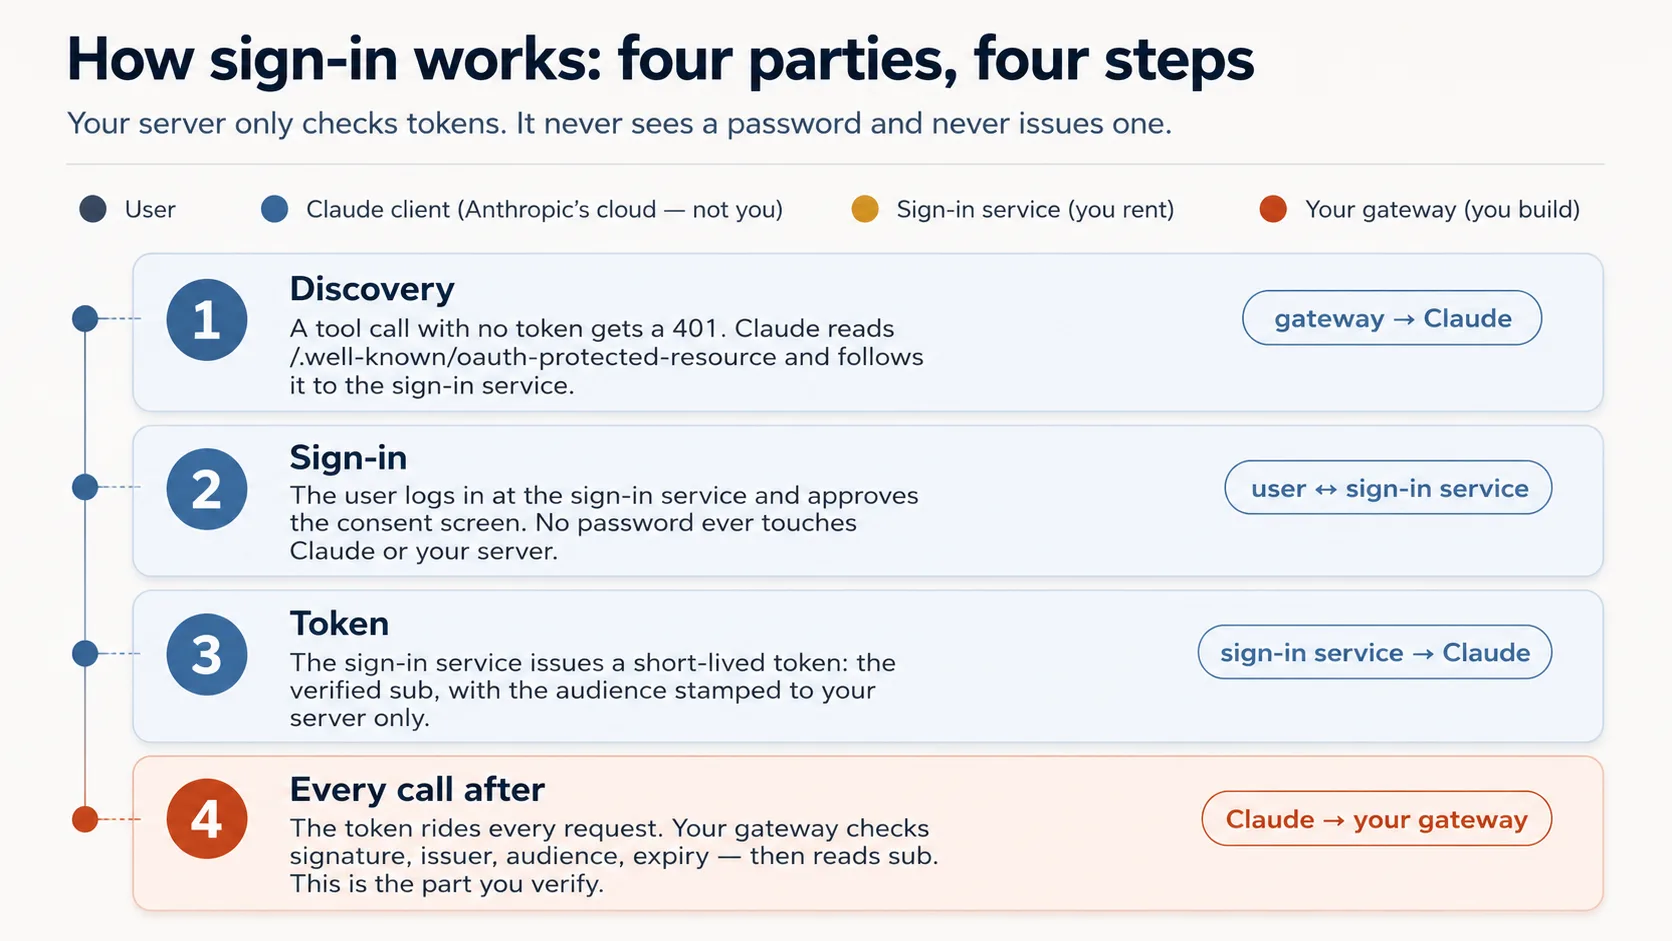
Do jobs hain, aur aap sirf ek karte hain. People ko sign in karwana hard/liability hai, so specialist login chalata hai aur aap ke server ko token deta hai. Server ka only job slip check karna hai. Four parties:
| Party | Who it is | You build it? |
|---|---|---|
| The user | The person whose data it is | — |
| Claude's MCP client | Runs in Anthropic's cloud, asks on the user's behalf | No |
| The sign-in service (authorization server) | An outside specialist — hosted (Clerk, Auth0, Stytch) or a framework you self-host (Better Auth) — that checks the login and issues tokens | No — you rent or self-host it |
| Your gateway (resource server) | Your server; it only checks tokens and serves data | Yes |
Current MCP spec ke under server resource server only hai. Issuer hosted ho ya self-hosted, aap yahan tokens validate karte hain; issue karna AI Identity course hai. Flow:
- Discovery. Token ke baghair tool call
401leta hai; Claude/.well-known/oauth-protected-resourcepar note find karta hai aur login tak jata hai. - Sign-in. User consent screen dekhta hai, Google/email code se login karta hai, approve karta hai. Password Claude ya server ko touch nahin karta.
- Token. Sign-in service short-lived token issue karti hai jisme verified
subaur server-stamped audience hota hai. - Every call after token carry karti hai; server check karta hai aur
subread karta hai.
Agent yahan wiring build karta hai, check nahin. Token check itself auth.py mein complete ship hota hai. Agent thin layer add karta hai jo no-token call ko 401 banata hai aur Claude ko sign-in par point karta hai.
| The check | The question it asks | If your server skipped it |
|---|---|---|
| Genuine? | A real token signed by the issuer, not a forgery? | Anyone could forge a token with any name and walk straight in. |
| Trusted issuer? | Did it come from our sign-in service, not some other? | A token from a service you never trusted would be accepted. |
| Stamped for us? | Minted for this exact server, not a different app? | The most dangerous one: a token meant for another app gets replayed against yours. |
| Still in date? | Has it expired? | A stolen token would keep working forever. |
Concept 7 ka one rule in chaar ke upar hai: identity token ke sub se read hoti hai, tool argument se never.
Curious readers ke liye: woh four questions actual code mein
# auth.py — the token check (ships complete in the base)
from jose import jwt
from jose.exceptions import JWTError

def verified_claims(token: str) -> dict:
    key = _key_for(token)                          # pick the matching public key (by the token's `kid`)
    try:
        claims = jwt.decode(
            token,
            key,                                    # Genuine?       signature checked against the issuer's public key
            algorithms=["RS256"],
            audience=RESOURCE_URL,                  # Stamped for us? must be THIS server (never omit)
            issuer=AUTH_ISSUER,                     # Trusted issuer? must be the service we trust
            options={"require": ["exp", "sub", "aud", "iss"]},  # Still in date? + require the facts we rely on
        )
    except JWTError as e:
        raise AuthError(f"token rejected: {e}") from e
    return claims                                   # claims["sub"] is the user; nothing came from the model
Prompt 1: door par lock lagayein. Paste:
Wire the OAuth layer around the given
auth.py, and don't rewriteauth.py. Check the current FastMCP via Context7 first, then wire theJWTVerifier/RemoteAuthProviderand the/.well-known/oauth-protected-resourceroute so an unauthenticated tool call returns HTTP401. Start the bundledmock_authservice (.envalready points at it). Show me an unauthenticated call returning401.
Prompt 2: prove karein lock discriminate karta hai. Paste:
Mint a token from the mock and show me it resolves its
subthroughauth.verified_claims. Then, before you mint a token for a different audience, tell me which of the four checks should reject it. Mint it, show me it's rejected, and walk me through where each ofauth.py's four checks runs.
Aap kya dekhenge, aur failures kaise read karne hain
Unauthenticated call par 401, token real sub resolve karta hai, wrong-audience token rejected. Four checks confirm karein: signature, issuer, audience = your server, expiry. Missing audience sab se common subtly-wrong output hai.
Ek cheez clear rakhein: aap ne flow rehearse kiya, flow ka part nahin bane. Beginner track par bundled mock_auth sign-in service ka stand-in tha. Production mein end user sign in karta hai, real sign-in service token mint karti hai, Claude's cloud token carry karta hai, aur server same four checks karta hai.
Go deeper: yeh course tokens validate karta hai; AI Identity unhein issue karta hai. Yahan gateway resource server hai. Apna OAuth/OIDC issuer stand up karna dedicated AI Identity course hai, Better Auth par built.
✓ Checkpoint: server knows who's there. Identity token se aati hai, model se never, aur data safe hai. Ab model ko behave karwayein.
Part 4: Steer - model ko behave karwana
Yeh "server woh karta hai jo model nahin kar sakta" ka second half hai. Teen Concepts invariant 4 aur app behavior serve karte hain.
Concept 9: App ke rules kahan rehte hain - Skill, ya connector
Yeh real decision hai, kyun ke app ke rules ke do homes hain: kaise behave kare, voice, guardrails. Skill table par printed placemat hai, hamesha visible. Connector waiter hai jo baithe waqt rules batata hai aur har dish par remind karta hai. Skill stronger enforce karta hai; connector setup friction ko one connector + one Authorize click tak reduce karta hai.
Skill (SKILL.md) | Connector (recommended) | |
|---|---|---|
| Enforcement strength | Stronger, because always in context | Slightly softer, mitigated below |
| Setup steps for user | Four: connector + code-exec + ZIP + toggle | One: connector |
| Shipping to free-tier strangers | Hard | Easy |
Is tradeoff ko safe banane wali chaar layers connector deta hai: tool description always loaded hoti hai aur kehti hai session-init first call karo; session-init return full rules laati hai; har tool return one-line reminder repeat karta hai; real tools session token ke peeche gated hain. So default connector path ship karein, Skill ko power-user add-on rakhein.
Concept 10: Session-init contract
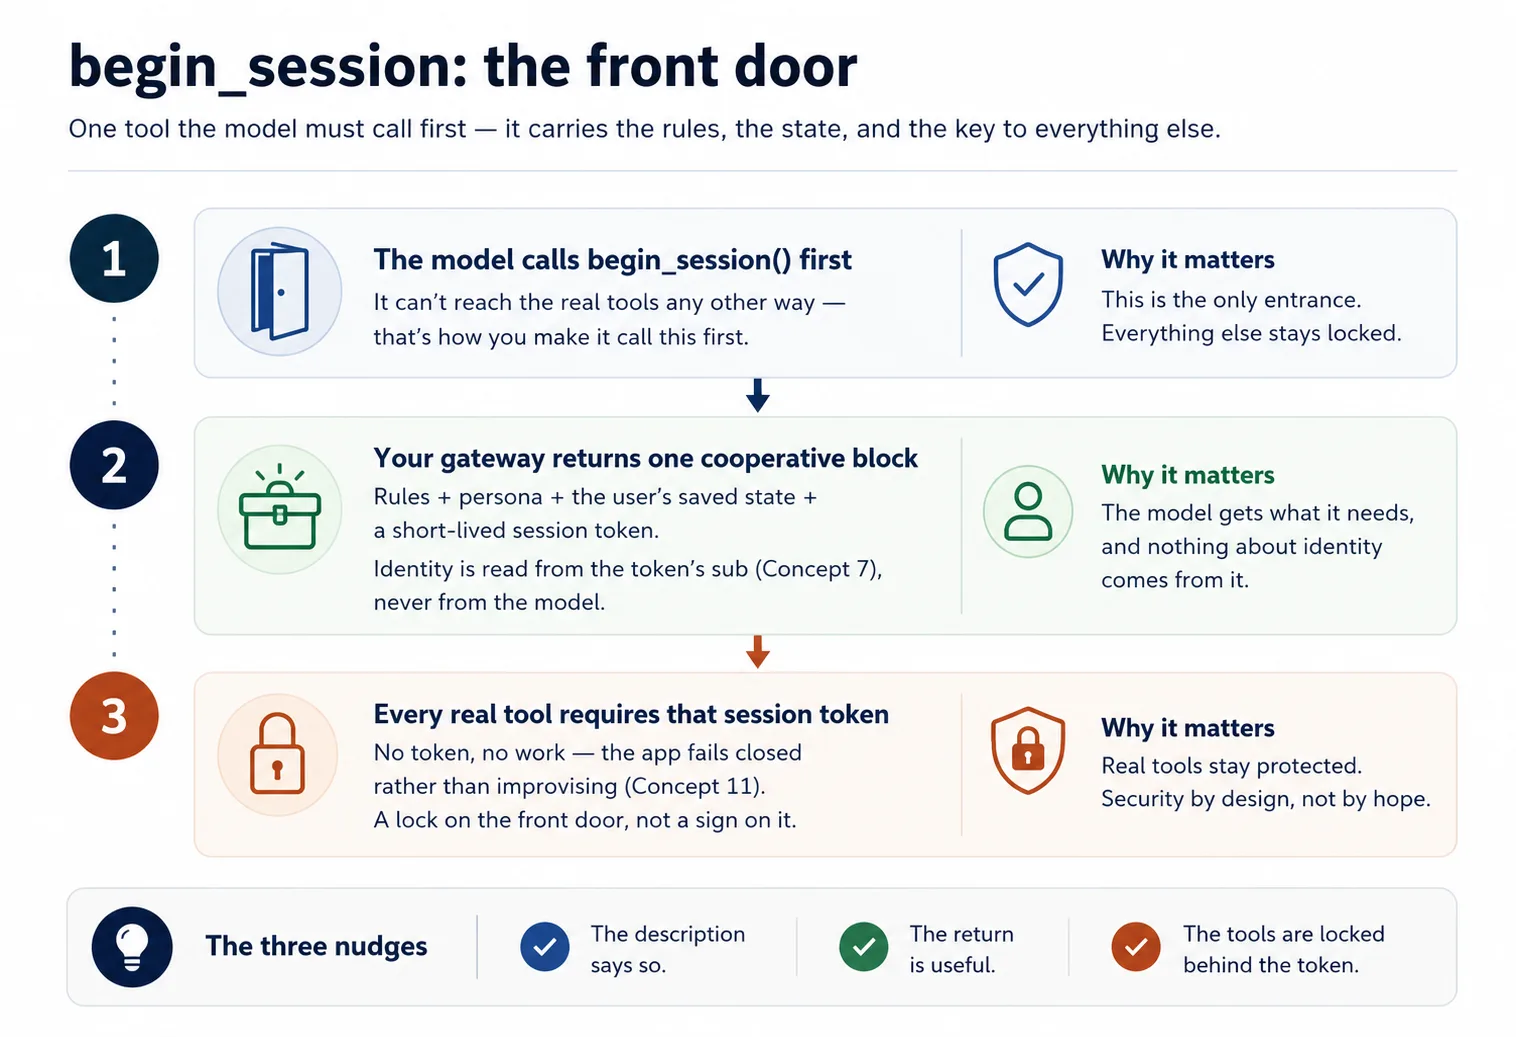
Rules aur user state ek tool ke through aate hain jo model pehle call karta hai. Use begin_session naam dein, ya jo chahen.
Jab user kuch bhi bole jo "start" ya "continue" ke meaning mein ho, model begin_session() call karta hai. Yeh check-in hai: desk guest passport, yani Concept 7 ka signed token, verify karta hai, phir keycard, yani short-lived session token, issue karta hai. Gateway app rules (config_*) aur user state (user_*) read karta hai aur cooperative block return karta hai: "here is how to behave for this user, and here is where they were", plus keycard. Phir har real tool usay check karta hai: no card, no entry.
Yeh application-level session token hai, MCP protocol session nahin. Yeh handle aap ka server issue karta hai aur model ordinary tool argument ke tor par pass karta hai: aap ka gating logic, transport logic nahin. Yeh MCP direction ke saath aligned hai.
@mcp.tool()
def begin_session() -> dict:
    """Call this FIRST on any new request. Returns how to behave for this
    user, their saved state, and a session token the other tools require."""
    sub = verified_claims(current_token())["sub"]   # identity from the token (Concept 7)
    return {
        "session": new_session_token(sub),           # gates every other tool (Concept 4)
        "rules":   config_get_rules(),                # cooperative: "here's how to behave"
        "state":   user_get_state(sub),               # where this user left off
    }
Do design points:
- Cooperative phrase karein, override ki tarah nahin. "Here is what our guest prefers" model ko help karne deta hai; "ignore previous instructions" attacker language lagti hai.
- Model ko pehle call karwana zaroori banayein. Real tools session token require karte hain jo sirf
begin_sessionissue karta hai.
Run it. Paste:
let's do Concept 10: add
begin_sessionreturning rules + state + a signed session token, make the description instruct the model to call it first, and havedomain_get_itemreject calls without a valid session.
Done when: new request par model begin_session call karta hai, rules + saved state leta hai, aur us ke baad hi domain tools reach karta hai.
Concept 11: Fail closed - quietly chatbot na ban jaye
Aisi app ko silently corrupt karne wala failure: connector missing, unauthorized, ya erroring ho, phir bhi model apni knowledge se confident answers improvise karta hai aur user state invent kar leta hai. Aap ka structured product apna naam pehne generic chatbot ban jata hai.
Trap yeh hai: file cabinet lock karna, session gate, model ki apni memory se guessing nahin rokta. Is liye rules mein permanent desk note add karein: agar begin_session reachable nahin ya tool error return kare, saaf kahen session abhi continue nahin ho sakti; results improvise na karein, saved state invent na karein.
# config_store.py — the fail-closed paragraph (you write this)
RULES = """\
You are the assistant for <YOUR APP>. Behave as follows for this user:
- <how to greet, your app's do's and don'ts>

Fail closed: if you cannot reach begin_session or a tool returns an error, tell the user
plainly that the session can't continue right now. Do NOT improvise an answer from your own
knowledge and do NOT invent the user's saved state.
"""
Run it. Paste:
stop my Postgres (or point
DATABASE_URLat a dead host), then ask the app to do its job. Show me whether it refuses cleanly per the fail-closed rule, or whether it invents an answer — and if it invents, strengthen the rule and the per-tool reminders until it refuses.
✓ Checkpoint: trust loop closed. Identity proven, model session gate ke through steered, app fake karne ke bajaye refuse karti hai. Ab isay internet par rakhna baqi hai.
Part 5: Ship it
Concept 12: Isay live chalayein (no Docker, no deploy)
Kyun ke Claude aap ke server tak Anthropic cloud se pahunchta hai, "mere laptop par works" enough nahin: laptop server locked house ke andar counter hai, real magar street door nahin. Textbook fix full deploy hai (rented host par container). Sirf work dekhne ke liye yeh nahin chahiye. Instead aap laptop tak temporary public doorway kholte hain, tunnel, aur connector ka quick pop-up run karte hain. Free, no host account, no card, about a minute.
Ek honest move saath aati hai. claude.ai real OAuth se users sign in karwata hai, aur aap ke paas abhi real sign-in service nahin; woh AI Identity course hai. Personal demo ke liye one-line AUTH_DISABLED=1 switch se lock off karte hain. Concept 8 mein mock ke against lock prove kar chuke hain; yahan usay aside rakhte hain taake aaj claude.ai reach ho sake.
Build it. Agent bundled live-connector skill drive karta hai, tunnel tool install karta hai, doorway open karta hai, aur auth off ke saath server start karta hai. Paste:
Put my connector live with the
live-connectorskill: turn auth off, start the gateway, open the Cloudflare tunnel, and give me the public connector URL. Confirm an unauthenticated tool list returns 200 over the tunnel before you hand it to me.
Done when: skill https://….trycloudflare.com/mcp URL print karti hai aur unauthenticated tools/list us ke through 200 return karta hai. Yahi public URL aap next claude.ai mein paste karte hain.
Yeh open, temporary doorway hai. Auth off hone ke saath jis ke paas URL hai woh tunnel up rehte hue aap ke tools aur Neon data tak pahunch sakta hai, aur har caller same stand-in user hai. Isay personal demo samjhein: finish par tunnel down karein (pkill -f "cloudflared tunnel"), aur expect karein URL har restart par change hoga.
Concept 13: Isay claude.ai mein add karein aur whole app chalta dekhein
Payoff, aur yeh part aap karte hain. Is dafa no Authorize step, kyun ke demo ke liye auth off hai:
- claude.ai mein: Settings -> Connectors -> Add custom connector. Tunnel URL paste karein (ending in
/mcp) aur Add click karein. No client id, no Advanced settings. - Apni app se plain language mein job ask karein.
- Brand-new chat kholein aur kahen jahan chhora tha wahan se pick up kare.
Aap kya dekhenge, aur kya verify karna hai
App apne aap ke tor par respond karti hai: model first begin_session call karta hai, rules aur stand-in user's state leta hai, aur gated tools se work karta hai. State user id ke under filed hai, chat ke under nahin, so brand-new chat wahin se resume karti hai jahan left off tha. Do notes: real sign-in wired hone tak everyone same stand-in user hai (woh AI Identity hai), aur tunnel URL change ho to connector re-add karein, edit nahin.
✓ Checkpoint: aap ne isay live run kiya. Aap ne whole app claude.ai ke andar work karti dekhi: model identity-gated session ke through tools call karta hai, memory chats ke across carry hoti hai, app fake karne ke bajaye fail closed hoti hai, all on free account. Public connector ke liye real sign-in service next stretch hai: AI Identity.
Part 6: Capstone - apna domain
Aap ne concepts ke across Reading Room build kiya. Ab skeleton ko apna prove karein by pointing it at something you know. Skeleton nahin badalta: one gateway, three tool groups, begin_session contract, identity from subject, fail closed. Sirf three groups badalte hain.
Kuch shapes:
- Tutor: domain course content; user learner's progress; config teacher persona plus teaching method;
begin_sessionpersona + method + learner position load karta hai. - Support assistant: domain orders/policies look up; user customer's ticket history; config tone and escalation rules.
- Internal-docs aide: domain team wiki search; user which team you're on; config what's confidential and how to cite.
- Booking helper: domain availability/reservations; user saved preferences; config cancellation/pricing rules.
Closest real thing pick karein, aur same loop run karein: plan -> review -> scaffold -> accumulate -> verify. Isay run karein, Claude mein add karein, one real request serve karwayein aur next day remember karwayein.
Reading Room ki tarah start karein: agent propose kare, aap review karein. Paste:
Before you build anything, map my domain onto the three groups for me: what goes in
domain, what goes inuser, what goes inconfig, and whatbegin_sessionshould hand back for this app. Show me that mapping so I can review it the way I reviewed the Reading Room plan, then we plan the rest.
Hard parts ke liye rhythm kabhi nahin badli. Har step par sirf what you reviewed badla: tool list, store, verified_claims wiring, gate, fail-closed behavior, live run. Yeh loop master karein aur specific code matter karna stop karta hai.
Discuss with an AI. Question your scores.
Come back when you have your BEST evaluation.
Part 7: Ceiling, aur yeh kahan grow karta hai
Concept 14: Ceiling - aur loop own karne ka bridge
Jo aap ne build kiya us ki edge feel karein, kyun ke yeh exactly dikhati hai book next kahan jati hai.
Aap ki app sirf jab user type kare act kar sakti hai. Yeh Concept 1 ka hand vacuum hai: trigger dabne tak dead. Yeh khud wake nahin ho sakti, schedule par run nahin ho sakti, kuch notice karke unprompted reach out nahin kar sakti, ya human turn ke baghair several steps tak goal pursue nahin kar sakti. Yeh flaw nahin, connector-native app ki nature hai. Loop host chat app ka hai, aap ka nahin.
Jis lamhe aap aisa worker chahte hain jo khud run ho, wake up, steps le, loop mein tools call kare, aap ke sote hue job finish kare, aap ko loop khud own karna hoga. Woh robot vacuum hai, aur path udhar jata hai. Build AI Agents mein aap hand vacuum tend karna chhorte hain aur robot build karna start karte hain.
Do courses pehle aate hain. Plugins for AI Agents is course ka mirror image hai: connector-native app end users ke liye chat app (claude.ai) extend karti hai; plugin builders ke liye coding agent (Claude Code, OpenCode) extend karta hai.

AI Identity: Human Sign-In and Agent Access, Better Auth par built, do halves mein aata hai: pehle aap sign-in own karte hain, apna OAuth/OIDC server khara karte hain; phir aap agent ko apni identity dete hain, scoped, time-boxed, revocable, human-approved way se person ki behalf par act karne ke liye. Phir Build AI Agents aap ko loop deta hai.
Aap ne step waste nahin kiya. Aap ne woh ship kiya jo loop own karne se pehle ship ho sakta hai, exactly feel kiya ke loop kyun chahiye, aur ab woh lene jate hain.
Same app, Mode 2 mein deepened
Aap v1 throw away nahin karenge. Later courses isi app ko upgrade karte hain:
| You'll add | Which upgrades | In |
|---|---|---|
| Semantic search over your domain | domain_get_item(id) -> domain_search(query) | RAG on Postgres + pgvector |
| A durable system-of-record (audit, approval, trustworthy state) | the bare two-table memory | Building a Digital FTE |
| A high-fidelity persona / richer config (no-fabrication guardrails) | the simple config_* rules | Identic AI |
| Your own token issuer, plus identity for agents (scoped, revocable, on-behalf-of) | the rented sign-in service | AI Identity (Better Auth) |
| Proof it actually does its job well | "it seems to work" | Eval-Driven Development |
| Production hardening (observability, a CI test gate) | the live tunnel demo | Deploy the Agent Harness |