Paperclip के साथ एक workforce बनाना: 90-minute crash course
सात scenarios। शून्य से शुरू करके एक ऐसी AI company तक जो असली चीज़ें बनाती है, जिसे आप board के रूप में चलाते हैं।
Paperclip, AI agents की एक company चलाने के लिए एक operating system है। आप goal तय करते हैं और काम करने के लिए agents hire करते हैं। वे plan और execute करते हैं; आप सिर्फ़ वही decisions approve करते हैं जो मायने रखते हैं। यह एक startup की तरह काम करता है: आप एक CEO agent hire करते हैं, वह एक strategy propose करता है, और एक बार जब आप उसे approve कर देते हैं, तो वह agent काम को tasks में बाँट देता है और team को assign कर देता है।
आख़िर में, क़रीब नब्बे minutes में, आपके पास अपने laptop पर एक चलती हुई AI company होगी:
- एक CEO जिसे आपने hire किया, जो board के रूप में आपको report करता है,
- एक team जिसे CEO ने hire किया और असली काम delegate किया, जिसमें हर report अपने tasks का मालिक है, और
- budgets, approvals और एक audit trail जो इस सब को आपके control में रखते हैं।
CEO leader है, मज़दूर नहीं: वह plan और delegate करता है, और जिन specialists को वह hire करता है वे tasks पूरे करते हैं। जैसे-जैसे company बढ़ती है, यही pattern दोहराया जाता है: आज के reports कल अपनी team वाले managers बन जाते हैं।
(OpenClaw crash course किया था? वह एक agent था। यह वह company है जिससे आप उनकी एक पूरी team चलाते हैं।)
📚 Teaching Aid
पूरा Presentation देखें: Paperclip के साथ एक workforce बनाना
यह कैसे काम करता है. आप एक छोटा folder download करते हैं और उसे अपने general agent (Claude Code या OpenCode) में खोलते हैं। वह agent Node check करता है, एक command से Paperclip install करता है, और सब कुछ चलाता है; आप सिर्फ़ वे calls लेते हैं जो सिर्फ़ एक इंसान ले सकता है: CEO की strategy approve करना, एक hire तय करना, dashboard खोलना। Paperclip free और open source है (हज़ारों GitHub stars)।
हर employee एक prebuilt agent (Claude Code, OpenCode, Codex या Gemini) या किसी custom agent से चलता है। इस course के लिए, जिसमें आप पहले से logged in हैं उसी का use करें: किसी अलग API key की ज़रूरत नहीं। आख़िर के क़रीब एक exception आता है: एक budget को किसी agent को सचमुच रोकते हुए देखने के लिए, आपको एक paid key चाहिए होगी। वहाँ पहुँचने पर उस पर और बात।
Collaboration pattern
तीन players। आप board हैं: आप वे calls लेते हैं जो सिर्फ़ एक इंसान ले सकता है। आपका general agent Paperclip की command-line चलाता है और कुछ टूटने पर recover करता है। Paperclip agents के ऊपर की layer है: यह company को रखता है और employees को जगाता है। एक naming note ताकि कुछ confuse न हो: "आपका general agent" वह tool है जिसमें आप paste करते हैं; Paperclip के अपने employees role से जाने जाते हैं, CEO और उसके reports।
यह रही वह पूरी structure जो आप बनाने वाले हैं:
हर scenario एक ही तरह चलता है: आप plain-language prompts paste करते हैं, आपका agent एक plan propose करता है और किसी भी destructive चीज़ से पहले पूछता है, आप approve करके देखते हैं, और यह एक ऐसी चीज़ पर ख़त्म होता है जो आप देख सकते हैं। ज़्यादातर scenarios दो छोटे prompts use करते हैं, instructions की एक दीवार नहीं।
अगर कुछ भी गड़बड़ हो जाए, तो आपको CLI commands जानने की ज़रूरत नहीं। यह paste करें:
कुछ काम नहीं किया।
paperclipai doctorrun करें, सबसे हाल का Paperclip server log पढ़ें, मुझे plain language में बताएँ कि आप क्या देख रहे हैं, और एक fix propose करें जिसे मैं approve कर सकूँ।
Download बस एक AGENTS.md brief है जिसे आपका agent ख़ुद पढ़ता है, वही pattern जो पिछले courses में था। आपका agent scenario 1 में Paperclip और उसके operator skills install करता है, इसलिए आप ख़ुद कोई setup command नहीं चलाते।
paperclip-workforce-base.zip download करें
Folder को अपने general agent में खोलें। यह आप एक बार set up करते हैं: paperclip-workforce/ पूरे course के लिए आपका folder है।
cd paperclip-workforce
claude
cd paperclip-workforce
opencode
एक paste confirm करता है कि brief load हो गया:
Paperclip के लिए आप क्या कर सकते हैं?
अगर reply specific Paperclip काम का नाम लेता है (install, एक CEO hire करना, strategy review, task board, budgets, audit log), तो आप तैयार हैं। अगर यह generic AI बातों जैसा लगे, तो agent बंद करें, confirm करें कि आप paperclip-workforce/ folder के अंदर हैं, और दोबारा launch करें।
Scenario 1: Paperclip खड़ा करें और अपनी company बनाएँ (~15 min)
एक company एक self-contained AI organisation है: एक goal, agents की एक team, एक task board, और एक budget। Goal वह है जिस तक बाक़ी सब कुछ वापस जाता है।
पहला prompt: probe करें, फिर plan करें।
मैं अपने laptop पर Paperclip चलाना चाहता हूँ। कुछ भी बदलने से पहले, check करें कि मेरी machine पर पहले से क्या है, फिर plain language में अपना plan मुझे बताएँ: आपको क्या मिला, आप क्या करेंगे, और कहाँ आपको मेरी ज़रूरत होगी।
आपका agent AGENTS.md पढ़ता है, pre-install probe (Node version, पुराने installs, ports) run करता है, और एक plan propose करता है। अगर उसे कोई पुराना state मिलता है तो वह उसे छूने से पहले आपके decision के लिए रुक जाता है। Plan पढ़ें; अगर कुछ ठीक न लगे तो पीछे धकेलें।
दूसरा prompt: इसे run करें, फिर company बनाएँ।
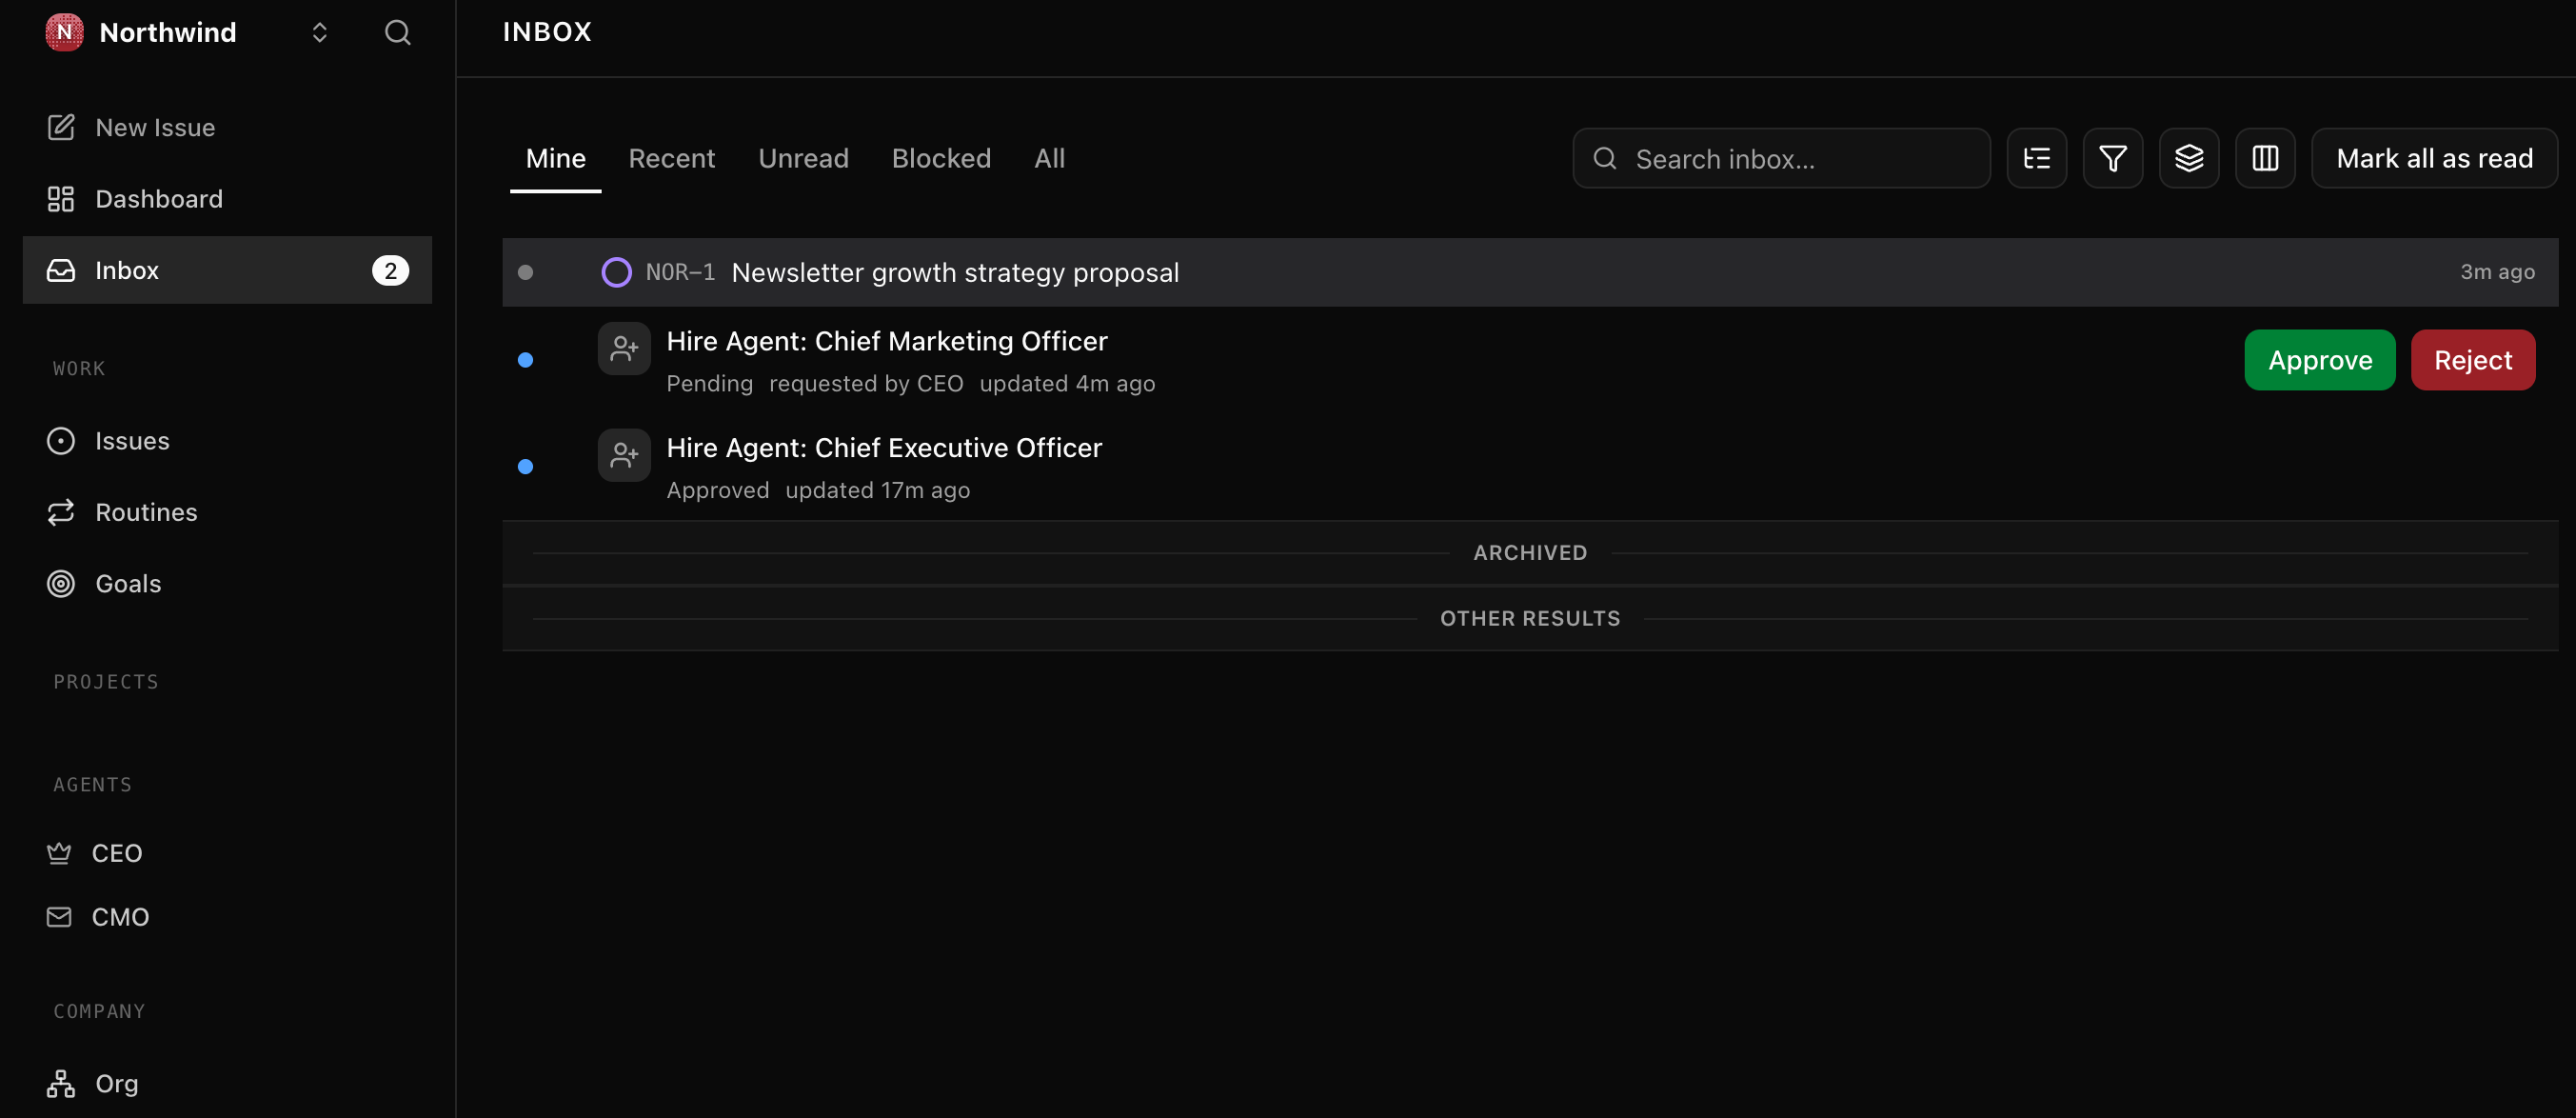
Plan अच्छा लग रहा है, step by step आगे बढ़ें और जो आप देखते हैं वह मुझे दिखाएँ; किसी भी destructive चीज़ से पहले रुकें। जब Paperclip up हो जाए, तो मेरी company बनाएँ: इसे Northwind नाम दें, goal "एक weekly AI newsletter launch करना और 90 दिनों में 1,000 subscribers तक पहुँचना" रखें, और इसे एक असली company goal के रूप में register करें जिसे CEO पढ़ सके और जिसके against plan कर सके, सिर्फ़ एक tagline नहीं। एक छोटी monthly budget ceiling रखें, बीस dollars, ताकि शुरू से ही spending capped रहे। यह require करें कि company किसी भी नए agent को hire करने से पहले मेरा sign-off ले, ताकि मैं team पर control में रहूँ। फिर मुझे dashboard URL दें।
तब पूरा जब: dashboard render होता है, और उस पर "Northwind" नाम की एक company दिखती है जिसमें आपका goal एक ऐसे goal के रूप में register है जिस पर CEO act कर सके, एक budget ceiling, और नए hires आपकी approval require करने के लिए set। हर बाद की action इसी पर बनती है।
किसी भी hire से पहले आपकी company, scenario 1 का payoff:
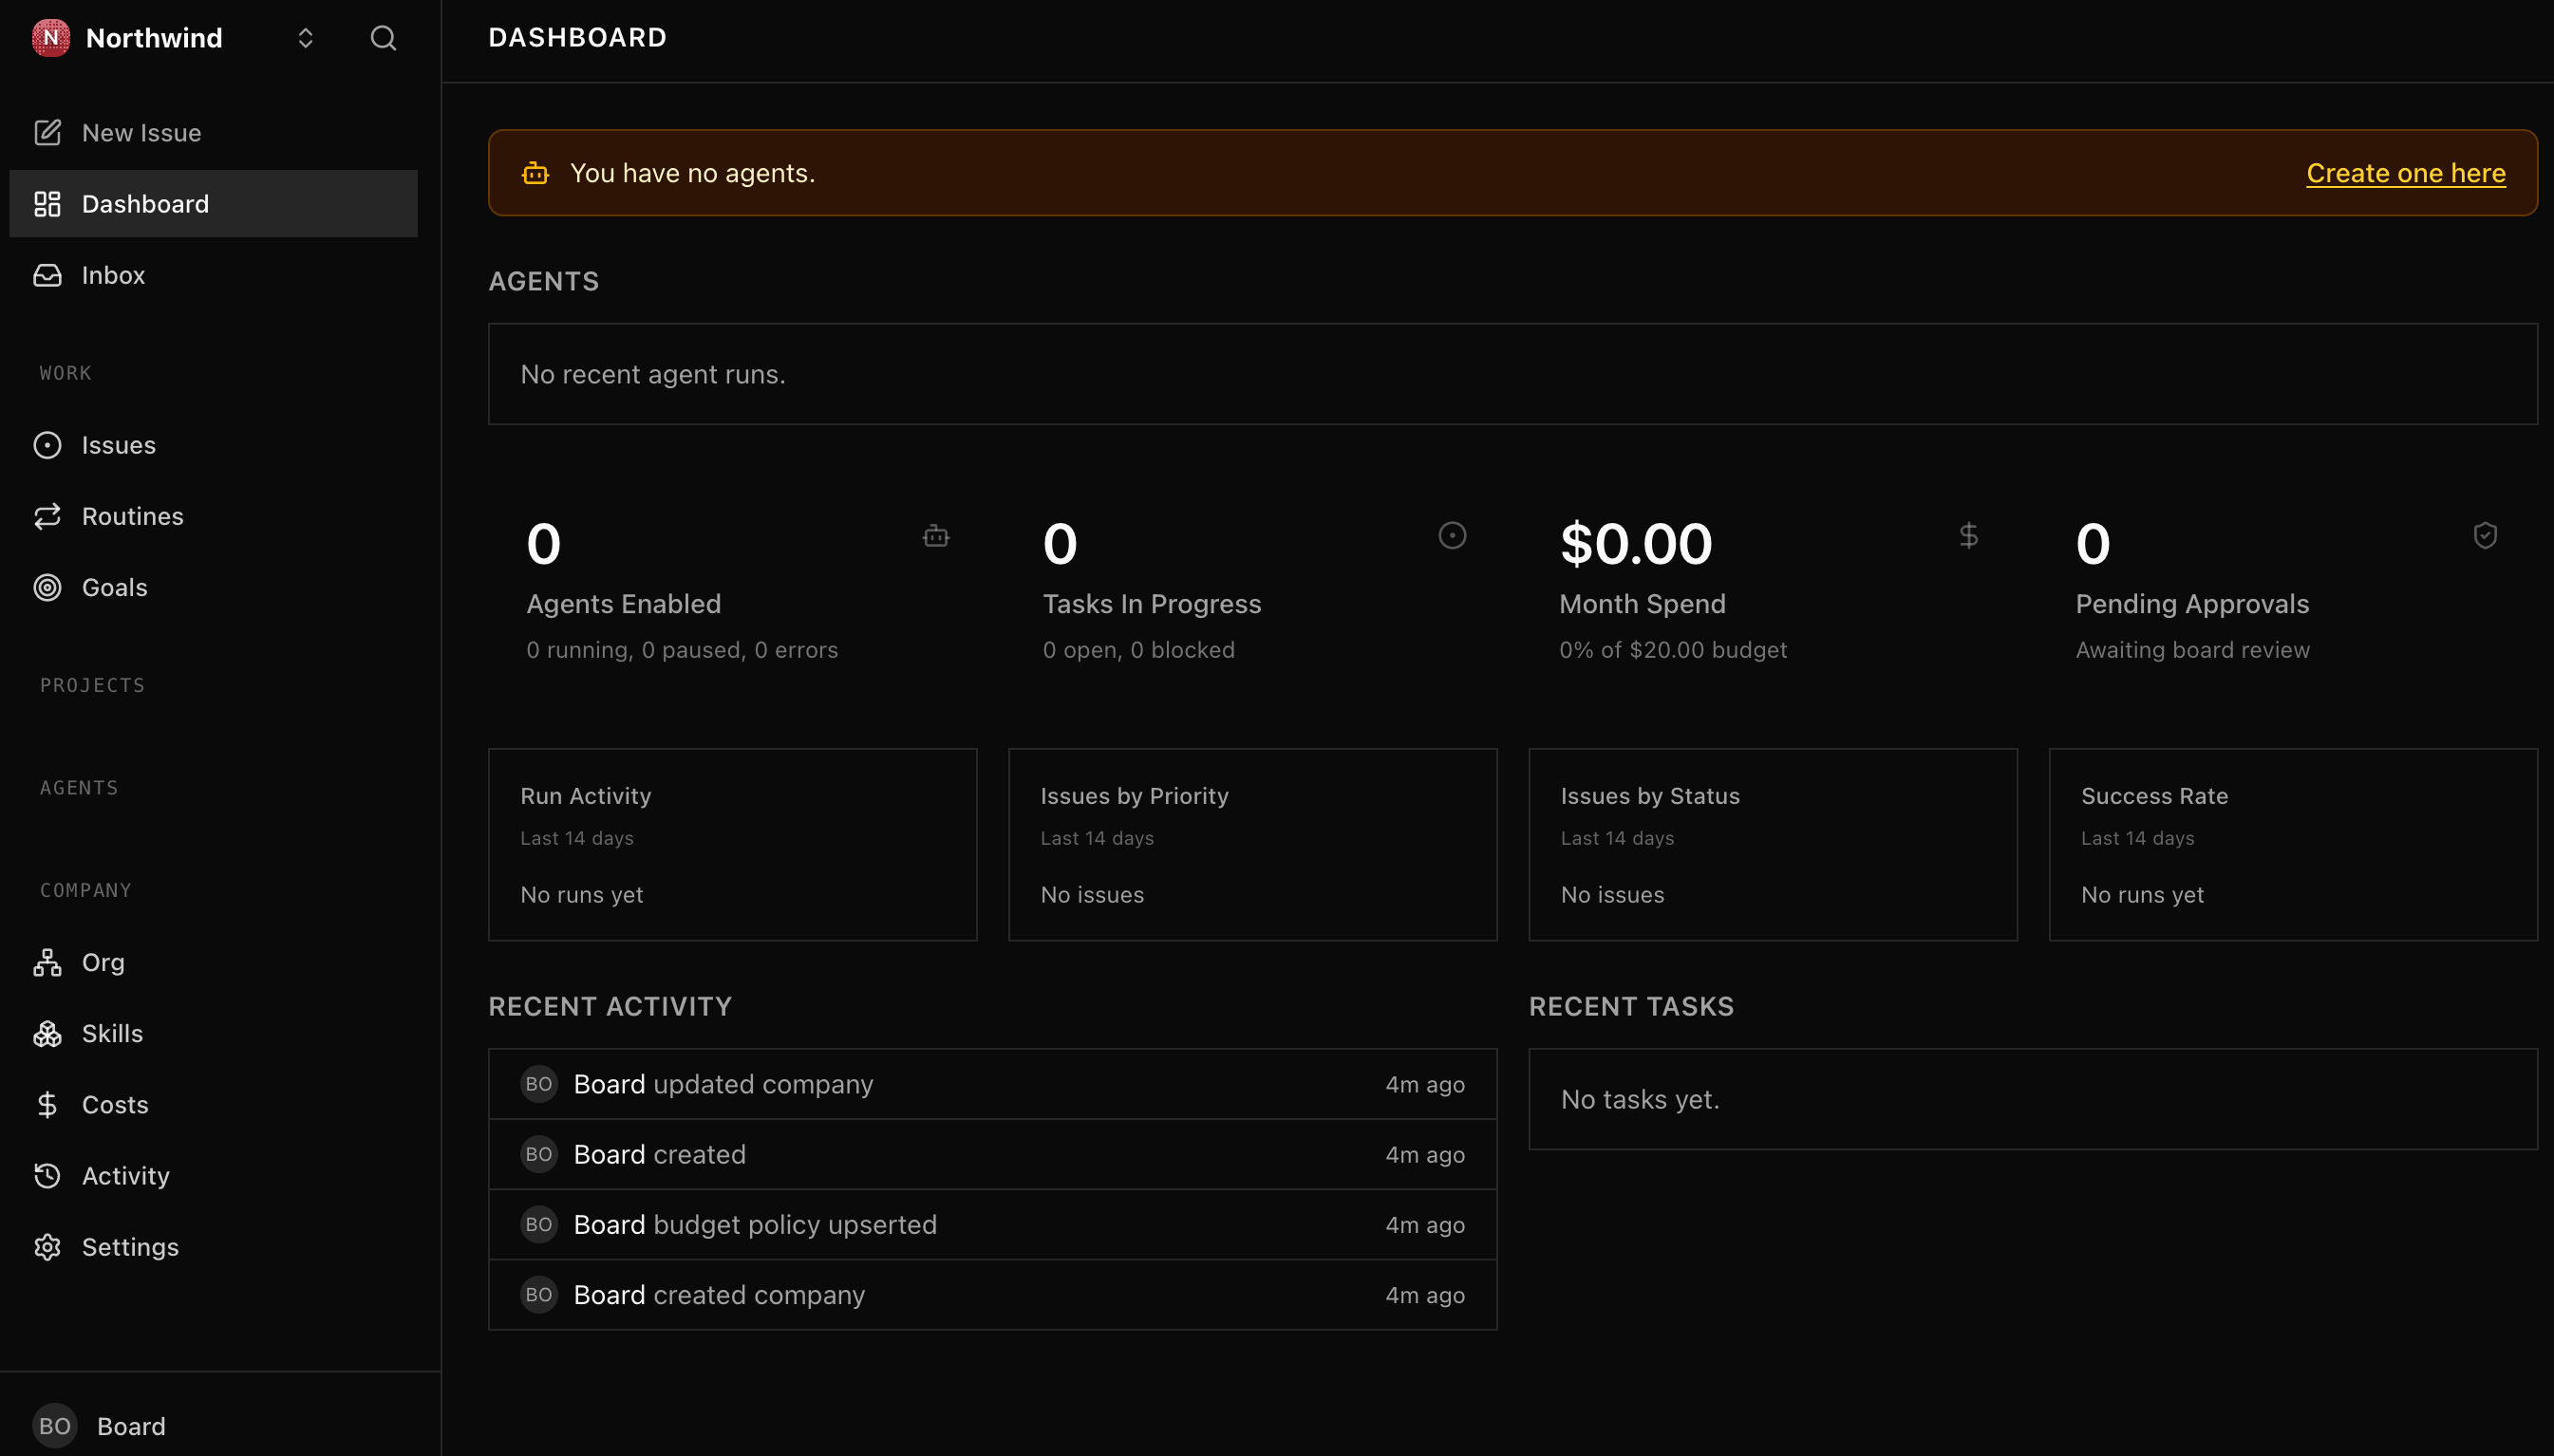
Paperclip के update होने पर आपका dashboard थोड़ा अलग दिख सकता है; जो मायने रखता है वह है company, budget ceiling, और आपके पहले hire का इंतज़ार करती ख़ाली roster।
Scenario 2: अपना CEO hire करें (~10 min)
एक agent एक AI employee है: एक role, एक manager जिसे वह report करता है, और एक budget। एक को hire करना एक contractor को लेने जैसा है, सिवाय इसके कि यह एक model से चलता है (एक adapter के ज़रिए plug किया जाता है, वह plug जो आपके provider से match करता है)। CEO पहला agent है जिसे आप hire करते हैं और इकलौता ऐसा जिसका कोई manager नहीं: वह आपको, board को, report करता है, और एक बार चलने पर goal पढ़ता है और एक strategy propose करता है।
पहला prompt: CEO draft करें।
मैं अपना CEO hire करना चाहता हूँ, Northwind का पहला agent। इसे locally जिस भी coding agent में मैं logged in हूँ उसी पर चलाएँ (Claude Code, OpenCode, Codex, Gemini CLI) Paperclip के matching local adapter के ज़रिए, ताकि कोई अलग API key न लगे। एक sensible default चुनें और मुझे बताएँ कि कौन सा। कुछ भी register करने से पहले setup मुझे दिखाएँ: role, adapter और model, budget, और heartbeat schedule। Budget modest रखें, कुछ dollars।
दूसरा prompt: hire करें और verify करें।
अच्छा लग रहा है। CEO को एक hire के रूप में file करें और approve करने के लिए मेरे पास लाएँ। एक बार जब मैं approve कर दूँ, तो dashboard में उसे confirm करें: उसका ID, कि वह मुझे report करता है और उसके ऊपर कोई manager नहीं, और उसका पहला heartbeat कब due है।
जो gate आपने scenario 1 में arm किया था वह सबसे पहले hire पर भी लागू होता है: आपका CEO भी एक hire है जिस पर आप sign off करते हैं। यही तो बात है। आप ठीक यही देखेंगे, CEO pending approval में बैठा हुआ एक Approve agent button के साथ, आपका इंतज़ार करता हुआ:
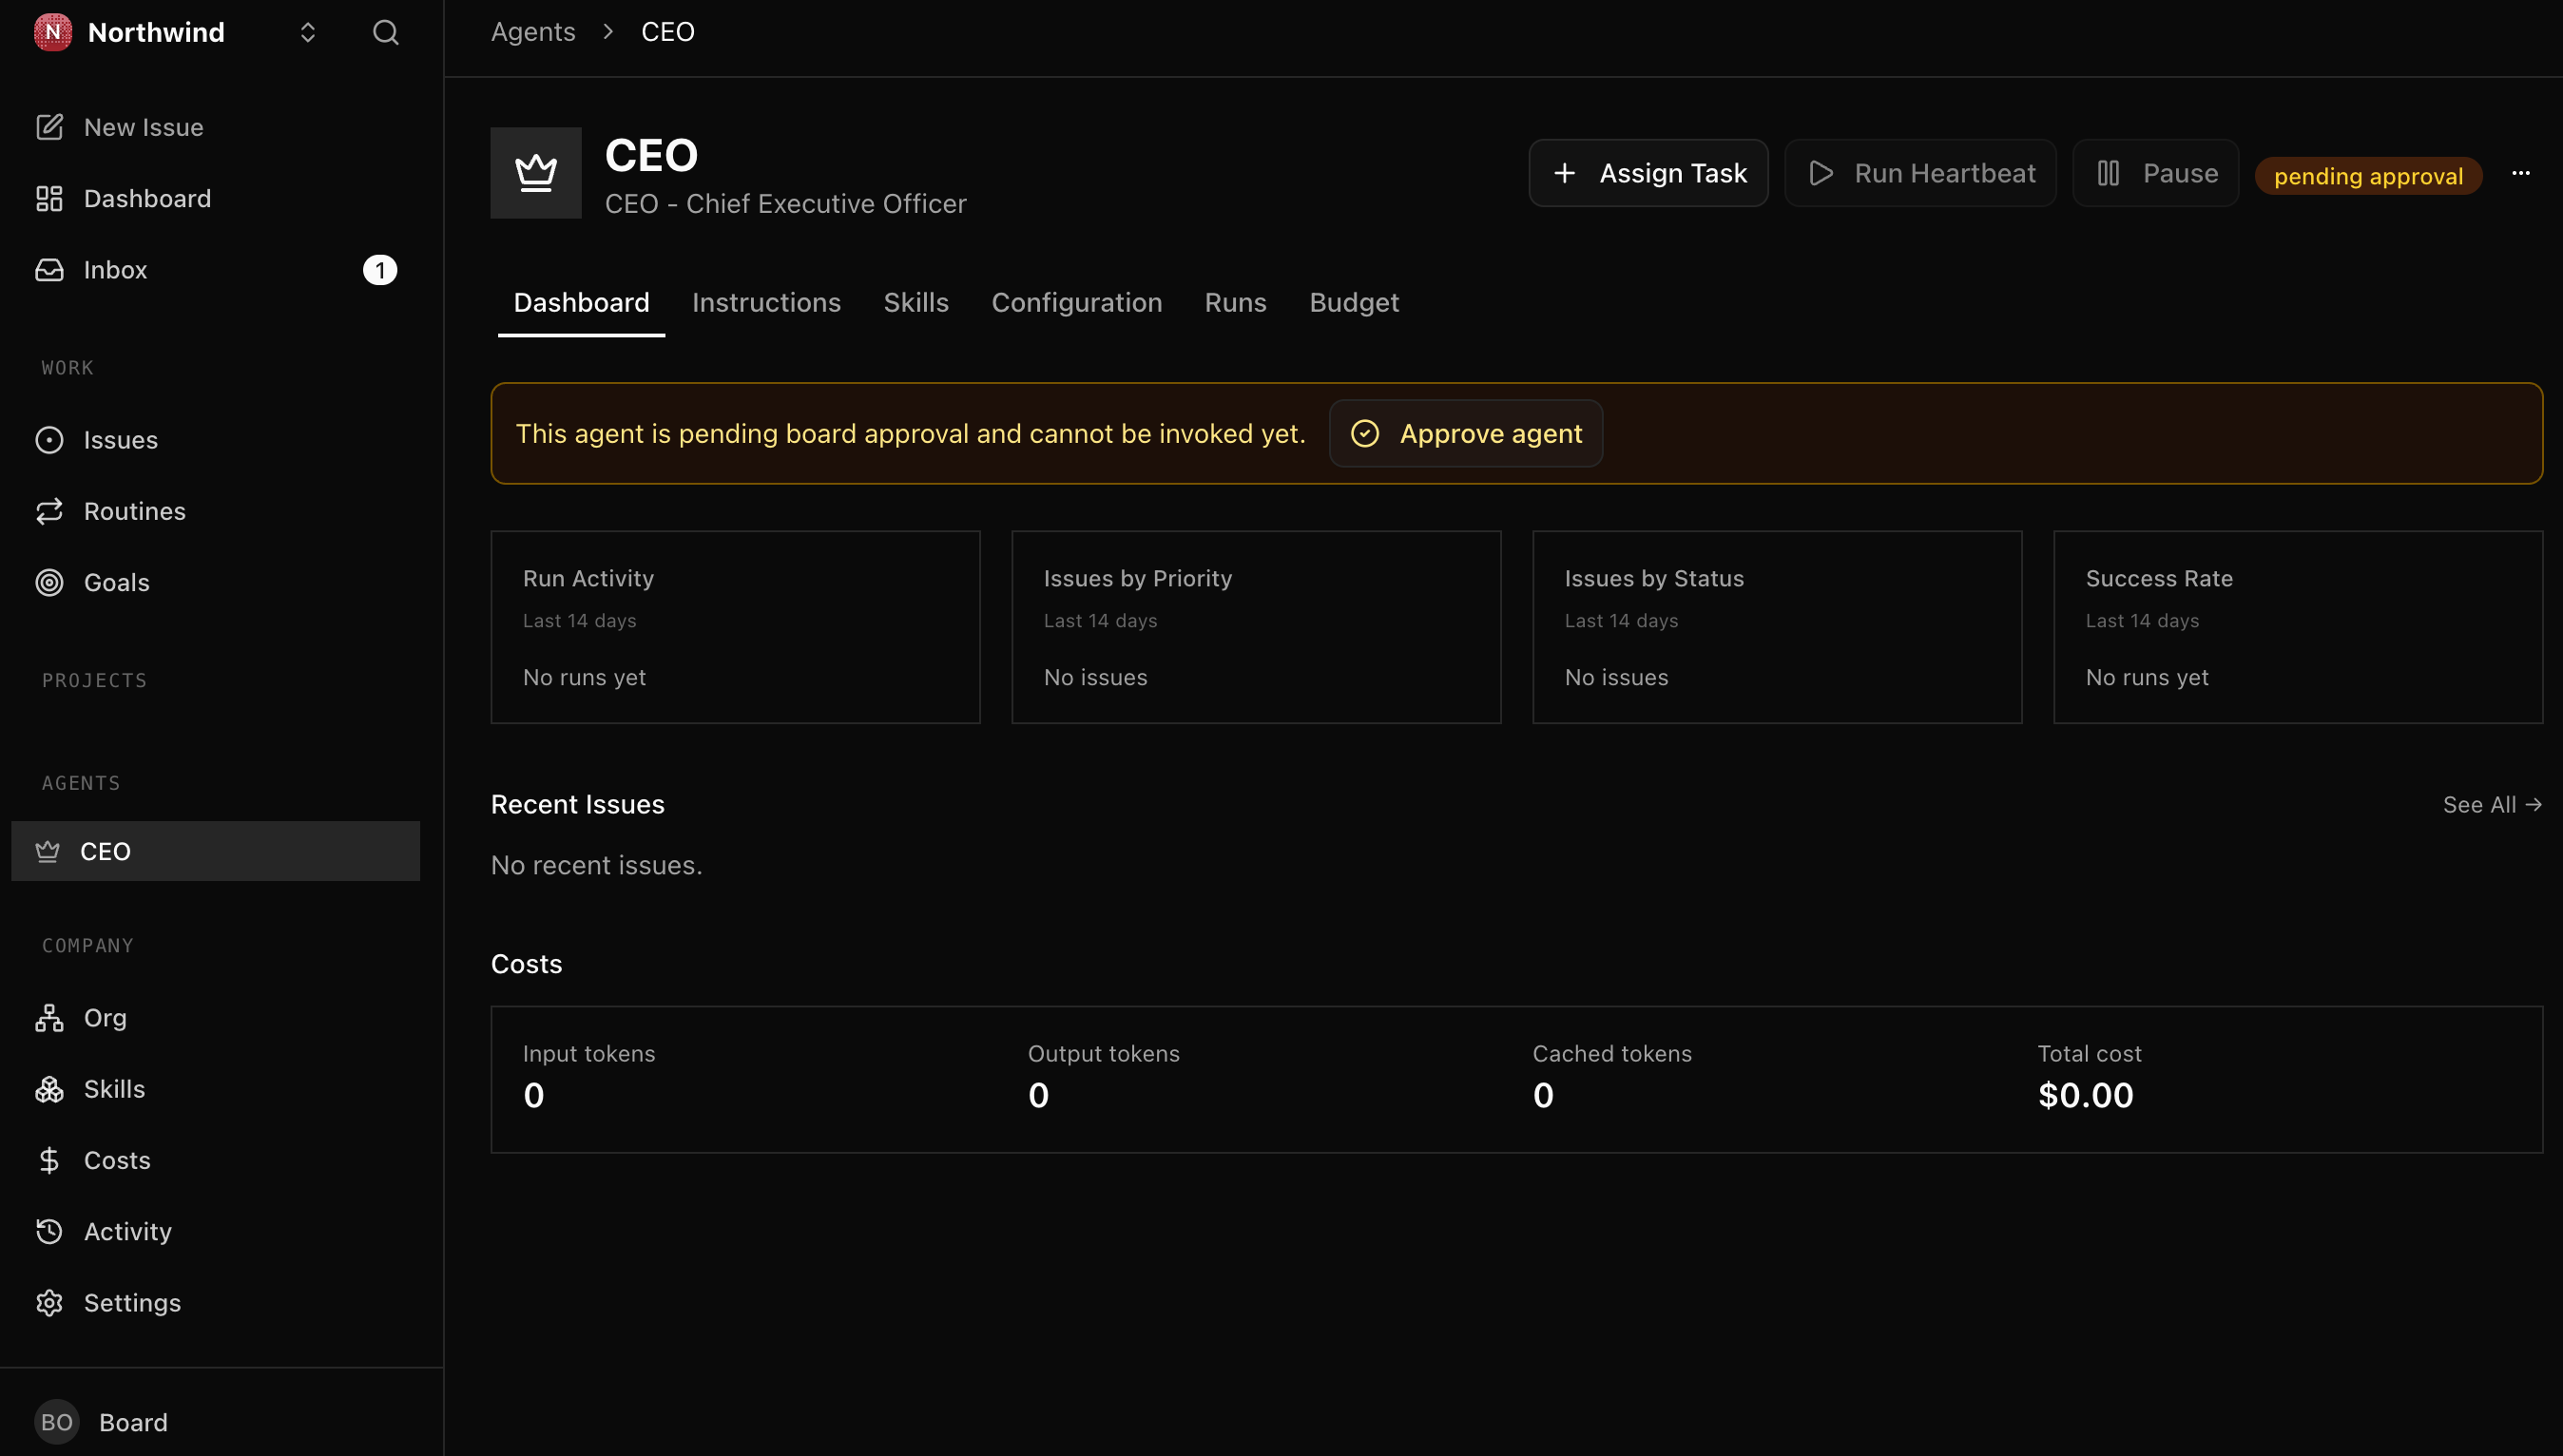
तब पूरा जब: आपके CEO के hire को approve करने के बाद, dashboard एक CEO agent दिखाता है, idle, आपको report करता हुआ, heartbeat enabled। उसने अभी कुछ नहीं किया; वह अगला scenario है।
Scenario 3: CEO एक strategy propose करता है; आप उसे approve करते हैं (~15 min)
एक heartbeat एक agent की काम करने की scheduled बारी है: वह जागता है, एक हिस्सा करता है, और अगली बार तक log off हो जाता है। अपने पहले heartbeat पर CEO एक चीज़ करता है: वह आपका goal पढ़ता है और task board पर पहले item के रूप में एक strategy draft करता है, फिर उस item को in_review में move कर देता है, board का review lane। जब तक आप sign off नहीं करते कुछ आगे नहीं बढ़ता। इसे approve करना board का act करना है: आप उस strategy को in_review से done में move करते हैं।
पहला prompt: पहला heartbeat fire करें।
CEO का पहला heartbeat fire करें और उसे सोचने दें। जब वह अपनी strategy draft कर ले और मेरी review के लिए रख दे, तो उसे मुझे दिखाएँ और मुझे समझाएँ कि CEO क्या propose कर रहा है।
इसे fire करें और CEO live हो जाता है, real time में काम करता हुआ:
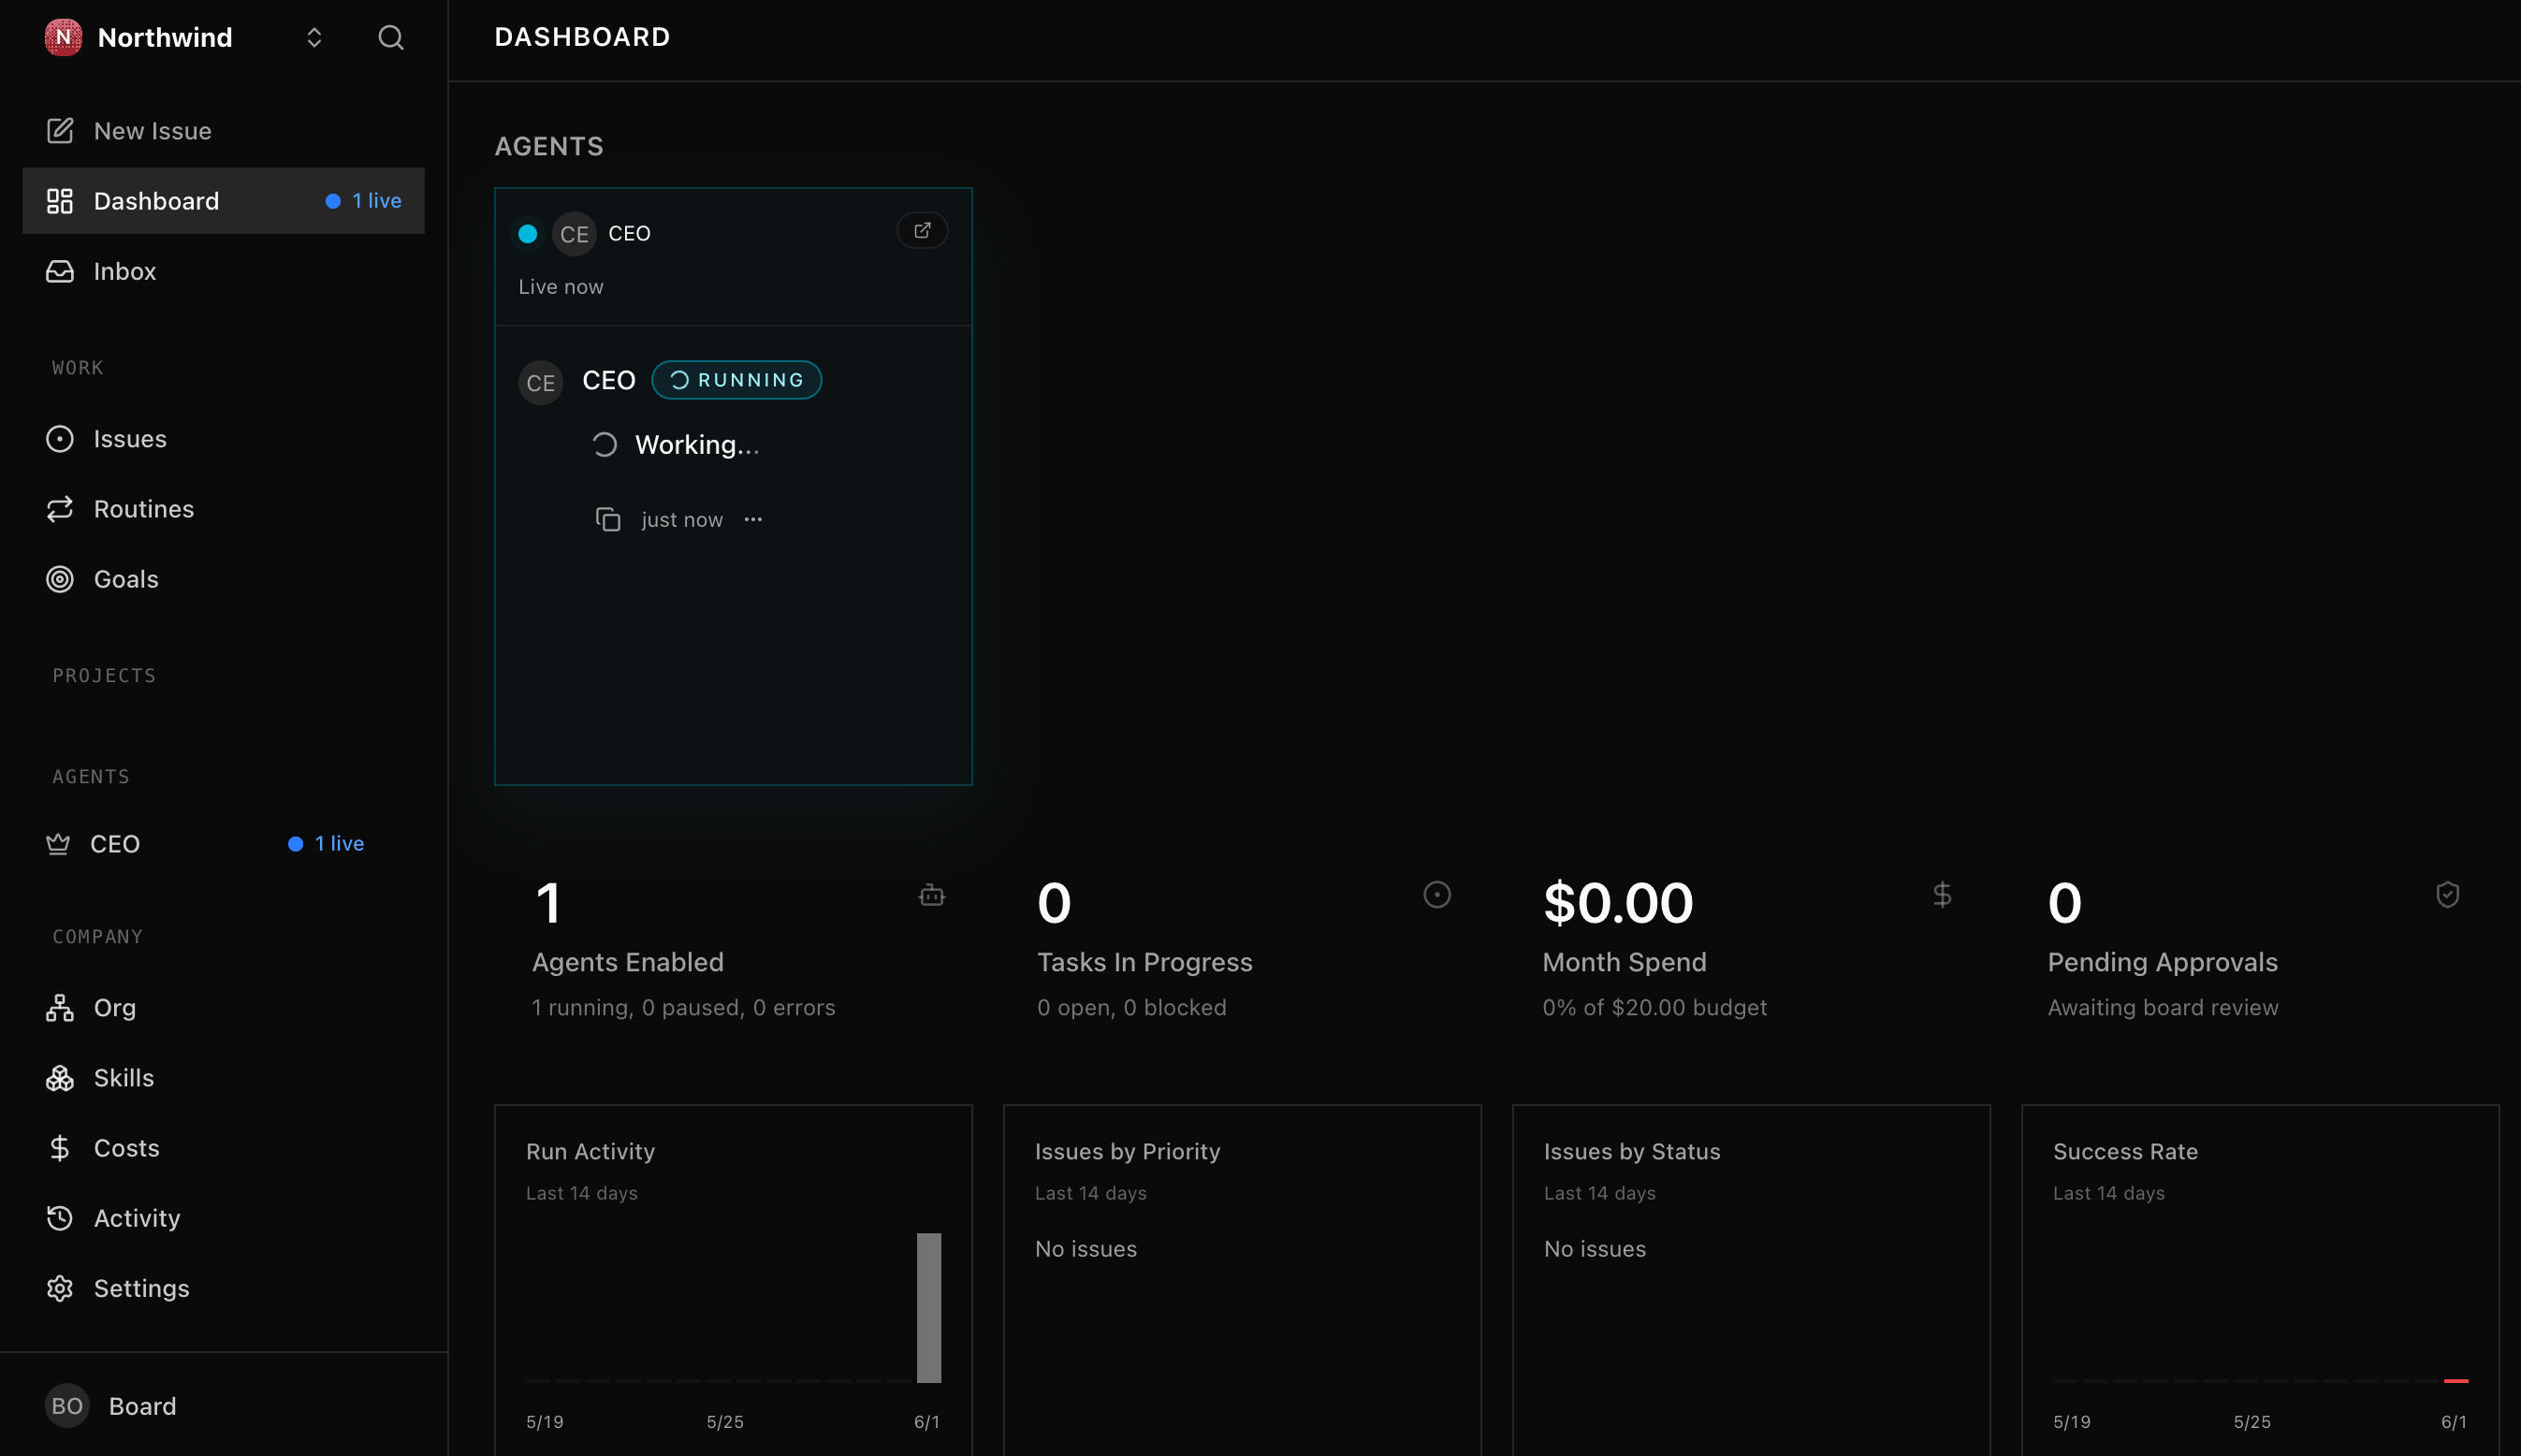
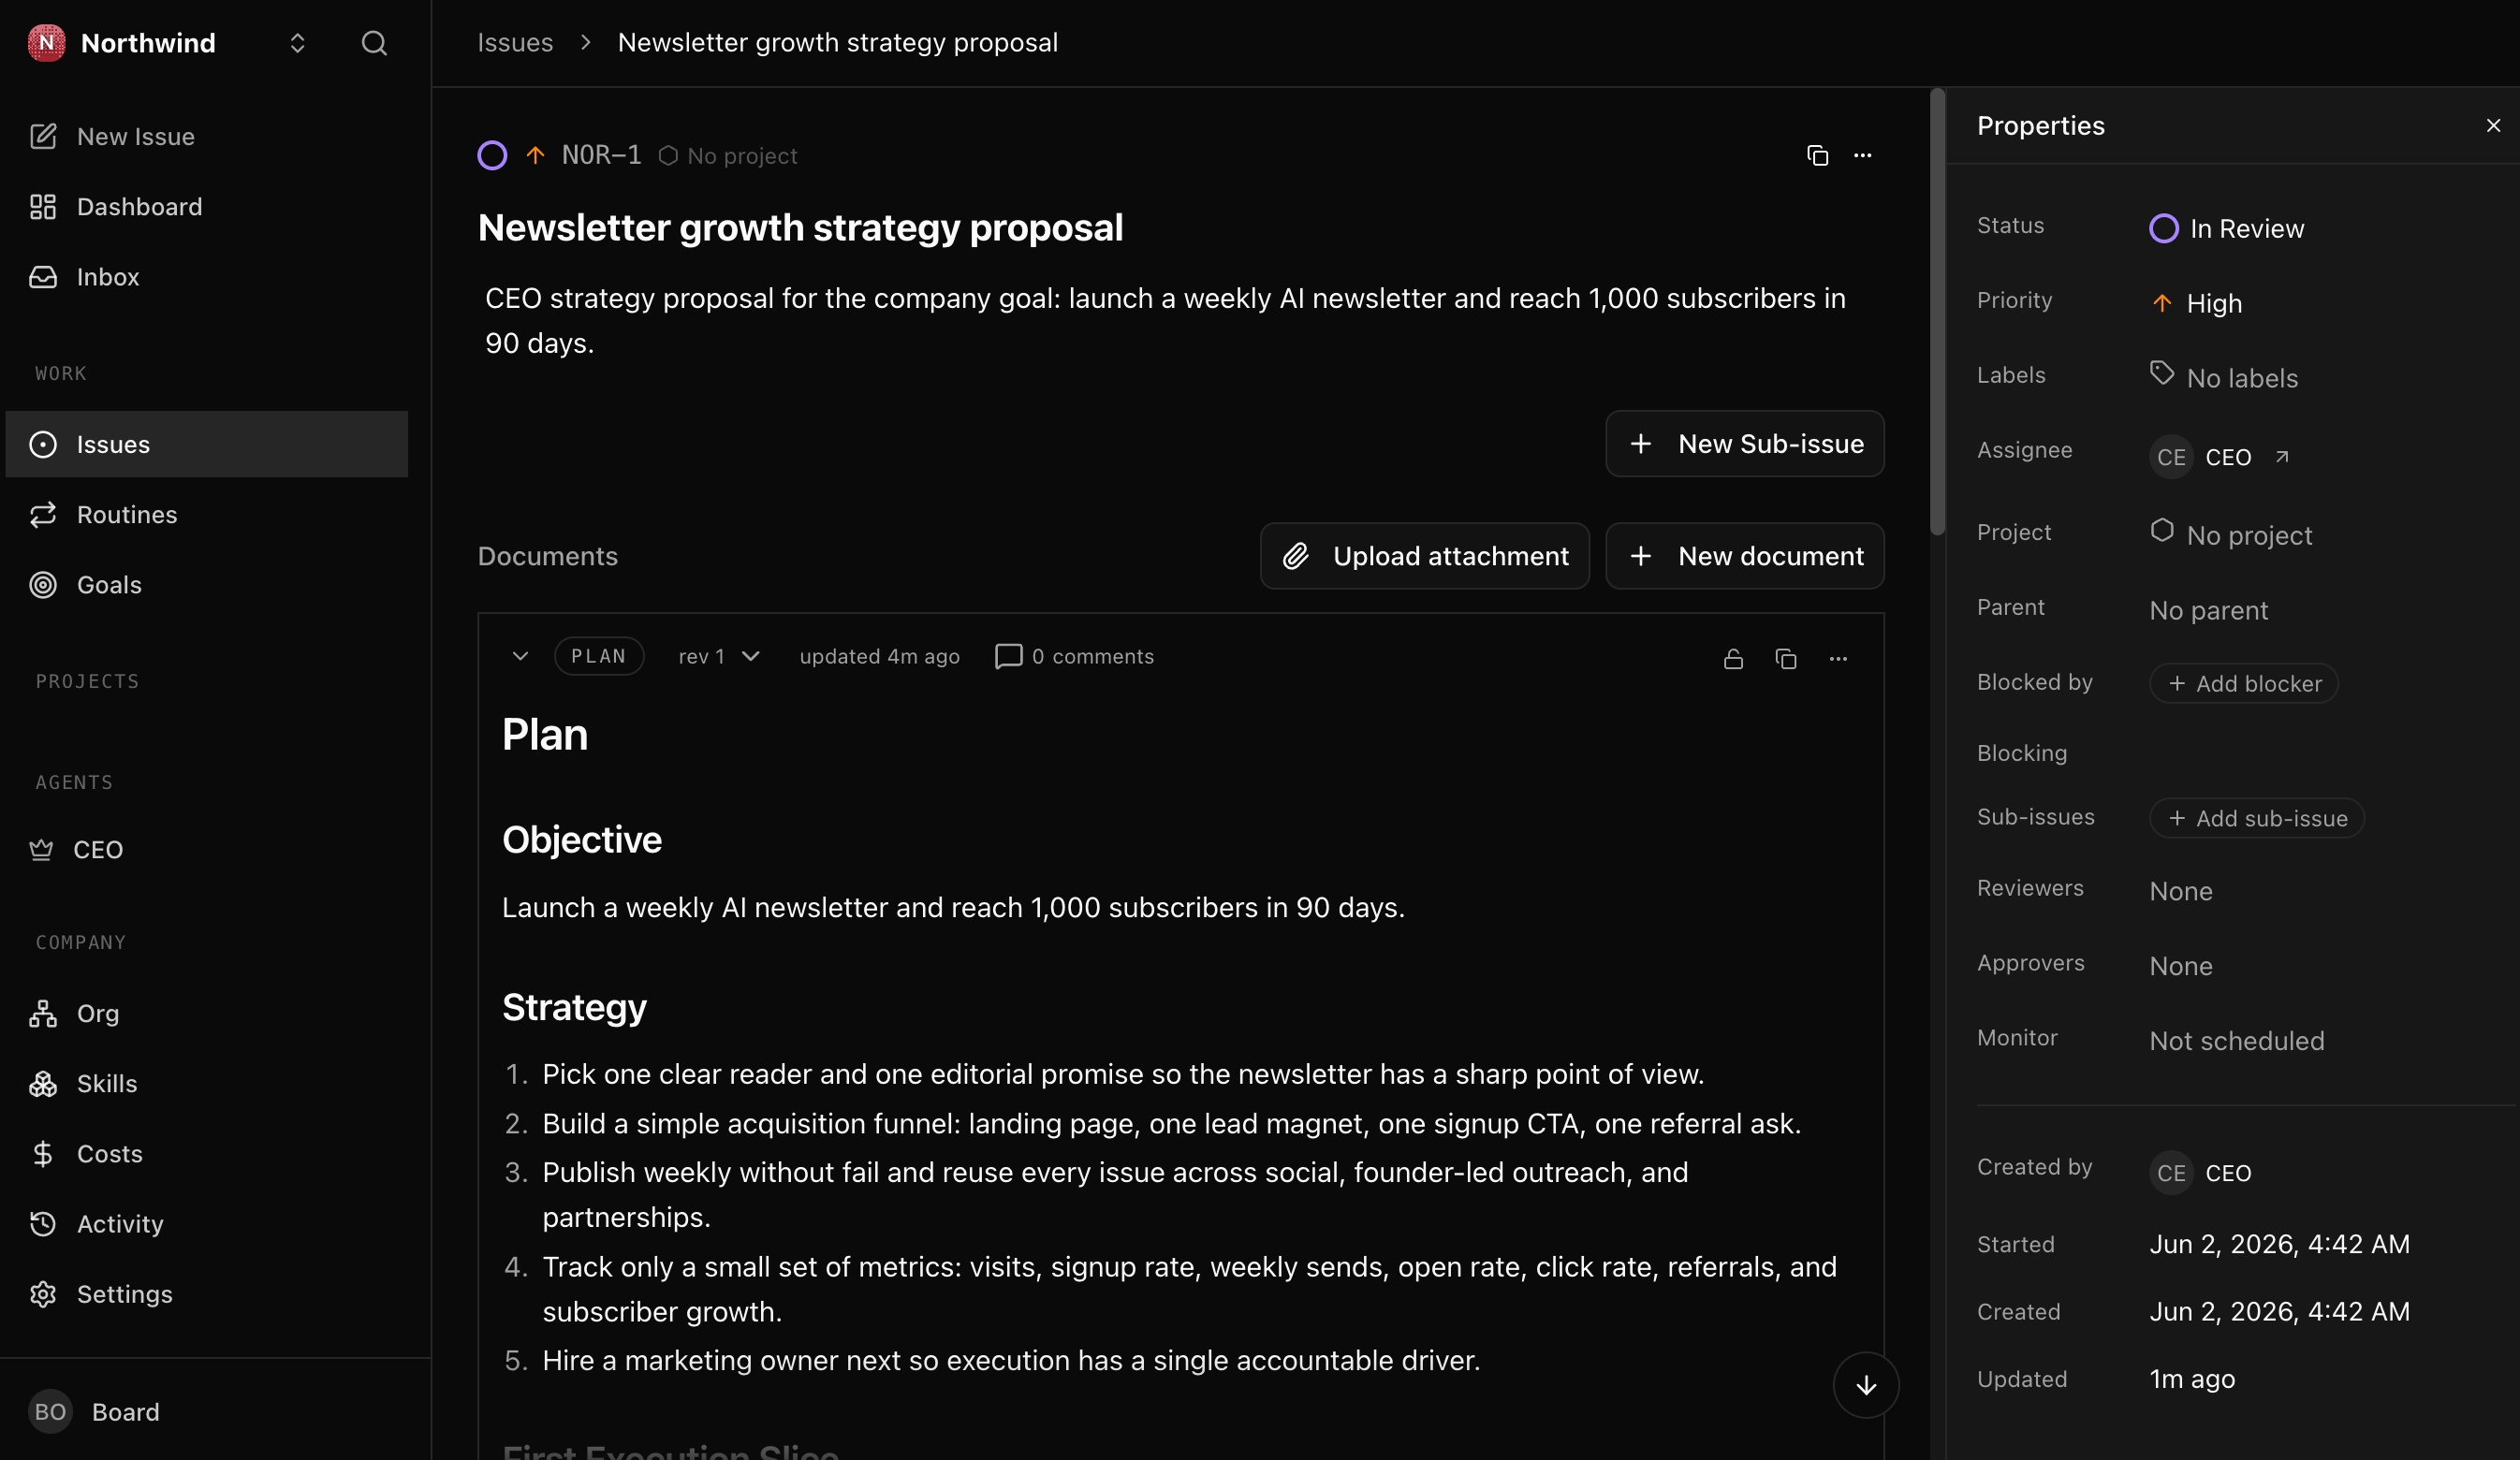
CEO जो exact plan लिखता है वह उसका अपना है; आप जो check कर रहे हैं वह यह है कि उसने एक propose किया और फिर रुक गया, आपका इंतज़ार करता हुआ। यह रही strategy जो आपके review lane में बैठी है, एक task जिसके साथ एक plan attached है:
(आप एक पल बाद अपने आप fire होती एक दूसरी run भी देख सकते हैं। वह एक automatic wake है जिसे कुछ नया करने को नहीं मिलता और वह exit हो जाती है, कोई duplicate नहीं; सिर्फ़ जो heartbeat आपने fire किया उसी ने काम किया।)
दूसरा prompt: इसे decide करें।
मैंने strategy पढ़ ली। मैं इसे जैसा है वैसा ही sign off कर दूँगा (या आपको वह एक बदलाव बता दूँगा जो मुझे चाहिए, और आप CEO से उसे revise करने को कहेंगे)। इसे done तक आगे move करें, मुझे वह activity-log row दिखाएँ जो साबित करती है कि मैंने, board ने, इसे decide किया, और मुझे बताएँ कि CEO अब आगे क्या करने के लिए cleared है।
तब पूरा जब: strategy item in_review से done में move हो गया, उस बदलाव पर activity-log row actor_type = user (आप, decider) दिखाती है, और आप बता सकते हैं कि जब तक आपने sign off नहीं किया तब तक कुछ आगे क्यों नहीं बढ़ सका।
Scenario 4: CEO board बनाता है और अपना पहला teammate hire करता है (~20 min)
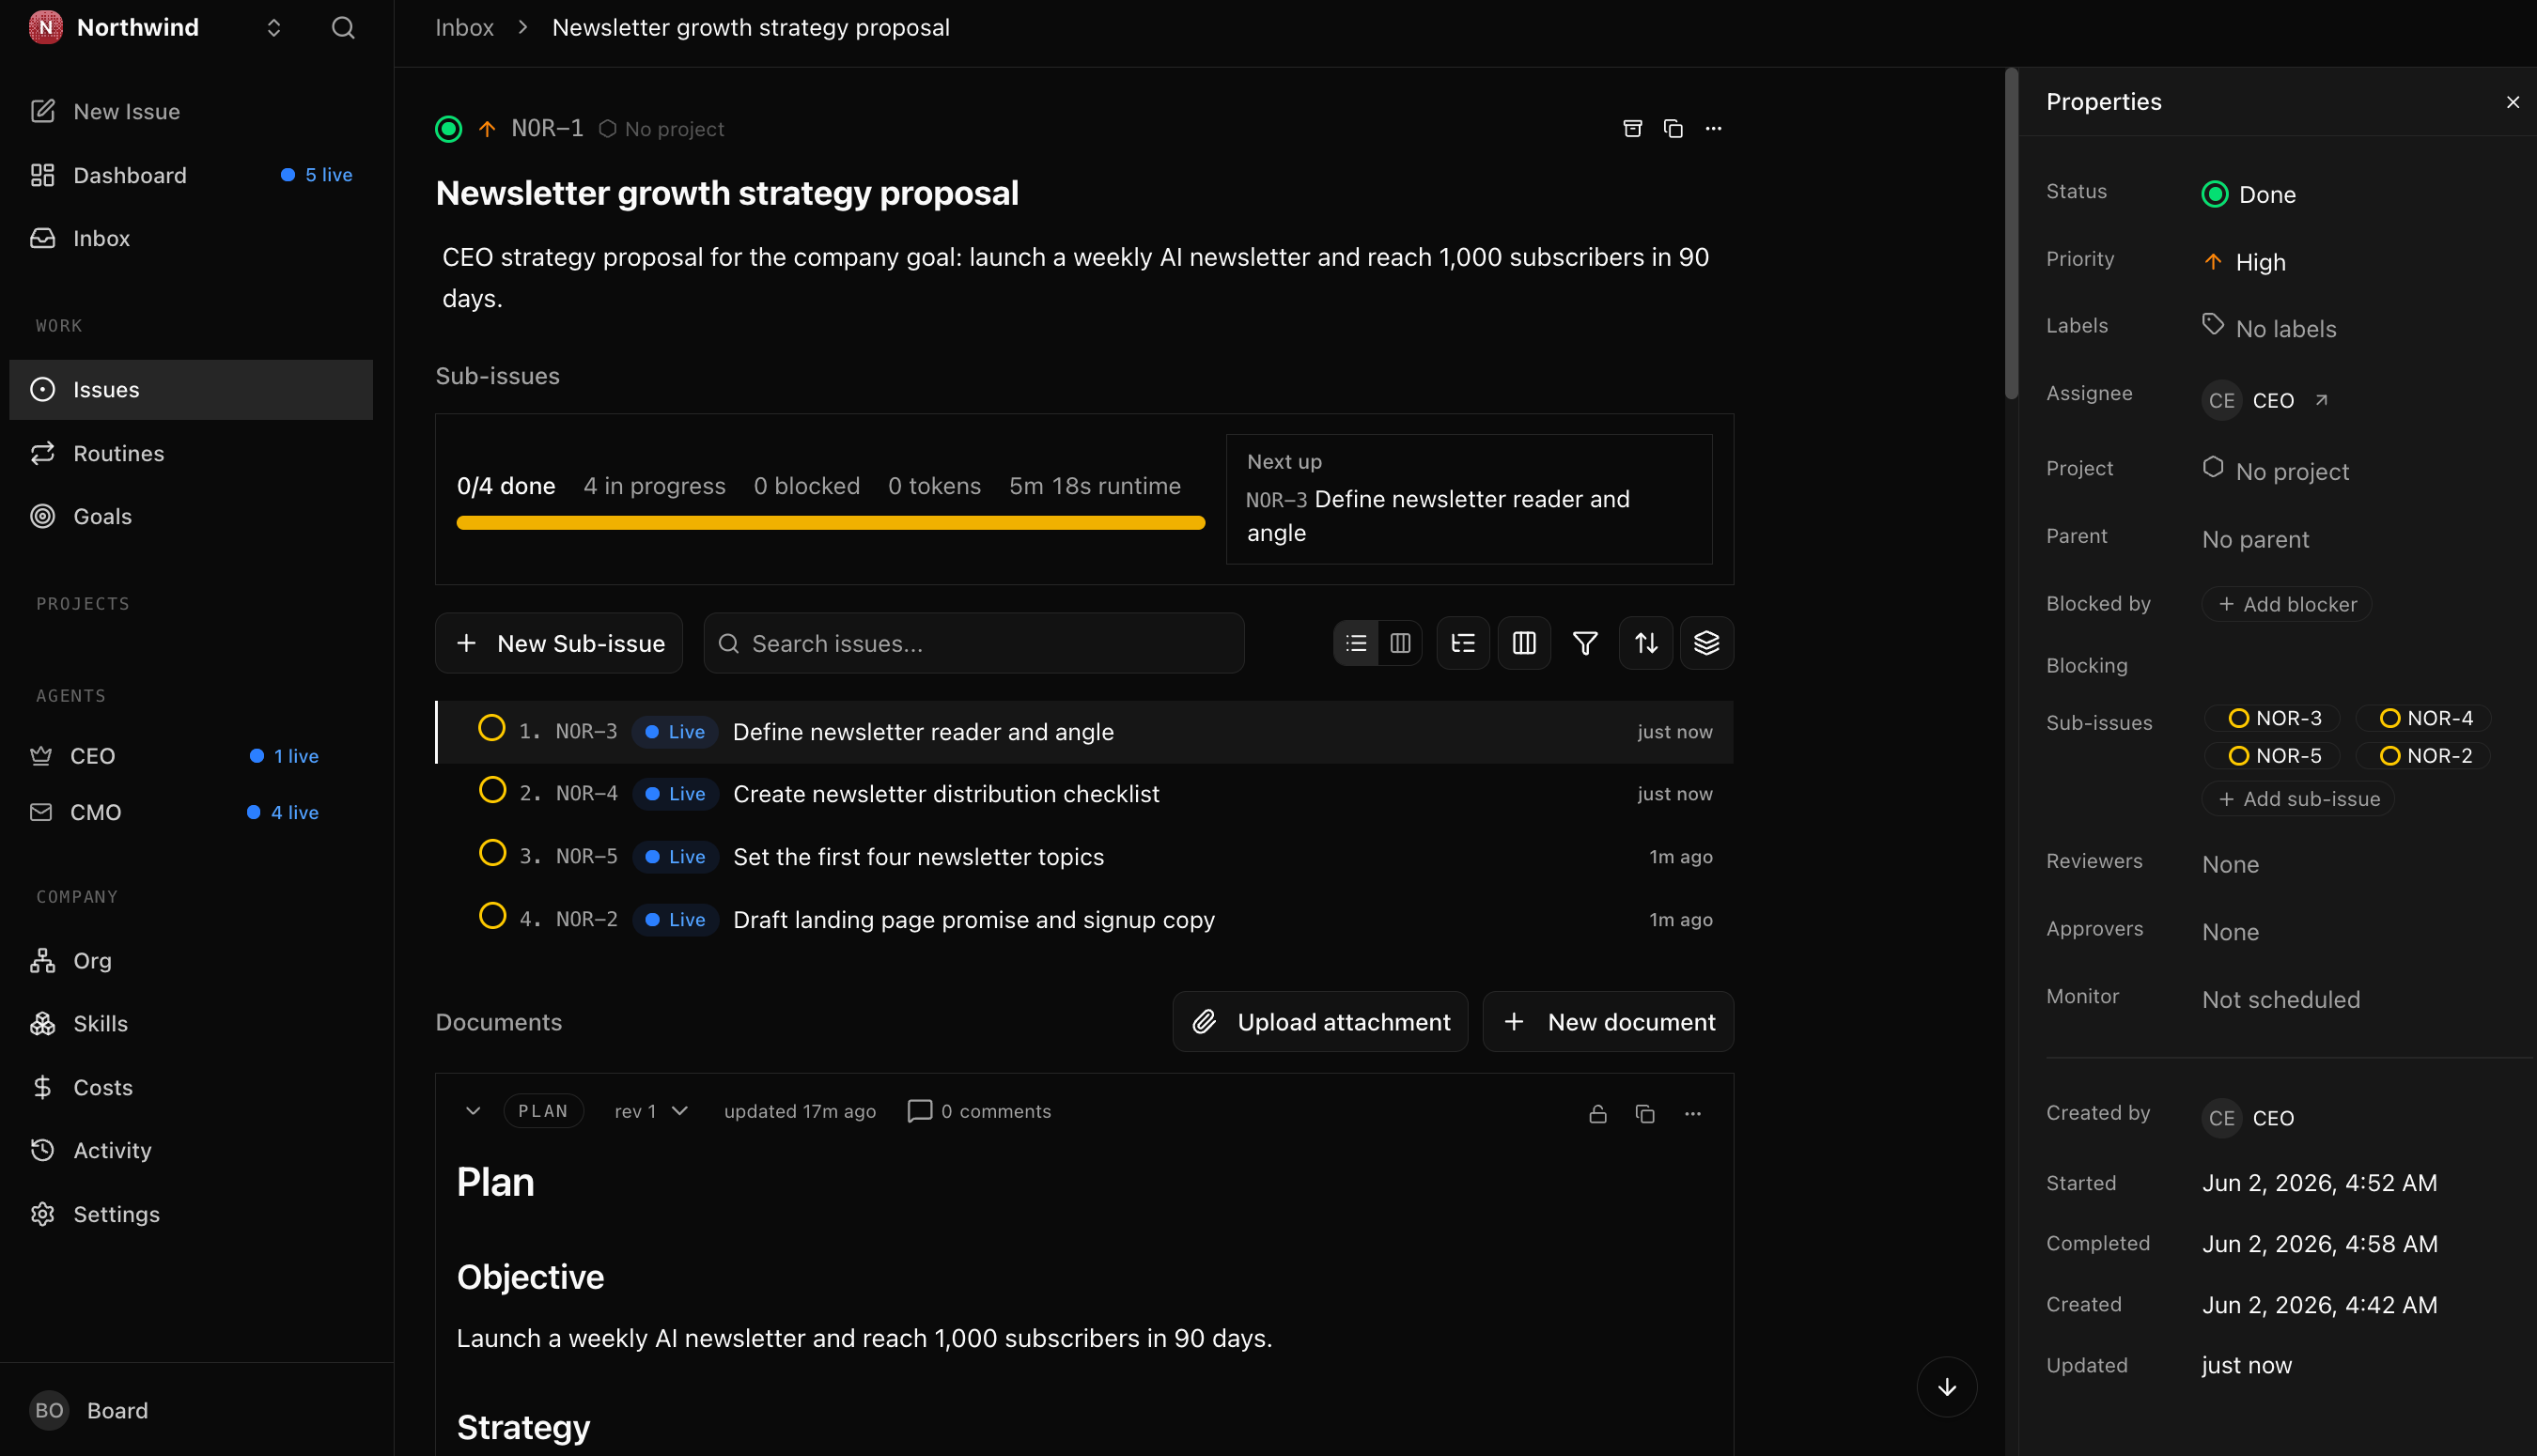
एक task काम की एक unit है, एक Jira या Linear ticket की तरह, सिवाय इसके कि assignee एक agent है। एक approved strategy के साथ, CEO goal को tasks में बाँटता है, फिर उन्हें assign और delegate करता है (पहले heartbeats पर ख़ुद को, और specialists को जैसे-जैसे उन्हें hire करता है), हर एक को एक lifecycle से होकर move करते हुए:
यहीं company एक workforce बन जाती है, अकेला CEO नहीं। CEO lead करता है: वह strategy को काम में बदलता है और, चूँकि goal एक agent से बड़ा है, वह काम नीचे सौंपने के लिए (आपके sign-off के साथ) एक specialist hire करता है। आप एक ऐसे hire को, जिसे आपने approve किया, वह task करते देखेंगे जो CEO ने उसे दिया।
पहला prompt: CEO को act करने दें।
CEO को approved strategy पर act करने दें। कुछ heartbeats fire करें और मुझे दिखाएँ कि वह क्या करता है। वह ख़ुद एक-दो task खोल सकता है, लेकिन goal एक agent से बड़ा है, इसलिए वह तय करेगा कि उसे एक specialist चाहिए और एक hire request file करेगा (role, एक budget, वह काम जिसका वह मालिक होगा)। वह request मुझे दिखाएँ ताकि मैं उसे decide कर सकूँ।
Hire आपके inbox में एक approval के रूप में आती है, उसी तरह का sign-off जो आपने strategy को दिया था, और जब तक आप हाँ नहीं कहते company में कुछ नहीं जुड़ता। हैरान न हों अगर CEO पहले hire करे और बाक़ी board को आपके decide करने तक रोके रखे: एक तेज़ CEO marketing tasks तब तक नहीं बनाएगा जब तक उनका मालिक एक marketer न हो। आप एक-दो task देख सकते हैं जो उसने ख़ुद के लिए खोले, या एक ख़ाली board जिस पर सिर्फ़ hire request इंतज़ार कर रही हो; दोनों में से कोई भी normal है, और आपका decision ही वह है जो काम को unblock करता है।
Heartbeats एक schedule पर भी fire होते हैं, सिर्फ़ तब नहीं जब आप कहें, इसलिए एक busy CEO वही hire दो बार file कर सकता है या कुछ extra tasks खोल सकता है। अगर आप एक duplicate hire request देखें, तो बस extra वाली reject कर दें; वह gate का अपना काम करना है। एक बार जब आपका specialist approved हो जाए और काम delegate हो जाए, तो अपने agent से कहें कि CEO का heartbeat pause कर दे ताकि वह बिना देखरेख के काम करना बंद कर दे। इसे pause करना एक board move है: autonomy वह चीज़ है जो आप grant करते हैं, और आप उसे वापस ले सकते हैं।
दूसरा prompt: hire approve करें और team को संभालते देखें।
मैं इस hire को approve करता हूँ। specialist को CEO को report करते हुए board पर लाएँ, फिर एक CEO heartbeat fire करें ताकि वह approved strategy को tasks में बाँटे और उन्हें नए teammate को सौंपे। मुझे board दिखाएँ: sub-tasks, उनका मालिक कौन है, और कि काम teammate ने किया, CEO ने नहीं।
एक बार hire approved हो जाने पर, बाक़ी CEO ख़ुद कर देता है: अपने अगले heartbeat पर वह approved strategy को sub-tasks में बाँटता है और नए teammate को assign करता है, जो assignment पर जागता है और उन्हें करता है। यही payoff है: काम team करती है, CEO नहीं। यह तेज़ चल सकता है: एक ही cascade में CEO tasks file करता है और teammate उन्हें कुछ ही minutes में ख़त्म कर देता है, इसलिए आप board खोलें तो काम पहले से हुआ मिल सकता है। वह पूरा हुआ board, हर task teammate द्वारा signed, वही है: workforce अपना काम करती हुई जब आप दूर थे।
Optional, एक task को live चलते देखें। चूँकि cascade आपके देखने से पहले ख़त्म हो सकता है, एक report को step by step काम करते देखने का तरीक़ा यह है कि उसे अलग से एक task दें: अपने agent से कहें कि एक fresh task बनाए, उसे teammate को assign करे, और उस teammate का heartbeat fire करे। आप उसे ख़ुद-ब-ख़ुद todo से in_progress से done तक move होते देखेंगे। यह teammate को एक specific piece सौंपने का भी तरीक़ा है, बजाय इसके कि CEO पूरा breakdown तय करे, या CEO के एक-दो heartbeat के बाद भी delegate न करने पर चीज़ों को आगे धकेलने का।
तब पूरा जब: आपकी company में कम से कम दो agents हैं (CEO, और एक specialist जो उसे report करता है), एक task जो CEO ने delegate किया वह उस specialist ने पूरा किया (उसका comment thread असली काम दिखाता है, teammate द्वारा signed, CEO द्वारा नहीं), और आप उस task को company goal तक वापस trace कर सकते हैं। यह एक workforce है: आप decide करते हैं, CEO lead करता है, team काम करती है।
Scenario 5: Budget, आपका safety rail (~5 min)
हर agent एक spending cap रखता है, और आपने scenario 1 में एक बीस-dollar company cap रखा था। नियम सरल है: एक cap के 80% पर Paperclip आपको warn करता है, और 100% पर वह agent को pause कर देता है, ताकि एक bug या एक runaway loop कभी भी सिर्फ़ एक bounded amount ही cost कर सके। यही वह है जो एक company को चलता हुआ छोड़ देना safe बनाता है।
सच्ची बात: एक budget सिर्फ़ वही spend count कर सकता है जो per token bill होता है, और आपका keyless local runtime कुछ bill नहीं करता। Paperclip हर token को $0 पर record करता है, इसलिए cap armed तो है पर उसके against धकेलने को कुछ नहीं है; team चाहे जितनी मेहनत करे, spend zero पर ही flat रहता है। (हर heartbeat एक reference figure print करता है जैसे cost=$0.71, यानी एक metered key पर इसकी जो cost होती; आपका budget जो billed number count करता है वह $0 है।) Rail आज नहीं काटता क्योंकि काटने को कुछ है ही नहीं। यह उस दिन काटता है जिस दिन आप एक agent को एक paid, per-token model की तरफ point करते हैं, जो ठीक वही है जब आप चाहते हैं कि वह काटे।
CEO पर एक one-dollar cap रखें, फिर मुझे वह spend दिखाएँ जो Paperclip ने सचमुच database में record किया। मुझे साफ़-साफ़ बताएँ कि इसकी क्या cost हुई और क्यों।
तब पूरा जब: cap set है, आप नियम बता सकते हैं (80% warn, 100% pause), और आपने वह सच्चा $0 ख़ुद देख लिया। Safety rail अब armed है, इससे पहले कि आपको कभी इसकी ज़रूरत पड़े।
अगर आप कभी एक pay-per-token API key wire करें, तो उसे अपने shell में export करें; इसे कभी project की किसी file में paste न करें, और कभी अपने agent को इसे किसी में लिखने न दें। अगर कोई key कहीं ऐसी जगह पहुँच जाए जहाँ उसे नहीं होना चाहिए, तो उसे rotate करें।
Scenario 6: एक CFO की तरह audit trail query करें (~10 min)
एक company के लिए एक operating system का मतलब यह है कि उसके बाहर का कोई (एक CFO, legal, compliance) सिर्फ़ database से, seconds में, reconstruct कर सके कि क्या हुआ। Paperclip उस history को एक embedded Postgres database में रखता है: activity_log में हर action का एक row होता है (company created, agent hired, strategy approved, task created), और cost_events dollar story रखती है।
यह अपने agent को paste करें:
CFO बनने का समय। Paperclip के database से connect करें और Northwind के लिए दो queries run करें: पहली, "क्या हुआ, क्रम में", हर action अपने actor और जो उसने touch किया उसके साथ, सबसे पुराना पहले; फिर अब तक की कुल cost dollars में। मुझे SQL और results दिखाएँ। आख़िर में, वह activity-log row निकालें जहाँ मैंने, board ने, strategy को done तक आगे move किया, और उन fields की ओर इशारा करें जिन्हें एक auditor यह confirm करने के लिए use करेगा कि decider मैं था।
Agent आपके install की config से Postgres connection string assemble करता है, history query run करता है (पूरी spine: company created, CEO hired, strategy आपके द्वारा done तक move की गई, आपकी approval के साथ एक specialist hired, tasks created, delegated, और team द्वारा done तक worked) और cost query, फिर आपको strategy decision row दिखाता है: actor_type = user, board को identify करने वाला actor_id (local mode में वह constant local-board है), और timestamp। वही actor_type column teammate के काम (agent) को आपके decisions (user) से अलग बताता है।
तब पूरा जब: history query आपकी पूरी run की ordered story लौटाती है, cost query एक असली number लौटाती है, और आप वह column नाम बता सकते हैं (actor_type) जो एक इंसानी decision को एक agent action से अलग बताता है।
Scenario 7: अपनी company को एक असली desk दें, ताकि वह असली files बनाए (~10 min)
पीछे देखें कि आपकी team ने क्या produce किया: landing-page copy, reader definition, topics की list। यह सब board पर comments के रूप में रहता है। Company ने अपना काम describe किया, पर अभी ऐसा कुछ नहीं बनाया जिसे आप पकड़ सकें। ग़ायब टुकड़ा एक workspace है: एक असली folder (या git repo) जिसकी तरफ आप company को point करते हैं, ताकि जब एक agent एक task करे तो वह वहाँ असली files लिखे, और वे run के बाद बची रहें। यह उस employee, जो आपको plan बताता है, और उस employee, जो आपको file सौंपता है, के बीच का फ़र्क़ है।
यह Paperclip का इकलौता हिस्सा है जिसकी exact wiring versions के बीच बदलती रहती है, इसलिए नीचे के prompts आपके agent से कहते हैं कि कुछ भी छूने से पहले current steps को live docs से confirm कर ले।
पहला prompt: एक folder connect करें।
मेरी company को काम करने की एक असली जगह दें। Northwind site के लिए एक fresh folder बनाएँ, एक Paperclip project को उसकी तरफ उसके workspace के रूप में point करें, और मुझे बताएँ कि वह disk पर कहाँ है। अगर एक workspace connect करने का तरीक़ा बदल गया है, तो पहले Paperclip के live docs check करें, फिर कुछ भी wire करने से पहले मुझे अपना plan दिखाएँ।
दूसरा prompt: team से एक असली artifact बनवाएँ।
अब CMO को उस project में एक task सौंपें: जो landing-page copy उसने पहले ही लिखी (hero "AI you can use this week", subheadline, और call to action) उसे एक असली
landing-page.htmlमें बदलें। CMO का heartbeat fire करें, उसे काम करने दें, फिर मुझे disk पर वह file दिखाएँ और उसे खोलें, ताकि मैं देख सकूँ कि company ने कुछ असली बनाया, एक और comment नहीं।
तब पूरा जब: आपके folder में एक असली file है (एक landing-page.html, या जो भी आपने माँगा), CMO द्वारा लिखी हुई, जिसे आप एक browser में खोल सकते हैं। आपकी company ने काम describe करना बंद किया और उसे produce किया। यही एक demo और एक company के बीच की लकीर है।
महीने में एक बार: उस company को operate करें जो अब आप चलाते हैं (~10 min)
एक company चलाना एक चलती हुई ज़िम्मेदारी है, एक बार का setup नहीं, और ठीक इसीलिए इसे एक recurring review चाहिए। समय के साथ यह जमा होता है: हर hire, budget change, और setting एक छोटा decision था, और छोटे decisions drift करते हैं। बचाव हर step पर सतर्कता नहीं है; यह एक fixed cadence पर एक छोटी review है। यह वह move है जो आप महीने में एक बार करते हैं, और जो run आप अभी करते हैं वही baseline है जिसके against अगला diff करता है। आप इसे हाथ से कर सकते हैं, या, चूँकि recurring काम ठीक वही है जिसके लिए Paperclip routines हैं, इसे एक routine के रूप में schedule करें जो एक cron पर fire होती है ताकि company ख़ुद को audit करे; Dynamic Workforce course routines बनाता है।
मेरा Paperclip monthly company audit run करें। पिछले audit के बाद से hired, configured, scheduled, approved, या paused हुई हर चीज़ को देखें। किसी भी ऐसी चीज़ को flag करें जिस पर मैंने explicitly sign off नहीं किया, किसी भी ऐसे agent को जिसने productive काम नहीं किया, किसी भी ऐसे budget को जो drift कर गया, और किसी भी ऐसी setting को जो होनी चाहिए उससे ज़्यादा loose है। इसे एक ही छोटी report में summarize करें जिसे मैं approve या trim कर सकूँ, और इसे अगले महीने के लिए baseline के रूप में save करें।
एक अच्छी audit एक clean ledger और कसने के लिए loose knobs की एक छोटी list के साथ वापस आती है। आम संदिग्ध: एक hire जो अपने budget cap के बिना अंदर आ गई (वह चुपचाप पूरी company ceiling inherit कर लेती है), एक agent जो एक साथ बहुत सारी चीज़ें run करने के लिए set है, एक config file जो अब live state से match नहीं करती, या एक task जो review में रुकी है, एक ऐसे decision का इंतज़ार करती जो सिर्फ़ आप ले सकते हैं। इनमें से कोई failure नहीं है, ये वह सामान्य drift हैं जो ख़ुद चलती हुई एक company चुपचाप पैदा करती है, और उन्हें एक cadence पर पकड़ना ही ठीक वह तरीक़ा है जिससे आप एक ऐसी चीज़ के board बने रहते हैं जो आपके बिना चलती है।
तब पूरा जब: आपके पास एक report है जिस पर आप भरोसा करते हैं, आप कम से कम एक loose knob बता सकते हैं जो उसने surface किया, और आपने कम से कम एक decision लिया (एक missing cap set करना, एक runaway concurrency कम करना, एक stale config refresh करना, एक idle agent retire करना, या एक रुकी हुई task close करना)। अपना calendar mark करें; अगले महीने का audit इसी के against diff करता है।
आप पूरा कर चुके: आपने क्या बनाया
आपने सिर्फ़ एक tool install नहीं किया, और आपने सिर्फ़ एक demo नहीं चलाया। एक घंटे से कम में आपने अपने laptop पर एक असली company खड़ी की और उसे ऐसे operate किया जैसे एक founder एक board operate करता है: आपने एक goal तय किया, एक CEO hire किया, उसकी strategy approve की, उसे जो specialist चाहिए था उस पर sign off किया, team को delegated काम करते देखा, उसे एक desk दी ताकि उसका काम disk पर एक असली file बन जाए, फिर पूरी run को ledger से audit किया। आपने जो हर move की, hire, approve, budget, delegate, audit, वह एक governance move थी, एक prompt नहीं।
और company अब भी वहीं है। आपने इसे ख़त्म नहीं किया; आपने इसे एक clean baseline पर pause किया। Laptop बंद करें और यह बनी रहती है, agents, org chart, काम, audit trail, सब आपके अगले decision का इंतज़ार करते हुए। यह एक जीती-जागती चीज़ है जो अब आप चलाते हैं।
वह newsletter तो rehearsal थी। असली move यह है कि उसी pattern को अपने goal की तरफ point करें: एक ऐसी company खड़ी करें जिसका goal आपका असली business हो, CEO को propose करने दें कि उसे कैसे आगे बढ़ाया जाए, उसे जो specialists चाहिए वे hire करें, और उसे उन budgets और approvals के under चलने दें जो आपको board बनाए रखते हैं। यही है वह तरीक़ा जिससे आप क़रीब किसी भी चीज़ के आसपास एक AI-native company found करते हैं, और आप एक बार पहले ही यह कर चुके हैं।
आप यहाँ से दो चीज़ें ले जाते हैं। टिकाऊ artifact AGENTS.md है, वह brief जिसे आपका general agent हर session पढ़ता है, अगले tool तक portable जिसके सामने आप एक agent रखें। टिकाऊ skill stance है: autonomy वह चीज़ है जो आप grant करते हैं, default नहीं, इसलिए आप tight budgets, hires और strategy पर ज़रूरी sign-off, और एक cadence पर review के ज़रिए board बने रहते हैं, तब भी जब company ख़ुद चलती है।
आगे कहाँ जाएँ:
| आप चाहते हैं... | यहाँ जाएँ |
|---|---|
| एक fleet manage करने से पहले एक single agent को एक durable workflow engine में wrap करें | Digital FTE से Production Worker तक: Inngest durability envelope |
| Hiring को एक callable capability में बदलें (agents जो policy के under दूसरे agents hire करते हैं) | Fixed से Dynamic Workforce तक: इस course का successor |
| Paperclip के REST API को किसी दूसरे agent के अंदर से tools के रूप में use करें | current MCP server package के लिए docs.paperclip.ing check करें; version pin करें |
| Paperclip को एक cloud या shared host पर deploy करें | docs.paperclip.ing पर live docs; उस पर भरोसा करने से पहले verify करें कि क्या ship हुआ है |
| OpenClaw को इंसानों और आपकी company के बीच edge layer के रूप में wire करें | OpenClaw crash course |
| अपने agents को काम करने के लिए एक असली codebase दें | docs.paperclip.ing पर Execution Workspaces guide: एक project connect करें ताकि agents असली code draft, edit और run करें |
| जो FTE आपने बनाया (OpenAI Agents SDK, या कोई custom runtime) उसे एक employee के रूप में hire करें | अपना ख़ुद का agent लाएँ: इसे http adapter पर hire करें; Paperclip आपके agent को काम POST करता है, वह task close करने के लिए वापस call करता है |
| Recurring काम को एक schedule पर रखें (एक daily standup, एक weekly report) | Paperclip routines (cron या webhook triggers); Dynamic Workforce course उन्हें बनाता है |
| पूरी company अपने साथ ले जाएँ | इसे एक portable markdown package में export करें, एक COMPANY.md साथ में हर role के लिए एक AGENT.md, वही brief pattern जो आपने अभी सीखा, फिर इसे re-import या version-control करें |
Flashcards Study Aid
Knowledge Check
आपने अभी जिन ideas से होकर गुज़रे उन पर एक quick gated self-check।