Skills & Connectors: AI को एक बार सिखाएँ, इसे अपने apps से जोड़ें
2 features, 5 tools, आपकी ओर से 0 code - अपने chat box को एक coworker में बदल दें।
ज़्यादातर लोग AI का इस्तेमाल वैसे ही करते हैं जैसे एक vending machine का करते हैं। वे आते हैं, एक request type करते हैं, जो निकलता है उसे ले लेते हैं, और चले जाते हैं। अगले दिन वे फिर आते हैं और पूरी request दोबारा type करते हैं: वही instructions, वही context, वही "नहीं, हमारे invoices ऐसे दिखते हैं," वही explanation कि वे कौन हैं और उनकी team कैसे काम करती है। machine को इनमें से कुछ भी याद नहीं रहता। हर बार शुरुआत शून्य से होती है।
काम करने का एक अलग तरीका है, और 2026 में यह अब सिर्फ़ programmers के लिए नहीं रहा। आप AI को एक काम एक बार सिखा सकते हैं और वह उस काम को हर बार आपके तरीके से कर देगा, बिना दोबारा समझाए। यह एक Skill है। और आप AI को उन apps तक सुरक्षित access दे सकते हैं जहाँ आपका असली काम रहता है: आपकी files, आपका email, आपकी spreadsheets, आपका project tracker। इस access के साथ यह आपसे copy-paste माँगना बंद कर देता है और खुद चीज़ें उठाने लगता है। यह एक Connector है।
यह page वही दोपहर है जहाँ ये दो ideas समझ में आते हैं। कोई programming background नहीं माना गया है। अगर आप एक accountant, doctor, marketer, engineer, teacher या student हैं, तो यहाँ हर example आपके लिए बना है। अंत तक आप जान जाएँगे कि Skills और Connectors क्या हैं, कब किसकी ज़रूरत है, जो पहले से मौजूद हैं उन्हें कैसे इस्तेमाल करें, अपना खुद का कैसे बनाएँ (AI इसे आपके लिए बना देता है), और यह सब सुरक्षित तरीके से कैसे करें - पाँच अलग-अलग tools में।
यह एक Foundations crash course है; यह What AI Actually Is से बना mental model मानकर चलता है, जो पहला Foundations course है। यह स्वाभाविक रूप से दो और courses के साथ जुड़ता है:
- AI Prompting in 2026 आपको सिखाता है कि AI से अच्छी तरह बात कैसे करें: context, reasoning, चापलूसी से बचना। अगर "context window" या "novice vs power user" आपके लिए नए शब्द हैं, तो पहले या इसके साथ-साथ वह primer पढ़ लें; दोनों एक-दूसरे को मज़बूत करते हैं।
- How to Think in the AI Era इसके बाद आता है, और इस सब के नीचे की गहरी skill सिखाता है: सबसे पहले सही सवाल पूछना।
यह course "यहाँ बताया गया है कि क्या संभव हो जाता है" वाला course है। बाकी दो "यहाँ बताया गया है कि इसे अच्छी तरह कैसे करें" वाले courses हैं।
यहाँ कुछ details उस वक़्त के हिसाब से हैं और बदलती रहेंगी: menu paths, free-plan limits (आज, free tier पर एक custom connector), और open-standard की timeline (December 2025 में publish हुई)। ideas (एक बार सिखाएँ, अपने apps जोड़ें, automatic invocation, अपना access scope करें) स्थिर हैं। जब कोई step screen पर दिखने वाली चीज़ से मेल न खाए, तो screen पर भरोसा करें और मौजूदा docs search करें।
📚 Teaching Aid
View Full Presentation — Skills & Connectors
हर चीज़ के नीचे एक ही idea
details से पहले, एक वाक्य अपने दिमाग़ में रखें, क्योंकि नीचे का हर section इसी का एक रूप है:
एक chat message AI को बताता है कि इस एक बार क्या करना है। एक Skill AI को सिखाता है कि कुछ हर बार कैसे करना है। एक Connector AI को हाथ देता है ताकि वह आपके असली apps और data तक पहुँच सके।
एक चलती हुई kitchen इसे ठोस बना देती है। एक professional kitchen की कल्पना करें।
- एक one-time chat message counter के उस पार चिल्लाया गया एक order है: "मुझे एक sandwich बनाकर दो।" यह एक बार बनता है और serve होते ही भुला दिया जाता है। आपको यह कैसा पसंद है, इसका कुछ भी कल तक नहीं बचता।
- Connectors खुद kitchen हैं: stove, चाकू, भरी हुई pantry, आपकी असली सामग्री से भरा fridge। इनके बिना एक रसोइया खाने का वर्णन तो कर सकता है पर बना नहीं सकता, क्योंकि उसके पास न tools हैं न पकाने के लिए कुछ।
- Skills recipe cards हैं: किसी ख़ास dish को आपके तरीके से बनाने के step-by-step instructions, जैसे आपका restaurant हमेशा बनाता है, ताकि वह हर बार एक जैसी बने, चाहे kitchen में आप हों या आपका नया कर्मचारी।
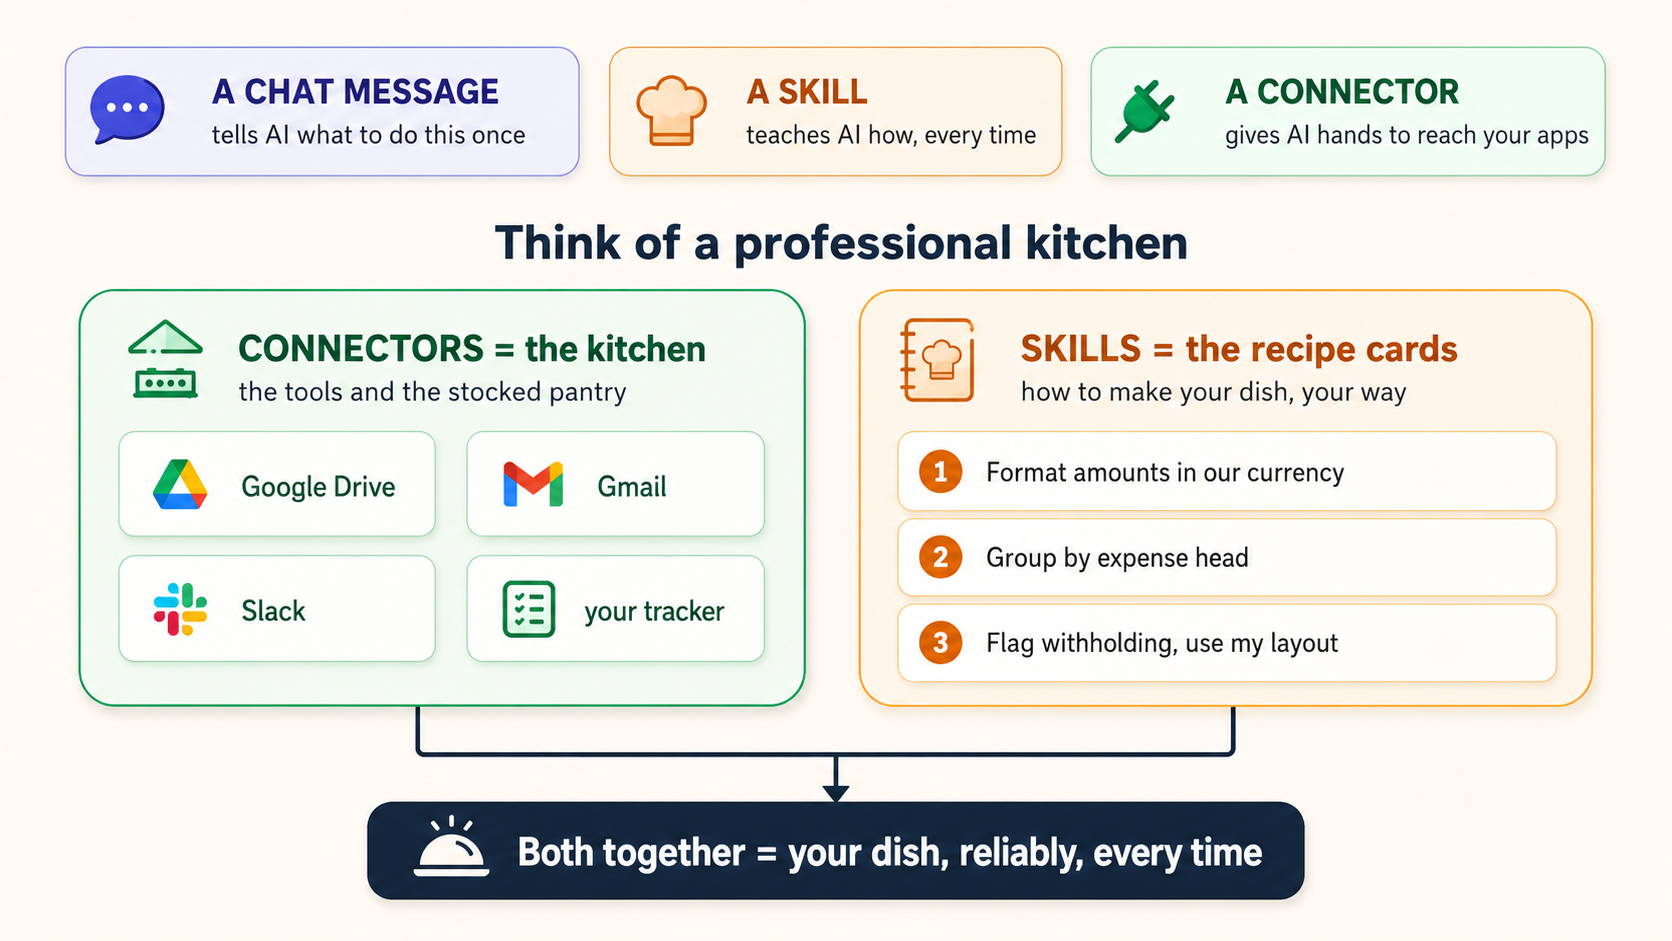
एक रसोइये को kitchen दे दें पर recipes नहीं, तो हर dish सुधारी हुई और बेमेल होगी। उसे recipes दे दें पर kitchen नहीं, तो वह पढ़ तो सकता है पर पका नहीं सकता। उसे दोनों दे दें, तो वह आपकी dish भरोसे के साथ बना देगा, बिना आपके सिर पर खड़े हुए। बस यही पूरा खेल है। इस page का बाक़ी हिस्सा सिर्फ़ यह सीखना है कि recipes और kitchen कहाँ रहती हैं, एक recipe कैसे लिखें, और किसी अजनबी को आपके card box में एक ख़राब recipe डालने से कैसे रोकें।
एक छोटी glossary ताकि बाद में कुछ भी आपको न उलझाए:
- Skill: instructions का एक saved set जो AI को सिखाता है कि एक काम आपके तरीके से कैसे करना है।
- Connector: एक सुरक्षित link जो AI को आपके किसी एक app (files, email, messages) तक पहुँचने देता है।
- Fire / trigger: जब AI किसी skill को अपने आप activate कर देता है क्योंकि आपकी request उससे मेल खाती है।
- Scope: आप कितना access देते हैं: एक अकेला folder, या सब कुछ। छोटा scope = ज़्यादा सुरक्षित।
- Read-only: AI देख सकता है पर बदल नहीं सकता। इसका उलटा है write access (यह edit या भेज सकता है)।
- Progressive disclosure: AI हर skill का सिर्फ़ एक छोटा summary loaded रखता है, और पूरे instructions सिर्फ़ ज़रूरत पड़ने पर खोलता है। इसी वजह से कई skills install किए जा सकते हैं बिना इसे धीमा किए।
Part 1: दो upgrades
1. chat box से operating layer तक
यहाँ वह रोज़ की रुकावट है जिसे Skills और Connectors हटा देते हैं। इन्हें "पहले" की तस्वीरों की तरह पढ़ें।
- एक accountant हर महीने एक client summary बनाने के लिए एक नया chat खोलता है। हर महीने वे वही instructions paste करते हैं: "amounts को हमारी reporting currency में thousands separators के साथ format करो, expense head के हिसाब से group करो, tax-withholding reporting threshold से ऊपर की किसी भी चीज़ को flag करो, और इसे उस template की तरह format करो जो मैं नीचे paste कर रहा हूँ।" AI इसे अच्छे से करता है, और chat ख़त्म होते ही यह सब भूल जाता है।
- एक doctor consultation notes dictate करता है और उन्हें हर बार SOAP format में चाहता है, allergies हमेशा सबसे ऊपर खींची हुई। वे रोज़ format दोबारा समझाते हैं।
- एक marketer चाहता है कि हर social caption brand की voice में हो: कोई exclamation mark नहीं, कोई "game-changer" नहीं, hook के तौर पर हमेशा एक सवाल। वे हर एक chat में brand rules paste करते हैं।
- एक engineer चाहता है कि design review notes severity के हिसाब से structured हों, हर finding पर एक तय checklist लगी हो। वही paste, हर review में।
इसका pattern देखिए: एक दोहराने लायक काम, जो आपके ख़ास तरीके से होता है, जहाँ सिर्फ़ input बदलता है। यह ठीक वही shape है जिसके लिए एक Skill बना है। आप "कैसे" को एक बार लिख देते हैं, और जब भी वह काम आता है AI उसे अपने आप लागू कर देता है।
अब दूसरी तरह की रुकावट:
- accountant के असली numbers एक Excel file में रहते हैं और पिछली quarter के आँकड़े एक email attachment में हैं। AI इन दोनों को तब तक नहीं देख सकता जब तक उन्हें हाथ से upload न किया जाए।
- doctor का patient history एक Google Drive folder में बैठा है।
- marketer का content calendar एक project tool में है; पुरानी posts एक Drive folder में हैं।
- engineer के open issues एक tracker में हैं, जैसे Jira या Linear।
AI इन सब पर शानदार ढंग से सोच सकता है, अगर जानकारी उस तक पहुँचे। copy-paste वह क़ीमत है जो आप AI के हाथ न होने के बदले चुकाते हैं। एक Connector यह क़ीमत हटा देता है: आपकी permission से, AI app में पहुँचता है, जो चाहिए वह खींचता है, और (जब आप अनुमति दें) नतीजे वापस लिख देता है।
दोनों को साथ रख दीजिए और chat box, chat box रहना बंद कर देता है। यह एक सक्षम सहकर्मी जैसा कुछ बन जाता है जो पहले से आपके standards (Skills) जानता है और आपकी files और tools (Connectors) तक पहुँच सकता है। यह बदलाव, "जिसमें मैं type करता हूँ" से "जो मेरे असली काम पर action लेता है" तक, वही है जिसे लोग AI को chatbot नहीं बल्कि एक operating layer कहते समय मतलब रखते हैं।
2. Skill असल में क्या है
जब आप रहस्य हटा देते हैं, तो एक Skill लगभग शर्मनाक हद तक सरल है: यह एक folder है जिसमें एक text file है।
ज़रूरी text file का नाम SKILL.md होता है (बिल्कुल यही, capital letters समेत)। इसमें ऊपर दो चीज़ें होती हैं, एक name और एक description, और उसके नीचे वे instructions जो आप चाहते हैं कि AI follow करे। बस इतना ही minimum है। एक skill सिर्फ़ एक name, एक description और plain-English instructions का एक paragraph हो सकता है, और वह काम करेगा।
ज़रूरत हो तो folder में और भी रखा जा सकता है: example files, एक template document, reference notes, यहाँ तक कि छोटे scripts। पर शुरू करने के लिए इनमें से कुछ भी ज़रूरी नहीं है। accountant का पहला skill formatting rules के पाँच वाक्य हो सकता है। marketer का उनका brand voice guide हो सकता है, बस paste किया हुआ। और वे optional scripts? वे असली code हैं, पर आप इसकी एक भी line नहीं लिखते; जब आप skill बनाते हैं तो AI उसके लिए ज़रूरी कोई भी code ख़ुद लिख देता है (Part 3)।
Anthropic का अपना description: skills "instructions, scripts और resources के folders हैं जिन्हें Claude dynamically load करता है ताकि specialized tasks पर performance बेहतर हो।" मुख्य शब्द है dynamically: AI हर skill को हर वक़्त अपने दिमाग़ में नहीं रखता। यह एक छोटी list रखता है कि हर skill किस लिए है (वही description है), और पूरे instructions सिर्फ़ तभी खोलता है जब आपकी request वाक़ई किसी एक से मेल खाती है। engineers इसे progressive disclosure कहते हैं, और इसी वजह से आपके पास दर्जनों skills install हो सकती हैं बिना किसी चीज़ को धीमा किए या AI को उलझाए। जब आप एक बनाएँगे तो हम इस पर लौटेंगे।
एक Skill एक recipe card है जिसे आप एक बार लिखते हैं और kitchen की दीवार पर pin कर देते हैं। हर बार जब वह dish order होती है, रसोइया card follow करता है: वही नतीजा, कोई याद दिलाना नहीं। आप kitchen में नहीं हैं, पर आपके standards वहाँ हैं।
3. Connector असल में क्या है
एक Connector वह तरीका है जिससे AI सुरक्षित रूप से आपके apps और data तक पहुँचता है। Claude को Google Drive से जोड़िए और यह आपकी files search कर सकता है; इसे Gmail से जोड़िए और यह आपके mail पढ़ सकता है और आपके भेजने के लिए replies draft कर सकता है; इसे Slack, Linear, Asana, Notion से जोड़िए और यह उन tools से चीज़ें खींच सकता है और उनमें action ले सकता है।
अंदर से, connectors एक open standard पर चलते हैं जिसे MCP (Model Context Protocol) कहते हैं। एक connector software का एक छोटा टुकड़ा है (एक "MCP server") जिसे किसी company ने, या बढ़ते हुए चलन में किसी AI ने, code से बनाया है। आप इसे कभी न बनाते हैं न पढ़ते हैं; आप बस Connect पर click करते हैं। यह वही सौदा है जिसे इस किताब का बाक़ी हिस्सा code जो आप कभी नहीं लिखते कहता है: code असली है और आपके लिए काम कर रहा है, पर इसे लिखना कभी आपका काम था ही नहीं। किसी connector को इस्तेमाल करने के लिए आपको MCP समझने की ज़रूरत नहीं है, ठीक वैसे ही जैसे एक email भेजने के लिए आपको यह समझने की ज़रूरत नहीं कि email कैसे deliver होता है। जो मायने रखता है वे तीन बातें हैं:
- AI को आपकी permissions विरासत में मिलती हैं। एक connector कभी उस चीज़ तक नहीं पहुँच सकता जिस तक आप ख़ुद नहीं पहुँच सकते। अगर मूल app में किसी file, channel या record तक आपका access नहीं है, तो connector भी वहाँ नहीं पहुँच सकता। Google Drive जोड़ने से AI को आपकी पूरी company की drive नहीं मिल जाती, सिर्फ़ वही जो आपका अपना account पहले से खोल सकता है।
- आप read-only या read-and-write चुनते हैं। "मेरे email को search और summarize करो" read-only और कम-जोखिम है। "यह email भेजो" या "यह issue बनाओ" एक write action है। अच्छी practice यह है कि read-only से शुरू करें और write access तभी दें जब आपको भरोसा हो जाए कि tool कैसा व्यवहार करता है (safety section में और)।
- आप इन्हें हर conversation के हिसाब से on करते हैं। एक बार किसी app को जोड़ देने से यह उपलब्ध हो जाता है; आप फिर भी तय करते हैं कि कोई दिया हुआ chat किन connectors को इस्तेमाल कर सकता है।
ready-made connectors की एक directory है (Google Drive, Gmail, Slack, Notion, Figma, Linear, Atlassian, और कई और), और आप किसी भी ऐसी service में, जो MCP बोलती है, एक custom connector भी जोड़ सकते हैं। कुछ connectors interactive होते हैं: वे सिर्फ़ text लौटाने के बजाय conversation के अंदर ही एक live dashboard, task board या design surface render कर देते हैं।
एक Connector kitchen है: tools और भरी हुई pantry। यही वह है जो AI को आपकी असली सामग्री के साथ वाक़ई कुछ करने देता है, बजाय इसके कि वह एक ऐसे खाने का बस वर्णन करे जिसे वह पका नहीं सकता।
4. Skills बनाम Connectors बनाम Projects बनाम Custom Instructions
चार features एक जैसे सुनाई देते हैं और beginners इन्हें लगातार मिला देते हैं। यहाँ साफ़ अलगाव है। Skills और Connectors इस course के दो सितारे हैं; बाक़ी दो उनके क़रीबी रिश्तेदार हैं, यहाँ इसलिए शामिल हैं ताकि आप इन्हें उलझाना बंद कर दें।
| Feature | यह क्या है | किसके लिए सबसे अच्छा | एक-line test |
|---|---|---|---|
| Skill | दोबारा इस्तेमाल लायक how-to instructions जिन्हें AI सिर्फ़ relevant होने पर load करता है | एक दोहराने लायक काम जो आपके ख़ास तरीके से हो (formatting, voice, methodology, checklists) | "मैं बार-बार समझाता रहता हूँ कि यह कैसे करना है।" |
| Connector | किसी बाहरी app या data source तक सुरक्षित access | files, email, messages, tickets तक पहुँचना - उन्हें पढ़ना या उनमें action लेना | "मैं किसी दूसरे app से बार-बार copy-paste करता रहता हूँ।" |
| Project | files और instructions के साथ एक workspace जो उसके अंदर के हर chat के लिए हमेशा load रहता है | खड़े हुए context के साथ काम का एक पुलिंदा (एक client, एक course, एक किताब) | "ये वही files और rules इस इलाक़े की हर चीज़ पर लागू होते हैं।" |
| Custom instructions | preferences जो आपके सभी chats पर मोटे तौर पर लागू होती हैं | global style ("संक्षिप्त रहो," "metric units इस्तेमाल करो," "जब पहली बार किसी acronym को इस्तेमाल करो तो उसे पूरा बताओ") | "मैं चाहता हूँ कि यह हर जगह, हमेशा सच हो।" |
जो भेद लोगों को उलझाते हैं:
- Skill बनाम Project. एक Project अपना context उसी पल load कर देता है जब आप उसमें कोई chat खोलते हैं, जो काम का तो है पर हमेशा on रहता है। एक Skill तब तक सोया रहता है जब तक कोई request उससे मेल न खाए, फिर कहीं भी activate हो जाता है, किसी भी project के बाहर भी। खड़ी हुई background जानकारी → Project। एक procedure जो माँग पर fire करे → Skill।
- Skill बनाम Connector. यह सबसे ज़रूरी जोड़ी है और वही जिसे आप सबसे ज़्यादा इस्तेमाल करेंगे। एक Connector access है (AI क्या तक पहुँच सकता है); एक Skill expertise है (AI को कैसा व्यवहार करना चाहिए)। ये विकल्प नहीं हैं; ये partners हैं, और यही section 8 की पूरी बात है।
- Skill बनाम Custom instructions. Custom instructions आपके हर काम को छूती हैं। एक Skill एक तरह के काम को छूता है। "हमेशा उसी भाषा में जवाब दो जिसमें मैं तुम्हें लिखता हूँ" एक custom instruction है। "जब मैं board paper माँगूँ, तो इस आठ-section वाली structure का इस्तेमाल करो" एक skill है।
5. वह सवाल जो हर कोई पूछता है: क्या मैं slash command type करूँ, या AI को बस पता होता है?
यह उलझन का सबसे आम बिंदु है, और YouTube tutorials इसे आधा-अधूरा बताते हैं, तो चलिए इसे साफ़-साफ़ निपटा लेते हैं।
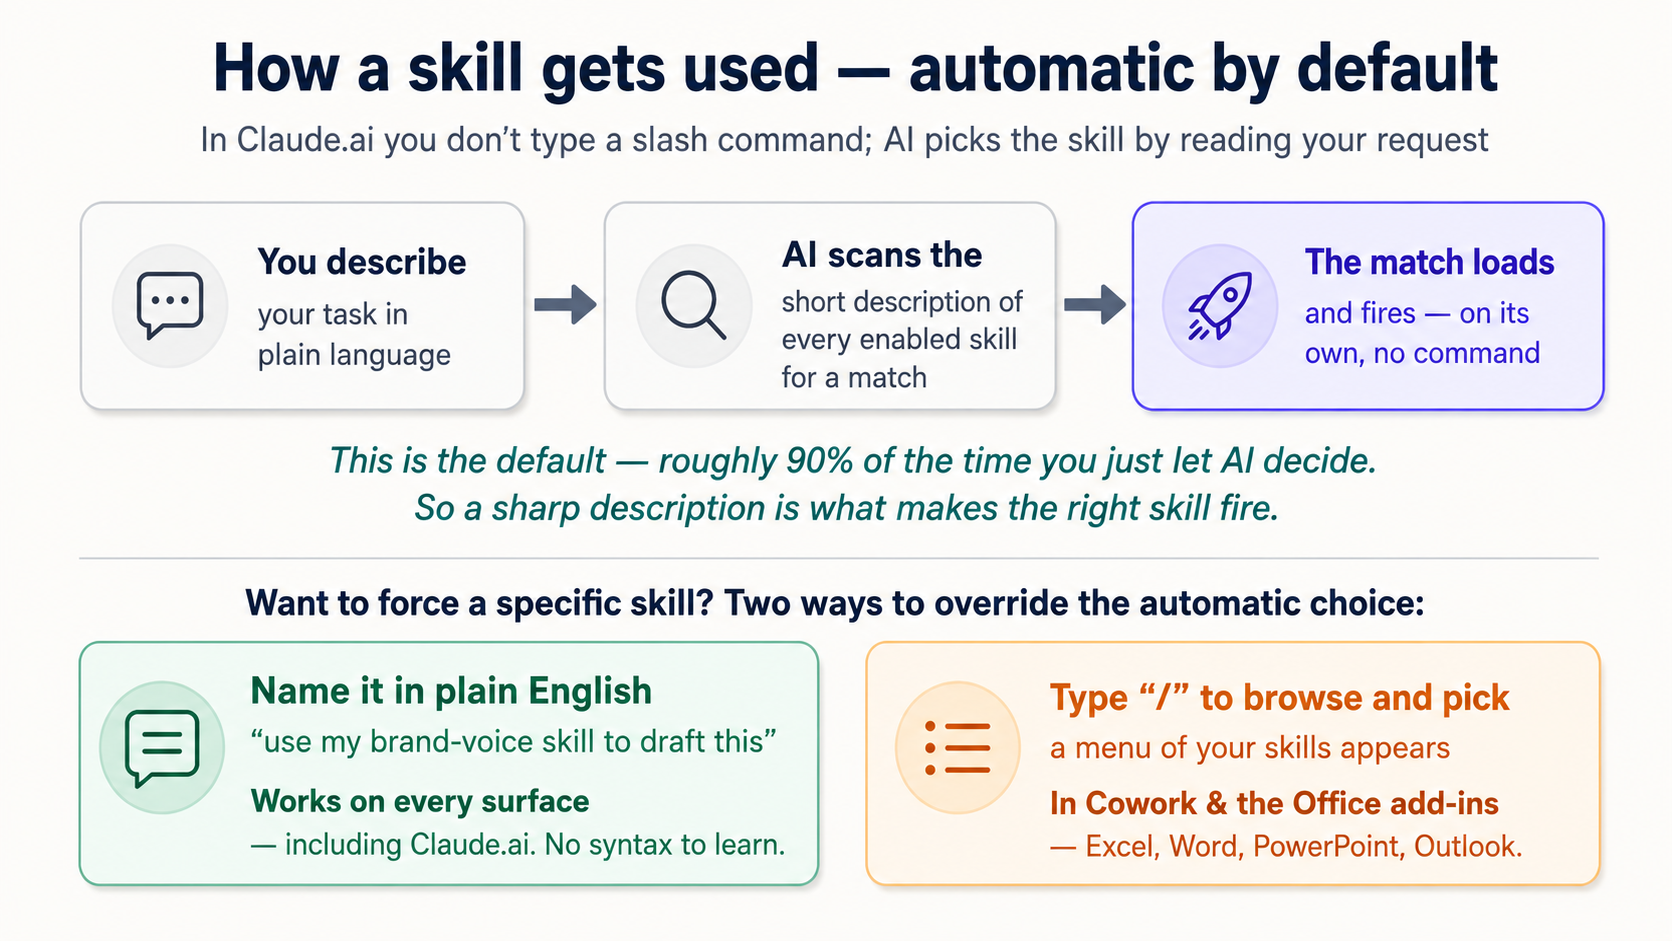
Claude.ai में (web और mobile app, आपका मुख्य tool), Skills अपने आप fire होती हैं। ("Fire" का मतलब यहाँ बस activate है; यह शब्द पूरे page में दोहराया जाता है।) आप कोई slash command type नहीं करते। आप अपने काम का वर्णन plain language में करते हैं, AI आपकी request पढ़ता है, उसे आपकी on की हुई हर skill के छोटे description से मिलाता है, और मेल खाने वाली को अपने आप load कर लेता है। पूछिए "Q3 results पर एक PowerPoint बनाओ" और PowerPoint skill बिना आपके नाम लिए activate हो जाती है। accountant का "इस महीने की client summary तैयार करो" पूछिए और, अगर उनकी summary skill on है, तो यह बस हो जाता है, उनके तरीके से formatted।
यह जानबूझकर ऐसा है। section 2 की progressive disclosure याद रखिए: AI हमेशा चुपचाप आपकी request को आपकी installed skills के descriptions से मिला रहा होता है। एक अच्छा description ही वह चीज़ है जो सही skill को सही पल पर fire कराती है। (यही वजह है कि एक तीखा description लिखना skill बनाने का सबसे ज़रूरी हिस्सा है, जो section 12 में है।)
तो आप slash commands कब देखते हैं? ज़्यादा hands-on surfaces में:
- Cowork और Microsoft 365 add-ins में (Excel, Word, PowerPoint, Outlook के अंदर Claude), आप अपनी skills को browse करने और एक को साफ़-साफ़ चुनने के लिए
/type कर सकते हैं, जो तब काम का है जब आप auto-detection पर भरोसा करने के बजाय किसी ख़ास skill को ज़बरदस्ती चलाना चाहें। आप काम का स्वाभाविक रूप से वर्णन भी कर सकते हैं; दोनों काम करते हैं। - Claude Code और OpenCode में (developer tools, Part 4 में शामिल), skills भी relevant होने पर अपने आप load होती हैं, और आप उन्हें जानबूझकर भी invoke कर सकते हैं।
और एक तीसरा विकल्प है जो हर जगह काम करता है, Claude.ai समेत: बस plain English में skill का नाम ले लीजिए। अगर auto-detection चूक जाए, तो लिखिए "इस caption को draft करने के लिए मेरी brand-voice skill इस्तेमाल करो।" किसी ख़ास syntax को सीखे बिना किसी skill को ज़बरदस्ती चलाने का यह सबसे आसान तरीका है।
| आप क्या चाहते हैं… | Claude.ai में (web/app) | Cowork / Excel-Word-PPT add-ins में | Claude Code / OpenCode में |
|---|---|---|---|
| AI को तय करने दें | बस काम का वर्णन करें - automatic | बस काम का वर्णन करें - automatic | बस काम का वर्णन करें - automatic |
| किसी ख़ास skill को ज़बरदस्ती चलाएँ | इसका नाम लें: "मेरी X skill इस्तेमाल करो" | / type करें और इसे चुनें, या नाम लें | नाम लें, या सीधे invoke करें |
| जो उपलब्ध है उसे browse करें | Customize → Skills | sidebar में / type करें | अपनी skills directory list करें |
default behavior automatic है: AI आपका prompt पढ़कर सही skill चुन लेता है। slash commands और skill का नाम लेना override tools हैं, जब आप साफ़-साफ़ बताना चाहें। आप अपना 90% वक़्त इसे ख़ुद तय करने देंगे, और यही ठीक वजह है कि skill का description इतना मायने रखता है।
यही बात Connectors के साथ भी सच है: एक बार जब आप कोई app जोड़ लेते हैं और इसे conversation के लिए enable कर देते हैं, तो जब आपकी request को इसकी ज़रूरत होती है AI इसे अपने आप ले आता है: "मेरी Drive में पड़ा contract summarize करो" बिना आपके कुछ click किए Drive से खींच लेता है। आप किसी connector को command से invoke नहीं करते; आप बस वह चीज़ माँगते हैं जिसके लिए इसकी ज़रूरत है।
Part 2: जो पहले से मौजूद है उसे इस्तेमाल करना (कुछ बनाने की ज़रूरत नहीं)
कुछ भी बनाने से पहले ही आप बहुत बड़ा फ़ायदा पा सकते हैं। Anthropic और इसके partners पहले ही ऐसी skills और connectors बना चुके हैं जिन्हें आप दो मिनट में on कर सकते हैं।
6. वे skills जो built in आती हैं
Anthropic ऐसी skills का एक set रखता है जो तैयार files निकालकर देती हैं, और वे सब एक ही switch पर चलती हैं: Code execution and file creation (Settings → Capabilities)। इसे on कीजिए और ये बस काम करने लगती हैं:
- Word: professionally formatted
.docxdocuments - PowerPoint: किसी वर्णन से पूरी slide decks
- Excel: formulas और formatting वाली असली spreadsheets, न कि chat में paste की हुई कोई table
- PDF: PDFs बनाना और भरना
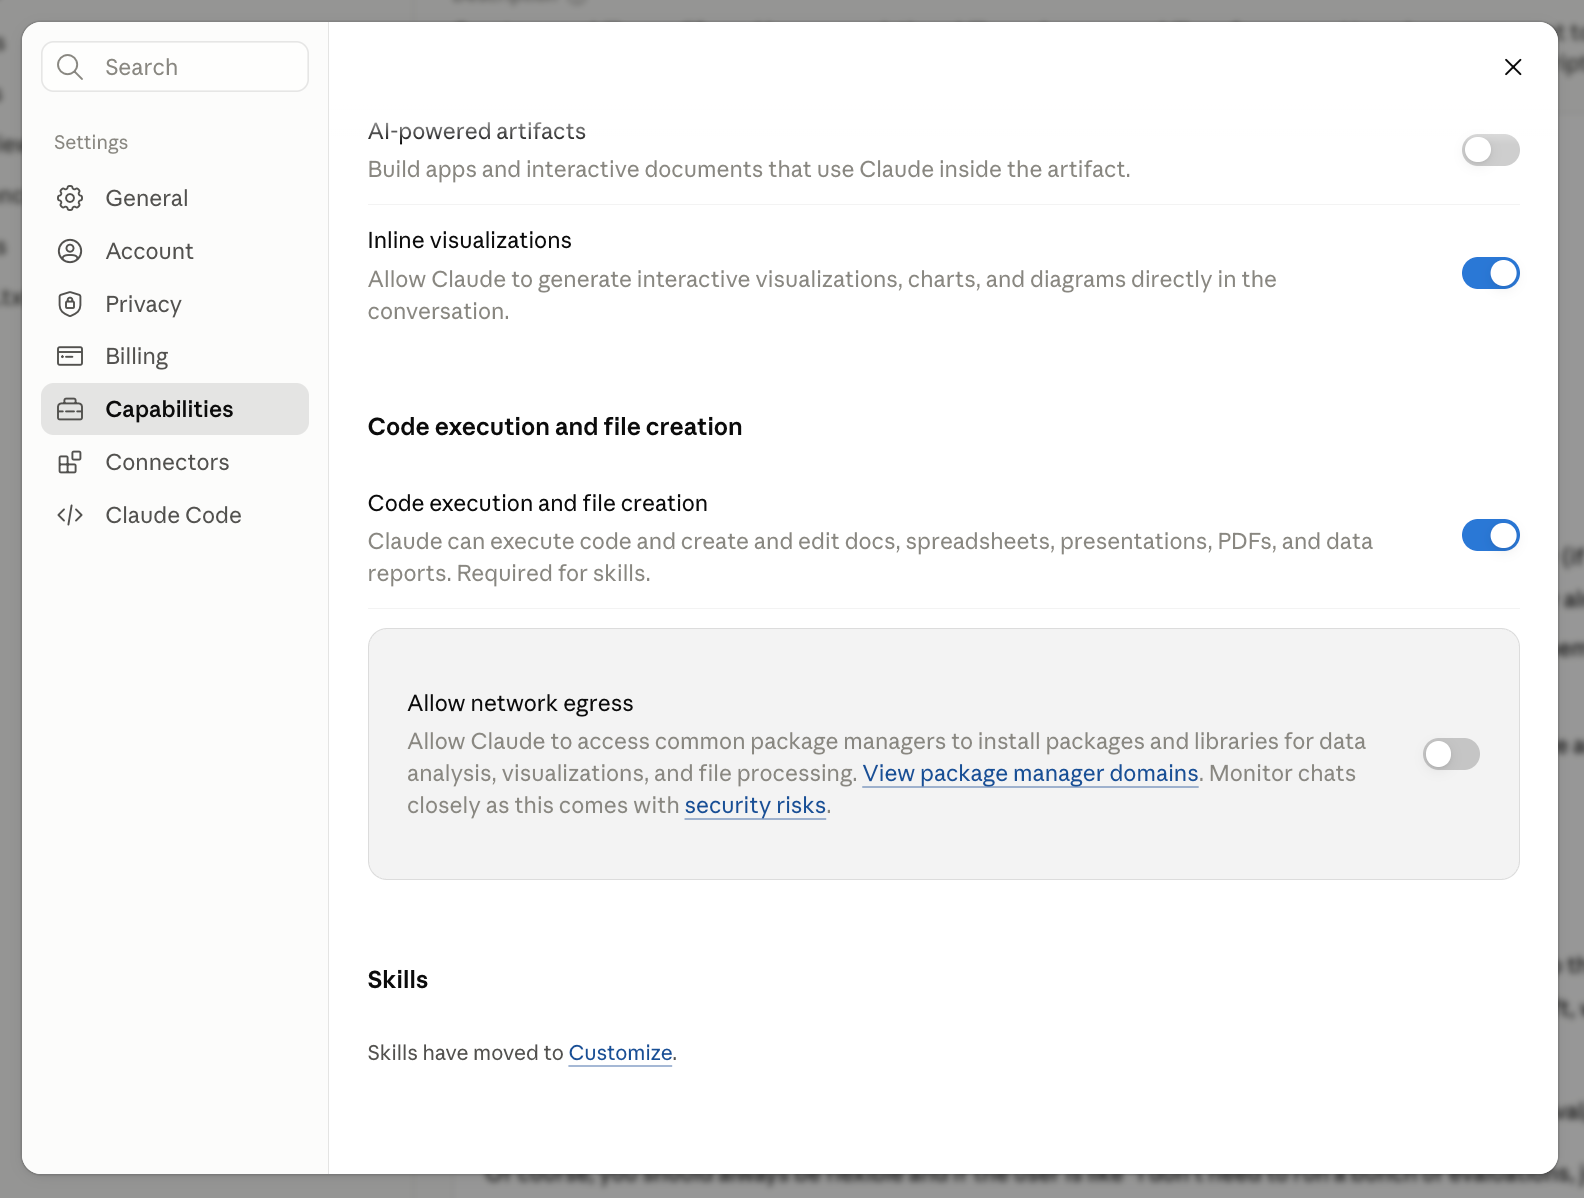
Settings → Capabilities. यह एक switch ही engine है। इसे on कीजिए और file skills काम करने लगती हैं। "Required for skills" label पर ध्यान दीजिए, और यह कि Skills panel अब बस "moved to Customize" कहता है।
आप बस माँगते हैं। Claude को बताइए "agentfactory.panaversity.org को एक general audience के सामने पेश करने वाली एक slide deck तैयार करो" और एक तैयार deck वापस आ जाती है, download के लिए तैयार।
जब आप Customize → Skills खोलते हैं (यह left sidebar में अपना अलग item है, Connectors के बग़ल में), तो एक fresh account पर वहाँ सिर्फ़ एक ही skill बैठी देखकर चौंकिए मत: skill-creator, एक Anthropic skill जिसका पूरा काम आपको अपनी ख़ुद की skills बनाने में मदद करना है (आप ठीक यही आगे करेंगे)। यह सही है, कोई bug नहीं। document skills ग़ायब नहीं हैं; वे engine में रहती हैं, इस shelf पर नहीं।
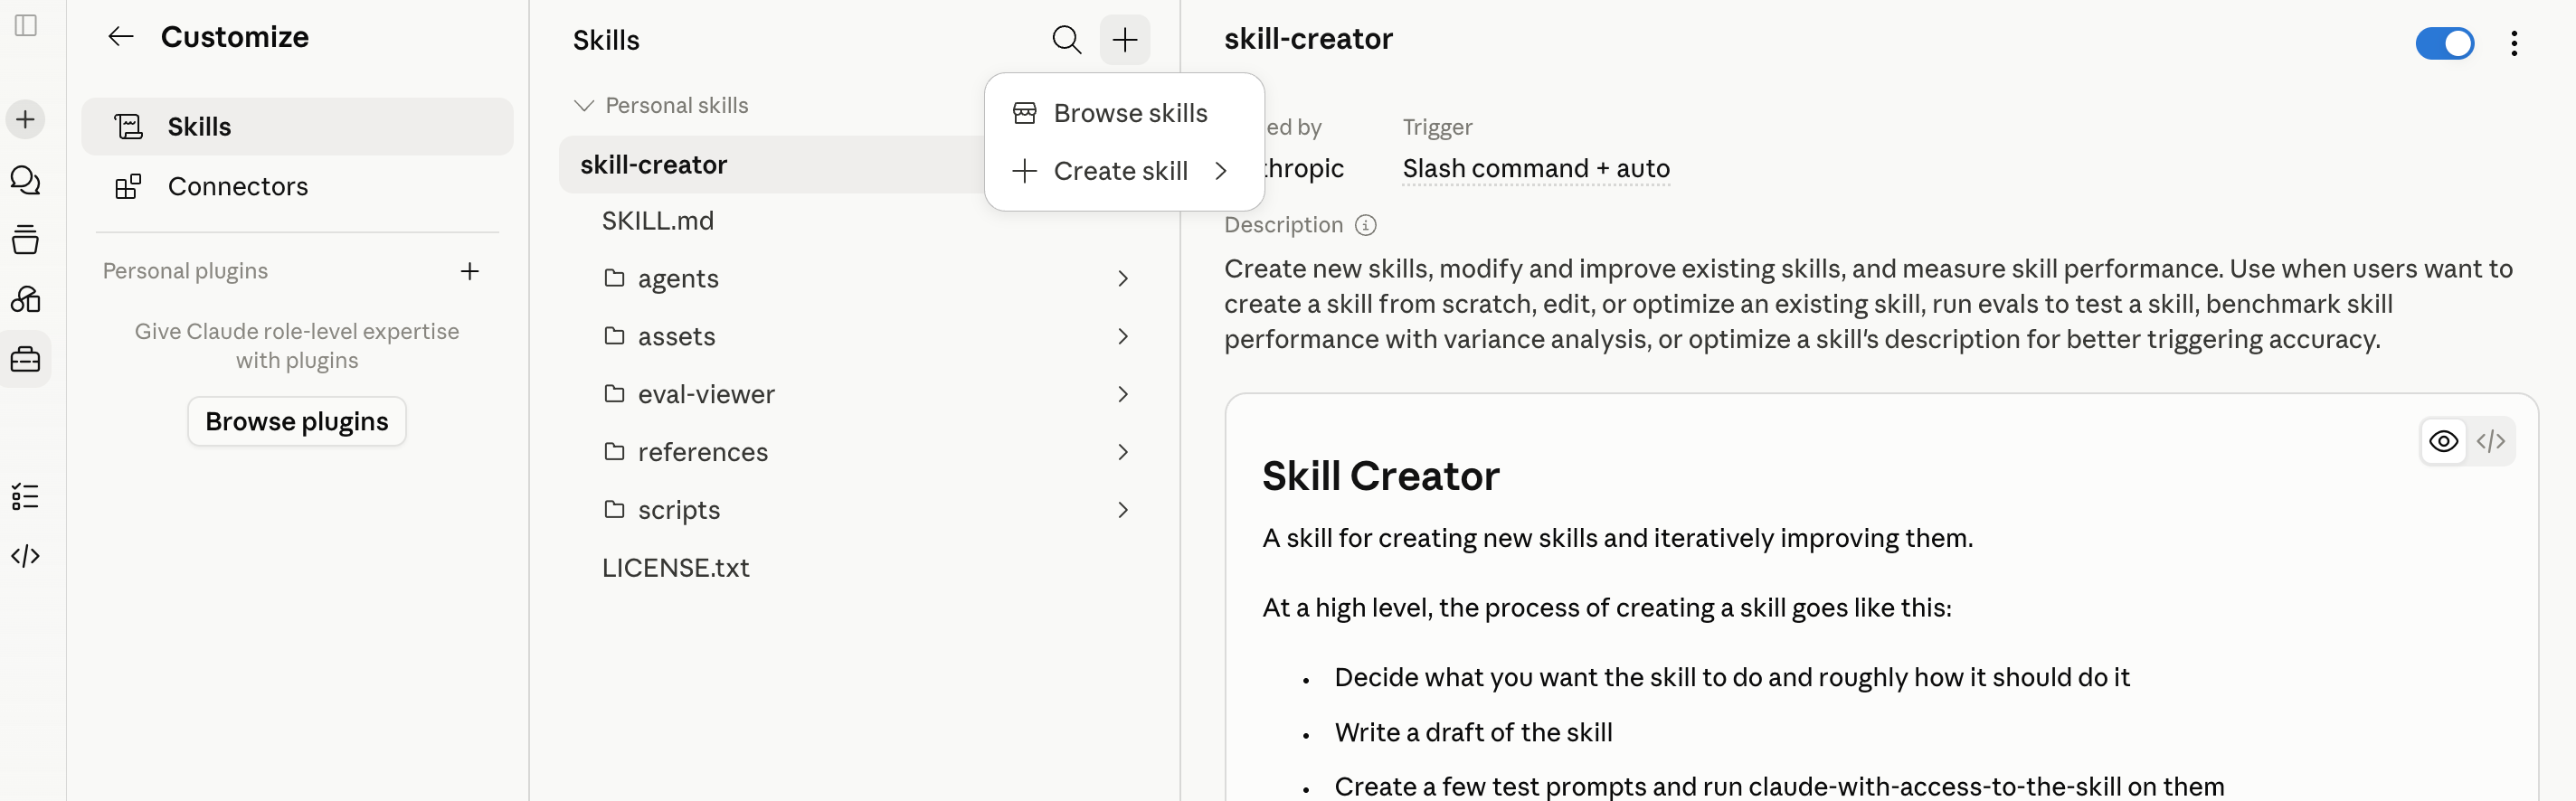
Customize → Skills. यह shelf है। आज एक skill, skill-creator, और साथ में और browse या बनाने के लिए "+"। Word, PowerPoint, Excel और PDF skills जानबूझकर यहाँ list नहीं हैं।
उस "+" पर click कीजिए और Browse skills चुनिए ताकि directory खुले: ऐसी skills जिन्हें आप एक click में install कर सकते हैं, जिनमें Notion, Figma और Atlassian जैसी companies की partner skills भी हैं, जो उनके connectors के साथ मिलकर काम करने के लिए बनी हैं। आप जो कुछ भी install करते हैं वह उसी shelf पर आ गिरता है। installed skills view-only होती हैं: आप उन्हें इस्तेमाल कर सकते हैं और off कर सकते हैं, पर किसी एक को बदलने के लिए आप एक copy download करते हैं, उसे edit करते हैं, और अपनी ख़ुद की के तौर पर दोबारा upload करते हैं।
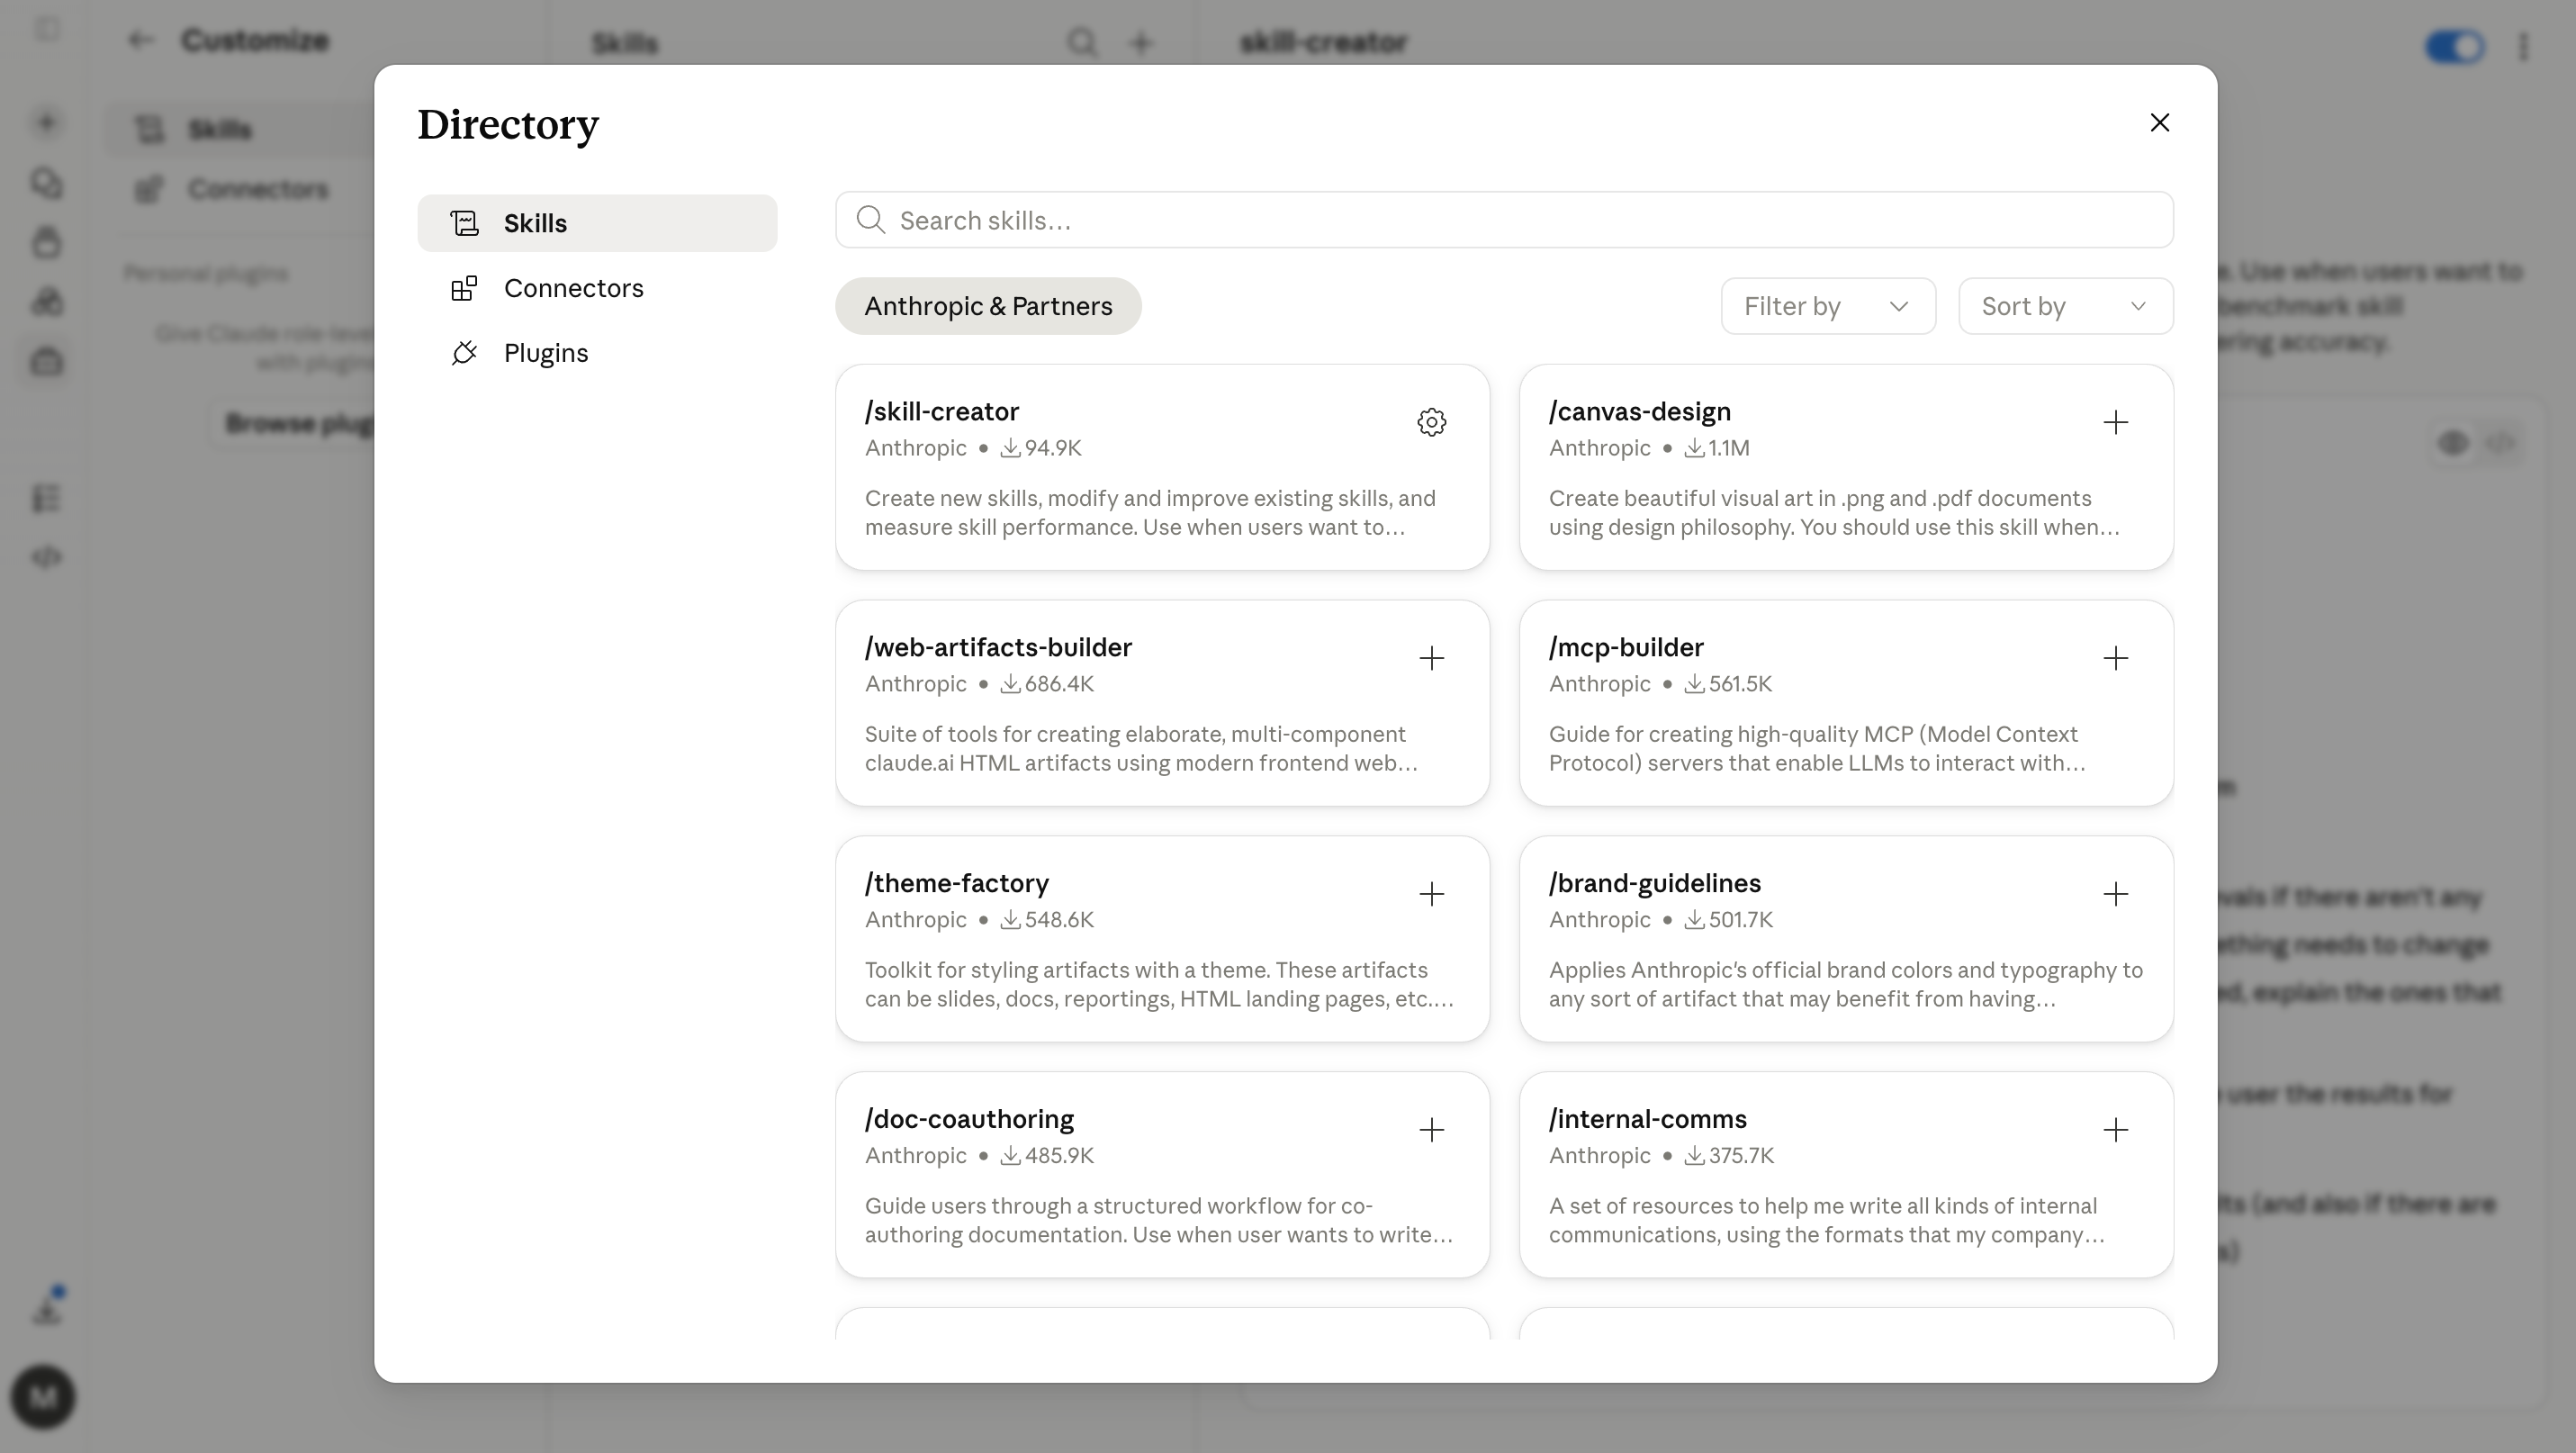
"+ → Browse skills" के पीछे की directory: Anthropic और partners से one-click installs। आप जो कुछ जोड़ते हैं वह shelf पर आ जाता है।
एक बड़ा ecosystem भी है जिसके होने के बारे में जानना अच्छा है। चूँकि skills 2025 के आख़िर में एक open standard बन गईं (Part 4 में और), public marketplaces जल्दी सामने आ गए, और community sites अब हज़ारों skills list करती हैं जिन्हें आप download कर सकते हैं। यह एक तोहफ़ा भी है और ख़तरा भी: किसी अजनबी की एक मुफ़्त skill एक text file है जिसे आप AI से follow कराने वाले हैं। हम इसे safety section में सँभालेंगे। फ़िलहाल: built-in skills और official directory शुरू करने के लिए सुरक्षित जगह हैं।
7. अपने apps जोड़ना
किसी app को जोड़ने में लगभग एक मिनट लगता है। किसी chat से, नीचे-बाएँ कोने में "+" पर click कीजिए (या / type कीजिए), Connectors पर hover कीजिए, Manage connectors चुनिए, फिर directory खोलने के लिए Connectors के बग़ल वाले "+" पर click कीजिए; या left sidebar से Customize → Connectors खोलिए। एक service चुनिए, Connect पर click कीजिए, और sign-in/authorization prompts पूरे कीजिए; यह वही "इस app को अपने account तक access की अनुमति दो" वाला flow है जो आप सैकड़ों बार कर चुके हैं।
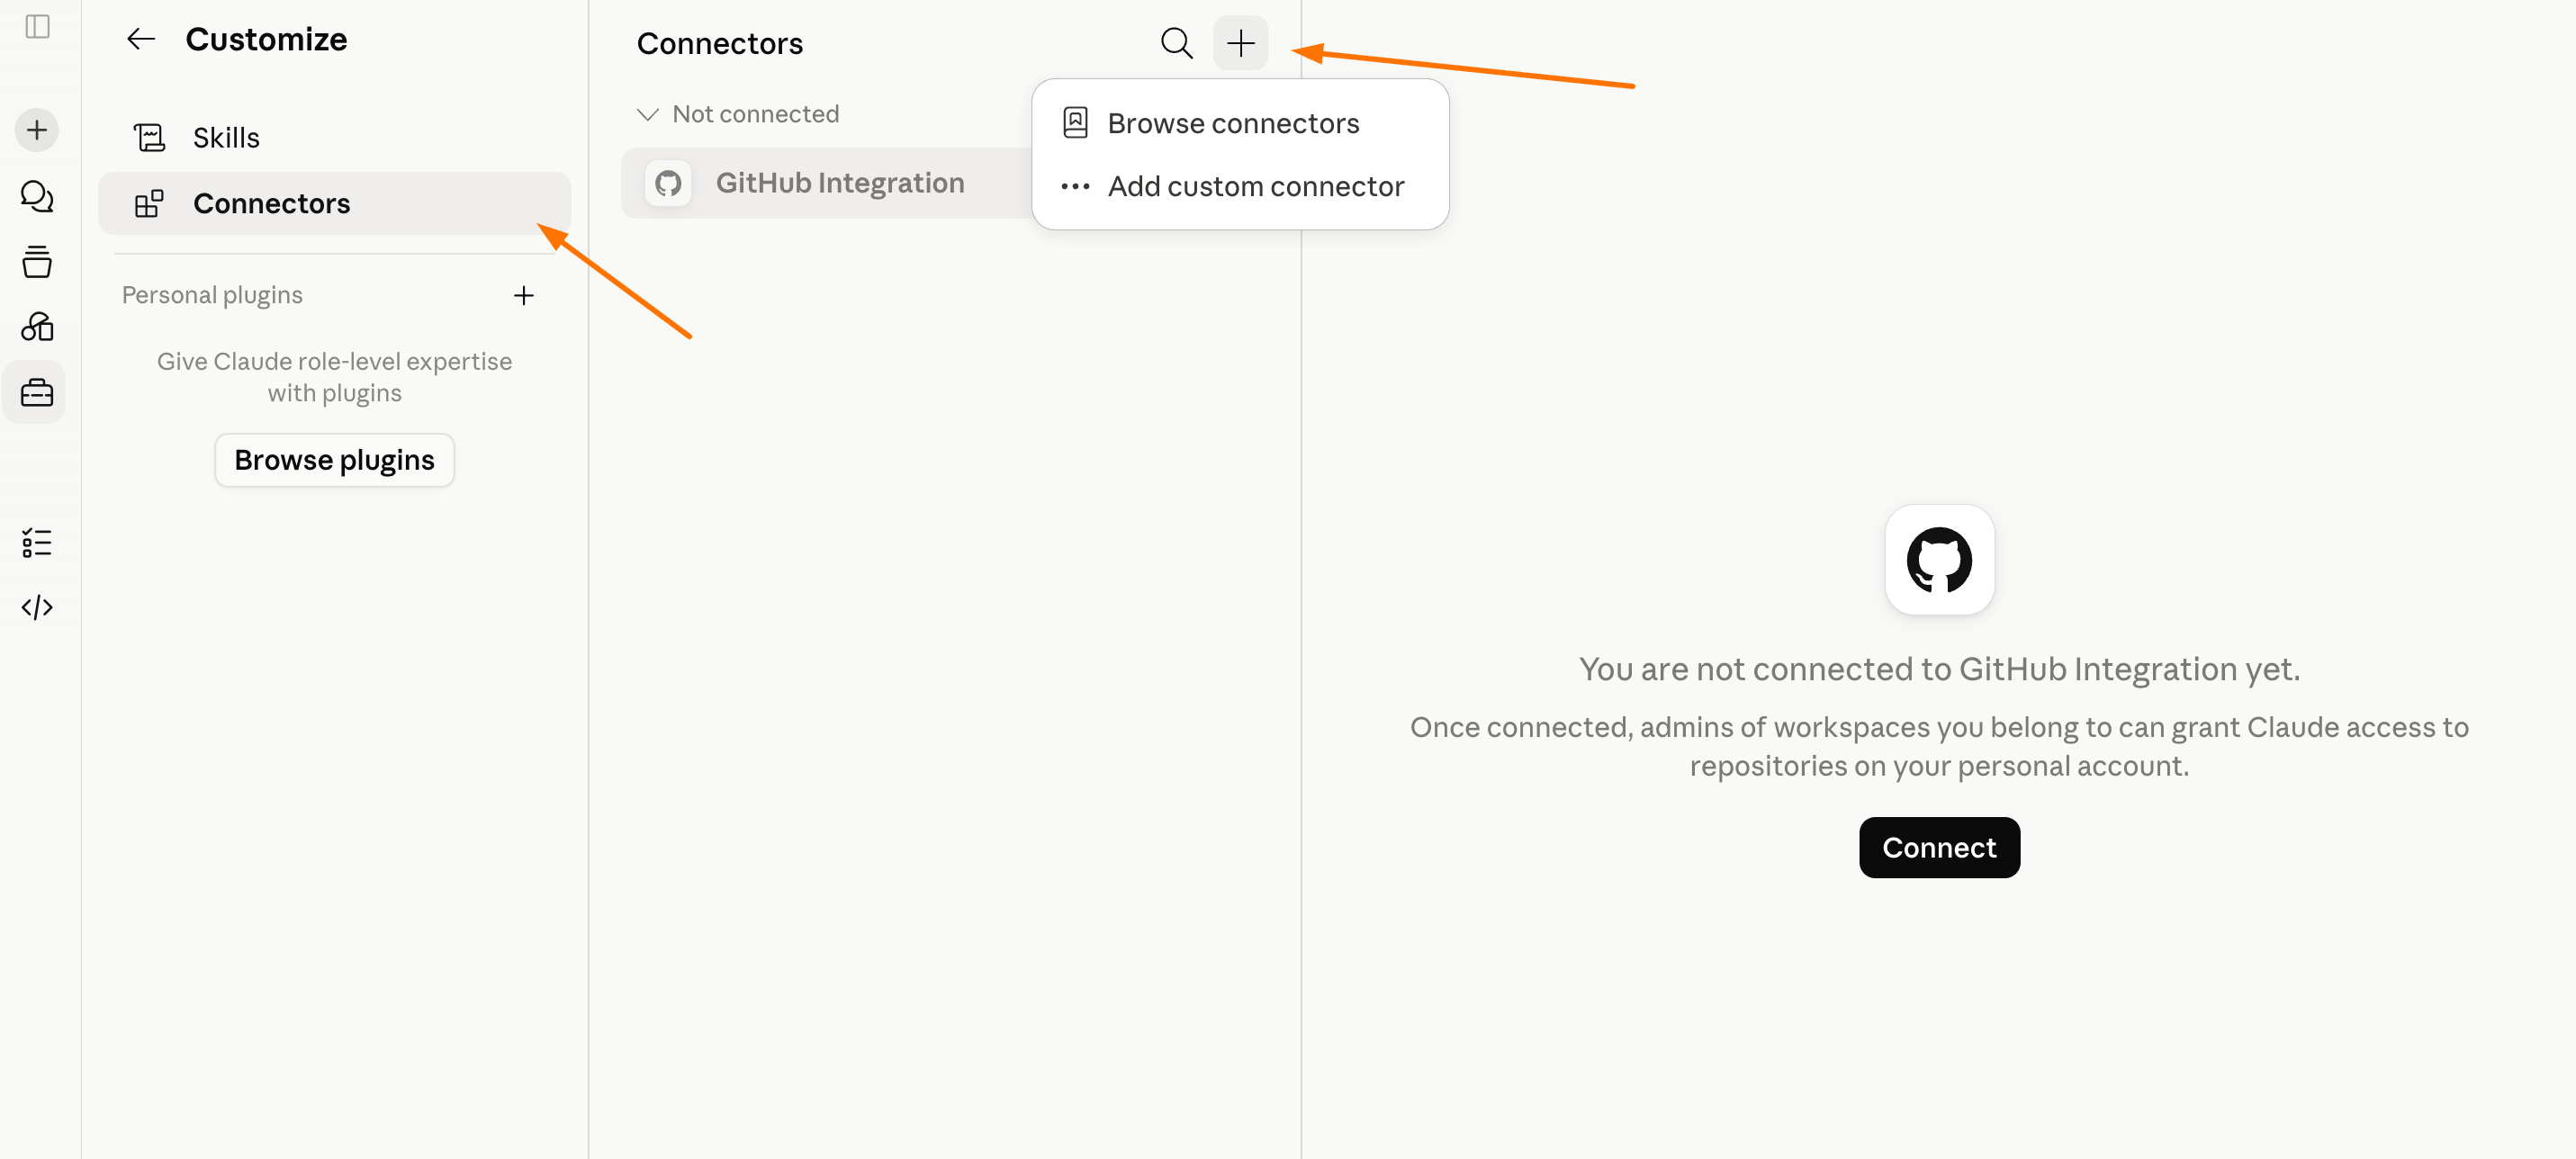
Customize → Connectors. "+" से Browse connectors (ready-made directory) या किसी भी MCP बोलने वाले app के लिए Add custom connector खुलता है।
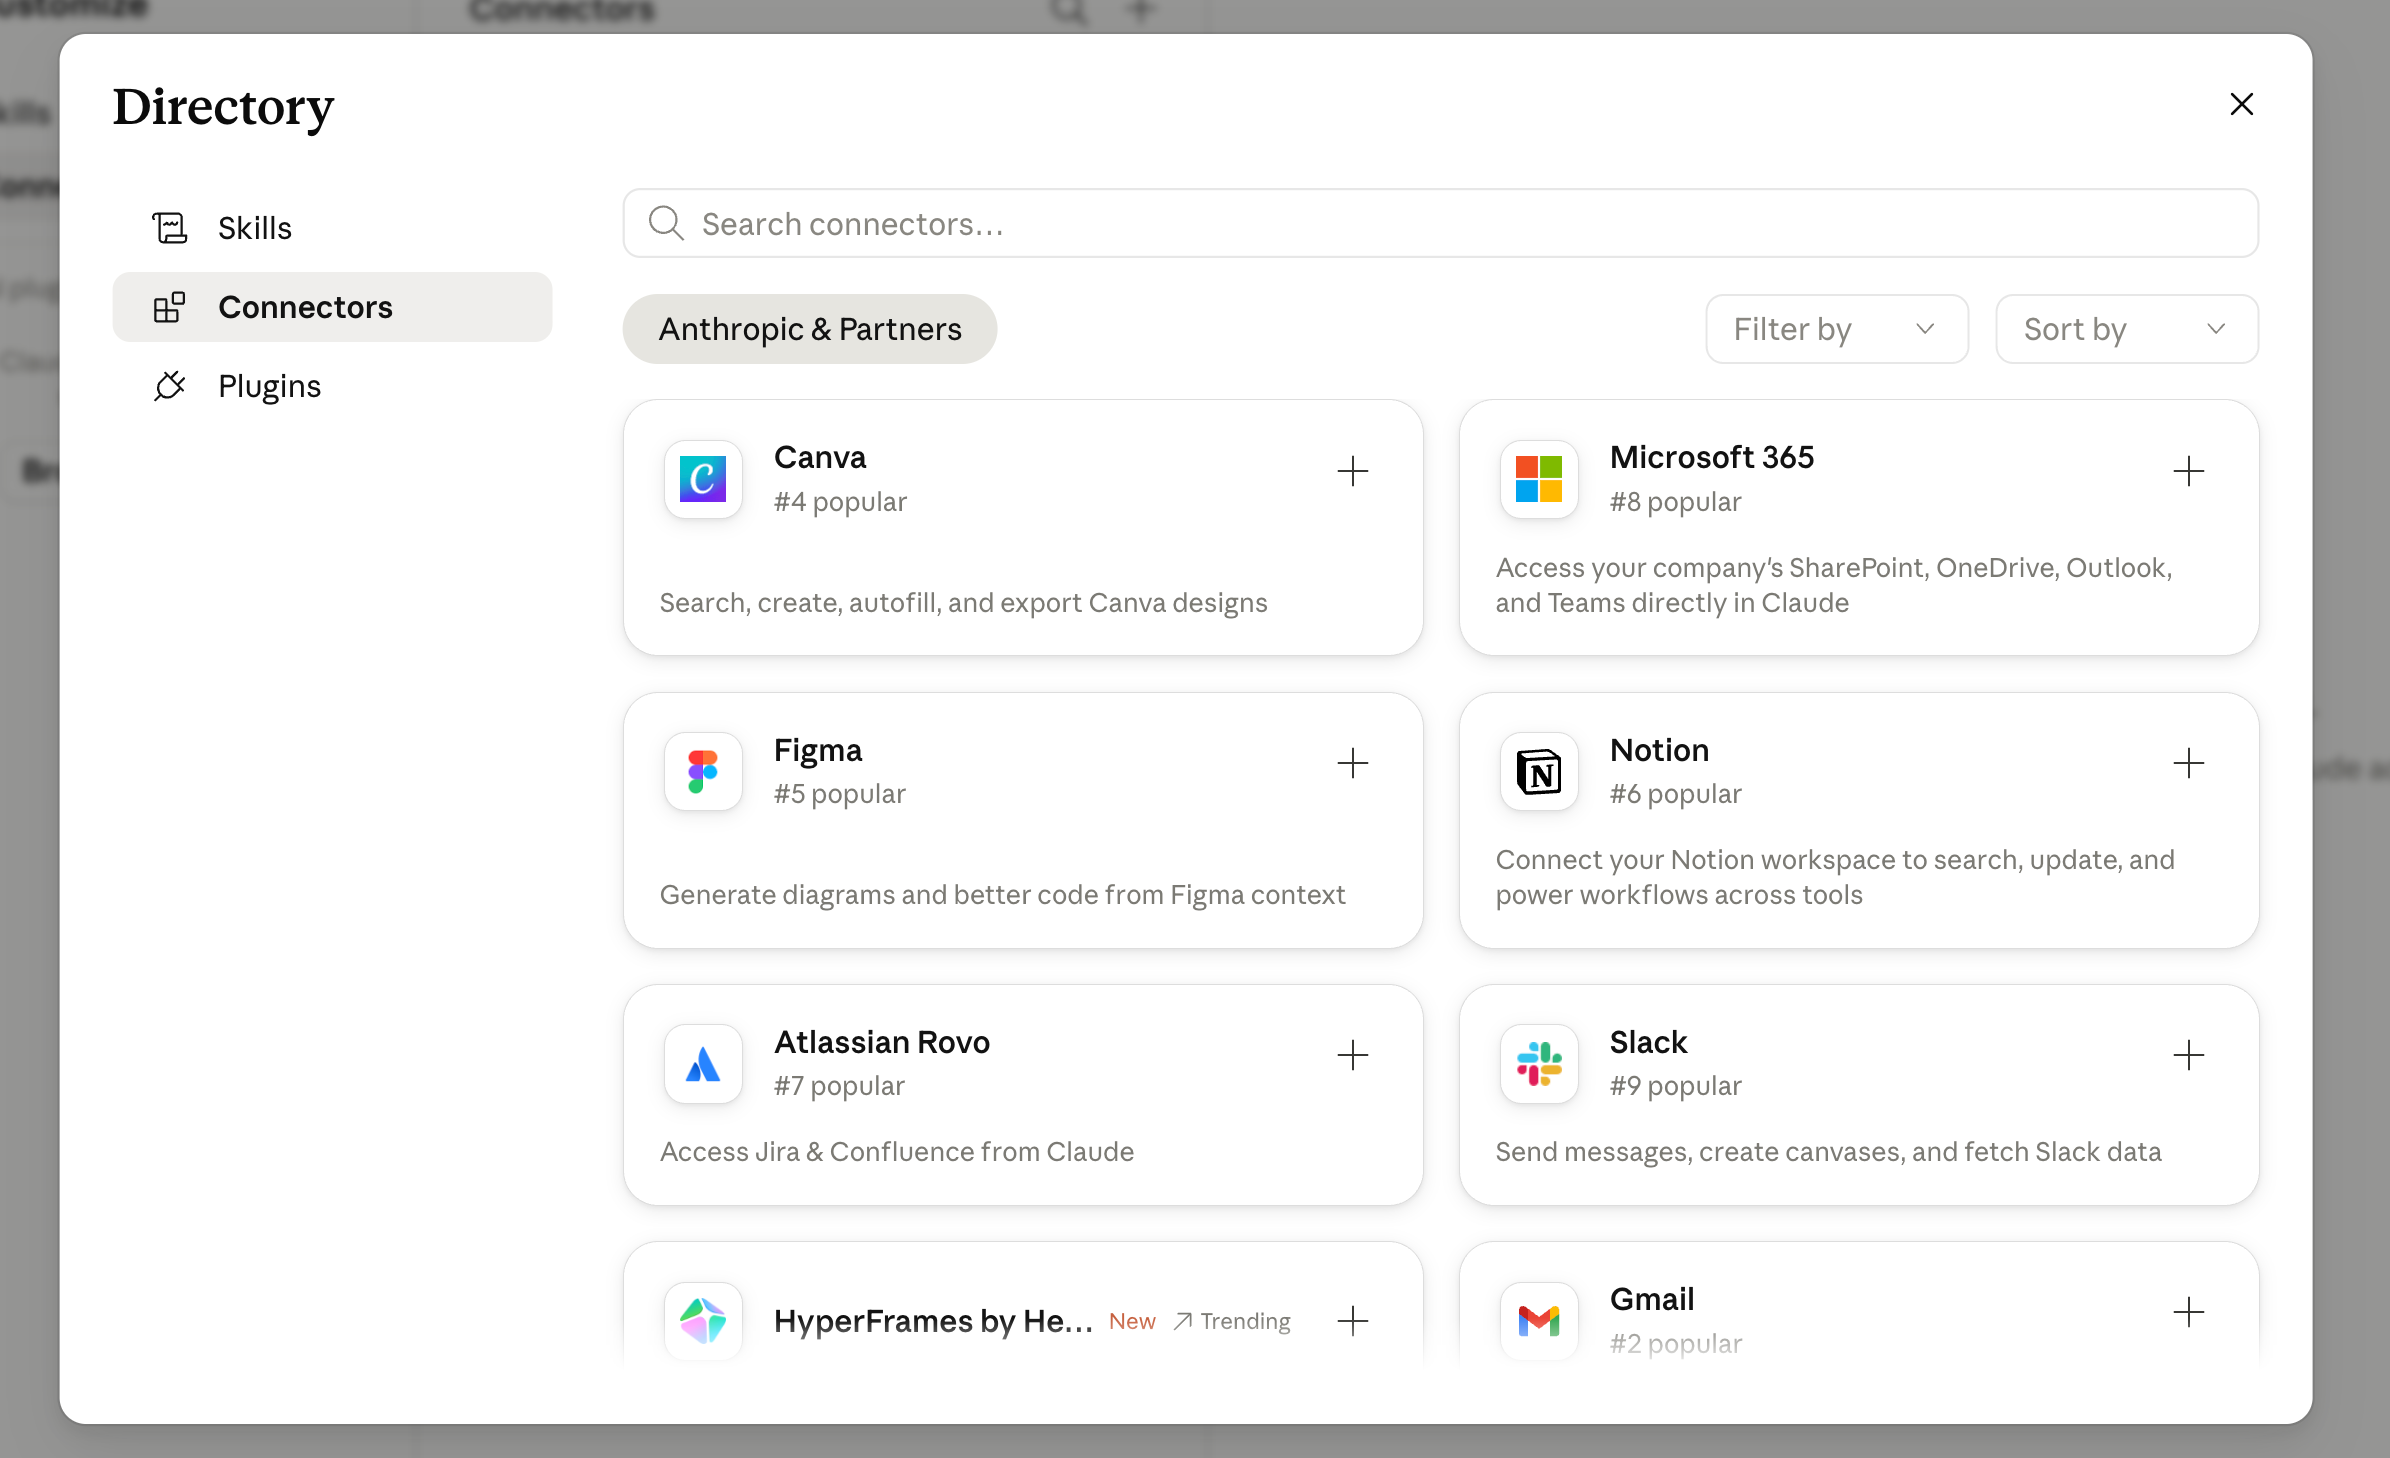
directory: search या browse कीजिए, एक app चुनिए, "+" पर click कीजिए, और sign-in पूरा कीजिए। ये ready-made Anthropic और partner connectors हैं।
कुछ काम की बातें जो आपको परेशानी से बचाती हैं:
- जोड़ने के बाद, उसी "+" → Connectors menu को खोलकर और जिन्हें आप इस chat में इस्तेमाल करना चाहते हैं उन्हें toggle on करके एक conversation के लिए connector को enable करें।
- Free plans में एक custom connector शामिल है; ready-made directory connectors मोटे तौर पर सबके लिए उपलब्ध हैं।
- अगर आप कई apps जोड़ते हैं, तो एक Tool access setting है जो tools को सिर्फ़ ज़रूरत पड़ने पर load कर सकती है। ज़्यादातर लोगों के लिए इसे अपने आप load होने देना ठीक है; अगर आपके दस या उससे ज़्यादा connectors active हैं और आप conversations को focused रखना चाहते हैं तो load-on-demand पर switch कर दीजिए।
- Interactive badge पर नज़र रखिए: वे connectors chat के अंदर live interfaces (एक task board, एक design canvas) render करते हैं।
एक worked example, doctor वाला, बनावटी data के साथ ताकि कुछ भी असली ग़लत हाथों में न जाए। पहले, Claude से practice file बनवाइए: "एक नक़ली patient intake form का एक-page Word doc बनाओ (इसे DEMO-Okafor-2026-03 कहो, तीन काल्पनिक medications और एक allergy के साथ) और इसे मेरी Google Drive में save करो।" यह section 6 का file engine है जो सीधे आपकी Drive में एक document लिख रहा है। अब इसे वापस पढ़िए: "मेरी Drive में DEMO-Okafor-2026-03 ढूँढो और medications को एक SOAP-style note में summarize करो।" Claude आपकी Drive search करता है (सिर्फ़ वही जो आपका account देख सकता है), file खींचता है, और note draft करता है, बिना किसी download या copy-paste के। एक ही connector में आपने अभी दोनों दिशाएँ देख लीं: Claude ने आपकी Drive में एक file लिखी, फिर उसे search और पढ़ा।
दो ईमानदार बातें। Drive connector आपके documents पढ़ता है पर उन्हें जगह पर edit नहीं कर सकता, इसलिए यहाँ "write" step का मतलब एक नई file save करना है, जिसके लिए Code execution and file creation on होना चाहिए (section 6 से) और साथ ही Drive की write permission। और चूँकि आपने हर detail ख़ुद गढ़ा, आपने एक भी असली record छुए बिना पूरा read-and-write loop चला लिया। किसी भी regulated data (healthcare, legal, finance, student records) के लिए इस आदत को बनाए रखिए: बनावटी examples पर practice कीजिए, और जब data असली हो, तो सिर्फ़ उन्हीं accounts और connectors का इस्तेमाल कीजिए जिन्हें आपके organization ने approve किया है।
8. असली जादू: Skills + Connectors एक साथ
हर एक अकेले काम का है। साथ में वे recipes-वाली-kitchen हैं, और यहीं काम वाक़ई delegate होता है, बजाय बस मदद मिलने के।
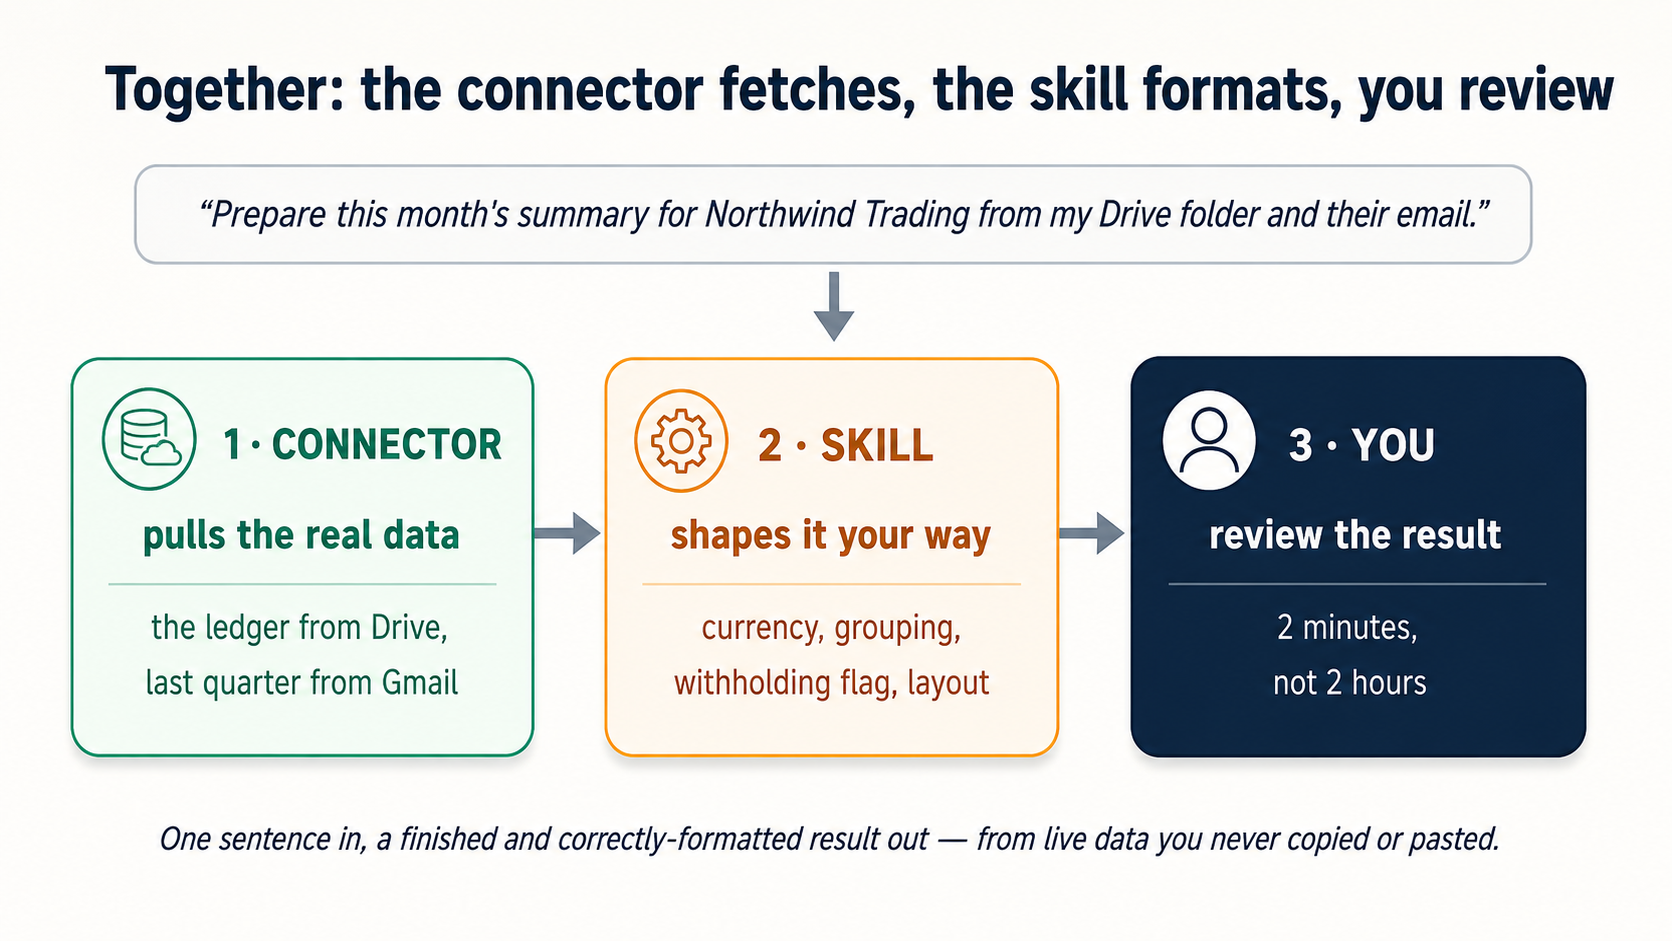
pattern: Connector असली data ले आता है; Skill output को आपके तरीके से आकार देती है। दो worked examples।
accountant का monthly close. एक "client-summary" skill बनी हो (Part 3 दिखाता है कैसे) और Google Drive जुड़ी हो, तो महीने की रस्म दो छोटे messages में सिमट जाती है, दोनों बनावटी data पर चलाए जा सकते हैं। पहले, काम करने के लिए एक ledger बनाइए:
Create a sample ledger spreadsheet for a made-up client called DEMO Trading:
a dozen March transactions across a few expense heads, two or three of them
deliberately above a typical withholding threshold. Save it to my Google
Drive as DEMO-ledger-March.
फिर महीने की request एक वाक्य है:
Prepare the March client summary for DEMO Trading from DEMO-ledger-March
in my Drive.
Drive connector ledger ले आता है; client-summary skill हर amount को reporting currency में format करती है, expense head के हिसाब से group करती है, withholding line के ऊपर के payments को flag करती है, और इसे firm के चार-section वाले template में सजा देती है। एक दो-घंटे की paste-and-format रस्म एक दो-मिनट की review बन जाती है, ऐसे data पर जिसे आप कभी भी दोबारा चला सकते हैं।
marketer का weekly content batch. एक "brand-voice" skill rules को encode करती है (कोई exclamation marks नहीं, question-hook openings, banned buzzwords, call-to-action format)। एक connector Notion में content calendar तक पहुँचता है। request: "इस हफ़्ते की तीन scheduled posts के captions Notion में, हमारी voice में draft करो।" Connector calendar पढ़ता है; skill captions को on-brand लिखती है। वे लिखने के बजाय edit करते हैं।
वही template engineer पर फ़िट बैठता है (एक "design-review" skill + एक Linear connector → "arch tag वाले तीन open issues की review करो और findings को severity के हिसाब से लिखो") और teacher पर भी (एक "lesson-plan" skill + एक Drive connector → "मेरी Drive में पड़े syllabus और पिछले हफ़्ते की graded worksheets से अगले हफ़्ते का plan बनाओ")।
9. किन problems को Skill चाहिए, किनको Connector, किनको दोनों?
यह वह सरल test है जिसे हाथ में रखिए। जब कोई काम दोहरावदार या उबाऊ लगे, तो ख़ुद से क्रम में पूछिए:
- क्या रुकावट यह है कि मैं बार-बार समझाता रहता हूँ कि यह कैसे करना है? → आपको एक Skill चाहिए।
- क्या रुकावट यह है कि मैं बार-बार किसी दूसरे app से data ले आता रहता हूँ? → आपको एक Connector चाहिए।
- दोनों? → आपको दोनों चाहिए। (यह आपकी सोच से ज़्यादा आम है।)
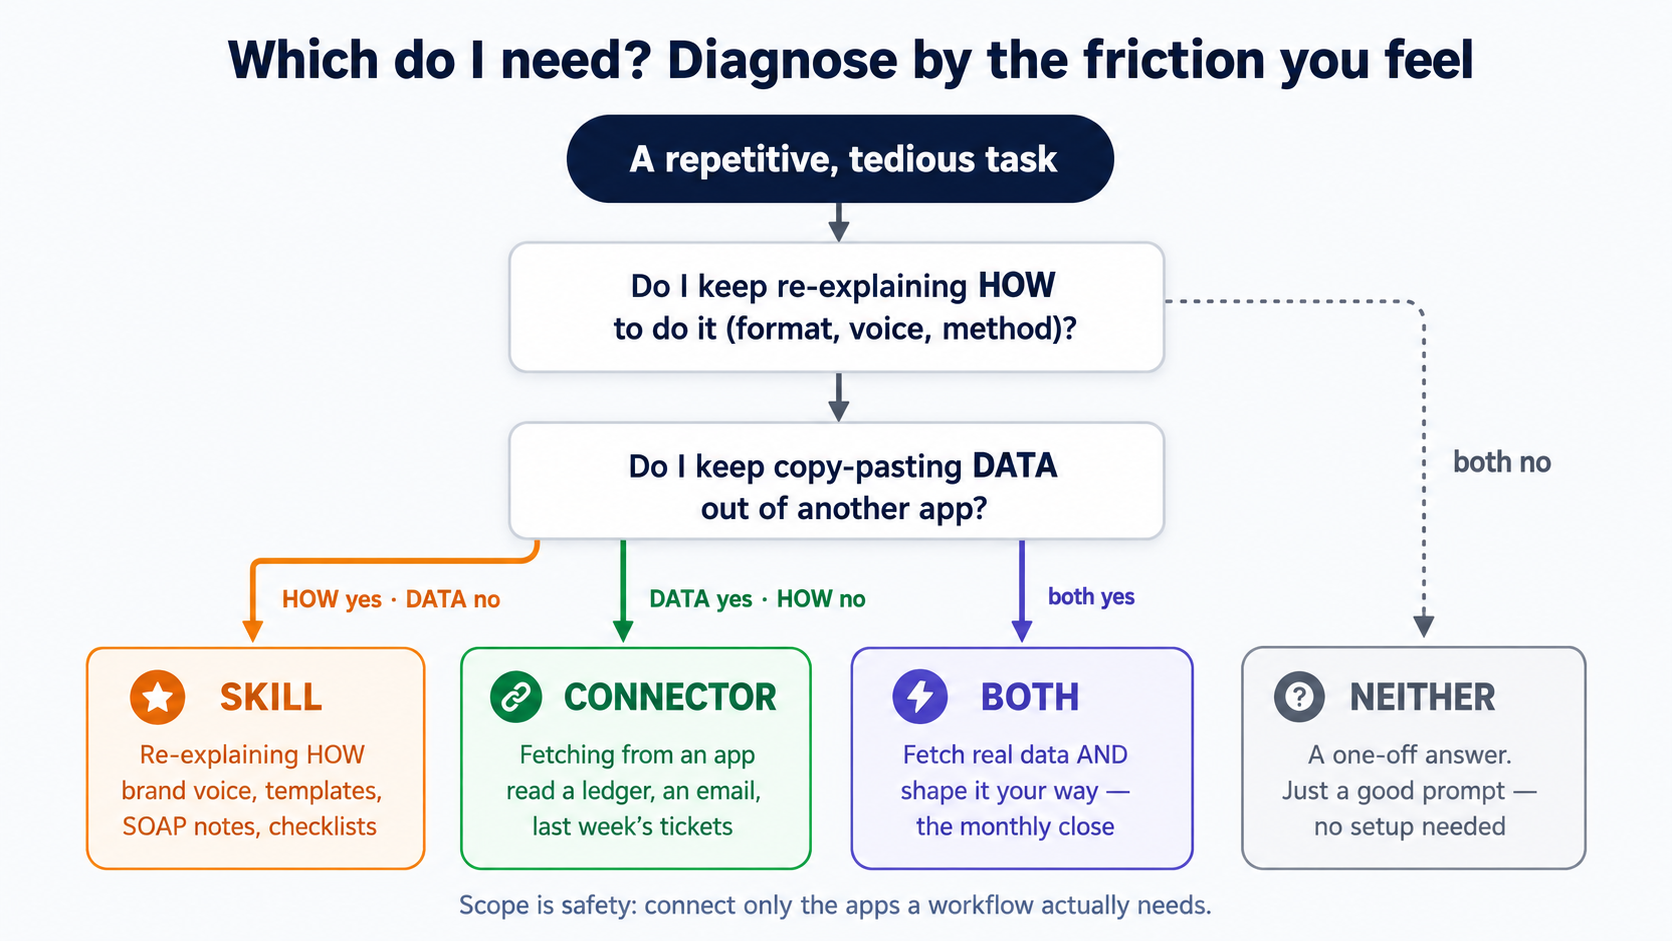
| जो रुकावट आप महसूस करते हैं | इसे क्या चाहिए | example |
|---|---|---|
| "मैं हर बार वही formatting/voice/method rules paste करता हूँ।" | Skill | brand voice; report template; SOAP notes; review checklist |
| "output हमेशा एक ख़ास तरह से दिखना चाहिए।" | Skill | board-paper structure; invoice layout |
| "मैं Drive / Gmail / Slack / किसी tracker से बार-बार data copy करता रहता हूँ।" | Connector | एक ledger, एक email thread, पिछले हफ़्ते के tickets खींचना |
| "मैं चाहता हूँ कि AI किसी दूसरे app में कुछ करे।" | Connector (write access) | एक Linear issue बनाना; एक email reply draft करना; एक Notion page update करना |
| "मैं असली data लाता हूँ और इसे मेरे ख़ास तरीके से निकलना चाहिए।" | दोनों | monthly client close; weekly content batch; design review |
| "मुझे अभी बस एक one-off जवाब चाहिए।" | कोई नहीं | एक अकेला सवाल; एक quick draft जिसे आप कभी नहीं दोहराएँगे |
दो ईमानदार चेतावनियाँ। पहली, हर चीज़ skill के लायक नहीं होती। जो काम आप एक बार करते हैं वह बस एक अच्छा prompt है; एक skill तभी बनाने लायक है जब काम दोहराया जाए। दूसरी, जिस connector की आपको ज़रूरत नहीं वह एक दरवाज़ा है जिसे आपने खुला छोड़ दिया है। सिर्फ़ वे apps जोड़िए जिनकी किसी workflow को वाक़ई ज़रूरत है, हर वह app नहीं जो आपके पास है। scope ही safety है।
Part 3: अपनी ख़ुद की Skill बनाना (AI इसे आपके लिए बनाता है)
यहाँ वह हिस्सा है जो सुनने में लगता है कि इसमें programming चाहिए, पर है नहीं। आप जो चाहते हैं उसका plain English में वर्णन करेंगे, और AI आपके लिए SKILL.md लिख देगा। फिर आप इसे test करते हैं, ठीक करते हैं, और बस हो गया। कोई code नहीं। चलिए चलते-फिरते example के तौर पर accountant की client-summary skill बनाते हैं।
10. सबसे तेज़ रास्ता: AI को इसे लिखने दीजिए
Anthropic skills बनाने के लिए एक skill देता है, जिसे skill-creator कहते हैं, और ऐसे ही helpers का एक community भी है। आप बस माँगते हैं। Claude.ai में:
Use the skill-creator skill to help me build a skill.

The skill prepares a monthly client financial summary for my
accounting firm. Whenever I ask for a "client summary"
or "monthly close," it should:
- Format all amounts in our reporting currency with thousands separators.
- Group line items by expense head.
- Flag any payment above the tax-withholding reporting threshold.
- Output using my standard four-section report layout
  (Overview, Income, Expenses by Head, Flags & Notes).

Ask me anything you need, then build it.
AI कुछ साफ़ करने वाले सवाल पूछेगा (threshold का आँकड़ा क्या है? template कैसा दिखता है?), फिर एक पूरी, सही formatted skill generate करेगा। यह prompting primer वाला brainstorm-iterate loop है, जो एक draft लिखने के बजाय एक tool बनाने की ओर मोड़ा गया है: context दीजिए, इसे draft करने दीजिए, इसे पढ़िए, feedback दीजिए, दोहराइए।
ध्यान दीजिए अभी क्या हुआ: आपने एक outcome का वर्णन किया, और AI ने artifact बना दिया, SKILL.md और skill के लिए ज़रूरी कोई भी code, बिना आपके एक line लिखे या पढ़े। यह ठीक वही चाल है जिसे पिछले Foundations crash course, Code You Never Write, ने एक पूरे अनुशासन में बदला: आप client हैं, contractor नहीं। एक अच्छा client ख़ुद ईंटें नहीं रखता; वह एक साफ़ brief लिखता है, नतीजे को उन चीज़ों के against जाँचता है जिन्हें वह माप सकता है, और जिसका उसने भुगतान किया है उसे रखता है। एक skill बस वही idea है जो स्थायी बना दिया गया हो: एक बार commission की गई, हमेशा के लिए दोबारा इस्तेमाल। आप उस course में commission करना practice कर चुके हैं; यहाँ आप commission को एक skill के तौर पर save करके इसे टिकाऊ बनाते हैं।
आप यही चीज़ बाक़ी surfaces पर भी कर सकते हैं (skill का वर्णन कीजिए, agent को file लिखने दीजिए), और यह जो बनाता है उसका shape हर जगह एक जैसा है, क्योंकि skills एक open standard हैं। (Part 4 बताता है कि हर surface इसे कहाँ save करता है, और ChatGPT और Gemini के equivalents कैसे अलग हैं।) इसलिए उस shape को समझना सही रहेगा।
11. एक SKILL.md की anatomy
हर skill की वही सरल structure है। यहाँ हमारी accountant skill का एक minimal version है; इसे एक बार पढ़िए और रहस्य ख़त्म:
---
name: client-monthly-summary
description: Prepares a monthly client financial summary for an
  accounting firm. Use when the user asks for a "client summary",
  "monthly close", or "month-end report". Formats amounts in the
  firm's reporting currency, groups by expense head, and flags
  tax-withholding items.
---

# Client Monthly Summary

## Settings (edit these to make it yours)

- Reporting currency: your currency (e.g., USD, EUR, NGN)
- Withholding threshold: the amount above which to flag a payment (e.g., 50,000)

## Instructions

When asked to prepare a client summary or monthly close:

1. Format every amount in the reporting currency above, with thousands
   separators (e.g., "1,250,000").
2. Group all line items by expense head. Sort heads by total,
   largest first.
3. Flag any single payment above the withholding threshold above
   with a "⚑ WITHHOLDING" note.
4. Produce the report in exactly four sections, in this order:
   Overview, Income, Expenses by Head, Flags & Notes.

## Example

User: "Prepare the March summary for DEMO Trading."
Result: A four-section report, currency-formatted, withholding lines flagged.
बस दो हिस्से, और इतना ही:
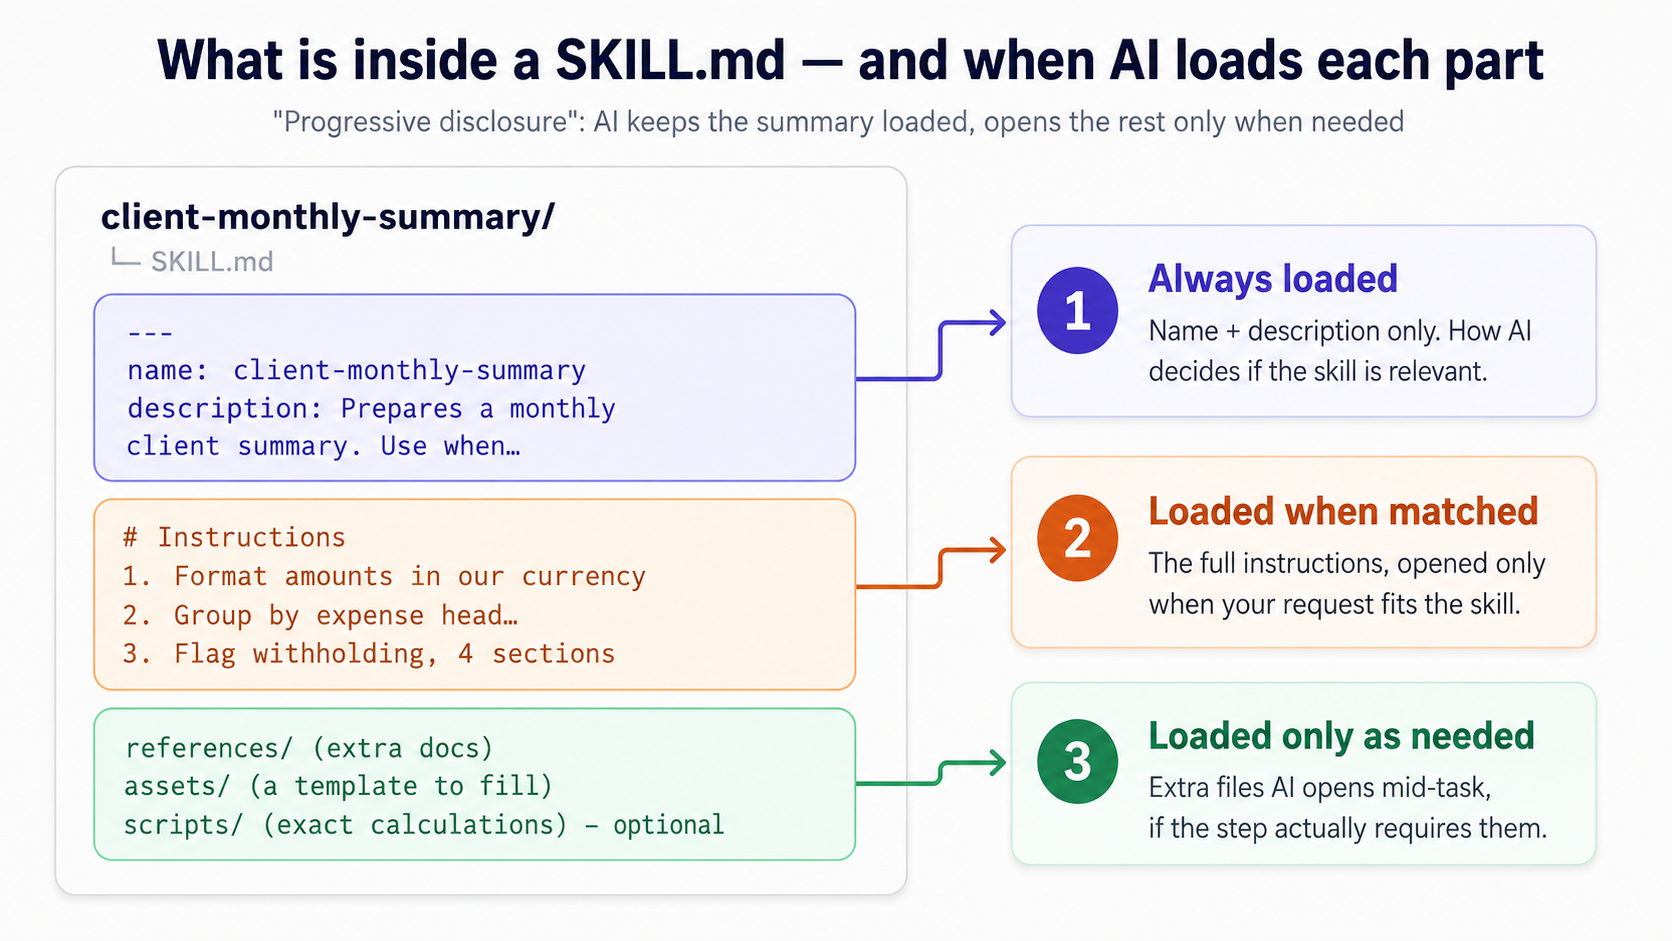
- frontmatter (
---lines के बीच):nameऔरdescription। यह एकमात्र चीज़ है जो AI हर वक़्त loaded रखता है। इसी से AI तय करता है कि यह skill relevant है या नहीं: progressive disclosure, level one। - body (इसके बाद का सब कुछ): असली instructions, सिर्फ़ तभी load होते हैं जब description आपकी request से मेल खाए: level two।
ज़्यादा जटिल skills के लिए आप एक references/ folder जोड़ सकते हैं (विस्तृत docs जिन्हें AI ज़रूरत पड़ने पर पढ़ता है, level three), एक assets/ folder (भरने के लिए एक template file), और scripts/ (उन steps के लिए छोटे programs जिन्हें बिल्कुल सटीक होना चाहिए)। शुरू करने के लिए आपको इनकी ज़रूरत नहीं होगी। कुछ rules जो आम upload errors से बचाते हैं:
- file का नाम बिल्कुल
SKILL.mdहोना चाहिए। - folder का नाम
kebab-caseइस्तेमाल करता है:client-monthly-summary✅, न किClient Monthly Summary❌ याclient_monthly_summary❌। nameऔरdescriptionमें कोई XML-style tags नहीं होने चाहिए (angle brackets के अंदर कुछ भी, जैसे<note>), और description छोटा और specific रहना चाहिए, platform की length limit के अंदर आराम से (एक-दो वाक्य आदर्श हैं)।- किसी skill के नाम में "claude" या "anthropic" न रखिए; वे reserved हैं।
12. description field ही पूरा खेल है
अगर आपको skills बनाने के बारे में एक चीज़ याद रखनी है, तो यह याद रखिए: description तय करता है कि आपकी skill कभी fire होगी भी या नहीं। AI relevance तय करने के लिए आपके instructions नहीं पढ़ता; यह सिर्फ़ description पढ़ता है। एक धुँधला description मतलब एक ऐसी skill जो कभी trigger नहीं होती; एक तीखा मतलब यह ठीक तभी activate होती है जब इसे होना चाहिए।
formula: यह क्या करती है + इसे कब इस्तेमाल करना है + वे exact phrases जो आप वाक़ई कहेंगे।
| ख़राब description | यह क्यों fail होता है | बेहतर description |
|---|---|---|
| "reports में मदद करती है।" | बहुत धुँधला - हर चीज़ पर या किसी चीज़ पर नहीं fire होता है। | "एक monthly client financial summary तैयार करती है। तब इस्तेमाल करें जब user एक 'client summary', 'monthly close', या 'month-end report' माँगे।" |
| "patient documentation सँभालती है।" | कोई trigger words नहीं जो कोई user कहे। | "consultation notes को SOAP-format clinical notes में बदलती है। तब इस्तेमाल करें जब user एक 'SOAP note', 'clinical note' माँगे, या किसी consultation को 'write up' करने को कहे।" |
| "marketing के लिए brand वाली चीज़ें।" | पता नहीं क्या और कब। | "हमारी brand voice में social captions लिखती है (कोई exclamation marks नहीं, question-hook openings)। Instagram, LinkedIn या X captions draft करते समय इस्तेमाल करें।" |
एक काम की debugging trick जब कोई skill install हो जाए: AI से पूछिए, "मेरी client-summary skill को आप कब इस्तेमाल करेंगे?" यह description को आपके सामने अपने शब्दों में दोहरा देगा। अगर इसका जवाब आपके इरादे से संकरा या चौड़ा है, तो आपको ठीक वही मिल गया जिसे description में fix करना है।
जब कोई skill ज़रूरत से ज़्यादा उत्साह से fire हो तो आप negative triggers भी जोड़ सकते हैं: "one-off calculations या quick questions के लिए इस्तेमाल मत करो - सिर्फ़ पूरे month-end reports के लिए।"
13. test करें, फिर iterate करें
कोई skill पहले draft पर कभी "पूरी" नहीं होती। भरोसेमंद build loop, इस आधार पर ढाला गया कि अनुभवी skill-builders असल में कैसे काम करते हैं:
- skill का वर्णन कीजिए और AI को पहला version generate करने दीजिए।
- इसे पढ़िए और test से पहले जो भी साफ़ ग़लत हो उसे ठीक कीजिए।
- triggering test कीजिए। वे phrases आज़माइए जिन्हें इसे activate करना चाहिए ("client summary तैयार करो," "monthly close करो," "month-end report लिखो") और पुष्टि कीजिए कि यह load होती है। बेमेल requests आज़माइए और पुष्टि कीजिए कि यह उन्हें अपने हाथ में नहीं लेती जिन्हें नहीं लेना चाहिए।
- output test कीजिए। skill को किसी असली (या असली जैसे) input पर चलाइए। क्या यह सही currency में format करती है? head के हिसाब से group करती है? withholding flag करती है? चारों sections को छूती है?
- इसे मुश्किल मामलों के साथ test कीजिए। एक client जिसकी उस महीने कोई income नहीं। एक payment ठीक threshold पर। एक गड़बड़ ledger। जहाँ यह fail हो, instructions को ज़्यादा सटीक बनाइए, और सोचिए कि क्या किसी पेचीदा calculation को एक prose instruction के बजाय एक छोटा
scriptहोना चाहिए, क्योंकि code सटीक होता है और prose की व्याख्या होती है। - failures को वापस skill-creator के पास लाइए: "इस skill ने reversed entries की दोहरी गिनती कर दी। इसे update करो ताकि group करने से पहले reversals को net out कर दे।"
दो failure patterns और उनके fixes:
- यह कभी trigger नहीं होती → description बहुत धुँधला है या उन शब्दों से ख़ाली है जो आप वाक़ई इस्तेमाल करते हैं। उन्हें जोड़िए।
- यह ग़लत चीज़ों पर trigger होती है → description बहुत चौड़ा है। इसे संकरा कीजिए, या एक negative trigger जोड़िए।
थोड़ी-सी testing बहुत असरदार होती है। किसी personal formatting skill के लिए आपको पचास test runs की ज़रूरत नहीं; पर इसे असली client काम पर भरोसा करने से पहले आप कुछ test runs ज़रूर चाहते हैं, जिनमें एक जानबूझकर अटपटा मामला भी शामिल हो।
14. अपनी skill save और share करना
एक बार skill तैयार हो जाए, तो इसे save करने में एक click लगता है। जब skill-creator ख़त्म करता है, तो यह आपकी skill को chat के बग़ल एक panel में एक Save skill button के साथ दिखाता है। इसे click कीजिए, और skill सीधे आपकी Personal skills (Customize → Skills) में चली जाती है, on, तैयार, और आपके account तक निजी। कोई zip नहीं, कोई upload नहीं।
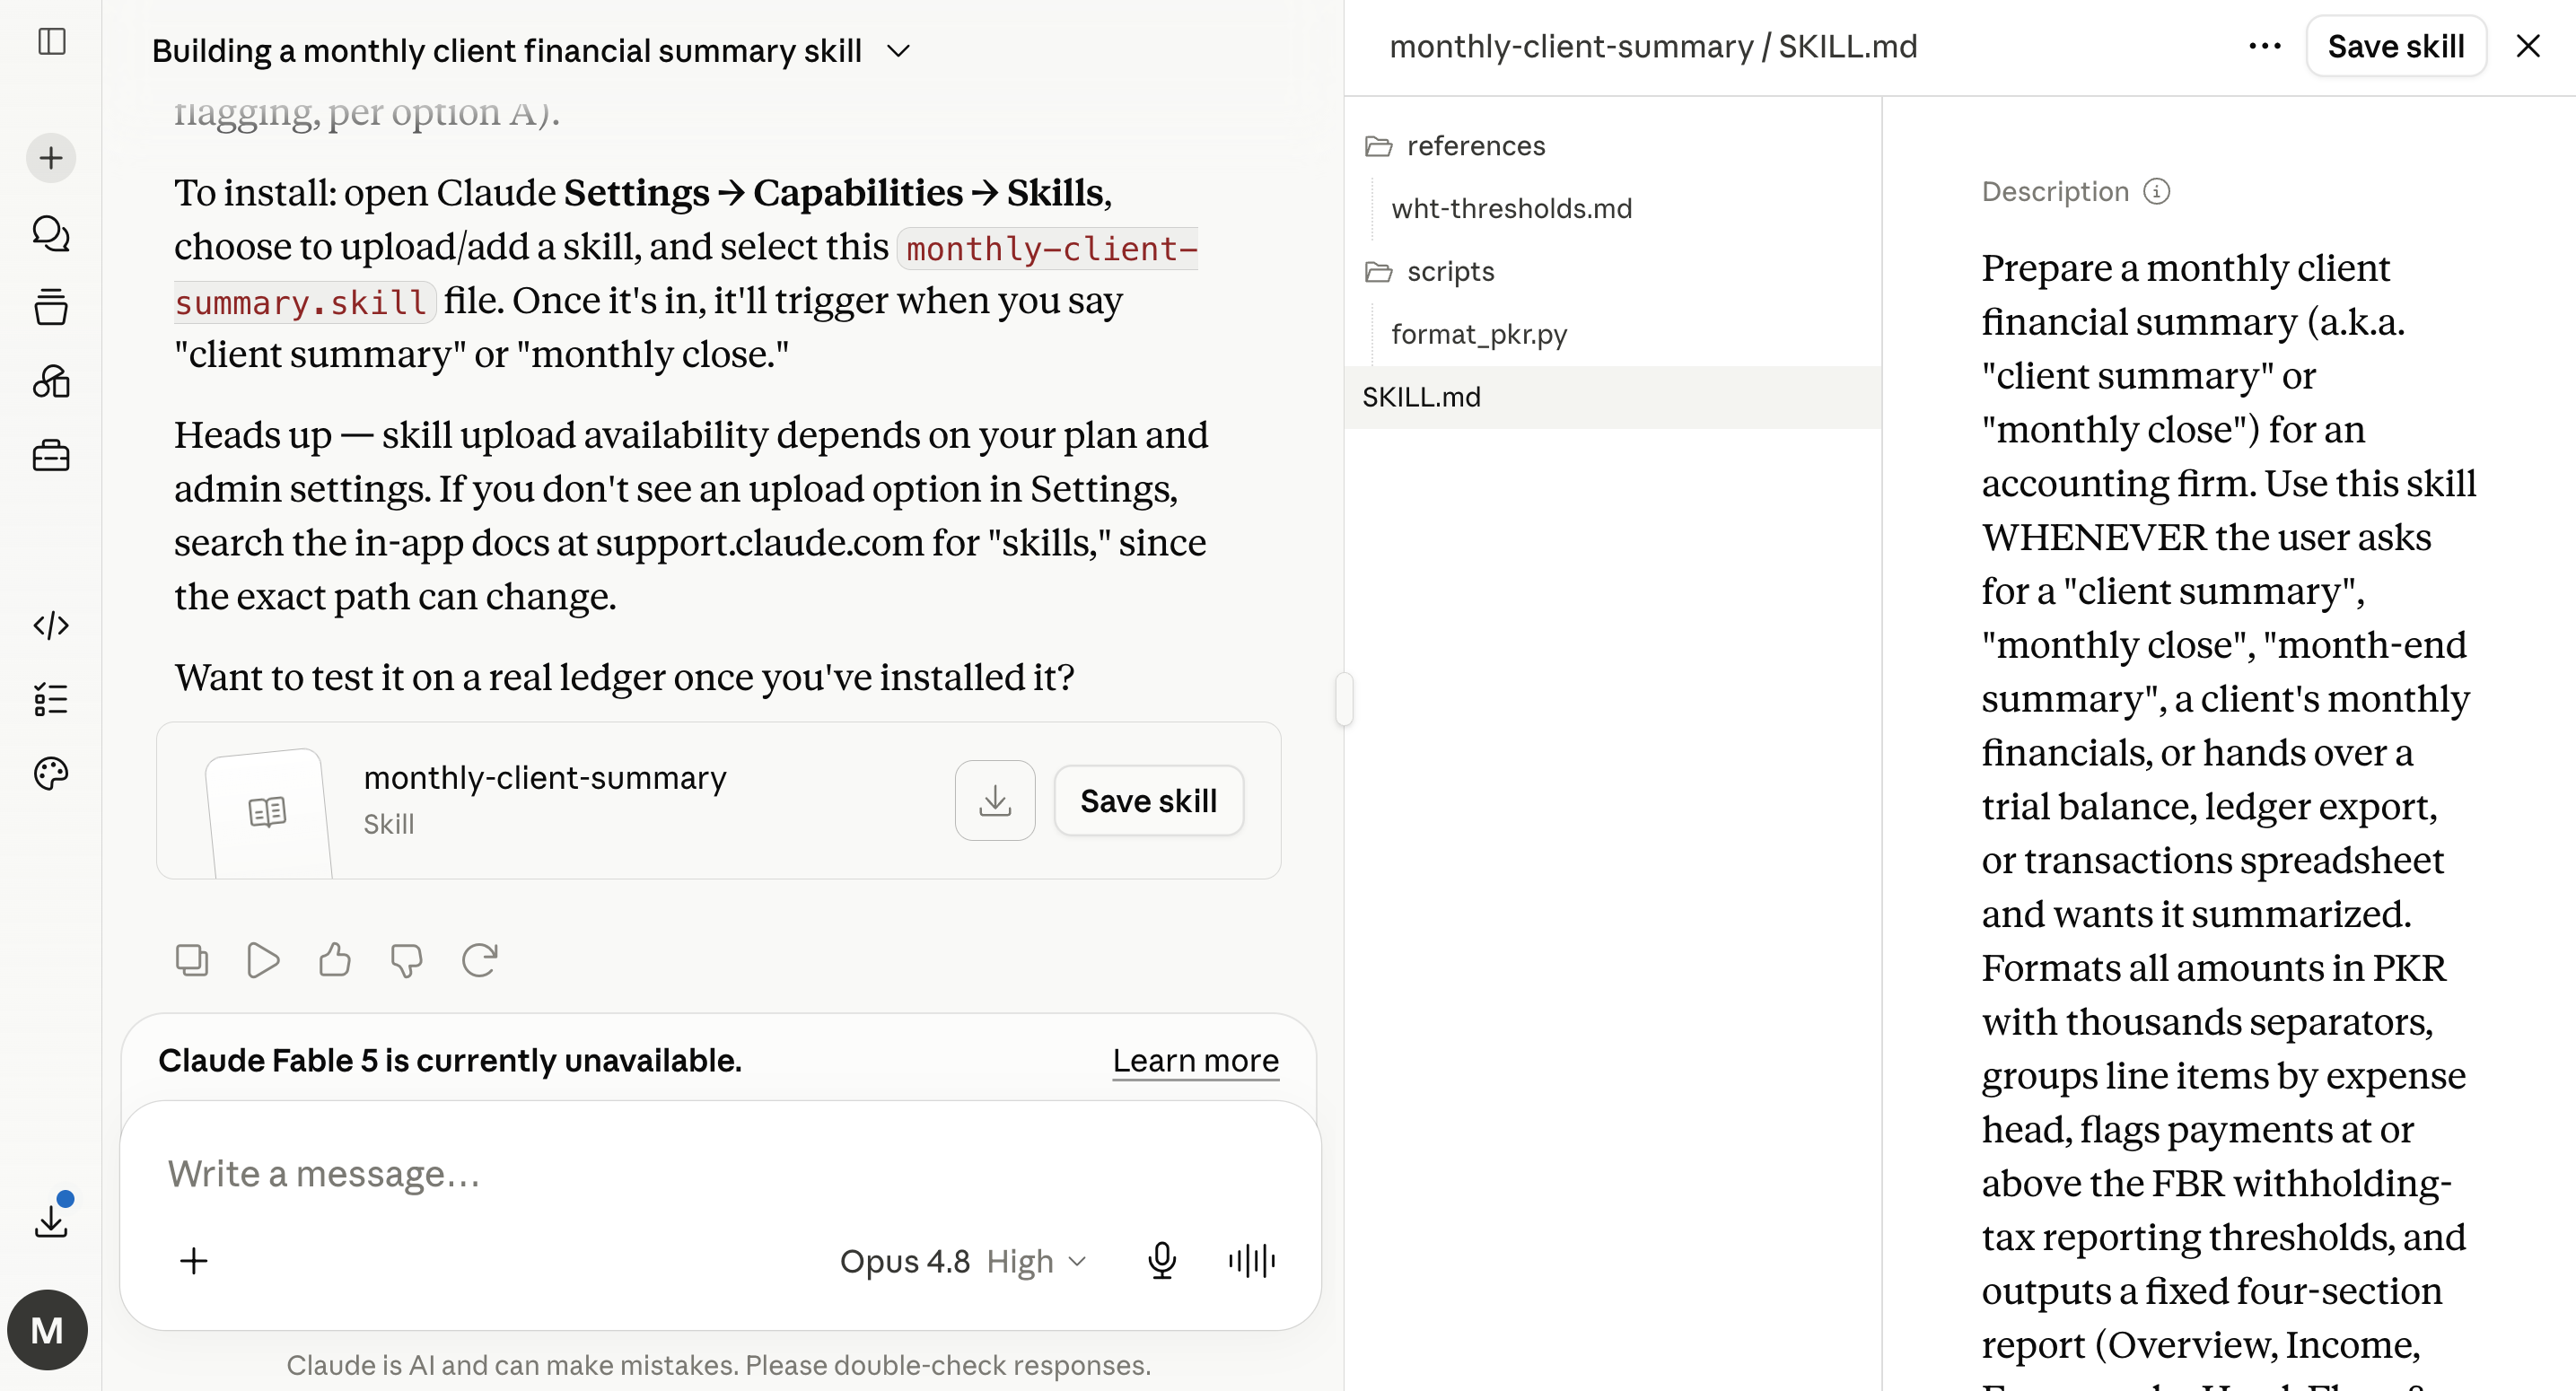
जब build पूरा हो जाए, तो एक Save skill click इसे आपके shelf पर रख देता है। कहीं और से कोई skill folder है? आप इसे फिर भी हाथ से जोड़ सकते हैं: Customize → Skills → "+" → Create skill → folder upload करें।
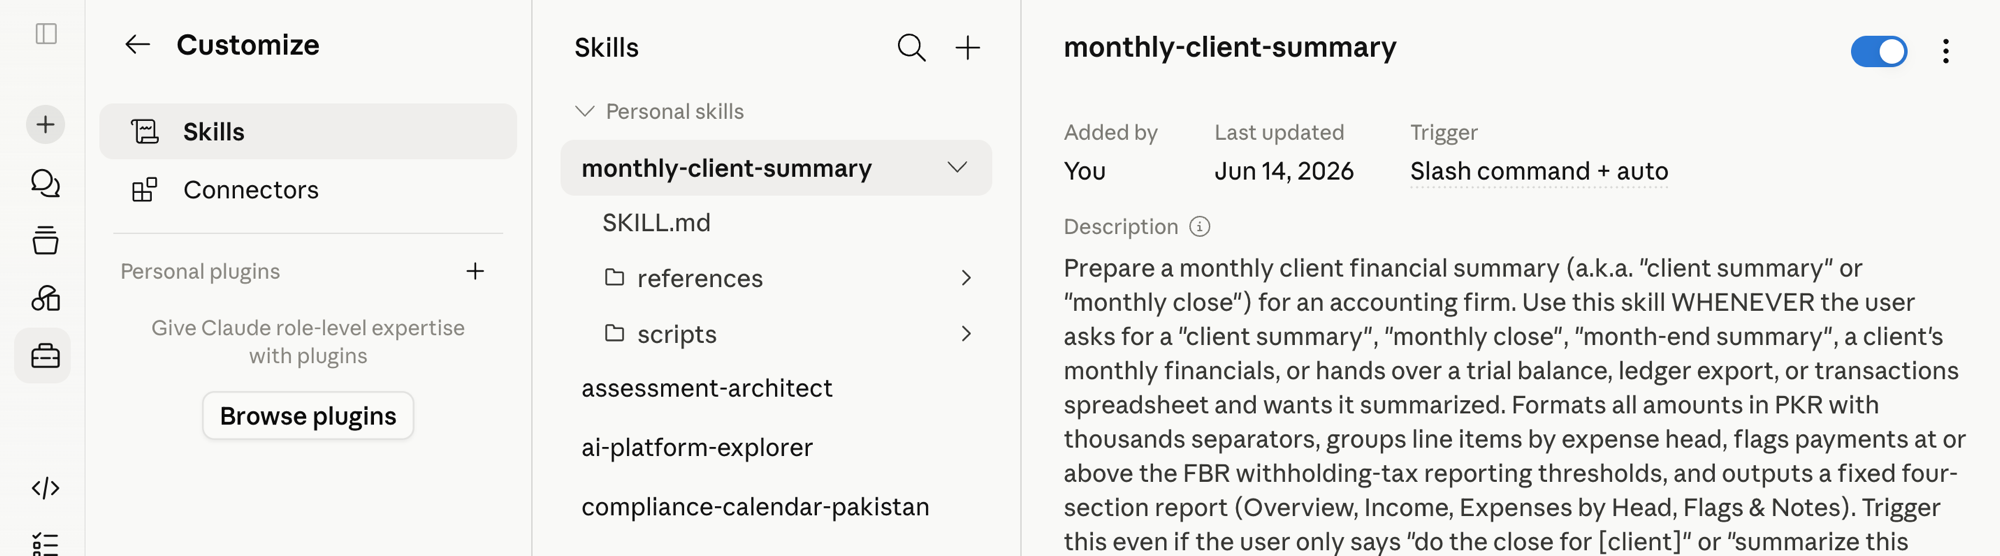
वही shelf जिस पर section 6 में सिर्फ़ skill-creator थी, अब आपकी अपनी skill रखती है, "Added by You", तैयार है fire होने के लिए जब भी आप "client summary" या "monthly close" कहें।
Team या Enterprise plans पर, आप और आगे जा सकते हैं: एक skill को ख़ास colleagues के साथ share कर सकते हैं या इसे अपने organization की directory में publish कर सकते हैं ताकि हर कोई इसे install कर सके। shared skills view-only होती हैं और जब आप original बदलते हैं तो auto-update हो जाती हैं, जो यह standardize करने के लिए काम का है कि एक पूरी accounting firm या clinic अपने documents कैसे बनाती है। (sharing default रूप से off है; एक owner पहले इसे enable करता है।)
Part 4: वही skill, पाँच जगहें
आप इस काम के लिए पाँच tools के बारे में सुनेंगे, और अच्छी ख़बर सच है: जो skill आप एक बार लिखते हैं वह portable है। December 2025 में Anthropic ने Agent Skills open standard publish किया (agentskills.io पर), और इसे अपनाना तेज़ रहा। कुछ ही महीनों में, दूसरे vendors के tools, जिनमें OpenAI का Codex CLI और Google का Gemini CLI शामिल हैं, उन्हीं SKILL.md files को पढ़ने पर राज़ी हो गए। ईमानदार चेतावनी: एक basic SKILL.md skill, skills-compatible tools में सफ़र करती है, पर हर product अपना install path, invocation syntax, permissions और ऊपर से extra features जोड़ता है, इसलिए core portable है जबकि किनारे अलग होते हैं। आपकी लिखी recipe कई kitchens में टँगी रहती है, भले हर kitchen अपनी shelves को थोड़ा अलग ढंग से जमाए।
उसी महीने, Linux Foundation ने Agentic AI Foundation बनाया ताकि इस तरह के infrastructure को neutral, cross-vendor governance मिले। इसके founding projects में से एक है MCP, वही standard जिस पर आपके connectors चलते हैं, इसलिए Skills और Connectors दोनों के नीचे की plumbing अब किसी एक company के बजाय खुले में चलाई जाती है। किसी skill को इस्तेमाल करने के लिए आपको इसमें से कुछ नहीं चाहिए; यह बस यह बताता है कि "portable" एक सुरक्षित दाँव क्यों है और किसी एक vendor का वादा क्यों नहीं।
यहाँ हर surface है, यह किसके लिए है, और तीन मुख्य कदम (एक skill install करना, एक app जोड़ना, और अपनी ख़ुद की बनाना) वहाँ असल में कैसे होते हैं:
| Surface | यह किसके लिए है | एक skill install करें | एक app जोड़ें | अपनी ख़ुद की बनाएँ |
|---|---|---|---|---|
| Claude.ai (web/mobile) | हर कोई — आपका मुख्य tool | directory में Install पर click करें, या एक zip upload करें | "+" → Connectors → चुनें → sign in करें | skill-creator इसे लिखती है; Save skill पर click करें |
| Cowork / OpenWork (desktop) | knowledge workers, non-coders | वही directory; enabled skills अपने आप दिखती हैं | वही flow, साथ ही आपके computer पर पहले से पड़ी files तक पहुँचता है | इसका वर्णन करें; agent इसे सीधे एक folder में save कर सकता है |
| Claude Code / OpenCode (terminal) | वे लोग जो code के साथ काम करते हैं | skill folder को skills directory में डाल दें | एक बार एक config file में set करें, फिर plain language में पूछें | agent से कहें "...के लिए एक skill बनाओ"; यह files लिख देता है |
हर जोड़ी में, पहला tool commercial है और दूसरा open-source विकल्प; दोनों वही SKILL.md पढ़ते हैं।
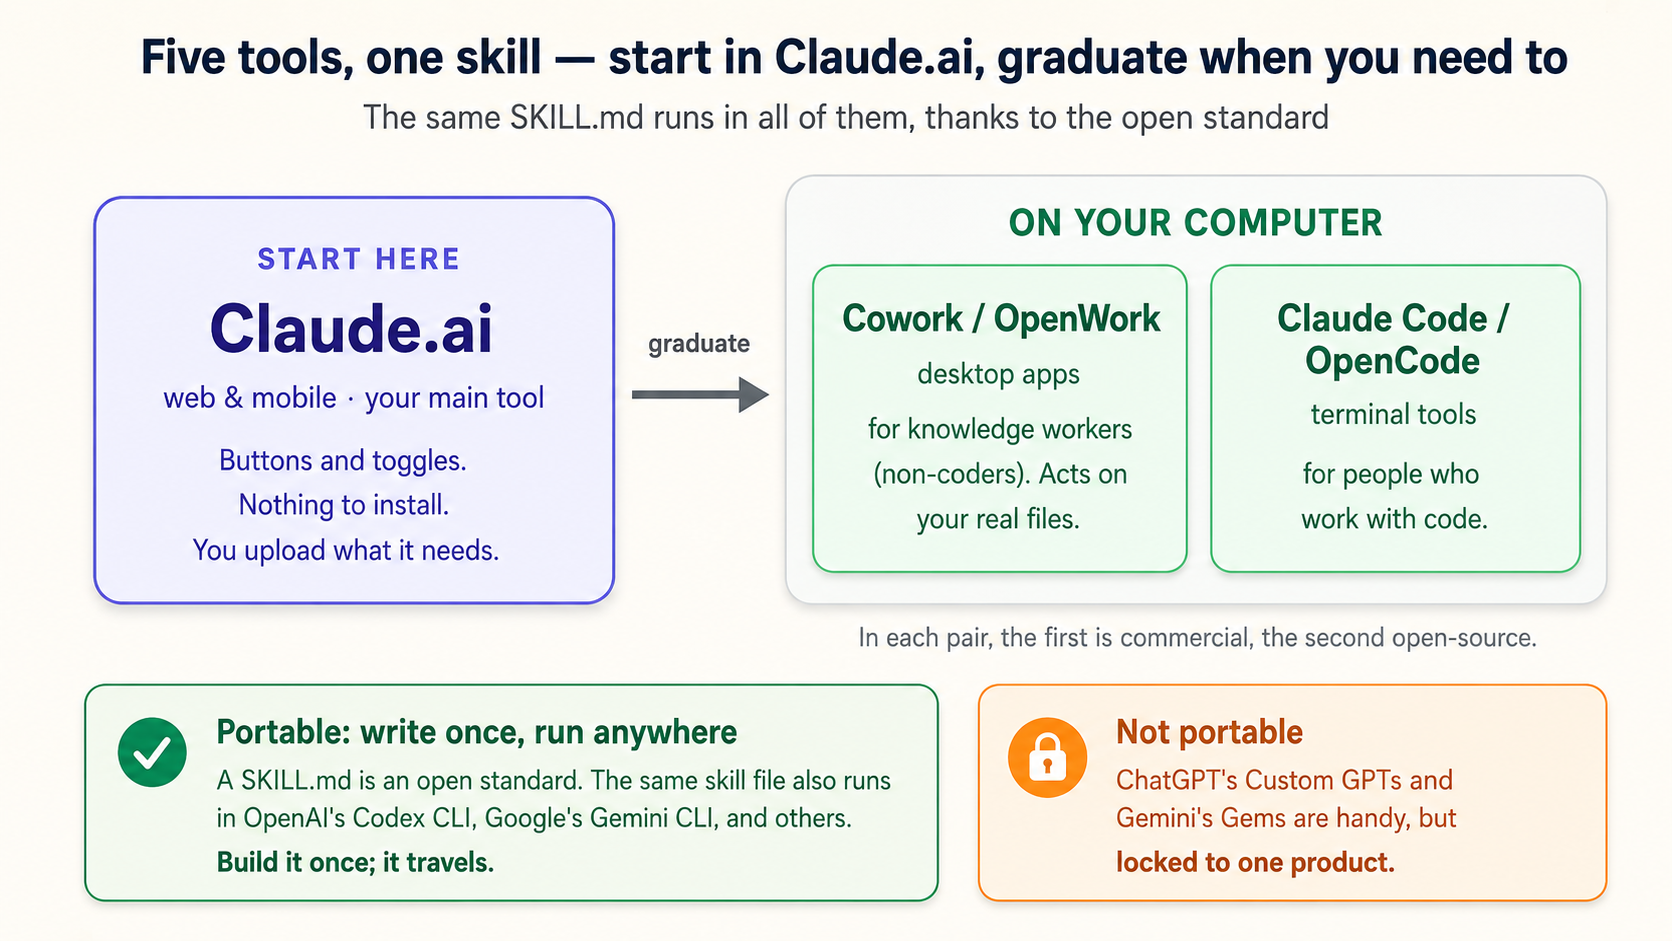
non-programmers के लिए, ईमानदार सलाह है: Claude.ai में शुरू करें और वहीं रहें। Parts 1–3 का सब कुछ वहाँ buttons और toggles के साथ होता है, सँभालने के लिए कोई files नहीं। Cowork (और इसका open चचेरा भाई OpenWork) स्वाभाविक अगला कदम है जब आप चाहते हैं कि AI सीधे आपके computer पर पड़ी files और folders पर काम करे, बजाय उन चीज़ों के जिन्हें आप एक-एक करके upload करते हैं: वही skills, आपके असली desktop पर लागू। Claude Code और OpenCode एक terminal में रहते हैं और उन लोगों के लिए हैं जो code लिखते हैं या उसके साथ काम करते हैं; open standard का मतलब है कि Claude.ai में बनाई आपकी skill यहाँ भी आ जाती है, उस tool के अपने setup के साथ।
ChatGPT और Gemini के बारे में क्या?
दो बातें एक साथ सच हैं, और सटीक रहना ज़रूरी है क्योंकि marketing इन्हें धुँधला कर देती है।
Skills पर, तस्वीर वाक़ई cross-vendor है। चूँकि Agent Skills एक open standard है, OpenAI (Codex CLI) और Google (Gemini CLI) के command-line tools, साथ ही VS Code, Cursor और दूसरे, उन्हीं SKILL.md files को पढ़ते हैं। skill इस course का वह एकमात्र हिस्सा है जो Claude से बँधा नहीं है। इसे एक बार लिखिए; इसे कई tools में चलाइए।
consumer chat apps के अंदर "एक बार सिखा दो" पर, हर vendor का अपना, non-portable version है:
- ChatGPT में Custom GPTs हैं: आपके instructions और optional knowledge files के साथ ChatGPT का एक saved version, जो GPT Store के ज़रिए बँटता है। ताक़तवर, पर यह सिर्फ़ ChatGPT के अंदर रहता है।
- Gemini में Gems हैं: instructions और knowledge files के साथ एक saved Gemini persona, जो सिर्फ़ Google के apps के अंदर रहता है।
जो भेद मायने रखता है: एक Skill portable है (open standard, कई tools); एक GPT या Gem एक vendor-specific custom assistant है जिसे आप कहीं और नहीं ले जा सकते। अगर आप कभी सिर्फ़ एक ही tool इस्तेमाल करते हैं, तो एक GPT या एक Gem बिल्कुल ठीक है। अगर आपकी strategy एक से ज़्यादा models तक फैली है, जो यह किताब कहती है कि होनी चाहिए, तो Skills ही future-proof विकल्प हैं।
Connectors पर, तीनों के पास एक equivalent है: ChatGPT और Gemini दोनों apps और data से जुड़ते हैं (ChatGPT अपने connectors/apps के ज़रिए; Gemini अपने Workspace integration और extensions के ज़रिए)। नीचे की MCP technology बढ़ते हुए साझा होती जा रही है। principle हर जगह एक जैसा है: आप access देते हैं, AI को आपकी permissions विरासत में मिलती हैं, आप read-only से शुरू करते हैं।
इसे Claude.ai में सीखिए। concepts (एक बार सिखाओ, अपने apps जोड़ो, automatic invocation, अपना access scope करो) हर tool में जाते हैं। जहाँ कोई feature Claude-specific है, हमने बता दिया है।
Part 5: इसे सुरक्षित तरीके से इस्तेमाल करें (वह हिस्सा जिसे ज़्यादातर tutorials जल्दबाज़ी में निपटा देते हैं)
वही principle जो What AI Actually Is (Idea 3) में है: model के अंदर कुछ भी यह check नहीं करता कि कोई action सुरक्षित या सही है या नहीं; वह check आप हैं। किसी skill को enable करने से पहले उसे पढ़िए; किसी connector पर भरोसा करने से पहले उसे scope कीजिए।
Skills और connectors ताक़तवर हैं, जिसका मतलब है कि वे थोड़ी सावधानी के लायक हैं। इस section का सबसे ज़रूरी वाक्य:
एक skill instructions का एक set है जिसे आप AI से follow करा रहे हैं, और एक connector आपके असली data में जाने वाला एक दरवाज़ा है। किसी अजनबी की skill को एक ऐसे contract की तरह लीजिए जिस पर आप sign करने वाले हैं, और एक connector को एक ऐसी चाबी की तरह जिसे आप सौंपने वाले हैं।
दो असली जोखिम
-
Malicious skills. चूँकि एक skill बस एक text file है (और शायद scripts), एक बदनीयत इंसान ऐसी एक लिख सकता है जिसके छिपे instructions AI से वह करवाएँ जो आपका इरादा नहीं था: data leak करना, किसी संदिग्ध server से संपर्क करना, या चुपचाप ग़लत व्यवहार करना। दो नामित ख़तरे हैं prompt injection (skill AI को अनचाहे actions में हेर-फेर कर देती है) और data exfiltration (skill का code या instructions चुपके से आपकी जानकारी बाहर भेज देते हैं)। यह काल्पनिक नहीं है; यही वजह है कि "मैंने social media से एक मुफ़्त skill download की" एक ऐसा वाक्य है जिस पर आपको रुककर सोचना चाहिए।
-
हद से ज़्यादा चौड़ा connector access. एक connector सिर्फ़ वहीं पहुँच सकता है जहाँ आप पहुँच सकते हैं, पर अगर आप लापरवाही से write access दे देते हैं, तो AI आपकी ओर से चीज़ें बदल सकता है। जोखिम आम तौर पर नाटकीय नहीं होता; यह एक ग़लत edit है, ग़लत जगह बना एक record, या बिना आसान undo के delete हुई एक file।
सुरक्षित इस्तेमाल की checklist
- भरोसेमंद sources से skills install कीजिए। built-in Anthropic skills और official directory सुरक्षित default हैं। किसी forum से उठाई कोई बेतरतीब zip नहीं।
- किसी skill को enable करने से पहले उसे पढ़िए।
SKILL.mdऔर साथ बँधी कोई भी files खोलिए। आप यह AI से भी करवा सकते हैं: "इस skill को पढ़ो और मुझे ठीक-ठीक बताओ कि यह तुम्हें क्या करने का निर्देश देती है। ऐसी किसी भी चीज़ को flag करो जो बाहरी servers से संपर्क करती हो, credentials सँभालती हो, या मेरा data leak कर सकती हो।" scripts पर और internet तक पहुँचने वाले किसी भी instruction पर ख़ास ध्यान दीजिए। - connectors को read-only से शुरू कीजिए। "send" या "create" या "delete" से पहले "search and summarize" दीजिए। write access तक तभी बढ़िए जब आप tool को अच्छा व्यवहार करते देख लें।
- काम को जितने छोटे folder या app की ज़रूरत हो उतने तक scope कीजिए। हर चीज़ मत जोड़िए; एक-folder वाले काम के लिए पूरी-drive का access मत दीजिए।
- AI को files edit, move या delete करने की अनुमति देने से पहले, पुष्टि कीजिए कि वह ख़ास connector recovery, version history और undo को कैसे सँभालता है। कुछ write actions उस recovery path को overwrite या bypass कर सकते हैं जिसकी आप उम्मीद करते हैं, इसलिए जिस चीज़ को आप खो नहीं सकते उसका अपना backup रखिए।
- किसी team में, shared skills को अपने organization की directory के ज़रिए route कीजिए, जहाँ एक owner ने उन्हें review किया हो, बजाय इधर-उधर zips पास करने के।
इनमें से किसी से भी आपको डरना नहीं चाहिए; built-in tools सुरक्षित हैं और रोज़ का workflow कम-जोखिम है। बात बस इतनी है कि जैसे-जैसे आप "जो built in आता है उसे इस्तेमाल करो" से "community skills install करो और write access दो" की ओर बढ़ते हैं, आपकी सावधानी भी उसी हिसाब से बढ़नी चाहिए। क्षमता और सावधानी साथ-साथ बढ़ती हैं।
Recap
पूरा page कुछ lines में:
- एक chat AI को बताता है कि एक बार क्या करना है; एक Skill इसे सिखाता है कि हर बार कैसे; एक Connector इसे आपके apps तक पहुँचने के हाथ देता है। (kitchen: connectors kitchen हैं, skills recipes हैं।)
- एक Skill एक folder है जिसमें एक
SKILL.mdtext file होती है: एक name, एक description, और plain-English instructions। शुरू करने के लिए कोई code ज़रूरी नहीं। - एक Connector किसी app तक सुरक्षित, permission-scoped access है (Drive, Gmail, Slack, एक tracker), जो MCP standard पर चलता है। AI को आपकी permissions विरासत में मिलती हैं।
- Claude.ai में, skills अपने आप fire होती हैं जब आपका prompt उनके description से मेल खाता है। slash commands और skill का नाम लेना override tools हैं, जिनका इस्तेमाल Cowork और developer apps में ज़्यादा होता है। इसलिए description ही सबसे ज़रूरी चीज़ है जो आप लिखते हैं।
- रुकावट से diagnose कीजिए: कैसे दोबारा समझाना → Skill; किसी app से copy-paste करना → Connector; दोनों → दोनों।
- आप skills को AI से वर्णन करके बनाते हैं (skill-creator लिखने का काम करती है); फिर आप triggering और output test करते हैं और iterate करते हैं।
- एक बार लिखी skill कई tools में चलती है, Agent Skills open standard की बदौलत, ChatGPT के GPTs या Gemini के Gems के उलट, जो vendor-locked हैं। इसे Claude.ai में सीखिए; concepts Claude Code, OpenCode, Cowork, OpenWork और उससे आगे तक जाते हैं।
- सावधानी क्षमता के साथ बढ़ती है: enable करने से पहले skills पढ़िए, भरोसेमंद sources से install कीजिए, connectors को read-only से शुरू कीजिए, access को कसकर scope कीजिए।
इन सबके नीचे वही बदलाव है जिस पर यह किताब लौटती रहती है: AI एक ऐसा box रहना बंद कर देता है जिसमें आप type करते हैं और एक ऐसी layer बन जाता है जो आपके standards जानती है और आपके tools तक पहुँचती है। Skills और Connectors वह तरीक़ा हैं जिससे एक आम professional, बिना किसी programming और कुछ toggles से ज़्यादा किसी setup के, यह बदलाव इसी हफ़्ते कर लेता है।
अभी यह आज़माएँ
पढ़ना करने का विकल्प नहीं है। Claude.ai खोलिए (free tier काफ़ी है) और इन्हें क्रम में चलाइए। लगभग तीस मिनट का बजट रखिए।
1. एक built-in skill trigger कीजिए। पुष्टि कीजिए कि file-creation on है (Settings → Capabilities), फिर:
Turn this into a one-slide PowerPoint with a title and three
bullet points: [paste any three facts about your work].
आपने कोई skill नाम नहीं ली; देखिए PowerPoint skill अपने आप fire होती है।
2. एक app जोड़िए, read-only। Google Drive (या Gmail) जोड़िए, इसे chat के लिए enable कीजिए, फिर:
Find [a specific document] in my Drive and give me a three-sentence
summary plus the three numbers that matter most.
ध्यान दीजिए आपने कुछ भी download या paste नहीं किया।
3. अपनी पहली skill बनाइए, बात करके। अपने हफ़्ते का वह सबसे दोहरावदार "मैं बार-बार समझाता रहता हूँ कि कैसे" वाला काम चुनिए। फिर:
Use the skill-creator skill to help me build a skill for [your task].
Here's exactly how I want it done every time: [list your rules,
your format, your must-dos and must-nots]. Ask me anything you
need, then build it.
4. description को pressure-test कीजिए। बनने और install होने के बाद:
When would you use the skill we just made? And when would you
NOT use it?
अगर जवाब बहुत चौड़ा या बहुत संकरा है, तो इसे fix बताइए और description update कराइए।
5. एक skill की safety audit कीजिए। कोई भी ऐसी skill लीजिए जो आपने ख़ुद नहीं लिखी और:
Read this skill and tell me, in plain language, exactly what it
instructs you to do. Flag anything that contacts an external
server, handles credentials, or could send my data anywhere.
6. अपने तीन कामों को diagnose कीजिए। अपने काम की तीन बार-बार होने वाली झुँझलाहटें लिखिए। हर एक के लिए जवाब दीजिए: रुकावट कैसे दोबारा समझाना है (एक Skill), किसी app से लाना है (एक Connector), या दोनों? अब आपके पास अपने पहले तीन projects हैं।
🚀 Projects
ऊपर की exercises में हर एक ने एक idea को अलग किया। ये projects पूरे chapter को एक साथ पिरोकर कुछ ऐसा बनाते हैं जिसे आप रखते हैं: एक असली asset जो आपका अपना है और जिसे आप किसी और को सौंप सकते हैं, साथ ही किसी skill पर भरोसा करने से पहले उसे जाँचने की आदत। न दिखाने के लिए कोई screen, न publish करने के लिए कोई link। आप साथ ले जाते हैं एक private skill (एक SKILL.md और उसके इर्द-गिर्द का connected workflow) और एक वाक्य जो आप किसी असली इंसान से कह सकते हैं कि यह अब आपके लिए क्या करती है।
एक filter तय करता है कि कोई काम skill के लायक है भी या नहीं: market-of-one test. एक skill तभी अपनी जगह कमाती है जब यह आपका ख़ास दोहराया हुआ तरीका encode करती है, वह चीज़ जो कोई app आपके लिए नहीं करता। कोई ऐसा app नहीं बेचता जो आपके class notes को आपके format में लिखे, या आपकी firm की report को आपकी firm के चार sections में; वही खाई ठीक वहाँ है जहाँ एक skill store के हर tool को मात देती है। जो काम कोई app पहले से सबके लिए करता है वह बस एक अच्छा prompt है, skill नहीं।
ये क्रम में हैं। Project 1 इस हफ़्ते कीजिए, किसी ऐसे काम पर जिसे आप वाक़ई दोहराते हैं, और हर एक एक free account में फ़िट बैठता है।
Project 130-45 minअपनी पहली असली skill बनाएँअपने सबसे ज़्यादा दोहराकर समझाए जाने वाले काम को एक ऐसी skill में बदलें जो आपका तरीका बस जान जाए।
Part 3 का पूरा build loop बस तीन messages है। Claude.ai खोलिए और इसे शब्द-दर-शब्द paste कीजिए, ताकि बात करके एक असली skill बने:
Use the skill-creator skill to build me a weekly study-notes skill.
Whenever I ask for "study notes" or "weekly notes", take my raw class
notes and format them as a heading per topic, a short bold key-terms
list, and exactly three review questions at the end. Ask me anything
you need, then build it.
skill-creator आपसे एक-दो छोटे सवाल पूछती है, SKILL.md लिखती है, और एक sample पर इसे test-run करती है ताकि आप output देख सकें। Save skill पर click कीजिए और यह आपके shelf (Customize → Skills) पर आ जाती है, आपके लिए private। (यह study-notes skill बनाता है। इसे अपने काम के बारे में बनाने के लिए, वही shape रखिए और उस चीज़ को swap कर दीजिए जिसे आप बार-बार type करते हैं, अपना report format, अपनी brand voice, अपनी review checklist, और अपने exact rules।)
इसके बाद, description check कीजिए, वह हिस्सा जो तय करता है कि यह अपने आप fire होती है या नहीं। paste कीजिए:
When would you use the weekly-study-notes skill, and when would you NOT use it?
अगर जवाब बहुत चौड़ा या बहुत संकरा है, तो इसे fix बताइए। फिर साबित कीजिए कि यह काम करती है: एक बिल्कुल नया chat खोलिए और, बिना skill का नाम लिए, इस line के ठीक बाद अपने एक असली हफ़्ते के notes paste कीजिए:
Make study notes from this:
आप इसे अपने आप आपकी skill की ओर हाथ बढ़ाते और आपका exact format वापस देते देखेंगे, हर बार: हर topic पर एक heading, आपके key terms bold में, तीन review questions। कोई app notes को आपके तरीके से नहीं लिखता, और यही पूरी वजह है कि यह एक skill के लायक है।
वह जीत जिसे आप ज़ोर से कह सकते हैं: 'मैंने AI को एक बार सिखाया कि मैं अपने weekly notes कैसे करता हूँ, और अब यह इसे एक वाक्य में करता है, हर बार।'
तब हो गया जब: skill एक स्वाभाविक request से अपने आप fire हो (कोई slash command नहीं, कोई नाम लेना नहीं), बिना याद दिलाए आपका format बनाए, और किसी बेमेल request को अपने हाथ में न ले।
Project 220-30 minएक app जोड़ें, read-only, और इसे इस्तेमाल करेंअपने ही data से सीधे एक असली जवाब पाएँ, ज़ीरो copy-paste के साथ।
एक ऐसा app जोड़िए जिसे आप वाक़ई इस्तेमाल करते हैं, Google Drive या Gmail सबसे आसान हैं, और इसे read-only रखिए। फिर एक असली सवाल पूछिए जिसके लिए इसके अंदर की किसी चीज़ की ज़रूरत हो। Drive के लिए, paste कीजिए:
Find my most recent document in my Drive, pull the three facts or
numbers that matter most, and give me a one-line summary of what it is.
या Gmail के लिए:
Summarize my most recent email thread, and list anything it is waiting
on me to do.
AI app में पहुँचता है और जवाब देता है, बिना कुछ upload किए और बिना कुछ paste किए। फिर सोच-विचार वाला आधा हिस्सा कीजिए: ज़ोर से कहिए कि आपने ठीक क्या access दिया, और तय कीजिए कि क्या इस काम को कभी write access की ज़रूरत होगी, और अगर हाँ, तो अनुमति देने से पहले आप क्या देखना चाहेंगे।
वह जीत जिसे आप ज़ोर से कह सकते हैं: 'मैंने एक सवाल पूछा और AI ने जवाब मेरी ही files से खींच निकाला; मैंने कुछ भी copy या paste नहीं किया।'
तब हो गया जब: आप किसी connector के ज़रिए असली data खींच चुके हों, और एक वाक्य में बता सकें कि connector आपके account के साथ क्या कर सकता है और क्या नहीं।
Project 345-60 minएक skill और एक connector को साथ जोड़ेंmonthly-close / weekly-batch वाली मशीन, आपके अपने data पर चलती हुई।
Projects 1 और 2 को मिलाइए: connector आपका असली data ले आता है, आपकी skill इसे आपके तरीके से आकार देती है। study-notes skill आपके shelf पर और Drive जुड़ी हो, तो पूरी हफ़्ते की रस्म एक वाक्य बन जाती है। paste कीजिए:
Find this week's class notes in my Drive and make study notes from them.
connector file पढ़ता है, skill इसे format करती है, आप बस review करते हैं, कोई paste नहीं और format दोबारा समझाना नहीं। accountant वाला version बिल्कुल वही shape है:
Prepare this month's summary for DEMO Trading; the ledger is the file
called DEMO-ledger-March in my Drive.
पूरी चीज़ पर भरोसा करने से पहले नतीजे को एक ऐसे टुकड़े के against जाँचिए जिसे आप हाथ से check कर सकते हैं। connector live data लाता है, skill आपका format लाती है, और दोनों मिलकर एक ऐसी चीज़ हैं जो कोई एक भी app आपको नहीं बेचता।
वह जीत जिसे आप ज़ोर से कह सकते हैं: 'मैंने AI को अपनी monthly report एक बार सिखाई और इसे अपनी files की ओर इशारा कर दिया; अब पूरी चीज़ एक वाक्य से चलती है और मैं बस इसे review करता हूँ।'
तब हो गया जब: एक plain-English वाक्य उस live data से बना, सही formatted नतीजा देता है जिसे आपने कभी copy या paste नहीं किया।
Project 430 minइसे portable बनाएँ, या सौंप देंCapstone: साबित करें कि asset chat और tool दोनों से ज़्यादा देर टिकता है।
Project 1 की skill लीजिए और दो में से एक काम कीजिए।
इसे सौंप दीजिए. इसे किसी दोस्त या colleague के साथ share कीजिए (या अगर आप Team या Enterprise plan पर हैं तो इसे अपने organization की directory में publish कीजिए), फिर उनसे इसे ठंडे दिमाग़ से चलवाइए, सिर्फ़ skill से, आपकी ओर से कोई explanation नहीं।
या इसे सफ़र कराइए. एक दूसरा surface खोलिए, Cowork या Claude Code, वही SKILL.md load कीजिए, और इसे वहाँ चलाइए। इस line के ठीक बाद अपने एक असली हफ़्ते के notes paste कीजिए:
Use this skill to make study notes from:
open standard को action में महसूस कीजिए: जो recipe आपने एक kitchen में लिखी, वह दूसरी में पक रही है। दोनों रास्ते वही सबक़ सिखाते हैं, कि एक skill एक asset है जो एक conversation और एक product से आगे टिकती है।
वह जीत जिसे आप ज़ोर से कह सकते हैं: 'मैंने अपनी skill एक दोस्त को सौंपी और यह बस काम कर गई, बिना मेरे कमरे में हुए।'
तब हो गया जब: कोई ऐसा जो मूल conversation में नहीं था, या एक दूसरा tool, आपकी skill से एक सही नतीजा बना दे, आपकी किसी मदद के बिना।
Project 515-20 minभरोसा करने से पहले एक skill की audit करेंकिसी अजनबी की एक skill install करें, फिर इसे चलाने से पहले ख़ुद को साबित करें कि यह सुरक्षित है।
Part 5 ने इसे साफ़ कहा: एक skill instructions का एक set है जिसे आप AI से follow कराने वाले हैं, इसलिए internet से उठाई एक skill एक contract है जिसे sign करने से पहले आपको पढ़ना चाहिए। यही वह आदत है जो आपको उस पल सुरक्षित रखती है जब आप community skills install करना शुरू करते हैं। एक ऐसी skill install कीजिए जो आपने नहीं लिखी (official directory से शुरू कीजिए, "+" → Browse skills), फिर, इस पर निर्भर होने से पहले, AI से इसे आपको पढ़कर सुनाने को कहिए:
Read the skill I just installed and tell me, in plain language, exactly
what it instructs you to do. Then flag anything in it that contacts an
external server, handles passwords or credentials, or could send my data
somewhere I didn't intend. If it's clean, say so plainly.
AI skill खोलता है, एक paragraph में बताता है कि यह असल में क्या करती है, और आपको एक सीधा फ़ैसला देता है: clean, या "यह रही वह line जो internet तक पहुँचती है।" ज़्यादातर बार यह clean निकलती है, और बात ठीक यही है: आपने बीस सेकंड लगाए और अब आप जानते हैं, उम्मीद करने के बजाय। जिस एक बार ऐसा नहीं होता, उस बार आपने कुछ ऐसा पकड़ लिया इससे पहले कि वह कभी आपके data को छूता।
वह जीत जिसे आप ज़ोर से कह सकते हैं: 'मैंने भरोसा करने से पहले एक skill पढ़ी, plain English में, बिना code की एक भी line समझे।'
तब हो गया जब: आप एक वाक्य में बता सकें कि आपकी न लिखी कोई skill असल में क्या करती है, और क्या यह आपके अपने account के बाहर किसी चीज़ तक पहुँचती है।
हमने जितनी भी रुकावटें देखी हैं वे इन्हीं में से किसी एक में आती हैं। किसी में भी यह समझना ज़रूरी नहीं कि यह क्यों टूटी; अटकाव को AI को बताना ही ख़ुद में fix है।
- skill कभी trigger नहीं होती। description बहुत धुँधला है या उन शब्दों से ख़ाली है जो आप वाक़ई कहते। AI से पूछिए: 'मेरी [name] skill को आप कब इस्तेमाल करेंगे, और कब नहीं?', फिर description को उससे मिलाकर कसिए जो आपका मतलब था।
- skill ग़लत चीज़ों पर trigger होती है। description बहुत चौड़ा है। इसे संकरा कीजिए, या एक negative trigger जोड़िए: 'Quick one-off questions के लिए इस्तेमाल मत करो।'
- connector किसी file को "नहीं ढूँढ पाता"। आम तौर पर permissions या scope: पुष्टि कीजिए कि connector इस chat के लिए enabled है, और आपका अपना account file खोल सकता है (AI को आपका access विरासत में मिलता है, इसलिए यह वहाँ नहीं पहुँच सकता जहाँ आप नहीं पहुँच सकते)।
- AI ने एक नज़र से जवाब दे दिया, connected data इस्तेमाल करने के बजाय। इसे साफ़ नाम दीजिए: 'जवाब देने से पहले असली file लाने के लिए मेरा [app] connector इस्तेमाल करो, और बताओ कि तुमने कौन-सी file इस्तेमाल की।'
- आप write access या sensitive data को लेकर घबराए हुए हैं। read-only रहिए और पहले वह हटा दीजिए जो ज़रूरी नहीं; write access सिर्फ़ एक ऐसे tool को दीजिए जिसने अच्छा व्यवहार किया हो, उस सबसे छोटे folder तक scoped जिसकी काम को ज़रूरत है।
- chat लंबा और उलझा हुआ हो गया है। एक नया शुरू कीजिए, काम को दो lines में दोबारा बताइए, और आगे बढ़िए। एक उलझे हुए chat को बचाने से छोड़ देना सस्ता है।
आगे कहाँ
- How to Think in the AI Era: आपका अगला Foundations course, और यहाँ की हर चीज़ के नीचे का गहरा अनुशासन: सबसे पहले सही सवाल पूछना, जो एक काम की skill को एक बदल देने वाली skill से अलग करता है।
- Code You Never Write: पिछला course, अब एक बार और देखने लायक: skills में code हो सकता है, और connectors ही code हैं। यह "ऐसा code commission करो जिसे तुम कभी नहीं पढ़ते, फिर इसे verify करो" को एक अनुशासन में बदलता है, और एक skill बस वही अनुशासन है जो स्थायी बना दिया गया हो।
- AI Prompting in 2026: prompting की वे बुनियादी बातें जो आपकी बनाई हर skill को बढ़िया inputs दिलाती हैं; अगर यहाँ कोई prompt अनजाना लगा हो तो इसे दोबारा देखिए।
The Agent Factory का बाक़ी हिस्सा सीधे इसी नींव पर बनता है। एक बार जब आप AI को एक काम सिखाने और इसे अपने tools से जोड़ने में सहज हो जाते हैं, तो आप उन agents के बारे में सोचने के लिए तैयार हैं जो यह काम ख़ुद करते हैं, और किताब आगे वहीं जाती है।
Flashcards Study Aid
Test Your Understanding
एक वाक्य पूरे इस course को थामे रखता है: एक chat AI को बताता है कि एक बार क्या करना है, एक Skill इसे सिखाता है कि हर बार कैसे, एक Connector इसे आपके apps तक पहुँचने के हाथ देता है। ये scenarios उस idea को दूसरे लोगों के offices, clinics और studios में काम पर लगाते हैं। हर एक यह जानने का इनाम देता है कि असल में क्या करना है, न कि कोई definition रटने का; reasoning से जवाब दीजिए, सबसे लंबे option से नहीं।