AI Agents के लिए Plugins: एक bundle, आपकी पूरी team
13 Concepts, real use का 80% · लगभग 90-min concept read · पहले real plugin के लिए एक focused दिन · empty folder से ऐसे plugin तक जिसे teammate एक command में install करता है
First: plugin असल में क्या है। Out of the box, Claude Code या OpenCode जैसा coding agent एक capable generalist है। यह किसी भी project में काम कर सकता है, लेकिन इसे आपका working style नहीं पता। Plugin वह package है जो one install में यह gap fix करता है: यह वे playbooks bundle करता है जिन्हें agent follow करता है (skills), वे specialists जिन्हें यह delegate करता है (subagents), वे systems जिन तक यह पहुँच सकता है (MCP servers), आपकी standing instructions, और वे rules जिन्हें यह skip नहीं कर सकता (hooks)। यह bundle generic agent को दें तो वह आपका बन जाता है, और teammate install करे तो उसे exact same one मिलता है।
अब इसे real देखें। Anthropic इनकी पूरी marketplace ship करता है। दो commands, claude plugin marketplace add anthropics/knowledge-work-plugins फिर claude plugin install finance@knowledge-work-plugins, और blank Claude finance specialist बन जाता है: skills खुद fire होती हैं, /finance:reconciliation जैसी commands आती हैं, और finance team के systems से connectors मिलते हैं। finance की जगह sales या legal रखें तो वह specialist मिल जाता है। यही plugin है: one install generalist को exact expert बना देता है जिसकी आपको ज़रूरत है। इस course के end तक आप अपना plugin बना चुके होंगे, और वह direction देख चुके होंगे जहाँ यह ले जाता है: इस book की sellable domain marketplaces, जैसे agentfactory-business (banking, legal-ops, Islamic finance), जो Anthropic के ऊपर regulated-domain depth layer करती हैं।
Bundle host-specific है; अंदर की ज़्यादातर चीज़ें नहीं। Claude Code plugin और OpenCode plugin वही pieces अलग formats में wrap करते हैं जो एक-दूसरे में load नहीं होते (Concept 2 बताता है क्यों)। लेकिन pieces mostly travel करते हैं: skill हर जगह वही SKILL.md है, instructions वही markdown हैं, MCP server एक URL है जिसकी तरफ कोई भी host point कर सकता है। सिर्फ़ hook truly per-host है, क्योंकि वह host की internal machinery में plug होता है (Concept 7 में आप exact फर्क देखेंगे)। इसलिए आप अपने host के लिए build करते हैं, और अंदर की ज़्यादातर चीज़ें फिर भी claude.ai, Codex, Cursor, यहाँ तक कि OpenClaw जैसे personal agent तक पहुँचती हैं।
और आप असल में यही सीखने आए हैं। आपके agent को syntax पहले से आता है; वह command पर hook या manifest लिख सकता है। अगर course सिर्फ़ यही सिखाता तो agent इसे pointless बना देता। Scarce चीज़ वह judgment है जो agent के पास नहीं: किस job को कौन-सा lever चाहिए, कब rule को hope नहीं guarantee होना चाहिए, और plugin के claim को prove कैसे करना है। आप plain English में direct करते हैं, empty folder से हर lever खुद build करते हैं, साथ में complete proven build compare के लिए होता है, और एक real plugin ship करते हैं जिसे teammate one command से install करता है। Decisions आप करते हैं; typing agent करता है।
सब कुछ एक fact से निकलता है: आप ऐसे agent को extend करते हैं जिसे आप own नहीं करते। Host loop, model, और machine own करता है। आपका plugin show नहीं चलाता; यह host को load करने के pieces देता है। इससे चार non-negotiables निकलते हैं, और whole course यही चार build करता है:
- Share करने के लिए bundle। Plugin customization का shareable, versioned form है। अगर यह सिर्फ़ आपके लिए एक repo में है, तो आपको
.claude/folder चाहिए, plugin नहीं। Plugin तब बनाएं जब दूसरों को भी यह मिलना चाहिए। - Job के लिए right lever। Skill वह knowledge है जिसे agent choice से use करता है; subagent वह work है जिसे यह delegate करता है; MCP server tools और data हैं जिन तक यह पहुँचता है; hook code है जो fixed moments पर खुद run होता है। Job को lever से match करें।
- Must-always hook है, instruction नहीं। Skill या
CLAUDE.mdमें लिखी बात advice है जिसे model skip कर सकता है। Hook code है जो हर बार run होता है। अगर कोई चीज़ होनी ही है, formatter या safety gate, तो वह hook है। - Plugin user के trust में run करता है। यह installer की machine पर code execute करता है। Least privilege के साथ build करें, साफ़ बताएं यह क्या touch करता है, और install या ship करने को trust decision समझें।
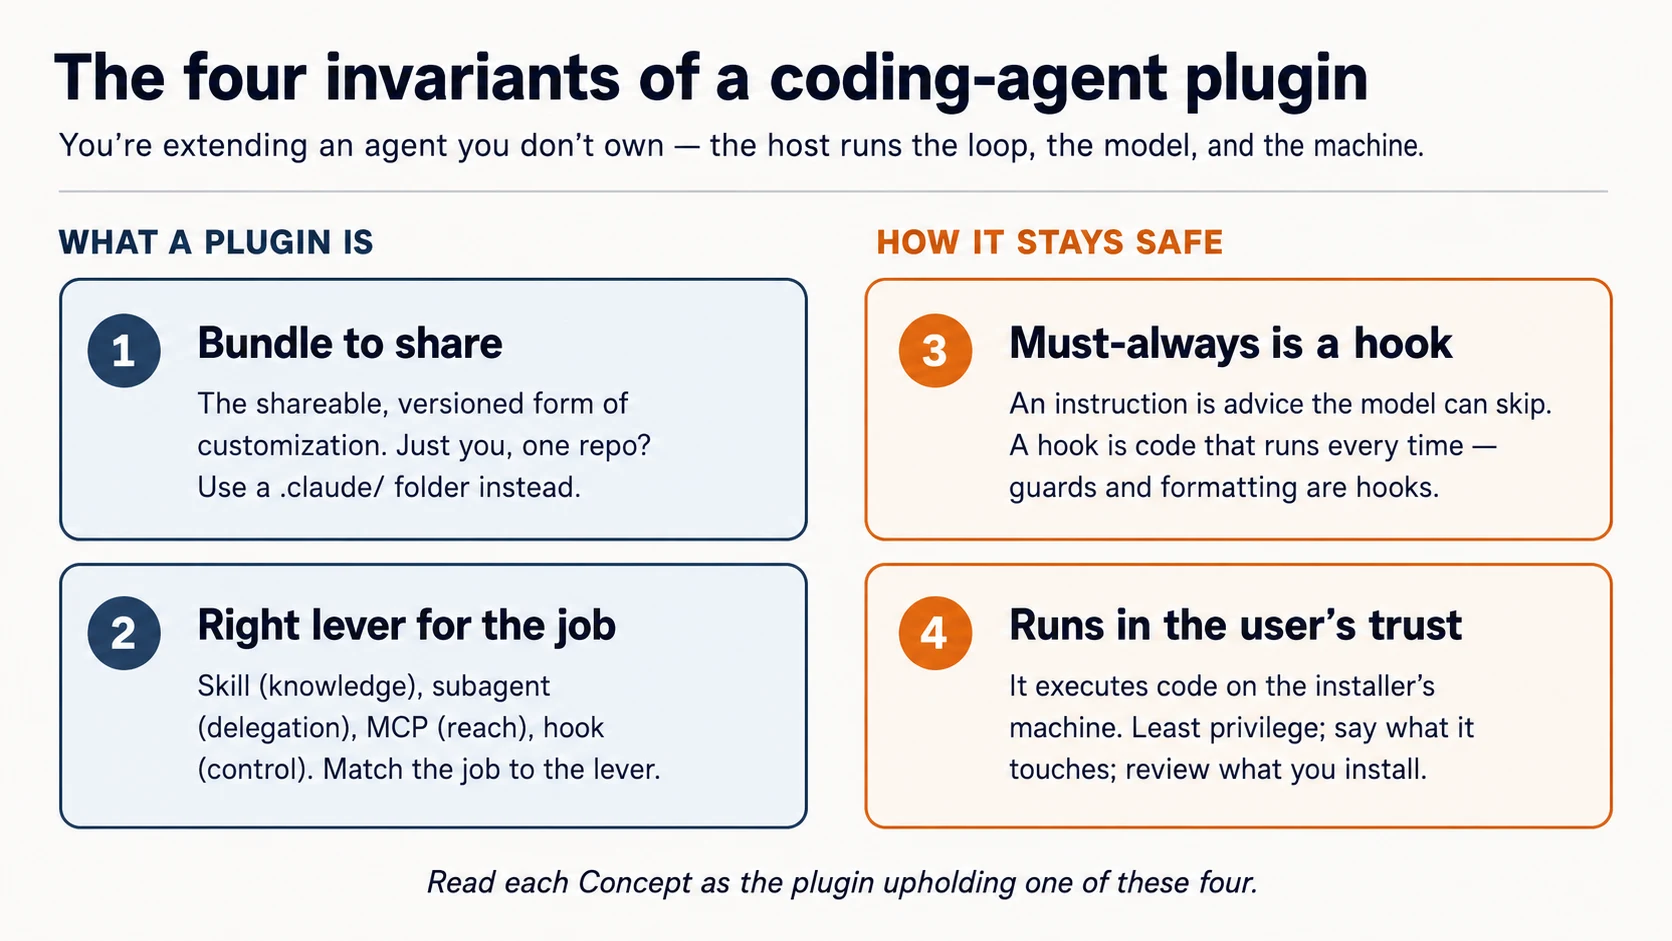
हर Concept पढ़ते समय पूछें: यह कौन-सा invariant है?
Prerequisites। यह page तीन चीज़ें assume करता है।
- आप coding agent drive करते हैं। आपने Agentic Coding Crash Course किया है: Claude Code या OpenCode, plan mode, rules file। हम उसी workbench के through build करते हैं।
- आप typed code पढ़ सकते हैं: shell, थोड़ा JSON, और TypeScript; directly या blocks अपने agent को paste करके plain-English explanation लेने के through।
- Recommended: Connector-Native Apps। उस course ने वही habit सिखाई: जानें कि आप किस layer पर हैं, और MCP server build किया। Plugin एक MCP server bundle कर सकता है (Concept 6), इसलिए दोनों courses connect होते हैं।
आपको Build AI Agents या AI Identity पहले करने की ज़रूरत नहीं। दोनों path में बाद में आते हैं, और यह course उनकी तरफ point करता है।
यह कहाँ fit होता है। Mode 2 में, Connector-Native Apps के तुरंत बाद। Path यह है: Connector-Native Apps → यह course → AI Identity (sign-in & agent access) → Build AI Agents। Connector-native apps end users के लिए chat app को extend करती हैं; plugins builders के लिए coding agent को extend करते हैं। Same move, दूसरा host।
Setup (कुछ मिनट)
आप यहाँ shell commands हाथ से नहीं चलाएँगे। आप अपने coding agent को plain English में direct करते हैं और check करते हैं कि यह क्या report करता है; यही loop आप plugin build करने में use करेंगे। Setup उसी की पहली rep है।
-
Base download करें (
plugins-crash-course-base.zip), unzip करें, औरplugins-crash-coursefolder को Claude Code (या OpenCode) में open करें। Open होते ही agentAGENTS.mdपढ़ता है: आपका brief कि क्या build करना है और proven reference कहाँ है। -
इसे setup करने को कहें। Paste:
Set up my base environment, then tell me what you did and what passed.
इस one line के पीछे agent AGENTS.md के brief को follow करता है: Claude Code पर यह official plugin-structure skill install करता है ताकि current spec से काम करे; OpenCode पर plugin docs पढ़ता है; फिर reference build के checks run करता है।
- अब इससे layout explain करवाएँ। Paste:
Walk me through, in plain English, how a plugin is laid out on my host.
Done when agent report करे कि reference build green है (guard .env और rm -rf block करता है, sample skill और MCP server check out हैं) और यह आपको host का plugin layout explain कर सके।
Box में क्या है। अभी आपका लगभग कुछ नहीं; यही point है। Plugin आप build करते हैं; starter आपको brief और proven build देता है जिसके against आप अपना काम check करते हैं।
plugins-crash-course/           ← you build YOUR marketplace + plugin here, from blank
  AGENTS.md                     your brief + how each host lays out a plugin
  CLAUDE.md                     points Claude Code at the same brief (@AGENTS.md)
  reference/                    a COMPLETE, PROVEN build — read it, diff against it, don't copy it
    plugins/agent-factory/      the finished plugin: proven guard, a model skill, a model reviewer
    server/                     a runnable MCP server you point your plugin at
    verify.sh                   one command that proves the reference is sound
आप हर lever खुद build करते हैं: guard hook, एक skill जो सच में आपके काम आती है, reviewer subagent, MCP wiring, marketplace। आप plain English में agent को direct करते हैं। जब कोई piece गलत आए, उसे reference/, यानी known-good version, के against diff करते हैं। आप direct करते हैं; agent type करता है; आप check करते हैं; आप compare करते हैं।
Build करने से पहले एक को चलता देखें (5 minutes)
आपने अभी पढ़ा कि plugin क्या करता है। अब इसे महसूस करें। Concepts से पहले starter में shipped finished plugin install करें और देखें कि यह कुछ enforce करता है। पहले देखना ही बाकी course को land करवाता है।
Reference plugin को session में load करें:
claude --plugin-dir reference/plugins/agent-factory
OpenCode में reference/plugins/agent-factory open करें। यह guard उस folder की .opencode/plugins/ से और skill उसके skills/ से load करता है।
फिर इसे काम पर लगाएँ। Paste:
Try to read a file called
.env, then use your loop-engineering skill to explain an agent loop in four moves.
आपको क्या दिखना चाहिए:
- Agent
.envपढ़ने से blocked है, और वजह बताता है। (hook, जो ऐसे tool call पर fire होता है जिसे model skip नहीं कर सकता) - Skill अपनी voice में answer देती है, बिना इस के कि आप उसे name करें। (skill जिसे model ने choose किया)
- (Claude Code) इसे scruffy file fix करने को कहें तो वह unasked auto-formatted वापस आती है। (second hook)
.env पर यह hard block वह चीज़ है जो plain "please don't read secrets" instruction कभी guarantee नहीं कर सकती, और इसे build करना इस course का heart है। आपने per-file कुछ configure नहीं किया; plugin behavior साथ लेकर आया। अब concepts के पास attach होने के लिए real चीज़ है।
Part 1: Shape
Concept 1: आप agent को extend करते हैं — उसे own नहीं करते
Plugin वह program नहीं है जिसे आप run करते हैं। यह pieces का set है जिसे host आपके लिए load और run करता है। Host — Claude Code या OpenCode — agent loop (decide-act-repeat cycle) own करता है, model लाता है, और user की machine पर run करता है। आपका plugin capabilities और rules contribute करता है जिन्हें host pick up करता है। यह picture सही हो गई तो बाकी detail है; गलत हुई तो आप plugin से ऐसे काम करवाने की कोशिश करते रहेंगे जिनका charge उसके पास कभी था ही नहीं।
यहाँ एक interesting twist है, और उसे नाम देना worth it है: आप coding agent को coding agents के लिए plugin build करने के लिए direct करते हैं। आप Claude Code से वही kind of extension लिखवाएँगे जिसे Claude Code load करता है। जो चीज़ इसे build कर रही है और जिसे यह extend करता है, दोनों एक ही तरह के tool हैं। यह gimmick नहीं है — यह plugin build करने का fastest way है, और हर Manufacturing course का pattern है: आप direct करते हैं, agent type करता है, आप verify करते हैं।
Concept 2: दो hosts, एक idea
यह course दो hosts cover करता है। वे extensions को अलग तरह से package करते हैं, लेकिन idea identical है: एक unit जिसे host load करता है।
- Claude Code एक declarative bundle लेता है — components (skills, subagents, hooks, MCP servers) का folder जिसे छोटा manifest describe करता है। आप ज़्यादातर configuration और scripts लिखते हैं; Claude Code उन्हें wire करता है।
- OpenCode एक code module लेता है — JavaScript/TypeScript file जो agent events में hook करती है और tools add कर सकती है। आप functions लिखते हैं; OpenCode उन्हें call करता है।
| Claude Code plugin | OpenCode plugin | |
|---|---|---|
| Form | a folder + plugin.json manifest | a .ts/.js module that exports functions |
| You write | skills, subagents, hooks config, .mcp.json | event handlers, custom tools |
| Loaded from | a marketplace, or --plugin-dir | .opencode/plugins/ or an npm package |
ये better या worse तरीके से extend नहीं करते — ये different तरीके से extend करते हैं, और target pick करने से पहले difference जानना ज़रूरी है। Claude Code Anthropic का tool है, Claude models से tied है, declarative bundle format और marketplace ecosystem के साथ distribute होता है। OpenCode open-source और model-agnostic है — अपनी API key लाएँ, या free/local models (Gemini, GPT, local) run करें — और इसके plugins code हैं, जिससे finer-grained control मिलता है लेकिन आपको खुद ज़्यादा लिखना पड़ता है। Cost-sensitive learners के लिए model freedom headline है: वही skill जो आप लिखते हैं, OpenCode में free model पर run कर सकती है। (दोनों interoperate भी करते हैं — skills सीधे cross over होती हैं, और community plugins credentials और backends bridge करते हैं — लेकिन वह tools को साथ use करना है, plugins author करना नहीं, इसलिए यहाँ scope में नहीं।)
इस course का ज़्यादातर हिस्सा shared mental model और Claude Code form है (क्योंकि वह richer bundle है); Part 5 उसी job का OpenCode form दिखाता है। वह host चुनें जिसे आप सच में use करते हैं; चार invariants नहीं बदलते।
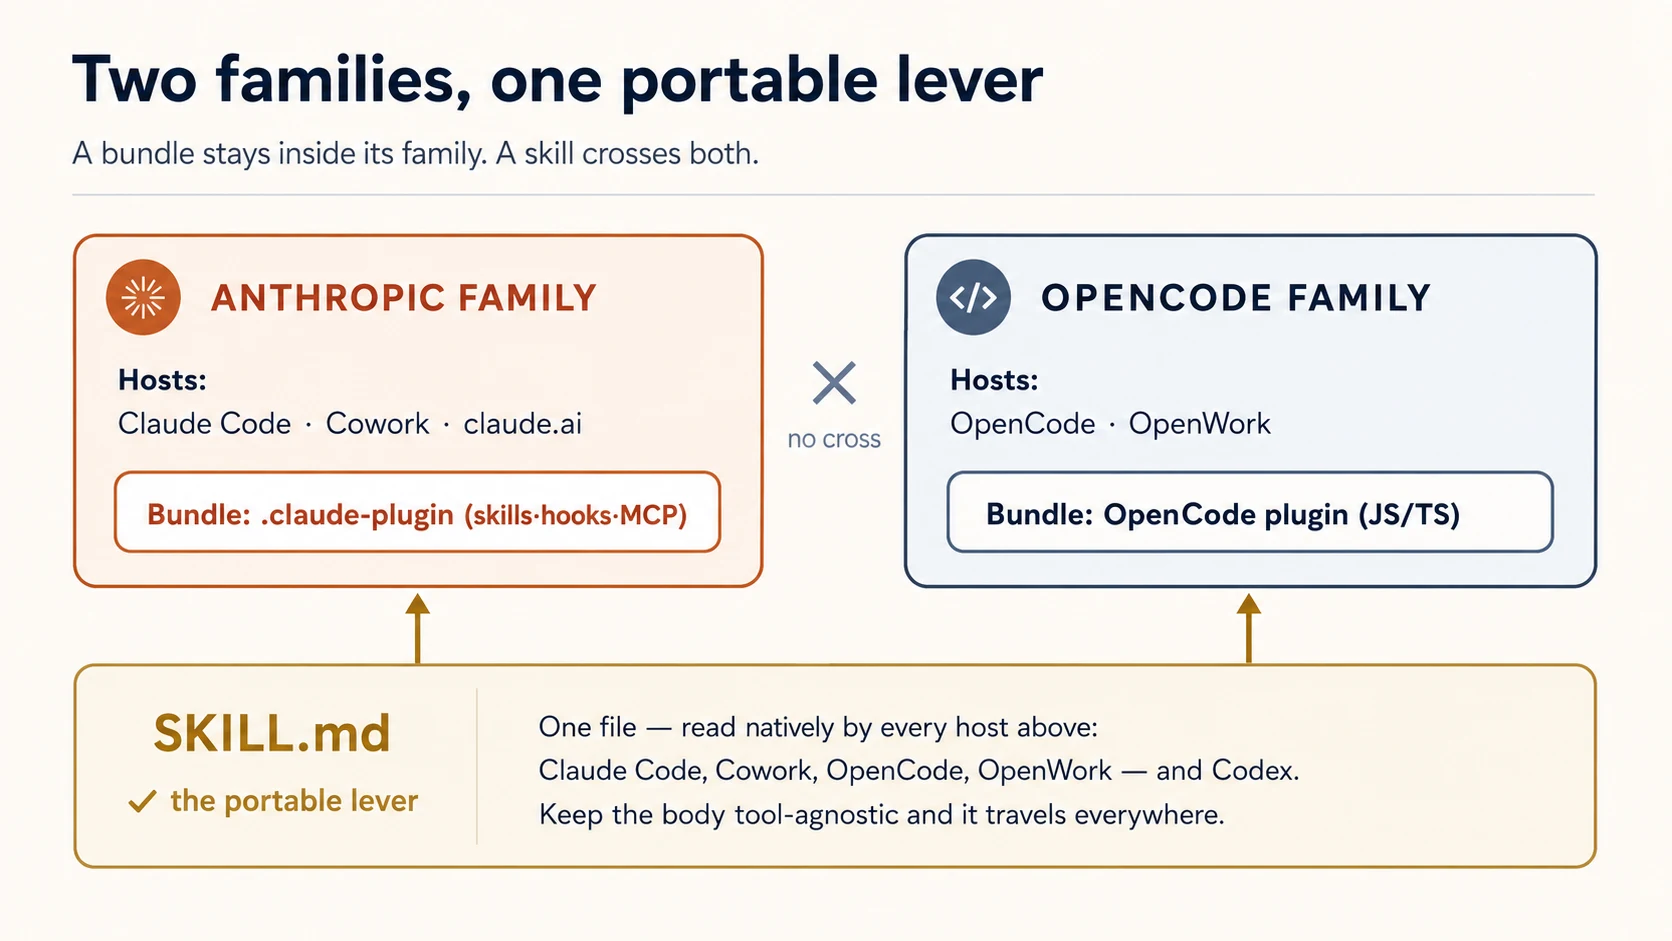
एक lever free में port होता है; एक नहीं। skill बस SKILL.md file है, और इस course के तीनों coding agents वह format natively पढ़ते हैं — Claude Code, OpenCode, और Codex। OpenCode .opencode/skills/, .claude/skills/, और .agents/skills/ से skills खुद discover करता है (skills के लिए plugin की ज़रूरत ही नहीं)। इसलिए एक skill folder हर tool को serve कर सकता है। Hooks opposite हैं: Claude Code hooks JSON config हैं, OpenCode hooks JavaScript module हैं — shared format नहीं है, इसलिए हर host के लिए hook अलग लिखते हैं। यह split याद रखें; cross-tool plugin layout इसी से shape होता है (Concept 4)।
यही split दो families तक scale होता है। जो Claude Code plugin आप build करते हैं वह Claude Cowork और claude.ai में भी load होता है — वे Anthropic का plugin format share करते हैं। जो OpenCode plugin आप build करते हैं वह OpenWork में भी load होता है, OpenCode-powered desktop agent — same OpenCode format। Skills दोनों families cross करती हैं (सब SKILL.md पढ़ते हैं); bundles cross नहीं करते (Claude bundle OpenCode module नहीं है)। इसलिए target host तय करता है कि bundle कितनी दूर travel करेगा — लेकिन plain skill हर जगह travel करती है। हम यहाँ दो coding agents पर रहते हैं; knowledge-work hosts का अपना course है (ceiling देखें)।
Concept 3: Share करने के लिए bundle करें, अपने पास रखने के लिए configure नहीं
दोनों hosts आपको plugin के बिना customize करने देते हैं — Claude Code आपके project में .claude/ folder पढ़ता है; OpenCode .opencode/ पढ़ता है। जब customization personal हो और एक repo में रहे, यही सही tool है। plugin वह चीज़ है जिसे आप तब उठाते हैं जब customization travel करनी चाहिए: teammates तक, projects के पार, community तक, versions और updates के साथ।
तो "क्या यह plugin होना चाहिए?" का test यह नहीं है कि यह करता क्या है — test है और किसे इसकी ज़रूरत है। एक developer, एक project: .claude/ folder। Team, कई projects, या strangers: plugin (invariant 1)।
एक consequence जल्दी जान लें: plugin skills और commands plugin के name से namespaced होते हैं — repo-tools नाम के plugin में hello skill /repo-tools:hello के रूप में invoke होती है। इससे दो installed plugins same name पर clash नहीं करते।
✓ Checkpoint: shape जगह पर है। आप जानते हैं कि plugin host-loaded unit है, दो hosts इसे अलग तरह से package करते हैं, और "plugin" का मतलब है "customization made to share." अब चार levers।
Part 2: Capability levers
चार levers में से तीन agent क्या कर सकता है उसमें add करते हैं। (चौथा, hooks, इतना अलग है कि उसे अपनी Part मिलती है।)
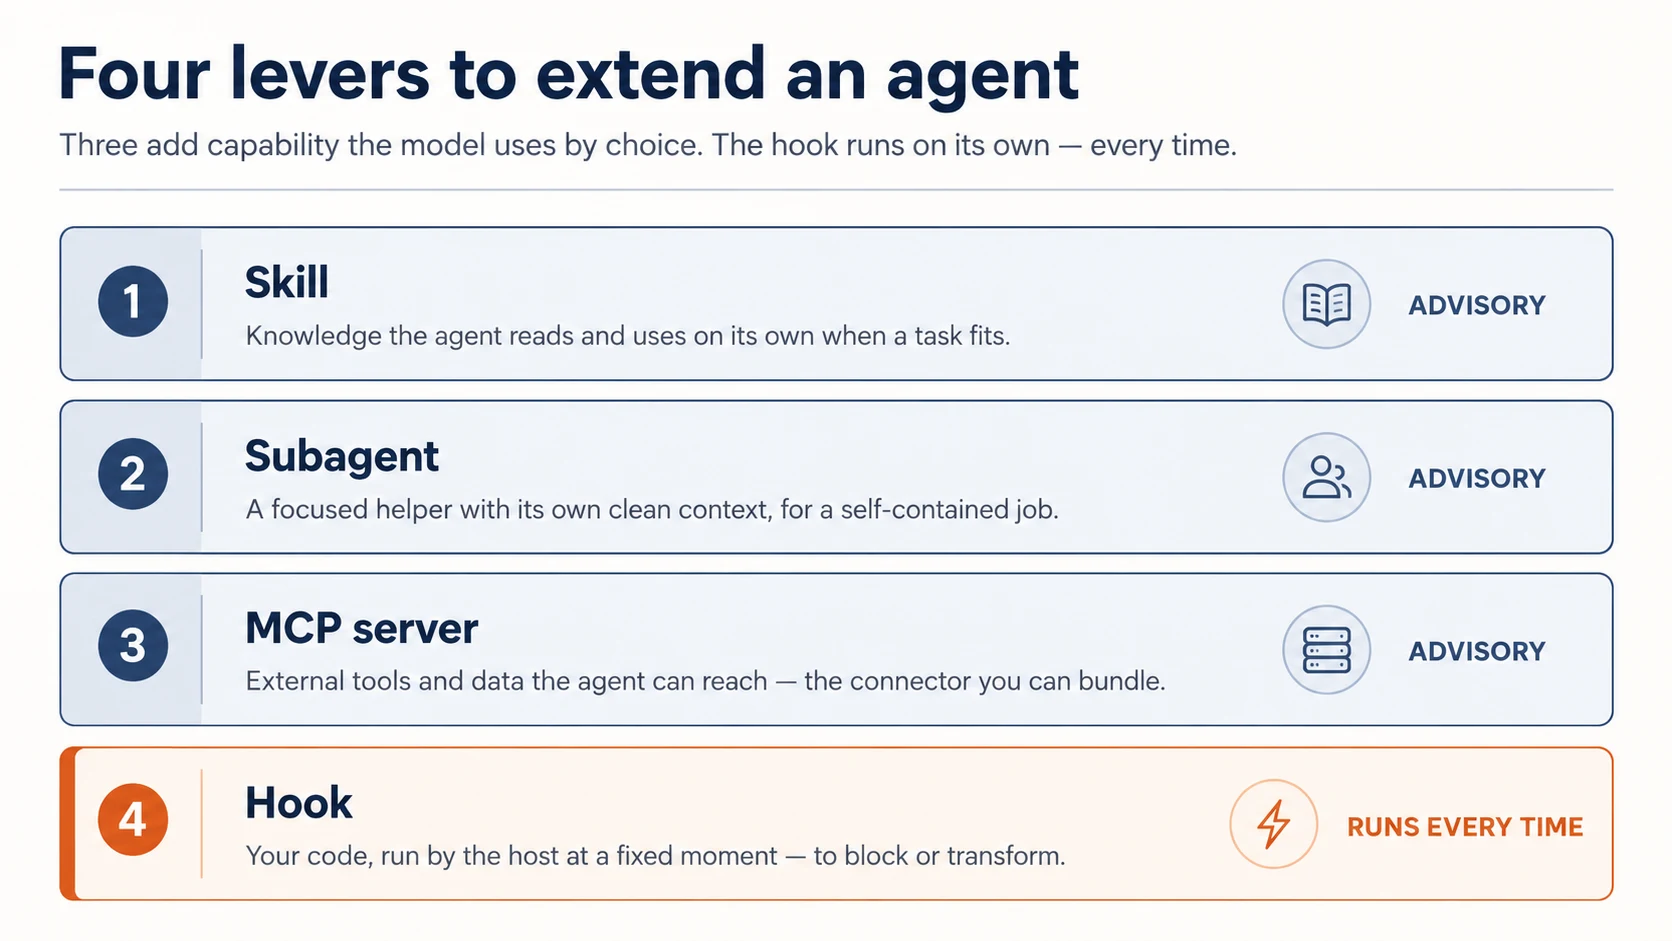
Concept 4: Skills — knowledge जिसे agent choice से use करता है
skill एक folder है जिसमें SKILL.md file होती है: description plus instructions। Claude description पढ़ता है और task match होने पर skill को खुद pull करता है — यह model-invoked है। Skill वह तरीका है जिससे आप agent को सिखाते हैं कि आपकी team कोई काम कैसे करती है: review checklist, commit-message format, release process के steps।
---
description: Review a diff for our team's standards. Use when reviewing code or a PR.
---

When reviewing, check in this order:

1. Does it match the existing patterns in the file?
2. Error handling and edge cases.
3. Tests for the new behavior.
4. Security: secrets, input validation, injection.
description सबसे important line है — model इसी से decide करता है कि skill relevant है या नहीं, इसलिए इसे कब use करना है के बारे में लिखें, सिर्फ़ यह क्या है नहीं। Body सिर्फ़ तब load होती है जब skill fire होती है, इसलिए वह जितनी लंबी चाहिए हो सकती है।
क्योंकि skill advice है जिसे model follow करना choose करता है, यह guidance के लिए सही lever है — और ऐसी चीज़ों के लिए गलत lever है जो बिना fail हुए होनी ही चाहिए (वह hook है, Concept 8)।
Skill एक बार लिखें, और हर tool इसे पढ़ता है। Lever के रूप में skill की superpower यही है: SKILL.md format Claude Code, OpenCode, और Codex में shared है। Skill को portable रखने के लिए इसकी body tool-agnostic रखें — केवल frontmatter name और description पर lean करें, और $ARGUMENTS, allowed-tools, या disable-model-invocation जैसे tool-specific constructs न use करें। फिर वही file हर जगह काम करती है: Claude Code इसे आपके plugin के skills/ से load करता है; OpenCode इसे .opencode/skills/ या .claude/skills/ में natively find करता है; Codex .agents/skills/ में। Starter का skills/loop-engineering/SKILL.md complete, portable example है — इसे पढ़ें।
Frontmatter ही क्यों?
हर host skill का name derive करता है और description से decide करता है कि कब invoke करना है। इन दो fields के बाद hosts diverge करते हैं — जो एक support करता है, दूसरा ignore कर सकता है या choke कर सकता है। इसलिए body में tool-specific कुछ भी डालना skill को दूसरों पर quietly तोड़ देता है। Body में plain instructions, frontmatter में दो fields, और skill universal हो जाती है।
Concept 5: Subagents — fresh context के साथ delegate करें
subagent helper है जिसे main agent job hand कर सकता है, अपने clean context window और अपनी instructions के साथ। आप इसे agents/ folder में markdown file के रूप में define करते हैं — frontmatter में name और description, body में brief:
---
name: reviewer
description: Reviews a diff against our standards. Use after a change is written.
---

You review code in your own context. Check, in order: matches existing patterns,
error handling, tests, security. Report findings as a short ordered list.
Do not edit files — only review and report.
Delegation दो वजहों से matter करता है: subagent main conversation से distract नहीं होता, और उसका काम main context को clog नहीं करता।
Subagent तब use करें जब task self-contained और verifiable हो — "review this diff," "find everywhere this function is called," "write tests for this file." Main agent through-line पर रहता है; subagent deep जाता है और report back करता है।
बचने वाली mistake: हर चीज़ subagent बनाना। Delegation की cost है (fresh context को बताना पड़ता है कि उसे क्या चाहिए)। इसे तब use करें जब focus और clean slate इसकी cost के लायक हों, हर छोटे step के लिए नहीं।
Concept 6: MCP servers — external reach जिसे plugin ship कर सकता है
चौथा lever agent को वह reach देता है जो पहले उसके पास नहीं थी: आपकी internal API, database, या service। यह MCP server की तरफ point करके होता है, और आप ऐसा server Connector-Native Apps में पहले ही build कर चुके हैं। यहाँ आप दूसरा नहीं बनाते। Plugin का whole job इसे wire करना है।
Plugin अपने root पर .mcp.json file के through connect करता है: server का name, उसका URL, और user की key header में। Plugin enabled हो तो host connect करता है और server के tools agent को दिखते हैं।
{
  "mcpServers": {
    "my-api": {
      "type": "http",
      "url": "https://api.yourdomain.com/mcp",
      "headers": { "Authorization": "Bearer ${MY_API_KEY}" }
    }
  }
}
Server design से remote है: logic, data, और secrets उस infrastructure पर रहते हैं जिसे आप control करते हैं, और plugin सिर्फ़ pointer ship करता है। यही reach को durable, और (Concept 10) gateable/sellable बनाता है। Plugin thin client है; value URL के पीछे रहती है। उस header की key simplest gate है: server इसे check करता है, और cancelled key काम करना बंद कर देती है। इससे मज़बूत route sign-in है, जिसे आप connector course में देख चुके हैं; अगला course, AI Identity, agents को bounded access देने पर है। यहाँ उसकी ज़रूरत नहीं।
Server कहाँ से आता है? वही जो आपने पहले build किया। पिछले course का connector open करें, agent से उसे run करवाएँ, और जो URL print हो उसे ऊपर वाली .mcp.json में copy करें। Same server, second front door: connector ने chat app serve की; यह plugin coding agent serve करता है। Connector handy नहीं? Starter में reference/server/ के अंदर tiny runnable server है जिसके against wire कर सकते हैं। दोनों cases में आप server की तरफ point करते हैं; plugin के अंदर server नहीं लिखते।
Local server क्यों नहीं?
Claude Code local MCP servers भी support करता है, यानी ऐसा command जिसे host user की machine पर process के रूप में run करे। हम इन्हें deliberately skip करते हैं। Local server अपना code plugin के साथ ship करता है और किसी दूसरे के computer पर run होता है: skill की तरह copyable, और runtime आप own नहीं करते। Plugin के लिए remote server लगभग हमेशा right call है: उसे एक बार build और host करें, फिर जितने चाहें plugins को URL से उसकी तरफ point करें।
एक चीज़ दोनों cases में carry होती है: वह server आपका code run करता है और आपके secrets hold करता है। ऐसा plugin ship करना जो उसे wire करे, उसे आपके shipped trust का part बनाता है (invariant 4), अब users तक extended।
✓ Checkpoint: capability levers covered। Skills knowledge add करती हैं, subagents focused help add करते हैं, MCP servers reach add करते हैं; और तीनों advisory हैं: model decide करता है कब use करना है। अगला lever वह है जो optional नहीं।
Part 3: Deterministic lever
Concept 7: Hooks — code जो हर बार run होता है
hook वह command है जिसे host agent lifecycle के fixed point पर automatically run करता है। यह model को suggestion नहीं है; यह आपका code है, host द्वारा execute किया गया, ऐसे schedule पर जिसे model change नहीं कर सकता। यही single property hooks को पहली नज़र से ज़्यादा important बनाती है।
Lifecycle points (events) तीन cadences में आते हैं:
- Once per session:
SessionStart,SessionEnd। - Once per turn:
UserPromptSubmit(agent new prompt देखने से पहले),Stop(जब agent finish करता है)। - On every tool call:
PreToolUse(tool run होने से पहले — वही point जो उसे block कर सकता है) औरPostToolUse(बाद में)।
Command hook हर बार एक जैसा काम करता है: host standard input पर event का JSON description भेजता है; आपका script उसे पढ़ता है, अपना काम करता है, और exit code से जवाब देता है।
- Exit 0 — allow / done।
PreToolUseपर Exit 2 — tool call block करता है। आप standard error पर जो print करते हैं वह model को reason की तरह दिया जाता है, ताकि वह adjust कर सके।- कोई भी other non-zero — non-blocking error: log होता है, लेकिन action proceed करता है।

Guardrails के लिए exit-2 rule ही whole game है, और यही सबसे common चीज़ है जो लोग गलत करते हैं (exit 1 block नहीं करता)। Plugin में hooks hooks/hooks.json में रहते हैं:
{
  "hooks": {
    "PostToolUse": [
      {
        "matcher": "Write|Edit",
        "hooks": [
          {
            "type": "command",
            "command": "${CLAUDE_PLUGIN_ROOT}/hooks/format.sh"
          }
        ]
      }
    ],
    "PreToolUse": [
      {
        "matcher": "Read|Edit|Write|Bash",
        "hooks": [
          {
            "type": "command",
            "command": "${CLAUDE_PLUGIN_ROOT}/hooks/block-secrets.sh"
          }
        ]
      }
    ]
  }
}
matcher pattern है कि hook किन tools पर fire होगा (Write|Edit = file writes; Bash = shell commands)। Plugin-root path variable आपके plugin folder पर point करता है ताकि host आपके scripts find कर सके — इसका exact name अपनी Claude Code version के against confirm करें (SDK और plugin paths move करते हैं)।
Concept 8: Must-always hook है, instruction नहीं
यह course का सबसे important idea है। आप जो भी instructions की तरह लिखते हैं — skill, CLAUDE.md line — वह advisory है। Model आम तौर पर follow करता है, लेकिन भूल सकता है, context से बाहर हो सकता है, या decide कर सकता है कि conversation आगे बढ़ गई है। ज़्यादातर guidance के लिए ठीक है। लेकिन जो चीज़ हर single time hold करनी है, उसके लिए advice enough नहीं है। Hook है।
दो patterns real value का ज़्यादातर हिस्सा carry करते हैं:
Format on write — PostToolUse। हर file edit के बाद formatter run करें। Model output को perfectly styled होने की ज़रूरत नहीं रहती, क्योंकि formatter हर बार normalize कर देता है:
#!/usr/bin/env bash
# hooks/format.sh — runs after every Write/Edit
path=$(jq -r '.tool_input.file_path // empty')   # read the edited file's path from the event
[[ -n "$path" ]] && npx --yes prettier --write "$path" 2>/dev/null
exit 0
जो कभी नहीं होना चाहिए उसे block करें — PreToolUse, exit 2। Tool call inspect करें; अगर line cross हो, तो block करें और model को बताएं क्यों। यह guard secret files और destructive commands दोनों cover करता है, इसलिए event से दो fields पढ़ता है:
#!/usr/bin/env bash
# hooks/block-secrets.sh — runs before Read/Edit/Write/Bash
input=$(cat)                                                   # read the event ONCE (see note)
path=$(printf '%s' "$input" | jq -r '.tool_input.file_path // empty')
cmd=$(printf '%s' "$input" | jq -r '.tool_input.command // empty')

if [[ "$path" == *.env* || "$path" == */secrets/* ]]; then
  echo "Blocked: $path is a secret file. Do not read or edit it." >&2   # stderr → the model
  exit 2                                                                  # exit 2 → blocked
fi
if [[ "$cmd" == *"rm -rf"* || "$cmd" == *"git push --force"* ]]; then
  echo "Blocked: refusing to run a destructive command ($cmd)." >&2
  exit 2
fi
exit 0
One-line gotcha: event को ONCE पढ़ें
Host event को standard input पर भेजता है, और standard input stream है — पहली चीज़ जो इसे पढ़ती है, उसे drain कर देती है। अगर आप सीधे दो बार jq call करते हैं (path=$(jq …) फिर cmd=$(jq …)), पहली call पूरा event consume कर लेती है और दूसरी को कुछ नहीं मिलता, इसलिए cmd silently empty हो जाता है और command guard कभी fire नहीं करता। ऊपर की तरह input=$(cat) से इसे एक बार capture करें और उसी variable को parse करें। Starter का test यही exact bug पकड़ता है — और यह ऐसा guard ship कर देता जो दिखने में सही है लेकिन rm -rf पर quietly fail करता है।
Skill जो कहती है "never read .env" बस उम्मीद है। यह hook guarantee है।
इसे run करें। अपने coding agent में यह paste करें:
add a
PostToolUsehook that formats files after Write/Edit, and aPreToolUsehook (matched onRead|Edit|Write|Bash) that blocks reads/edits of.env/secrets/and blocksrm -rfin Bash, all with exit 2. Read the event once withinput=$(cat). Then try to read my.envand runrm -rfand show me both are blocked, and edit a file and show me it got formatted.
(आप यहाँ mechanics देखने के लिए एक build करते हैं। Worked example में आप starter का already-proven version use करेंगे, इसे rewrite नहीं करेंगे — खुद एक बार build करना ही वह तरीका है जिससे आप उस पर trust करेंगे।)
Terminal में खुद run करें (raw commands)। Hook को वैसे test करें जैसे host call करता है — fake event pipe करें और exit code check करें:
echo '{"tool_input":{"file_path":"/app/.env"}}' | ./hooks/block-secrets.sh; echo "exit: $?"   # expect: exit 2
echo '{"tool_input":{"command":"rm -rf /"}}'    | ./hooks/block-secrets.sh; echo "exit: $?"   # expect: exit 2
echo '{"tool_input":{"file_path":"/app/main.ts"}}' | ./hooks/block-secrets.sh; echo "exit: $?" # expect: exit 0
Verify। तीनों exit codes match करते हैं: .env blocked (2), rm -rf blocked (2), normal file allowed (0)। अगर secret read through हो जाती है, आपका hook exit 1 कर रहा है, 2 नहीं — single most common mistake। अगर rm -rf through हो जाता है लेकिन .env caught है, आप stdin दो बार पढ़ रहे हैं (ऊपर gotcha देखें)। Exit 2, read once, वरना block नहीं करता।
✓ Checkpoint: deterministic lever काम करता है। आप हर edit पर कोई चीज़ करा सकते हैं, और हर tool call पर कोई चीज़ रोक सकते हैं। यही उस plugin का difference है जो suggest करता है और उस plugin का जो enforce करता है।
जब hook misbehave करे (वह हिस्सा जिसे guides skip कर देती हैं)
Hooks हर matching tool call पर run होते हैं, इसलिए bad hook तुरंत महसूस होता है। चार rules इन्हें रास्ते से हटाए रखते हैं:
- इन्हें fast रखें।
PreToolUsehook हर matching call को gate करता है, इसलिए slow logic (network round-trip, हर edit पर full test suite) agent को stall कर देता है। अच्छी तरह under a second aim करें; heavy workStopपर करें, per call नहीं। - Fail safe, on purpose। Decide करें कि जब hook खुद error करे तो क्या होगा। Formatter नहीं चल सकता तो exit 0 करना चाहिए (edit रहने दें) — इसलिए
format.shexit 0पर end होता है और prettier errors swallow करता है। guard opposite है: अगर decide नहीं कर सकता, block करना prefer करें। Crashing guard को कभी silently exit 0 में fall through न होने दें। - Block करते समय हर बार reason दें। Message के बिना bare exit 2 model को कुछ actionable नहीं देता, और वह वही चीज़ retry करेगा।
stderrline fix instruction है — specific बनाएं ("edit the source, not the generated file")। - उसे वैसे debug करें जैसे host call करता है। Fake event pipe करें और exit code पढ़ें (ऊपर raw-command test)। अगर hook बहुत बार fire होता दिखे,
matchercheck करें —Write|Editnarrow है; empty या broad matcher हर चीज़ पर fire करता है।
Part 4: Ship it
Concept 9: Manifest और structure
Claude Code plugin manifest, .claude-plugin/plugin.json, से described folder है। (Claude Code standard component folders को इसके बिना भी auto-discover कर सकता है, लेकिन manifest ship करें — यही name, version, और description carry करता है।)
{
  "name": "agent-factory",
  "description": "A portable skill, guard hooks, and a reviewer subagent.",
  "version": "1.0.0",
  "author": { "name": "Your Name" }
}
बाकी सब plugin root पर बैठता है (.claude-plugin/ के अंदर नहीं — यही structural mistake लोग करते हैं):
agent-factory/
├── .claude-plugin/
│   └── plugin.json          # the manifest (this, and only this, goes here)
├── skills/                  # skills as <name>/SKILL.md
├── agents/                  # subagent definitions
├── hooks/
│   └── hooks.json           # event → command wiring
└── .mcp.json                # optional: MCP servers to load
version updates के लिए matter करता है: जब आप इसे bump करते हैं, installers को new version मिलता है; अगर आप इसे omit करते हैं और git से distribute करते हैं, हर commit new version की तरह count होता है। Share करने से पहले claude plugin validate run करें — marketplace review भी यही check करता है।
ऊपर का tree plugin itself है, चाहे वह जहाँ भी बैठा हो। Starter में यह marketplace repo के अंदर plugins/agent-factory/ में रहता है — यही next Concept है।
Concept 10: Marketplaces — teammate इसे कैसे लेता है
marketplace बस एक git repository है जिसमें catalog file (marketplace.json) एक या ज़्यादा plugins list करती है। Distribution story बस इतनी है: आप package registry में publish नहीं करते, लोगों को repo पर point करते हैं।
{
  "name": "agent-factory",
  "owner": { "name": "Your Name" },
  "plugins": [
    {
      "name": "agent-factory",
      "source": "./plugins/agent-factory",
      "description": "A portable skill, guard hooks, and a reviewer."
    }
  ]
}
Teammate फिर Claude Code के अंदर दो commands run करता है:
/plugin marketplace add your-org/agent-factory   # the git repo with marketplace.json
/plugin install agent-factory@agent-factory       # plugin@marketplace
Develop करते समय marketplace छोड़ दें। अपनी machine पर दो faster loops हैं: plugin को disk से सीधे claude --plugin-dir ./plugins/agent-factory के साथ load करें (यह .zip भी accept करता है), या claude plugin init <name> से scaffold करें, जो इसे ~/.claude/skills/<name>/ में डालता है और next session में <name>@skills-dir के रूप में auto-load करता है, बिना marketplace और बिना install के। Marketplace share करने के लिए है; build और test करने के लिए इसकी ज़रूरत नहीं।
दो manifests confuse न करें। plugin के पास .claude-plugin/plugin.json होता है; marketplace के पास .claude-plugin/marketplace.json। Documented layout इन्हें अलग रखता है: marketplace.json repo root पर बैठता है, और हर plugin अपने subfolder (./plugins/<name>/) में अपने plugin.json के साथ रहता है। Starter exactly यही use करता है — plugins/agent-factory/। (एक repo marketplace भी हो सकता है और one plugin host भी कर सकता है, लेकिन plugin को ./plugins/<name> subfolder में रखना वह pattern है जिसे हर official example use करता है — इसे prefer करें।)
Pinning और sources — updates सच में कैसे काम करते हैं। Plugin का source relative path (ऊपर) हो सकता है या किसी दूसरे repository की ओर point करता object; marketplace कई repos से plugins list कर सकता है, हर एक independently pinned:
{
  "name": "code-formatter",
  "source": { "source": "github", "repo": "acme/formatter", "ref": "v2.1.0" }
}
ref branch या tag pin करता है, sha exact commit pin करता है, और दोनों set हों तो sha wins। Teammate को specific version कैसे मिलता है और आप updates कैसे ship करते हैं — यह catalog file नहीं, यही mechanism है। (url source GitLab और other git hosts cover करता है; local path testing के लिए handy है।)
Publish करने से पहले दो footguns जान लें:
- Relative paths तभी resolve होते हैं जब marketplace Git से add किया गया हो (GitHub/GitLab/git URL)। अगर कोई इसे
marketplace.jsonfile के direct URL से add करे,./plugins/...resolve नहीं होगा — उस case मेंgithubयाurlsource use करें। - Installed plugins cache में copy होते हैं, इसलिए plugin अपने folder के बाहर
../से files reach नहीं कर सकता। Plugin को जो चाहिए, सब उसके अंदर रखें; copy के दौरान symlinks follow होते हैं जब तक वे plugin के अपने files के भीतर point करते हैं — इसलिए starter के दोनों symlinks plugin की अपनी files target करते हैं।
Anthropic अपने official catalogs run करता है — claude-plugins-official (curated) और community claude-community (आप इसका repo anthropics/claude-plugins-community add करते हैं और इससे @claude-community के रूप में install करते हैं) — इसलिए अपने marketplace के लिए distinct name चुनें, इन्हें shadow न करें। (Naming और submission rules अभी young हैं; publish करने से पहले current reserved-name policy को plugins reference के against confirm करें।)
Team या non-coders को distribute करना। Team और Enterprise plans में owners Organization settings → Plugins से marketplace publish करते हैं; Knowledge Work marketplace default रूप से add होता है, और जो plugins आप distribute करते हैं वे chat और Claude Cowork में दिखाई देते हैं — same bundle knowledge workers तक पहुँचता है, सिर्फ़ builders तक नहीं (ceiling देखें, और Cowork and OpenWork course)।
Share करने से पहले claude plugin validate run करें। ऊपर का schema mid-2026 तक current है; publishing से पहले Claude Code plugins reference के against field names re-verify करें, क्योंकि यह surface young और moving है।
क्या आप इसके पैसे ले सकते हैं? हाँ, मगर files के नहीं। Marketplace catalog है, store नहीं: payment layer नहीं, licence check नहीं, subscription primitive format में नहीं। Billing और access enforcement आपको plugin system के बाहर build करना है। और sharp edge यह है: skill plaintext SKILL.md है, DRM नहीं। Customer install करते ही source hold करता है, इसलिए static files को subscription के पीछे gate करना हर customer से one churn event invite करता है (pay once, clone, cancel), और curriculum जहाँ value readable text है वहाँ आप first download पर IP दे देते हैं।
इसलिए real subscription को support करने वाला model hosted access है: valuable logic अपने control वाले server पर रखें और entry server की sell करें, files की नहीं। Installed plugin thin, free client है जिसकी .mcp.json user key header में रखकर आपके hosted MCP server की तरफ point करती है (Concept 6 की wiring); key subscription gate है, और revoke करते ही access cut हो जाती है। Free SKILL.md funnel है; paid moat वह चीज़ है जो clone copy नहीं कर सकता: hosted server, retrieval quality, URL के पीछे live data।
यह उसी pattern का plugins-only version है जो आप पहले build कर चुके हैं। Connector-native app copyable-files problem में नहीं पड़ती, क्योंकि वह pure hosted server है जिसकी कोई file user disk पर नहीं होती। Clean shape दोनों together है: free plugin client और funnel है, subscription उसके पीछे connector-native server पर ride करती है। Same server, second front door। मगर यह दोनों तरफ trust काटता है: users अब आपके server को अपनी requests के साथ trust कर रहे हैं, इसलिए trust contract दोनों directions में चलता है (Concept 11)।
Bill करने से पहले दो cautions
- Anthropic की usage policies न तोड़ें। अगर students आपकी hosted service के through Claude consume करते हैं, तो वह usage licensed और billed legitimate तरीके से होना चाहिए — वही reasoning जो personal Pro/Max subscription को third-party tools में route करने को problem बनाती है। अगर यह real revenue में बदलता है, Anthropic की commercial terms directly पढ़ें (blog नहीं) और confirm करें कि आपका server जो Claude usage trigger करता है उसके लिए billing path क्या है।
- Hosting का मतलब security surface आपका है। Paid, gated MCP server attack target है, और paying customers stability expect करते हैं — इसलिए किसी भी write/delete/network action के लिए tool permissions और confirmations optional नहीं रहते। यह invariant 4 है, बस अब money riding on it है।
Human-only step। Git repo create करना और marketplace में submit करना आपका काम है; coding agent files लिखता है लेकिन accounts open नहीं कर सकता या आपके नाम से push नहीं कर सकता। Teammate का /plugin install भी उनका trust decision है (next Concept)।
Concept 11: Plugin user के trust में run करता है
एक step पीछे हटकर देखें कि plugin उस machine पर क्या कर सकता है जहाँ यह install होता है: इसके hooks shell commands run करते हैं, इसका bin/ path में add होता है, इसके MCP servers run होकर बाहर reach करते हैं। Plugin install करना किसी और का code run करना है। यह दोनों directions में सच है, और दोनों आपकी job हैं:
-
Author के रूप में: least privilege। सिर्फ़ वही hooks जो चाहिए, जितना narrow हो सके उतना match करें। Job से आगे network या filesystem तक reach न करें। Trust legible बनाएं — README ship करें जो plain words में बताता हो कि plugin installer की machine पर क्या करता है:
README.md — the trust contract
  What this plugin installs   (skills, subagents, hooks, MCP servers)
  What hooks run, and when    (e.g. PostToolUse formatter on Write/Edit)
  What files they inspect     (e.g. reads tool_input.file_path; never opens .env)
  What commands they execute  (e.g. prettier; no network calls)
  What network access they use (ideally: none)
Installer जो इसे दस seconds में पढ़ सकता है, दस seconds में आप पर trust कर सकता है।
-
Installer के रूप में: install से पहले review करें, जैसे dependency review करते हैं। Trusted marketplaces prefer करें; hooks क्या करते हैं पढ़ें; याद रखें
PreToolUsehook हर tool call देखता है। किसी plugin पर trust करने से पहलेclaude plugin details <plugin>run करें — यह कुछ enable किए बिना component inventory print करता है (कौन-सी skills, subagents, hooks, और MCP servers ship हो रहे हैं) और projected token cost भी। Hooks सबसे पहले पढ़ने वाली line हैं।
यह invariant 4 है, और यह paperwork नहीं है — formatter hook अगर quietly आपकी files upload करे तो पढ़ने से पहले invisible रहेगा। वही plugins ship करें जिन्हें आप खुद comfortably install करेंगे।
✓ Checkpoint: आप ship कर सकते हैं। Manifest, structure, teammate-installed marketplace, और जो trust आप ship कर रहे हैं उसकी clear-eyed view। एक और host, फिर full build।
Part 5: OpenCode plugins
Concept 12: OpenCode plugins — hooks as code
OpenCode वही ideas अलग form में लेता है: plugin एक JavaScript/TypeScript module है जो function export करता है। Host आपके function को context object के साथ call करता है और आप hooks return करते हैं — agent events के handlers। Separate manifest नहीं; आप file .opencode/plugins/ में drop करते हैं (या npm package install करते हैं)।
इस section को अपनी version के against verify करें। OpenCode का plugin API Claude Code की declarative form से younger और ज़्यादा code-level है, इसलिए नीचे exact event names और signatures (tool.execute.before, session.idle, tool helper) बाकी course से तेज़ move करते हैं। ये mid-2026 तक current हैं, लेकिन इस section से teach या ship करने से पहले इन्हें installed @opencode-ai/plugin के against check करें।
Claude Code से एक key difference: OpenCode में plugin hooks और tools के लिए है — skills के लिए नहीं। OpenCode skills को directories (.opencode/skills/, .claude/skills/, .agents/skills/) से natively discover करता है, इसलिए आपके portable SKILL.md files को यहाँ कोई plugin या shim नहीं चाहिए। Plugin उस part के लिए है जो port नहीं कर सकता — hooks।
// .opencode/plugins/block-secrets.ts
import type { Plugin } from "@opencode-ai/plugin";

export const BlockSecrets: Plugin = async ({
  project,
  client,
  $,
  directory,
}) => {
  return {
    // runs before any tool — throw to block it (the OpenCode equivalent of exit 2)
    "tool.execute.before": async (input, output) => {
      if (input.tool === "read" && output.args.filePath?.includes(".env")) {
        throw new Error("Blocked: .env files are off-limits.");
      }
    },
  };
};
Mental model सीधे map होता है: tool.execute.before आपका PreToolUse है, tool.execute.after आपका PostToolUse, और error throw करना call block करता है जैसे exit 2 करता है। OpenCode session और file events भी fire करता है (session.idle, file.edited, और more), और plugin tool helper से custom tool add कर सकता है — MCP server वाला same "add reach" idea, inline लिखा हुआ।
Context object आपको ज़रूरी चीज़ें देता है: project और directory (आप कहाँ हैं), $ (shell commands run करना), और client (agent से बात करना, log करना)। Form अलग है; चार invariants नहीं। Must-always rule यहाँ भी hook है — बस यह script नहीं बल्कि function है जो exit 2 के बजाय throw करता है।
Part 6: Complete worked example — agent-factory plugin build करें
आपने Quick Win में finished agent-factory पहले ही run किया है। अब आप इसे blank से खुद build करते हैं: lever by lever, plain English में agent को direct करते हुए। जब piece गलत आए तो उसे reference/, proven build, के against diff करते हैं। आप stubs fill नहीं कर रहे; आप calls कर रहे हैं (कौन-सा lever, hope या guarantee, क्या travel करता है) और हर एक prove कर रहे हैं। Rhythm वही है: plan → review → execute → verify।
Done होने पर आपका agent-factory चारों levers दिखाता है: real job के लिए portable skill, reviewer subagent, guard hook plus format-on-write hook, URL से wired MCP server, और teammate के लिए installable marketplace entry। Must-always guard पहले आता है, क्योंकि यही part right होना ज़रूरी है।
1. Empty plugin scaffold करें। Prompt आपके agent को host के authoritative layout की तरफ point करता है। अपने host वाला paste करें:
Using the Plugin Structure skill you installed in setup, scaffold an empty plugin called agent-factory, set up the right way for Claude Code. Show me the layout.
Read the OpenCode plugin docs at https://opencode.ai/docs/plugins, then scaffold an empty OpenCode plugin called agent-factory the way they describe. Show me the layout.
Done when: shell आपके host के layout से match करे (uncertain हो तो agent reference build से diff कर सकता है)। Claude Code पर claude plugin validate empty plugin पर pass हो।
2. Guard hook पहले build करें, यानी must-always lever, और prove करें कि यह block करता है। यह वह part है जिसे right होना है, इसलिए build करें, prove करें, फिर proven one के against check करें। Paste:
Add two house rules my agent can't skip: auto-format any file right after it's changed, and hard-block anything that reads my secrets or runs a destructive command. Prove both live: have it try a secret read and a destructive command and show me they're stopped, then edit a file and show me it came back formatted.
फिर अपने work को trust करने के बजाय proven build से compare करें:
Compare my guard against the proven one and tell me if I missed anything that would keep it from actually blocking.
Done when: guard .env और destructive command live block करता है, और reference comparison कोई important gap नहीं निकालता। (Guard हर host में different form लेता है: Claude Code में shell script, OpenCode में throwing function; reference build दोनों रखता है। Agent वह form build करता है जो आपका host use करता है।)
3. ऐसी skill build करें जो सच में आपके काम आए। Toy नहीं: कोई real repetitive thing pick करें, जैसे review checklist, commit-message format, release steps। Paste:
Look at the model skill in the reference build first. Then write me a skill for [a real, repetitive job you do]: a clear description of when to use it and the steps to follow. Keep it portable so it works in any agent, not just this one. Show it firing on a real example.
Done when: skill task match होने पर खुद fire करती है, और body portable है (agent ने इसे plain instructions रखा, tool-specific constructs नहीं)।
4. Reviewer subagent add करें। Paste:
Add a subagent that reviews a change in its own context and only reports, never edits. Run it on a real diff, show me what it finds, then compare it to the model reviewer.
Done when: subagent clean context में review करता है और ordered list report करता है; reference comparison कोई important missing thing नहीं दिखाता।
5. MCP server wire करें, plugin को running server की तरफ point करें। आप server नहीं लिखते। आप एक existing server की तरफ point करते हैं: पिछले course का connector, या starter का runnable sample। Paste:
Start the sample MCP server in the starter and wire my plugin to it, then show me the agent can call one of its tools.
(अपना prefer करते हैं? Agent से last course वाला connector run करवाएँ और वह URL use करें।) Agent जो wiring लिखता है वह जगह है जहाँ दो hosts सच में differ करते हैं; shape यह है:
Plugin root पर .mcp.json ship करें (यह plugin के साथ travel करता है):
{
  "mcpServers": {
    "agent-factory": {
      "type": "http",
      "url": "http://localhost:3000/mcp",
      "headers": { "Authorization": "Bearer ${AGENT_FACTORY_KEY}" }
    }
  }
}
/mcp से confirm करें: server connected दिखता है और tool callable है।
opencode.json में remote block add करें:
{
  "$schema": "https://opencode.ai/config.json",
  "mcp": {
    "agent-factory": {
      "type": "remote",
      "url": "http://localhost:3000/mcp",
      "enabled": true
    }
  }
}
Done when: host server को connected दिखाता है और tool callable है।
6. इसे installable बनाएं, और prove करें कि यह travel करता है। Paste:
Make this installable from a marketplace. Then prove it travels: install it into a different project and show the guard blocks a secret read there too, with no extra setup.
Done when: second project one install से same hook के through protected है। Plugin का whole point यही है: rule travels।
Notice करें rhythm: plan → review → execute → verify, must-always guard पहले build और prove हुआ क्योंकि यही part right होना ज़रूरी है, हर piece proven reference के against check हुआ। Judgment आपका था; typing agent ने की।
Part 7: Ceiling, और यह कहाँ grow करता है
Concept 13: Ceiling, और बाहर की bridges
Plugin की edge महसूस करें। Plugin builder's agent को बेहतर बनाता है: sharper, safer, more yours। मगर तीन चीज़ें अब भी आप own नहीं करते, और हर एक अगला course name करती है।
Loop आपका नहीं। Hooks host के loop के around fire होते हैं; अपना loop नहीं चलाते। Plugin खुद wake up होकर many steps across goal pursue नहीं कर सकता, या आपके सोते हुए job नहीं कर सकता। जब आपको ऐसा worker चाहिए जो अपना loop own करे, आप agent लिखते हैं: path में आगे Build AI Agents।
Identity आपकी नहीं। Plugin host चलाने वाले person के रूप में act करता है। इसकी अपनी credential नहीं, और किसी के behalf पर bounded, revocable authority से act करने का way नहीं। जब agent को अपनी identity चाहिए, और person को उसे safely authority delegate करनी है, तो वह AI Identity है (Better Auth पर built): sign-in own करें, फिर agent को scoped, time-boxed, human-approved access दें।
Reach borrowed है। Plugin remote MCP server wire कर सकता है, मगर server itself, वह durable user-facing thing जिसे stranger chat app में paste करता है, अपनी state और sign-in के साथ, वह connector-native app है जो आपने last course में build किया। Plugins और connectors same server को दो hosts से point करते हैं; together they cover both।
मगर देखें limits किस तरफ run करते हैं, और यह कहाँ grow करता है। जो आपने build किया वह coding agent से आगे पहुँचता है। Anthropic family के अंदर वही .claude-plugin bundle Claude Cowork और claude.ai chat में भी load होता है; OpenCode plugin OpenWork में भी load होता है। और portable piece, यानी skill, इससे भी आगे personal agent जैसे OpenClaw तक travel करती है। इसलिए builder's agent के लिए लिखी skill unchanged knowledge-worker's agent तक move कर सकती है: lawyer, analyst, ops lead। (Shell hook exception है। उसे real shell चाहिए, इसलिए guard coding side पर रहता है जबकि skill chat hosts तक cross करती है।) जहाँ knowledge-work hosts bonus नहीं बल्कि whole story हों, वह अपना course है: Cowork and OpenWork।
आपने step waste नहीं किया। आपने agent को deterministically extend करना और team को ship करना सीखा; यही skills दोबारा use होंगी जब agent, और उसकी identity, आपकी अपनी होगी।
Same skeleton, other plugins
agent-factory एक shape है। Levers नहीं बदलते; सिर्फ़ job बदलता है:
- House-style plugin: आपके writing या code conventions वाली skill,
PostToolUseformatter, reviewer subagent। (Team के लिए जो one consistent voice चाहती है।) - Safety plugin: production targets, secrets, और destructive commands के लिए
PreToolUseguards; nothing else। (Least privilege, invariant 4।) - Service plugin: आपकी hosted API के लिए remote MCP server (
.mcp.json), plus ऐसी skill जो agent को उसे use करना सिखाती है। - Workflow plugin:
Stophook जो agent finish होने पर test suite run करता है, और release steps के लिए skill।
अपनी team के real pain के closest one को pick करें; build worked example जैसी ही है।
Capstone
अपना plugin ship करें। अपनी team coding agent के साथ कैसे काम करती है, उसमें एक real friction pick करें। ऐसा plugin build करें जो right levers से उसे fix करे: कम से कम एक hook जो must-always rule enforce करे (exit 2 या thrown error), और कम से कम एक capability lever (skill, subagent, या MCP server)। इसे marketplace पर publish करें और किसी और से install करवाएँ। Confirm करें hook उनके project में, no extra setup, fire होता है।
Discuss with an AI. Question your scores.
Come back when you have your BEST evaluation.