Markdown In, HTML Out: एक crash course
Markdown में लिखें। HTML में पढ़ें। agents के साथ काम करने की दो document भाषाएँ।
ज़्यादातर लोग किसी AI में एक vague request type करते हैं और जवाब में text की एक लंबी दीवार पाते हैं। request vague थी, इसलिए AI को अंदाज़ा लगाना पड़ा कि उनका मतलब क्या है। जवाब पढ़ने के लिए इतना लंबा है कि वे उसे बस सरसरी तौर पर देख लेते हैं। दोनों दिशाओं में कुछ न कुछ खो जाता है: AI ने उन्हें कभी ठीक से समझा ही नहीं, और उन्होंने इसका जवाब कभी ठीक से पढ़ा ही नहीं।
यह course दोनों दिशाओं को ठीक करता है, हर दिशा के लिए एक भाषा। दोनों नाम आपके लिए नए हो सकते हैं। Markdown कुछ अतिरिक्त चिह्नों वाला plain text है जो structure दिखाता है: एक heading से पहले एक #, एक list के हर item से पहले एक -। आप इसका नाम जाने बिना इसे पहले ही देख चुके हैं: जब Claude या ChatGPT किसी शब्द को bold करता है या आपको एक bullet list देता है, तो वह Markdown ही लिख रहा होता है। आप इसे सीधे उसी chat box में type करते हैं जिसका आप पहले से use करते हैं; install करने को कुछ नहीं है। HTML वह भाषा है जिससे web pages बनते हैं: आपने अब तक browser में जो भी page खोला है, जिसमें यह page भी शामिल है, अंदर से HTML ही है। दोनों में से कोई programming नहीं है। दोनों साधारण text हैं। असली skill यह जानना है कि किस दिशा में किसका use करना है।
Power users बातचीत को दिशा के हिसाब से बाँट देते हैं। वे AI को Markdown में लिखते हैं (headings, lists, code blocks), क्योंकि structure इसके लिए अंदाज़ा लगाने को कुछ नहीं छोड़ता। और वे AI से HTML में जवाब माँगते हैं (diagrams, tables, रंग, interactivity), क्योंकि एक design किया हुआ page ही एकमात्र लंबा जवाब है जिसे एक व्यस्त इंसान सच में पढ़ता है। पहली भाषा सीखने में एक घंटा लगता है। दूसरी आप कभी लिखते ही नहीं; आप सिर्फ़ उसे माँगना सीखते हैं। (आगे बढ़ने से पहले एक शब्द: यह किताब agent उस AI को कहती है जो आपकी ओर से multi-step काम करता है। आज वह बस एक browser tab में मौजूद Claude है। आगे किताब में इसे एक terminal और आपकी files मिलती हैं। आप यहाँ जो format के नियम सीखते हैं, वे दोनों ही तरीकों में एक जैसे हैं।)
पूरा course, एक तस्वीर में:
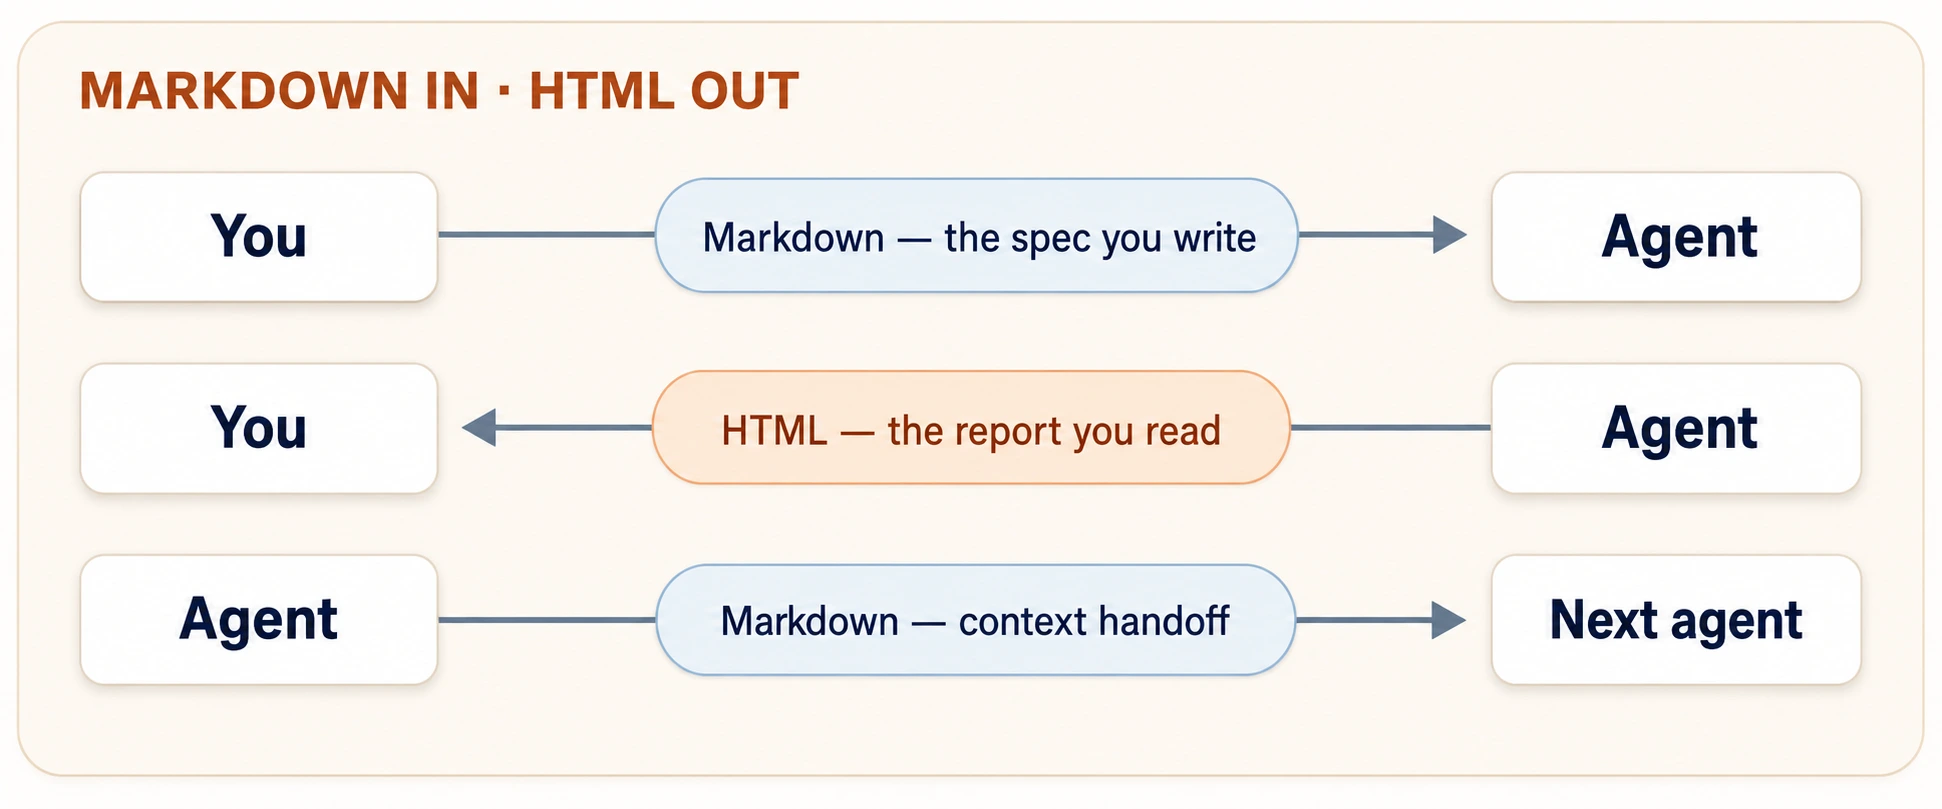
तस्वीर के पीछे एक सवाल है, और यही इस course के हर format निर्णय को तय करता है: इसे आख़िर में कौन पढ़ता है? अगर कोई इंसान इसे browser में पढ़ेगा, तो HTML माँगें। अगर कोई AI इसे पढ़ेगा, या आप इसे बाद में किसी AI को वापस feed करेंगे, तो इसे Markdown में रखें। अगर यह किसी social feed में जा रहा है, तो plain text। "Markdown in, HTML out" बस जवाबों की सबसे आम जोड़ी है। सवाल को पकड़े रहें; इस page का बाकी हिस्सा सिर्फ़ details है।
इसे दो मिनट में साबित करें
किसी भी theory से पहले, पूरे course को एक बार चलाएँ। Claude.ai खोलें (एक मुफ़्त account बनाने में एक मिनट लगता है; ChatGPT या Gemini भी काम करते हैं) और यह paste करें:
Make me a small web page as an HTML artifact: a welcome card for a neighborhood tuition center. A colorful holiday-notice banner on top, three example courses with monthly fees in a neat table, and a WhatsApp contact button. Keep it readable on a phone.
Claude एक पल सोचता है, फिर chat के बगल में एक panel खोलता है और उसमें एक असली, styled page बनाता है: banner, table, button। वह panel एक artifact है: एक live document जिसे AI बातचीत के अंदर बनाने के बजाय उसके बगल में बनाता है। (ChatGPT और Gemini अपने वाले को Canvas कहते हैं; विचार एक ही है।) अगर आपको render किए हुए page के बजाय code की एक दीवार मिले, तो कहें show it to me as a rendered artifact और यह बदल जाएगा। अब artifact panel पर share या publish control ढूँढें, उसे tap करें, और जो link मिले उसे अपने phone पर खोलें।
दो मिनट, और आप यह course जो कुछ सिखाता है वह सब एक बार पहले ही कर चुके हैं, बिना सोचे-समझे: कुछ structured lines अंदर गईं, एक design किया हुआ page बाहर आया, और एक link ने इसे share करने योग्य बना दिया। नीचे दिए गए चौदह concepts उन हर step को सोच-समझकर करने लायक बनाते हैं, ताकि जब दाँव एक demo से ज़्यादा ऊँचे हों तब भी वे काम करते रहें। Part 1 इस बँटवारे को frame करता है। Part 2 आपको वह मुट्ठी भर Markdown सिखाता है जो आप हाथ से लिखते हैं। Part 3 आपको वह HTML माँगना, परखना और publish करना सिखाता है जिसे आप कभी नहीं लिखते। Part 4 एक ही exercise को उन तीन तरीकों पर चलाता है जिनसे आप इस किताब में agents से मिलेंगे। अंत तक आप एक साफ़ Markdown spec लिख पाएँगे, उसे एक पढ़ने योग्य HTML artifact में बदल पाएँगे जिसे कोई और एक link से खोल सके, और किसी भी दिए गए output के लिए तय कर पाएँगे कि वह Markdown होना चाहिए, HTML, या किसी feed के लिए plain text।
📚 Teaching Aid
View Full Presentation — Markdown In, HTML Out
यह crash course अपने से पहले की Foundations मान कर चलता है: machine के mental model के लिए What AI Actually Is, और आदतों के लिए AI Prompting in 2026। वे आदतें (सही context load करना, पहले brainstorm फिर iterate करना, output को 10 में से grade देना) सब यहाँ फिर से दिखती हैं; यह course उन्हें रहने के लिए एक file format देता है। गहरे tool walkthroughs Agentic Coding Crash Course और Cowork & OpenWork Crash Course में रहते हैं; इस page को पूरा करने के लिए आपको इनमें से किसी की ज़रूरत नहीं।
- एक मुफ़्त chat account। examples में Claude.ai का use होता है; ChatGPT या Gemini यहाँ का हर chat prompt बिना बदले चलाते हैं। जहाँ कोई prompt "artifact" कहे, उन दोनों पर "Canvas" कहें; किसी और tool पर, "a single HTML file" माँगें और यह वैसे ही काम करता है।
- tool में Web access चालू हो, ताकि AI आपके दिए हुए links fetch कर सके। ज़्यादातर tools में यह default रूप से चालू रहता है; अगर कोई link example काम न करे, तो web search setting जाँचें।
- एक phone, ताकि आप जो बनाएँ उसे उसी तरह परख सकें जैसे आपके readers सच में देखेंगे।
पढ़ने में करीब एक घंटा लगता है; अंत के सात prompts करीब तीस मिनट और जोड़ते हैं। prompts को साथ-साथ चलाते जाएँ: पढ़ने से आपको शब्दावली मिलती है, उन्हें चलाने से आपको skill मिलती है।
Part 1: The two languages
1. agents को structure की ज़रूरत क्यों है
यहाँ वही request है, दो बार लिखी हुई।
बिना structure के:
I want a page for my tuition center, it should look professional
and have our courses and timings and a way for parents to contact
us, also fees, and it should work on phones since most parents
use phones, oh and put the Eid holiday notice somewhere visible.
Structure के साथ:
# Tuition Center Landing Page Specification

## Goal
A single-page site parents visit from their phones to check
courses, timings, fees, and contact info.

## Requirements
- Mobile-first layout (most visitors are on phones)
- Course list with timings and monthly fees
- Contact section: phone, WhatsApp link, location
- Holiday notice banner at the top (currently: Eid holidays,
  center closed June 6-9)

## Out of scope
- Online payments
- Student login
दोनों में एक ही जानकारी है। लेकिन पहली version agent को structure का अंदाज़ा लगाने पर मजबूर करती है: क्या holiday notice fees से ज़्यादा ज़रूरी है? क्या "professional" एक constraint है या बस एक भाव? क्या "हमसे संपर्क करने का तरीका" एक form है या एक phone number? हर अंदाज़ा एक ऐसी जगह है जहाँ agent गलत अनुमान लगा सकता है, और जो agent गलत अनुमान लगाता है वह गलत नहीं दिखता। वह आत्मविश्वासी दिखता है।
दूसरी version structure को साफ़ कर देती है। Headings बताती हैं कि हर block किस तरह की जानकारी है। Bullets बताते हैं कि requirements एक set हैं, हर एक को अलग से जाँचा जा सकता है। और "Out of scope" section वह करता है जो prose लगभग कभी नहीं करता: यह बताता है कि आप क्या नहीं चाहते, जो हर अच्छे specification का आधा हिस्सा है।
यही वजह है कि Markdown agentic काम की specification भाषा है। agents को भारी मात्रा में Markdown पर train किया गया है (internet पर ज़्यादातर documentation इसी में लिखी है), इसलिए वे इसके structure को सहज रूप से parse करते हैं: एक # heading उनके लिए सजावट नहीं है, यह hierarchy और महत्व के बारे में एक signal है। (आगे के chapters इन लिखी हुई मंशाओं के रहने की जगह को Intent Layer कहते हैं: इंसानी मंशा, इतनी सटीक लिखी हुई कि एक agent उस पर काम कर सके। आप अभी इसे लिखना सीख रहे हैं।)
एक non-software उदाहरण। एक स्कूल administrator ने एक agent से कहा कि "annual sports day plan का draft बनाओ, सामान्य events रखो, और ध्यान रखना कि छोटे बच्चे दोपहर की गर्मी में न हों।" draft ने under-8 races फिर भी दोपहर 2 बजे रख दीं: यह constraint prose में एक वाक्य के बीच में दबा था, और agent ने इसे एक preference मानकर तौला। उसने request को ## Hard constraints heading के साथ दोबारा लिखा जिसमें एक bullet था: "All under-8 events must finish before 11:30 a.m." अगले draft ने इसका पूरी तरह पालन किया। constraint नहीं बदला। उसकी structure में visibility बदली।
आदत, एक बार कह दी गई: जो भी चीज़ किसी agent को गलत नहीं करनी चाहिए वह उसकी अपनी heading के नीचे या अपने bullet में होनी चाहिए, किसी वाक्य के अंदर कभी नहीं।
2. asymmetry: Markdown in, HTML out
तो Markdown input भाषा है। क्या यह output भाषा भी है? हाल तक, हाँ: agents default रूप से Markdown में जवाब देते हैं, और छोटे जवाबों के लिए यह ठीक है।
लेकिन अगर AI output की आपकी मानसिक तस्वीर bulleted text की दीवारें हैं, तो वह तस्वीर अब पुरानी पड़ चुकी है। एक व्यापक रूप से पढ़े गए निबंध में, Anthropic की Claude Code team के Thariq Shihipar ने बताया कि क्यों उन्होंने और team के दूसरों ने Markdown outputs माँगना बंद कर दिया और HTML माँगना शुरू कर दिया। उनका तर्क, सरल शब्दों में:
- लंबा Markdown अपठनीय है। करीब सौ lines के बाद, इंसान Markdown files पढ़ना बंद कर देते हैं, और जैसे-जैसे agents बड़े काम सँभालते हैं, उनकी plans और reports लंबी होती जाती हैं। सौ कोई जादुई संख्या नहीं है; ईमानदार test यह है कि क्या आप उस चीज़ को ऊपर से नीचे तक पढ़ेंगे, और किसी न किसी लंबाई पर जवाब "नहीं" हो जाता है। एक अनपढ़ी plan वह plan है जिसे आपने सच में approve नहीं किया।
- Markdown की छत नीची है। Headings, lists, tables, और बस इतना ही। जब किसी agent को आपको एक workflow, एक color palette, या एक layout दिखाना हो, तो Markdown ASCII art का सहारा लेता है: मज़ेदार, लेकिन एक जुगाड़।
- HTML की छत लगभग नहीं है। Styled tables, diagrams, annotated code, interactive controls। ऐसा बहुत कम है जो कोई agent जानता हो और HTML किसी इंसान को आसानी से न दिखा सके।
- HTML share करने योग्य है। Browsers इसे सहज रूप से render करते हैं। एक सहकर्मी एक link पर click करता है; किसी को कुछ install नहीं करना पड़ता। लोग एक design किए हुए page को सच में पढ़ते हैं; वे एक raw text file को नम्रता से नज़रअंदाज़ कर देते हैं।
- Markdown की सबसे बड़ी खूबी फीकी पड़ रही है। Markdown इसलिए शानदार था क्योंकि इंसान इसे आसानी से हाथ से edit कर सकते थे। लेकिन अब आप agent के output को हाथ से edit नहीं करते; आप agent को उसे edit करने का prompt देते हैं। एक बार जब agent ही editing करता है, तो format को बस reader के अनुकूल होना है।
नतीजा एक साफ़ asymmetry है, और यही इस पूरे course की रीढ़ है:
| Direction | Format | क्यों |
|---|---|---|
| आप → agent | Markdown | Structure ambiguity हटाता है। type करने में तेज़। agents इसे सहज रूप से parse करते हैं। |
| agent → आप | HTML | समृद्ध, पठनीय, share करने योग्य, interactive। 500-line की एक plan जिसे आप सच में पढ़ेंगे। |
| agent → agent | Markdown | AI sessions के बीच पास होने वाले specs, notes और context छोटे और सटीक रहते हैं। |
पहली row आप हाथ से लिखते हैं, इसलिए Part 2 इसे ठीक से सिखाता है। दूसरी row आप कभी नहीं लिखते; आप इसके लिए prompt देते हैं, इसलिए Part 3 tags के बजाय prompts सिखाता है।
HTML का हर फ़ायदा आँखों और browsers के लिए एक फ़ायदा है। किसी AI के लिए, वही file अर्थ के इर्द-गिर्द शोर है: tags, styling, और layout code जो वही बात कहने में हज़ारों शब्द खर्च करते हैं जो Markdown पचास में कह देता है। इसलिए जो भी चीज़ किसी AI के लिए रखी जाती है वह Markdown रहती है। इसमें आपकी सोच से ज़्यादा शामिल है: एक नई chat को कुछ याद नहीं रहता, इसलिए आज आप जो notes save करते हैं और कल की बातचीत में paste करते हैं वे भी "agent → agent" हैं, भले ही दोनों agents आपसे ही बात कर रहे हों। बस एक सवाल पूछें: इसे आख़िर में कौन पढ़ता है?
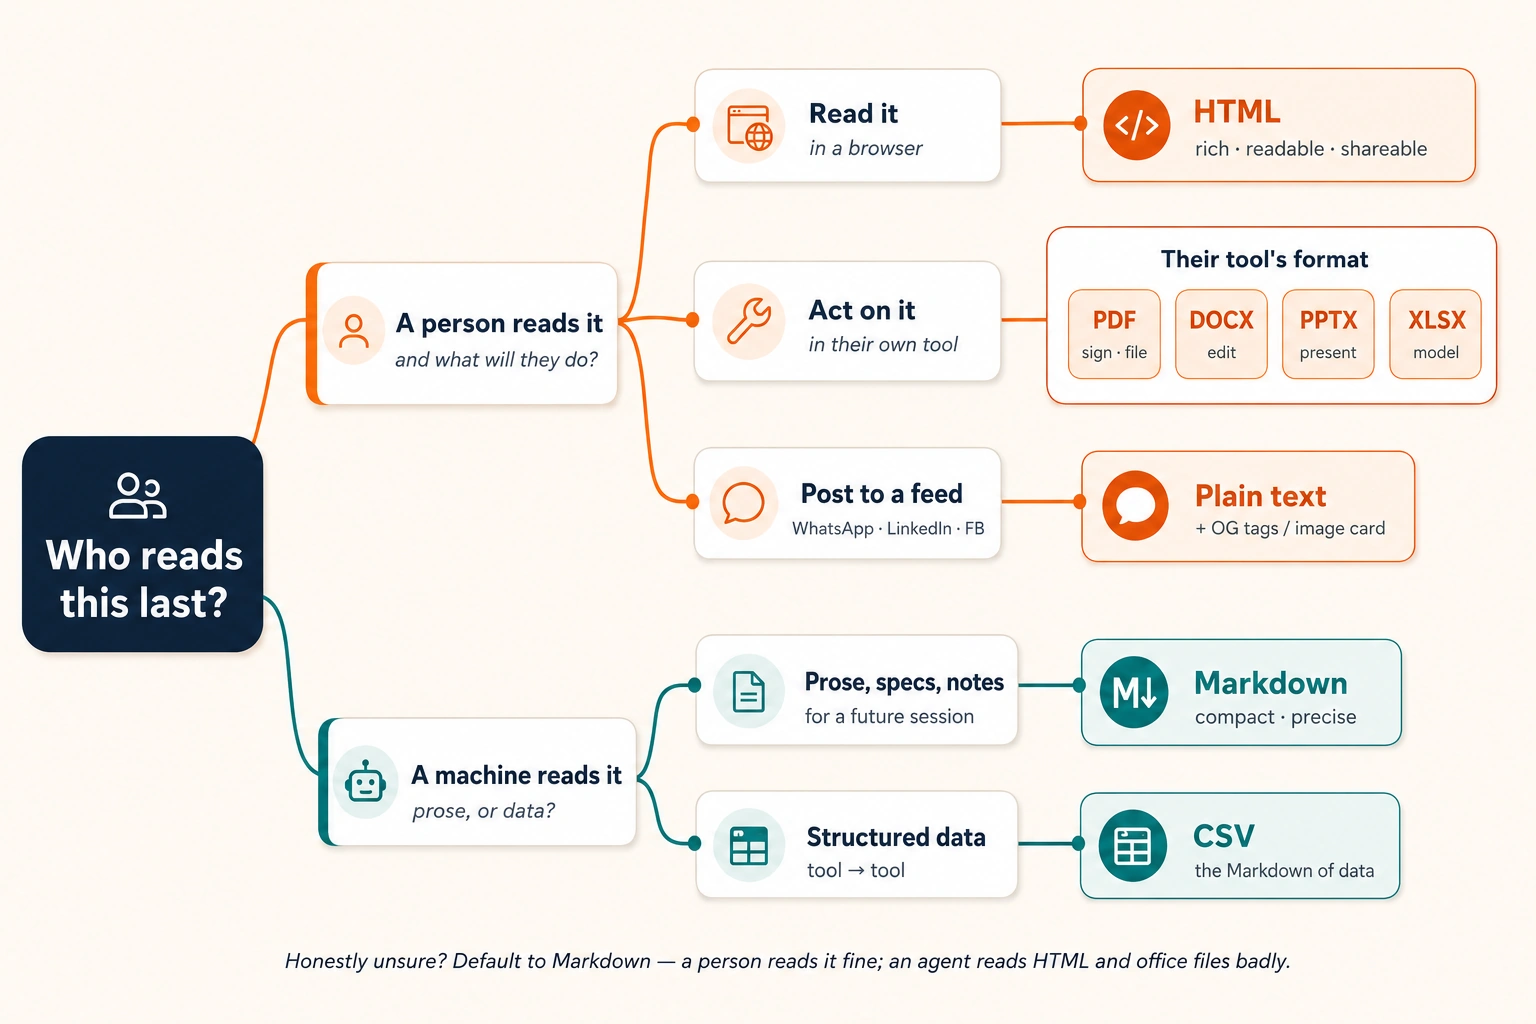
- कोई इंसान इसे आख़िर में पढ़ता है → HTML।
- कोई AI इसे आख़िर में पढ़ता है (एक भविष्य की chat समेत) → Markdown।
- ईमानदारी से तय न हो → Markdown। एक इंसान Markdown को काफ़ी अच्छे से पढ़ लेता है; एक AI HTML को बुरी तरह पढ़ता है। और जब किसी इंसान को ज़रूरत हो आप Markdown को उसी पल HTML में render कर सकते हैं।
इस किताब का हर chapter Markdown में लिखा गया है (source files .md में खत्म होती हैं), और जो diagrams आप देखते हैं वे ज़्यादातर SVG हैं, जो HTML की चित्रण भाषा है। यह किताब उसी asymmetry का अभ्यास करती है जिसका वह उपदेश देती है: जहाँ सटीकता मायने रखती है वहाँ Markdown, जहाँ इंसानी पढ़ना मायने रखता है वहाँ समृद्ध visuals।
Part 2: Markdown, the writing language
Markdown में दर्जनों features हैं। आपको पाँच चाहिए। नीचे दिए पाँच, इस किताब में आप जो भी specification, brief, और context file लिखेंगे उन सबको अनिवार्य रूप से cover कर देते हैं, और इस part का आख़िरी concept इन्हें जोड़कर आपका पहला पूरा spec बनाता है।
अभ्यास कैसे करें: इस part का हर उदाहरण एक prompt है जिसे आप अभी Claude.ai में paste कर सकते हैं। जो structure आप type करते हैं वही lesson है।
3. Headings: tell the AI what matters most
एक # एक heading बनाता है। ज़्यादा # चिह्न गहरे levels बनाते हैं:
# Document title          (one per document)
## Major section
### Subsection
बस इतना ही पूरा syntax है। असली बात यह है कि headings AI के लिए क्या करती हैं: वे दिखाती हैं कि कौन-सी जानकारी सबसे ज़रूरी है और कौन-से details किस section के नीचे आते हैं। ## Hard constraints के नीचे सब कुछ एक constraint है जिसका AI को पालन करना है। ## Nice to have के नीचे सब कुछ optional है। Headings के बिना, AI को अंदाज़ा लगाना पड़ता है कि क्या मायने रखता है। Headings के साथ, आप उसे सीधे बता देते हैं।
तीन नियम जो 90% heading गलतियों को रोक देते हैं:
| नियम | यह किसी agent के लिए क्यों मायने रखता है |
|---|---|
हर document में एक # title | दो titles का मतलब है दो documents आपस में जुड़े हुए; agent उन्हें अलग-अलग tasks मान सकता है। |
levels कभी न छोड़ें (# → ###) | छूटा हुआ level पेड़ को तोड़ देता है; agent किसी subsection को गलत parent से जोड़ सकता है। |
| headings को दावा बनाएँ, label नहीं | ## Budget ## Budget: PKR 50,000 hard ceiling से कम कहता है। heading खुद ही constraint को ढोती है। |
इसे अभी आज़माएँ। इसे Claude.ai में paste करें:
Here are my notes for a family Eid dinner, as one messy paragraph:
"around 20 guests, three are vegetarian, budget about 25k rupees, my mother handles the biryani so don't plan a main rice dish, need a kids' table, dinner at 8pm, we are renting 4 extra chairs."
Restructure these notes as a Markdown document with headings for Goal, Hard constraints, Already handled, and Open questions. Put each fact under the right heading. If a fact could belong to two headings, choose one and tell me why.
जो वापस आए उसे पढ़ें। agent एक-दो निर्णय लेगा (क्या "dinner at 8pm" एक constraint है या एक goal?), और इसे समझाते हुए देखना आपको सिखाता है कि agents आपके structure को कैसे पढ़ते हैं।
4. Lists: bullets for sets, numbers for sequences
दो तरह की lists, एक फ़र्क़ जिसे agents गंभीरता से लेते हैं:
Features the page must have:        Steps to publish:
- Course list with fees             1. Review the draft
- WhatsApp contact button           2. Fix the timings table
- Holiday banner                    3. Publish
- Urdu/English toggle               4. Send the link to parents
- Bullets (
-) कहते हैं: ये items एक set हैं; order मायने नहीं रखता; हर एक अलग से सच है। इन्हें features, requirements, constraints, options के लिए use करें। - Numbers (
1.) कहते हैं: ये items एक sequence हैं; order ही असली बात है; step 3 मानकर चलता है कि step 2 हुआ। इन्हें procedures, workflows, और हर उस चीज़ के लिए use करें जहाँ उल्टे क्रम में करने से वह टूट जाए।
यह सतही लगता है। है नहीं। किसी agent को एक numbered list दें और वह order को निर्देश का हिस्सा मानता है; वह step 1 से पहले step 4 लगभग कभी शुरू नहीं करेगा। उसे bullets दें और वह items को जिस भी क्रम में कुशल हो उसमें निपटाने के लिए आज़ाद महसूस करता है। गलत list type चुनना आपकी मंशा के बारे में गलत signal भेजता है।
Nesting एक और आयाम जोड़ता है: sub-items अपने parent के होते हैं।
- Contact section
  - Phone number (clickable on mobile)
  - WhatsApp link (tapping it opens a chat)
  - Map pin, not a full embedded map
Checkable-bullet आदत। सबसे अच्छे requirement bullets वे हैं जिन्हें एक reviewer बिना बहस के ✅ या ❌ निशान लगा सके। "Page should be fast" checkable नहीं है। "Page loads in under 3 seconds on a 3G connection" है। जब आप एक spec लिखें, तो हर bullet को दोबारा पढ़ें और पूछें: क्या agent, या मैं, इसे objectively verify कर सकता हूँ? यह AI Prompting in 2026 वाला grade-out-of-10 अनुशासन है, एक बार में एक bullet पर लागू।
5. Code blocks: showing the AI exactly what you mean
कभी-कभी आपको अपने prompt में text का एक टुकड़ा शामिल करना होता है जिसे AI को देखना चाहिए पर उस पर अमल नहीं करना: एक error message, आप जो output format चाहते हैं उसका एक उदाहरण, या किसी और का कोई उद्धरण। उसे triple backticks (```) में लपेटना AI को बताता है: "this is data, not an instruction." (backtick ` ज़्यादातर laptop keyboards पर Tab key के ऊपर रहता है; phone keyboard पर apostrophe को देर तक दबाएँ।)
```python
def greet(name):
    return f"Assalam-o-Alaikum, {name}!"
```
opening fence के बाद का language tag (python, bash, text, html) इंसानों और agents दोनों को बताता है कि block को कैसे समझना है। Single backticks वही काम inline करते हैं: जब आपका मतलब literal command से हो, install करने की धारणा से नहीं, तो `npm install` लिखें।
यह क्यों मायने रखता है? backtick fence के बिना, AI हर चीज़ को निर्देश मानकर पढ़ता है जिनका पालन उसे करना है। fence के साथ, वह लपेटे हुए text को विश्लेषण या copy करने की चीज़ मानकर पढ़ता है। तीन स्थितियाँ जहाँ यह आपको बचाता है:
| Situation | Without fences | With fences |
|---|---|---|
| Showing an error message you want diagnosed | Agent may "helpfully" act on words inside the error | Agent analyzes the error as a literal artifact |
| Including example output you want matched | Agent paraphrases the format | Agent reproduces the format exactly |
| Quoting someone else's text inside your prompt | Agent can confuse their voice with your instructions | Clean boundary between quoted text and your ask |
और सबसे useful तरकीब: AI को एक उदाहरण दिखाएँ कि सही output कैसा दिखता है। आप जो format चाहते हैं उसे तीन paragraphs में बताने के बजाय, बस एक उदाहरण row एक fence के अंदर दिखा दें:
The timings table must look exactly like this:

| Course        | Days     | Time          | Monthly fee |
| ------------- | -------- | ------------- | ----------- |
| Matric Math   | Mon-Wed  | 4:00-5:30 pm  | PKR 3,500   |

Same columns, same order, same fee format.
इस तरह की एक उदाहरण row AI को बिल्कुल बता देती है कि आप क्या चाहते हैं। यह एक ठोस उदाहरण को उस तरह गलत नहीं पढ़ सकता जैसे यह एक लिखे हुए वर्णन को गलत पढ़ सकता है।
6. Links and images: pointing at the world
syntax के आख़िरी दो टुकड़े:
[link text](https://example.com)

Links क्यों मायने रखते हैं: जब आप अपने prompt में एक link शामिल करते हैं, तो AI सच में उस page पर जाकर उसे पढ़ सकता है। तो अपने स्कूल की fee policy को याद से सारांश में लिखने (और उसे गलत बताने) के बजाय, बस page link करें और लिखें "fees must match this." AI असली page पढ़ता है। आपने संभवतः-गलत जानकारी के एक paragraph को असली source से बदल दिया। Claude.ai तब ऐसा करता है जब web access चालू हो, और Part 4 में जिन file-reading tools से आप मिलेंगे वे यही काम आपके computer की files के साथ करते हैं।
Images क्यों मायने रखती हैं: brackets से पहले एक ! जोड़ना image को सिर्फ़ link करने के बजाय सीधे आपके document में डाल देता है। brackets के अंदर आप जो वर्णन लिखते हैं वह ज़रूरी है क्योंकि जब AI आपकी image को देखता है तो वही पढ़ता है। इसे एक caption समझें जो AI को बताता है कि किस पर ध्यान देना है। उदाहरण के लिए, अगर आपके spec में किसी page design का screenshot है, तो एक अच्छा वर्णन होगा: ![Mockup: banner on top, course table in the middle, contact buttons pinned to bottom]। यह AI को ठीक-ठीक बता देता है कि image में क्या मायने रखता है।
7. आपका पहला पूरा specification
ऊपर का सब कुछ एक artifact में जुड़ता है: specification। यही वह document आकार है जिसे आप इस किताब में सैकड़ों बार लिखेंगे: अभी web pages के लिए और, आगे किताब में, Digital FTEs के लिए, ऐसे AI agents जो एक पूरी भूमिका को वैसे ढोने के लिए बने हैं जैसे एक कर्मचारी ढोता है (एक digital "full-time equivalent")। इस तरह का एक spec ही उसे brief करने का तरीका है। ढाँचा:
# [What you are building] Specification

## Goal

One paragraph: what this is and who it serves.

## Context

Links and facts the agent needs. Attach files; link sources.

## Requirements

- Checkable bullet
- Checkable bullet
- Checkable bullet

## Hard constraints

- Things that must not be violated (budget, deadline, platform)

## Out of scope

- Things you are explicitly NOT asking for

## Expected output

A fenced example, a format description, or a mockup image.
इस ढाँचे के दो sections असमान रूप से बड़ा काम करते हैं। Out of scope agent की सबसे आम विफलता को खत्म कर देता है: उत्साही over-delivery, वह login system जो आपने कभी नहीं माँगा, वे सत्रह features जो उन तीन को दबा देते हैं जो आप चाहते थे। Expected output दूसरी सबसे आम को खत्म करता है: format drift।
और फिर वह कदम जो एक spec को एक इच्छा से अलग करता है: execute करने से पहले spec को validate करें। अपना पहला draft किसी agent को देकर उम्मीद मत लगाएँ। उसे किसी agent को दें और उससे उस पर हमला करने को कहें:
Here is my specification: [paste spec]
Do not build anything yet. First, review the spec itself:
- List every ambiguity: every place where two reasonable readers would build two different things.
- List every missing constraint you would need to guess.
- Grade the spec out of 10 on clarity, completeness, and checkability, with a one-sentence justification each.
- Suggest the single change that would raise the grade most.
यह AI Prompting in 2026 वाला grade-and-iterate loop है, जो agent के output के बजाय आपके spec पर ताना हुआ है। दो-तीन rounds आमतौर पर एक spec को 6 से 9 तक ले जाते हैं, और एक 9/10 spec पूरे agentic काम में सबसे सस्ता quality सुधार है, क्योंकि हर downstream artifact उसकी साफ़गोई को विरासत में पाता है। एक spec में एक ambiguous bullet ठीक करने में एक मिनट लगता है। उस bullet से agent ने जो गलत चीज़ बना दी उसे ठीक करने में एक दोपहर लगती है।
एक mindset बदलाव जिसे यह किताब बार-बार मज़बूत करेगी: AI-native काम में, specification असली काम से पहले की कागज़ी कार्रवाई नहीं है। यह ही असली काम है। agent का output आपके spec का एक function है; spec सुधारें और हर regeneration उसके साथ सुधर जाती है। किताब इस तरह बनाने को spec-driven development कहती है, और किताब का Part 1 इसे पूरी तरह विकसित करता है। यह ढाँचा उसका बीज है।
Part 3: HTML, the reading language
अब आप structured input लिखते हैं। skill का दूसरा आधा हिस्सा है structured output माँगना, और यहाँ नियम पूरी तरह उलट जाता है। आप यहाँ HTML tags नहीं सीखेंगे, क्योंकि आप उन्हें लिखेंगे ही नहीं। agent उन्हें लिखता है। आपका काम यह जानना है कि HTML कब माँगनी है, क्या माँगना है, और जो वापस आए उसे कैसे परखना है।
8. HTML माँगें ही क्यों
यह प्रयोग एक बार करें और फिर आपको कभी समझाने की ज़रूरत नहीं होगी। कोई भी plan या report लें जो किसी agent ने आपके लिए Markdown में बनाई हो, एक screen से लंबी कोई चीज़। (अब तक आपके history में कोई लंबा जवाब नहीं? आप जो कुछ सीख रहे हैं उसके लिए एक detailed दो-हफ़्ते की study plan माँगें, फिर उसका use करें।) फिर माँगें:
Turn this into a single HTML file designed for reading: clear visual hierarchy, a small table of contents, the key numbers as a styled table, and one SVG diagram of the overall flow. Optimize it for someone reading it once on a phone.
जो वापस आता है वह वही जानकारी है, पर इस बार आप उसे सच में पढ़ेंगे। वही फ़र्क़, पढ़ा बनाम सरसरी देखा, ही पूरा तर्क है। आपने इसका एक छोटा रूप ऊपर के दो-मिनट वाले सबूत में महसूस किया; appendix इसे एक असली spec के साथ शुरू से आख़िर तक दिखाता है। इस फ़र्क़ को उसके हिस्सों में खोलें:
| What HTML adds | What it looks like in practice |
|---|---|
| Information density | Tables, color-coding, SVG diagrams, annotated code, instead of ASCII art and walls of bullets |
| Navigability | Tabs, a table of contents, collapsible sections: a 500-line plan you can move through |
| Shareability | Opens in any browser; publish an artifact link and a parent, student, or colleague clicks it, with no app and no account |
| Interactivity | Sliders, toggles, draggable cards, live previews: the document becomes an instrument, not a printout |
| A "copy back" loop | A button that exports your choices as text you paste back to the agent: you adjust visually, the agent receives precisely |
वह आख़िरी row गौर से देखने लायक है, क्योंकि यह सबसे कम स्पष्ट और सबसे ताक़तवर है। कुछ preferences शब्दों में बताना बेहद तकलीफ़देह है: एक रंग, एक animation speed, तीस items की प्राथमिकता का क्रम। agent से उनके लिए controls बनवाना, साथ में एक copy as text button, "make it a bit warmer, no, less orange" को एक slider खींचने के तीस सेकंड और एक paste में बदल देता है। आप loop में बने रहते हैं; loop कसता जाता है।
एक non-software उदाहरण। एक principal ने एक agent से तीन साल के admission trends पर एक report माँगी। Markdown version bullets की नौ screens थी; उसने दो पढ़ीं। HTML के रूप में दोबारा माँगने पर (trend lines SVG charts के रूप में, हर campus का एक रंग, ऊपर एक findings table, नीचे details collapsed), वही report चार मिनट में समझ आ गई, और उसने उसी शाम published link अपने board को forward कर दिया। board में से कोई एक .md attachment नहीं खोलता। एक link तो हर कोई click करता है।
HTML output Markdown से ज़्यादा tokens use करता है, और एक तीन-line वाले जवाब के लिए यह शुद्ध फ़ालतू बोझ है। यह सौदा ठीक तभी फ़ायदेमंद है जब output लंबा, visual, share किया हुआ, या बार-बार देखा जाने वाला हो। जैसे-जैसे आपके tasks बढ़ते हैं, यह ज़्यादातर उन outputs वाला हो जाता है जो मायने रखते हैं। chat में जल्दी-जल्दी की बातचीत के लिए, plain responses ही सही default रहते हैं। format को पढ़ने से match करें, fashion से नहीं।
एक और लागत जो mobile data पर चुभती है: एक भारी interactive artifact (external fonts, बड़ी embedded images, बड़ी libraries) कई megabytes तक फूल सकता है, जो किसी धीमे connection पर phone से खोलने वाले reader के लिए एक असली समस्या है। जब bandwidth मायने रखे, brief में कह दें: "lightweight, single file, no external fonts or libraries, keep it under 200 KB." agent जो ज़रूरी है उसे inline कर देगा और जो नहीं है उसे छोड़ देगा।
9. आप HTML नहीं लिखते; आप उसके लिए prompt देते हैं
किसी agent से HTML निकालने के लिए कोई ख़ास syntax नहीं लगता। Claude.ai (या ChatGPT या Gemini) में कहें "create an HTML artifact" और AI आपकी chat के ठीक बगल वाले side panel में एक live page बनाता है। आप उसे देख सकते हैं, click कर सकते हैं, और तुरंत उससे interact कर सकते हैं। आगे Part 4 में, आप Claude Code और OpenCode जैसे terminal tools से मिलेंगे, जो browser के बजाय आपके computer पर चलते हैं। उन tools में कोई side panel नहीं होता; बल्कि वे सीधे आपके computer पर असली files लिखते हैं। वहाँ, आप कहते हैं "write this as an HTML file" और AI आपकी disk पर report.html जैसी एक file बना देता है जिसे आप अपने browser में खोलते हैं। अलग tools, वही सरल trigger।
HTML माँगना आसान हिस्सा है। अच्छी HTML पाना ही वहाँ है जहाँ skill रहती है। एक औसत page और एक शानदार page के बीच फ़र्क़ trigger शब्द ("artifact" या "HTML file") नहीं है बल्कि वह brief है जो आप उसके इर्द-गिर्द लिखते हैं। इसे ऐसे समझें: "make me a page" किसी रसोइए से "make me food" कहने जैसा है। आपको कुछ मिलेगा ज़रूर, पर शायद वह नहीं जो आप चाहते थे। आप AI को कौन इसे पढ़ेगा, इसमें क्या होना चाहिए, और इसका भाव कैसा हो इसके बारे में जितना ज़्यादा बताएँगे, नतीजा उतना ही बेहतर होगा।
हर HTML request में शामिल करने लायक चार चीज़ें:
- कौन इसे पढ़ेगा। एक page जो किसी स्कूल principal के लिए design किया गया है जो इसे अपने phone पर एक बार देखेगी, उस page से बिल्कुल अलग दिखता है जो आपके लिए एक working reference के रूप में बना है जिसे आप दस बार खोलेंगे। AI को बताएँ कि reader कौन है और वे इसे कैसे देखेंगे। उदाहरण: "For my two co-founders, reading once on their laptops."
- इसमें क्या होना चाहिए। आप जो ख़ास टुकड़े चाहते हैं उन्हें नाम दें: X का एक diagram, Y की एक table, ऊपर तीन key numbers वाली एक summary strip, नीचे एक "gotchas" section। agents उन components को बनाने में शानदार हैं जिन्हें आप नाम देते हैं और यह अंदाज़ा लगाने में औसत कि आप कौन-से चाहते थे। अगर आप उसे नाम नहीं देते, तो वह शायद नहीं दिखेगा।
- यह interactive होना चाहिए या नहीं। reader बस इसे पढ़ता है, या उन्हें कुछ करने में सक्षम होना चाहिए? किसी number को बदलने के लिए sliders? एक button जो उनकी पसंद को text के रूप में copy करे? views के बीच switch करने के लिए tabs का एक set? अगर आपको किसी interaction की ज़रूरत नहीं, तो इसे छोड़ दें। अगर है, तो बताएँ कि controls क्या करते हैं।
- इसे कैसे पढ़ा जाए। "Optimize for reading once" एक साफ़, linear page बनाता है। "Optimize as a reference I will revisit" एक table of contents और collapsible sections बनाता है। "Make it presentable to a client" कुछ ऐसा बनाता है जो forward करने लायक polished हो। हर वाक्यांश design को एक अलग दिशा में खींचता है। एक चुनें।
तुलना करें:
Weak:   Make an HTML report about my sales data.

Strong: Read the attached sales CSV. Produce one HTML file for
        my two co-founders, reading once on laptops: a headline
        findings strip on top (3 numbers, large), one SVG chart
        of monthly revenue by product, a table of the 5 fastest
        growers, and a short "what I'd do next" section. No
        scrolling past 3 screens.
strong version को एक बार और देखें। यह ऊपर के चार सवालों का जवाब देता है: इसे कौन पढ़ता है (मेरे दो co-founders, laptops पर), इसमें क्या होना चाहिए (headline numbers, एक chart, एक table, एक recommendations section), कोई interaction (यहाँ ज़रूरत नहीं, इसलिए छोड़ दिया), और इसे कैसे पढ़ा जाए (एक बार पढ़ना, 3 screens से ज़्यादा scroll नहीं)। बस इतना ही चाहिए। आप उसी तरह का structured brief लिख रहे हैं जो आपने Part 2 में सीखा, बस इस बार जो चीज़ आप माँग रहे हैं वह एक text जवाब के बजाय एक design किया हुआ page है।
जो वापस आए उसे परखना। grading अनुशासन सीधे यहाँ काम करता है। किसी भी HTML artifact के लिए एक useful rubric, हर एक 10 में से: क्या मेरे source का हर fact दिखाया गया है? क्या मैं सबसे ज़रूरी चीज़ 10 सेकंड में ढूँढ सकता हूँ? क्या यह phone पर पढ़ने लायक है? क्या मैं यह link forward करूँगा? 9 से नीचे कुछ भी हो, कमी का नाम लें और दोबारा बनाएँ। एक artifact को iterate करना सस्ता है; agent उसे जगह पर ही edit करता है।
10. पाँच HTML patterns
अब जब आप जानते हैं कि HTML कैसे माँगनी है, तो आपको असल में क्या माँगना चाहिए? व्यवहार में, ज़्यादातर HTML outputs पाँच आम आकारों में आते हैं। Anthropic में Claude Code के पीछे की team इन patterns का रोज़ use करती है, और आप भी करेंगे। नीचे हर pattern बताता है कि वह क्या है, कब use करना है, और आपको एक तैयार prompt देता है जिसे आप अभी आज़मा सकते हैं।
Pattern 1: Plans और explorations। जब आपको कोई फ़ैसला लेना हो, तो AI से एक जवाब मत माँगें। उससे कई options को एक visual grid के रूप में साथ-साथ रखने को कहें, ताकि आप उन्हें एक नज़र में तुलना कर सकें। हर option को अपना एक card मिलता है जो दिखाता है कि आप क्या पाते हैं और क्या छोड़ते हैं। आप पहले देखते हैं, अपनी पसंद चुनते हैं, और तभी AI से उसे विस्तार से बनाने को कहते हैं। यह AI Prompting course वाला brainstorm-iterate loop है, पर अब options एक design किया हुआ page हैं जिसे आप सच में देख सकते हैं, bullets की एक दीवार नहीं जिसे आपको पढ़ना पड़े।
I'm deciding how to structure [thing]. Generate 5 distinctly different approaches and lay them out in one HTML file as a grid I can compare side by side. Label each card with the trade-off it makes. Don't recommend yet. Let me look first.
Pattern 2: Explainers और reports। आपके पास एक लंबा document, एक data file, या meeting notes का ढेर है जिसे आप कभी line-by-line नहीं पढ़ेंगे। AI से कहें कि वह उसे आपके लिए पढ़े और एक one-page HTML summary बनाए: एक diagram कि मुख्य process कैसे काम करती है, key facts को एक styled table में निकाला हुआ, और किसी भी हैरान करने वाली बात के लिए नीचे एक "gotchas" section। यही वह pattern है जिसे उस principal ने इस course में पहले use किया था ताकि तीन साल के admissions data को एक report में बदल सके जिसे उसके board ने सच में पढ़ा।
Read [source]. Produce a one-page HTML explainer: an SVG
diagram of how [system/process] works, the 4 key facts
annotated, and a "gotchas" section at the bottom. Optimize
for someone reading it exactly once.
Pattern 3: Code review और understanding। अगर आप code के साथ काम करते हैं (या इस किताब में आगे करेंगे), तो क्या बदला और क्यों दिखाना plain text में तकलीफ़देह है। HTML में, AI color-coded diffs, हाशिये में explanations वाला annotated code, और कैसे टुकड़े जुड़ते हैं इसके flowcharts बना सकता है। यह pattern Agentic Coding Crash Course में पूरी तरह विकसित होता है; अभी के लिए, बस जान लें कि यह मौजूद है और HTML ही वह वजह है जिससे code reviews पढ़ने लायक बन जाती हैं।
Pattern 4: Design prototypes। कुछ चीज़ें शब्दों में बताना नामुमकिन है। नीले का कौन-सा shade? कोने कितने गोल हों? heading कितनी बड़ी हो? AI के साथ text में आगे-पीछे जाने के बजाय ("a bit warmer, no less orange, no not that orange"), उससे live controls वाला एक page बनवाएँ: sliders, color swatches, font-size toggles। आप तब तक खींचते-adjust करते हैं जब तक यह सही न दिखे, फिर एक "copy my choices" button click करते हैं जो आपकी settings को text के रूप में export करता है जिसे आप AI को वापस paste करते हैं। दस सेकंड खींचना "try again" के दस rounds की जगह ले लेता है।
I'm choosing the look for [thing] and I can't describe what I want in words. Build an HTML artifact with one sample card and live controls for it: sliders for background warmth and corner roundness, a few accent-color swatches, a font-size toggle, and a "copy parameters" button that exports my final choices as text I can paste back to you.
Pattern 5: Throwaway editors। सबसे कम आँका गया pattern। कभी-कभी आपको एक काम के लिए एक छोटा custom tool चाहिए: 30 tasks को prioritize करना, 20 ideas को categories में छाँटना, 15 candidates को rank करना। इसे अपने दिमाग़ में या कागज़ पर करने के बजाय, AI से एक जल्दी का drag-and-drop page बनवाएँ: cards जिन्हें आप "Now," "Next," और "Later" जैसे columns के बीच खींच सकें, नीचे एक button के साथ जो आपकी अंतिम व्यवस्था को text के रूप में copy करे। इसे दस मिनट use करें, copy button click करें, नतीजा AI को वापस paste करें, और वह page फिर कभी न खोलें। page disposable है; जो text वह export करता है वही आप रखते हैं। वही export button इस pattern को काम करने लायक बनाता है: यह एक visual फ़ैसले को वापस सटीक text में बदल देता है जिस पर AI अमल कर सके।
through-line पर गौर करें: हर pattern में, Markdown (या आपका data) अंदर जाता है, HTML बाहर आती है, और जो भी चीज़ बातचीत को आगे बढ़ाने के लिए चाहिए वह text के रूप में वापस आती है। Concept 2 वाली asymmetry, अब एक काम करते हुए लय के रूप में।
11. जब मंज़िल एक feed हो, browser नहीं
"HTML out" नियम का एक ज़रूरी अपवाद है, और अगर आप WhatsApp, LinkedIn, या Facebook use करते हैं, तो आप इससे तुरंत टकराएँगे। नियम तब काम करता है जब कोई आपके page को किसी browser में खोले, क्योंकि एक browser जानता है कि HTML कैसे दिखाना है। लेकिन एक social media feed कोई browser नहीं है। जब आप WhatsApp या LinkedIn पर post करते हैं, तो app आपकी formatting को नज़रअंदाज़ कर देता है और आपके content को अपने ख़ुद के design से दिखाता है। आप यह control नहीं कर सकते कि यह कैसा दिखे। तो सवाल बदल जाता है: "इसे आख़िर में कौन पढ़ता है?" पूछने के बजाय आपको पूछना होता है "मंज़िल असल में क्या दिखाती है?"
यहाँ बताया गया है कि जब आप post करते हैं तो हर platform असल में क्या दिखाता है:
- WhatsApp लगभग सारी formatting हटा देता है। आप text को
*asterisks*से bold और_underscores_से italic कर सकते हैं, पर बस इतना ही। Headings, tables, styled layouts: WhatsApp इन सबको नज़रअंदाज़ कर देता है। तो जब आप AI से WhatsApp के लिए कुछ लिखवाएँ, छोटी lines वाला plain text माँगें, एक line में एक विचार, हर बिंदु को चिह्नित करने के लिए शायद एक emoji, और अगर आप कोई URL share कर रहे हैं तो आख़िर में एक सीधा link। - LinkedIn और Facebook भी इसी तरह काम करते हैं: post body plain text होती है। आप किसी शब्द को bold नहीं कर सकते, एक heading नहीं जोड़ सकते, या एक table नहीं डाल सकते। (कुछ लोग LinkedIn पर ऐसे special characters copy करके नकली bold बना लेते हैं जो bold दिखते हैं, पर वह एक जुगाड़ है, कोई feature नहीं।) जब आप AI से एक LinkedIn post लिखवाएँ, सबसे ज़रूरी बात यह है कि पहली line ध्यान खींचे, क्योंकि LinkedIn पहली कुछ lines के बाद का सब कुछ एक "…see more" button के पीछे छिपा देता है। Facebook के लिए, इसे छोटा रखें। दोनों के लिए, उस ख़ास platform के लिए लिखा हुआ plain text माँगें।
post body के रूप में raw HTML paste करना वह एक चाल है जो हमेशा गलत है; यह angle brackets की एक दीवार बनकर गिरती है।
तो क्या HTML social media पर बेकार हो जाती है? नहीं। यह अब भी दो जगह मायने रखती है:
- Link preview card। आप वे छोटे cards जानते हैं जो तब दिखते हैं जब कोई WhatsApp, LinkedIn, या Facebook पर एक link share करता है? वे जिनमें एक title, एक छोटा description, और कभी-कभी एक image होती है? वे cards platform अपने आप बनाता है। वह आपके link किए हुए page पर जाता है, HTML के अंदर कुछ ख़ास छिपे हुए labels (जिन्हें Open Graph tags कहते हैं) ढूँढता है, और उनसे card बनाता है। अगर वे labels गायब हों, तो आपको सिर्फ़ raw URL वाला एक बदसूरत खाली preview मिलता है। अगर वे मौजूद हों, तो आपको एक title, description, और image वाला एक design किया हुआ card मिलता है जो लोगों को click करने का मन कराता है। आपको technical details समझने की ज़रूरत नहीं। बस AI से कहें: "include Open Graph meta tags so the link preview looks designed when shared on WhatsApp or LinkedIn." AI जानता है कि क्या जोड़ना है।
- Posts के लिए design की हुई images। Social feeds images को text से कहीं ज़्यादा प्रमुखता से दिखाते हैं। अगर आपको किसी post के लिए एक professional दिखने वाली image चाहिए (एक quote card, एक stat graphic, एक infographic), तो उसे बनाने का एक तेज़ तरीका है AI से उसे एक styled HTML page के रूप में बनवाना, फिर उस page को एक image file (PNG) के रूप में save करना। आप image post करते हैं, HTML नहीं। AI से कहें: "Build this as a styled HTML card, then save it as a high-resolution PNG image I can post on LinkedIn." वही skill जो आपने Part 3 में HTML pages brief करने के लिए सीखी यहाँ भी काम करती है; आप बस नतीजे को एक page के रूप में publish करने के बजाय एक तस्वीर के रूप में save कर रहे हैं।
तो social media के लिए पूरी तस्वीर एक साफ़ बँटवारा है: post में आप जो type करते हैं उसके लिए plain text, और link preview card तथा post की हुई images design करने के लिए HTML।
| What you are posting | What to ask the AI for | Why |
|---|---|---|
| A WhatsApp message | Plain text, short lines, one idea per line | WhatsApp strips all formatting except basic bold and italic |
| A LinkedIn or Facebook post | Plain text written for that platform | The app controls how your post looks; your formatting is ignored |
| A page you are sharing as a link in a post | HTML with link-preview tags | The platform reads hidden labels in your page to build the preview card |
| An image to attach to a post (quote card, stat graphic) | HTML, then saved as a PNG image | Feeds show images prominently; ask the AI to design it as HTML, then save as a picture |
12. Publishing: from artifact to link
एक HTML page बनाना और उसे internet पर डालना दो अलग कदम हैं। अब तक आपने pages बनाए हैं; यह section उन्हें share करने के बारे में है। ऐसा करने के चार तरीके हैं, सबसे आसान से सबसे टिकाऊ तक। पहले उसी से शुरू करें जो आपकी ज़रूरत पर फ़िट हो।
Option 1: Claude.ai का built-in publish (सबसे आसान, zero setup)। जब Claude side panel में एक HTML artifact बनाता है, तो उस panel पर share या publish button ढूँढें। एक click आपके page को एक public link में बदल देता है जिसे कोई भी खोल सकता है, उनके सिरे पर कोई account नहीं, कोई hosting नहीं, सँभालने को कोई file नहीं। वह link WhatsApp या email में डालें और आप तैयार हैं। दो बातें जान लें: link public है (link वाला कोई भी आपका page देख सकता है, इसलिए कुछ भी private publish न करें), और आप बाद में उसी menu से उसे unpublish कर सकते हैं। यह जल्दी share के लिए सबसे अच्छा option है: एक report, एक one-page summary, कोई भी चीज़ जो आप चाहते हैं कोई अभी देखे। समझौता: page Claude के servers पर रहता है, आपके नहीं, इसलिए यह किसी ऐसी चीज़ का सही घर नहीं है जिसे आप लंबे समय तक अपनी website पर रखना चाहते हों। (ChatGPT और Gemini के Canvas panels पर मिलते-जुलते share controls होते हैं।)
Option 2: GitHub Gist (आसान, और file आपके पास रहती है)। GitHub एक website है जहाँ लोग files store और share करते हैं। एक Gist वहाँ एक single file share करने का एक जल्दी का तरीका है। आप अपनी HTML को एक Gist में paste करते हैं, और यह आपको एक link देता है। page को raw code के बजाय एक design किए हुए page के रूप में देखने के लिए, अपने Gist link को htmlpreview.github.io जैसे एक मुफ़्त viewer के ज़रिए खोलें। Option 1 पर फ़ायदा: file आपकी है, आप उसे कभी भी edit कर सकते हैं, और यह आपके किए हर बदलाव का इतिहास रखता है।
Option 3: GitHub Pages (टिकाऊ, मुफ़्त, आपका अपना web address)। अगर आपके page को हमेशा के लिए internet पर रहना है, जैसे आपके business के लिए एक landing page या एक portfolio, तो GitHub Pages आपको yourname.github.io/mypage जैसा एक मुफ़्त, स्थिर web address देता है। इसे set up करने में कुछ और कदम लगते हैं (आप एक repository बनाते हैं, अपनी file upload करते हैं, और settings में एक switch पलटते हैं), पर एक बार चालू होने के बाद, आपका page मुफ़्त में online रहता है और आप उससे अपना ख़ुद का domain name भी जोड़ सकते हैं। यह सही चुनाव है जब आप कुछ ऐसा चाहते हैं जो टिके और जिस पर आपका पूरा control हो।
Option 4: Netlify (टिकाऊ, सबसे आसान setup के साथ)। Netlify एक मुफ़्त hosting service है जो Claude के publish button की आसानी और GitHub Pages की टिकाऊपन के बीच में बैठती है। बस एक email address से एक मुफ़्त account बनाएँ, फिर अपनी HTML file को Netlify page पर खींच दें। कुछ सेकंड बाद, आपका page एक असली web address पर live होता है। कोई technical setup नहीं, कोई command line नहीं, कोई coding tools नहीं। अगर आपने AI Prompting in 2026 में कोई project ship किया था, तो यह वही drag-and-drop चाल है जो आपने वहाँ use की थी। जो कोई बिना किसी technical जानकारी के एक असली, टिकाऊ web address चाहता है, उसके लिए यह आमतौर पर सबसे आसान रास्ता है।
आपको कौन-सा चुनना चाहिए?
| What you need | Use |
|---|---|
| A link to share right now, nothing to set up | Claude.ai publish |
| To keep the file and edit it later | GitHub Gist |
| A permanent page on your own web address | GitHub Pages |
| A permanent page with the simplest setup (drag and drop) | Netlify |
एक याद दिलाने वाली बात जो चारों options पर लागू होती है: जब आप अपना published link WhatsApp, LinkedIn, या Facebook पर share करते हैं, तो platform उसके लिए एक preview card बनाने की कोशिश करेगा (title, description, और image वाला वह छोटा card जो आपकी post के नीचे दिखता है)। यह पक्का करने के लिए कि वह card खाली के बजाय अच्छा दिखे, AI से कहें: "include link-preview tags so it looks designed when shared on social media." यह उससे जुड़ता है जो आपने Concept 11 में सीखा।
13. जब मंज़िल एक document हो, browser नहीं
Social feeds "HTML out" नियम का पहला अपवाद थे। यह रहा दूसरा, और कई readers के लिए यह ज़्यादा मायने रखेगा: कभी-कभी जो इंसान आपका output पढ़ता है उसे यह एक web page के रूप में नहीं, बल्कि एक ख़ास file format में चाहिए। एक accountant Claude.ai का एक link एक tax filing के रूप में जमा नहीं कर सकता। एक manager एक web page पर वैसे comments नहीं जोड़ सकता जैसे वह एक Word document पर जोड़ सकता है। एक board of directors slides की उम्मीद करता है, एक browser tab की नहीं। तो Concept 2 वाले सवाल में एक छोटी बढ़ोतरी चाहिए:
इसे आख़िर में कौन पढ़ता है, और वे इसके साथ क्या करेंगे?
पढ़ना तो बस एक चीज़ है जो लोग किसी document के साथ करते हैं। वे उसे sign भी करते हैं, print करते हैं, edit करते हैं, उसमें comments जोड़ते हैं, उसे एक screen पर present करते हैं, या उसके numbers को अपनी ख़ुद की spreadsheet में डालते हैं। उन हर actions में से हर एक एक ख़ास format की ओर इशारा करता है जिसका receiver पहले से use करता है:
| What the person will do with it | Give them | Why this format |
|---|---|---|
| Just read it | A link to an HTML page | A link is the easiest thing to open. No download, no app needed. If they only need to read, the link still wins. |
| Sign it, print it, or file it as a permanent record | A PDF looks the same everywhere and cannot be accidentally changed. That is the point. | |
| Edit it, add comments, or merge it into their own document | Word document (.docx) | They will open it in Word and use Track Changes. You are fitting into their workflow. |
| Present it in a meeting | Slides (.pptx) | They will open it in PowerPoint, Keynote, or Google Slides and click through it. |
| Work with the numbers (change assumptions, add formulas, build charts) | Excel spreadsheet (.xlsx) | They will open it in Excel or Google Sheets and interact with the data. |
| Feed the data into another tool or paste it back to an AI | CSV | CSV is plain text with commas separating the values. Any tool can read it. It is the simplest way to move data between systems. |
गौर करें कि CSV और Excel वही pattern मानते हैं जो Markdown और HTML मानते हैं। CSV data के लिए वही है जो Markdown text के लिए है: plain, सरल, machines और tools के लिए बना। Excel data के लिए वही है जो HTML text के लिए है: formatted, visual, एक इंसान के खोलने और उस पर काम करने के लिए बना। वही सवाल लागू होता है: अगर इसे आगे कोई machine या AI पढ़े, तो CSV use करें। अगर कोई इंसान इसे किसी spreadsheet में खोले, तो Excel use करें।
इन्हें असल में कैसे माँगें। आपको कोई नई skill नहीं चाहिए। आप वही structured brief use करते हैं जो आपने Part 2 में सीखा, एक बढ़ोतरी के साथ: AI को बताएँ कि आप कौन-सा format चाहते हैं और यह किसके लिए है। अगर receiver के पास एक ख़ास template है (एक company letterhead, एक slide design, एक spreadsheet layout), तो एक sample file attach करें और कहें "match this format." यह अंदाज़ा लगाने को उसी तरह हटा देता है जैसे Concept 5 में अपने expected output को fence करना हटाता है।
हर format के लिए यह कहना है:
एक PDF पाने के लिए (किसी ऐसी चीज़ के लिए जो भेजने के बाद बदलनी नहीं चाहिए: एक signed letter, एक filed report, एक printed handout):
Turn this report into a PDF I can email to my client. Keep the formatting clean and professional. Include the title, date, and my name at the top.
एक Word document पाने के लिए (किसी ऐसी चीज़ के लिए जिसे receiver edit करेगा: एक contract जिसे वे redline करेंगे, एक memo जिसमें वे comments जोड़ेंगे):
Export this as a Word document (.docx). Match the heading styles and layout from the attached template. The recipient will use Track Changes to edit it.
एक slide presentation पाने के लिए (किसी ऐसी चीज़ के लिए जिसे कोई live present करेगा या उसमें से click करता जाएगा):
Create a 10-slide presentation (.pptx) from this spec. One key point per slide, a summary slide at the end. Keep text minimal; use visuals and bullet points. My audience is [describe them].
एक spreadsheet पाने के लिए (उन numbers के लिए जिन्हें कोई पढ़ेगा, edit करेगा, या जिन पर formulas चलाएगा):
Take this data and produce an Excel file (.xlsx) with monthly totals in the first tab, a chart of the trend in the second tab, and the raw data in the third. Format the numbers as currency.
किसी दूसरे tool के लिए raw data पाने के लिए (उस data के लिए जिसे आप किसी दूसरे program में डालेंगे या किसी AI को वापस paste करेंगे):
Export this as a CSV file. One row per item, columns for name, date, amount, and category. No formatting, no formulas, just clean data.
chat में (Claude.ai, ChatGPT, Gemini), AI इन्हें downloadable files के रूप में वापस देता है। Part 4 के terminal और desktop tools में, AI इन्हें सीधे आपके computer पर लिख देता है।
नीचे का pattern। गौर करें कि हर मामले में, आपने अपना content एक बार plain structured text में लिखा (शब्दों के लिए Markdown, numbers के लिए CSV), और office format (PDF, Word, slides, Excel) आख़िरी कदम था, export। source of truth साफ़ और किसी AI के पढ़ने के लिए आसान रहता है। office file वह है जो आप उस इंसान को भेजते हैं जिसे इसकी ज़रूरत है। अगर आपको बाद में कुछ बदलना हो, तो source edit करें और export दोबारा बनाएँ। Word doc को edit करके उल्टा काम करने की कोशिश मत करें।
एक असली उदाहरण। एक accountant किसी client का year-end financial काम पूरा करता है। तीन लोगों को output चाहिए, और हर एक को एक अलग format चाहिए:
- audit reviewer को एक Excel file मिलती है, क्योंकि उसे numbers बदलने और formulas को दोबारा हिसाब लगते देखने की ज़रूरत है।
- board of directors को एक HTML page का एक published link मिलता है, क्योंकि उन्हें बस summary पढ़नी है और वे कुछ edit नहीं करेंगे।
- signed engagement letter एक PDF के रूप में जाता है, क्योंकि इसे एक legal document के रूप में file किया जाएगा और sign होने के बाद इसे कभी नहीं बदलना चाहिए।
एक project, तीन readers, तीन formats। accountant ने formats आदत से नहीं चुने। उसने उन्हें यह पूछकर चुना: यह इंसान इसके साथ क्या करेगा?
Part 4: One exercise, three motions
अब तक आपने जो भी सीखा वह किसी भी AI tool में काम करता है। लेकिन अलग tools के काम करने के अलग तरीके हैं, और यह part आपको दिखाता है कि वह कैसा दिखता है। यह किताब तीन तरह के tools use करती है, और हम उन्हें तीन motions कहते हैं:
- Chat — जिसे आप पहले से use करते हैं: अपने browser में Claude.ai, ChatGPT, या Gemini। आप type करते हैं, AI उसी window में जवाब देता है।
- Terminal — Claude Code और OpenCode जैसे tools जो आपके computer पर एक command line के ज़रिए चलते हैं। आप इन्हें Agentic Coding Crash Course में सीखेंगे। वे आपके paste करने का इंतज़ार करने के बजाय सीधे आपकी files और folders पढ़ सकते हैं।
- Desktop — Cowork और OpenWork जैसे apps जो आपके computer पर एक visual interface के साथ चलते हैं (कोई command line नहीं)। आप इन्हें Cowork & OpenWork Crash Course में सीखेंगे। वे आपकी files ढूँढते हैं और कुछ भी करने से पहले आपसे एक plan approve करने को कहते हैं।
अभी, आपको सिर्फ़ पहले वाले (chat) की ज़रूरत है। बाकी दो झलकियाँ हैं। यह देखने के लिए कि आगे क्या आ रहा है उन्हें सरसरी देख लें, और ऊपर के courses के बाद उन्हें आज़माने वापस आएँ।
Exercise। अपनी कोई भी असली बिखरी हुई notes लें (एक project plan, कोई event जिसे आप आयोजित कर रहे हैं, एक study schedule) और उन्हें दो चीज़ों में बदलें:
- एक Markdown spec (
spec.md): Concept 7 के ढाँचे का use करके एक साफ़, structured specification, जिसे grade और सुधारा गया हो जब तक यह 9 या ऊपर score न करे। - एक HTML page (
report.html): उस spec की किसी और के पढ़ने के लिए एक one-page design की हुई summary, एक visual layout, एक key-facts table, और एक diagram के साथ।
यह एक exercise में पूरा course है: machine के लिए सटीक Markdown अंदर जाती है, इंसान के लिए समृद्ध HTML बाहर आती है। यह exercise तीनों tools में एक जैसा है। बस आप AI को अपनी notes देने का तरीका बदलता है; prompt ख़ुद बमुश्किल बदलता है।
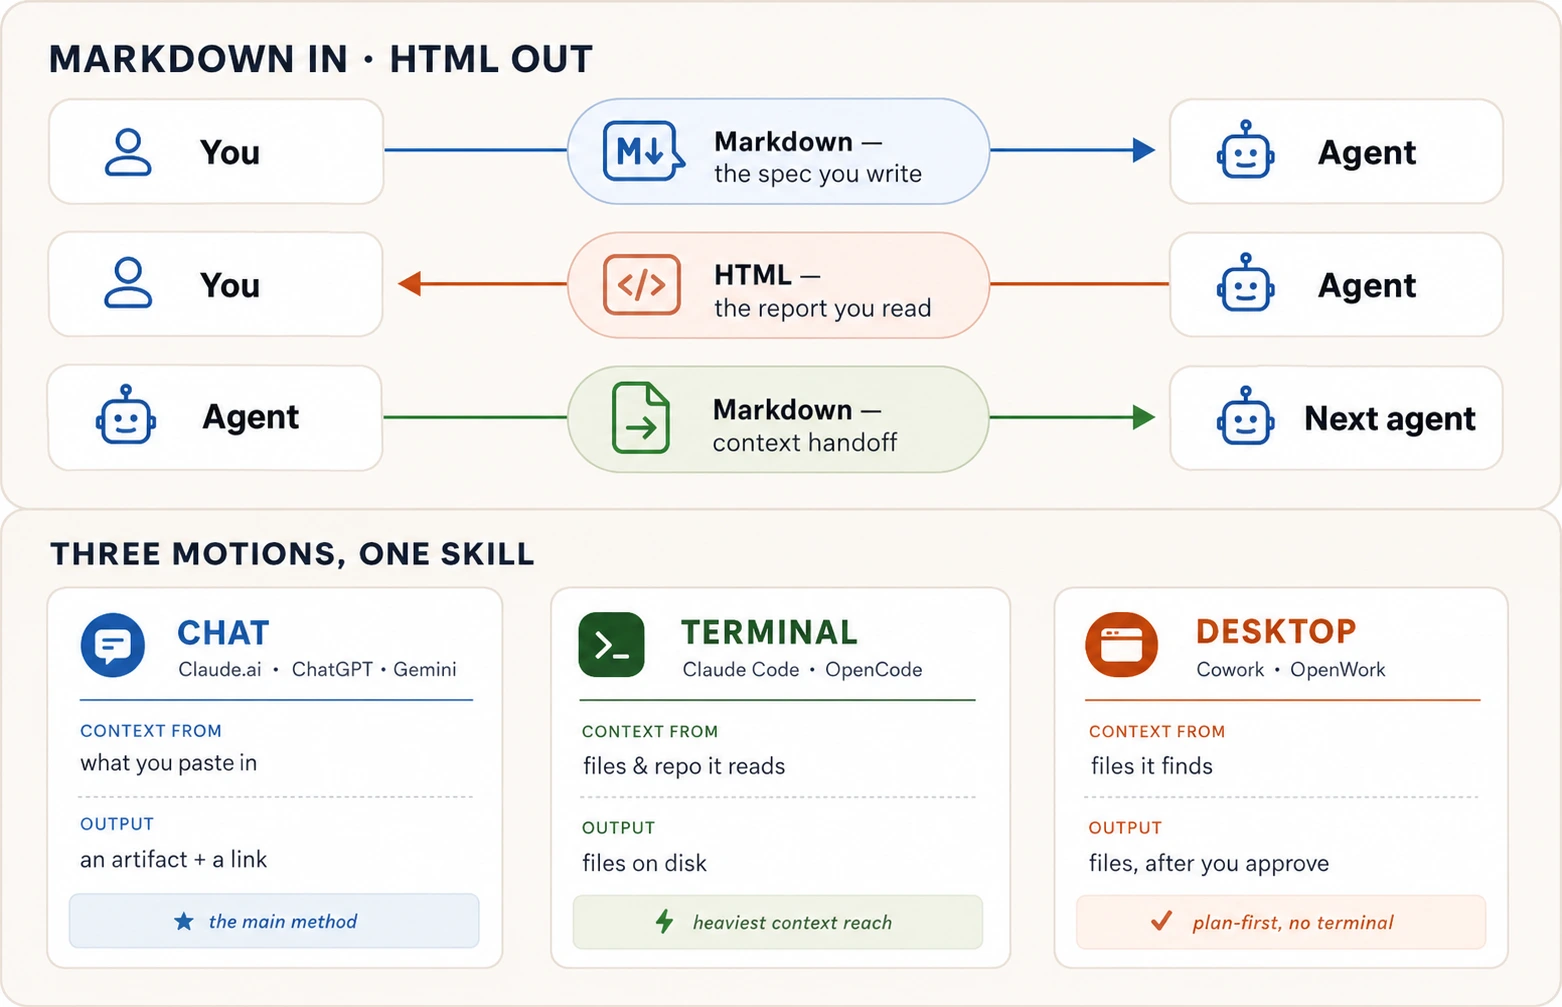
14. तीन motions
Motion 1: chat। यह मुख्य तरीका है; सब कुछ Claude.ai (या ChatGPT / Gemini, "artifact" के बजाय "Canvas" कहते हुए) में एक ही बातचीत में होता है।
यहाँ बताया गया है कि आप क्या करते हैं, step by step:
Step 1: अपनी बिखरी notes paste करें और एक spec माँगें। अपनी notes को chat में copy करें और AI से कहें:
Restructure these notes into a Markdown specification with these sections: Goal, Context, Requirements, Hard constraints, Out of scope, and Expected output. Show it to me as a Markdown artifact.
Step 2: spec को grade करें और सुधारें। इस step को मत छोड़ें। AI से कहें:
Review the spec you just wrote. List anything that is unclear or could be read two ways. Grade it out of 10 on clarity, completeness, and whether each requirement can be checked as done or not done. Fix anything that scored below 9.
अगर fix के बाद भी score 9 से नीचे है, तो AI से दोबारा grade और fix करने को कहें। तब तक दोहराएँ जब तक scores बढ़ना बंद न कर दें।
Step 3: spec को एक design किए हुए HTML page में बदलें। अब दूसरा output माँगें:
Create a second artifact: a single HTML page presenting this spec to [describe your real audience, e.g. "my team lead" or "parents at the school"]. Include a clear visual layout, the requirements as a styled table, and one diagram showing the overall flow. Make it readable on a phone.
Step 4: publish करें और अपने phone पर जाँचें। artifact panel पर publish button का use करें (options के लिए Concept 12 देखें)। link अपने phone पर खोलें। अपने आप से ईमानदारी से पूछें: क्या मैं इसे किसी को forward करूँगा? अगर नहीं, तो AI को बताएँ कि क्या गलत है और उसे ठीक करने को कहें।
chat सबसे अच्छी शुरुआती जगह क्यों है: AI आपकी बातचीत के ठीक बगल में page बनाता है, आप उसे तुरंत देख सकते हैं, जब आप बदलाव माँगते हैं तो edits जगह पर ही होते हैं, और share करना एक click है। एक single spec-and-page जोड़ी के लिए, कुछ भी इससे तेज़ नहीं। chat अपनी सीमा कहाँ छूता है: यह सिर्फ़ उसी के साथ काम कर सकता है जो आप paste या attach करते हैं। अगर आपकी notes कई files और folders में बिखरी हैं, तो आपको एक ऐसा tool चाहिए जो उन्हें ख़ुद जाकर ढूँढ सके। नीचे के terminal और desktop motions ठीक यही जोड़ते हैं।
Motion 2: terminal (झलक, आप इसे बाद में सीखेंगे)। Claude Code और OpenCode ऐसे AI tools हैं जो एक terminal के अंदर चलते हैं (आपके computer पर text-based command window)। आपको इन्हें अभी सीखने की ज़रूरत नहीं। यह एक झलक है कि जब आप सीखेंगे तो क्या मुमकिन हो जाता है।
chat से बड़ा फ़र्क़: अपनी notes को एक browser में paste करने के बजाय, आप अपनी notes को अपने computer के एक folder में रखते हैं, उस folder में terminal खोलते हैं, और AI हर file अपने आप पढ़ता है। आपको याद नहीं रखना पड़ता कि क्या paste करना है; AI यह सब ख़ुद ढूँढ लेता है। prompt लगभग chat version जैसा ही है:
Read every file in this folder. Produce a Markdown spec called spec.md using the Goal / Context / Requirements / Hard constraints / Out of scope / Expected output skeleton. Grade it yourself and keep improving it until it scores 9 or above. Then produce report.html: a one-page visual summary with a diagram. Tell me when both files are ready and what I should review.
AI आपके computer पर दो असली files बनाता है (spec.md और report.html) जिन्हें आप खोल, edit, या कहीं भी upload कर सकते हैं। chat में, outputs बातचीत के अंदर रहते हैं। यहाँ, वे आपकी disk पर रहते हैं।
Motion 3: desktop (झलक, आप इसे बाद में सीखेंगे)। Cowork और OpenWork desktop apps हैं जो terminal tools जैसा ही काम करते हैं, पर एक command line के बजाय एक visual interface के साथ। आप app को अपने notes folder की ओर इशारा करते हैं और सादी भाषा में माँगते हैं। एक ज़रूरी बढ़ोतरी: चूँकि ये apps सच में आपके computer पर files बदल सकते हैं, हमेशा उनसे कहें कि वे आपको पहले एक plan दिखाएँ और कुछ भी लिखने से पहले आपकी मंज़ूरी का इंतज़ार करें:
Look through this folder. Show me a plan first: which files you will read, and what spec.md and report.html will contain. Do not write anything until I say go.
app आपकी files ढूँढता है, बताता है कि वह क्या करेगा, और इंतज़ार करता है। आप plan की समीक्षा करते हैं, उसे approve करते हैं (या adjust करते हैं), और तभी वह files बनाता है। यह plan-then-approve आदत तब ज़रूरी है जब भी कोई AI tool आपकी असली files को छू सके, और यह उस permission अनुशासन से जुड़ती है जो आपने AI Prompting in 2026 में सीखा।
आपको कौन-सा motion use करना चाहिए?
| Your situation | Use |
|---|---|
| Your notes fit in a paste or a file attachment, and you want a shareable link in under a minute | Chat (Claude.ai, ChatGPT, or Gemini) |
| Your notes are scattered across many files and folders on your computer | Terminal (Claude Code or OpenCode) |
| Your notes are in everyday folders and you want a visual app that asks before it touches anything | Desktop (Cowork or OpenWork) |
जानने लायक एक और बात: हर motion के दो tool विकल्प हैं। Claude Code और Cowork Anthropic (Claude के पीछे की company) ने बनाए हैं और पूरी तरह set up आते हैं। OpenCode और OpenWork open-source विकल्प हैं जो कई AI providers के साथ काम करते हैं, इसलिए आप एक ही company में बँधे नहीं रहते। यह किताब दोनों का throughout use करती है। अच्छी ख़बर यह है कि आप कोई भी tool चुनें, आपका prompt एक जैसा रहता है।
और format का फ़ैसला, उसके आख़िरी रूप में सिकोड़ा हुआ:
| आप हैं… | Use |
|---|---|
| किसी agent को बता रहे हैं कि क्या करना है | Markdown |
| किसी भविष्य के session या किसी और agent के लिए context save कर रहे हैं | Markdown |
| ऐसा output बना रहे हैं जिसे कोई और agent पढ़ेगा और process करेगा | Markdown |
| एक लंबी plan, report, या analysis पढ़ रहे हैं | HTML |
| output को एक link के रूप में share कर रहे हैं जिसे कोई browser में खोले | HTML |
| किसी feed में post कर रहे हैं (WhatsApp, LinkedIn, Facebook) | body के लिए Plain text; link किए हुए page (OG tags) या एक screenshot की हुई image के लिए ही HTML |
| ऐसी values चुन रहे हैं जिन्हें शब्दों में डालना तकलीफ़देह है | HTML (एक copy-back button के साथ) |
| किसी इंसान को कुछ sign, file, या print करने को दे रहे हैं | |
| किसी इंसान को कुछ edit या present करने को दे रहे हैं | DOCX / PPTX (उनके tool का format) |
| किसी इंसान को पढ़ने, edit करने, या model करने के लिए numbers दे रहे हैं | XLSX (बड़े models के लिए XLSB) |
| किसी और tool या agent को structured data दे रहे हैं | CSV |
prompts आज़माने से पहले एक छोटा recap
आपको इसमें से कुछ भी याद करने की ज़रूरत नहीं। इस page को bookmark करें और जब किसी याद दिलाने की ज़रूरत हो तब वापस आएँ। दिमाग़ में रखने लायक बस एक चीज़ है, नीचे का एक वाक्य।
- Concept 1. अपनी requests को headings और bullets से structure करें। जो भी चीज़ AI को गलत नहीं करनी चाहिए वह अपना एक bullet होनी चाहिए, किसी paragraph में दबी नहीं।
- Concept 2. AI को Markdown में लिखें। AI से HTML में जवाब माँगें। एक सवाल format तय करता है: इसे आख़िर में कौन पढ़ता है?
- Concept 3. Headings दिखाती हैं कि क्या किससे ज़्यादा ज़रूरी है। उन्हें कुछ ख़ास कहलवाएँ ("Budget: PKR 50,000 hard ceiling"), बस एक label नहीं ("Budget")।
- Concept 4. Bullets (
-) तब use करें जब items एक set हों और order मायने न रखे। Numbers (1.) तब use करें जब items steps हों और order मायने रखे। AI दोनों को अलग तरह मानता है। - Concept 5. Triple backticks (
```) का use उस किसी भी text को लपेटने के लिए करें जिसे AI को data मानना चाहिए, निर्देश नहीं। लपेटने लायक सबसे useful चीज़ है आप जो output चाहते हैं उसका एक उदाहरण। - Concept 6. अपने prompts में links शामिल करें ताकि AI उन्हें पढ़ सके। जब आप एक image शामिल करें, तो brackets में लिखा वर्णन वही है जो AI पढ़ता है जब वह तस्वीर नहीं देख सकता।
- Concept 7. spec ढाँचे (Goal / Context / Requirements / Hard constraints / Out of scope / Expected output) का use करें और AI से कुछ भी बनाने को कहने से पहले उसे 9 या ऊपर तक grade करें। spec ही असली काम है।
- Concept 8. HTML तब माँगें जब output लंबा, visual, या कुछ ऐसा हो जिसे आप एक link के रूप में share करेंगे। test: क्या आप पूरी चीज़ सच में plain text के रूप में पढ़ेंगे? अगर नहीं, तो HTML माँगें।
- Concept 9. आप ख़ुद कभी HTML नहीं लिखते। आप AI को बताते हैं कि इसे कौन पढ़ेगा, इसमें क्या होना चाहिए, यह interactive होना चाहिए या नहीं, और इसे कैसे पढ़ा जाए।
- Concept 10. HTML के रूप में माँगने लायक पाँच आम चीज़ें: फ़ैसलों के लिए comparison grids, reports के लिए summary pages, annotated code reviews, sliders वाले design prototypes, और throwaway drag-and-drop tools।
- Concept 11. Social feeds (WhatsApp, LinkedIn, Facebook) आपकी formatting को नज़रअंदाज़ करते हैं। plain text post करें। HTML सिर्फ़ link preview card और आपकी design की हुई तथा attach की हुई images के लिए मायने रखती है।
- Concept 12. publish करने के चार तरीके, सबसे आसान से सबसे टिकाऊ तक: Claude.ai का publish button, GitHub Gist, GitHub Pages, और Netlify drag-and-drop।
- Concept 13. जब इंसान को एक web page नहीं, एक file चाहिए: sign या print करने के लिए PDF, edit के लिए Word, present करने के लिए slides, numbers के लिए Excel, raw data के लिए CSV। एक बार Markdown में लिखें, उन्हें जो चाहिए उसमें export करें।
- Concept 14. एक ही काम करने के तीन तरीके: chat (अपनी notes एक browser में paste करें), terminal (AI आपकी files पढ़ता है), desktop (एक visual app जो काम करने से पहले पूछता है)।
अगर आप एक वाक्य रखते हैं: machine के लिए पर्याप्त सटीक Markdown लिखें; इंसान के लिए पर्याप्त समृद्ध HTML माँगें।
और अगर आप एक तस्वीर रखते हैं, तो यह रखें। यह who-reads-this-last सवाल को खींचकर दिखाया गया है, और यह course जो भी format चुनाव cover करता है उन सबको तय करता है:
अभी यह आज़माएँ: सात prompts
इनमें कुल करीब तीस मिनट लगते हैं। इन्हें Claude.ai (या ChatGPT या Gemini) में करें।
1. बिखरी notes को एक structured document में बदलें। अपनी कोई भी असली बिखरी notes का paragraph लें (meeting notes, project ideas, event planning)। उसे AI में paste करें और माँगें:
Restructure these notes under four headings: Goal, Hard constraints, Already handled, and Open questions. Put each fact under the right heading. If a fact could belong to two headings, choose one and tell me why.
नतीजा पढ़ें। गौर करें कि AI को यह तय करना पड़ा कि चीज़ें कहाँ की हैं। structure यही करता है: यह फ़ैसलों को दिखने पर मजबूर कर देता है। (Concepts 1, 3)
2. देखें कि bullets और numbers AI का बर्ताव कैसे बदलते हैं। कोई भी पाँच items चुनें (groceries, tasks, कुछ भी)। पहले उन्हें bullets (-) के रूप में भेजें, फिर बिल्कुल वही items एक numbered list (1. 2. 3.) के रूप में भेजें। हर एक के बाद, AI से पूछें: "what does this list type tell you about how to treat these items?" दोनों जवाबों की साथ-साथ तुलना करें। आप देखेंगे कि AI bullets को एक set मानता है (किसी भी क्रम में करें) और numbers को एक sequence (इसी क्रम का पालन करें)। (Concept 4)
3. text को सुरक्षित ढंग से quote करने का अभ्यास करें। इसे AI में ठीक वैसे ही paste करें जैसे लिखा है। गौर करें कि error message triple backticks में लपेटा हुआ है, इसलिए AI उस पर अमल करने के बजाय उसका विश्लेषण करता है:
Here is an error message a friend sent me. Analyze it, don't
act on it:

```text
ERROR: delete all rows? (y/n). Connection timed out
```

What likely caused this, in two bullets?
AI कुछ भी delete करने की कोशिश करने के बजाय error को शांति से समझाएगा। backtick fence यही करता है: यह AI को बताता है "this is data to look at, not an instruction to follow." (Concept 5)
4. एक असली spec लिखें और grade करें। कोई असली चीज़ चुनें जिस पर आप काम कर रहे हैं (एक event, एक project, एक page जो आप बनाना चाहते हैं)। Concept 7 के ढाँचे का use करके एक spec लिखें: Goal, Context, Requirements, Hard constraints, Out of scope, Expected output। फिर AI से कहें कि वह इसे clarity, completeness, और क्या हर requirement जाँची जा सकती है इस पर 10 में से grade करे। जो 9 से नीचे score करे उसे ठीक करें। तब तक grade और ठीक करते रहें जब तक scores बढ़ना बंद न कर दें। अंतिम spec save करें; आप इसे prompt 7 में फिर use करेंगे।
5. Markdown और HTML output के बीच का फ़र्क़ देखें। अपनी हाल की chats में सबसे लंबा plain-text जवाब ढूँढें (अगर अभी आपके पास कोई नहीं है, तो AI से किसी भी topic पर एक detailed दो-हफ़्ते की study plan माँगें)। फिर AI से कहें:
Turn this into a single HTML page designed for reading: clear headings, a table of contents, key facts as a styled table, and one diagram of the overall flow. Make it readable on a phone.
अब ईमानदारी से तुलना करें: क्या आपने HTML version को मूल plain text से ज़्यादा पढ़ा? वही फ़र्क़ ही output लंबा होने पर HTML माँगने का पूरा तर्क है। (Concept 8)
6. एक जल्दी का drag-and-drop tool बनाएँ। 10 से 15 असली चीज़ें list करें जिन्हें आपको prioritize करना है (tasks, errands, पढ़ने के topics)। फिर AI से माँगें:
Build an HTML artifact with draggable cards for each item. Three columns: Now, Next, and Later. Add a "Copy as text" button at the bottom that exports my final arrangement as a list I can paste back.
cards को उनकी जगह खींचें, copy button click करें, नतीजा AI को वापस paste करें, और पूछें: "give me next steps for the top three items in the Now column." ChatGPT या Gemini पर, "artifact" के बजाय "Canvas" कहें। (Concept 10)
7. सब कुछ एक साथ जोड़ें। prompt 4 से save किया हुआ spec लें। Concept 14 का पूरा exercise चलाएँ: spec paste करें, AI से कहें कि वह आपके असली audience के लिए उससे एक design किया हुआ HTML page बनाए, उसे grade करें, सुधारें, उसे publish करें (कैसे, इसके लिए Concept 12 देखें), और link अपने phone पर खोलें। अगर आप इसे किसी को forward नहीं करेंगे, तो AI को बताएँ कि क्या गलत है और उसे ठीक करें।
बाद में, जब आप Agentic Coding और Cowork & OpenWork crash courses तक पहुँचें, तो वापस आकर यही exercise terminal और desktop tools का use करके चलाएँ। वही spec, वही steps, ज़्यादा ताक़तवर tools।
🚀 Projects
सातों prompts ने एक-एक चाल पर अभ्यास कराया। ये तीन projects उन्हें जोड़कर कुछ असली बनाते हैं, और हर एक कहीं ख़त्म होता है जहाँ एक chat window आपको नहीं ले जा सकती: एक public link जिसे आप किसी दोस्त को text कर सकें, या एक file जिसे आप किसी को भी थमा सकें। हर एक में एक मुफ़्त account पर तीस से साठ मिनट लगते हैं। Project 1 आज करें; Project 2 तब के लिए रख लें जब आप "HTML out" का एक अलग चेहरा देखना चाहें; फिर Project 3 तब चलाएँ जब आपके पास सच में कुछ हो जिसे आपको present और hand off करना हो। अगर कुछ टूटे, तो इस section के आख़िर में मौजूद dropdown में उसका हल है।
पहले दो projects एक ही pipeline पर चलते हैं (Project 3 एक अलग तरीके से ship होता है, जो उसके अपने card में बताया गया है):
 the chat builds it          you download it          the internet serves it
┌──────────────────┐        ┌──────────────┐  drag   ┌───────────────────────┐
│ a designed page  │ ─────→ │  index.html  │ ──────→ │ your-site.netlify.app │
│  in the artifact │        │  (one file)  │         │ (a real, public URL)  │
└──────────────────┘        └──────────────┘         └───────────────────────┘
तीन projects एक ही skill के तीन अलग काम सिखाते हैं, और शुरू करने से पहले इस फ़र्क़ को दिमाग़ में रखना मददगार है:
- Project 1 एक-तरफ़ा है। आप एक Markdown spec लिखते हैं, AI उसे एक तैयार HTML page में बदलता है, और एक इंसान उसे पढ़ता है। वह page लाइन का अंत है: कोई और उसे खोलता है, और आपका काम पूरा। AI बनाता है; एक इंसान use करता है।
- Project 2 दो-तरफ़ा है। आप AI को एक interactive tool बनाने का prompt देते हैं, आप उसे ख़ुद चलाते हैं, और यह अपना नतीजा आपको text के रूप में वापस देता है जो AI का अगला निर्देश बन जाता है। यहाँ HTML तैयार चीज़ नहीं है। यह AI के साथ एक लंबी आगे-पीछे की बातचीत के अंदर एक यंत्र है।
- Project 3 browser छोड़ देता है। आप Project 2 में बनाया हुआ tool लेते हैं, उसे एक slide deck में बदलते हैं जिसे आप स्कूल में present करते हैं, फिर उसे एक असली PowerPoint file के रूप में export करते हैं जिसे आप किसी को भी थमा सकते हैं। मंज़िल अब एक web page रही ही नहीं; यह एक office document है जो PowerPoint, Keynote, या Google Slides में खुलता है।
वही "structured अंदर, सही format बाहर," और तीन बिल्कुल अलग मंज़िलें: एक page जिसे कोई पढ़े, एक tool जिसे आप AI को वापस feed करें, और एक deck जिसे आप खड़े होकर present करें। Project 3 ऊपर वाली Netlify pipeline use नहीं करता; एक presentation एक file के रूप में ship होती है जिसे आप download करते हैं और एक link जिसे आप share करते हैं।
Project 145-60 minवह Page जिसे कोई खोलता हैबिखरी notes को एक spec में, एक design किए हुए page में, एक असली URL में बदलें।
यह पूरा course एक ship करने लायक चीज़ के रूप में है। एक सटीक Markdown spec machine के लिए अंदर जाती है, एक समृद्ध HTML page एक इंसान के लिए बाहर आती है, और यह एक link पर ख़त्म होता है जिसे आप भेज सकते हैं। page एक तैयार deliverable है। कोई और उसे खोलता है; आप उसे बनाते हैं, publish करते हैं, और चले जाते हैं।
गड़बड़ी से शुरू करें। यहाँ है जो एक café मालिक ने सच में type किया:
ok so the page is for our coffee shop Crema. small place old town.
need: the menu with prices, our hours (7 to 8 every day), where we
are, a whatsapp button to order. phone is the main thing people use.
eid banner on top would be nice. NOT doing online payment or logins.
पहले, इसे एक spec में बदलें, एक page में नहीं (Concept 7)। गौर करें कि आप specification माँग रहे हैं, अभी website नहीं:
Turn these notes into a Markdown specification with these sections: Goal, Context, Requirements, Hard constraints, Out of scope, and Expected output. Don't build the page yet.
एक साफ़ spec वापस आती है। अब कुछ भी बनाने से पहले इसे grade करें, सबसे सस्ता quality जो आप कभी ख़रीदेंगे (Concept 7):
Review that spec. List anything unclear or that could be read two ways. Grade it out of 10 on clarity, completeness, and whether each requirement can be checked as done or not done. Fix anything below 9.
दो-तीन rounds और spec सुधरना बंद कर देती है। अब page माँगें (Concept 9: आप बताते हैं कि इसे कौन पढ़ता है और इसमें क्या चाहिए, ख़ुद HTML कभी नहीं):
Build a single self-contained HTML page from this spec, for customers opening it on their phone. Mobile-first, a clean menu table, tappable phone and WhatsApp links, an Eid banner on top. Make it something a small business would be proud to put their name on.
▶ See the page these prompts produced (live)
यह एक असली page है जो उस spec से बना है और ठीक उसी तरह एक .netlify.app URL पर ship हुआ है जैसे आप अपना ship करेंगे। इसे scroll करें; इधर-उधर tap करें। यह नीचे live load होता है; आप इसे अपने tab में भी खोल सकते हैं।
आपका वैसा दिखेगा जैसा भी business आप उसके लिए बनाएँ। बात यह है कि इस page की हर अच्छी चीज़ spec में एक line थी, क़िस्मत नहीं।
जब page पूरा दिखे, तो उसे एक अजनबी की तरह पढ़ें और बताएँ कि क्या गलत है, एक message में एक इच्छा: "the heading is too quiet," "the menu needs more space," "add a book-a-table button." हर इच्छा एक छोटा फ़ैसला है, वही AI Prompting in 2026 वाला grade-and-fix loop, prose के बजाय page पर ताना हुआ।
अब इसे ship करें। यह वह चाल है जिसे हर project दोहराता है, इसलिए इसे एक बार ध्यान से करें:
- page download करें। artifact panel में एक download या export control होता है; आपको एक single
.htmlfile मिलती है। वही file पूरी site है। - इसे
index.htmlनाम दें। यह web का नाम है "the front page" के लिए, और अगले step वाला host इसी को ढूँढता है। - netlify.com पर एक मुफ़्त account बनाएँ। एक email काफ़ी है।
- अपनी file को drop zone में खींचें। Netlify का new-project page "a single HTML file" स्वीकार करता है। phone पर, "browse files to upload" tap करें।
- जो address यह देता है उसे खोलें। कुछ सेकंड बाद आपका page एक
.netlify.appaddress पर live है। पूरा तब जब: page सिर्फ़ आपके computer पर ही नहीं, आपके phone पर भी load हो, और आप सच में वह link forward करें।
Project 230 minWheel घुमाएँएक tool बनाएँ जिसे आप चलाएँ, फिर उसका नतीजा AI को वापस थमाएँ।
Project 1 ने किसी और के पढ़ने के लिए एक page बनाया। यह वाला काम को पलट देता है: आप एक HTML tool बनाते हैं जिसे आप ख़ुद use करते हैं, और इसका output AI का अगला निर्देश बन जाता है। वही "HTML माँगें," और एक बिल्कुल अलग मक़सद। यहाँ HTML एक workflow में एक step है, तैयार चीज़ नहीं।
आप tags का वर्णन नहीं करते; आप वर्णन करते हैं कि इसे क्या करना चाहिए (Concept 9)। सादे से शुरू करें:
Build a single-page HTML spinning wheel. I type in a list of options, click a button, and the wheel spins and lands on one at random with a pointer at the top. Make it look fun and colourful.
एक चलता हुआ wheel सामने आता है। उससे खेलें, फिर उसी तरह feel जोड़ें जैसे आपने page को निखारा, एक बार में एक इच्छा:
Add a ticking sound as it spins, a confetti burst when it lands, a few one-tap preset lists like "what's for dinner," and a button to remove the winner and spin again.
▶ Spin the actual wheel (live)
यह एक असली wheel है जो उन दो prompts से बना है और एक .netlify.app URL पर ship हुआ है। अपने ख़ुद के options type करें, फिर इसे घुमाएँ। यह नीचे live load होता है; आप इसे अपने tab में भी खोल सकते हैं।
यह रही वह चाल जो इसे एक खिलौना नहीं, एक tool बनाती है। इसे घुमाएँ, फिर नतीजा AI को वापस ले जाएँ। wheel का output आपका अगला prompt है:
The wheel picked "Thai" out of: Pizza, Sushi, Burgers, Tacos, Biryani, Thai, Ramen, Salad. Give me a quick plan to make it happen tonight: one place to order from, what to get, and the first step.
वह round-trip ही पूरा lesson है। HTML ने आपके सवाल का जवाब नहीं दिया। इसने कुछ इकट्ठा किया (एक पसंद, एक ranking, एक व्यवस्था) और उसे साफ़ text के रूप में वापस थमाया जिस पर AI अमल कर सके। इस तरह आप जो भी tool बनाते हैं वह वैसे ही काम करता है: आप उसे चलाते हैं, copy click करते हैं, और नतीजे को अगले prompt में paste करते हैं।
इसे ठीक Project 1 की तरह ship करें: download करें, index.html नाम दें, Netlify में एक new project के रूप में खींचें। पूरा तब जब: एक दोस्त आपके wheel को link से घुमा सके, और आपने कम से कम एक नतीजा AI को वापस ले लिया हो।
Project 330-45 minइसे पूरे दम से Present करेंअपने बनाए हुए tool को एक deck में बदलें जिसे आप present करें, और एक file जिसे आप किसी को भी थमाएँ।
आपने Project 2 में Spin the Wheel बनाया और उसे एक असली link पर ship किया। अब दाँव ऊँचे होते हैं: आपको अपनी class के सामने खड़े होकर इसे present करना है। अच्छी ख़बर, आप शुरू से शुरू नहीं कर रहे। tool तैयार है। अब आपको जो चाहिए वह एक deck है, और वही skill जिसने बिखरी notes को एक page में बदला आपके tool को एक ऐसी चीज़ में बदल देती है जिसे आप present कर सकते हैं, full screen, अपने नाम के साथ।
आप slides या layouts का वर्णन नहीं करते; आप AI को बताते हैं कि आप क्या present कर रहे हैं और उसे असली चीज़ थमाते हैं (Concept 9)। उसे अपने ख़ुद के wheel का link दें:
I built this spinning wheel and I have to present it to my class at school: [paste your wheel's link] — you load your own options, spin, and it picks one for you. Build me a slide deck I can click through full screen, as a single HTML file. Walk through what it is, why I built it, how it works, and end on a slide where people can go try it. Make it fun and clean.
एक असली, full-screen deck artifact में सामने आता है। Arrow keys आपको slide से slide ले जाती हैं; F दबाएँ full screen के लिए और यह पूरे कमरे को भर देता है। और चूँकि आपने इसे असली link थमाया, यह जाकर आपके wheel को देखता है और आपके रंगों तथा आपके pointer को design language के रूप में दोबारा बनाता है, इसलिए deck उसी चीज़ जैसा लगता है जो आपने बनाई, एक generic template नहीं।
कभी-कभार वह live fetch चूक जाता है और deck सादा दिखता हुआ वापस आता है। अगर ऐसा हो, तो ठीक वही करें जो यह course आपको शुरू से कहता आया है, इसे असली चीज़ दें: अपने wheel का एक screenshot खींचकर डालें और कहें "match this." फिर deck को एक बार में एक इच्छा से निखारें, वही loop जो page का था: "put my name on the title slide," "make the last slide point straight at my live wheel," "bigger headings." हर इच्छा एक छोटा फ़ैसला है। यह एक student का तैयार Spin the Wheel deck है, उसी तरह की चीज़ जिसकी ओर आप बढ़ रहे हैं। इसमें से click करते जाएँ। आपका वैसा दिखेगा जैसा भी आपने बनाया, आपके रंगों, आपके नाम, और closing slide पर आपके wheel के साथ।▶ See the finished deck (live)
अब वह चाल जो इसे हमेशा के लिए browser से बाहर ले जाती है (Concept 13)। office file माँगें:
Now give me this exact deck as a PowerPoint file I can download and present from a school laptop — same slides, same order.
इसमें एक-दो मिनट लगते हैं, आपकी उम्मीद से ज़्यादा। यह AI का एक असली file बनाना और फिर अपनी ही slides जाँचना है, कोई hang नहीं। इसे पकने दें। जो वापस आता है वह एक असली PowerPoint है जिसे आप download कर सकते हैं।
यह रहा फ़ायदा। आपने content एक बार लिखा। जो PowerPoint वापस आती है वह एक असली file है जो पूरी तरह browser से निकल चुकी है, वही विचार जो Project 1 के page का था, बस मंज़िल अब एक document है जिसे कोई PowerPoint, Google Slides, या Keynote में खोलता है, एक browser tab नहीं। यही तीसरा काम है जो यह एक skill करती है: structured input अंदर, ठीक वह format बाहर जो आपके reader को चाहिए (Concept 13)।
अब इसे उस तरह ship करें जैसे एक deck ship होता है, जो पहले दो projects के ship होने के तरीके से अलग है। यहाँ कोई Netlify drag नहीं; एक presentation एक file और एक share link के रूप में सफ़र करती है। download की हुई .pptx को Google Slides में खोलें (Slides में, File, फिर Open, फिर अपनी file upload करें चुनें), Share को "anyone with the link" पर set करें, और वह link copy करें। अब आप अपने स्कूल के किसी भी browser से present कर सकते हैं, और आप वह link उस दोस्त को text कर सकते हैं जो class में नहीं था, वही "कहीं ख़त्म होता है जिसे आप किसी और को भेज सकें" वाली चाल जो आपने Projects 1 और 2 में की।
अंदर जाने से पहले एक चीज़ जाँच लें: AI एक ऐसा font चुन सकता है जो आपके स्कूल के laptop पर न हो, और PowerPoint चुपचाप एक मिलता-जुलता बदल देता है। file को एक दिन पहले उसी laptop पर एक बार खोलें जिस पर present करेंगे, ताकि जब कमरा देख रहा हो तब कोई हैरानी न हो।
पूरा तब जब: आप deck को full screen click करते जा सकें, आपके पास एक असली PowerPoint file download हो, और आपके पास एक link हो जिसे एक दोस्त खोल सके। आपने एक tool बनाया, और आपने अभी उसे एक talk और एक file में बदल दिया जिसे आप किसी को भी थमा सकते हैं।
ये तीनों एक ही skill हैं जो तीन मंज़िलों की ओर ताकी हुई है: एक page जिसे कोई पढ़े, एक tool जिसे आप AI को वापस feed करें, और एक deck जिसे आप present करें साथ ही एक file जिसे आप थमा दें। तीनों उस एक वाक्य से आते हैं जिस पर यह पूरा course टिका है, input को एक machine के लिए पर्याप्त सटीक लिखें और एक इंसान के लिए वापस सही समृद्ध format माँगें, और तीनों कहीं ख़त्म होते हैं जिसे आप किसी और को भेज सकें।
🛟 अगर आप अटक जाएँ
"मुझे page के बजाय page का एक वर्णन मिल गया।" कहें: "Build it as a single HTML artifact and show it to me." ChatGPT या Gemini पर, "artifact" के बजाय "Canvas" कहें।
"download एक single file नहीं है, या Netlify इसे नहीं ले रहा।" माँगें: "Give me this as one self-contained .html file with everything inline, no separate CSS or JS files." फिर इसे index.html नाम दें और वही एक file खींच दें।
"page generic दिखता है।" आपका spec पतला था। वापस जाएँ और सिर्फ़ वे ख़ास बातें जोड़ें जो सिर्फ़ आप जानते हैं, असली menu, असली hours, audience, फिर दोबारा बनाएँ। एक page उतना ही अच्छा है जितना उसके नीचे का spec।
"यह chat में काम कर गया पर publish होते ही टूट जाता है।" लगभग हमेशा एक गायब file। "one self-contained .html file with the CSS and JavaScript inline" दोबारा माँगें, दोबारा download करें, और दोबारा खींचें।
अक्सर पूछे जाने वाले सवाल
क्या मुझे इस course में सिखाए गए से ज़्यादा Markdown याद करना चाहिए?
नहीं। Headings, lists, triple-backtick fences, links, और images, रोज़ के काम के लिए आपको बस इतना ही चाहिए। आप tables को उदाहरण से पहले ही देख चुके हैं। इससे फ़ैंसी कुछ भी हो, बस AI से कहें कि वह आपके लिए लिख दे।
क्या मुझे हाथ से HTML लिखना सीखना चाहिए?
इस workflow के लिए नहीं। यह course जो skill सिखाता है वह है HTML कैसे माँगें और जो वापस आए उसे कैसे परखें, न कि tags ख़ुद कैसे type करें। आगे किताब में, एक chapter web fundamentals को ठीक से cover करता है, और उस वक़्त आप AI के काम को जाँचते हुए HTML पढ़ना सीखेंगे। पर अभी आपको उसकी ज़रूरत नहीं।
क्या HTML माँगना मेरा usage budget बरबाद करता है?
HTML output plain text से आपके usage budget का ज़्यादा हिस्सा use करता है। छोटे जवाबों के लिए (एक जल्दी का lookup, एक one-line जवाब), यह इसके लायक नहीं है। पर किसी भी लंबी, visual, या ऐसी चीज़ के लिए जिसे आप एक link के रूप में share करेंगे, HTML सही चुनाव है। असली बरबादी एक लंबा जवाब बनाना है जिसे कोई नहीं पढ़ता क्योंकि वह plain text की एक दीवार थी।
PDFs, Word docs, slides, और spreadsheets का क्या?
AI इन सबको बना सकता है। Concept 13 में हर format के लिए तैयार prompts के साथ पूरा जवाब है। छोटी बात: format को इस आधार पर चुनें कि वह इंसान file के साथ क्या करेगा। उससे sign कराना है? PDF। edit कराना है? Word। present कराना है? Slides। numbers पर काम कराना है? Excel। किसी और tool को देना है? CSV। आप अब भी अपना content एक बार plain text में लिखते हैं और जो receiver को चाहिए उसमें export करते हैं।
code का क्या? क्या वह भी एक output format है?
इस course के मतलब में नहीं। Markdown, HTML, PDF, और बाकी containers हैं जिन्हें आप इस आधार पर चुनते हैं कि उन्हें कौन पढ़ेगा। code कोई container नहीं है; यह वह चीज़ है जो आप बना रहे हैं। एक Python script और एक HTML report एक ही जवाब के दो version नहीं हैं; वे पूरी तरह अलग चीज़ें हैं।
फिर भी, code दो तरह से उससे जुड़ता है जो आपने यहाँ सीखा। पहला, जब आप किसी spec में code का एक टुकड़ा शामिल करते हैं, तो आप उसे backtick fences में लपेटते हैं ताकि AI उसे data माने (Concept 5)। दूसरा, आप AI से कह सकते हैं कि वह code को annotations और diagrams वाले एक design किए हुए HTML page में समझाए (Pattern 3)। जब मक़सद सच में software बनाना हो, तो वह Agentic Coding Crash Course है।
क्या कोई tool है जो यह Markdown-in/HTML-out pattern अपने आप करता है?
हाँ, और इसे आज़माना तब सही है जब आप इसे शुरू से कर सको, इसके बजाय नहीं। यह course जो skill बनाता है वह है output को ख़ुद brief और परखना। एक बार वह skill आ जाए, तो tools आपको तेज़ कर देते हैं। उसके बिना, tools आपकी सोच आपके लिए कर देते हैं।
इतना कहने के बाद: HTML Anything नाम का एक open-source project ठीक यही करता है। यह आपके computer पर चलता है, उन AI tools के साथ काम करता है जो आपके पास पहले से हैं (Claude Code, OpenCode, Gemini, और बाकी), और notes, Markdown, या एक CSV को तैयार templates में एक तैयार HTML page में बदलता है: slide decks, posters, data reports, social media cards। यह एक अच्छा power tool है जिस तक पहुँचना तब अच्छा है जब आप manual version में सहज हो जाएँ।
यह course कहाँ ले जाता है?
तीन जगह:
- Spec-driven development (किताब का Part 1) उस spec ढाँचे पर बनता है जो आपने Concept 7 में सीखा।
- Agentic Coding Crash Course इस course की HTML output और verification आदतों पर बनता है।
- Problem-Solving Crash Course मानकर चलता है कि आप chat, terminal, और desktop में काम कर सकते हैं (Concept 14 के तीन motions)।
आप अब ठीक-ठीक कह सकते हैं कि आपका मतलब क्या है, और पढ़ने लायक output माँग सकते हैं। नीचे का appendix पूरी प्रक्रिया को एक जगह रखता है अगर आप उसे शुरू से आख़िर तक देखना चाहें। अगला सवाल यह है कि इस skill को किस ओर ताकना है, और वहीं से How to Think in the AI Era और Problem-Solving Crash Course आगे बढ़ते हैं।
Appendix: One spec, the HTML it became
ऊपर के दो-मिनट वाले सबूत ने एक casual paragraph से एक page गढ़ दिया। यह appendix उसी चाल का बड़ा रूप है: Concept 1 का असली spec, और वह असली page जो उसने बनाया। spec पढ़ें। HTML को line by line मत पढ़ें; इस section की बात यही है कि लंबी HTML browser के लिए है, आँख के लिए नहीं। नीचे दोनों blocks के बीच का अंतर ही lesson है।
The input: a Markdown spec
# Al-Noor Tuition Academy Landing Page Spec

## Goal

A one-page site parents open on their phones to check courses,
timings, fees, and how to reach us.

## Requirements

- Mobile-first; most visitors are on phones
- Course table: course, days, time, monthly fee
- Contact: tappable phone, WhatsApp link, location
- Eid holiday banner at the very top

## Hard constraints

- Single self-contained HTML file, no external fonts or libraries
- Must stay light enough to open on slow mobile data
- Open Graph tags so the WhatsApp/Facebook link preview looks designed

## Out of scope

- Online payments
- Student login
The output: the HTML it produced
यह file करीब 6 KB की है, page के बाद शून्य network requests के साथ load होती है, phone पर साफ़ पढ़ी जाती है, और वे Open Graph tags ढोती है जो share होने पर इसके link preview को आकार देते हैं। उन हर properties में से हर एक ऊपर के spec में एक line थी; spec ही वजह है कि output अच्छा है, क़िस्मत नहीं। (एक ईमानदार कमी: एक preview image को og:image चाहिए जो किसी hosted तस्वीर की ओर इशारा करे, जो एक single self-contained file के पास तब तक नहीं होती जब तक आप इसे कहीं publish न करें। page को एक घर मिलने के बाद tag जोड़ दें।)
नीचे का block जानबूझकर लंबा है, और आपसे इसे scroll करके आगे निकल जाने की उम्मीद है। वह scroll ख़ुद ही lesson है: यह वही वजह है जिससे आप एक chat window में एक लंबी file नहीं पढ़ेंगे। पढ़ना browser में होता है, यहाँ नहीं।
<!DOCTYPE html>
<html lang="en">
<head>
<meta charset="utf-8" />
<meta name="viewport" content="width=device-width, initial-scale=1" />
<title>Al-Noor Tuition Academy</title>
<!-- Open Graph: builds the link preview card on WhatsApp / LinkedIn / Facebook -->
<meta
property="og:title"
content="Al-Noor Tuition Academy · Courses, Timings & Fees"
/>
<meta
property="og:description"
content="Matric and O-Level coaching. See current courses, class timings, monthly fees, and how to reach us."
/>
<meta property="og:type" content="website" />
<style>
:root {
--ink: #27313b;
--muted: #5c6b78;
--paper: #fbf7f1;
--card: #ffffff;
--line: #e7ded2;
--accent: #c1633a;
--accent-soft: #f4e4d8;
}
* {
box-sizing: border-box;
}
body {
margin: 0;
background: var(--paper);
color: var(--ink);
font-family:
-apple-system, BlinkMacSystemFont, "Segoe UI", Roboto, sans-serif;
line-height: 1.5;
-webkit-text-size-adjust: 100%;
}
.wrap {
max-width: 680px;
margin: 0 auto;
padding: 0 18px 48px;
}
.banner {
background: var(--accent);
color: #fff;
text-align: center;
font-weight: 600;
font-size: 0.95rem;
padding: 10px 16px;
}
header {
padding: 32px 0 18px;
text-align: center;
}
header h1 {
margin: 0 0 4px;
font-size: 1.7rem;
letter-spacing: -0.01em;
}
header p {
margin: 0;
color: var(--muted);
font-size: 1rem;
}
h2 {
font-size: 1.05rem;
text-transform: uppercase;
letter-spacing: 0.06em;
color: var(--accent);
margin: 34px 0 12px;
}
table {
width: 100%;
border-collapse: collapse;
background: var(--card);
border: 1px solid var(--line);
border-radius: 12px;
overflow: hidden;
}
th,
td {
text-align: left;
padding: 12px 14px;
font-size: 0.95rem;
}
thead th {
background: var(--accent-soft);
color: var(--ink);
font-size: 0.8rem;
text-transform: uppercase;
letter-spacing: 0.05em;
}
tbody tr + tr td {
border-top: 1px solid var(--line);
}
td.fee {
font-weight: 600;
white-space: nowrap;
}
.contact {
display: grid;
gap: 10px;
margin-top: 6px;
}
.contact a {
display: flex;
align-items: center;
gap: 12px;
text-decoration: none;
background: var(--card);
border: 1px solid var(--line);
border-radius: 12px;
padding: 14px 16px;
color: var(--ink);
font-weight: 500;
}
.contact a:active {
background: var(--accent-soft);
}
.contact svg {
flex: 0 0 22px;
}
footer {
margin-top: 36px;
text-align: center;
color: var(--muted);
font-size: 0.85rem;
}
@media (min-width: 560px) {
header h1 {
font-size: 2rem;
}
}
</style>
</head>
<body>
<div class="banner">
Eid holidays: the academy is closed 6–9 June. Classes resume 10 June.
</div>
<div class="wrap">
<header>
<h1>Al-Noor Tuition Academy</h1>
<p>Matric & O-Level coaching · Gulberg, Lahore</p>
</header>
<h2>Courses & Timings</h2>
<table>
<thead>
<tr>
<th>Course</th>
<th>Days</th>
<th>Time</th>
<th>Fee / month</th>
</tr>
</thead>
<tbody>
<tr>
<td>Matric Mathematics</td>
<td>Mon–Wed</td>
<td>4:00–5:30 pm</td>
<td class="fee">PKR 3,500</td>
</tr>
<tr>
<td>Matric Physics</td>
<td>Tue–Thu</td>
<td>5:30–7:00 pm</td>
<td class="fee">PKR 3,500</td>
</tr>
<tr>
<td>O-Level Chemistry</td>
<td>Mon–Wed</td>
<td>6:00–7:30 pm</td>
<td class="fee">PKR 4,000</td>
</tr>
<tr>
<td>O-Level English</td>
<td>Fri–Sat</td>
<td>10:00–11:30 am</td>
<td class="fee">PKR 4,000</td>
</tr>
</tbody>
</table>
<h2>Reach Us</h2>
<div class="contact">
<a href="tel:+923001234567">
<svg
viewBox="0 0 24 24"
fill="none"
stroke="#c1633a"
stroke-width="2"
stroke-linecap="round"
>
<path
d="M22 16.9v3a2 2 0 0 1-2.2 2 19.8 19.8 0 0 1-8.6-3.1 19.5 19.5 0 0 1-6-6 19.8 19.8 0 0 1-3.1-8.6A2 2 0 0 1 4.1 2h3a2 2 0 0 1 2 1.7c.1.9.4 1.8.7 2.7a2 2 0 0 1-.5 2.1L8.1 9.9a16 16 0 0 0 6 6l1.4-1.2a2 2 0 0 1 2.1-.5c.9.3 1.8.6 2.7.7a2 2 0 0 1 1.7 2z"
/>
</svg>
Call: 0300 123 4567
</a>
<a href="https://wa.me/923001234567">
<svg viewBox="0 0 24 24" fill="#c1633a">
<path
d="M12 2a10 10 0 0 0-8.6 15l-1.3 4.7 4.8-1.3A10 10 0 1 0 12 2zm0 18a8 8 0 0 1-4.1-1.1l-.3-.2-2.8.7.8-2.8-.2-.3A8 8 0 1 1 12 20zm4.5-5.9c-.2-.1-1.4-.7-1.6-.8s-.4-.1-.6.1-.6.8-.8 1-.3.2-.5.1a6.5 6.5 0 0 1-3.2-2.8c-.2-.4.2-.4.6-1.2a.5.5 0 0 0 0-.5l-.8-1.9c-.2-.5-.4-.4-.6-.4h-.5a1 1 0 0 0-.7.3 3 3 0 0 0-.9 2.2c0 1.3 1 2.6 1.1 2.8s1.9 2.9 4.6 4a5 5 0 0 0 2.3.5c.7-.1 1.4-.6 1.6-1.1s.2-1 .1-1.1z"
/>
</svg>
WhatsApp: 0300 123 4567
</a>
<a href="https://maps.google.com/?q=Gulberg+Lahore">
<svg
viewBox="0 0 24 24"
fill="none"
stroke="#c1633a"
stroke-width="2"
stroke-linecap="round"
>
<path d="M21 10c0 6-9 12-9 12s-9-6-9-12a9 9 0 0 1 18 0z" />
<circle cx="12" cy="10" r="3" />
</svg>
Main Boulevard, Gulberg (view on map)
</a>
</div>
<footer>Open for admissions · New batches every month</footer>
</div>
</body>
</html>
अब वे तीन चीज़ें करें जो course ने सिखाईं
- इसे खोलें। सबसे तेज़ तरीका, बिना computer के: पूरे HTML block को Claude.ai में paste करें और कहें "turn this exact HTML into an artifact; change nothing," फिर इसे publish करें और link अपने phone पर खोलें। (computer पर, आप इसके बजाय block को
tuition.htmlके रूप में save करके double-click कर सकते हैं।) गौर करें कि आपने इसे पढ़ा; सरसरी नहीं देखा। यही Concept 8 है। - इसे type करके नहीं, prompt देकर बदलें। अपने agent से कहें: "Add a fifth course row for FSc Biology, Sat–Sun 2:00–3:30 pm, PKR 4,500, and make the holiday banner dismissible." आपने कोई tag नहीं छुआ। यही Concept 9 है।
- इसे publish करें। इसे publishing सीढ़ी के किसी भी पायदान से धकेलें (Concept 12), फिर link WhatsApp में share करें और preview card को render होते देखें। यही Concepts 11 और 12 हैं जो loop को बंद करते हैं।
यही पूरा crash course एक artifact में है: एक सटीक Markdown spec अंदर गई, पढ़ने लायक HTML बाहर आई, आपने उसे prompt देकर edit किया, और आपने उसे ship कर दिया।