कहाँ से शुरू करें: महीनों में नहीं, दिनों में Agentic AI Engineer बनें
AI सीखने के लिए आपके पास महीनों का समय नहीं है। अच्छी बात यह है कि आपको महीनों की ज़रूरत भी नहीं है। हर कोई एक ही तरह शुरू करता है: browser में आठ Foundations courses, कुछ भी install किए बिना, चाहे आप code कर सकते हों या नहीं। फिर आप एक decision लेते हैं, AI से अपना काम करवाना है या ऐसा AI बनाना है जो आपके लिए काम करे, और वहीं से courses आगे बढ़ते हैं। Engineer destination है, prerequisite नहीं।
यह section beginner से production में काम पहुँचा सकने वाले Agentic AI Engineer तक जाने का सबसे छोटा रास्ता है: semesters में नहीं, दिनों में मापा गया। कुछ hours में AI के साथ productive होना, एक weekend में पहला Digital FTE, और focused evenings के एक महीने में पूरा Agent Factory stack।
दिन क्यों, महीने क्यों नहीं
यह promise impossible लगता है, जब तक आप उसके पीछे का method नहीं देखते। यह वही method है जिसे कोई भी कम background के साथ नई job में survive करने के लिए इस्तेमाल करता है। पहले, आपको काम की बड़ी तस्वीर मिलती है। दूसरे, आप उन थोड़े से topics को identify करते हैं जो सच में काम करने के लिए critical हैं। तीसरे, आप हर topic का वह 80% सीखते हैं जो routine में इस्तेमाल होता है, काम शुरू करते हैं, और बाकी रास्ते में सीखते जाते हैं: reference material आपके पास खुला रहता है।
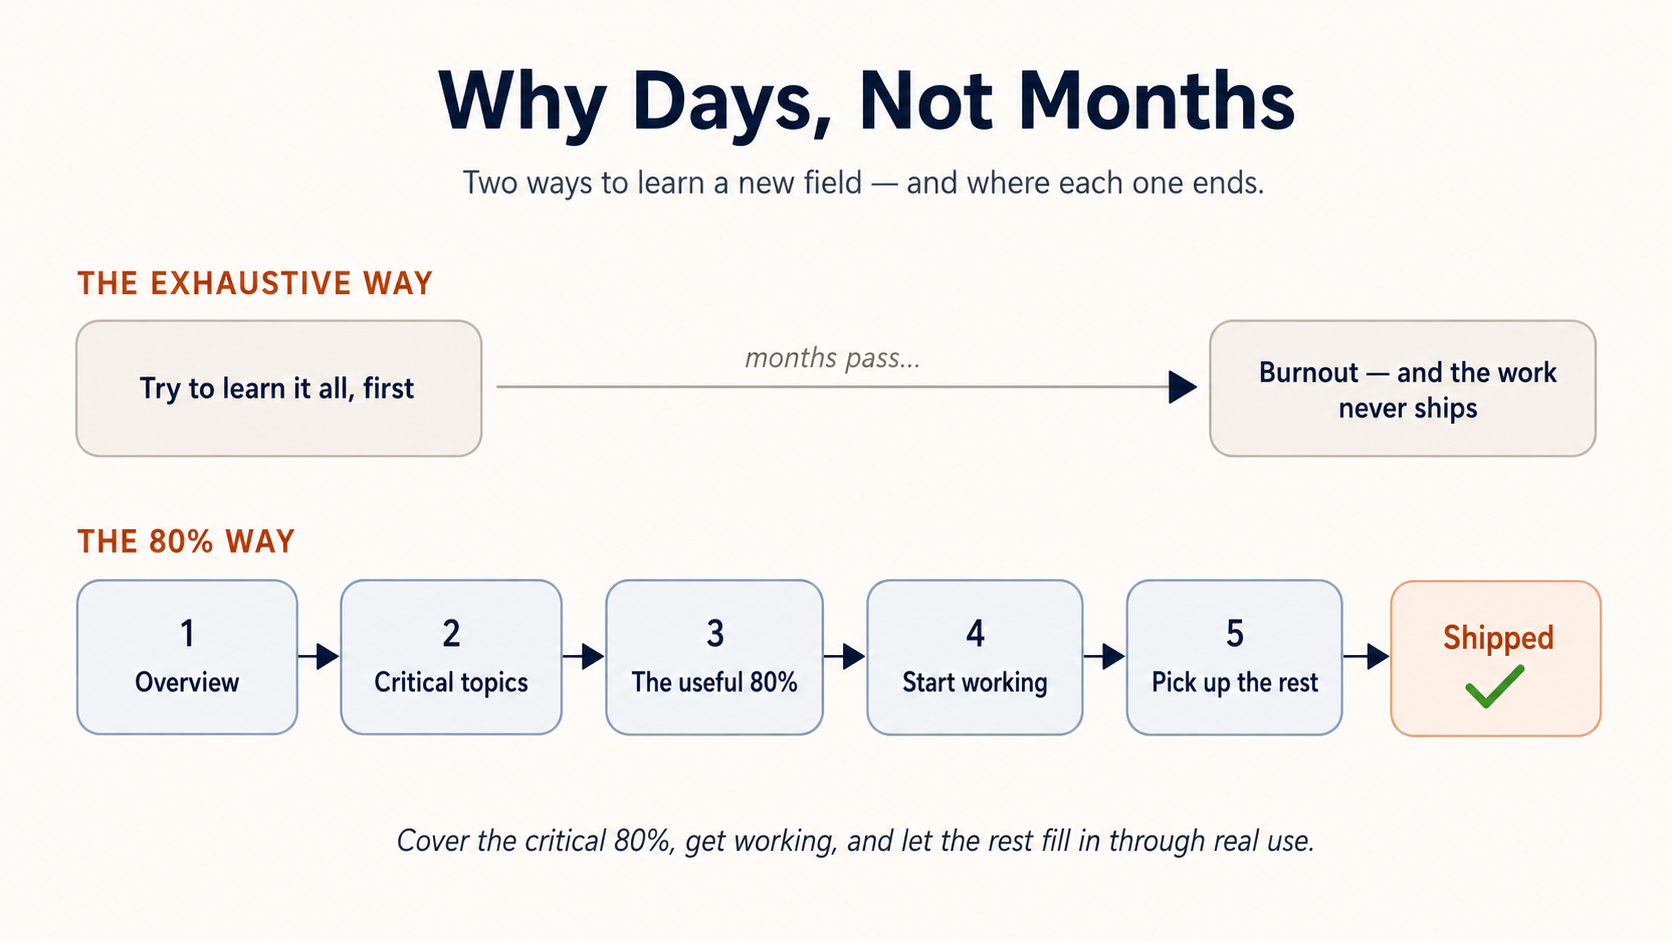
हर topic की हर detail पहले ही सीखने की कोशिश करने में महीनों लगते हैं। कुछ भी ship करने से पहले ही आप थक जाएँगे। हमारी pedagogy उलटी philosophy पर बनी है: critical 80% cover करें, आपको काम में लगाएँ, और बाकी real use से भरने दें। इस section का हर crash course बिल्कुल इसी तरह बनाया गया है।
यह कैसे organized है (यहाँ से शुरू करें)
आप इसे सब कुछ पढ़कर नहीं सीखते; आप इसे एक clear path चलकर सीखते हैं। इसलिए यही path है, सिर्फ़ यही map आपको याद रखना है। यही वही map है जो sidebar पहले से दिखाता है: पहले Foundations, फिर General Agents, फिर Personal Agent Harnesses, जहाँ हर कोई अपना persistent agent हासिल करता है, फिर दो tracks में से एक, Mode 1 या Mode 2, और अंत में References & Companions। बीच में सिर्फ़ एक decision है, कौन सा mode, और उस decision से पहले की हर चीज़ हर reader के लिए common है।
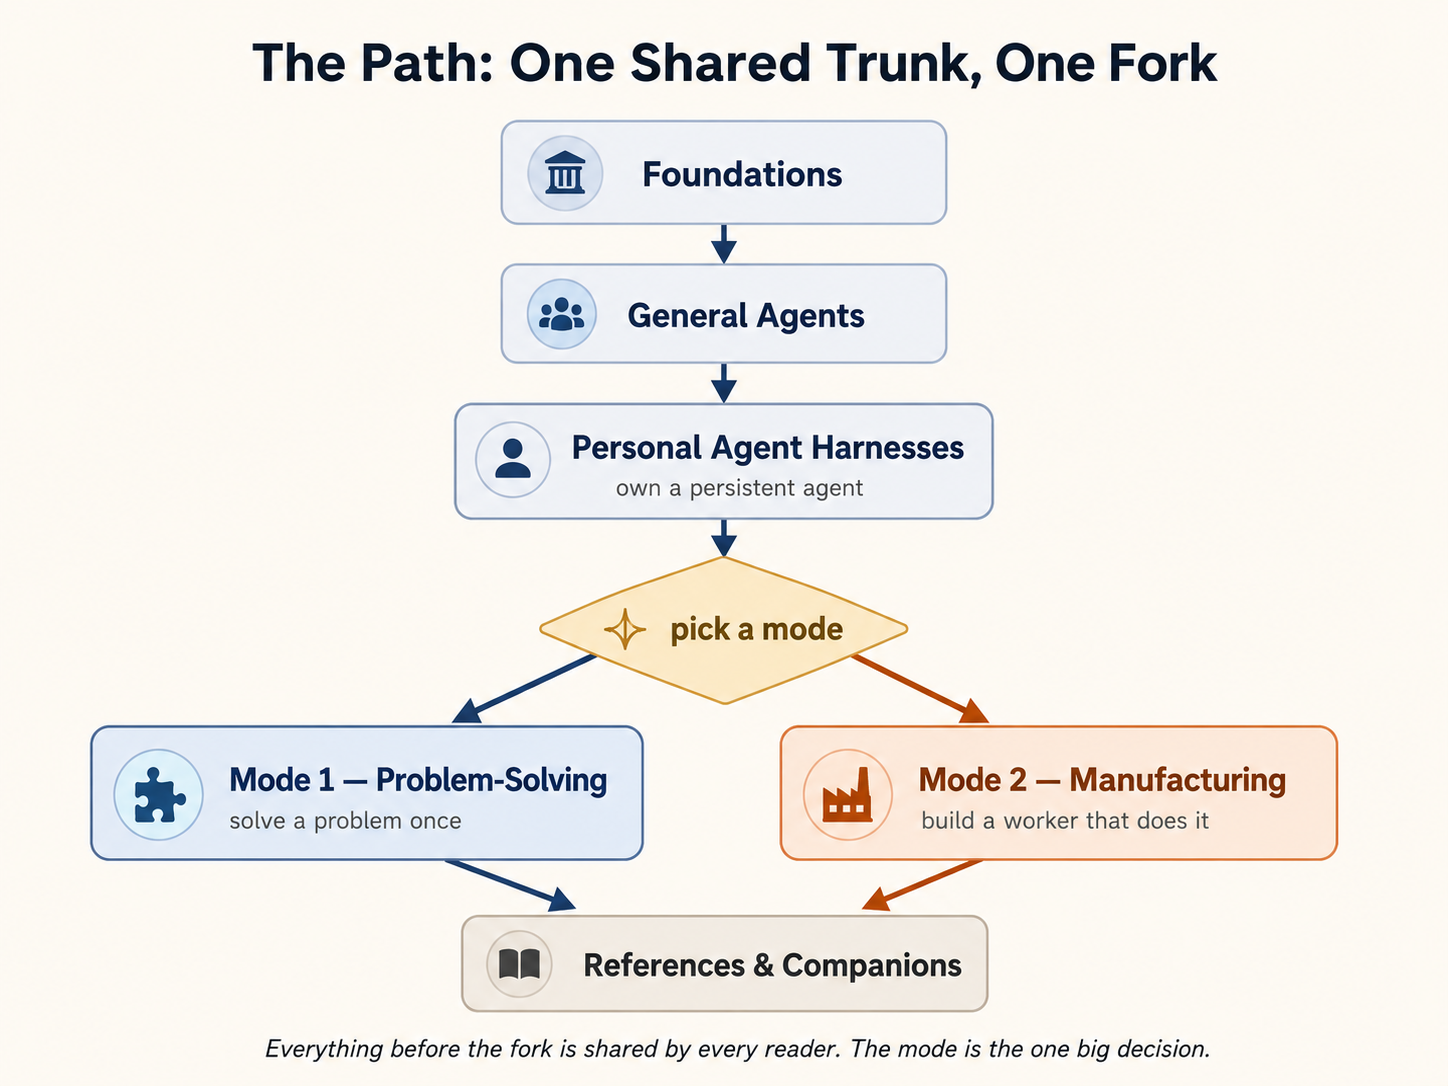
पहले thesis पढ़ें। इसके दो versions हैं, एक technical और business professionals के लिए, और एक absolute beginners के लिए, ताकि background कुछ भी हो, हर कोई follow कर सके। Thesis के बाद Foundations आते हैं: language model सच में क्या है, prompting, agentic work की दो document languages, वह code commission करना जो आप कभी नहीं लिखते, AI को task एक बार सिखाना और उसे अपने apps से connect करना, और AI era में सोचना सीखना। Mode चुनने से पहले हर reader ये courses लेता है।
आप कहाँ से शुरू करते हैं? Browser में। आपके पहले आठ courses, Foundations, chat tab में चलते हैं: Claude.ai, ChatGPT या Gemini, कुछ भी install किए बिना, चाहे आप पहले से code कर सकते हों या नहीं। वही browser tab वह जगह है जहाँ everyday AI value का बड़ा हिस्सा पहले से मौजूद है। जब काम को आपकी real files चाहिए होती हैं, तब आप अपनी machine पर चलने वाले general agent तक आगे बढ़ते हैं, और agentic work की तीन layers शुरू होती हैं।
आपको यह mental model चाहिए: AI era में काम तीन layers में होता है। आप problems solve करने के लिए general agents इस्तेमाल करते हैं। आप specialized jobs करने के लिए AI Workers बनाते हैं। आप उन Workers को जोड़कर AI-Native Companies assemble करते हैं। हर professional engagement एक ही तरह शुरू होता है: एक इंसान general agent को direction देता है। बस सवाल यह है कि कौन सा agent, और यह इस पर depend करता है कि आप क्या हासिल करना चाहते हैं।
नामों पर छोटी note। इस book में AI Worker, Digital FTE, और AI Employee एक ही idea को बताते हैं: human-defined policy के तहत real job करने वाला specialized agentic system। Business value पर ज़ोर देते समय हम Digital FTE इस्तेमाल करते हैं, implementation पर ज़ोर देते समय AI Worker, और company के अंदर role पर ज़ोर देते समय AI Employee। किसी भी दूसरे unfamiliar term के लिए glossary आपकी मदद करेगा।
यही तीन layers वह arc हैं जिस पर यह section आपको अभी की जगह से आगे ले जाता है:
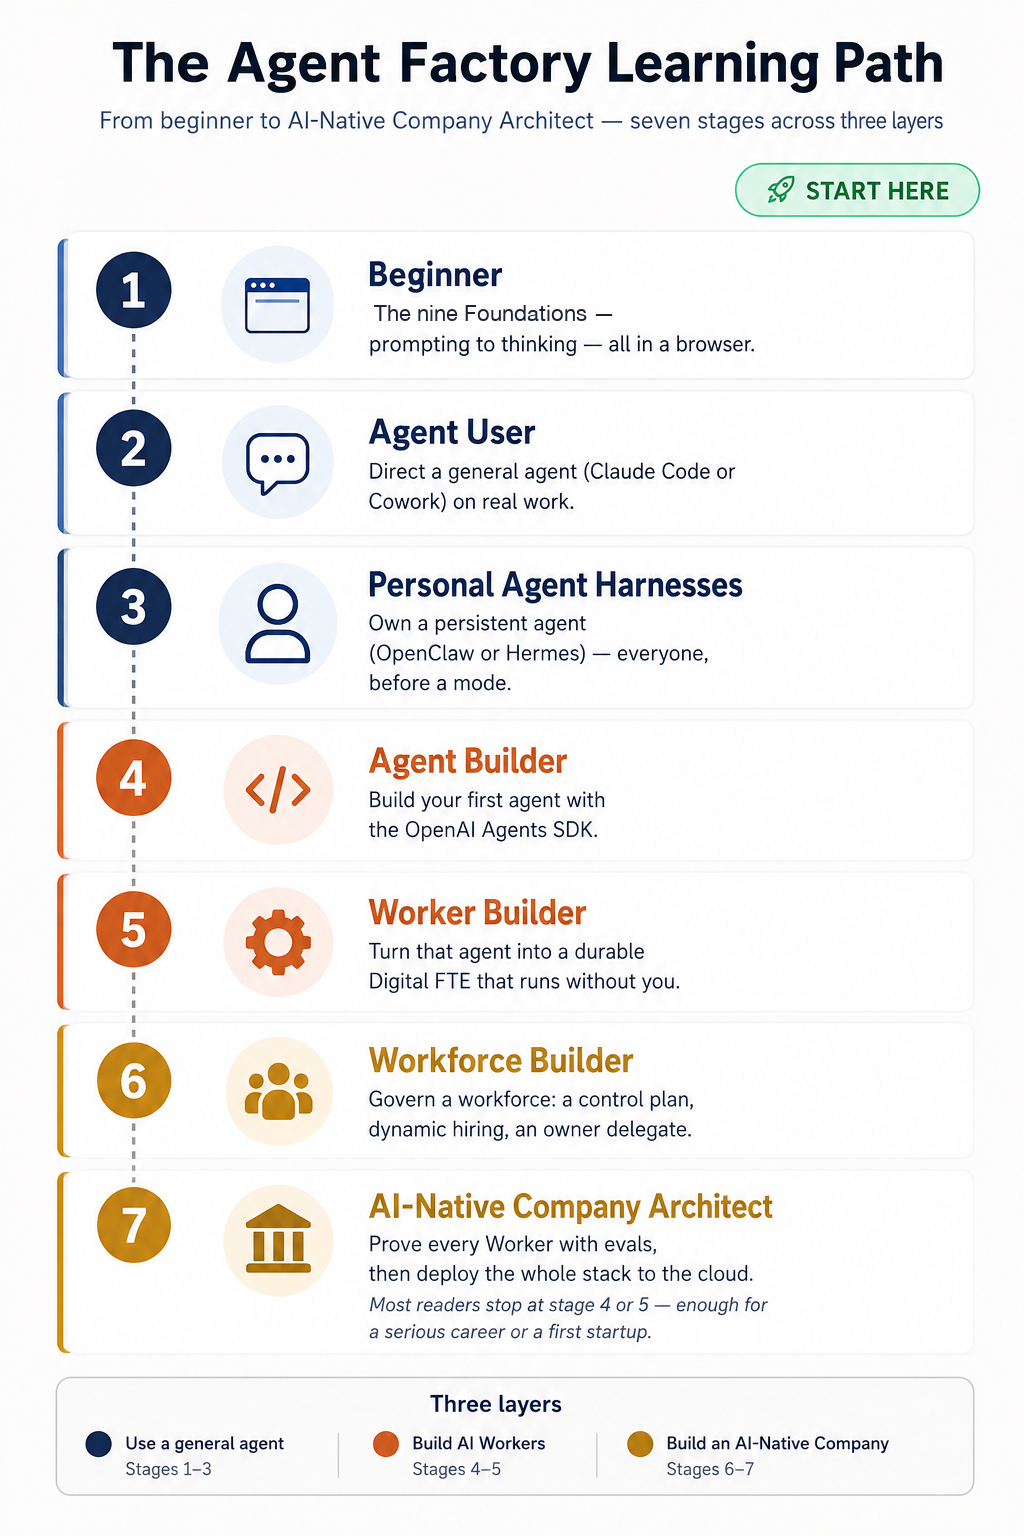
आपको पूरा path चलना ज़रूरी नहीं है। ज़्यादातर readers stage 4 या 5 पर रुकते हैं, और serious career या first startup के लिए इतना काफी है। Full path तब है जब आप उसे चाहते हैं।
अपना Mode चुनें
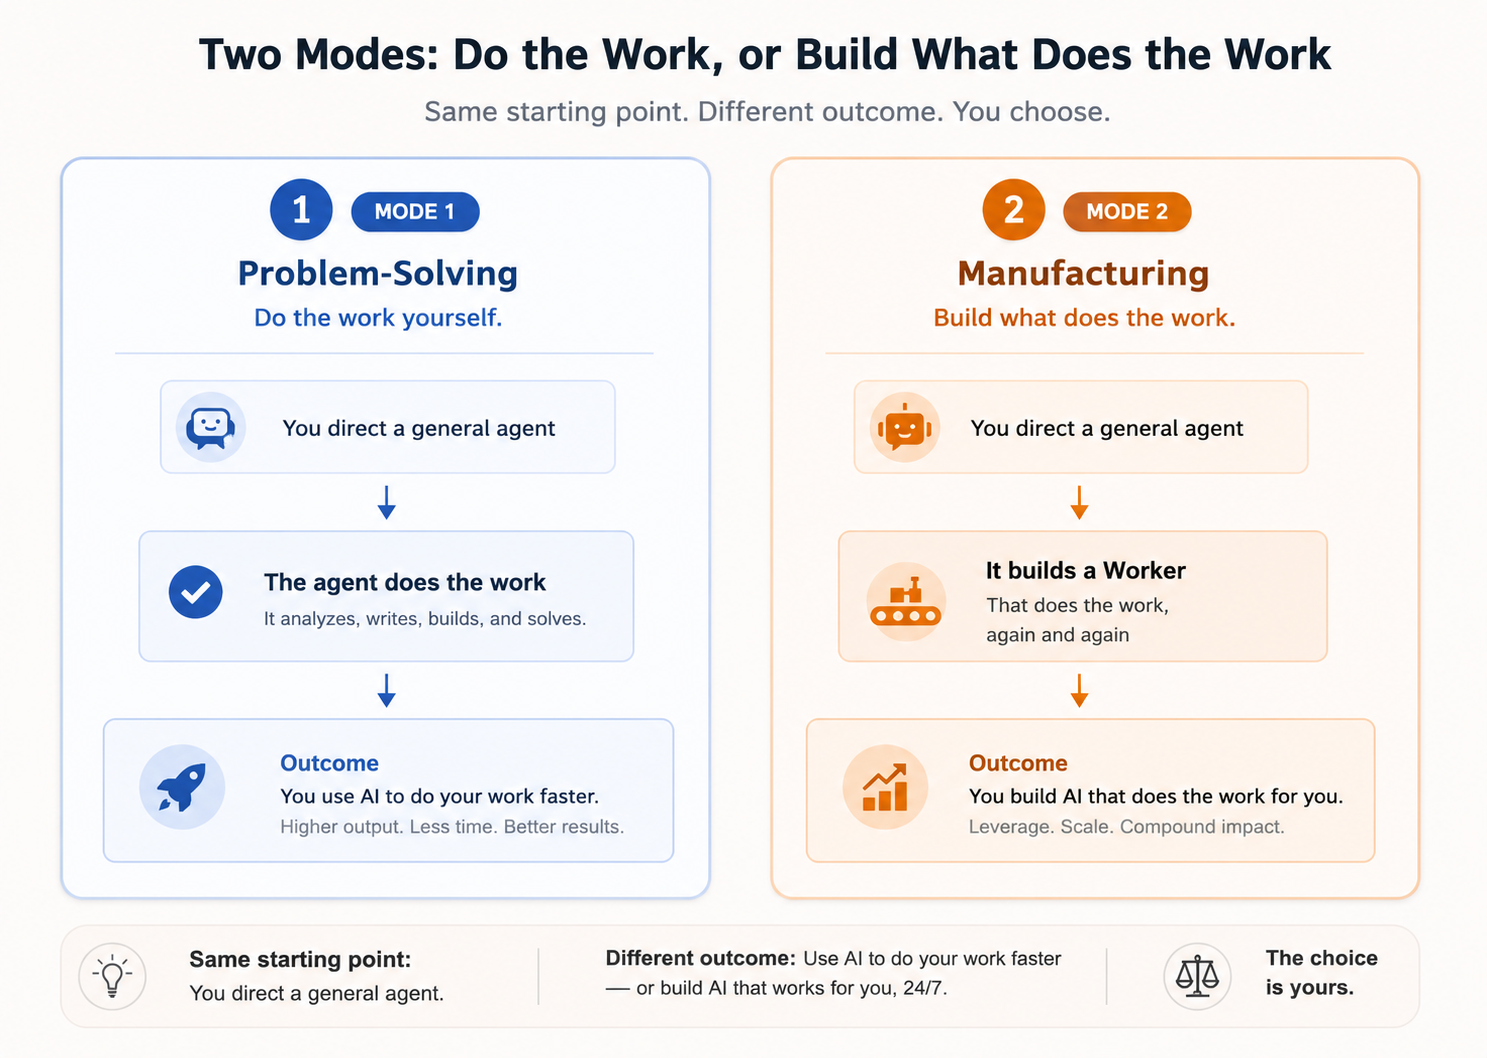
यही decision पास से देखें: AI इस्तेमाल करने और ऐसा AI बनाने के बीच fork जो आपके लिए काम करे। पहले इसे abstract रूप में लें, फिर अपनी row ढूँढें।
Thesis का section general agents इस्तेमाल करने के दो modes उन दो तरीकों को बताता है जिनसे लोग सच में general-purpose agents इस्तेमाल करते हैं। Mode 1 तब, जब आप AI से अपना काम करवाना चाहते हैं। Mode 2 तब, जब आप ऐसा AI बनाना चाहते हैं जो आपके लिए काम करे। "Manufacturing" नाम industrial लगता है, और है भी: Workers बनाना उन्हें इस्तेमाल करने से अलग discipline है।
एक चीज़ decision नहीं बदलता: Foundations के ठीक बाद हर कोई general agent चुनता है, Course 12 या Course 10। Mode decision आपको track पर route करता है; यह decide नहीं करता कि आप general agent इस्तेमाल करेंगे या नहीं। आप हमेशा करते हैं।
| Mode 1: Problem-Solving | Mode 2: Manufacturing | |
|---|---|---|
| इसे चुनें अगर आप... | चाहते हैं कि AI आपको काम तेज़ करने में मदद करे | ऐसे AI Workers बनाना चाहते हैं जो आपके लिए काम करें |
| किसके लिए है | कोई भी: engineers या knowledge workers | Engineers, या engineer के साथ paired knowledge worker |
| आपका tool | Claude Code/OpenCode या Claude Cowork/OpenWork | बनाने के लिए Claude Code/OpenCode; course pages वे concepts सिखाते हैं जिन्हें आप पहले खुद पढ़ते हैं, फिर agent से बनवाते हैं |
| यहाँ से शुरू करें | Course 12 (engineers) या Course 10 (knowledge workers) | Course 32: AI Agents बनाएँ |
| आप क्या बनाते हैं | पूरा हुआ काम | ऐसा Worker जो अपने आप काम निकालता है |
| किससे governed है | Problem Solving के सात principles | Agent Factory के सात invariants |
Fork से पहले एक note। Mode pick करने से पहले हर कोई एक shared step लेता है: खुद को अपना persistent personal agent देना। यही Personal Agent Harnesses section है (OpenClaw with General Agents, Course 21, और Hermes with General Agents, Course 22)। यह shared path का step है, mode नहीं: आप यहाँ अपना agent बनाते हैं, फिर Mode 1 या Mode 2 choose करते हैं।
Mode 2 पर ध्यान दें। General agent का output अंतिम नतीजा नहीं है; वह Worker है जो नतीजा देता है। Developer Claude Code से code-reviewing Worker को spec करता, बनाता और deploy करता है। Finance analyst, engineer के साथ मिलकर, Claude Code से ऐसा close-process Worker spec करता है जो हर month-end run करता है। Tool वही, discipline वही, domain अलग।
आपका शुरुआती path
अगर Mode picker अभी भी abstract लग रहा है, तो वही फैसला पूरी तरह concrete terms में यहाँ है: जो row आपसे match करे उसे चुनें और सबसे बाएँ वाले course से शुरू करें। हर path universal Foundations (Courses 1-8) से शुरू होता है।
| आप हैं... | आपका शुरुआती path | पहला पड़ाव |
|---|---|---|
| बिल्कुल नए reader | Thesis → Course 1 (AI क्या है) → Course 2 (AI Fluency) → Course 3 (Prompting) → Course 4 (Claude & ChatGPT 101) → Course 5 (Markdown & HTML) → Course 6 (Code जो आप कभी नहीं लिखते) → Course 7 (Skills & Connectors) → Course 8 (Thinking) | Foundations तैयार; नीचे किसी mode के साथ आगे बढ़ें |
| Knowledge worker | Foundations (Courses 1-8) → Course 10 (Cowork) → Course 21 या 22 (coding agent के ज़रिए अपना harness own करें) → Course 23 (क्या यह Agent Problem है?) → Course 24 (Principles) | AI के साथ असली knowledge work पूरा करें |
| Engineer | Foundations (Courses 1-8) → Course 12 (Claude Code) → Course 21 या 22 (अपना harness own करें) → Course 32 → Course 33 (FTE) | अपना पहला Digital FTE तैयार करें |
| Workforce builder | Engineer path, फिर Course 37 (Paperclip) → Course 40 (Evals) → Course 41 (Deploy) | Governed AI workforce, cloud पर deploy |
Courses
आपने call कर ली है, इसलिए यहाँ हर course है, ठीक उसी grouping में जो sidebar दिखाता है, साथ में सबसे तेज़ route और पूरी list से पहले हर depth का time।
कई courses में Reader track है: एक conceptual, no-build pass जिसे आप काम समझने और direct करने के लिए लेते हैं, हर line implement करने के लिए नहीं। जहाँ यह offered है वहाँ इसे use करके, Digital FTE ship करने का सबसे तेज़ path है Foundations (Courses 1-8) → Course 12 → Course 32 → Course 33 → Course 40 (Reader track): लगभग 15 hours का focused काम। बाकी courses उस Digital FTE को governed workforce में बदलते हैं, लेकिन पहला ship करने के लिए वे ज़रूरी नहीं हैं।
गहराई के हिसाब से कुल समय: Mode 1 (AI के साथ productive) ~8h · Mode 2 minimum (पहला Digital FTE) ~15h · Mode 2 full (governed workforce) ~28h · Full Agent Factory mastery ~48h (cloud deployment course के साथ)।
नीचे दिए गए आठ Foundations सबके लिए common हैं; उसके बाद path mode के हिसाब से split होता है।
Foundations (सबके लिए)
-
AI सच में क्या है: बिना math और बिना code का mental model, उस machine का जो हर दूसरे course के नीचे बैठी है। नौ ideas जो बताते हैं कि language model चीज़ें look up करने के बजाय predict क्यों करता है, गलत होने पर भी confident क्यों लगता है, "strawberry" में letters गलत क्यों गिनता है, और उसकी skill jagged क्यों होती है। इसे पहले पढ़ें, और नीचे के courses में हर "इसने ऐसा क्यों किया?" का जवाब पहले से तैयार मिलेगा। लगभग 45 minutes।
-
AI Fluency (4Ds): वे चार मानवीय क्षमताएं जो तय करती हैं कि AI वास्तव में आपकी मदद करेगा या नहीं, अलग-अलग युक्तियों के बजाय एक रूपरेखा के रूप में: Delegation, AI को क्या करना चाहिए और क्या मेरे पास रहे; Description, उसे क्या जानना चाहिए; Discernment, जो वापस आया वह सच में अच्छा है या नहीं; और Diligence, क्या यह जिम्मेदार उपयोग है और नतीजे की जिम्मेदारी किसकी है। इसमें AI के साथ काम करने के तीन तरीके, automation, augmentation और agency, तथा दूसरों के लिए बनाते समय चारों का specs, system prompts, evals और governance में बदलना भी शामिल है। लगभग 40 मिनट और छह अभ्यास prompts। पहले करें: Course 1.
-
2026 में AI Prompting: 2026 में ChatGPT, Claude और Gemini को अच्छे से इस्तेमाल करने पर 45-minute, 13-concept परिचय: context, reasoning modes, deep research, multimodal और AI desktop apps। वे mechanics जिन्हें इस book का हर chapter मानता है कि आप पहले से जानते हैं।
-
Claude & ChatGPT 101: उन दो chat workspaces का 9-concept tour जहाँ आप सच में अपना समय बिताएँगे। दोनों को साथ-साथ सिखाया गया है, ताकि आप दो products के बजाय एक discipline सीखें: model tiers और thinking modes, attachment असल में क्या करता है, एक workstream के कमरे के रूप में projects, instructions, memory और projects का अंतर, artifacts बनाम writing blocks, skills और plugins, connectors बनाम apps और दोनों के नीचे MCP standard, किसी सवाल को search, thinking या research की ओर कैसे भेजना है, और वह proving loop जो पहले से ज्ञात उत्तर वाले काम को दोबारा बनाकर भरोसा अर्जित करता है। हर product claim अगस्त 2026 में verify किया गया। लगभग 35 minutes और छह practice prompts। पहले करें: Courses 1-3.
-
Markdown In, HTML Out: Agentic काम की दो document languages पर 13-concept परिचय: machine के लिए काफ़ी precise Markdown specs लिखना, headings, lists, fences, links, और grade-to-9 validation loop वाला spec skeleton, और इंसान के लिए काफ़ी rich HTML output माँगना, साथ में वह publishing ladder जो artifact को share करने लायक link में बदल देती है। Closing prompts समेत लगभग 90 minutes। पहले करें: Course 3.
-
Code जो आप कभी नहीं लिखते: AI से ऐसा code लिखवाने, run करवाने और verify करवाने पर 13-concept परिचय जिसे आप कभी नहीं पढ़ते। कौन से tasks code problems हैं (Volume, Precision, Repetition, Files), बिना technical words के five-section brief कैसे लिखना है, estimation की जगह computation कैसे force करनी है, ऐसा result कैसे verify करना है जिसे आप पढ़ नहीं सकते, और वे पाँच surfaces जहाँ AI आपके लिए code run करता है: Claude.ai, Claude Code, OpenCode, Cowork और OpenWork। लगभग 1 hour, plus closing prompts और चार projects के लिए 40 minutes। पहले करें: Courses 3 और 5.
-
Skills और Connectors: दो upgrades पर no-code primer जो chat box को coworker में बदल देते हैं। एक Skill AI को task एक बार सिखाती है, एक
SKILL.mdजिसे वह तभी load करता है जब request match होती है, ताकि वह हर बार आपके तरीके से काम करे; एक Connector AI को आपके real apps, Drive, Gmail, Slack या tracker, तक safe, permission-scoped access देता है, MCP standard पर। किसे कब use करना है, built-in वाले कैसे use करने हैं, AI से अपना कैसे बनवाना है, वह file आपके लिए लिखता है, और वही पाँच surfaces पर सब safely कैसे करना है, ChatGPT और Gemini equivalents की notes के साथ। Accountants, doctors, marketers, engineers और students के लिए बनाया गया। Closing prompts और projects समेत लगभग 75 minutes। पहले करें: Courses 3-6. -
AI युग में कैसे सोचें: वह cognitive discipline जो AI से वास्तविक लाभ लेने वालों को उन लोगों से अलग करती है जो लाभ नहीं ले पाते: agent कब इस्तेमाल करना है, कब नहीं, और problems को कैसे frame करना है ताकि agent सच में मदद कर सके।
General Agents (अपना co-worker चुनें)
ये general-purpose agents हैं जिन्हें आप आगे आने वाले हर mode में direct करेंगे। Engineers coding agent चुनते हैं; knowledge workers desktop co-working agent चुनते हैं। दोनों Mode 2 में भी reuse होते हैं: ये Mode 1-specific नहीं, बल्कि हर mode के नीचे वाला tool layer हैं। हर कोई web से शुरू करता है, फिर रास्ता तुरंत बँट जाता है: knowledge workers सीधे Cowork पर जाते हैं, जबकि coding track की शुरुआत Open Source LLMs से होती है, जो open model को तीनों scales पर चलाता है: आपका laptop, आपके control वाला server, और cloud। इससे शुरुआत से ही पता चलता है कि नीचे क्या चल रहा है। इसके बाद Agentic Coding आता है। फिर चुने हुए co-worker पर पाँच disciplines चलाएँ: Spec-Driven Development, Loop Engineering, Harness Engineering, Graph Engineering और Trusting the Checker। क्या बनाना है यह specify करें, आपके लिए बनाने वाला loop design करें, loop को safe और trustworthy बनाने वाला harness engineer करें, एक से ज़्यादा loop होने पर shared memory दें, और center के checker को evals से prove करें।
-
Web पर General Agents: आपका पहला general agent, browser tab से drive किया गया और कुछ भी install नहीं। यह 12-concept tour July 2026 के web work surfaces, web पर Claude Cowork और ChatGPT Work, को समझाता है: remote session क्या है, files असल में कहाँ रहती हैं और three-tier exit discipline, connectors reach और exit door कैसे बनते हैं, approval phone तक कैसे पहुँचती है, four-step delegation loop, और scheduled tasks जो कोई device online न होने पर भी चलते हैं। इसका lasting lesson एक reading lens है: हर agent product के वही छह parts होते हैं, इसलिए हर नया tool आधे घंटे में समझा जा सकता है। पूरे section का सबसे आसान on-ramp; code आता हो या नहीं, कोई tool install करने से पहले हर व्यक्ति browser में यहीं से शुरू करता है।
-
Cowork Crash Course: Claude Cowork पर 90-minute, 15-concept primer: real desktop knowledge work delegate करना, autonomy ladder, prompt-injection defenses, और plan-review habit जो ज़्यादातर पछतावे रोकती है। Knowledge workers के लिए general-agent starting point।
-
Open Source LLMs: आपका Laptop, आपका Server/Cluster, Cloud: coding track यहाँ से, और open models की पूरी range से, शुरू होता है। तीन standalone parts हैं, हर tier के लिए एक। Part 1 (local, Ollama): अपनी machine पर free और offline model चलाएँ, Claude Code या OpenCode को उससे जोड़ें, और local setup की दो दीवारें समझें, capable model और काफ़ी तेज़ hardware। Part 2 (server, vLLM): अपने control वाली GPU machine से वही Qwen3 8B serve करें, दोनों serving layers पर 50 concurrent requests भेजें, और दो curves बनाएँ जिनमें एक रेंगता और दूसरा चढ़ता दिखे। Part 3 (cloud, OpenRouter): Kimi K3 और DeepSeek V4 Pro जैसे frontier open models को उन्हीं दो agents से चलाएँ, जिन्हें कोई individual host नहीं कर सकता, फिर तीनों tiers के आगे एक router रखें। Lasting idea एक sentence है: आपका agent harness और swappable brain है, और brain सिर्फ़ एक address है। पढ़ने में 2 से 4 hours; Part 1 अकेला लगभग 60 से 90 minutes लेता है और free install के अलावा कुछ नहीं चाहिए। Coding agent पहले drive किया हो तो मदद मिलती है; नहीं किया तो one-command install आपको वहाँ पहुँचा देता है, और Course 12 driving सिखाता है। Coding track का open-model on-ramp; Skills crash course के साथ pair होता है।
-
Agentic Coding Crash Course: Claude Code और OpenCode: Claude Code और OpenCode का 90-minute, 15-concept tour। Vocabulary वही, keybindings थोड़ी अलग; skills दोनों tools के बीच साफ़ transfer होती हैं। Engineers के लिए general-agent starting point।
-
Website Design Crash Course: 15-concept applied build course जो अभी सीखी हर चीज़ को एक real job पर लगाता है: single-page और multi-page client website design, verify और ship करें, जो generated नहीं बल्कि thoughtfully made लगे। Model द्वारा load की जाने वाली taste file, free photos से paid video तक four-lane media pipeline, tests की तरह screenshots, और अंत में live URL। Agentic machine के साथ आपका पहला real build।
-
Spec-Driven Development: कैसे बनाया जाए यह generate करने से पहले क्या बनाना है उस पर सहमत होने का 13-concept primer: project constitution, चार phases (Research, Specify, Clarify, Build), और वही discipline तीन तरीकों से claude.ai, Claude Code और OpenCode में चलती है। यह coding skill नहीं, सोचने की discipline है, इसलिए non-programmers भी इसे चलाते हैं। लगभग 90 minutes, साथ में दो बार बनाया गया worked example और छह hands-on projects। वह discipline जो आपके चुने co-worker को reliable बनाती है।
-
The Four Layers: इस field में जिन शब्दों पर बार-बार बहस होती है, उनका 12-concept map, और जान-बूझकर इस section का सबसे छोटा course। Prompt, context, harness और loop न चार अलग skills हैं जिनमें से एक चुननी हो, न चढ़ने वाली चार सीढ़ियाँ। ये चार containers हैं, हर एक दूसरे के अंदर, और हर एक की अपनी work unit है: एक model call, window, एक beat और पूरा run। आप हर layer का failure signature, maker beat का अपना एक success signal और कोई prompt उसे क्यों fix नहीं कर सकता, human gate stop नहीं exit क्यों है, Mode 1 और Mode 2 में असल में कौन-सी layers आपकी हैं, और graphs कहाँ fit होते हैं, यह सीखते हैं। Graph पाँचवीं layer नहीं है। अंत में eight-case diagnosis drill और framework कब आपके खिलाफ़ जाता है उसका honest account है। Payoff एक habit है: agent पूरा afternoon एक ही काम दोहराने में जला दे, तो prompt दोबारा लिखने के बजाय पूछें कि कौन-सी layer टूटी। लगभग 50 minutes, कुछ install नहीं। पहले करें: Course 12 या 10; Course 16 (Loop Engineering) से पहले पढ़ें।
-
Loop Engineering: agent को turn by turn prompt करने से वह loop design करने की shift पर 15-concept primer जो आपके लिए उसे prompt करता है। आप loop के छह parts सीखते हैं: heartbeat, worktree isolation, skill, maker-checker sub-agent split, connector और runs के बीच बचने वाली state spine। इन्हें Claude Code और OpenCode दोनों में एक बार बनाया जाता है, फिर एक morning-triage-to-PR loop में compose किया जाता है। Course एक beat के codified body के रूप में dynamic workflows, loop को affordable रखने वाली cost-by-cadence discipline, और durable skill loop के उन दो ends पर क्यों रहती है जिन्हें automate नहीं किया जा सकता, intent और accountability, भी cover करता है। पढ़ने में लगभग दो hours, build में ज़्यादा। पहले करें: Course 12; सीधे Courses 14 (Spec-Driven Development) और 13 (The Four Layers) पर बनता है।
-
Harness Engineering: model के चारों ओर की layer पर 12-concept primer जो raw intelligence को भरोसेमंद agent में बदलती है: Agent = Model + Harness। इसमें हर harness surface को organize करने वाले पाँच verbs (constrain, inform, verify, correct, escalate), blast radius के हिसाब से sorted permission rules, नुकसान को forbidden नहीं impossible बनाने वाले sandboxes, काम automatically check करने वाले hooks, program द्वारा validate किया जा सकने वाला typed output, चार failure classes और हर पकड़ी गलती को permanent fix में बदलने वाली ratchet habit शामिल हैं। अंत में Claude Code और OpenCode दोनों में Loop Engineering के morning-triage loop को end to end harden किया जाता है, साथ में आठ practice harness builds। पढ़ने में लगभग दो hours। पहले करें: Course 12; सीधे Course 16 (Loop Engineering) पर बनता है।
-
Graph Engineering: जब एक loop काफ़ी न रहे, कई agents की shared memory पर 16-concept primer। Thesis एक sentence है: agent भूलता है, graph नहीं। Agents सीखी बातें session के साथ मरने वाले transcripts में छोड़ने के बजाय typed, connected records में लिखते हैं। दो graphs रखें और कभी collapse न करें: work के लिए commit DAG (Karpathy का autoresearch और AgentHub), और facts के लिए knowledge graph (Anthropic का Knowledge Graph Cookbook)। इसमें trained pipeline के बजाय schema से extraction, receipts रखने और reversible रहने वाला entity resolution, और हर edge पर provenance rule शामिल है। फिर graph से काम करें: agents को bounded subgraphs दें, dumps कभी नहीं; checker से edge cite करवाएँ या माँगें, ताकि "seems off" की जगह "triple not found" आए। पाँचवाँ part governance graph जोड़ता है: single loop टूटने के चार तरीके, gaming पकड़ने वाला counter-metric, और वे anchors जिनसे कोई loop बहस नहीं कर सकता। अंत में Loop Engineering की morning-triage loop को prose spine से queryable graph में upgrade किया जाता है, तीन JSON files,
jqऔर pre-commit hook से, बिना database के, साथ में आठ practice builds। Course अपना honest विरोध भी देता है: ज़्यादातर systems को graph नहीं बनाना चाहिए, और यह बताता है कैसे जानें। Core reading लगभग दो hours, deeper notes के साथ तीन। पहले करें: Course 12; Courses 16 और 17 (Loop और Harness Engineering) पर बनता है। दूसरा loop चलाते समय करें; एक ही loop हो तो skip करें। -
Checker पर भरोसा: Evals Crash Course: operating size पर evals का 12-concept primer, यानी tester को कैसे test करें ताकि "checker ने PASS कहा" ऐसा number बने जिसका आप बचाव कर सकें। Agent एक distribution है, इसलिए single run नहीं pass rate grade करें; run को तीन depths पर grade किया जा सकता है, answer, actions और trace; real पकड़ी failures से golden set बनाएँ, जहाँ ratchet cases बनती है; rubric anchor करें और judge को अपनी blind grading के against calibrate करें; हर change पर set को regression gate की तरह और drift पकड़ने के लिए schedule पर चलाएँ; sealed hold-outs से Goodhart's law के सामने honest रहें। Framework नहीं चाहिए: cases का folder, shell runner और jq, Claude Code और OpenCode दोनों में, अंत में morning-triage reviewer को खुद test करते हुए। पढ़ने में लगभग दो hours। पहले करें: Course 12; सीधे Course 17 (Harness Engineering) पर बनता है।
-
Laptop से बाहर: Runtime Crash Course: runtime decision पर 12-concept primer, भरोसा कमा चुकी loop कहाँ रहे और track record खोए बिना कैसे move हो। एक सवाल हर option sort करता है: loop कौन operate करता है और work कहाँ execute होता है? चार homes हैं: आपकी session, cloud schedule (Routines या scheduled GitHub Actions), managed runtime (Claude Managed Agents), या आपका अपना process। Headless mode वह bridge है जिसे हर move cross करता है; minimum unattended kit बिना देखरेख वाली loop को honest रखती है; suitcase test travel करने वाली discipline और दोबारा बननी वाली mechanics अलग करता है; trust नए home में फिर earn होता है, transfer नहीं। चार questions home चुनते हैं और blast radius speed set करता है, Claude Code और OpenCode दोनों में। पढ़ने में लगभग 90 minutes; moves में ज़्यादा समय। पहले करें: Course 12; सीधे Course 19 (Trusting the Checker) पर बनता है और Stage 3 trilogy बंद करता है।
Personal Agent Harnesses
एक agent इस्तेमाल करने और एक mode चुनने के बीच का shared step। यहाँ हर कोई खुद को एक persistent personal agent देता है, ऐसा agent जो sessions के पार याद रखता है और आपकी अपनी infrastructure पर चलता है, बजाय हर chat में नए सिरे से शुरू करने के। आप इसे coding agent (Claude Code या OpenCode) को direct करके बनाते हैं; वही install करता है, इसलिए अगर Cowork आपका daily driver भी हो तो इस एक step के लिए coding agent लगाते हैं। यहाँ अपना agent own करें, फिर Mode 1 या Mode 2 pick करें।
-
OpenClaw with General Agents: 90-minute, 6-scenario hands-on course जहाँ आपका general agent OpenClaw पर Personal AI Employee install और configure करता है: शून्य से फ़ोन पर AI Employee तक, एक custom skill, एक MCP tool, एक heartbeat task, और अंत का ACP-spawn demo जिसमें AI Employee अपना coding agent बुलाता है। Karpathy की "little skill", expanded। पहले करें: Course 12.
-
Hermes with General Agents: 90-minute, 6-scenario hands-on course जहाँ आपका general agent Hermes (Nous Research) install और run करता है, वह memory-first, self-improving harness: persistent cross-session memory ताकि वह जो सीखे उसे runs के बीच साथ ले जाए, एक learning loop जो हल किए गए कठिन tasks से अपनी skills खुद लिखता है, model-agnostic ताकि आप vendor lock-in से बचें, यह सब आपकी अपनी infrastructure पर चलता है। वही Personal AI Employee idea जो Course 21 में है, लेकिन ऐसे harness पर बना जो जो सीखता है उसे compound करने के लिए design किया गया है। पहले करें: Course 9; Course 21 (OpenClaw) के साथ pair होता है।
Mode 1: Problem-Solving track
Mode 1 तीन-course arc है: diagnose, solve, cross. आप पहले तय करते हैं कि task सच में agent का काम है या नहीं और कौन-सा mode fit है (Course 15), फिर एक session के अंदर उसे अच्छे से solve करते हैं (Course 16), और जब कोई solve रखने लायक साबित हो जाए, उसे permanent worker में promote करते हैं (Course 17, Mode 2 का bridge).
-
क्या यह Agent Problem है?: किसी भी agent को खोलने से पहले चलाया जाने वाला दस-minute triage। तीन gates: क्या यह सच में agent job है, या regular tool/chatbot काफी है; क्या आप इसे एक बार करेंगे या हर week करेंगे, यानी Mode 1 या Mode 2; और "finished" दिखता कैसा है? तीन gates, तीन गलत मोड़, एक clear path। अंत में reference card है जो हर answer को 2026 के सही tool से map करता है। यह course आपको ऐसे task पर पूरी session जलाने से बचाता है जो agent का काम था ही नहीं। Beginners और international audience के लिए लिखा गया। Mode 1 का on-ramp और पहला page.
-
General Agents के साथ समस्या सुलझाना: काम करने की discipline पर 90-minute, 7-principle crash course, जो किसी भी general agent, Claude Code, OpenCode, Cowork या OpenWork, को clever toy से ऐसे tool में बदलता है जिस पर आप असली काम पूरा कर सकते हैं। सात principles चारों tools पर apply होते हैं: Bash को key मानना, code को universal interface मानना, verification को core step बनाना, small reversible decomposition, files में state persist करना, constraints और safety, और observability। इसमें four-phase workflow शामिल है: explore, plan, implement, commit, और capstone exercise।
-
One-Off से Worker तक: Manufacturing को handoff: यह bridge Mode 1 को बंद करता है और Mode 2 खोलता है। जब कोई task जिसे आप बार-बार हाथ से solve कर रहे हैं, permanent worker बनने लायक proven हो चुका हो, तो उसे promote कैसे करें: एक signal (method अब बदल नहीं रहा), चार promotions (आपका brief → spec, आपकी eyeball check → eval, you-in-the-loop → escalation rule, आपकी session → runtime), और एक fork (personal harness own करें या Digital FTE manufacture करें)। यह Mode 1 से Mode 2 की crossing को cliff से चलने लायक step बनाता है और दिखाता है कि worker ज़्यादातर promotion है, invention नहीं। Mode 1 का आखिरी page; Mode 2 track (Course 26 onward) में handoff.
Mode 2: Manufacturing track
पहले gateway है। नीचे हर course मानकर चलता है कि आप अपने agent का लिखा Python पढ़ सकते हैं, इसलिए अगर आपने कभी code नहीं किया, तो build courses से पहले AI era में Python से शुरू करें। आपकी पहली build loop से पहले आती है: connector-native app, यानी ऐसा server जिसे आप ship करते हैं और जिसे host का model call करता है, अभी आपकी अपनी agent loop के बिना। वहाँ से manufacturing path सात moves में end-to-end चलता है: Agent बनाएँ, उसे Employee में promote करें, Employees को nervous system से जोड़ें, management add करें, hiring dynamic बनाएँ, founder को free करें, और evals से साबित करें कि पूरी workforce मापने योग्य भरोसेमंद है। उस आखिरी move के बिना manufacturing साबित नहीं की जा सकती: जिन्हें आप measure नहीं कर सकते, वे Workers सच में production में नहीं जा सकते।
Phase 1: Building Blocks
-
AI era में Python: उन लोगों के लिए read-before-you-write primer जिन्होंने कभी code नहीं किया। आप blank page से Python नहीं लिखते; आप अपने agent द्वारा generate किए गए Python को पढ़ना, predict करना, test करना और verify करना सीखते हैं, PRIMM-AI+ method और Test-Driven Generation (TDG) loop के साथ। 17 concepts और छह छोटे projects, एक companion base के साथ जो आपके agent को disciplined tutor में बदल देता है। हर Mode 2 build course जिस literacy gateway को assume करता है। पहले करें: Course 12.
-
Connector-Native Apps: pre-loop build course: एक remote MCP server ship करें जिसे free-tier Claude user एक pasted URL और एक Authorize click से add करता है, कभी agent loop लिखने से पहले। Connector-native app के four invariants पर 14 concepts: one gateway, tools only, verified sign-in से identity prove करना, fail closed, जिन्हें OAuth 2.1, two-table Postgres memory, session-init gate और real deploy वाले Reading Room worked example में बनाया गया है। Host model और loop लाता है; आपका server tools, state और identity लाता है। पढ़ने में लगभग 90-120 minutes, build के लिए एक focused day। पहले करें: Courses 12 और 25; path में आगे आने वाला Build AI Agents आपको loop देता है.
-
अपने AI को searchable context दें: Postgres और pgvector पर RAG: अपने AI को searchable context देने पर 15-concept परिचय: आप अपने agent को direction देते हैं कि वह Neon + pgvector को working RAG system में बदले: schema, embedding worker, chunking, semantic और hybrid search, eval-driven retrieval, और ऐसा read-only RAG MCP server जिसे कोई भी agent call कर सकता है। वह retrieval foundation जिस पर Digital FTE बनता है, उसी Manufacturing base से। पढ़ने में ~90 minutes plus एक build। पहले करें: Course 12.
-
Context Layer बनाना: अपने खुद के store से बाहर निकलकर लगाई गई scope की छलांग। पिछले course ने एक Worker को ऐसा searchable store दिया जिसे आपने खुद भरा था; यह course वह corpus बनाता है जिससे पूरी workforce पढ़ती है, और उसे एक असली customer सवाल के इर्द-गिर्द बनाता है जो असल में एक साथ चार professional सवाल है। सात हिस्सों में पंद्रह concepts: कोई connected source चार में से कौन सी class हो सकता है, और उन्हें आपस में मिला देना महँगी गलती क्यों है; Onyx Standard deploy करके उसे अंदर से पढ़ना; permission inheritance, और वह gate जो आप खुद बनाते हैं क्योंकि Community Edition नहीं बनाएगा, ऐसे role से test किया गया जिसका सही जवाब कुछ भी नहीं है; आपका Neon record MCP पर serve किया गया ताकि discovery और confirmation दो अलग calls बनी रहें; prompt से पहले लिखी गई एक
authority-map.yaml; और ऐसा Context Router जो हर बार citations के साथ वही सात sections लौटाता है, और किसी conflict को एक आरामदेह "हाँ" में मिलाने से मना कर देता है। अंत में पूरा build end to end, उसे जान-बूझकर तोड़ने के चार तरीके, eight-dimension eval set, और एक Context Gateway जो वही corpus एक identity boundary के ज़रिए Claude Code, OpenCode और आपके Digital FTE तक पहुँचाता है। पढ़ने में लगभग दो घंटे, बनाने में एक दोपहर। -
AI Agents के लिए Plugins: एक असली plugin बनाएँ और ship करें जो ऐसे AI agent को extend करता है जो आपका अपना नहीं है (Claude Code या OpenCode), और वही bundle claude.ai तक जाते देखें। Agent plugin के four invariants और उसके चार levers (एक skill, एक subagent, एक MCP server, एक hook) पर तेरह concepts, साथ में वह deterministic exit-2 guard जो सलाह को guarantee में बदल देता है। एक tested starter आपको खाली folder से ऐसे plugin तक ले जाता है जिसे teammate एक ही command से install करता है। यह Connector-Native Apps का आईना है: वहाँ आपने chat app extend किया था; यहाँ आप coding agent extend करते हैं। पहले करें: Course 26.
-
AI Identity: Human Sign-In और Agent Access: identity और access layer, दो हिस्सों में: पहले अपना sign-in own करें (email और social login, sessions, two-factor, और एक OAuth/OIDC server जो असली tokens issue करता है, Better Auth पर बना), फिर एक AI worker को उसका अपना credential दें और किसी व्यक्ति की ओर से काम करने का एक scoped, time-boxed, revocable, human-approved तरीका दें। मुख्य सूत्र: यह identity किसकी है, और authority इंसान से agent तक कैसे pass होती है? Human sign-in आज production-grade है; agent identity अभी settle हो रही है, इसलिए course durable primitives पर टिका है। पहले करें: Course 26.
Phase 2: Workers बनाएँ
-
AI Agents बनाने का crash course: OpenAI Agents SDK पर 90-minute, 16-concept परिचय: agent loop, tools, sessions, streaming, handoffs, guardrails, tracing, day-1 evals, human approval, Cloudflare पर sandboxed deployment, और cost discipline के लिए DeepSeek V4 Flash। पहले करें: Course 12.
-
Agent से Digital FTE तक: Basic agent को durable Worker में बदलने पर 4-hour workshop: portable Skills, system of record के रूप में pgvector वाला Neon Postgres, उनके बीच wire के रूप में Model Context Protocol, audit-trail discipline, authority model के रूप में approval, और end-to-end बनाया गया customer-support Worker। 15 concepts, 8 build decisions। पहली Quick Win 15 minutes में; cheat-sheet skim 90 में; पूरा build लगभग 3 और hours में। पहले करें: Course 32.
-
Digital FTE से nervous system वाले production Worker तक: आपके Digital FTE को Inngest operational envelope में wrap करने पर 90-minute, 15-concept course: durable execution, event-driven triggers, step memoization, concurrency और throttling, replay, और HITL gates। Customer-support Worker को extend करता है ताकि वह network की छोटी failures, restarts और लंबे समय तक pending approvals झेल सके। पहले करें: Course 33.
Phase 3: Workforce scale करें
-
Human-Agent Teams: आपकी Workforce का Operating Model: इंसानों और Digital FTEs को एक ही team की तरह चलाने का operating model: खुले में काम, clear roles वाला एक roster, एक north star, और ऐसा भरोसा जो verified reliability के साथ बढ़ता है। कोई code नहीं; आप अपने agent को direction देते हैं कि वह आठ operating documents draft करे (roster, role cards, north star, verification rubric, doer-verifier, weekly report, attention budget) और आप एक असली team का operating manual लेकर निकलते हैं। पहला worker बनने से पहले planning mode में किया जा सकता है। पहले करें: planning mode के लिए Course 12; live mode एक Digital FTE (Course 33) मानकर चलता है।
-
Agent Experiences Design करना: software अपने आप act करने लगे तो design craft कैसे बदलती है, यह crash course उसी पर है। Agentic product के एक साथ दो users होते हैं: इंसान जिसे उस पर trust करना है, और दूसरे agents जिन्हें उसे parse करना है। चार parts में 18 concepts, shift, human trust surface, machine surface और नया craft, आपको agent की judgment readable, autonomy adjustable और mistakes survivable बनाना सिखाते हैं। आप पहले से बनाए Digital FTE के लिए अपने agent से Agent Experience Brief draft करवाते हैं, फिर hands-on lab में official
create-mcp-appskill के साथ coding agent को direct करके MCP App ship करते हैं। लगभग एक hour का Reader track उन leaders और designers के लिए concepts cover करता है जो implementation करने के बजाय काम direct करते हैं। Course 35 (Human-Agent Teams) के साथ pair होता है: वह course team का operating model लिखता है; यह उस surface को design करता है जहाँ इंसान team को काम करते अनुभव करता है। -
Paperclip के साथ Workforce बनाना: 90-minute, 6-scenario hands-on course जहाँ आपका coding agent Paperclip (open-source, MIT-licensed AI-native company control plane) set up करता है, keyless local Worker hire करता है, permanent audited decision record के रूप में board approval file करता है, वास्तविक Gemini-backed Worker लगाता है ताकि budget के पास आखिरकार billable काम meter करने को हो, और activity log के against एक SQL query से पूरी company history दोबारा बना देता है। Scenarios 1-4 और 6 को API key नहीं चाहिए; सिर्फ़ budget scenario को मुफ़्त Gemini key चाहिए। पहले करें: Course 33 या Course 21.
-
Fixed से Dynamic Workforce तक: Half-day, 15-concept और 7-decision workshop जहाँ Course 37 की workforce capability gap detect करती है, hire proposal draft करती है, उसे उसी approval primitive से पास करवाती है जो $500 refund gate करता है, और Claude Managed Agents पर Legal Specialist provision करती है। Hiring as a callable function। Invariant 6 पूरा करता है: workforce policy के तहत expandable है। पहले करें: Course 37.
-
Founder Bottleneck से Owner Delegate तक: Half-day, 15-concept और 7-decision workshop जहाँ workforce owner OpenClaw पर Owner Identic AI configure करता है: यह routine Paperclip approval requests पढ़ता है, signed delegated envelope के अंदर वाले requests clear करता है, और सिर्फ़ वे decisions सामने लाता है जिन्हें सच में इंसान चाहिए। Owner आखिरी bottleneck है; यह course उसे हटाता है। Invariant 2 पूरा करता है: हर इंसान को delegate चाहिए। Mock endpoints, rules templates और sample judgment context के साथ downloadable शुरुआती lab zip देता है। पहले करें: Course 38.
-
AI Employees के लिए Eval-Driven Development: वह discipline जो manufacturing arc पूरा करती है और Courses 9 से 27 तक बनी हर चीज़ को wrap करती है। सीखने के चार रास्ते: Reader (~3-4 hours, conceptual), Beginner (~1 day), Intermediate (~2 days), Advanced (~3 days for full implementation)। 15 concepts plus a 7-decision lab। Nine-layer evaluation pyramid सिखाता है: unit, integration, output, tool-use, trace, RAG, safety, regression, production, और उसे भरने वाला four-tool stack: trace grading के साथ OpenAI Agent Evals, DeepEval, Ragas, Phoenix। अंतिम स्थिति: ऐसी workforce जहाँ हर member measurably trustworthy है, weekly trace-to-regression-test promotion ritual के साथ जो eval suite को महीनों तक चलाए रखता है। Reader track leaders के लिए; Advanced track shipping teams के लिए। OpenAI Agents SDK या Claude Managed Agents runtime में से किसी एक को assume करता है.
-
अपना Agent Harness cloud पर deploy करें: वह course जो manufacturing track में बनी हर चीज़ ship करता है। यह harness/sandbox split सिखाता है: control plane, यानी harness जो secrets hold करता है, agent loop run करता है और state रखता है, execution plane से अलग security boundary में रहता है, यानी sandbox जहाँ agent का generated code सच में run होता है। आप एक complete production path deploy करते हैं: harness के लिए Azure Container Apps पर FastAPI, durable state के लिए Neon Postgres, files के लिए Cloudflare R2, code-execution sandbox, four-surface observability, और CI gate के रूप में wired Course 40 eval suite। सीखने के चार रास्ते: leaders और architects के लिए Reader; shipping teams के लिए Beginner से Advanced तक; 17 concepts और 9-decision agent-driven lab जहाँ आपका coding agent companion AGENTS.md पढ़कर harness बनाता है जबकि आप उसे direction देते हैं। पहले करें: Course 40; Decision 8 उसका eval suite wire करता है। Reader track को cloud accounts नहीं चाहिए.
-
Agentic Architectures चुनना: Pattern selection पर conceptual crash course: आपके task के बारे में पाँच सवाल चार core patterns में से एक तक map करते हैं (sequential workflow; single agent + ReAct + tools; planning + ReAct execution; multi-agent specialist), plus additive layer के रूप में reflection। Discipline यह है कि impressive दिखने वाली चीज़ से नहीं, architectural fit से चुनना है: हर pattern task के बारे में एक bet है, और सही bet वही है जिसकी assumptions reality से match करती हैं। पाँच-सवाल decision tree, दो बराबर common failure modes, overshooting और undershooting, mismatch दिखाने वाले runtime signals, और हर pattern आपकी deployment topology और eval suite के साथ कैसे compose होता है, यह सिखाता है। सीखने के चार रास्ते: Reader ~2-3 hours conceptual; Beginner ~1 day; Intermediate ~2-3 days; Advanced ~4-5 days, five-case decision lab, और design reviews के लिए printable classify-this-task worksheet। पहले करें: आप agents बना और evaluate कर सकते हैं; agent-building, operational-envelope और eval courses को cross-reference करता है.
-
Payment-Enabled Agents: ACP, AP2, x402 और MPP: Agents को money move करने देने वाले चार protocols पर multi-track crash course: consumer shopping के लिए ACP, authorization mandates के लिए AP2, HTTP-native machine payments के लिए x402, और session-based settlement के लिए MPP। मुख्य बात: ये चार layers हैं, rivals नहीं। आप use case पढ़ते हैं, हर layer (discovery, authorization, commerce, settlement) के लिए एक protocol चुनते हैं, और उन्हें OpenAI Agents SDK code के रूप में compose करते हैं, tool-input guardrail के साथ जो payment होने से पहले रोक देता है। सीखने के चार रास्ते: Reader ~2-3 hours conceptual; shipping teams के लिए Beginner से Advanced तक; 19 concepts, five-decision lab, और three-level spend-limit discipline जो runaway agent को wallet खाली करने से रोकती है। पहले करें: Course 32 (OpenAI Agents SDK); Course 34 (Inngest) और Course 41 (cloud deployment) के साथ pair होता है.
References & Companions
-
2026 में कौन से AI Employees इस्तेमाल करें?: पाँच tools, आपकी identity और need से matched। एक minute से कम में अपनी शुरुआती जगह find करें।
-
Cheatsheets: इस book के key tools के लिए interactive जल्दी देखने वाले reference cards: Claude Code, Claude collaborative workspace, और OpenClaw।
-
Agentic Engineering की बुनियाद: उस engineering discipline पर 45-minute परिचय जो इस section की हर चीज़ को सहारा देता है: agent-based systems को उसी rigor के साथ कैसे design, release और operate करें जो आप किसी भी दूसरे production software पर apply करेंगे। Course 33 से आगे जाने वाले किसी भी reader के लिए वैकल्पिक companion read।
Glossary आपका दूसरा लगातार साथ रहने वाला reference है। दोनों tabs में खुले रखें।
पूरा करने पर आपके पास क्या होगा
जब आप इस section के अंत तक पहुँचेंगे, तो आप सिर्फ़ Agent Factory thesis नहीं समझेंगे; आपने उसके अनुसार बनाया होगा। आपने general agents का इस्तेमाल करके असली काम पूरा किया होगा। आपने कम से कम एक Digital FTE deploy किया होगा जो आपके बिना run करता है। आपने उसे nervous system से जोड़ा होगा, Paperclip-governed workforce के अंदर रखा होगा, उस workforce को अपने colleagues hire करते देखा होगा, और Identic AI के ज़रिए खुद को उसका bottleneck होने से मुक्त किया होगा। आपने पूरी चीज़ को अपने लिखे evals में wrap किया होगा, ताकि आप साबित कर सकें, सिर्फ़ उम्मीद न करें, कि हर Worker trustworthy है।
यही इस book और हर दूसरे AI course के बीच अंतर है: आप notes के साथ finish नहीं करते। आप काम करती AI workforce के साथ finish करते हैं।
और यह section finish करने के बाद भी काम का रहता है: ऊपर दिए गए References & Companions वही हैं जिन्हें आप अटकने पर खोलते हैं।
इस section के बाद सब कुछ वही निखारता है जो आप पहले ही बना चुके हैं। अब अपना mode चुनें और शुरू करें।