Digital FTE बनाना: एक 4-घंटे का Crash Course
पंद्रह concepts और एक worked build: Skills, system of record, और उनके बीच MCP wire।
पिछले course में आपने एक agent बनाया था। इस course में आप agent से AI Worker की ओर पहला असली कदम उठाते हैं। (यह Mode 2, the Manufacturing track का दूसरा course है, सात में से move दो।) वह agent, Build AI Agents से, एक streaming chat agent था जिसमें sessions, guardrails, और tracing थे, और compute के लिए एक sandbox पर चलता था। यह काम करता था। लेकिन जिस पल आप terminal बंद करते, यह सब कुछ भूल जाता था, और इसके पास जो भी tool था वह इसकी Python में लिखा हुआ था।
पहले इसे काम करते देखना चाहते हैं? नीचे दिए 15-minute Quick Win पर जाएँ। आप एक असली database और एक छोटा Worker बनाएँगे जो उसमें लिखता है और याद रखता है, फिर उन concepts के लिए वापस आएँ जो समझाते हैं कि इसका shape ऐसा क्यों है।
एक AI Worker वही chat agent है, बड़ा होकर। लोग इसे AI Employee या Digital FTE भी कहते हैं: एक ही चीज़, जिसे इस आधार पर नाम दिया जाता है कि आप इसे कैसे बनाते हैं, यह किसमें शामिल होता है, और इसकी लागत क्या है। यह course इसकी foundation बनाता है: एक ऐसा agent जिसे आप बढ़ा सकते हैं, जो याद रखता है, और जो आपका अपना है। एक पूरा Worker चौबीसों घंटे भी चलता है, अपने-आप act करता है, और किसी भी app पर आप तक पहुँचता है, लेकिन वह बाद में आता है। पिछले course का SDK और SandboxAgent runtime वही रहते हैं; उनके आसपास की हर चीज़ ही बदलती है।
वह बदलाव दो moves में होता है, साथ में उनके बीच का wire:
- इसकी abilities Skills बन जाती हैं: छोटे folders जिन्हें agent खुद ढूँढता और load करता है, बजाय इसके कि tools इसकी Python में hard-wired हों।
- जो चीज़ें यह restart पर भूल जाता था, वे Postgres में चली जाती हैं, इसका system of record: वह एक authoritative store जिसके against Worker चलता है, वह source of truth जिस पर एक business चलता है, ठीक वैसे जैसे एक CRM या एक ledger चलता है। इसमें कुछ तरह का data रहता है:
- Business records: operational truth। Customers, tickets, orders। आप इन्हें look up और update करते हैं।
- Reference library: वह knowledge जिसे यह meaning से search करता है। policy library, reference documents, past cases।
- State: अभी काम कैसा दिख रहा है। कौन से chats खुले हैं, क्या approval का इंतज़ार कर रहा है।
- Trace: इसने क्या किया उसका एक record, ताकि company इसके actions को replay कर सके और उन पर भरोसा कर सके।
- MCP (the Model Context Protocol) एक open standard है जो agents को बाहरी tools और data से जोड़ता है। यहाँ, यह वह wire है जिससे agent उस store तक पहुँचता है।

Semantic recall वह एक हिस्सा है जिसे लोग गलत नाम देते हैं। इसका मतलब है चीज़ों को meaning से ढूँढना, exact words से नहीं। यह search का एक तरीका है, अपने आप में एक store नहीं: आप इसे reference library पर, past conversations पर, या business records पर ही चला सकते हैं। यह एक चलते हुए Worker के दो हिस्से होते हैं जिन्हें production अलग-अलग deploy करता है। harness agent का runtime है: SDK loop खुद। compute वह sandbox है जहाँ agent का code असल में चलता है; जब agent किसी tool को call करता है, यह code उस sandbox को सौंप देता है। इस course में दोनों local रहते हैं। पूरी presentation देखें: Digital FTE foundation बनाएँ thesis सात Invariants बताती है जिन्हें हर production agent system को पूरा करना चाहिए। पिछले course ने engine (Invariant 4) बनाया: एक sandbox पर OpenAI Agents SDK। यह course Invariant 5: हर Worker एक system of record के against चलता है जोड़ता है। engine वह है जिस पर Worker चलता है; system of record वह है जिसके against यह चलता है। दो open standards इसे portable रखते हैं। Skills (मूल रूप से Anthropic से, अब agentskills.io पर ecosystem-wide) capabilities को tools के बीच travel करने देते हैं। MCP वह standard wire है जिससे agent record तक पहुँचता है; पिछले course में कोई नहीं था, और यह यहाँ का मुख्य नया pattern है। record खुद Neon Postgres + pgvector है, जिसे इसलिए चुना गया क्योंकि यह शुरू करने के लिए free है, idle होने पर zero तक scale होता है, और एक official MCP server के साथ आता है। product replaceable है; Swap guide विकल्प बताती है।pgvector से आता है, जो Postgres में search-by-meaning जोड़ता है।एक Worker कैसे चलता है: harness बनाम compute (आप यहाँ दोनों में से कुछ भी deploy नहीं करते)
UnixLocalSandboxClient sandbox को आपकी machine पर चलाता है (zero infrastructure, एक API key), और आप इसे एक-line के बदलाव से Docker, Cloudflare, E2B, या Modal की ओर point कर सकते हैं (Part 5's Swap guide)। harness को खुद एक always-on cloud service के रूप में deploy करना अपना अलग course है, Deploy Your Agent Harness to the Cloud।यह course Agent Factory thesis में कहाँ बैठता है
📚 पढ़ाने की सहायक सामग्री
ये पंद्रह concepts तीन layers में बँटते हैं: Skills, system of record, और MCP। नीचे की table पूरा map है।एक नज़र में 15 concepts (पूरे map के लिए expand करें)
# Concept Layer यह किस सवाल का जवाब देता है 1 एक Agent Skill क्या है Skills reusable capability कहाँ रहती है? एक folder में, SKILL.md के साथ और optional scripts/references के साथ।2 Progressive disclosure Skills skills को हाथ में रखना सस्ता क्यों है? discovery → activation → execution तभी load करता है जो ज़रूरी है, जब ज़रूरी है। 3 एक SKILL.md लिखना Skills एक skill file में असल में क्या होता है? Metadata, trigger description, operational instructions। 4 Skill packaging conventions Skills skills tools के बीच कैसे travel करती हैं? वही folder Claude Code, OpenCode, और किसी भी compliant client में काम करता है। 5 Composing skills Skills छोटी skills को filesystem handoff से chain करना बनाम एक बड़ी skill लिखना, कब क्या। 6 Managed Postgres क्यों System of record कौन सा store "system of record" कहलाने लायक है? वह जिसमें persistence, branching, governance, और एक agent को चाहिए vector primitives हों। 7 Worker का schema System of record एक agent को असल में कौन सी tables चाहिए? Conversations, documents, embeddings, audit log, capability invocations, साथ ही turns के लिए SDK Session। 8 pgvector basics System of record Postgres में semantic search कैसे काम करता है? Embedding column, distance operators, index types। 9 The embedding pipeline System of record text एक queryable vector कैसे बनता है? Chunking, embedding model, कब re-embed करना है। 10 Audit trail as discipline System of record एक Worker के लिए "reads and writes" का क्या मतलब है? एक Worker जो भी action लेता है वह एक trace छोड़ता है जिसे company replay कर सकती है। 11 MCP क्या है और क्या नहीं MCP tools, resources, और prompts के लिए एक protocol: न framework, न service। 12 The Neon MCP server MCP agent का अपने database से interface: यह क्या expose करता है, यह कैसे authenticate होता है। 13 MCP को Agents SDK से जोड़ना MCP SDK का MCP integration: एक server कैसे register करें, model क्या देखता है, trust boundary कहाँ रहती है। 14 Custom MCP servers MCP अपना server कब लिखें बनाम सिर्फ़ @function_tool कब इस्तेमाल करें। Decision tree।15 MCP under load MCP Transport choices, connection pooling, कब queue करना है।
एक बार आपके पास यह mapping हो, तो बाकी ज़्यादातर mechanics है। production में एक failure इनमें से एक तक पहुँचती है: एक Skill जो कभी discover नहीं हुई (description बहुत vague थी), एक system of record जिस पर दो Workers असहमत हैं (schema race), या एक MCP wire जो events drop करता है (workload के लिए गलत transport)। diagnostic आपको बताता है कि कौन सा।
यह course किसके लिए है
Intermediate। आपके पास होना चाहिए:
- आदर्श रूप से Build AI Agents कर चुके हों, हालाँकि अगर आपने इसे छोड़ दिया तो आपका agent base पर अपनी end state scaffold कर सकता है।
- Agentic Coding Crash Course से Plan-mode और rules-file की आदतें।
- एक PRIMM-AI+ cycle का अनुभव।
यह एक Python-first sequel है: आप Python या SQL हाथ से type नहीं करेंगे, आपका agent code लिखता है जबकि आप steer करते हैं, और Parts 2 और 3 घने होते हैं (Pydantic models, asyncpg pools, एक छोटा custom MCP server), तो वहाँ ज़्यादा back-and-forth की उम्मीद रखें। एक database जानकारी को tables में रखता है। एक spreadsheet की कल्पना करें: हर row एक चीज़ है (एक customer, एक support ticket) और हर column उसके बारे में एक detail है (एक name, एक date, एक status)। बस यही पूरा mental model आपको यहाँ चाहिए। आप database code खुद कभी नहीं लिखते; आपका agent लिखता है, और ये दो शब्द बस इतना मदद करते हैं कि आप पढ़ सकें कि यह क्या बनाता है। पाँच शब्द जिन्हें यह course ऐसे इस्तेमाल करता है मानो आप जानते हों:Databases में नए हैं? 60-second version
मई 2026 तक current, openai-agents 0.17.x, mcp SDK, Neon के MCP docs, और pgvector 0.8+ के against verified। जब आप build कर लें तो अपने versions pin करें; अगर docs और यह page कभी असहमत हों, तो Cloudflare Sandbox tutorial और Neon docs जीतते हैं।
आप direct करते हैं, agent build करता है, और चूँकि base एक AGENTS.md के साथ आता है जिसे यह खुलते ही पढ़ता है, आपके prompts छोटे रह सकते हैं: बस यह कहें कि आगे क्या build करना है।
The fifteen-minute quick win: succeed once, then study why it worked
इससे पहले कि आप वे 15 concepts पढ़ें जो समझाते हैं कि यह architecture क्यों काम करता है, इसका सबसे छोटा version बनाएँ जो असल में काम करता है। अंत तक आपके पास होगा:
- एक fresh Neon project जिसमें दो tables हों,
notesऔरaudit_log, जिन्हें आपने MCP पर बनाया और console में देखा, - एक minimal AI Worker जिसने अपने ही
save_notetool के ज़रिए एक transaction में दोनों में लिखा, - और "क्या एक system of record ने मेरे लिए असल में कुछ किया?" का एक worked जवाब: आपका note और इसकी audit row, एक ही id साझा करती हुई।
यह prompts की एक screen है: आपका coding agent Neon MCP पर store बनाता है, फिर एक छोटा Worker scaffold करता है जो इसमें लिखता है, और आप Worker को याद रखते हुए देखते हैं। पूरा Worker (आठ decisions, एक five-table schema) Part 4 में आता है। अगर आपके पास सिर्फ़ एक बैठक है, तो यह करें, फिर concepts के लिए वापस आएँ।
इसमें दो planes चलते हैं, और इन्हें अलग रखना ही पूरा mental model है। आपका coding agent (Claude Code या OpenCode) database को build और inspect करने के लिए Neon MCP इस्तेमाल करता है। आपका बनाया Worker runtime पर इसमें लिखने के लिए अपना ही tool इस्तेमाल करता है। Worker कभी Neon MCP को छूता नहीं, और Neon के अपने docs इसकी वजह साफ़ बताते हैं: MCP server "development and testing only" के लिए है, कभी किसी चलते हुए app में wired नहीं किया जाता।

Base लें और इसे खोलें
base download करें और folder को अपने general agent में खोलें। agent खुद setup करता है, नीचे दिए prompts से। आप इसे एक बार set up करते हैं: digital-fte/ पूरे course के लिए आपका folder है, Quick Win और Part 4 दोनों के लिए। हर build अपना fresh Neon project (एक database) provision करता है, लेकिन आप कभी दोबारा download या unzip नहीं करते।
cd digital-fte
claude
cd digital-fte
opencode
यह base एक capable general agent मानकर चलता है (Claude Code, या Claude Sonnet या Opus, GPT-5, या मिलते-जुलते चलाने वाला OpenCode)। एक छोटा model build prompt पर drift करेगा; अगर इसका पहला plan specific के बजाय vague दिखे, तो आगे बढ़ने से पहले किसी मज़बूत model पर switch करें।
Base prep करें (~3 min)
base rules और wiring के साथ आता है; skills और आपकी key आगे आती हैं। अपने agent से खुद को set up करवाएँ। यह paste करें:
Read AGENTS.md, then get this base ready: install the skills it lists for whichever agent you are, copy
.env.exampleto.envfor me, and tell me exactly what you need from me to bring the Neon and Context7 MCP servers online.
इस पर नज़र रखें: agent skill-creator, mcp-builder, और neon-postgres install करे (आप install run होते देखते हैं), .env बनाए, फिर आपसे दो चीज़ें माँगे: .env में paste करने के लिए आपकी OPENAI_API_KEY, और Neon को OAuth पर authorize करने के लिए एक browser click। Neon free है; अगर आपके पास अभी account नहीं है, तो लगभग एक मिनट में neon.com पर sign up करें, या authorization screen पर ही एक बना लें। जब install और wiring हो जाए, agent आपसे इसे restart करने को कहता है (exit करके फिर launch) ताकि नई skills और MCP servers load हों; इनमें से कोई भी session के बीच में load नहीं होता।
तब हो गया जब: skills install हो गईं, .env में आपकी key है, Neon authorized है, और आपने agent को restart कर दिया ताकि नई skills और MCP servers live हों।
The gate: पुष्टि करें कि agent database तक पहुँच सकता है (~1 min)
इस course की एक सचमुच नई चीज़ है agent का MCP पर एक असली system of record तक पहुँचना। तो कुछ भी build करने से पहले, पुष्टि करें कि वह boundary live है। यह paste करें:
List the Neon tools you can see.
इस पर नज़र रखें: Neon tool names की एक असली list (एक project बनाना, SQL चलाना, tables describe करना, और इसी तरह की)। वह list database पर agent का हाथ है, और नीचे की हर चीज़ इस पर सवार है।
Gate खुला: reply असली Neon tool names बताता है। अगर नहीं बताता: आपने लगभग ज़रूर restart छोड़ दिया है, तो tools अभी load नहीं हुए। Exit करें, फिर launch करें, और दोबारा पूछें। फिर भी कुछ नहीं? Neon OAuth पूरा नहीं हुआ: इसे दोबारा करें और retry करें।
Store बनाएँ, और इसकी connection string लें (~3 min)
अपने coding agent से Neon MCP पर database बनवाएँ, फिर अपने Worker को वह एक चीज़ सौंपें जो इसे बाद में पहुँचने के लिए चाहिए: एक connection string।
यह अपने general agent को paste करें। Plan first; execute on approval.
On a fresh Neon project, create two tables:
notes(the note text) andaudit_log(a record of what happened). Then callget_connection_stringand write that URL into my.envasDATABASE_URL. Use the Neon tools for all of it; don't write SQL for me to run.
इस पर नज़र रखें: agent project और दोनों tables बनाने के लिए Neon MCP tools को call करे (आप वे tool calls देखते हैं, आपके type किए SQL नहीं), फिर .env में DATABASE_URL लिखे। वह string handoff है: Neon MCP ने store provision किया, और आपका Worker string इस्तेमाल करेगा, MCP server नहीं।
तब हो गया जब: एक fresh Neon project मौजूद हो जिसमें एक notes table और एक audit_log table हो, और .env में एक DATABASE_URL हो।
इसे अपनी आँखों से देखें (~1 min)
कोई code चलने से पहले, Neon console में खाली tables देखें। यह "यह सचमुच वहाँ है" वाला पल है, और आपको सिर्फ़ एक browser tab की लागत पड़ती है।
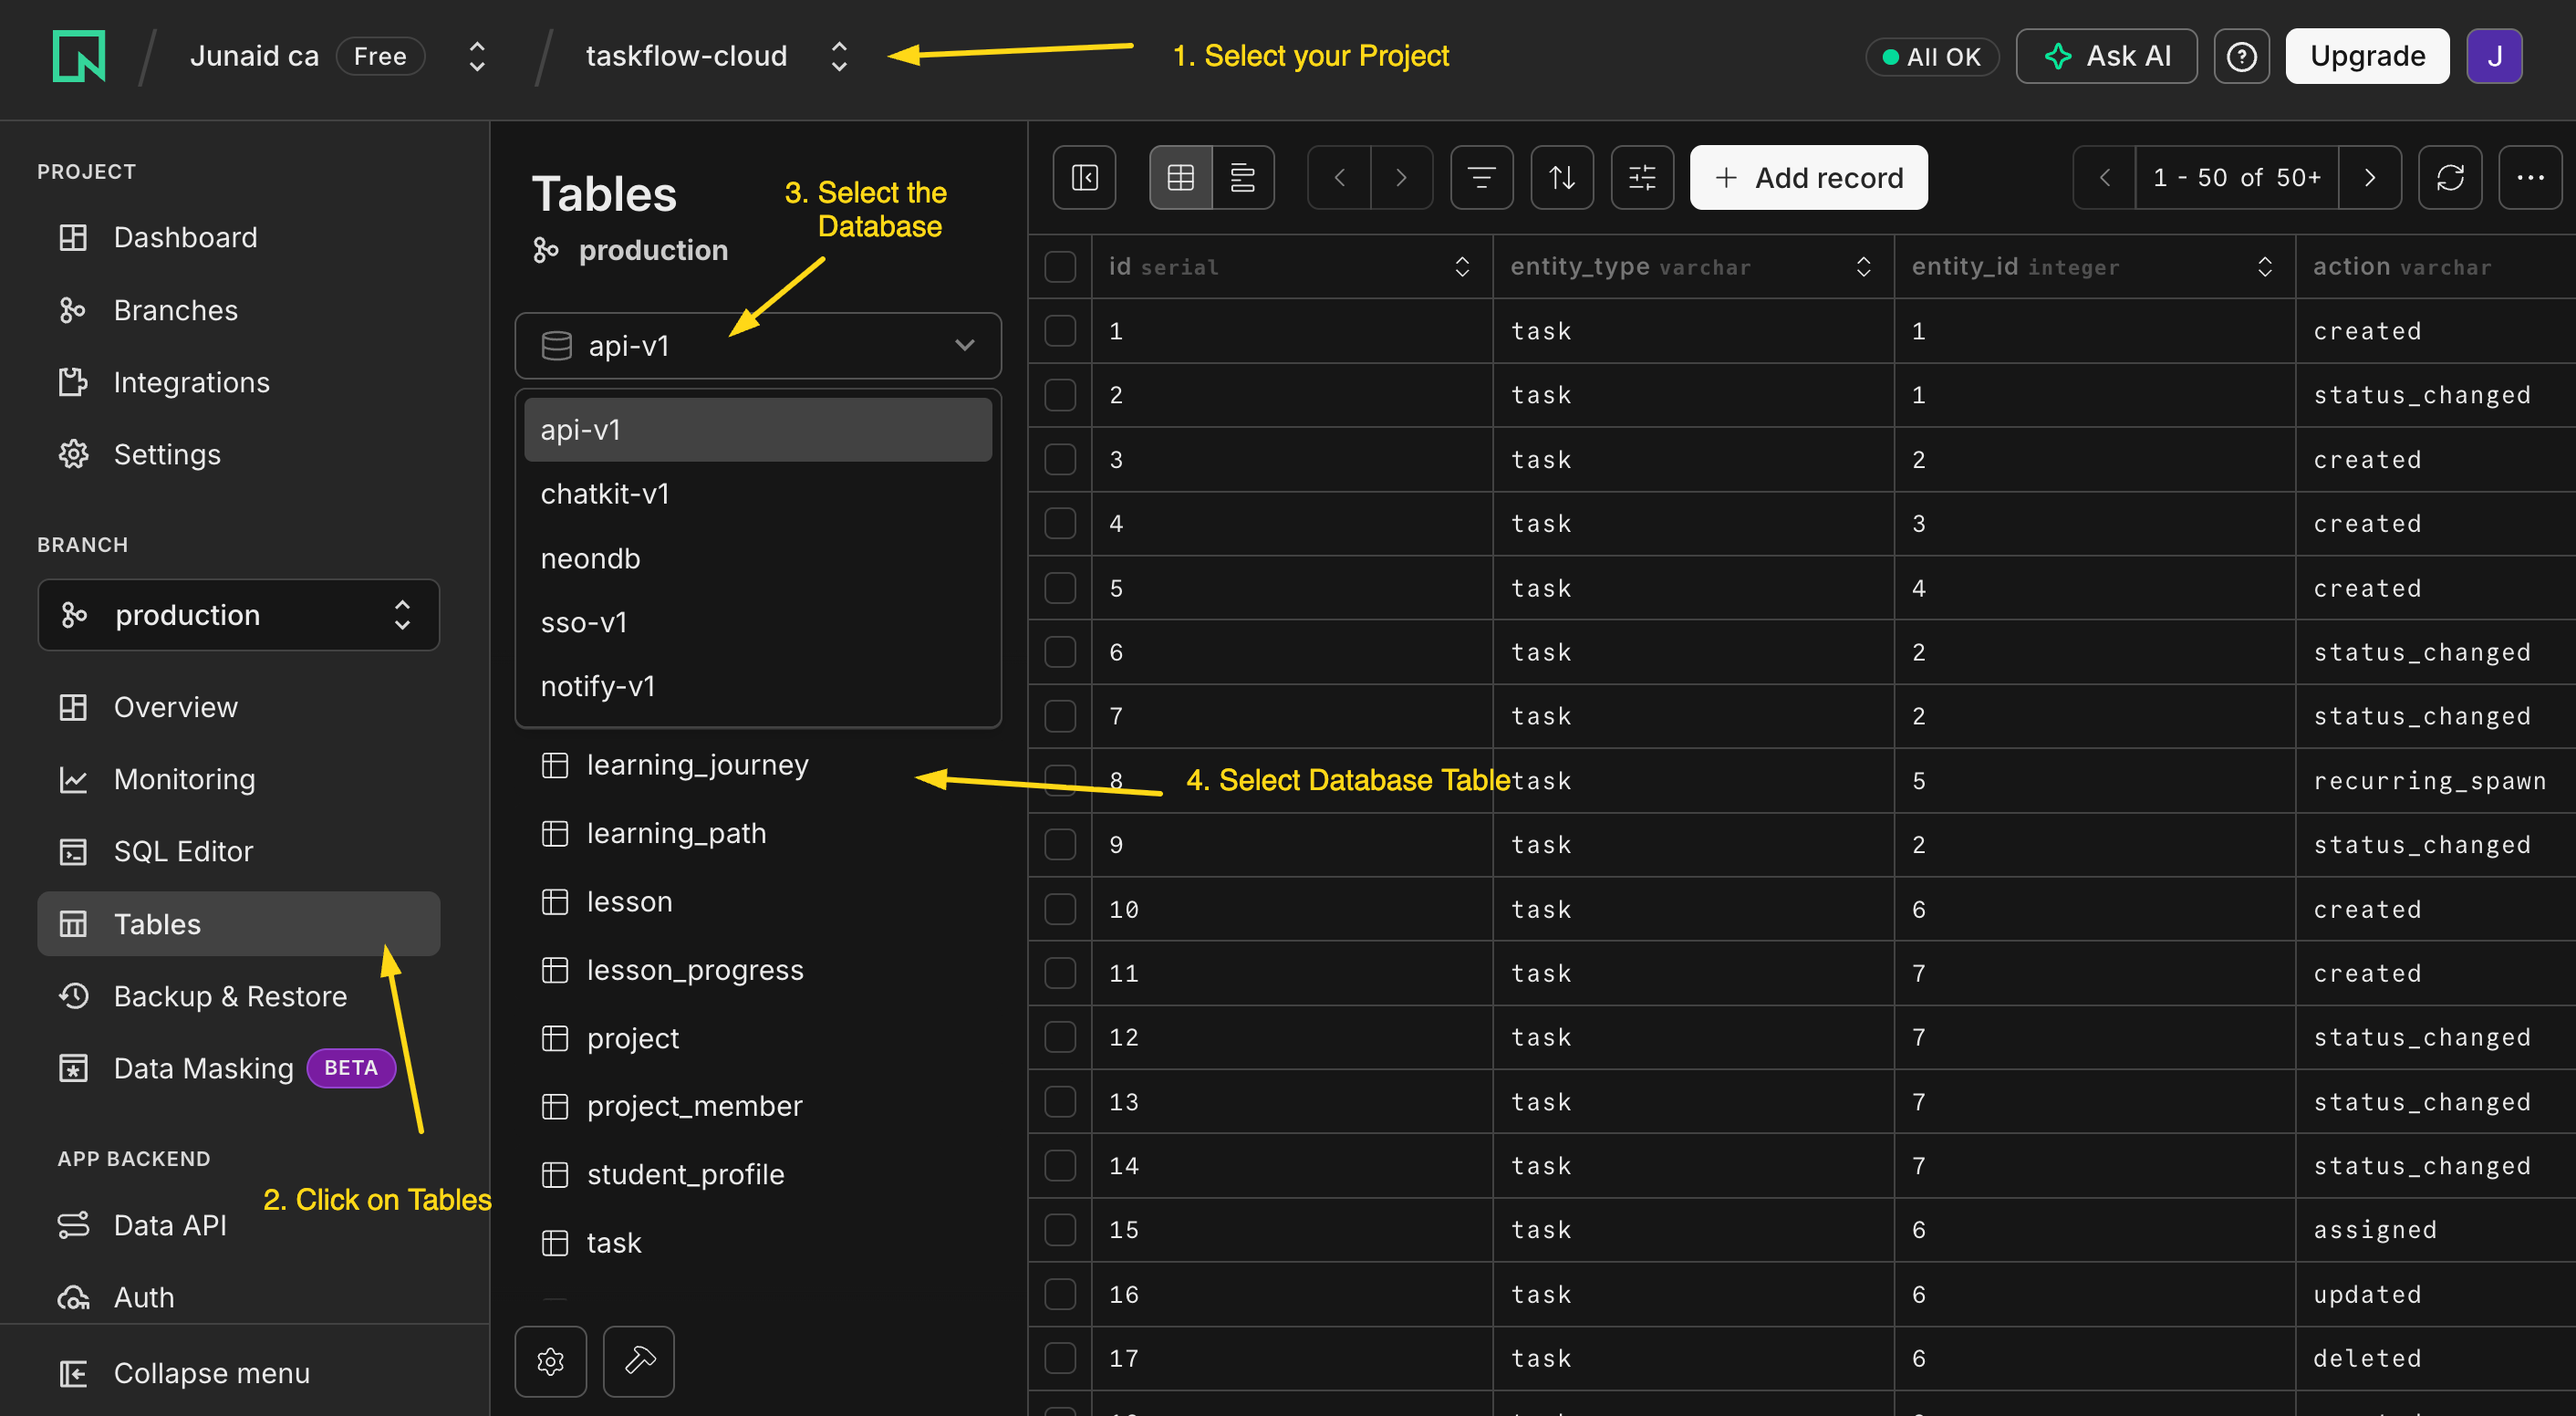
console.neon.tech खोलें, वह project चुनें जो agent ने अभी बनाया, और Tables खोलें। वहाँ notes और audit_log बैठे हैं, अभी खाली। एक table बस एक spreadsheet है: हर row एक चीज़, हर column एक detail। आप अंत में इस view को refresh करेंगे और एक row को दिखते देखेंगे।
Worker scaffold करें और इसे एक बार चलाएँ (~2 min)
अब Worker खुद बनाएँ: एक minimal SandboxAgent, वही runtime जो बाकी course इस्तेमाल करता है, अभी कोई tools नहीं। इसे पहले खाली चलाना साबित करता है कि runtime काम करता है और आपकी key ठीक है, इससे पहले कि आप कुछ और जोड़ें जो fail हो सके।
Using
uv, scaffold a minimal OpenAI Agents SDK project in this folder: aSandboxAgenton a gpt-5-class model (e.g.gpt-5-mini) with no tools yet, run from the terminal on a local sandbox, readingOPENAI_API_KEYfrom.env. Run it once with "hello" so I can see it answer.
इस पर नज़र रखें: agent project को uv से set up करे, एक छोटा SandboxAgent plus Runner script लिखे (UnixLocalSandboxClient पर, zero infrastructure), और इसे चलाए। एक reply वापस आता है।
यह पहली बार है जब आपकी key इस्तेमाल होती है, तो यह पहली जगह है जहाँ एक गलत key सामने आती है। अगर run 401 देता है, तो key गलत है या आपका provider OpenAI नहीं है: यह paste करें "the run failed with a 401; read the error and propose one fix I can approve."
तब हो गया जब: खाली Worker चलता है और जवाब देता है।
Worker को इसका tool दें, और इसे याद रखते देखें (~3 min)
अब वह एक capability जोड़ें: एक tool जो एक note और इसकी audit row, एक transaction में, आपके बनाए database में लिखता है।
Add a
save_notetool to the Worker, written as a@function_tool, that inserts a row intonotesand a matching row intoaudit_login a single transaction, using theDATABASE_URLin.env. Then run the Worker and send it: "Remember this: the production deploy needs a new env var before Friday." Show me what happened.
इस पर नज़र रखें: model आपके sentence को खुद save_note से match करे (tool की description इसका एकमात्र routing signal है), और tool DATABASE_URL से एक connection खोले और दोनों rows एक transaction में लिखे। Worker बताता है कि note save हो गया। ध्यान दें इसने क्या नहीं किया: इसने कभी Neon MCP की ओर हाथ नहीं बढ़ाया। admin wire ने store बनाया; Worker अपना ही narrow tool इस्तेमाल करता है।
तब हो गया जब: Worker पुष्टि करता है कि note save हुआ और आपको वह save_note call दिखाता है जिसने यह किया। एक sentence अंदर, एक tool call, दो rows लिखी गईं।
The win: इसे वापस पढ़ें (~2 min)
थोड़ी देर पहले वाले Neon console Tables view को refresh करें। आपका note अब notes में एक row है, और audit_log में एक matching row note_saved record करती है, उसी id से इससे बँधी हुई। (Terminal में रहना पसंद करते हैं? अपने coding agent से पूछें: "using the Neon tools, show me the new notes row and its matching audit_log row side by side.")
यही पूरी architecture miniature में है: एक system of record जो truth रखता है, एक Worker जिसने अपने ही tool के ज़रिए इसमें लिखा, और एक audit trail जिसे आप replay कर सकते हैं।
आपने क्या बनाया, और यह कहाँ बढ़ता है
आपने एक plain @function_tool इसलिए इस्तेमाल किया क्योंकि एक Worker एक store में लिखता है, जो सही default है, कोई shortcut नहीं। आप एक छोटे MCP server की ओर तब हाथ बढ़ाते हैं जब इनमें से एक चीज़ सामने आए: एक second consumer जिसे वही save_note चाहिए (एक और Worker, आपका coding agent, खुद Claude), एक tighter scope जिसे आप enforce करना चाहते हों, या process isolation। वह decision, एक function tool बनाम आपका अपना server, Concept 14 है, और Part 4 server बनाता है।
Part 4 इसी shape को कई Skills, five-table schema, कुछ tools, और एक embedding pipeline तक scale करता है। shape नहीं बदलता: एक system of record, उसी transaction में audit, और admin wire और Worker के अपने access के बीच एक साफ़ रेखा। अगर यह Quick Win काम कर गया, तो बाकी course बस यह समझा रहा है कि हर हिस्से का shape ऐसा क्यों है।
अगर कुछ काम नहीं किया, तो वह एक recovery move paste करें जो सब कुछ cover करता है: "Something didn't work. Read the error, tell me in plain language what you see, and propose one fix I can approve." फिर यहाँ वापस आएँ।
Part 1: Skills, portable folders के रूप में capability
आपने Claude Code के अंदर Skills पहले ही इस्तेमाल की हैं। Part 1 वही on-demand, professional workflows उस agent को देता है जिसे आप बनाते हैं। एक Skill एक reusable capability है जिसे आप एक agent को सौंपते हैं: एक folder जो एक workflow को package करता है (instructions, साथ में कोई भी scripts या references) जिसे agent तभी load करता है जब किसी task को इसकी ज़रूरत हो, agents के बीच portable, एक agent के code में baked नहीं। ये पाँच concepts आपको ऐसी Skills लिखना सिखाते हैं जो तब fire हों जब उन्हें होना चाहिए, और Part 1 एक को आपके Worker के अपने SDK में, उसी digital-fte folder में, चलाकर खत्म होता है।
Concept 1: एक Agent Skill क्या है
एक Agent Skill एक folder है जिसमें एक SKILL.md file होती है (साथ में optional scripts/, references/, assets/)। SKILL.md entry point है। यह Anthropic का एक open standard है जिसे कोई भी agent पढ़ सकता है: आज Claude Code और OpenCode, और वह OpenAI Agents SDK Worker जिसे आप बना रहे हैं। सबसे छोटी skill एक file है:
---
name: hello-skill
description: Greets the user by name and time of day. Use when the user says hello or asks to be greeted.
---

# Hello skill

1. Check the local time of day.
2. Greet the user warmly, by name if known, in under 25 words.
कोई code नहीं, कोई deploy नहीं, कोई SDK call नहीं। चूँकि यह disk पर एक file है, एक skill किसी भी text की तरह version होती है, travel करती है, और review होती है, किसी Python object या API endpoint की तरह नहीं।
PRIMM, Predict. agent startup पर, किसी message के आने से पहले, क्या load करता है? (a) पूरी
SKILL.md; (b) सिर्फ़nameऔरdescription; (c) invoke होने तक कुछ नहीं। Confidence 1–5.
जवाब है (b): startup पर agent सिर्फ़ हर skill का metadata पढ़ता है; body on demand load होती है। यह progressive disclosure है, अगला concept।
Concept 2: Progressive disclosure, तीन-stage loading model
एक साथ पचास skills load करना model को उन instructions में दबा देगा जिनकी इसे ज़रूरत नहीं। तो एक skill तीन stages में load होती है, हर एक तभी fire होता है जब पिछला कहता है कि यह relevant है।
Stage 1, Discovery. startup पर agent हर skill का name और description load करता है, लगभग 100 tokens हर एक। पचास skills लगभग 5,000 tokens प्रति turn की लागत हैं: यह जानने की कीमत कि library में क्या है।
Stage 2, Activation. जब model किसी task को एक description से match करता है, यह उस पूरी SKILL.md body को load करता है (इसे ~5,000 tokens के नीचे रखें; ज़्यादातर 500–2,000 पर बैठती हैं)। सिर्फ़ उन्हीं turns पर paid जो skill इस्तेमाल करते हैं।
Stage 3, Execution. वे files जिन्हें body reference करती है (एक scripts/ script, एक references/ doc) तभी load होती हैं जब agent उनकी ओर हाथ बढ़ाता है।

PRIMM, Predict. एक Worker के पास 30 skills हैं: ~100-token descriptions हर एक, ~1,500-token bodies, दो reference files (~4,000 tokens कुल) हर एक। एक turn पर जो एक skill activate करता है और इसकी एक reference पढ़ता है, मोटा context cost है: (a) ~3,000 tokens; (b) ~6,500 tokens; (c) ~135,000 tokens। Confidence 1–5.
जवाब है (b), ~6,500 tokens: discovery के लिए 30 × 100 (3,000), साथ में एक 1,500-token body, साथ में एक ~2,000-token reference। Discovery library size के साथ scale होता है; activation और execution प्रति turn constant रहते हैं। progressive disclosure के बिना आप हर turn पर सभी 30 bodies और उनकी references pay करते, सिर्फ़ यह जानने के लिए कि agent क्या कर सकता है ~165,000 tokens। कोई इसे नहीं चलाता।
दो चीज़ें इससे निकलती हैं, और वे अगले तीन concepts को चलाती हैं: description वही है जो Stage 1 में fire होती है, तो यह सब कुछ तय करती है; और लंबी bodies हर matching turn पर आपको लागत पड़ती हैं, तो SKILL.md को tight रखें और depth को references/ में डालें।
Concept 3: description ही trigger है, और वह एक हिस्सा जो आपका अपना है
एक SKILL.md के दो हिस्से होते हैं: YAML frontmatter (वह contract जो model पढ़ता है) और markdown body (वे instructions जिनका यह पालन करता है)। सिर्फ़ दो frontmatter fields required हैं:
| Field | Required | यह क्या है |
|---|---|---|
name | Yes | skill का identifier (lowercase, hyphens, folder name से match करता है)। |
description | Yes | trigger surface: वह जो agent discovery पर पढ़ता है यह तय करने के लिए कि इस skill को fire करना है या नहीं। |
(license, compatibility, metadata, allowed-tools optional हैं और कम ही चाहिए; skill-creator उन्हें भर देता है।)
description ही पूरा खेल है, और यही वह हिस्सा है जिसे scaffold गलत करता है। यह एक circular description लिखता है: "Summarizes a ticket into five sections. Use when the user wants to summarize a ticket." यह "summarize this ticket" पर fire होता है लेकिन यह चूक जाता है कि support असल में कैसे बात करता है: "write a handoff note for #4471," "TL;DR this thread," "give my lead the rundown before I escalate." generic version असली phrasings में से लगभग 8 में 6 पकड़ता है; एक हाथ से लिखा हुआ सभी 8 पकड़ता है।
एक description जो भरोसेमंद ढंग से fire होती है तीन चीज़ें करती है, साथ में एक guardrail:
- What यह क्या produce करती है (असली output का नाम लें: पाँच sections, एक ticket पर)।
- When इसकी ओर कब हाथ बढ़ाना है (असली situations: handoff, escalation, एक manager को briefing, किसी और के thread को उठाना)।
- Keywords जो users असल में type करते हैं, उन्हें भी शामिल करके जो कभी obvious word नहीं कहतीं ("handoff note," "TL;DR this thread," "where does this stand")।
- A do-NOT line उन look-alikes के लिए जिन्हें चुप रहना चाहिए (एक customer reply draft करना, एक batch triage करना, ticket volume पर reporting करना)।
एक self-check जो circular descriptions को मार देता है: अपनी description से obvious keyword ("summarize") हटाएँ। क्या यह अब भी कहती है कि कब fire करना है? अगर नहीं, तो यह बहुत narrow है।
body, convention के हिसाब से। कोई required format नहीं, लेकिन अच्छी skills imperative होती हैं ("Read the full thread. List what was tried."), एक या दो असली examples रखती हैं (steering के लिए लगभग 5× एक description के बराबर), और दो या तीन edge cases का नाम लेती हैं जो असल में टूट चुके हों।
PRIMM, Predict. दो skills एक ही
namesummarize-documentसाझा करती हैं: एक~/.claude/skills/में (user-level), एक.claude/skills/में (project-level)। एक task दोनों से match करता है। क्या होता है? (a) random pick; (b) project-level जीतता है; (c) model चुनता है। Confidence 1–5.
(b), project-level जीतता है Claude Code और OpenCode दोनों में: ज़्यादा specific context ज़्यादा general को override करता है, उसी तरह जैसे एक project rules file एक global को override करती है।
Concept 4: Packaging, skills कहाँ रहती हैं और कैसे travel करती हैं
एक skill बस disk पर एक folder है, तो आप इसे कहाँ रखते हैं यह तय करता है कि कौन से agents इसे ढूँढते हैं। एक rule इस पूरे course को cover करता है: अपनी skills OpenCode पहले अपना folder check करता है, फिर .claude/skills/ में रखें। Claude Code वह folder पढ़ता है, OpenCode इस पर fall back करता है, और आपके Worker का SDK सीधे इस पर point करता है (LocalDir(src=".claude/skills"), ऊपर के hands-on से)। skill एक बार लिखें और तीनों वही folder load करते हैं, byte-for-byte।पूरा path map (प्रति tool, project बनाम user-level)
Tool Project-level User-level (global) Claude Code .claude/skills/<name>/SKILL.md~/.claude/skills/<name>/SKILL.mdOpenCode .opencode/skills/<name>/SKILL.md~/.config/opencode/skills/<name>/SKILL.mdOpenCode (fallback) .claude/skills/<name>/SKILL.md~/.claude/skills/<name>/SKILL.md.claude/skills/ पर fall back करता है; Claude Code सिर्फ़ .claude/ पढ़ता है। यही वजह है कि .claude/skills/ वह एक location है जो हर जगह काम करता है।
एक skill के folder में एक required file और तीन optional folders होते हैं, हर एक का एक काम:
my-skill/
├── SKILL.md      # required: frontmatter + body, the entry point
├── scripts/      # optional: code the agent runs (by relative path)
├── references/   # optional: deep docs, loaded on demand, one topic per file
└── assets/       # optional: templates, schemas, lookup tables
SKILL.md के अंदर, उन files को relative path से point करें (references/policies/us.md, scripts/extract.py); वे skill के अपने folder से resolve होती हैं, इससे नहीं कि agent कहाँ चल रहा है। references/ को shallow रखें, एक topic प्रति file।
Concept 5: Composing skills, एक बड़ी बनाम कई छोटी
एक "weekly customer-health report" एक skill हो सकती है जो research, draft, format, और review करती है, या चार skills जो filesystem के ज़रिए handoff करती हैं। दोनों काम करते हैं, उल्टे trade-offs के साथ।
- One big skill: discover करना आसान, एक activation। लेकिन हर step एक context में चलता है, कुछ भी अकेले reusable नहीं है, और बीच में एक failure model को context में stale work के साथ recover करता छोड़ देती है।
- Many small skills: हर एक अकेले test, replace, और reuse हो सकती है; एक failure localized रहती है; हर step fresh activate होता है, तो कोई leftover context नहीं जमता। लागत है ज़्यादा discovery entries और इन्हें chain करने के लिए कुछ।
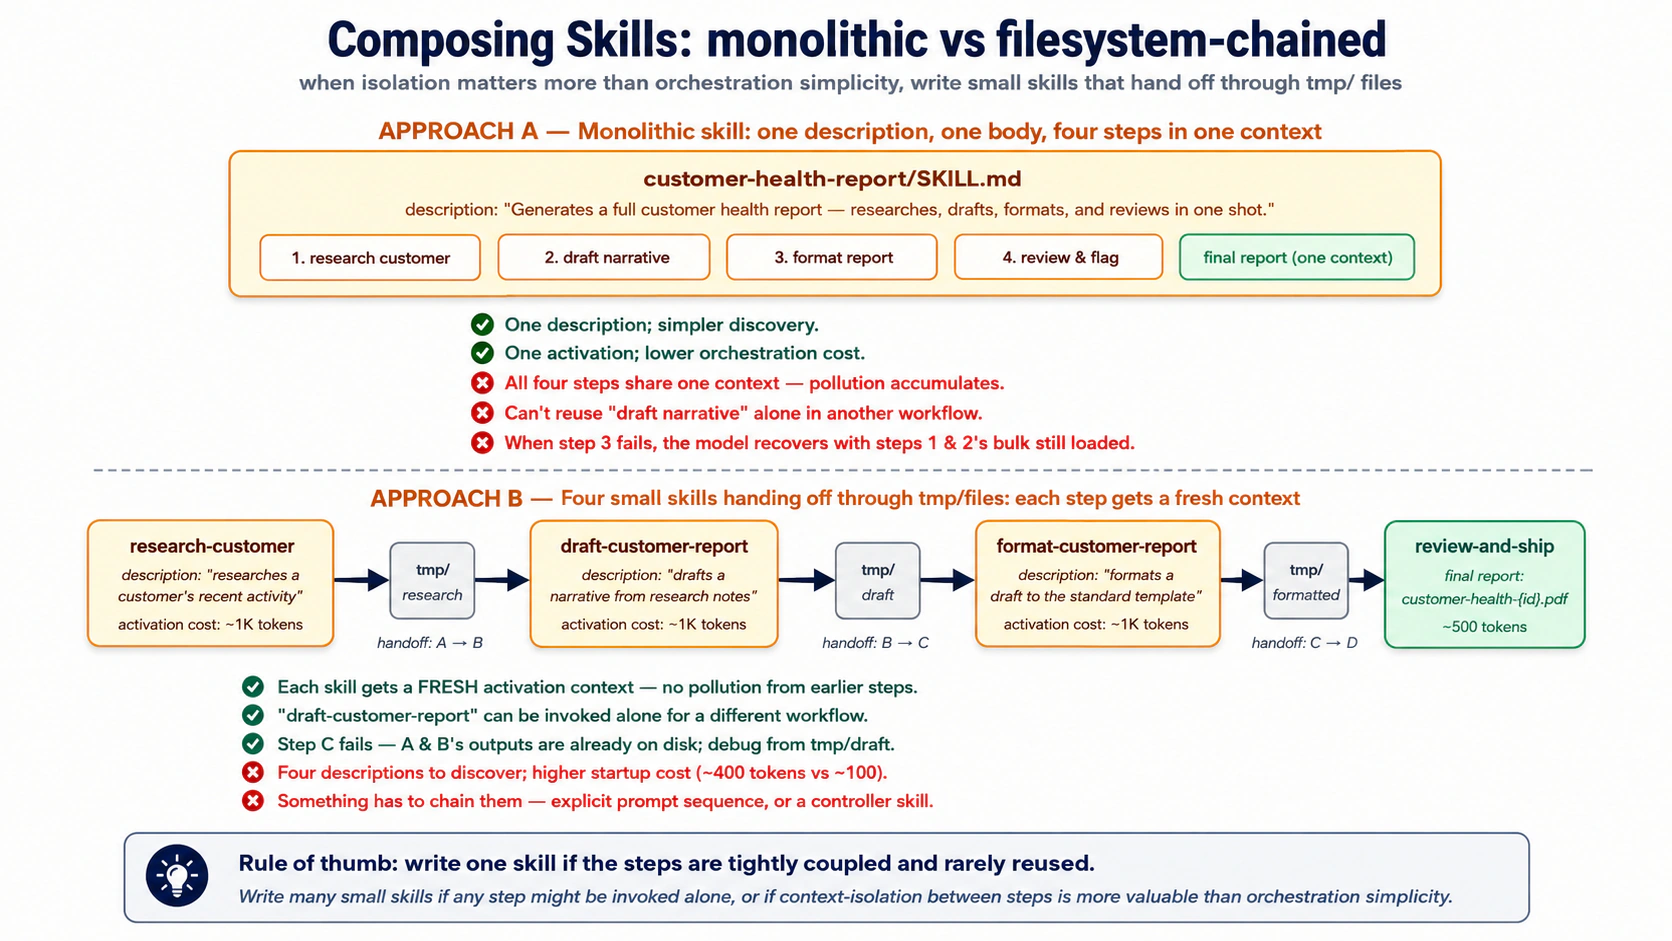
एक skill लिखें जब steps tightly coupled हों और कभी अकेले reuse न हों। कई लिखें जब एक step अकेले call हो सकता हो, या जब हर step के context को साफ़ रखना wiring को simple रखने से ज़्यादा मायने रखता हो। Separation आमतौर पर दो या तीन steps के बाद जीतता है।
इन्हें filesystem के ज़रिए chain करें, conversation के ज़रिए नहीं। Skill A tmp/research-{id}.md लिखती है, Skill B इसे पढ़ती है और tmp/draft-{id}.md लिखती है, और इसी तरह। conversation सिर्फ़ final result देखती है; बीच के steps agent, आप, और audit trail के लिए disk पर रहते हैं। वही isolation जो पिछले course ने subagents के लिए इस्तेमाल किया, अब skill size पर।
और यह Part 2 का पुल है: कुछ handoffs एक temp file में नहीं belong करते, वे system of record में belong करते हैं। एक skill जो tmp/ में लिखती है एक draft है; एक skill जो system of record में लिखती है एक action है। वही distinction Part 2 बनाता है।
Try with AI
Compare two designs for a customer-refund workflow:
A: one "issue-refund" skill (eligibility, policy, amount, gateway, ticket, notify).
B: five small skills chained via tmp/ handoffs.

For each, name one situation where it's the right call and one failure mode
it's vulnerable to. Then say which you'd ship, and why.
एक skill को दोनों runtimes में fire करें (~10 min, hands-on)
आपने काफ़ी पढ़ लिया; अब एक skill को उस agent के अंदर fire होते देखें जिसे आप बनाते हैं। Quick Win से वही digital-fte folder खोलें, जहाँ आपका SandboxAgent पहले से चलता है। एक throwaway skill पर इसे एक बार चलाएँ ताकि mechanics परिचित हों (यह वही move है जो Decision 4 असल में करता है), और देखें कि वही .claude/skills/ files जो आप पहले से Claude Code में इस्तेमाल करते हैं आपके Worker के अपने SDK में उसी तरह काम करती हैं।
1. इसे scaffold करें। आपको एक general agent और Node installed चाहिए (npx के लिए)। यह paste करें:
Use skill-creator to scaffold a summarize-ticket skill. It turns one support ticket into a
short five-section handoff. Make it fire on how support actually asks (handoff note, TL;DR
this thread, "what's the status and next step"), including phrasings that never say
"summarize", and not on look-alikes (drafting a reply, triaging a batch). Then check it:
delete "summarize" from the description; if it no longer says when to fire, sharpen it.
body अच्छी वापस आती है; description पढ़ें और इसे तब तक sharpen करें जब तक यह delete-the-keyword check पास न कर ले। वह review ही skill है, और वह हिस्सा जो कोई scaffold आपके लिए नहीं करता।
2. इसे एक client में fire करें (optional, zero wiring)। अगर आपके पास Claude Code या OpenCode installed और signed in है, folder वहाँ खोलें और इससे एक ticket handle करने को कहें बिना "summarize" कहे (जैसे "write a handoff note for case #4471 before I escalate")। client .claude/skills/ discover करता है, आपकी description से match करता है, और summarize-ticket activate करता है। एक caveat: अगर एक request इतनी simple है कि model इसे सीधे जवाब दे देता है, तो कोई skill fire नहीं होती, और यह model का फ़ैसला है, description bug नहीं; एक असली handoff से test करें, एक एक-line सवाल से नहीं। SDK-only readers step 3 पर skip कर सकते हैं।
3. इसे OpenAI Agents SDK में fire करें। अब skill को अपने Worker के अपने runtime में wire करें, और इसे उसी तरह करें जैसे आप Part 4 में सब कुछ करेंगे: आप prompt करते हैं, agent plan करता है, आप approve करते हैं, यह build और run करता है। आप अब भी digital-fte folder में हैं, तो uv project और OPENAI_API_KEY carry over होते हैं। यह paste करें:
Wire the
summarize-ticketskill into a minimalSandboxAgentI can run from this folder: aSkillscapability pointed at.claude/skills, the default capabilities kept, a gpt-5-class model, on a local sandbox. Make sureopenai-agentsis installed. Plan first.
यह Quick Win जैसा ही SandboxAgent shape है, जिसमें save_note tool की जगह एक Skills capability है (एक gpt-5-class model मायने रखता है: default capabilities में एक filesystem tool शामिल है जिसे छोटे models 400 के साथ reject करते हैं)। जब plan सही दिखे, approve करें और इसे एक साथ live-test करें:
Implement it, then run it with "write a handoff note for case #4471: no refund, two weeks" and show me the trace so I can see the skill fire.
पुष्टि करें कि यह fire हुई, trace में। SDK हर run को उसी OpenAI dashboard पर trace करता है जो आपने पिछले course में इस्तेमाल किया: platform.openai.com/traces खोलें और आप run में summarize-ticket के लिए load_skill call देखेंगे, फिर five-section reply। (कोई dashboard नहीं? print loop वही load आपके terminal में दिखाता है।) .claude/skills source है; .agents/ वह जगह है जहाँ एक loaded skill run time पर staged होती है। वही file, दो runtimes: यही portable capability है, और Decision 8 इसे पूरे Worker में wire करता है।
ये concepts एक मज़बूत instruction-follower मानकर चलते हैं (Claude Sonnet/Opus, GPT-5-class)। एक छोटे model पर (deepseek-chat, Haiku-class, ज़्यादातर local models), तीन चीज़ें drift करती हैं:
- Multi-skill sequencing. "ALWAYS run X before Y" मज़बूत models पर land करता है, कमज़ोरों पर फिसलता है। Fix: order को system prompt में एक छोटे GENERAL-FLOW preamble में डालें; SKILL bodies को declarative रखें।
- Format drift. एक कमज़ोर model emojis, tables जोड़ता है, या आपके inputs को paraphrase करता है। explicit रहें कि क्या नहीं करना है, सिर्फ़ क्या करना है नहीं।
- Trigger blindness. एक description जो "summarize ticket TKT-1042" पर fire होती है "what's the story on #1042" चूक सकती है। Concept 3 की discipline एक कमज़ोर model पर ज़्यादा मायने रखती है, कम नहीं।
Rule of thumb: मज़बूत model की मेहनत SKILL.md में budget करें, कमज़ोर model की मेहनत system prompt में। architecture टिकती है; आप बस इसके आसपास ज़्यादा scaffolding लिखते हैं।
Part 2: system of record के रूप में Neon Postgres + pgvector
Part 1 ने agent को capabilities दीं। अब इसे कहीं durable चाहिए वह रखने के लिए जो यह भूलने का जोखिम नहीं उठा सकता: customer record, policy library, past resolved cases, और जो भी इसने किया उसका एक trace।
वह store आपके Worker का system of record है, वह authoritative store जिसके against यह चलता है (opening map का CRM-या-ledger विचार, अब concrete बनाया गया)। यह pgvector extension वाला Postgres है; Concept 6 समझाता है कि एक dedicated vector database के बजाय क्यों। हम Neon इस्तेमाल करते हैं: शुरू करने के लिए free, idle रहने पर कुछ खर्च नहीं, और आपका coding agent इसे सीधे drive कर सकता है, लेकिन pgvector वाला कोई भी managed Postgres काम करता है।
उस map के चार तरह के data में से, business records (customers, orders, tickets) आपके business के लिए specific हैं, तो आप उन्हें Part 4 में बनाते हैं। यह Part जो बनाता है वह बाकी तीन हैं, वे हिस्से जो हर Worker साझा करता है, अब उन असली tables से mapped जो उन्हें रखती हैं:
- Reference library: वह knowledge जिसे Worker meaning से search करता है, policy library, knowledge-base articles, past resolved cases के summaries। यह
documentsऔरembeddingsमें रहता है (Concepts 8 और 9)। - State: live conversation। इसके turns agent SDK की Session में रहते हैं, जिसे SDK आपके लिए बनाता और लिखता है, तो आप वे tables कभी design नहीं करते (Concept 7); एक
conversationsrow उनके बगल में बैठती है, session id से linked, envelope के रूप में: कौन, कब, एक closing summary। - Trace: Worker ने क्या किया उसका record,
audit_logledger (Concept 10)। (एक optional companion table,capability_invocations, per-skill और per-tool metrics जोड़ती है।)
Concept 6: Managed Postgres क्यों, और Neon ही क्यों
thesis systems of record के बारे में product-agnostic रहती है: "the AI-Native Company's existing databases, workflows, and operational platforms (CRMs, ERPs, ticketing systems, data warehouses, ledgers) serve as the system of record." लेकिन एक agent के लिए जिसे आप scratch से बनाते हैं, आपको कुछ चुनना पड़ता है। सवाल "Postgres vs. MongoDB vs. a vector DB" नहीं है। यह "कौन सा Postgres" है।
Postgres क्यों, एक dedicated vector database नहीं। तीन कारण जो 2026 में भी टिकते हैं।
-
एक database, एक transaction, एक auth boundary. एक अलग vector DB का मतलब है sync में रखने को दो stores, दो auth systems, दो backup pipelines।
pgvectorvectors को उन records के बगल में रखता है जिनसे वे जुड़े हैं, तो एक JOIN एक JOIN रहता है, दो services के बीच एक network hop नहीं। हर बड़ा managed Postgres (AWS RDS, Cloud SQL, Azure, Supabase, Neon) इसके साथ आता है, और यह सबसे ज़्यादा-installed Postgres extensions में से है। ज़्यादातर workloads के लिए यह काफ़ी है। -
Postgres पहले से ही hard parts करता है। Transactions, indexes, foreign keys, row-level security, point-in-time recovery, query planning। एक dedicated vector DB को इन्हें scratch से invent करना पड़ता है और आमतौर पर कुछ को बदतर करता है। default boring choice के compounding फ़ायदे हैं।
-
हर layer पर Postgres के लिए MCP servers मौजूद हैं। Neon एक के साथ आता है (management के लिए)। General Postgres MCP servers मौजूद हैं (SQL execution के लिए)। आप अपना लिख सकते हैं (scoped runtime access के लिए)। Postgres के आसपास का MCP ecosystem सबसे mature है।
एक dedicated vector DB कब जीतता है। Pinecone, Weaviate, Qdrant, और Milvus जैसे tools तब worth हैं जब search-by-meaning ही product है, आपके business data के बगल में बैठी एक feature नहीं। संकेत extreme होते हैं: इतने vectors कि वे अब एक Postgres server की memory में नहीं समाते, इतना heavy search traffic कि सिर्फ़ vectors के लिए बनी एक engine चाहिए, या vectors कई अलग services द्वारा अपने आप इस्तेमाल किए जाते हों। कोई fixed number नहीं है जहाँ pgvector जवाब दे जाता है, तो एक figure पर भरोसा करने के बजाय अपना data test करें। एक tickets table और इसके बगल में embeddings वाला एक Worker उस बिंदु से कहीं दूर है, तो pgvector सही default है।
Neon ही क्यों: तीन differentiators।
-
यह zero तक scale होता है। जब database idle होता है, इसकी कोई लागत नहीं। एक Worker जो एक दिन में 50 conversations handle करता है ज़्यादातर समय idle बैठता है, तो यह एक always-on server के लिए monthly pay करने के बजाय ~$0 के पास रहता है। यह तब मायने रखता है जब आप कई Workers चलाते हैं जो हर एक सिर्फ़ bursts में busy हों।
-
यह branch होता है। सेकंडों में, Neon आपके live database की एक पूरी copy काम करने के लिए बनाता है, original को छुए बिना। agent-relevant use: agent को एक branch पर एक change try करने दें, और अगर यह गलत जाए, तो बस branch delete कर दें। एक ऐसे database पर जो branch नहीं हो सकता, एक खराब change को undo करने का मतलब है एक backup से restore करना।
-
इसका एक official MCP server है। Neon एक MCP server के साथ आता है जिससे आपका coding agent बात कर सकता है, तो यह plain language में projects बना सकता है, branches manage कर सकता है, और migrations चला सकता है। इसे build करते समय इस्तेमाल करें; Concept 12 समझाता है कि यह चलते हुए Worker के लिए क्यों नहीं है।
Try with AI
A teammate proposes splitting the stores: Postgres for the relational
data (customers, tickets, orders) AND a separate Pinecone index for the
embeddings, "because Pinecone is purpose-built for vectors."

Context for you, the assistant: keeping vectors in Postgres (via the
pgvector extension) next to the relational data means one query can
filter by business state, rank by similarity, and return the full
record in a single transaction. Splitting the stores forces the agent
to round-trip between two services, denormalize and sync metadata
across them, and give up cross-store transactional consistency.

1. Make the case against the split as concretely as you can on ONE
   request: a support Worker gets a message and must answer "have we
   seen this before, and what did we tell them?" Show exactly what that
   request costs when the vectors live in Pinecone and the tickets live
   in Postgres. Name the join, what happens to ranking at the LIMIT
   boundary when you filter in application code, and how an embedding
   goes stale after a resolution is updated.
2. Name the ONE condition under which the teammate is actually right and
   a dedicated vector DB is the better call. Be specific about the scale
   at which the crossover happens.
3. Neon adds two properties a plain Postgres box doesn't: scale-to-zero
   (an idle Worker's database costs nothing) and branching (the agent
   forks a production-fidelity copy of the data, experiments or migrates
   on it in isolation, then verifies before merging). Which matters more
   for an AI Worker specifically, and why? Defend your pick in two
   sentences.
Concept 7: Worker का schema, एक agent को असल में कौन सी tables चाहिए
एक database schema बस वे tables हैं जो आप रखते हैं और हर एक में columns, आपके data का shape। worked example जो पाँच tables बनाता है वे system of record के साझा हिस्से हैं जो हर Worker को चाहिए; business records खुद Part 4 में आते हैं। वे दो groups में आते हैं, तो आप देख सकें कि क्या essential है और क्या optional।
चार tables जो हर Worker रखता है, साझा रीढ़। वे Part opener से state, reference library, और trace रखती हैं, अब tables के रूप में:
conversations(state): प्रति conversation एक row, यह किसके साथ था, कब, और अंत में एक छोटा summary। (turn-by-turn messages अलग से store होते हैं, SDK द्वारा; नीचे देखें।)documentsऔरembeddings(reference library):documentstext रखती है (policies, past cases);embeddingsवह है जो इसे meaning से searchable बनाती है। एक embedding text के एक टुकड़े को numbers की एक list में बदलती है जो इसका topic capture करती है, तो related text पास-पास आ जाता है, जैसे एक board पर notes pin करना जहाँ similar वाले cluster करते हैं, और "find relevant" "find the nearest" बन जाता है। (Concept 9 इसे बनाता है; यहाँ, बस जानें किembeddingssearch-by-meaning layer है।)audit_log(trace): Worker ने क्या किया उसका एक running record, हर action क्रम में, including business events जैसे एक refund जारी होना।
एक और जो आप ज़रूरत होने पर जोड़ते हैं, usage analytics।
capability_invocations: हर बार जब Worker एक skill चलाता है या एक tool call करता है एक row (दोनों यह एक table साझा करते हैं; एक column बताता है कौन सा, तो आप प्रति tool एक table कभी नहीं बढ़ाते), साथ में कितना समय लगा, यह सफल हुआ या fail हुआ, और एक मोटी cost। इसे तब जोड़ें जब आप SQL में capability-usage analytics चाहें: एक skill कितनी बार fire होती है, इसकी error rate, एक escalation से पहले आमतौर पर क्या होता है।
दो और tables इस set के बाहर रहती हैं, दोनों Part 4 में: आपकी business-specific tables (customers, tickets, orders), और run_states, जो एक paused approval store करती है जब एक human बाद में या किसी और process में sign off करता है बजाय तुरंत के। दोनों में से कोई साझा रीढ़ का हिस्सा नहीं है।
messages खुद कहाँ जाते हैं? एक transcript और एक cover sheet की कल्पना करें। transcript हर message है, आपका सवाल, model का reply, हर tool call, हर एक अपनी row के रूप में रखा हुआ; SDK इसे आपके लिए लिखता और रखता है (Decision 3 में wired), तो आप इसे कभी नहीं बनाते। cover sheet वह एकल conversations row है जो आप लिखते हैं: कौन, कब, एक summary, साथ में business details जैसे user_id जो SDK की अपनी tables नहीं रखतीं। आप इसे इसलिए रखते हैं क्योंकि transcript "show this customer's last five conversations" का जवाब नहीं दे सकता; वह conversations पर एक quick lookup है, transcript से उस session id पर joined जो वे साझा करते हैं। यह optional है: अगर आपको कभी per-user lists या summaries नहीं चाहिए, अकेला transcript काफ़ी है।
सभी पाँच tables के लिए पूरा SQL नीचे box में है। आपका coding agent इसे Decision 3 के plan से लिखता है, तो आप इसे skim कर सकते हैं; जो मायने रखता है वह यह जानना है कि हर table किसके लिए है।schema, पूरा (चार साझा tables plus optional capability_invocations)
-- 1. CONVERSATIONS: business metadata per conversation (your app writes this row)
CREATE TABLE conversations (
    session_id  TEXT PRIMARY KEY,   -- the SAME id you pass to SQLAlchemySession
    user_id     TEXT NOT NULL,
    started_at  TIMESTAMPTZ NOT NULL DEFAULT NOW(),
    ended_at    TIMESTAMPTZ,
    metadata    JSONB NOT NULL DEFAULT '{}'::jsonb,
    -- searchable summary; your app writes it at conversation end
    summary     TEXT
);
CREATE INDEX idx_conversations_user ON conversations(user_id, started_at DESC);
-- The turns themselves live in the SDK Session's tables (agent_sessions /
-- agent_messages, via SQLAlchemySession), created automatically on this same
-- database and keyed by this session_id; you do not hand-build them.

-- 2. DOCUMENTS: the agent's reference library
CREATE TABLE documents (
    id          UUID PRIMARY KEY DEFAULT gen_random_uuid(),
    source      TEXT NOT NULL,      -- 'policy_library', 'kb_article', 'past_case', etc.
    title       TEXT NOT NULL,
    body        TEXT NOT NULL,
    metadata    JSONB NOT NULL DEFAULT '{}'::jsonb,
    created_at  TIMESTAMPTZ NOT NULL DEFAULT NOW(),
    updated_at  TIMESTAMPTZ NOT NULL DEFAULT NOW()
);
CREATE INDEX idx_documents_source ON documents(source);

-- 3. EMBEDDINGS: vector representations of documents AND past conversations
CREATE TABLE embeddings (
    id              UUID PRIMARY KEY DEFAULT gen_random_uuid(),
    -- one of these is populated; the other is NULL
    document_id     UUID REFERENCES documents(id) ON DELETE CASCADE,
    conversation_id TEXT REFERENCES conversations(session_id) ON DELETE CASCADE,
    chunk_text      TEXT NOT NULL,
    chunk_index     INT NOT NULL,
    embedding       VECTOR(1536) NOT NULL,
    model           TEXT NOT NULL,  -- 'text-embedding-3-small', etc.
    created_at      TIMESTAMPTZ NOT NULL DEFAULT NOW(),
    CHECK (
        (document_id IS NOT NULL)::int + (conversation_id IS NOT NULL)::int = 1
    )
);
-- the key index for semantic search; see Concept 8
CREATE INDEX idx_embeddings_hnsw
  ON embeddings USING hnsw (embedding vector_cosine_ops);

-- 4. AUDIT_LOG: replayable trace of how the Worker changed or used the record
CREATE TABLE audit_log (
    id              BIGSERIAL PRIMARY KEY,
    conversation_id TEXT REFERENCES conversations(session_id) ON DELETE SET NULL,
    actor           TEXT NOT NULL,        -- 'worker:customer-support', 'system', etc.
    action          TEXT NOT NULL CHECK (action IN (
                        'message_received', 'message_sent', 'skill_activated',
                        'capability_invoked', 'refund_issued', 'refund_blocked',
                        'guardrail_tripped', 'corpus_seeded'
                    )),                   -- closed vocabulary; widening it is a migration (Concept 10)
    target          TEXT,                 -- table name, skill name, etc.
    payload         JSONB NOT NULL,       -- the data of the action
    result          JSONB,                -- what happened
    created_at      TIMESTAMPTZ NOT NULL DEFAULT NOW()
);
CREATE INDEX idx_audit_conv ON audit_log(conversation_id, created_at);
CREATE INDEX idx_audit_action ON audit_log(action, created_at);

-- 5. CAPABILITY_INVOCATIONS: every skill or tool call, for replay and metrics
CREATE TABLE capability_invocations (
    id              UUID PRIMARY KEY DEFAULT gen_random_uuid(),
    conversation_id TEXT NOT NULL REFERENCES conversations(session_id) ON DELETE CASCADE,
    capability      TEXT NOT NULL,        -- 'skill:summarize-ticket', 'tool:search_docs', etc.
    arguments       JSONB NOT NULL,
    result          JSONB,
    status          TEXT NOT NULL CHECK (status IN ('ok', 'error', 'blocked', 'timeout')),  -- 'blocked' = approval rejected
    latency_ms      INT,
    cost_cents      INT,                  -- approximate cost in 1/100 cents
    created_at      TIMESTAMPTZ NOT NULL DEFAULT NOW()
);
CREATE INDEX idx_cap_conv ON capability_invocations(conversation_id, created_at);

कुछ design choices समझने लायक:
-
documents और conversations दोनों के लिए एक
embeddingstable। एकCHECKconstraint हर row को ठीक एक की ओर point करवाती है, एक document या एक conversation। तो एक ही search policies और past conversations को एक साथ cover कर सकती है, और "have we answered this before?" एक index इस्तेमाल करती है, दो नहीं। -
audit_logएकBIGSERIAL(एक auto-incrementing number) इस्तेमाल करती है, एकUUIDनहीं। Audit rows तेज़ी से जमती हैं, और एक plain integer key writes को quick और order को obvious रखती है। बाकी tablesUUIDs इस्तेमाल करती हैं (random, globally unique ids) क्योंकि उनकी rows API responses और URLs में दिखती हैं, जहाँ एकUUIDछिपाता है कि आपके पास कितनी rows हैं। -
Skills और tools
capability_invocationsसाझा करते हैं। एक skill call और एक tool call मिलते-जुलते हैं लेकिन एक जैसे नहीं (अलग code, अलग costs, fail होने के अलग तरीके)। दोनों को एक table में रखना, एक column के साथ जो कहता है कौन सा, आपको "what did the agent do?" दोनों के पार पूछने देता है, या उन्हें split करके "which skills are slow or failing?" पूछने देता है। -
metadataJSONB columns escape hatches हैं। कोई schema हर field नहीं guess कर सकता जो एक दिए business को चाहिए, तो एक JSONB column आपको table बदले बिना fields जोड़ने देता है। इसे संयम से इस्तेमाल करें: जो भी आप अक्सर query करते हैं उसे अपना column बनना चाहिए।
आप अपने business के लिए और tables जोड़ेंगे: एक customers table, एक tickets table, एक orders table, ordinary relational tables जिन्हें agent MCP के ज़रिए पढ़ता और लिखता है।
PRIMM, Predict. एक Worker 200 conversations/day handle करता है, हर एक औसत 10 turns, 30% एक skill invocation trigger करते हैं और 50% skill row से आगे दो audit rows लिखते हैं। एक महीने (30 days) बाद, कौन सा store सबसे तेज़ बढ़ता है? तीन options: (a) सभी मिलते-जुलते volume पर; (b)
audit_logएक बड़े margin से सबसे तेज़ बढ़ता है; (c) embeddings table, क्योंकि हर turn embed होता है। Confidence 1–5.
जवाब है (b): जो tables आप बनाते हैं उनमें, audit_log सबसे तेज़ बढ़ता है, क्योंकि एक interaction कई action rows लिख सकता है (एक skill या tool call, record में एक write, कभी-कभी एक refund) जबकि यह सिर्फ़ एक conversations row जोड़ता है और कोई नया documents नहीं। तो यह वह table है जिसके retention और indexing की आप पहले plan करते हैं जैसे-जैसे आप बढ़ते हैं। (SDK का अपना turn store इससे भी तेज़ बढ़ता है, लेकिन आप इसे manage नहीं करते।)
Try with AI
I'm building a customer-support Worker. Its database already
has the four shared tables from Concept 7: `conversations` (one row per
conversation, plus a summary), `documents` and `embeddings` (a
searchable reference library), and `audit_log` (the record of what it
did). The turn-by-turn messages are held by the agent SDK's Session,
not a table I built.

I want to extend this for a Worker that handles software bug reports
specifically. What three additional tables would you add, and what
columns would they have? For each, say what the agent will use it for
(read access? write access? both?) and what foreign keys connect it to
the tables above.
Concept 8: pgvector basics, types, distance operators, indexes
embeddings table वह है जो Worker को text को meaning से ढूँढने देती है, सिर्फ़ words match करके नहीं। board की ओर वापस सोचें: text का हर टुकड़ा (एक policy, एक past case, एक record) एक pin पाता है, और related चीज़ें पास-पास बैठती हैं। एक pin की position ही embedding है, numbers की एक list। pgvector (एक Postgres extension) वह है जो Postgres को उन pins को store करने और nearest वालों को ढूँढने देता है, तो आपको एक अलग vector database की ज़रूरत नहीं (Concept 6 बताता है क्यों)।
vector type. VECTOR(n) एक column है जो एक pin रखता है: n numbers की एक fixed list। embeddings बनाने वाला model n तय करता है, OpenAI के text-embedding-3-small के लिए 1536, text-embedding-3-large के लिए 3072, बाकी models अलग होते हैं। वह rule जो लोगों को काटता है: आपका stored text और आपकी search query एक ही model से आने चाहिए। दो models दो अलग scales पर बने दो maps की तरह हैं, एक spot जो एक पर "downtown" मतलब रखता है दूसरे पर समुद्र में land करता है। अपने documents को एक model से embed करें और अपनी queries को दूसरे से, और "nearest" results बकवास आते हैं हालाँकि query बिना error चलती है। यह सबसे आम pgvector गलती है।
बहुत बड़े embeddings के लिए (2,000 से ज़्यादा numbers), एक halfvec column हर number को आधी precision पर store करता है: यह storage को लगभग आधा कर देता है और फिर भी index हो सकता है (4,000 numbers तक), एक छोटी accuracy cost पर। हमारे 1536-number case को इसकी ज़रूरत नहीं; plain vector(1536) ठीक है।
"कितना पास" मापने के तीन तरीके। एक बार text pin हो जाए, "similar" का बस मतलब है "near"। pgvector दो pins के बीच की distance मापने के तीन तरीके देता है। एक चुनें और इस पर टिके रहें; इनके बीच project के बीच में switch करना सिर्फ़ results को उलझाता है।
| Operator | Name | यह क्या मापता है | कब इस्तेमाल करें |
|---|---|---|---|
<=> | Cosine | दो pins कितने aligned हैं, length अनदेखा करके | text, हमारा default |
<-> | Straight-line | दो points के बीच plain distance | image search और अन्य geometric data |
<#> | Dot product | direction और length एक साथ | rare: सिर्फ़ तब जब आपके vectors सब एक length के न हों |
Text के लिए, cosine (<=>) इस्तेमाल करें। यह meaning compare करता है चाहे vectors कितने भी लंबे हों, जो आप चाहते हैं, और यह standard choice है (इसका index vector_cosine_ops नाम का है)।
Search करने के लिए, आप user के सवाल को एक embedding में बदलते हैं और Postgres से उन rows के लिए पूछते हैं जिनकी इससे <=> distance सबसे छोटी है, nearest first, top few। आपका agent वह SQL लिखता है; आप "Feel it work" में एक असली query चलते देखेंगे।
Indexes: वह जो search को तेज़ बनाता है। हर pin एक-एक करके check करना हज़ारों होने पर slow हो जाता है। एक index इसे ठीक करता है, उस तरह जैसे एक किताब के पीछे का index आपको हर page पढ़ने के बजाय एक topic पर jump करने देता है। pgvector यह index दो तरह से बना सकता है, HNSW और IVFFlat नाम के; आपको यह जानने की ज़रूरत नहीं कि letters का क्या मतलब है, सिर्फ़ यह कि हर एक क्या करता है। 2026 तक सलाह तय है:
- HNSW से शुरू करें। यह हर pin को इसके neighbors से link करता है तो एक search सीधे closest वालों की ओर hop कर सके: fast searches, build करने में slower, ज़्यादा memory। सही default।
- IVFFlat सिर्फ़ तब इस्तेमाल करें जब build speed search speed से ज़्यादा मायने रखे। यह pins को buckets में sort करता है और nearest buckets search करता है: build करने में quicker और memory पर lighter, लेकिन slower searches, और आप इसे table में data होने के बाद ही बना सकते हैं (यह पहले से मौजूद rows से buckets सीखता है)। worth है अगर आप index अक्सर rebuild करते हैं।
- DiskANN (एक अलग add-on) उन indexes के लिए है जो memory में समाने के लिए बहुत बड़े हैं। आपको लगभग ज़रूर इसकी ज़रूरत नहीं।
ऊपर के schema से HNSW index:
CREATE INDEX idx_embeddings_hnsw
  ON embeddings USING hnsw (embedding vector_cosine_ops);
HNSW के दो dials हैं, m और ef_construction। defaults ज़्यादातर workloads के लिए ठीक हैं; इन्हें तब तक न छुएँ जब तक आपने इन्हें बदलने का कोई कारण न मापा हो।
Quick check. True या false? (a) आप एक ही column पर एक से ज़्यादा HNSW index डाल सकते हैं, एक प्रति distance operator। (b) एक HNSW index वाली table में एक row जोड़ना उससे ज़्यादा लागत है जिसमें कोई vector index न हो। (c) आप किसी भी data load होने से पहले एक HNSW index बना सकते हैं। तीनों true हैं: आप कई operators के लिए index कर सकते हैं (कम ही चाहिए), rows आते ही index को current रखने की एक असली लागत है (तो कुछ teams पहले bulk-load करती हैं, फिर index बनाती हैं), और HNSW को कोई training data नहीं चाहिए, IVFFlat के उलट।
Try with AI
Two scenarios. For each, pick HNSW or IVFFlat and justify with one
specific property of the index:

Scenario A: A research index of 10M scientific papers. Built once,
queried millions of times. Build time is "whatever it takes,
overnight is fine." Query latency directly affects user experience.

Scenario B: A live index of customer support tickets that's
re-indexed every 4 hours because thousands of new tickets stream in.
Query patterns are simple (top-5 nearest neighbors). The current
HNSW build takes 20 minutes, a third of the re-index cycle.

After you answer: name ONE thing that would change your answer for
each scenario. Be specific about what you'd need to see in
production metrics before switching.
Concept 9: The embedding pipeline, text in, queryable vector out
एक embedding text के एक टुकड़े को space में एक point में बदलती है। refunds के बारे में text दूसरे refunds-के-बारे-में text के पास land करता है; login bugs के बारे में text कहीं और land करता है। तो "find similar tickets" "find the nearest points" बन जाता है। बस यही पूरा विचार है। बाकी plumbing है।
plumbing चार steps है, और हर एक में एक decision है जो मायने रखता है:
- document को टुकड़ों में Chunk करें जो इतने छोटे हों कि हर एक एक idea रखे।
- हर टुकड़े को model को call करके Embed करें; आपको इसका point वापस मिलता है।
- text, इसका point, और थोड़ा metadata
embeddingstable में Store करें। - user के सवाल को भी एक point में बदलकर Query करें, फिर nearest stored points ढूँढें।
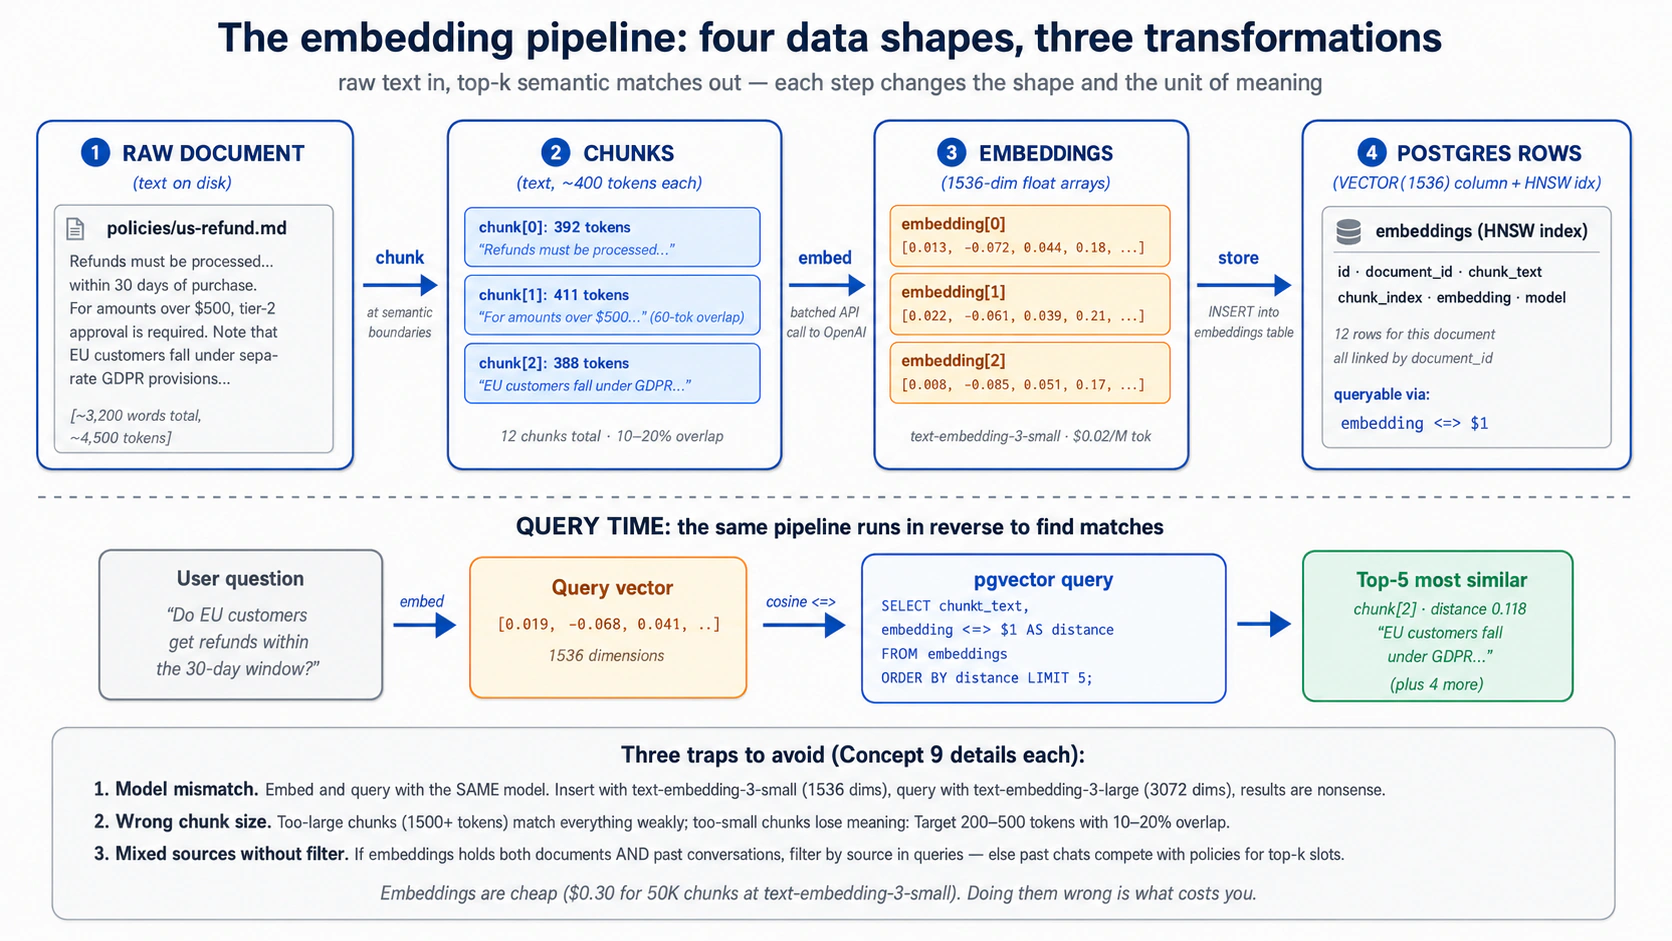
Chunking: लंबे text को पहले split करें। एक लंबे document को एक विशाल embedding नहीं बनना चाहिए। आप इसे chunks में split करते हैं, और chunk size वह एक decision है जो मायने रखता है:
- Natural breaks पर split करें (headings, paragraphs)। एक chunk जो वाक्य के बीच में रुकता है badly search करता है।
- प्रति chunk कुछ सौ words का लक्ष्य रखें। बहुत बड़ा और यह "matches everything weakly"; बहुत छोटा और यह वह context खो देता है जिसने इसे meaningful बनाया।
- Chunks को थोड़ा overlap करें, तो एक idea जो boundary पर फैला हो वह भी मिल जाए।
- जो पहले से छोटा है उसे chunk न करें। एक single resolved ticket या एक छोटा FAQ entry पहले से एक chunk है; इसे जैसा है वैसा embed करें।
आपका agent splitting code लिखता है; आप जो तय करते हैं वह chunk size और overlap है।
Embedding: हर chunk को एक point में बदलें। आप हर chunk को embedding model को सौंपते हैं और जो point यह वापस देता है उसे store करते हैं (batches में, जो प्रति chunk एक call से कहीं सस्ता है)। Concept 8 का rule लागू रखें: अपने stored text और search queries को एक ही model से embed करें, वरना matches noise आते हैं। एक setup trap जानने लायक (आपका agent इसे handle करता है): database driver को vector type के बारे में बताना पड़ता है, वरना आपके inserts चुपचाप fail हो सकते हैं।
अगर आप OpenAI पर नहीं हैं तो क्या? OpenAI एकमात्र बड़ा provider है जो एक first-class embeddings API भी देता है, तो अगर आप DeepSeek, Anthropic, Gemini, या एक local model के ज़रिए inference चलाते हैं, आप एक embedding model अलग से चुनते हैं, और dimension वह है जिसे match होना है। आम escape hatch एक local sentence-transformers model जैसे all-MiniLM-L6-v2 (384 dims) है: कोई API call नहीं, और कोई text आपकी machine से बाहर नहीं जाता। किसी भी तरह embeddings bill की सबसे सस्ती line है, तो यह choice आपकी architecture move करती है, आपका budget नहीं।
कब re-embed करें। तीन triggers:
- source text बदला, उन rows को re-embed करें।
- आपने embedding models switch किए, हर पुराना point अब एक अलग map पर रहता है और शायद एक अलग size पर, तो आप column rebuild करते हैं और हर row re-embed करते हैं (या switchover के दौरान दोनों रखें)। कोई "close enough" नहीं है।
- आपने chunk size बदला, re-chunk और re-embed करें।
PRIMM, Predict. आपने
text-embedding-3-smallसे 100,000 chunks embed किए हैं। फिर आप अपनी past conversations भी embed करने का फ़ैसला करते हैं (सिर्फ़ documents नहीं) तो agent "have we discussed this before?" lookups कर सके। आप conversation embeddings को उसीembeddingstable में उसी column से लिखते हैं। एक semantic search query (एक user सवाल के 5 nearest neighbors ढूँढें, कोई filter नहीं) mixed document और conversation results के साथ वापस आती है। क्या यह वही है जो आप चाहते थे? सही query shape क्या है? Confidence 1–5.
जवाब: लगभग ज़रूर वह नहीं जो आप चाहते थे। results में documents और past conversations mixed होने से, agent एक पुराने chat के snippet को ऐसे treat कर सकता है मानो वह authoritative policy हो। fix है search करते समय source से filter करना: सिर्फ़ documents माँगें, या दो searches चलाएँ और उन्हें weigh करें, तो दोनों तरह कभी blur न हों।
जब results गलत दिखें, कारण लगभग हमेशा तीन में से एक होता है: query और stored text अलग models से गुज़रे (matches noise हैं), आप source type से filter करना भूल गए, या आपके chunks meaning रखने के लिए बहुत छोटे हैं। इन्हें पहले check करें।
Retrieval quality Worker accuracy का silent killer है। final answer पूरी तरह reasonable लग सकता है जबकि गलत evidence cite कर रहा हो। इसे पकड़ने का एकमात्र तरीका answer से पहले retrieval check करना है।
Try with AI
I'm chunking a corpus of legal contracts (each averaging 8,000 words)
for semantic search. The user will query things like "what's the
termination clause in this contract", phrases that map cleanly to
specific sections. Walk me through three chunking strategies:

A) Fixed 400-token chunks with 60-token overlap (the default)
B) Chunk at section headings only, with no overlap
C) A two-level approach: store both 400-token chunks AND
   whole-section chunks, search both, combine results

For each, name (1) when it wins and (2) when it loses.
Feel it work: दस मिनट में semantic search
आपने pgvector और embedding pipeline के बारे में पढ़ा है बिना किसी एक result को return होते देखे। schema के आख़िरी हिस्से, audit trail, से पहले, दस मिनट लें semantic search को असल में meaning से rank करते देखने के लिए। यह एक throwaway है, Worker नहीं: एक scratch table, पाँच sentences, एक query। Part 4 असली चीज़ बनाता है।
आपका Neon Quick Win से पहले से wired है, तो यह एक prompt है:
On a fresh scratch branch of my Neon project, create a tiny
notes(id, text, embedding vector(1536))table with an HNSW index. Embed these five sentences withtext-embedding-3-smalland insert them: "the refund hasn't arrived", "my package is late", "how do I reset my password", "the charge appears twice", "I was billed for something I didn't buy". Then embed the query "I never got my money back", run a cosine-distance search, and show me the rows ranked by distance.
इस पर नज़र रखें: billing और refund sentences "my package is late" से ऊपर और "reset my password" से कहीं ऊपर rank करते हैं, हालाँकि query इनमें से किसी के साथ लगभग कोई words साझा नहीं करती। meaning से rank करना, keyword overlap से नहीं, ही पूरी वजह है कि embeddings table मौजूद है।
तब हो गया जब: आपने ranked list देखी हो जिसमें refund और billing sentences ऊपर हों। अपने agent को scratch branch delete करने को कहें; असली schema Part 4 है।
अगर refund sentences नहीं जीते, आम कारण Concept 9 का model mismatch है: insert और query अलग embedding models से गुज़रे। दोनों सिरों पर वही model, वरना distances noise हैं।
Concept 10: Audit trail as discipline, एक Worker के लिए "reads and writes" का क्या मतलब है
agent जो भी meaningful action लेता है उसे database में एक row छोड़नी चाहिए। उस row के बिना, आप बाद में जवाब नहीं दे सकते "agent ने क्या किया, और कब?" वह trail वही है जो एक असली action को एक plausible-sounding reply से अलग करता है।
यहाँ दो चीज़ें पास-पास बैठती हैं और उलझ जाती हैं, तो इन्हें अलग रखें:
- The truth itself: अभी क्या case है, एक customer का tier, एक ticket का status, एक policy का text। यह business records और reference library में रहता है, और Worker इसे पढ़ता और update करता है।
- The audit trail: Worker ने उस truth के साथ क्या किया उसका replayable record, इसने कौन सा tool call किया, इसने क्या बदला, इसने क्या return किया, इसे किसने approve किया। यह
audit_logमें रहता है, उसी database में, और यह एक अलग सवाल का जवाब देता है, "क्या true है?" नहीं बल्कि "Worker ने क्या किया, और क्या आप साबित कर सकते हैं?" यह conversation की दूसरी copy नहीं है (Session पहले से हर message रखती है); यह typed actions और उनके results record करता है, including वे जो कभी एक message के रूप में नहीं दिखते, एक database write, एक refund, एक guardrail block। (एक अलग, optionalcapability_invocationstable इसके बगल में per-skill और per-tool metrics के लिए बैठती है; Concept 7 देखें।)
तो हर meaningful action अपनी audit row लिखता है हालाँकि जिस data को इसने छुआ वह कहीं और store होता है। यह तथ्य कि action हुआ audit_log में रहता है; दोनों foreign key से joined हैं।
इसमें क्या जाता है। meaningful actions, उन्हें replay करने के लिए काफ़ी detail के साथ: हर tool या skill call (name, inputs, result, कितना समय लगा, यह सफल हुआ या नहीं), record में हर change (कौन सी table, क्या बदला, किस conversation के तहत), हर guardrail decision, और हर model call इसकी token cost के साथ।
क्या बाहर रहता है। पूरा conversation text, Session पहले से इसे रखती है, तो इसे फिर store करना बस आपकी storage दोगुनी करता है। एक row में raw sensitive data जिसे humans पढ़ सकें, एक hash या एक summary रखें और पूरी चीज़ lock कर दें। और model का private reasoning।
वह test जो इसे एक audit trail बनाता है, सिर्फ़ logs नहीं: एक conversation और एक समय दिए जाने पर, आप reconstruct कर सकते हैं कि Worker ने क्या किया और क्यों, model को फिर चलाए बिना। अगर आप नहीं कर सकते, तो आपके पास logs हैं।
Action और इसका record एक साथ लिखें। जो भी code एक refund जारी करता है वह refund और इसकी audit row को एक transaction में लिखता है: दोनों land होते हैं या कोई नहीं। एक half-written audit trail none से बदतर है, यह complete दिखता है और नहीं है। (आपका agent इसे Part 4 में लिखता है।)
हर action को एक छोटे, agreed set से एक name दें (refund_issued, message_sent, और इसी तरह) और उन names को drift न करने दें। एक ही event के लिए तीन अलग names, अब से छह महीने बाद, वही है जो trail को query करना असंभव बनाता है। refund_issued जैसे domain events अपना name पाते हैं तो row एक business event की receipt की तरह पढ़ी जाए, सिर्फ़ उस tool call की नहीं जिसने इसे trigger किया।
चूँकि वह set छोटा और fixed है, इसे audit_log.action पर एक CHECK constraint से enforce करें (Concept 7 schema यह करता है)। वह catch जो एक build हफ़्तों बाद hit करता है: vocabulary अब closed है, तो एक नया verb introduce करना (Decision 9 में एक guardrail_tripped row, वह corpus_seeded row जो Decision 5 अपने seed run के लिए लिखता है) एक one-line ALTER TABLE ... DROP/ADD CONSTRAINT migration है, सिर्फ़ नया code नहीं, और error एक DB constraint violation के रूप में सामने आती है जो "you forgot to plan your vocabulary" के पास कहीं नहीं point करती। तो पूरा set upfront तय करें; Concept 7 का CHECK पहले से उन आठ को list करता है जो यह course इस्तेमाल करता है।
Audit trail क्या नहीं है। सिर्फ़ logs नहीं: यह आपके अपने database में queryable SQL है ("agent ने पिछले महीने customer X को क्या बताया, और किस policy को cite किया?" एक query है), text files पर grep नहीं, और यह आपके business data के साथ backed up और access-controlled है। Event sourcing नहीं: यह आपके state के बगल में एक append-only trace है, वह चीज़ नहीं जिससे आप state rebuild करते हैं (आपके tickets, documents, और Session ही state हैं)। आपके traces नहीं: tracing (OpenTelemetry, OpenAI dashboard) debugging के लिए flight recorder है, यह एक अलग system में रहता है, बंद हो सकता है, और Zero-Data-Retention के तहत unavailable है; audit log receipt है, action के उसी transaction में committed और जितना समय आपको चाहिए रखा गया। दोनों चलाएँ: trace debug करने के लिए, ledger साबित करने के लिए।
thesis का यही मतलब है: "Workers only become governable as a workforce when a ledger makes them legible." आपका audit_log ही वह ledger है। और legible वही है जो एक Worker को sellable बनाता है: आप एक ऐसे outcome के लिए charge नहीं कर सकते जिसके होने को आप साबित नहीं कर सकते। Per-seat pricing logins गिनती है; outcome pricing गिनती है कि Worker ने क्या किया, प्रति resolved ticket, प्रति processed invoice, प्रति drafted reply। refund_issued और ticket_resolved rows ही वे outcomes हैं, उसी log में बैठी हुईं जिसमें low-level events, कुछ ऐसा जिसकी ओर आप एक customer को point कर सकें और इसके against invoice कर सकें। तो एक Worker को एक system of record सिर्फ़ इसलिए नहीं चाहिए कि यह runs के बीच भूलना बंद कर दे, बल्कि इसलिए कि इसका काम एक provable, billable artifact बन जाए। यही वह रेखा है जो एक agent को एक database से wiring करने और एक ऐसा Worker बनाने के बीच है जिसे आप असल में बेच सकें।
Try with AI
Here's a customer support scenario: a customer claims the Worker told
them they would receive a $50 refund, but the actual refund issued was
$30. The Worker handled the conversation 19 days ago.

Walk me through the audit-trail query path to resolve this:

1. Find the conversation. (Which columns of which tables?)
2. Find the message where the refund amount was promised. (How do you
   distinguish "discussed" from "promised"?)
3. Find the capability invocation that issued the refund.
4. Find the database write that recorded the $30 amount.

For each step, name the table you'd query and the WHERE clauses.
Then say what's MISSING from the five-table schema that would make
this query easier.
Part 3: MCP, agent को system of record से wiring करना
Part 1 ने agent को Skills की एक library दी। Part 2 ने इसे एक Postgres system of record दिया। Part 3 दोनों को Model Context Protocol से एक साथ wire करता है: वह open standard कि agents बाहरी state और बाहरी capability तक कैसे पहुँचते हैं। thesis MCP की जगह के बारे में सीधी है: "MCP is how the workforce reaches [its systems of record]: every authoritative store becomes addressable to any Worker through an MCP server, under policy." यह Part उसे operational बनाता है।
Concept 11: MCP क्या है और क्या नहीं
Model Context Protocol (modelcontextprotocol.io) एक open client/server protocol है (मूल रूप से Anthropic से, अब एक open standard के रूप में governed) कि एक AI agent बाहरी tools, data, और prompts से कैसे जुड़ता है। जो framing दोहराया जाता है वह है "USB-C for AI tools": एक protocol, कई implementations, दूसरी side को तोड़े बिना किसी भी side को swap करें। framing सही है; सभी metaphors की तरह, इसकी limits हैं जिनका नाम लेना worth है।
MCP क्या है। एक protocol। एक specification। तीन primitives जो server client को expose कर सकता है।
- Tools: functions जिन्हें model invoke कर सकता है। client उन्हें list करता है, model एक चुनता है, server इसे execute करता है। पिछले course के एक
@function_tooldecorator जैसा conceptually, लेकिन implementation MCP server process में रहता है, agent के process में नहीं। यह कहीं ज़्यादा सबसे ज़्यादा-इस्तेमाल primitive है। - Resources: read-only data जिसे agent fetch कर सकता है। Files, database query results, API responses। इन्हें MCP की GET-only side समझें। practice में tools से कम आम, लेकिन "agent को यह document on demand पढ़ने दें" के लिए उपयोगी।
- Prompts: reusable prompt templates जो server देता है। एक team standardised prompts publish कर सकती है ("summarize-incident-report") जिन्हें server से जुड़ने वाला कोई भी agent invoke कर सके। tools और resources के मुकाबले कम ही इस्तेमाल होते हैं।
तीन transports, 2026 तक current recommendations के साथ:
| Transport | कब इस्तेमाल करें | Status |
|---|---|---|
stdio | Local subprocess; agent और server एक ही machine पर | Mature. local tools के लिए default। |
streamable HTTP | Remote server; production deployments | नए remote work के लिए recommended. plain HTTPS पर single endpoint। |
SSE | Remote server; पुराने deployments | Legacy. कई servers अब भी इसे expose करते हैं; नए तेज़ी से streamable HTTP को default करते हैं। |
Streamable HTTP दो flavors में आता है, और जब आप deploy करते हैं तो फ़र्क़ मायने रखता है। Stateless वह default है जिसकी ओर हाथ बढ़ाना है: हर call एक independent request और response है, ठीक एक ordinary API call की तरह, तो आप एक load balancer के पीछे server की कई copies चला सकते हैं और कोई भी एक जवाब दे सकता है। Stateful एक live session खुली रखता है तो server partial results stream कर सके या task के बीच में notifications push कर सके, जो आपको long-running work के लिए चाहिए, लेकिन यह हर client को एक server instance से pin करता है और operate करने को ज़्यादा है। stateless इस्तेमाल करें जब तक आपके पास open session की ज़रूरत का कोई specific कारण (live streaming, server-initiated messages) न हो।
MCP क्या नहीं है।
- एक framework नहीं। यह एक protocol है। आपका agent "MCP इस्तेमाल" उस तरह नहीं करता जैसे यह Agents SDK इस्तेमाल करता है; आपके agent का MCP client एक MCP server को MCP बोलता है। Agents SDK में एक MCP client शामिल है; वही integration point है।
- एक service नहीं। कोई "MCP cloud" नहीं है। MCP servers programs हैं जिन्हें आप चलाते हैं (या vendors आपके लिए चलाते हैं)। Neon MCP server
mcp.neon.techपर hosted है; filesystem MCP server एक local subprocess के रूप में चलता है; आपका लिखा एक custom MCP server जहाँ आप deploy करते हैं वहाँ चलता है। - एक security boundary नहीं। MCP transport और protocol define करता है; एक MCP server क्या tools expose करता है और वे क्या कर सकते हैं यह server की ज़िम्मेदारी है। एक malicious MCP server कुछ भी कर सकता है जो इसका server-side code करता है। trust boundary अब भी agent loop है जो तय करता है कि कौन से tools call करने हैं, और वह sandbox जिसमें tools execute होते हैं।
@function_toolका replacement नहीं। दोनों की अब भी एक जगह है। decision tree Concept 14 है।
Quick check. True या false: (a) एक MCP client एक समय में ठीक एक MCP server से बात करता है। (b) वही
@function_tool-style function, अगर आप चाहें, एक MCP tool के रूप में expose हो सकता है या एक function tool के रूप में रखा जा सकता है, और model फ़र्क़ नहीं जानेगा। (c) MCP servers और OpenAI Agents SDK tightly coupled हैं, तो MCP इस्तेमाल करने के लिए आपको SDK इस्तेमाल करना होगा। Answers: (a) False: एक agent कई MCP servers से जुड़ सकता है और उनके tools का union देख सकता है। (b) True: model को, दोनों schemas वाले callable tools दिखते हैं। फ़र्क़ है कि implementation कहाँ रहता है। (c) False: MCP model-agnostic है। Claude, Gemini, और बाकी के अपने MCP clients हैं। OpenAI Agents SDK कई में से एक client है।
Try with AI
For each item, say which MCP primitive fits best (tool, resource, or
prompt), and why in one line:

A) The agent reads the current text of a policy document on demand,
   but never writes it.
B) The agent issues a refund through the payment gateway.
C) Every Worker on the team should summarize incidents the same way,
   from one shared, versioned template.

Then a judgment question. A teammate says: "We put the refund logic
behind an MCP server, so the agent can't do anything dangerous." Using
this concept's "what MCP is NOT," explain why that sentence is false,
and name where the real trust boundary actually lives.
Concept 12: The Neon MCP server, development plane, runtime नहीं
इस concept के specifics age करेंगे। pattern नहीं करेगा। Neon का MCP server tooling, auth flow, और exact tool surface हर कुछ महीनों में बदलता है। जो सच रहता है: एक managed-database vendor अपनी management API को natural-language operations के लिए MCP के ज़रिए expose करता है, जबकि runtime production traffic direct connections या scoped custom servers इस्तेमाल करता है। specifics pin करने से पहले Neon's docs के against verify करें।
आप setup के दौरान पहले ही Neon MCP server को अपने coding agent से जोड़ चुके हैं, और तब से इस पर टिके हैं: plain English में schema माँगना, tables में क्या है check करना, एक connection string खींचना। वह पंद्रह-मिनट का connection रुककर देखने लायक है, क्योंकि यह इस पूरे Part की सबसे ज़रूरी एक line सिखाता है: Neon MCP server किसके लिए है, और इसे कभी किससे wired नहीं होना चाहिए।
यह Neon की management API (projects, branches, schema, migrations, ad-hoc SQL) को tools के रूप में expose करता है जिन्हें आपका agent plain language में call कर सके। यह इसे एक development tool बनाता है, एक production tool नहीं। Neon के अपने docs blunt हैं: "Never connect MCP agents to production databases."
यहाँ है कि वह line इतनी hard क्यों है। server का run_sql tool कोई भी SQL चलाता है जो model लिखता है। जब आप build कर रहे हैं, वही पूरा point है: आप कहते हैं "show me users who signed up last week and never logged in," model query लिखता है, server इसे चलाता है, आपको जवाब मिलता है। उसी tool को अपने live database की ओर point करें और यह एक door बन जाता है। कोई भी जो आपके Worker में instructions slip कर सके (एक customer एक चालाकी से शब्दबद्ध message type करके) इससे आपका पूरा database पढ़ने को कह सकता है, क्योंकि tool का काम है जो भी SQL इसे सौंपा जाए उसे चलाना।
तो इसे वहाँ इस्तेमाल करते रहें जहाँ यह चमकता है, सब कुछ development के दौरान:
- Schema और migrations. "Add a
prioritycolumn to the tickets table." server पहले change को एक throwaway branch पर test करता है, फिर इसे merge करता है। वह branch-first आदत schema को evolve करने का safe तरीका है। - अपना data explore करना. "How many embeddings are in there, grouped by source?" एक one-off सवाल के लिए हाथ से SQL लिखने से तेज़।
- चीज़ें look up करना. Connection strings, project settings, table shapes, Neon console खोले बिना।
आपने यह setup में देखा: आपने अपने agent से project बनाने, pgvector on करने, schema चलाने, और connection string report करने को कहा, और इसने यह सब इन tools के ज़रिए किया, main को छूने से पहले एक branch पर migration test करते हुए। कोई SQL हाथ से type नहीं किया।
PRIMM, Predict. आपके finished customer-support Worker को चाहिए: (a) एक customer के orders look up करना; (b) उनके tier के लिए refund policy check करना; (c) एक refund जारी करना; (d) इसने क्या और क्यों किया उसकी एक audit row लिखना। क्या इसे इसी MCP server के ज़रिए Neon तक पहुँचना चाहिए, या किसी और तरीके से? Confidence 1–5.
जवाब: किसी और तरीके से, चारों के लिए। एक live Worker को कभी एक run_sql-style tool नहीं रखना चाहिए, वह एक door है जिसे आप पूरी तरह lock नहीं कर सकते। इसे कुछ narrow abilities चाहिए, arbitrary SQL चलाने की power नहीं। दो production patterns हैं एक custom MCP server जो सिर्फ़ वे specific operations expose करता है जो इसे चाहिए (Concept 14), या एक direct Postgres connection जो उन्हें wrap करता है। Part 4 दोनों इस्तेमाल करता है: business operations के लिए एक custom customer-data server, और audit subsystem के लिए सिर्फ़ एक direct connection (Decision 7 समझाता है कि audit उस MCP boundary से बाहर क्यों रहता है जिसका यह audit कर रहा है)।
यह ठीक Invariant 5 है: workforce governed stores के ज़रिए पढ़ता और लिखता है। एक broad run_sql tool governance नहीं है, यह बिना किसी governance पर एक friendly face है। Neon MCP server वह है जिससे आप store बनाते हैं। यह वह नहीं है जिससे आपका Worker इसे छूता है।
Try with AI
Read Neon's MCP server documentation page and answer three questions:

1. List THREE management operations the Neon MCP server exposes that
   would be useful while you're building a customer-support Worker.
2. List THREE things a running Worker NEEDS to do that you should NOT
   use the Neon MCP server for, and why.
3. For each of the three in (2), say what the Worker should use instead
   (direct Postgres connection? custom MCP server? function_tool?).
Concept 13: MCP को OpenAI Agents SDK से जोड़ना
आप Neon MCP server को अपने coding agent से drive कर रहे हैं। आपका Worker, वह जिसे आप Part 4 में बनाते हैं, एक अलग program है: एक OpenAI Agents SDK agent। तो जिस सवाल का यह concept जवाब देता है वह बस है: वह agent एक MCP server से कैसे बात करता है? आप connection plumbing हाथ से नहीं लिखेंगे, SDK इसे देता है। जो समझने लायक है वह shape है, तो आप build steer कर सकें और जब यह misbehave करे तो इसे debug कर सकें।
यहाँ पूरी picture है। SDK में एक built-in MCP client है जिसमें प्रति transport एक connector है: stdio के लिए एक local, remote streamable HTTP के लिए एक modern, और SSE के लिए एक legacy (किसी भी नई चीज़ के लिए SSE से बचें)। आप एक server से एक connection खोलते हैं, इसे अपने agent को सौंपते हैं, और वहाँ से SDK सब कुछ करता है: यह server से पूछता है इसके पास क्या tools हैं, उन tools को model के सामने ठीक उन @function_tools के बगल में रखता है जो आपने खुद लिखे, और जब model एक चुनता है, call को सही server तक route करता है और जवाब वापस लाता है। model एक MCP tool को एक local function tool से नहीं बता सकता, और इसे ज़रूरत नहीं। वह sameness ही point है: MCP बस model को एक capability सौंपने का एक और तरीका है।
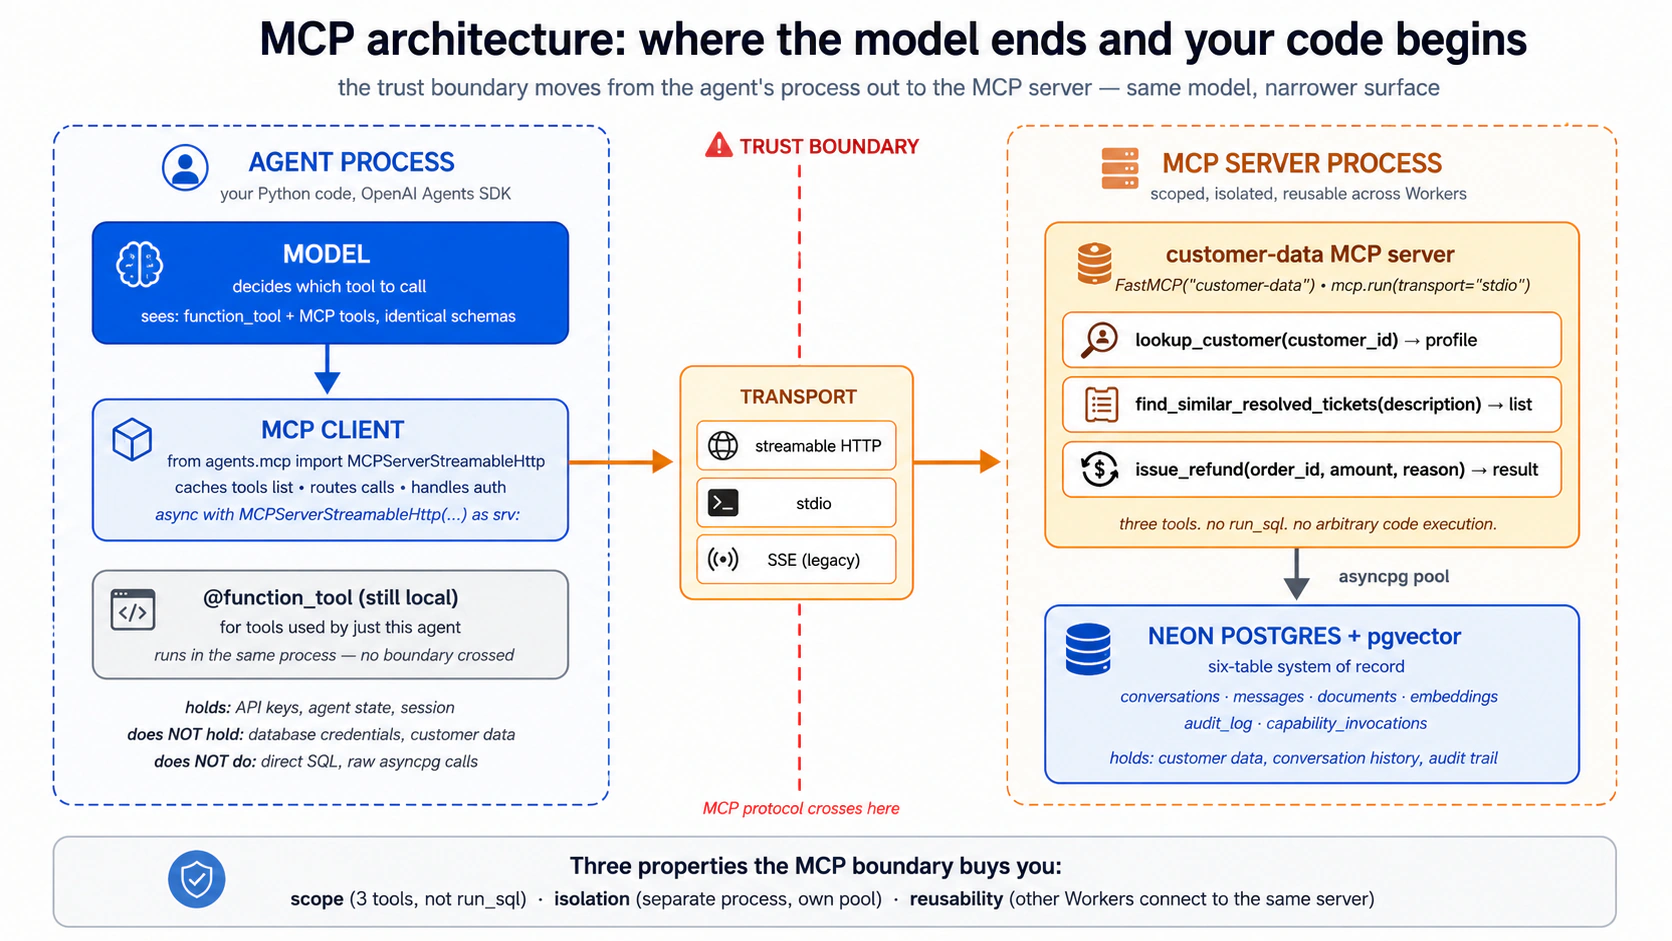
ध्यान में रखने के लिए चार चीज़ें, जिन्हें माँगते ही आपका agent आपके लिए handle कर देता है:
- connection साफ़ खोलें, और साफ़ बंद करें। एक MCP connection कुछ खुला रखता है: stdio के लिए एक subprocess, remote के लिए एक HTTPS session। अगर इसे ठीक से बंद न किया जाए तो connection leak होता है। SDK के connection objects एक managed block के रूप में खोले और बंद होने के लिए बने हैं, तो यह handle रहता है जब तक आप इससे न लड़ें।
- production में tool list cache करें। by default agent हर एक run पर server से दोबारा पूछता है "what tools do you have?", एक wasted network round-trip। caching on करना इसे एक बार पूछवाता है। एक catch: अगर आप server के tools बदलते हैं, तो आप agent को cache refresh करने को कहते हैं (या इसे restart करें)। build करते समय, caching off रखें तो changes तुरंत दिखें।
- Servers stack होते हैं। आप अपने agent को एक साथ कई MCP servers सौंप सकते हैं, और model बस tools का combined set देखता है। Part 4 का Worker अपने custom
customer-dataserver से इसी तरह जुड़ता है। - dangerous tools को approval के पीछे gate करें। by default tool calls बिना confirmation चलते हैं। sensitive वालों के लिए आप एक human को हर call approve करने को require कर सकते हैं। यह Concept 12 के development-vs-runtime gap के लिए practical knob है: तब भी जब आप Neon MCP server को हाथ से इस्तेमाल करते हैं, इसके destructive tools (जो भी drop या rewrite करता है) को एक approval prompt के पीछे रखना एक असली safety win है।
एक gotcha याद रखने लायक: अगर एक MCP server startup पर कुछ भारी load करता है (एक machine-learning model, उदाहरण के लिए), agent की default "did the server answer in time?" window बहुत छोटी हो सकती है और आपको एक confusing connection-failure error दिखेगा। fix एक single setting है जो उस window को लंबा करता है। आप इससे सिर्फ़ तभी मिलेंगे जब एक server boot होते ही असली काम करता हो।
Hands-on, सिर्फ़ समझने के लिए। यह shape को concrete बनाने का सबसे तेज़ तरीका है। नीचे का prompt अपने coding agent में paste करें। यह एक tiny throwaway script बनाता है जो एक OpenAI Agents SDK agent को उस Neon MCP server की ओर point करता है जो आपके पास पहले से connected है, और आपको agent को plain language में आपके projects list करते देखने देता है। यह एक learning exercise है, production path नहीं: एक असली Worker कभी Neon MCP server से नहीं जुड़ता (Concept 12)। आप इसे एक बार, यहाँ, एक Agents SDK agent को एक MCP server end to end drive करते देखने के लिए कर रहे हैं।
Write me a small throwaway Python script (call it scratch_neon_agent.py)
that uses the OpenAI Agents SDK to connect to the Neon MCP server over
its remote streamable-HTTP transport, then runs one agent turn asking it
to "list my Neon projects and show the schema of the largest one."

Use the current OpenAI Agents SDK MCP classes (check the docs for the
exact import and class name). Open the connection as a managed block so
it closes cleanly, turn on tool-list caching, and print the final output.

Then run it and show me what the agent did, step by step. Remind me in a
comment that this is for understanding only and a real Worker should
never connect to the Neon MCP server.
देखें क्या होता है: agent जुड़ता है, SDK Neon के tools खींचता है, model खुद list_projects चुनता है, और आपको English में एक जवाब मिलता है। आपने अभी वही wiring देखी जो आपका Part 4 Worker इस्तेमाल करेगा, सिर्फ़ एक ऐसे server की ओर point की हुई जिसे इसे production में इस्तेमाल नहीं करना चाहिए, जो ठीक वही वजह है कि आप यह script फेंक रहे हैं।
Try with AI
Explain, in plain language and without writing code, how you would
connect one OpenAI Agents SDK agent to TWO MCP servers at once: the
Neon MCP server (remote) and a local filesystem MCP server for reading
project files. Cover:

1. Which transport each server would use, and why.
2. How the model decides which server's tool to call.
3. Which tools you'd put behind human approval, and why.
4. One thing that could go wrong with two servers connected, and how
   you'd notice it.
Concept 14: Custom MCP servers, अपना कब लिखें बनाम कब नहीं
Neon MCP server generic है: यह कुछ भी कर सकता है जो Neon की API कर सकती है। वही development के लिए इसकी ताक़त है और runtime के लिए इसकी कमज़ोरी। एक custom MCP server trade-off को उलट देता है: narrow surface, कोई general-purpose run_sql नहीं, सिर्फ़ वे specific operations जो आपके Worker को असल में चाहिए।
decision tree, priority के क्रम में।
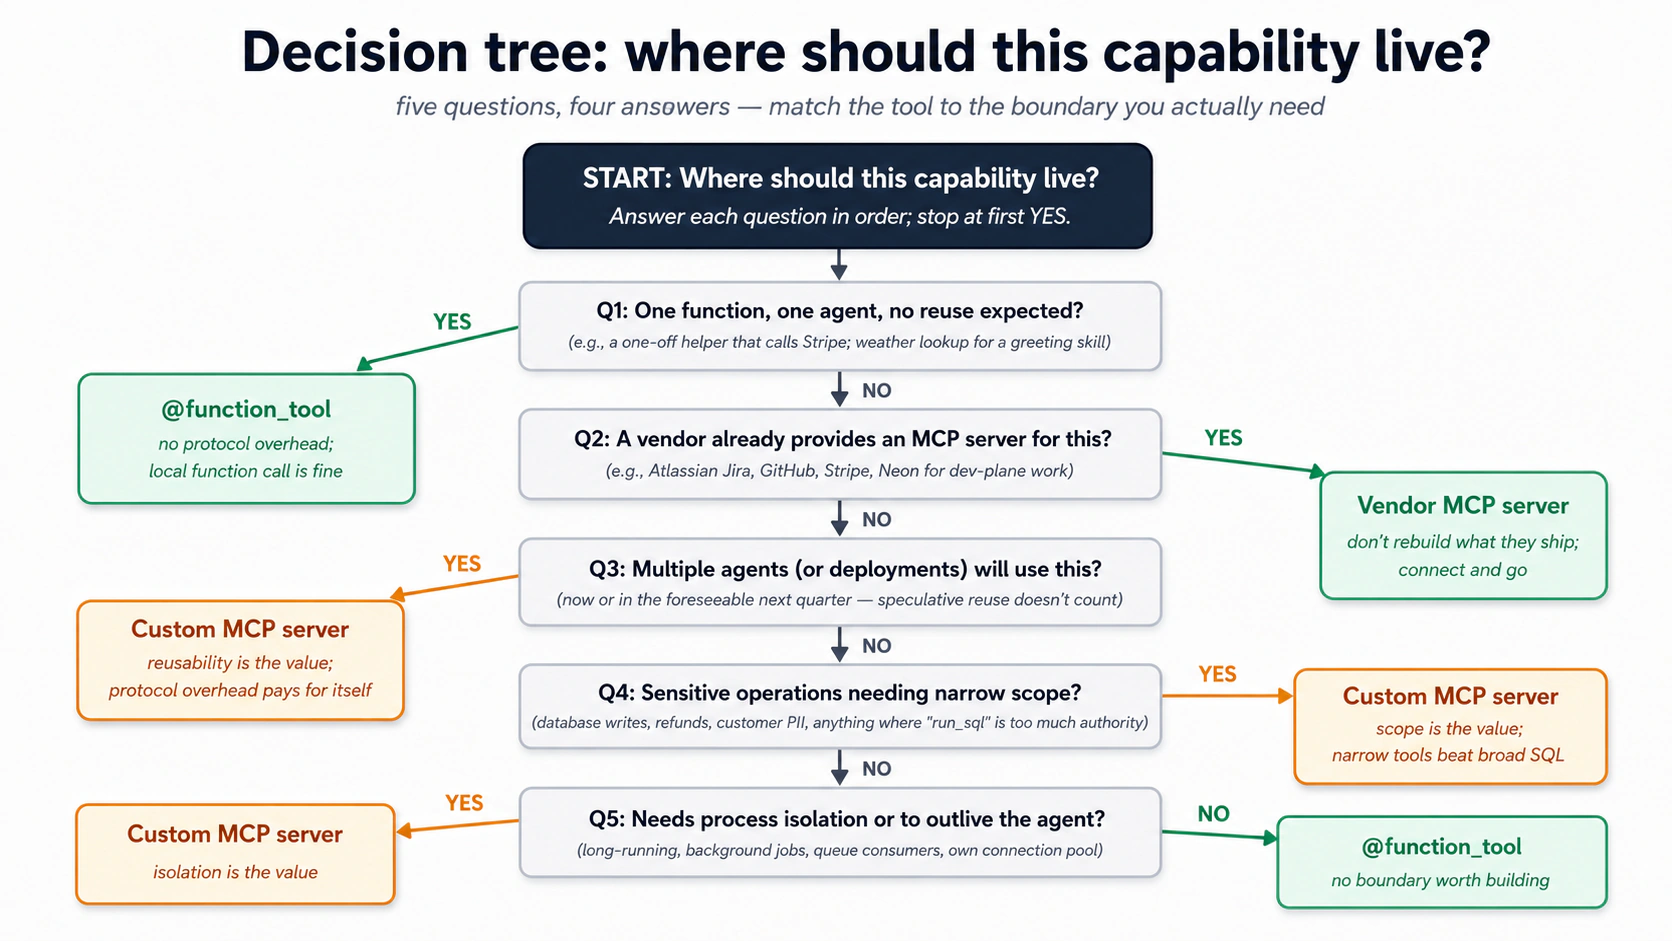
वही logic एक quick-scan table में:
| आप expose करना चाहते हैं... | यह इस्तेमाल करें | क्यों |
|---|---|---|
| एक input वाला एक function, एक agent द्वारा इस्तेमाल | @function_tool | protocol overhead की ज़रूरत नहीं। Local function call ठीक है। |
| आपके agent के code से tightly coupled कई functions | @function_tool | अगर वे agent के साथ state साझा करते हैं और उसी repo में रहते हैं, वे agent का हिस्सा हैं। |
| एक capability जिसे कई agents (या कई deployments) इस्तेमाल करेंगे | Custom MCP server | protocol ही इसे reusable बनाता है। |
| एक capability जिसे agent के process से ज़्यादा जीना है | Custom MCP server | Long-running connections, background jobs, queue consumers। |
| Vendor-provided functionality (Neon, GitHub, Linear) | Vendor's MCP server | जो वे देते हैं उसे फिर से न बनाएँ। |
| Sensitive operations जिन्हें narrow scope चाहिए | Custom MCP server | ठीक वे tools define करें जो आपको चाहिए; और कुछ नहीं। |
एक custom MCP server का shape जितना लगता है उससे simpler है। यह एक छोटा program है जो कुछ named tools declare करता है। हर tool की एक plain-English description होती है (वही तरह का trigger text जो एक SKILL.md रखता है) जो model को बताती है कब इसकी ओर हाथ बढ़ाना है, और typed inputs की एक छोटी list तो model जाने क्या pass करना है। बस इतना: कुछ well-described, narrow tools और कुछ नहीं। कोई general run_sql नहीं, कोई escape hatch नहीं।
और आप वह program हाथ से नहीं लिखते। उसी तरह जैसे आपने skills install की हैं और अपने agent को काम करने दिया है, एक mcp-builder skill है जो एक scope description को एक working, tested server में बदलती है। आपका judgment scope में जाता है, कौन से tools मौजूद हैं, हर एक को क्या करने की अनुमति है, और कौन से deliberately नहीं, plumbing में नहीं। prompt flow ऐसा दिखता है:
/mcp-builder Let's design a custom MCP server called "customer-data"
on the streamable-HTTP transport, stateless flavor (each call an
independent request, no open session, so it scales). Plan the
implementation first, then build it.

Scope: exactly three tools, nothing else.
- lookup_customer(customer_id): return id, email, tier, open-ticket count
- find_similar_resolved_tickets(description, limit): semantic search over
  past resolved tickets
- issue_refund(order_id, amount_cents, reason): issue a refund (amount in
  integer cents, never a float) AND write an audit row in the same transaction

No general SQL tool. Each tool gets a clear description so the model
knows when to call it. Start a fresh project with uv, walk me through
the plan before writing code, then build and verify it.
agent एक नया uv project scaffold करता है, tools plan करता है, server बनाता है, और verify करता है कि यह चलता है। एक बार यह मौजूद हो, आप इसे उन्हीं दो तरीकों से जोड़ते हैं जो आप पहले देख चुके हैं MCP servers को जुड़ते: अपने general coding agent से (Claude Code या OpenCode, तो आप इसे हाथ से test कर सकें) और अपने OpenAI Agents SDK Worker से (तो Worker इसे असल में इस्तेमाल कर सके)। Part 4 का Decision 6 इस build को end to end walk करता है।
तीन चीज़ें यह server आपको देता है जो @function_tool नहीं देता।
-
Process isolation. MCP server अपने ही process में चलता है (stdio के लिए subprocess, streamable HTTP के लिए separate service)। server में एक crash agent को crash नहीं करता; server में एक memory leak agent में leak नहीं करता।
-
Scope. server सिर्फ़ वे कुछ tools expose करता है जो आप define करते हैं (worked example का
customer-dataserver तीन रखता है)। कोईrun_sqlनहीं। कोई "execute arbitrary code" नहीं। model इस scope से नहीं बच सकता क्योंकि protocol और कुछ expose नहीं करता। यह एक असली defense in depth है: अगर model ने कुछ बेवक़ूफ़ी करने का फ़ैसला भी कर लिया, तो इसे करने का surface area वे कुछ functions हैं। -
Agents के पार reusability. एक दूसरा agent (एक Sales Worker, एक Reporting Worker) उसी
customer-dataMCP server से बात कर सकता है। वही scope, वही protocol, वही trust boundary। capability agents के बीच एक copy-paste के बजाय एक shared piece of infrastructure बन जाती है।
trade-off असली है। Custom MCP servers operational complexity जोड़ते हैं: deploy करने को एक और process, logs का एक और set, एक और network hop (अगर remote), manage करने को एक और version। एक single agent द्वारा इस्तेमाल किए एक single function के लिए एक न लिखें। तब लिखें जब capability reuse होने वाली हो, जब scoping मायने रखे, या जब isolation आपको safety खरीदकर दे।
PRIMM, Predict. आप customer-support Worker design कर रहे हैं। आपको चाहिए: (1) past resolved tickets पर semantic search; (2) एक refund audit row लिखना; (3) current weather पढ़ना (एक greeting skill में इस्तेमाल जो कहती है "good morning from sunny Karachi"); (4) एक refund जारी करने के लिए payment gateway call करना। हर एक के लिए predict करें:
@function_tool, custom MCP server, या vendor MCP server (जैसे Stripe का, अगर ऐसा कोई मौजूद हो)?
जवाब framework को सामने लाते हैं:
- Custom MCP server (
customer-data). Agents के पार reused; sensitive data; scoped tools एक broadrun_sqlसे बेहतर। - Custom MCP server (
customer-data) या@function_tool. दोनों काम करते हैं; अगर Worker एकमात्र writer है, function tool ठीक है। अगर कई Workers audit rows लिखेंगे, MCP server। @function_tool. एक agent, एक tiny function, defend करने को कोई security surface नहीं। इसके लिए एक server न बनाएँ।- Vendor MCP server (Stripe MCP) अगर मौजूद हो, वरना Stripe की API call करता
@function_tool. third-party APIs को अपने MCP server में wrap न करें जब तक आपको ऊपर policy जोड़ने की ज़रूरत न हो।
framework एक बार trace करने पर साफ़ है: MCP की value उस boundary की value के साथ बढ़ती है जो यह बनाता है। एक boundary जो आपको नहीं चाहिए overhead है।
Try with AI
इसे अपने coding agent में paste करें। यह decision tree को उस customer-support Worker पर लागू करता है जिसे आप असल में बना रहे हैं, तो हर choice वह है जिसे आप ship कर सकें, उस infrastructure के बारे में guess नहीं जो आपके पास नहीं है।
Here are five capabilities I'm thinking of adding to my customer-support
Worker. For each, walk the Concept 14 decision tree with me and recommend
one: a @function_tool, my custom customer-data MCP server, or a vendor
MCP server (if a credible one exists). Justify each choice with ONE of
the three properties (isolation, scope, reusability), or say plainly why
no boundary is worth building.

1. Look up a customer by email (the gap Decision 8 leaves open).
2. Issue the real refund through Stripe (actual money, third-party API).
3. Send the drafted reply as an email through our mail provider.
4. Convert a UTC timestamp to the customer's local time for a greeting.
5. Let a second Worker (a sales assistant) reuse the customer lookups.

Then push back on me: which TWO of these would you deliberately NOT put
behind a custom MCP server, and what does that say about when the
boundary earns its cost?
Concept 15: MCP under load: transports, pooling, और scale पर क्या होता है
एक agent और एक server वाला एक demo बस काम करता है। असली traffic, एक मिनट में कई conversations, तीन pressures जोड़ता है। आपको एक पहले Worker के लिए इन पर act करने की ज़रूरत नहीं, लेकिन इनके मौजूद होने को जानना आपको बाद में एक confused afternoon से बचाता है। हर एक का एक plain fix है।
- Agent और server के बीच का wire। एक local subprocess (stdio) तब ठीक है जब सब कुछ एक machine पर चलता हो। जिस पल एक से ज़्यादा agent server साझा करे, या server अपने hardware पर जाए, remote transport (streamable HTTP) पर switch करें। वह एक deployment change है, एक rewrite नहीं।
- वही setup cost बार-बार न pay करें। तीन छोटी आदतें repeated costs को one-time में बदलती हैं: Worker boot होने पर हर server से एक बार connect करें और वह connection खुली रखें, बजाय हर request पर reconnect करने के; agent को server की tool list याद रखने दें बजाय हर run "what can you do?" दोबारा पूछने के (जब आप tools बदलें तो इसे refresh करें); और server के अंदर database connections का एक ready pool रखें, तो एक query हर बार एक fresh खोलने का इंतज़ार न करे। एक quirk जो एक long-lived Worker एक scale-to-zero या pooled Postgres (Neon) पर hit करता है: pooler idle connections बंद कर देता है, तो अगर process block होता है (एक terminal
input()prompt asyncio event loop को freeze कर देता है), अगली write "connection was closed in the middle of operation" के साथ fail होती है। blocking prompts को loop से बाहर चलाएँ (asyncio.to_thread) और pool को उस error पर एक बार re-acquire करवाएँ। - हर चीज़ पर एक ceiling डालें, और trace को पूरा रखें। cap करें कि एक request कितने steps ले सकता है, हार मानने से पहले एक failed tool call को कुछ बार retry करें, और server को rate-limit करें तो एक burst इसे swamp न कर सके। और सुनिश्चित करें कि आपका trace call को MCP boundary के पार follow करे: जब Worker एक tool call करता है, आप चाहते हैं कि server का अपना database work उसी picture में दिखे। वरना server के अंदर एक slow query बाहर से invisible है, और आप latency को गलत जगह chase करेंगे।
deeper knobs (per-tenant concurrency caps, fine transport tuning) उससे आगे हैं जो एक पहले Worker को चाहिए। ये तीन वे हैं जो पहले काटते हैं।
Quick check. True या false: (a) एक server को legacy SSE transport से streamable HTTP पर ले जाना आपको server के tools rewrite करने पर मजबूर करता है। (b) agent को एक server की tool list cache करने देना production में safe है, जब तक आप tools बदलने के बाद cache refresh करें। (c) पाँच abilities को MCP tools के रूप में expose करना हमेशा model को उन्हीं पाँच को local function tools के रूप में expose करने से ज़्यादा context budget की लागत है। Answers: (a) Mostly false: tools unchanged हैं; server को बस newer transport बोलना है, जो ज़्यादातर modern पहले से करते हैं। (b) True: वही intended pattern है। (c) False: model को एक tool एक tool है। पाँच tool descriptions लगभग उतनी ही लागत हैं चाहे वे किस side रहें।
Try with AI
My customer-support Worker is in production. It runs 80 conversations/minute
at peak. Each conversation makes 2-4 MCP tool calls on average. I'm seeing
intermittent latency spikes: most calls return in 200ms, but a small
percentage take 5-15 seconds.

Walk me through five places I'd investigate, in order of priority:

1. The agent-side MCP client connection management.
2. The transport choice between agent and MCP server.
3. The MCP server's internal connection pool to Postgres.
4. Postgres-side query performance (slow queries blocking the pool).
5. Network or DNS issues between agent and MCP server.

For each, name the specific signal I'd look for and the rough fix.
Part 4: worked example, customer-support Worker
एक realistic build जो ऊपर के हर concept को इस्तेमाल करता है। आप एक minimal chat agent से शुरू करते हैं (एक prompt, लगभग एक मिनट), फिर उसी worker को एक customer-support Worker में बढ़ाते हैं, एक-एक टुकड़ा। हर Decision एक टुकड़ा जोड़ता है, system of record, फिर Skills, फिर MCP layer, फिर audit trail, और आप हर बार worker को फिर चलाते हैं तो नया टुकड़ा आगे बढ़ने से पहले काम करता दिखे। आठ Decisions worker बनाते हैं; एक नौवाँ उस एक action के सामने एक human रखता है जो पैसा हिलाता है।

Step 0: chat agent खड़ा करें (एक prompt, ~1 minute). तो हर कोई Decision 1 को एक ही जगह से शुरू करे। (Build AI Agents किया था? वह project खोलें, यह वही agent है, और Decision 1 पर skip करें।)
In this digital-fte folder, build me a small terminal chat agent with the
OpenAI Agents SDK: a uv project, a gpt-5-class model, on a local sandbox.
Check the current SDK docs for the API. Get it answering "hi", then stop,
we grow it in the steps below.
Creates: worker file (जैसे worker.py) plus इसका uv project।
Check. आप "hi" भेजते हैं और यह जवाब देता है। वही starting line है; Decision 1 इसे
AGENTS.mdके ज़रिए नई architecture सिखाता है।
The brief
Step 0 के minimal chat agent को एक customer-support Worker में evolve करें जो:
- तीन Skills on demand load करता है:
summarize-ticket,find-similar-cases, औरescalate-with-context। - Concept 7 की पाँच tables वाले एक Neon Postgres system of record से पढ़ता और लिखता है (conversation turns उसी database पर SDK Session में रहते हैं)।
- past resolved cases की एक छोटी library पर semantic search के लिए pgvector इस्तेमाल करता है।
- runtime पर business data के लिए Postgres से एक scoped, custom MCP server (
customer-data) के ज़रिए बात करता है, कभी Neon MCP server नहीं और कभी agent code में directasyncpgनहीं। - हर meaningful action के लिए एक audit row लिखता है (हर skill invoked, हर database write, हर refund considered) अपने own direct connection के ज़रिए, वह एक path जो deliberately MCP boundary को bypass करता है, तो audit trail उस system से starved न हो सके जिसका यह audit करता है।
"verification at the end" test: एक customer message करता है "I haven't received my refund from order #4429, it's been two weeks." Worker vector search के ज़रिए तीन similar past cases ढूँढता है, एक response draft करता है जो सबसे similar case की resolution cite करता है, और इसने क्या किया उसकी एक audit row लिखता है (और, एक असली deploy में, escalate करता है अगर customer Pro-tier है)। message से exact customer या order record resolve करने को एक lookup tool चाहिए जो आप बाद में जोड़ते हैं; Decision 8 दिखाता है कि वह gap कहाँ है।
जो prompts आगे आते हैं उन्हें कैसे पढ़ें। आप इस Worker को अपने coding agent को एक छोटे task at a time prompt करके बढ़ाते हैं, और हर Decision उसी तरह खत्म होता है: नया टुकड़ा उस एक worker में wired होता है और आप इसे चलाते हैं, तो आप इसे काम करता देखें इससे पहले कि अगला Decision इस पर बनाए। आप SQL, Python, या config type नहीं करेंगे: agent इसे लिखता है, आप steer और check करते हैं। आपके agent ने folder खोलते ही
AGENTS.mdपढ़ लिया, तो यह project जानता है; आपके prompts छोटे रहते हैं। दो आदतें:
- एक step, एक task. उस step का prompt paste करें और कुछ नहीं। जो भी असली code लिखता है, उसके लिए prompt कहता है "plan first": plan पढ़ें, push back करें, approve करें, फिर इसे build करने दें।
- अगले step से पहले check करें। हर step एक Check से खत्म होता है: एक plain-English सवाल जो आप पूछते हैं ("show me X")। तब तक आगे न बढ़ें जब तक यह pass न हो, वरना आप चार steps गहरे होंगे इससे पहले कि आप पाएँ कि step one गलत था।
Decision 1: rules file को नई architecture से update करें
आप कहाँ हैं: एक minimal chat agent जो "hi" का जवाब देता है; यह Decision AGENTS.md में तीन architecture rules जोड़ता है; अंत तक आप उन rules को file के diff में देखेंगे।
आपका agent इस project को AGENTS.md से पहले से जानता है। जो यह अभी नहीं जानता वे कुछ rules हैं जो इस course की architecture जोड़ती है, तो आप उन्हें अभी AGENTS.md में लिखते हैं, और हर बाद का prompt छोटा रह सकता है। एक task।
Step 1: AGENTS.md में नए rules जोड़ें।
Add a short "Rules" section to AGENTS.md so a fresh session follows these:
- business data is read and written only through the customer-data MCP
  server, never raw SQL from the running worker
- the audit log uses its own direct database connection, and each action
  and its audit row are committed together
- embeddings use the same model to store and to search

Show me the diff before you write it.
Edits: AGENTS.md।
Check. diff पढ़ें। वे तीन rules वहाँ हैं, plain language में, खासकर पहला: यही वह है जो model को बाद में MCP boundary के चुपके से इर्द-गिर्द जाने से रोकता है। अगर agent ने एक को softened या drop किया, फिर से prompt करें।
Why. एक weak rules file हफ़्तों बाद चुपचाप fail होती है, जब model वह shortcut लेता है जिसे forbid करने को rule बना था। इसे अभी लिखना ही वह है जो इसके बाद हर prompt को छोटा रखता है।
Decision 2: schema और Skill set plan करें
आप कहाँ हैं: एक AGENTS.md जो architecture बताती है लेकिन इसके लिए अभी कोई design नहीं; यह Decision एक reviewed written plan जोड़ता है; अंत तक आप एक markdown plan देखेंगे जिस पर आपने push back किया और approve किया।
आप इस Decision को एक written plan के साथ खत्म करते हैं जिसे आपने review किया है, code की एक line मौजूद होने से पहले। एक task। Plan Mode में जाने के लिए Shift+Tab दो बार दबाएँ (OpenCode में, Plan agent पर switch करने के लिए Tab दबाएँ): model आपका project पढ़ सकता है लेकिन कुछ edit नहीं कर सकता।
Step 1: plan लें।
Plan the customer-support Worker evolution of this project. The
foundation (OpenAI Agents SDK, your sandbox runtime, sessions, streaming,
guardrails) stays. We're adding:

1. Three Skills: summarize-ticket, find-similar-cases, escalate-with-context.
   For each, propose: the description, the operational shape (script-driven
   or instruction-driven), and what reference files it needs.

2. The five-table schema from Part 2 Concept 7, plus any tables specific
   to a customer-support domain (probably: customers, orders, tickets, refunds).

3. The custom MCP server (customer-data), with exactly the runtime tools
   our agent will need. Propose the tool list and signatures. No run_sql.

4. The audit-logging plan: what writes an audit row, what doesn't.

Output the plan as a markdown file at plans/customer-support-worker-plan.md.
Do not write code yet.

For reference the part 2 here: https://agentfactory.panaversity.org/docs/digital-fte-crash-course
Creates: plans/customer-support-worker-plan.md।
Check. plan पढ़ें और उन दो चीज़ों पर push back करें जो पहला draft आमतौर पर गलत करता है: vague Skill descriptions ("Summarizes tickets", एक description जो कभी सही fire नहीं होती, Concept 3) और over-broad MCP tool inputs ("query: string", जो बस disguise में
run_sqlहै;lookup_customerको एकcustomer_idलेना चाहिए, free text नहीं जिससे आप SQL बनाते हैं)। दोनों tight होने तक plan approve न करें।
एक plan पहले क्यों। दोनों failure modes बनने के बाद घंटों की लागत हैं और एक markdown plan में fix करने में मिनटों की। यह पूरे Part में गलत होने की सबसे सस्ती जगह है।
आप पहली बार database छूने वाले हैं, और आप Decisions 3 से 8 के पार बहुत सारा SQL देखेंगे। आप इसे कभी type या हाथ से run नहीं करते। तीन components इसके owner हैं, और दो different काम करते दो अलग MCP servers हैं।
| SQL / data path | कौन लिखता है | कौन चलाता है | कब |
|---|---|---|---|
| Schema + migrations (यह Decision) | आप describe करते हैं; agent draft करता है | Neon MCP server (एक dev tool जो आप अपने agent से जोड़ते हैं) | एक बार, setup पर |
| Verification queries ("Done when" checks) | lesson में दिखाया गया | Neon MCP server run_sql, आपके द्वारा plain English में driven | एक step के काम करने की पुष्टि के लिए |
| Runtime business SQL: lookups, vector search, refunds (D6) | mcp-builder generate करता है | आपका बनाया customer-data MCP server | हर customer interaction |
| Audit writes (D7) | audit subsystem code | एक separate asyncpg pool (no MCP) | हर action |
दो MCP servers, कभी confused नहीं। Neon MCP server (जिसे आपने ऊपर setup step में authenticate किया) एक development tool है: आप इसे database को plain English में provision और verify करने के लिए इस्तेमाल करते हैं, और आप इसे runtime पर कभी इस्तेमाल नहीं करते। customer-data MCP server वह scoped server है जिसे आप Decision 6 में बनाते हैं; चलता हुआ Worker उससे बात करता है, और सिर्फ़ उससे, business data के लिए। Concept 12 समझाता है कि production में एक general-purpose run_sql एक prompt-injection hole क्यों है।
Read, write, और drop बराबर authority नहीं हैं। चलते हुए Worker के tools risk से बँटते हैं:
- Read (
lookup_customer,find_similar_resolved_tickets, D6 में बने): freely चलते हैं, कोई gate नहीं। Reads allow करना सस्ता है। - Write (
issue_refund, D6 में बना): वह एक tool जो पैसा हिलाता है। आप इसे Decision 9 में human approval के पीछे gate करते हैं, Worker के end to end काम करने के बाद, तो किसी refund के जाने से पहले एक human sign off करे। Audit writes append-only हैं: inserted, कभी updated या deleted नहीं। - Drop / schema change (
CREATE/DROP TABLE, DDL): runtime पर बिल्कुल callable नहीं। custom server कभी एक DDL tool expose नहीं करता, तो approve करने को कुछ नहीं है। Schema changes सिर्फ़ dev time पर होते हैं (यह Decision), Neon MCP server के ज़रिए, एक temporary branch पर इससे पहले कि वे कभीmainको छुएँ।
Rule of thumb: reads free चलते हैं, writes gated हैं, और structural changes agent के ज़रिए कभी production तक नहीं पहुँचते।
Decision 3: Neon provision करें और schema migration चलाएँ
Neon का free tier Part 5 के मान लिए volume (~200 conversations/day) पर एक single Worker cover करता है। यहाँ $0/month plan करें। free plan limits 0.5 GB storage और 100 compute-hours per project हैं (Neon pricing); उससे ऊपर, Launch tier pay-as-you-go है (मोटे तौर पर $0.11/CU-hour + $0.35/GB-month), और एक worked-example Worker आमतौर पर $25/month के नीचे रहता है। पूरे breakdown के लिए Part 5 की cost shape table देखें।
आप कहाँ हैं: एक approved plan लेकिन कोई database नहीं; यह Decision आपके schema और एक persistent Session वाला एक live Neon database जोड़ता है; अंत तक आप Postgres में नौ tables और earlier turns याद रखने वाला एक worker देखेंगे।
आप इस Decision को एक live Neon database के साथ खत्म करते हैं जो आपका schema रखता है, plus एक Session जो conversation turns इसमें persist करती है। चार छोटे steps, और आप अगले से पहले हर एक check करते हैं, क्योंकि एक broken database step तब तक invisible है जब तक कुछ downstream कुछ नहीं पढ़ता। Plan Mode से बाहर निकलने के लिए Shift+Tab दबाएँ और सुनिश्चित करें कि Neon MCP server connected है (Concept 12)। agent यह सब Neon MCP tools के ज़रिए चलाता है; आप कभी एक database console नहीं खोलते।
Step 1: project बनाएँ।
Create a fresh Neon project called "chat-agent" and give me the
connection string for its main branch.
Check. agent से project के मौजूद होने की पुष्टि करने और
mainconnection string वापस paste करने को कहें। (आप इसे Neon console में भी देख सकते हैं।) हाथ में एक connection string के बिना आगे न बढ़ें।
Step 2: pgvector on करें।
Enable the pgvector extension on the chat-agent database.
Check. "Confirm the
vectorextension is now listed on the database." अगर नहीं है, तो embeddings store करने वाली कोई भी downstream चीज़ काम नहीं करेगी, तो यहीं रुकें जब तक यह न हो।
Step 3: schema apply करें, branch-first।
Apply our schema to chat-agent: the five-table core from Concept 7
(conversations, documents, embeddings, audit_log, capability_invocations)
plus four domain tables, customers, orders, tickets, refunds. Build the
audit_log and capability_invocations columns EXACTLY as Concept 7 prints
them: audit_log keeps its `target` column and the closed `action` CHECK
set, capability_invocations keeps its `status` CHECK set, so Decision 8's
replay query matches the schema you built. Test it on a temporary branch
first, then merge to main. Plan the DDL first; I'll approve before you merge.
Check. "Count the tables in the public schema, I expect nine, and confirm the embeddings index exists." नौ tables का मतलब migration land हो गया। अगर यह कम है, merge साफ़ apply नहीं हुआ: agent से एक fresh branch पर फिर run करवाएँ। (यह ठीक Concept 12 का development use case है: schema work plain English में, एक branch पर tested, सिर्फ़ आपके "go ahead" के बाद
mainमें merged।)
मोटे तौर पर आपको क्या दिखना चाहिए:
table_count = 9
embeddings index: present
Step 4: worker को इसकी Session दें, और साबित करें कि यह याद रखता है।
Write the connection string to .env as NEON_DATABASE_URL, then give the
worker a SQLAlchemySession on that database so it remembers across turns.
Install what the session needs (the sqlalchemy extra, asyncpg, pgvector,
and greenlet), and use the postgresql+asyncpg:// form of the URL for it.
Edits: worker file (Session जोड़ता है); .env में NEON_DATABASE_URL लिखता है।
Check. एक two-turn conversation चलाएँ: worker को अपना name और एक order number बताएँ, फिर एक दूसरे turn में इससे उन्हें वापस दोहराने को कहें। यह दोनों याद रखता है, वह Session का अपना काम करना है, सिर्फ़ एक table में बैठी एक row नहीं। फिर पूछें: "show me those turns in the
agent_messagestable." इन्हें Postgres में देखना साबित करता है कि state अब system of record में रहता है, सिर्फ़ memory में नहीं। (दो चीज़ें जो agent अक्सर चूकता है:[sqlalchemy]extragreenletनहीं खींचता, तो इसेuv add greenletचाहिए; और async engine को URL काpostgresql+asyncpg://form चाहिए, barepostgresql://नहीं।SQLAlchemySessionआपके लिएagent_sessionsऔरagent_messagesबनाती है।)
Decision 4: पहली Skill, summarize-ticket, define और prove करें, फिर इसे wire करें
आप कहाँ हैं: एक worker जो याद रखता है लेकिन कोई portable capability नहीं रखता; यह Decision disk पर तीन Skills जोड़ता है और उन्हें worker में wire करता है; अंत तक आप एक को एक असली run पर fire होते देखेंगे।
आप इस Decision को disk पर तीन Skills के साथ खत्म करते हैं, पहली आपके सेट किए criteria के against proved, और Skills capability worker में wired तो आप इसे fire होते देखें। यहाँ है वह shift कि लोग आमतौर पर skills कैसे लिखते हैं: आप skill को hand-author और eyeball नहीं करते। आप skill-creator को बताते हैं skill कब fire होनी चाहिए और एक अच्छा result कैसा दिखता है, और यह skill को उन criteria के against build, test, और tighten करता है। success define करना और results judge करना वह काम है जो एक domain expert असली दुनिया में करता है; नीचे की authoring tool की है।
Step 1: पुष्टि करें कि skill-creator available है। आपने इसे पहले ही install किया (mcp-builder और neon-postgres के साथ) base prep में, तो यह .claude/skills/ में बैठा है और आप इसे यहाँ फिर install नहीं करते। इसे सिर्फ़ तभी फिर add करें अगर यह किसी तरह गायब हो गया हो:
npx skills add https://github.com/anthropics/skills --skill skill-creator --agent claude-code -y
Check.
skill-creator.claude/skills/में मौजूद है। (एक install ने दोनों tools की सेवा की: OpenCode.claude/skills/को एक fallback के रूप में पढ़ता है, तो चलाने को कभी एक अलग--agent opencodeinstall नहीं था।)
Step 2: define करें कि skill क्या करती है और कब fire होती है। skill-creator आपसे वे दो चीज़ें पूछता है जो सिर्फ़ आप तय कर सकते हैं, trigger और output। दोनों upfront दें, plain language में, और इसे draft करने दें।
Use skill-creator to build a summarize-ticket skill. Here is the spec.
Output: turn one support ticket into a five-section handoff (Customer
Context, Issue, Resolution Steps Taken, Current Status, Recommended Next
Action). It SHOULD fire on phrasings like "write a handoff note for #4471",
"TL;DR this thread", and "where does this stand before I escalate",
including ones that never say "summarize". It should NOT fire on drafting a
customer reply, triaging a batch, or reporting on ticket volume. Draft the
skill from that, then we'll test it.
Creates: .claude/skills/summarize-ticket/।
Check.
.claude/skills/summarize-ticket/के तहत एक draft मौजूद है, और इसकीdescriptionआपकी fire / don't-fire list को दर्शाती है, एक generic "summarizes tickets" नहीं। वह description वह एक input है जो तय करती है कि skill कभी चलेगी या नहीं (Concept 3); आपने इसे शब्दबद्धी पर guess करने के बजाय testable criteria के रूप में सौंपा।
Step 3: skill-creator को इसे test और tighten करने दें। यह वह हिस्सा है जो description को eyeball करना replace करता है। skill-creator आपकी fire / don't-fire list को trigger evals में बदलता है, उन्हें चलाता है, और description को तब तक improve करता है जब तक skill तब fire हो जब इसे होना चाहिए और चुप रहे जब इसे नहीं चाहिए।
Test summarize-ticket against the fire and don't-fire cases I gave you:
turn them into trigger evals, run them, and tighten the description until
it passes. Show me which cases pass and which fail, before and after.
Check. आप eval results पढ़ते हैं, raw description नहीं: skill handoff, TL;DR, और status phrasings पर fire होती है और near-misses (एक reply draft करना, batch triage) पर चुप रहती है। वह pass / fail table Concept 3 के "keyword delete करें और देखें कि यह अब भी कहती है कब fire करना है" instinct का rigorous version है। model इस skill को इसकी description अकेले से चलाने का फ़ैसला करता है, तो उस table को green करना ही पूरा खेल है।
दोनों tools, एक discipline। Claude Code में, skill-creator इसे एक automated loop के रूप में चलाता है: यह आपके cases को एक training set और एक held-out set में split करता है, हर एक को एक reliable trigger rate के लिए कुछ बार चलाता है, और कई rounds पर optimize करता है, उस description को रखता है जो उन cases पर सबसे अच्छा score करती है जिन पर इसने train नहीं किया। OpenCode में आप वही loop हाथ से चलाते हैं: cases define करें, test करें, tighten करें, दोहराएँ। automation अलग है; असली phrasings के against trigger साबित करने की discipline एक जैसी है।
Step 4: बाकी दो Skills को उसी तरह define करें। वही move: define करें कि हर एक कब fire होती है और क्या produce करती है, और skill-creator को उन्हें build करने दें। आपको तीनों पर पूरा test loop की ज़रूरत नहीं; इसे summarize-ticket पर एक बार चलाने ने आपको cycle सिखाया। हर एक के लिए trigger और output shape दें; जिन descriptions पर यह land करता है उन्हें नीचे वालों जैसी पढ़ना चाहिए। Worker को तीनों चाहिए।
# .claude/skills/find-similar-cases/SKILL.md (frontmatter only)
---
name: find-similar-cases
description: Searches the resolved-tickets library for tickets semantically similar to a customer's described issue, returning the top 3-5 with their resolutions, ranked by how closely each matches. Use when the user describes a problem, complaint, or symptom and you need to check whether the team has handled something similar before. Calls the find_similar_resolved_tickets MCP tool. Always run this BEFORE drafting a response, so the response can reference proven prior resolutions rather than inventing a new approach.
---
body इन steps से गुज़रती है:
- context से issue description extract करें।
find_similar_resolved_ticketsकोlimit=5के साथ call करें।- top तीन को उनके distance values के साथ एक markdown table में present करें।
- low-confidence matches को explicitly flag करें (distance लगभग 0.3 से ऊपर, जहाँ कम का मतलब ज़्यादा similar) "no strong prior precedent found" के रूप में।
instruction "always run this BEFORE drafting" असली काम कर रहा है; इसके बिना, model कभी-कभी priors से एक reply draft करता है और library को कभी नहीं देखता।
# .claude/skills/escalate-with-context/SKILL.md (frontmatter only)
---
name: escalate-with-context
description: Packages a customer conversation for handoff to a tier-2 support agent. Produces a structured escalation note with customer profile, issue summary, what was already tried, why escalation is recommended, and the suggested specialist team. Use when (a) the customer is on the Pro or Enterprise tier AND the issue is unresolved after one round of investigation, (b) the customer's sentiment is clearly negative, (c) the issue involves billing >$500 or a refund decision, or (d) the user explicitly asks for a human.
---
body पहले summarize-ticket invoke करती है structured context पाने के लिए, फिर एक six-section escalation note लिखती है (customer context, issue, attempted resolutions, sentiment signals, recommended team, suggested SLA)। description में चार explicit trigger conditions वही हैं जो इस skill को over-firing से रोकती हैं; vague escalation logic वाला एक Worker सब कुछ escalate करता है, जो purpose ही defeat कर देता है।
Check. दोनों descriptions explicit, specific triggers का नाम लेती हैं, "use when relevant" नहीं। खासकर
escalate-with-context: इसकी चार conditions वही हैं जो इसे हर message पर fire होने से रोकती हैं। तीनों Skills अब.claude/skills/में रहती हैं।
Creates: .claude/skills/find-similar-cases/ और .claude/skills/escalate-with-context/।
Step 5: Skills capability को worker में wire करें, और एक को fire होते देखें। तीनों Skills disk पर हैं; अब worker को खुद उन्हें load करना है। इसे इसकी default capabilities के ऊपर Skills capability दें, फिर इसे चलाएँ।
Give the worker the Skills capability pointed at .claude/skills, on top of
its default capabilities, and run it from the project root with: "write a
handoff note for ticket #4471, refund delayed two weeks, customer Sam."
Show me the run so I can see the skill load.
Edits: worker file (Skills capability जोड़ता है)।
Check. run
summarize-ticketके लिए एकload_skillcall दिखाता है और reply पाँच sections में वापस आता है: वह skill का आपके अपने worker के अंदर fire होना है, सिर्फ़ disk पर बैठना नहीं। अगर इसके बजाय worker एक summary free-write करता है और कोईload_skillनहीं दिखता, तो path गलत resolve हुआ: Skills एक path से load होती हैं जहाँ worker चलता है उसके relative, तो project root से एक relative.claude/skillsके साथ चलाएँ, एक absolute नहीं। (macOS पर/tmpके तहत एक absolute path चुपचाप zero skills load करता है, बिल्कुल कोई error नहीं, जो यह fail होने का सबसे confusing तरीका है।) एक और: आप Skills को default capabilities में add करते हैं, उन्हें replace नहीं करते, वरना worker उस filesystem और shell को खो देता है जिस पर यह निर्भर है।
मोटे तौर पर run में आपको क्या दिखना चाहिए:
tool call: load_skill(name="summarize-ticket")
reply: Customer Context / Issue / Resolution Steps Taken / Current Status / Recommended Next Action
इसे अभी क्यों wire करें। यह वह पल है जब Skills files होना बंद करके capability बन जाती हैं: अगला message जो एक ticket का ज़िक्र करता है इस skill को इसकी description अकेले से fire करता है। बाकी दो Skills उन MCP tools पर निर्भर हैं जो आप आगे बनाते हैं, तो summarize-ticket, जो अपने आप खड़ी रहती है, यहाँ verify करने के लिए honest वाली है।
Decision 5: embedding pipeline बनाएँ और document library seed करें
कुछ दर्जन resolved tickets का एक seed corpus ~300 tokens हर एक पर text-embedding-3-small के $0.02 per 1M input tokens पर एक cent के अंश के लिए embed होता है। नए tickets और conversations का ongoing embedding worked-example volume पर आमतौर पर $3/month के नीचे रहता है। cost lever inference budget है, embedding budget नहीं।
आप कहाँ हैं: empty tables वाला एक schema और ऐसी skills जिनके पास search करने को कुछ नहीं; यह Decision past resolved tickets की एक seeded, embedded library जोड़ता है; अंत तक आप एक similarity search को ranked matches return करते देखेंगे।
आप इस Decision को past resolved tickets की एक छोटी library के साथ खत्म करते हैं, embedded और searchable। दो steps।
Step 1: seed library code में generate करें। Worker की "library" past resolved tickets का एक set है: इतना छोटा कि तेज़ चले, इतना varied कि search के पास बताने को कुछ हो। आप इसे hand-write नहीं करते, और आप एक CSV नहीं भरते; agent इसे generate करता है।
Have the worker's own SDK generate a dozen-plus varied resolved tickets as
structured data (a Pydantic model is the clean way): each with a customer
email, a one-line summary, and the resolution. Vary the issues across
refunds, logins, duplicate charges, and shipping, so semantic search has
something to tell apart. Write the generator and run it; don't hand me a CSV.
Creates: ticket generator script।
Check. सचमुच अलग issues (refunds, logins, charges, shipping) के पार एक दर्जन-plus generated tickets, तीन के rewordings नहीं। आपने कभी एक row hand-type नहीं की, और वही point है: एक Worker का अपना seed data कुछ ऐसा है जो Worker produce कर सकता है।
Step 2: seed और embed करें। हर generated ticket एक customer_email रखता है, जो seeder को ticket insert करने से पहले एक customers row find-or-create करने देता है (tickets.customer_id foreign key NOT NULL है)। फिर:
Seed the generated resolved tickets so the Worker can search them later.
For each one: find-or-create the customer by email, insert a resolved
ticket, store the case text as a documents row tagged source='past_case'
with the ticket id at metadata->>'ticket_id' (there is no ticket_id column
on documents), then embed that text with
text-embedding-3-small and link the embedding to the document. Write one
audit_log row for the whole seed run. Plan first.
Creates: seed-and-embed script।
वह shape arbitrary नहीं है, और यह वह हिस्सा है जो agent guess नहीं कर सकता: Decision 6 का find_similar_resolved_tickets embeddings को documents (जहाँ source='past_case') को tickets से join करके search करता है। अगर seed rows को उस तरह नहीं बिछाता, तो Decision 8 में search चुपचाप कुछ नहीं return करती और आपको पता नहीं होगा क्यों। agent असली seeder लिखता है; आप वह shape specify कर रहे हैं जो इसे produce करना है। result में पुष्टि करने को दो rules, दोनों Concept 9 से और दोनों पहले से आपके AGENTS.md में: उसी same model से embed करें जिससे आप बाद में query करेंगे, और connection पर pgvector register करें (वरना vectors garbage के रूप में वापस लिखते हैं)।
Check. agent से result वापस पढ़ने को कहें: "Count the documents tagged as past cases (should match the number of tickets you generated), count the embeddings (should match too), confirm only one embedding model is present, and run one similarity search to show the closest match to 'refund delayed two weeks' comes back ranked." दो failure shapes: अगर यह दो embedding models report करता है, seed ने बीच में models mix किए, reset करें और फिर run करें; अगर counts zero वापस आते हैं, seeder ने एक error निगल लिया, इससे वह
audit_logrow वापस पढ़वाएँ जो इसने seed run के लिए लिखी (जो ठीक वजह है कि seeder एक लिखता है)। एक similarity search ranked results return करने तक Decision 6 पर न जाएँ।
मोटे तौर पर similarity search को क्या return करना चाहिए:
query: "refund delayed two weeks"
1. "refund not received after 14 days"   distance 0.08
2. "duplicate charge, awaiting reversal"  distance 0.24
यह एक direct connection क्यों है, MCP नहीं। एक seed script infrastructure है: यह एक बार चलता है, हाथ से, आपके द्वारा, कुछ ऐसा नहीं जो Worker अपने आप करता है। MCP boundary उसके लिए है जो agent autonomously करता है; seed script कुछ ऐसा है जो आप करते हैं। अपने और अपने ही database के बीच एक boundary न डालें जब आप ही keyboard पर हों।
Decision 6: customer-data MCP server define, build, और connect करें
custom MCP server आपके Worker के साथ एक छोटी service के रूप में चलता है; उसी host पर co-located यह कोई meaningful hosting cost नहीं जोड़ता (सिर्फ़ अगर आप इसे separate hardware पर push करते हैं तभी एक compute line दिखती है)। bill असल में inference में दिखता है: हर lookup_customer या find_similar_resolved_tickets call अगले model turn में एक round-trip जितने tokens जोड़ता है। Concept 15 MCP-under-load की latency और pool-size side cover करता है।
आप कहाँ हैं: एक seeded library जिस तक worker अभी runtime पर नहीं पहुँच सकता; यह Decision scoped customer-data MCP server जोड़ता है और इसे wire करता है; अंत तक आप worker को एक असली message पर इसके एक tool को call करते देखेंगे।
आप इस Decision को scoped customer-data server चलते और आपके worker में wired के साथ खत्म करते हैं, इसके तीन tools एक असली run से callable। यह Decision 4 की Skills जैसा ही shape है: आप define करते हैं कि connector को क्या करना है और यह कितना narrow रहता है, mcp-builder इसे बनाता है, और आप इसे इस्तेमाल करके prove करते हैं। आप scope steer करते हैं; आप कोई FastMCP boilerplate hand-write नहीं करते। (एक dangerous tool, issue_refund, को gate करना Decision 9 में आता है, पूरी चीज़ के काम करने के बाद।)
Step 1: पुष्टि करें कि mcp-builder available है। skill-creator की तरह, आपने इसे base prep में install किया, तो यह पहले से यहाँ है। इसे सिर्फ़ तभी फिर add करें अगर यह गायब हो गया हो:
npx skills add https://github.com/anthropics/skills --skill mcp-builder --agent claude-code -y
Check.
mcp-builder.claude/skills/में मौजूद है।
Step 2: tool contract और scope define करें। यह एक Skill के criteria define करने का connector version है: आप ठीक कहते हैं कौन से tools मौजूद हैं, हर एक क्या लेता है, और server कितना narrow रहता है (no general SQL), और mcp-builder इसे plan करता है। इसे streamable HTTP, stateless flavor पर बनाएँ (Concept 11 का default): हर call एक independent request है, तो server एक असली addressable service है जिस तक Worker URL से पहुँचता है, और traffic बढ़े तो आप एक से ज़्यादा copy चला सकते हैं। (एक purely local single-Worker build stdio इस्तेमाल कर सकता था; stateless service उससे match करता है जो आप असल में ship करेंगे।)
/mcp-builder Plan a custom MCP server called "customer-data" on the
streamable-HTTP transport, stateless flavor, with exactly three scoped
tools and no general SQL tool:

- lookup_customer(customer_id): return id, email, tier, open-ticket count.
  Tier lives in customers.metadata->>'tier' (COALESCE to 'standard'); there
  is no tier column.
- find_similar_resolved_tickets(description, limit): semantic search over
  past resolved cases. Embed the description with text-embedding-3-small
  (the SAME model the seed used) and register pgvector on the connection.
  The search joins embeddings -> documents -> tickets, where the
  documents->tickets link is documents.metadata->>'ticket_id' (there is no
  ticket_id column on documents).
- issue_refund(order_id, amount_cents, reason): insert the refund (amount in
  integer cents), set the order to refunded, AND write the audit_log row,
  all in ONE transaction.

Give each tool a clear description so the model knows when to call it.
Show me the plan before any code.
Check. किसी code से पहले plan पढ़ें: ठीक तीन tools, कोई general SQL tool नहीं, और
issue_refundrefund, order-status change, और audit row को एक transaction में लिखता हुआ। अगर कोई missing हो तो push back करें। (एक Neon gotcha agent को सिर्फ़ तभी सौंपें अगर आपने schema को defaultpublicसे हटाया: table names को schema-qualify करें, क्योंकि Neon का pooled endpoint connection release परsearch_pathreset करता है, तोSET search_pathटिकेगा नहीं। course के default migration पर यह बस काम करता है।) एक Neon gotcha जो हमेशा लागू होता है, यहाँ और Decision 7 में: pooled endpoint (PgBouncer, transaction mode) asyncpg के prepared statements तोड़ता है, तो इस server के pool और audit pool दोनों कोasyncpg.create_pool(...)कोstatement_cache_size=0pass करना होगा, वरना पहली ही query error देती है।)
Step 3: इसे build करें, और mcp-builder को tools test करने दें। एक बार plan सही हो: "Build the server exactly as we planned, three tools and no more, then start it and confirm it boots cleanly. Don't add tools I didn't ask for." mcp-builder एक step आगे जाकर evaluations generate कर सकता है, realistic tasks जिन्हें tools को end to end satisfy करना है, जो उस trigger eval का connector version है जो आपने Skill पर चलाया। course के लिए decisive test अगला step है, worker से एक tool call करना, तो यहाँ एक clean boot आगे बढ़ने के लिए काफ़ी है।
Creates: customer-data-mcp/ server।
Check. built server में हर tool की description पढ़ें: यही वह है जो model किसी tool को कब call करना है तय करने के लिए पढ़ता है (वही role एक
SKILL.mddescription निभाती है), और एक vague वाली गलत समय पर fire होती है। फिर वह एक चीज़ पुष्टि करें जो agent सबसे अक्सर subtly गलत करता है:issue_refundbody तीनों writes एक single transaction में करती है। इनमें से ज़्यादातर disciplines आपकेAGENTS.mdमें भी रहती हैं, तो एक careful agent उन्हें लागू करता है; आप पुष्टि कर रहे हैं कि वे बचीं।
customer-data server एक streamable-HTTP service है, तो worker के इस तक पहुँचने से पहले इसे चल रहा होना चाहिए। यहाँ से, live runs (यह Decision, और Decisions 8 और 9) को दो terminals चाहिए: एक में server start करें, दूसरे में worker चलाएँ, server पहले। server बंद करें और worker के tool calls एक connection error से fail होते हैं, एक गलत answer नहीं।
Step 4: इसे worker से connect करें और एक tool call करें। server को उस worker में wire करें जिसके पास पहले से इसकी Session और Skills हैं, और prove करें कि एक tool असल में चलता है। यह Decision 4 में Skill को fire होते देखने का connector version है:
Register the customer-data server with the worker as a remote
streamable-HTTP server at its URL, alongside the Session and Skills it
already has. Check the current SDK docs for the exact registration API.
Edits: worker file (customer-data server register करता है)।
Check. यह एक streamable-HTTP service है, तो पहले server start करें, फिर worker को एक असली message पर चलाएँ: "Start the customer-data server, then run the worker on 'I'm Sam, and I haven't had my refund for order #4429 in two weeks.'" worker को
find_similar_resolved_ticketscall करना चाहिए और ranked past cases के साथ वापस आना चाहिए, एक empty result नहीं और एक made-up answer नहीं। वह MCP wire का काम करना है: worker scoped server के ज़रिए business data तक पहुँचा, और सिर्फ़ उस server। दो red flags: list में एक generalrun_sql-style tool का मतलब है worker अब भी runtime पर Neon MCP server से wired है, इसे निकालें (Concept 12); search से एक empty result का मतलब है Decision 5 का seed उस shape में नहीं landed जिसे join पढ़ता है (embeddingsकोdocumentsजहाँsource='past_case'कोtickets)। अगर server खुद start नहीं होगा, agent से इसके logs पढ़वाएँ (Concept 13 startup-import note आम कारण है)।
एक custom server क्यों, सिर्फ़ agent code में asyncpg नहीं। Concept 14 के तीन कारण, उस क्रम में जिसमें वे यहाँ मायने रखते हैं: scope (agent database से ठीक तीन चीज़ें कर सकता है, जो भी SQL allow करे वह नहीं), isolation (server अपने ही process में अपने ही pool के साथ चलता है जिसे agent exhaust नहीं कर सकता), और reusability (एक दूसरा Worker जिसे lookup_customer चाहिए इसी server से बात करता है)। वह narrow surface ही पूरा security argument है, जो वजह है कि Step 3 का check boundary के बारे में है, plumbing के बारे में नहीं।
Decision 7: audit logging हर जगह wire करें
आप कहाँ हैं: एक worker जो act करता है लेकिन सिर्फ़ एक refund write record करता है; यह Decision agent के अपने actions को audit trail में जोड़ता है; अंत तक आप एक conversation के लिए एक message_received / skill_activated / capability_invoked / message_sent trace देखेंगे।
यह दो Decisions में से एक है जहाँ एक पहला build आमतौर पर एक error hit करता है; नीचे के callouts हर एक का नाम लेते हैं इससे पहले कि आप इससे मिलें, तो इन्हें पहले पढ़ें।
आप इस Decision को agent के अपने actions को audit_log में record के साथ खत्म करते हैं। MCP server पहले से एक चीज़ log करता है, issue_refund अपनी audit row refund transaction के अंदर लिखता है (Decision 6); जो बचा है वह agent-side writes हैं: skill invocations, model calls, tool calls, guardrail trips। एक task, Concept 10 के log_capability helper का इस्तेमाल करके।
Step 1: हर boundary पर audit helper wire करें।
Wire the audit helper around the agent's own actions, at three points:
the start and end of each skill invocation, after each MCP tool call,
and around any guardrail trip. Use the separate audit connection (its
own pool), not the customer-data MCP boundary. Plan first.
Edits: worker file (हर boundary पर audit wiring जोड़ता है)।
ऊपर के तीन "boundaries" तीन matching hooks पर map नहीं होते, और naive wiring run को crash करती है। हकीक़त:
- कोई skill hook नहीं है। इस course द्वारा इस्तेमाल किए lazy Skills mode में, एक skill model द्वारा
load_skilltool call करने से activate होती है, तो skill start/end कोon_tool_start/on_tool_endमें देखें जहाँtool.name == "load_skill"। MCP tool calls उसीon_tool_endके ज़रिए आते हैं। - Guardrail trips raised exceptions हैं, एक hook नहीं।
Runner.runके aroundtry/exceptसेInputGuardrailTripwireTriggered(और output/tool variants) catch करें, और वहाँguardrail_trippedrow लिखें। on_tool_endकाresulttypedstrहै लेकिन आपको tool का raw object सौंपता है (एक Pydantic model या dict)। इस पर slicing या string-ops throw करते हैं, और एक hook के अंदर एक unhandled exception पूरे turn को मार देता है (यह एक confusingUserError: Error running tool ...के रूप में सामने आता है)।str(...)से coerce करें AND hook body कोtry/exceptमें wrap करें तो एक audit bug कभी user के turn को abort न कर सके।on_tool_endतब भी fire होता है जब एक tool fail होता है, आपको एक"Error executing tool ..."result सौंपता हुआ। इसे detect करें (एक substring check,startswithनहीं) औरstatus="error"record करें, वरना एक failed refund एक success के रूप में log होता है।
conversations row पहले लिखें। audit_log.conversation_id conversations(session_id) का एक foreign key है। अगर एक audit row एक ऐसी session को reference करती है जिसकी अभी कोई conversations row नहीं है, FK violate होता है और पूरी transaction roll back करता है, including वह refund जो यह record कर रहा था। message_received पर conversations row upsert करें, किसी audit row के इस पर point करने से पहले (Decision 3 table बनाता है लेकिन कभी नहीं कहता कि row कब लिखी जाती है: यह यहाँ है)।
एक Session वाला input guardrail पूरा transcript देखता है। सिर्फ़ नया message नहीं: पूरी prepared history plus नया turn। तो किसी earlier turn का एक flagged word हर later turn को trip करता है (एक benign "say hello" block हो जाता है क्योंकि एक test token अब भी history में है)। सिर्फ़ latest role: user item screen करें, पूरा input नहीं।
Check. एक throwaway conversation चलाएँ, फिर: "Using the Neon tools, find the most recent conversation and show me every
audit_logrow for it, in order." आपको कम से कम एकmessage_received, एकskill_activated(worker के पास Decision 4 से इसकी Skills हैं), MCP call के लिए एकcapability_invoked, और एकmessage_sentदिखना चाहिए। दो failure shapes: अगर आप सिर्फ़ MCP server की अपनी rows (capability_invoked,refund_issued) देखते हैं और agent-side वालों में से कोई नहीं, helper wired है लेकिन कभी fire नहीं होता, agent से पुष्टि करवाएँ कि यह streaming loop के अंदर से चलता है, सिर्फ़ startup पर एक बार नहीं; अगर आप zero rows देखते हैं, audit connection database तक नहीं पहुँच रहा, इससे audit pool को आपके database URL के against check करवाएँ।
मोटे तौर पर आपको क्या दिखना चाहिए (एक conversation, क्रम में):
message_received
skill_activated
capability_invoked
message_sent
audit pool separate क्यों है। यह अपना connection इस्तेमाल करता है, customer-data MCP pool नहीं, दो कारणों से: audit तब भी सफल होना चाहिए जब data pool saturated हो, और audit writes को business writes से connections के लिए compete नहीं करना चाहिए। एक audit subsystem जिसे उस system द्वारा starve किया जा सके जिसका यह audit कर रहा है वह audit subsystem नहीं है। mechanics छोटे हैं (Concept 7 tables देता है, Concept 10 helper देता है); discipline है इसे हर boundary पर consistently call करना। (OpenCode में identical: यह plain Python है।)
Decision 8: एक scenario पर पूरे worker को verify करें
आप कहाँ हैं: हर layer wired और isolation में checked; यह Decision कुछ नया नहीं जोड़ता, यह उन्हें एक scenario पर एक साथ काम करते prove करता है और log से इसे replay करता है; अंत तक आप एक ordered trace देखेंगे जो सभी layers को cross करता है।
अब तक worker के पास तीनों layers wired और हर एक अपने आप checked हैं: Session (Decision 3), Skills (Decision 4), और MCP server (Decision 6), नीचे audit के साथ (Decision 7)। यह Decision prove करता है कि वे एक असली scenario पर एक साथ काम करते हैं, फिर इसे अकेले audit log से replay करता है।
Step 1: scenario चलाएँ और इसका trace पढ़ें। अपने agent से Worker को उस एक message के against चलवाएँ जो पूरे stack को exercise करता है (एक terminal में server, दूसरे में worker, server पहले; Decision 6 देखें):
Run the Worker and send it this customer message, then show me the
audit_log rows that conversation produced, in order:

"I haven't received my refund from order #4429, it's been two weeks."
आपको कुछ सेकंडों में ये rows दिखनी चाहिए:
action=message_received: message आता है, conversation row बनती है।action=skill_activated(सिर्फ़ अगर एक skill load हो): worker request handle करने के लिए एक Skill (find-similar-casesयाsummarize-ticket) load कर सकता है। modelfind_similar_resolved_ticketsको पहले एक skill load किए बिना भी सीधे पहुँच सकता है, जिस case में यह row बस absent है और trace सीधेcapability_invokedपर जाता है। दोनों correct builds हैं, तो एक missingskill_activatedको एक bug न समझें।action=capability_invoked, target=mcp:find_similar_resolved_tickets: skill MCP server के ज़रिए एक vector search drive करता है, और worker draft करने के लिए closest past resolution पढ़ता है।action=message_sent: drafted reply, recorded।
एक conditional पाँचवाँ, action=capability_invoked, target=mcp:lookup_customer, सिर्फ़ तभी दिखता है अगर worker के पास पहले से एक customer id हो। पहला turn आमतौर पर नहीं रखता (customer ने एक order number और एक email दिया, एक UUID नहीं), तो इसे तब तक skip किया जाता है जब तक कुछ upstream customer resolve न करे: auth, orchestrator, या एक lookup_customer_by_email tool जो आप बाद में जोड़ते हैं। यह ठीक है; reply अब भी past case cite कर सकता है।
Check. core rows मौजूद और क्रम में हैं (
skill_activatedसिर्फ़ अगर एक skill load हुआ), और वे एक trace में layers cross करती हैं: एक MCP tool system of record के against चला, conversation record हुई, और एक Skill activate हो सकती थी। वह पूरा worker एक साथ काम करना है। अगरcapability_invokedयाmessage_sentmissing है, उस Decision पर वापस जाएँ जिसने इसे wire किया और उस Decision का अपना check फिर चलाएँ।
message_received, skill_activated, और message_sent Decision 7 की agent-side audit wiring द्वारा लिखी जाती हैं; capability_invoked rows उसी wiring से हर MCP call के around आती हैं। MCP server अपनी row सिर्फ़ तब लिखता है जब एक tool data बदलता है (issue_refund के अंदर refund_issued row)। तो इस जैसे एक read-only scenario में agent-side rows plus capability_invoked reads रहते हैं, और कोई business-write rows नहीं जब तक एक refund असल में न हो, Decision 9 में।
अब जब Skills worker के अंदर चलती हैं, एक skill का scripts/ sandbox में executable code है। UnixLocalSandboxClient कोई isolation नहीं देता; Docker, E2B, Cloudflare, या Modal इसे contain करते हैं। अपनी skill library तक write access को deploy access की तरह treat करें, और उन skills को load करने से पहले sandbox isolate करें जो आपने नहीं लिखीं।
Memory capability को जानें, और यह क्या नहीं हैवही capabilities list Skills() के साथ एक Memory() लेती है (दोनों agents.sandbox.capabilities से)। इसे ठीक से जानना worth है, क्योंकि यह उसी चीज़ जैसा लगता है जो आपने अभी बनाई और नहीं है। Memory() एक Worker को अपने past runs से सीखने देता है: यह हर run की conversation को workspace files में distill करता है (एक MEMORY.md और एक summary) जब sandbox session बंद होती है, और later runs उन्हें वापस पढ़ते हैं, तो agent कम explore करता है और कम corrections दोहराता है। वह Concept 3 का "have we seen a question like this before?" recall है, runtime द्वारा handled, तो आप इसे hand-build नहीं करते।
जो यह नहीं है वह durable business record है। Sandbox memory file-based है, अपनी सबसे पुरानी entries को recency से prune करती है, और beta में है; एक fresh sandbox empty शुरू होती है, और agent को इसे guidance के रूप में treat करने को कहा जाता है, authoritative storage नहीं। आपकी Neon tables हर गिनती पर उल्टी हैं: durable, complete, stable, SQL में queryable। तो आप दोनों चाहते हैं, अलग कामों के लिए। Memory() agent को runs के पार smarter बनाता है; system of record इसके काम को durable, provable, और sellable बनाता है: वह asset जो आपका अपना है। SDK docs में Sandbox agents के तहत चार pages इस पूरी layer के लिए source हैं; companion AGENTS.md चारों को link करता है।
Step 2: replay query चलाएँ। यह वह proof है जिसके लिए पूरी audit layer थी। agent से उस conversation का trace खींचने को कहें जो आपने अभी चलाई:
Using the Neon tools, take the most recent conversation and show me its full
audit_logtrace, in order: created_at, action, target, payload, result.
Check. उस output को पढ़कर, आप line by line reconstruct कर सकते हैं कि agent ने क्या किया और क्यों, model को फिर चलाए बिना। अगर आप नहीं कर सकते, अगर एक step हुआ जो log में नहीं है, या एक row एक ऐसा action claim करती है जो business tables में नहीं दिखता, तो एक wiring bug है। Worker को done कहने से पहले इसे fix करें।
मोटे तौर पर replay को कैसा पढ़ना चाहिए:
created_at  action               target                            result
10:02:11    message_received     conversation:abc                  ok
10:02:12    capability_invoked   mcp:find_similar_resolved_tickets ok
10:02:14    message_sent         conversation:abc                  ok
यह scenario क्यों। यह इस course द्वारा जोड़े हर architectural टुकड़े को exercise करता है, एक pass में: एक Skill activate होती है, एक MCP-backed tool system of record के against एक semantic search चलाता है, और audit trail पूरा path record करता है, SQL में replayable। इनमें से कुछ भी उस minimal chat agent में नहीं था जिससे आपने शुरू किया। जो यह अभी नहीं करता वह पैसा हिलाना है; वह एक action जिसके सामने आप आगे एक human रखते हैं।
Decision 9: पैसा हिलाने वाले एक action को harden करें
आप कहाँ हैं: एक worker जो end to end चलता है लेकिन बिना check refunds जारी करता है; यह Decision issue_refund पर एक human-approval gate जोड़ता है; अंत तक आप एक refund को sign-off के लिए pause होते देखेंगे, फिर approve पर जाते और reject पर रुकते।
यह वह दूसरा Decision है जहाँ एक पहला build आमतौर पर एक error hit करता है; नीचे के callouts हर एक का नाम लेते हैं इससे पहले कि आप इससे मिलें, तो इन्हें पहले पढ़ें।
worker end to end काम करता है। अब वह एक चीज़ जोड़ें जो आपने deliberately छोड़ी: issue_refund के सामने एक human, एकमात्र tool जो पैसा हिलाता है। आप इसे आख़िर में बनाते हैं, जानबूझकर, क्योंकि एक approval gate तभी meaningful है जब वह चीज़ जिसकी यह रखवाली करता है असल में चलती हो।
Step 1: refund tool gate करें।
Gate issue_refund behind human approval: register the customer-data server
so that tool needs sign-off before it runs, and leave lookup_customer and
find_similar_resolved_tickets un-gated. Check the current SDK docs for the
exact approval API.
Edits: worker file (server registration पर issue_refund gate करता है)।
Check. दोनों read tools अब भी untouched चलते हैं; सिर्फ़
issue_refundgated है। gate इस पर रहता है कि server कैसे register होता है, tool के अंदर नहीं। (Claude Code या OpenCode के अंदर client का अपना permission prompt वही gate है; standalone worker में यह server registration पर approval setting है।)
Step 2: एक refund चलाएँ और इसे pause होते देखें। (एक terminal में server, दूसरे में worker, server पहले; Decision 6 देखें।)
Run the worker on a message that should lead to a refund on order #4429,
and show me what happens when it tries to issue it.
Check. run refund जारी करने के बजाय pause होता है: worker बताता है कि यह
issue_refundके लिए approval का इंतज़ार कर रहा है (SDK terms में, run एक final answer के बजाय एक interruption के साथ वापस आता है), औरrefundstable में अभी कुछ नहीं लिखा गया। वह pause authority model का काम करना है: model ने एक action propose किया, और system boundary पर रुक गया।
gate सिर्फ़ तब engage होता है जब model issue_refund को असल में call करता है। एक cautious system prompt (जैसे "only issue a refund once approved") model को prose में approval माँगते रहने और tool को कभी invoke न करने पर मजबूर कर सकता है, तो कुछ pause नहीं होता और कोई refund नहीं होता, जो एक broken gate जैसा दिखता है पर नहीं है। gate को खुद दिखाने पर मजबूर करने के लिए, call को explicitly push करें: "Supervisor approved the refund for order #4429. Call issue_refund now: 2999 cents, reason 'arrived damaged'. Invoke the tool, don't ask again." SDK gate execution पर hard backstop है; यह model को पहले एक tool के ज़रिए route करने पर मजबूर नहीं कर सकता।
Step 3: एक बार approve करें, फिर एक बार reject करें। gate के दोनों halves prove करें:
Approve the pending refund and let the run finish, then show me the refunds
table and the audit_log row. Then run the same scenario again, reject it,
and show me that no refund was written.
Check. approve पर: refund row दिखती है, order refunded पर flip होता है, और
issue_refundअपनीrefund_issuedaudit row लिखता है, सब एक transaction में। reject पर: कोई refund row नहीं, और trace दिखाता है action declined था। agent को सौंपने को एक gotcha, क्योंकि यह "works" और "looks like it should" के बीच का फ़र्क़ है: एक approved run को resume करना एक loop है, एक single call नहीं। एक run एक से ज़्यादा pending approval रख सकता है, तो agent तब तक resume करता रहता है जब तक run के पास approvals waiting हों (हर एक approve या reject करें, फिर resume करें), सिर्फ़ एक बार नहीं। एक single बार resume करें और आपको refund अब भी unwritten के साथ एक empty answer वापस मिल सकता है।
मोटे तौर पर हर half को क्या produce करना चाहिए:
approve -> refunds: 1 new row | orders.status = refunded | audit: refund_issued
reject  -> refunds: no new row | audit: action declined
यह आख़िर में क्यों। worker के चलने से पहले जोड़ा गया एक approval gate untestable theatre है: जब कुछ इसमें से नहीं बहता तो आप एक working gate को एक broken से नहीं बता सकते। यहाँ जोड़ा गया, एक ऐसे worker पर जिसे आपने search, draft, और audit करते देखा, आप दोनों halves prove कर सकते हैं: approve refund को जाने देता है, reject इसे रोकता है, और audit log record करता है कौन सा। वह पूरा authority model है, agent propose करता है और एक human dispose करता है।
ऊपर का check मानता है कि एक human ठीक वहाँ है। अगर sign-off एक घंटे बाद आता है, किसी और process में, तो paused run को serialize करना होगा (SDK का RunState), store करना होगा, और decision आने पर resume करना होगा। इसका durable home एक छोटी run_states table है (प्रति pause एक row: serialized state plus awaiting/approved/rejected), audit_log नहीं (append-only) और conversations पर एक column नहीं (एक conversation एक से ज़्यादा बार pause हो सकती है)। serialize-and-resume calls moving SDK surface का हिस्सा हैं, तो इन्हें Context7 के ज़रिए confirm करें।
अभी क्या हुआ
नौ Decisions, और Step 0 के minimal chat agent के पास अब एक Worker की foundation है। जो बदला उस पर वापस देखें:
- Capability code से बाहर निकली। तीन Skills
.claude/skills/में बैठती हैं, version-controlled, agents के पार sharable। - Durable stores process से बाहर निकले। एक असली Postgres schema (five-table core plus customers, orders, tickets, और refunds के लिए एक domain layer) अब Worker का system of record और वह reference library रखता है जिसे यह pgvector से search करता है, जबकि SDK Session Worker के conversation state को उसी database पर रखती है।
- Runtime business access mediated है। agent Postgres में business data तक सिर्फ़ एक scoped MCP server के ज़रिए पहुँचता है जो ठीक तीन tools expose करता है; हर business read और write उस एक boundary को cross करता है। audit subsystem एकमात्र deliberate exception है, अपने ही direct connection पर, तो इसे उस boundary द्वारा starve नहीं किया जा सकता जिसका यह audit करता है।
- हर action एक trace छोड़ता है। audit log किसी भी conversation का पूरा reasoning trace replay कर सकता है, हफ़्तों या महीनों बाद, SQL में।
- dangerous action का एक owner है। वह एक tool जो पैसा हिलाता है चलने से पहले एक human के लिए pause होता है; approve इसे जाने देता है, reject इसे रोकता है, और किसी भी तरह audit log decision record करता है। वह authority model एक Worker को चाहिए इससे पहले कि कोई इसे असली actions पर भरोसा करे।
OpenAI Agents SDK अब भी वहाँ है। sandbox अब भी आपका compute है, और streaming, guardrails, और tracing जिनसे agent ने शुरू किया सब अब भी वहाँ हैं। जो बदला वह ऊपर की architecture है: Skills capabilities रखती हैं, system of record truth रखता है, MCP उन्हें एक साथ wire करता है, और एक human उन actions पर loop में रहता है जो मायने रखते हैं।
वह एक Worker की foundation है। जो यह अभी नहीं है वह always-on, proactive, या एक managed workforce का हिस्सा है। वे moves अगले courses जोड़ते हैं।
Decision 10 (optional challenge): paused approval को एक restart में जीवित बनाएँ
Decision 9 में approver ठीक terminal पर बैठा था, तो एक [y/N] काफ़ी था। असली approvals शायद ही उस तरह काम करते हैं: वह manager जो एक refund पर sign off करता है एक घंटे बाद जवाब दे सकता है, किसी और app से, किसी और machine पर। आपका worker यह अभी handle नहीं कर सकता। जब एक refund pause होता है, paused run सिर्फ़ worker की memory में रहता है, तो अगर process human के जवाब देने से पहले बंद होता है, pending refund चला जाता है।
आपने पहले से तीन तरह का state Postgres में move किया है: conversation turns, business records और reference library, और audit trail। paused run वह एक तरह है जो अभी भी memory में फँसा है। यह optional capstone इसे भी database में move करता है, तो एक pause बाद में, कहीं से भी, approve हो सके। यह एक graded challenge है, एक guided build नहीं: हर step आपको idea और prompt देता है, और wiring आपके agent पर छोड़ देता है।
Goal: एक paused refund को उस process से एक अलग process से approve या reject करें जिसने इसे शुरू किया।
Step 1: हर paused run को database में एक home दें। एक pause को अपनी row चाहिए: यह किस conversation और tool का है, saved run खुद, और एक status जो awaiting से approved, rejected, या resumed तक move हो। यह अपनी table है, audit log नहीं (वह finished history है) और conversations पर एक column नहीं (एक conversation एक से ज़्यादा बार pause हो सकती है)।
Add a run_states table that stores one paused run per row: the conversation
and tool it belongs to, the saved run, and a status that defaults to
"awaiting" and can become approved, rejected, or resumed. Plan the DDL first;
I'll approve before you apply it on a branch.
Check. एक
run_statestable मौजूद है और एक fresh pauseawaitingपर default होता है। आपने कभी SQL type नहीं किया: आपने कहा table किसके लिए है, आपके agent ने इसे लिखा, उसी तरह जैसे schema Decision 3 में landed।
Step 2: जब एक refund pause हो, इसे save करें और आगे बढ़ें। अभी worker terminal पर इंतज़ार करता है; इसके बजाय इसे pause record करना चाहिए और अगले turn के लिए खुद को free करना चाहिए।
When a run comes back waiting for approval instead of with a final answer, do
not block on input. Save the paused run as a run_states row marked "awaiting"
and return, so the worker is free for the next turn. One turn is one request
that either finishes or parks. Check the current Agents SDK docs for the exact
"save the paused run" call before you write it.
Check. एक refund turn अब promptly return होता है, एक
awaitingrow पीछे छोड़ता हुआ, और कुछ भी एक human पर block करते हुए इंतज़ार नहीं करता।
Step 3: एक separate command से approve या reject करें। decision chat loop से बाहर अपने ही छोटे entry point में move होता है, तो यह पूरी तरह किसी और process में चल सके।
Build a small "decide" command, separate from the chat loop: it lists the
awaiting rows, takes my approve or reject on one, then reloads that saved run
and finishes it. Keep resuming in a loop while the run still has approvals
pending, since resuming once can come back empty with the refund unwritten
(the loop gotcha from Decision 9). Confirm the reload call through Context7.
Check. decide command से एक row approve करना उस refund को completion तक drive करता है; इसे reject करना कोई refund नहीं लिखता और rejection record करता है।
Step 4: refund को retry करने के लिए safe बनाएँ। एक distributed setup में एक network retry उसी approved refund को दो बार fire कर सकता है।
Make issue_refund idempotent: dedupe on the order plus a request id, so the
same approved refund cannot run twice.
Check. उसी approval को जानबूझकर दो बार resume करें: आपको ठीक एक
refundsrow मिलती है, दो नहीं।
Step 5: प्रति conversation एक active turn। एक ही conversation पर एक साथ दो turns इसकी session को corrupt कर देंगे।
Add a per-conversation lock (a Postgres advisory lock on the session id, or a
status guard) so only one turn is active per conversation at a time.
Check. उसी conversation पर एक दूसरा turn पहले के साथ race करने के बजाय इंतज़ार करता है या refuse होता है।
वे calls जो एक paused run save करते हैं और इसे बाद में reload करते हैं उस beta SDK surface का हिस्सा हैं जो releases के बीच shift होता है। course की discipline इसके अपने challenge पर लागू होती है: इन्हें recall करने के बजाय current Agents SDK docs या Context7 से exact save और reload calls paste करें। idea, कि एक paused run एक row बन जाता है जिसे आप बाद में उठाते हैं, stable है; method names नहीं हैं।
Done when:
- आप एक process में एक refund शुरू करते हैं; यह
run_statesमें run parked (statusawaiting) के साथ exit होता है, और अभी कोईrefundsrow नहीं।- एक दूसरे process में, आप इसे approve करते हैं; refund commit होता है (refund row, order flips,
refund_issuedaudit row), और parked rowresumedबन जाती है।- reject path zero business writes और एक
refund_blockedaudit row छोड़ता है।- उसी parked run को दो बार approve करना कोई दूसरा refund जारी नहीं करता।
- पूरा episode
audit_logplusrun_statesसे model फिर चलाए बिना replayable है।
Stretch (full distributed). customer-data server को authentication वाले एक असली URL के पीछे रखें और worker को इस पर point करें; agent को खुद बदले बिना local sandbox को एक hosted वाले से swap करें (client swap करें, agent रखें); और अपने secrets को .env file से एक secret manager में move करें। वही worker, अब machines के पार चलने में सक्षम।
Database में state ज़रूरी है पर sufficient नहीं: move करने वाली आख़िरी stateful चीज़ paused run खुद है, और एक बार यह run_states में रहता है आपका worker एक single process से बँधा होना बंद कर देता है।
Part 5: यह course कहाँ छोड़ता है
एक Worker की cost shape: इसका अनुमान कैसे लगाएँ
यहाँ कोई dollar totals जानबूझकर नहीं: per-token prices और free-tier limits monthly बदलते हैं, तो जो भी number छापा जाए वह आप पढ़ने तक stale होगा, और एक stale number none से बदतर है। जो टिकता है वह method है। यहाँ यह है, worked example के अपने traffic को उन inputs के रूप में जो आप plug करते हैं: 200 conversations/day, लगभग 10 turns हर एक, लगभग 8K input tokens per turn।
एक line लगभग पूरा bill है; बाकी तीन rounding errors हैं। इन्हें क्रम में करें।
1. Model inference. आपका monthly token volume times आपके model की price per token। volume आपके अपने traffic से आता है:
input tokens/month ≈ conversations/day × turns/conversation × tokens/turn × 30
example के लिए: 200 × 10 × 8,000 × 30 ≈ 480M input tokens/month। इसे अपने model की input price से multiply करें (इसके pricing page से), फिर output tokens को उसी तरह जोड़ें (इनमें से कहीं कम, लेकिन एक higher per-token price)। वह single multiplication आपका bill है।
इस पर सबसे बड़ा lever prompt caching है। आपका AGENTS.md, system prompt, और Skills metadata हर turn पर identical हैं, तो जब provider उस stable prefix को cache करता है, वे tokens normal rate के एक अंश पर bill होते हैं। prefix को stable रखना (AGENTS.md को mid-day churn न करें) आपके पास सबसे high-value cost move है। easy turns को एक smaller model पर और सिर्फ़ hard वालों को एक frontier model पर route करना दूसरा है।
2. Embeddings. tokens embedded × embedding model की price। आप seed corpus को एक बार embed करते हैं और नए tickets जैसे-जैसे आते हैं; एक small embedding model की rate पर वह cents है, dollars नहीं, जब तक आप लगातार पूरी conversation histories re-embed न करें। वही pricing page।
3. Postgres (Neon). अक्सर $0: free tier एक single low-volume Worker cover करता है, और scale-to-zero का मतलब idle hours की कोई लागत नहीं। आप सिर्फ़ free storage / compute-hour limits cross करने के बाद pay करते हैं, और फिर यह storage plus active compute है, दोनों Neon's pricing page पर।
4. Sandbox compute. यहाँ $0, क्योंकि worked example UnixLocalSandboxClient, आपकी अपनी machine, पर चलता है। production में यह container-minutes है जहाँ आप deploy करते हैं (Docker, Cloudflare, E2B, Modal): session length × concurrency × उस provider की rate।
पूरा method एक line में: अपने monthly token volume को अपने conversation numbers से compute करें, आज की per-token price से multiply करें, और बाकी तीन lines pricing pages से पढ़ें। कई Workers तक scale करना formula नहीं बदलता, यह inference line को इस से multiply करता है कि कितने Workers और कितने busy हैं; infrastructure lines मोटे तौर पर flat रहती हैं, तो model bill वह है जो बढ़ता है, और ऊपर की दो आदतें (stable cached prefix, easy turns के लिए cheaper model) वही हैं जो इसे काबू में रखती हैं।
Swap guide: architecture invariant है, products नहीं
यह course हर layer पर specific vendors का नाम लेता है (OpenAI Agents SDK, SDK का local sandbox, Neon, OpenAI embeddings, MCP Python SDK)। वह इसलिए कि एक teaching example को concrete answers चाहिए, "use any LLM runtime you like" नहीं। लेकिन architecture किसी भी compliant alternative के साथ काम करता है। पाँच swaps जिन्हें course का design explicitly anticipate करता है:
- Postgres host: Neon → Supabase, AWS RDS, self-hosted.
pgvectorवाला कुछ भी काम करता है। आप branching और scale-to-zero खोते हैं (वे Neon-specific हैं), लेकिन five-table schema, embedding pipeline, audit-trail discipline, और custom MCP server pattern सब byte-for-byte transferable हैं। एकमात्र change connection string और शायद SSL config है। - Vector storage: pgvector → Pinecone, Weaviate, Qdrant. अगर आप Concept 6 के "one database for both relational and vector data" argument को reject करते हैं,
embeddingstable को एक vector-DB client से swap करें। cost: consistent रखने को दो stores (Concept 6 argue करता है यह कम ही worth है)। benefit: बहुत बड़े scales (10M+ vectors) पर बेहतर recall, और managed-service operational simplicity। - Embedding model: OpenAI → Cohere, Voyage, BGE-small (local). एक constant (
EMBEDDING_MODEL) और एक column dimension (VECTOR(n)) बदलें। existing data का एक one-shot re-embed चलाएँ। Concept 9 की pipeline नहीं बदलती। - Sandbox: local sandbox → Cloudflare, E2B, Modal, Daytona, आपका अपना Docker. isolated process boundaries और एक clean restart वाला कुछ भी काम करता है।
SandboxAgentruntime backend-agnostic है; worked exampleUnixLocalSandboxClientपर चलता है, और production इनमें से किसी पर swap करता है। Skills काscripts/उसी तरह execute होता है। पिछले course का trust-boundary diagram अब भी लागू होता है। - Agent runtime: OpenAI Agents SDK → LangGraph, CrewAI, Pydantic AI, आपका अपना loop. MCP boundary वह है जो बचता है; हर modern agent framework का एक MCP client है। Skills किसी भी agent में काम करती हैं जो
SKILL.mdfiles load कर सके (Claude Code, OpenCode, Goose, और बढ़ते हुए Cursor/Windsurf)। audit-trail discipline framework-agnostic Python है।
जो आसानी से swap नहीं होता। MCP protocol खुद, Skills format spec, और audit-trail आदत। ये वे हिस्से हैं जो आप products के पार carry करते हैं; products वे हिस्से हैं जो आप swap करते हैं। नीचे वही architectural shape, ऊपर replaceable implementations।
"invariant" और "owned" पर एक शब्द। दोनों bet करने लायक heuristics हैं, settled facts नहीं। "Invariant" 2026 के best-available open standards का नाम लेता है: MCP लगभग अठारह महीने पुराना है और Skills spec younger है, और एक दिन wire या capability format खुद वह चीज़ हो सकती है जो replace होती है, सिर्फ़ इसमें plug किए products नहीं। proprietary पर open protocols bet करना ही वह है जिससे आप अच्छे age करते हैं, लेकिन architecture को durable-by-design treat करें, eternal नहीं। और "owned" का असल मतलब owned-by-composition है: यह Worker Neon के cloud, एक vendor के models, एक coding-agent client, और third-party repos से खींची skills पर चलता है। आप जो own करते हैं वह बाकी को rewrite किए बिना इनमें से किसी एक को swap करने की freedom है। वह असली है और बहुत worth है, और यह पूरे शब्द के सुझाव से कम है। seams own करें, substrate नहीं।
यह course क्या (अभी) cover नहीं करता
आपके पास अब एक Worker है जो thesis द्वारा बताए Seven Invariants में से दो satisfy करता है। खासकर: यह एक engine पर चलता है (Invariant 4, पिछले course से), और यह एक system of record के against चलता है (Invariant 5, इस course से)। बाकी पाँच Invariants वह हैं जो production AI-Native Companies require करती हैं, और जो subsequent courses cover करते हैं। हर एक यहाँ एक bullet है, एक section नहीं।
- Invariant 1: The human is the principal. Authored specs, approval gates, budget declarations। intent set करने और outcomes own करने की architecture, Part 6 of the book में cover।
- Invariant 2: Every human needs a delegate. edge पर एक personal agent जो आपका context रखता है, आपके judgment का प्रतिनिधित्व करता है, और workforce को work broker करता है। thesis current realization के रूप में OpenClaw का नाम लेती है।
- Invariant 3: The workforce needs a manager. एक orchestrator जो work assign करता है, budgets enforce करता है, execution audit करता है, hiring को एक callable capability के रूप में expose करता है। thesis Paperclip का नाम लेती है।
- Invariant 6: The workforce is expandable under policy. एक meta-layer जहाँ एक authorized agent एक prompt generate करता है, एक runtime provision करता है, और एक नया Worker register करता है, बिना एक human को जगाए। Claude Managed Agents एक realization है।
- Invariant 7: The workforce runs on a nervous system. Triggers (schedules, webhooks, inbound API calls) agent को authority envelope के तहत जगाते हैं। Inngest (durable functions और background jobs) general workforce events के लिए एक realization है; Claude Code Routines coding-agent-specific path है।
इसमें असल में अच्छा कैसे बनें
इस crash course को पढ़ना आपको Workers बनाने में अच्छा नहीं बनाता। इसे इस्तेमाल करना बनाता है। path पिछले course जैसा ही दिखता है: आप manual शुरू करते हैं, friction महसूस करते हैं, और friction के हर टुकड़े को आपको सिखाने देते हैं कि यह किस Concept का है।
इस course के लिए mapping:
- "मेरी skill तब fire क्यों नहीं हो रही जब इसे होना चाहिए?" → description quality (Concept 3)। फिर से लिखें। पाँच अलग तरीके invent करके test करें जिनसे एक user trigger phrase कर सकता है।
- "agent वह data क्यों invent कर रहा है जो database में नहीं है?" → agent असल में MCP server को call नहीं कर रहा। trace check करें;
mcp_servers=[...]registration check करें। - "मेरा audit log incomplete क्यों है?" → audit write action के same code path में नहीं है (Concept 10)। इसे action के बगल में move करें, same transaction में।
- "मेरे pgvector results irrelevant क्यों हैं?" → या तो chunking गलत है (Concept 9), या insert-time पर embedding model query-time पर embedding model से match नहीं करता। Re-embed करें।
- "मेरा MCP server load में slow क्यों है?" → server के अंदर connection pool बहुत छोटा है, या tools list client पर cached नहीं है। Concept 15।
- "Neon MCP server production में scary क्यों लगता है?" → क्योंकि Neon के अपने docs कहते हैं यह production के लिए नहीं है। एक custom MCP server लिखें (Concept 14)। पहला 30 minutes लेता है; दूसरा 10 लेता है।
architecture एक-एक टुकड़ा बनाएँ। Skills, system of record, और MCP सब एक weekend में जोड़ने की कोशिश न करें। Step 0 chat agent से शुरू करें। पहले एक system of record जोड़ें (Decisions 3–5) और अपना debugging experience बदलते देखें। एक Skill जोड़ें (Decision 4) और देखें model इसे इस्तेमाल करने का फ़ैसला कैसे करता है। MCP boundary आख़िर में जोड़ें (Decision 6)। हर step अपनी learning है; तीनों एक साथ करना एक दीवार है।
portability dividend असली है: Skills, schemas, और MCP servers जो आप यहाँ लिखते हैं सब दूसरे products पर move होते हैं। Swap guide per-layer alternatives बताती है।
आप किस पर समय बिताते हैं उसमें shift
Decision 4 के बाद, आपका काम shape बदलता है। code लिखना agent को brief करना बन जाता है; description review करना (एक config-file field जिसे आप आमतौर पर skim करते) key craft बन जाता है। एक description जिसे आपने 30 minutes draft और refine करने में बिताए उन 200 lines के MCP server code से ज़्यादा architectural काम करती है जो agent ने नीचे generate किया, क्योंकि description वह routing surface है जो model हर turn पढ़ता है।
दो practical shifts। पहला, आप "how do I implement this?" पूछना बंद करते हैं और "एक असली user trigger phrase करने के पाँच अलग तरीके क्या हैं?" पूछना शुरू करते हैं। Code downstream है; अगर description गलत है, agent कभी code तक नहीं पहुँचता और code की quality irrelevant है। दूसरा, review authorship को key skill के रूप में replace करता है। agent draft करता है; आप तय करते हैं कि draft उन trigger cases में काम करता है या नहीं जिनके लिए आपने description लिखी। सबसे hard हिस्सा rewrite करने के urge को resist करना है जब आप इसे तीन minutes में खुद solve कर सकते हैं: वही discipline जो आपको MCP boundary bypass करने से रोकती है।
Quick reference
15 concepts हर एक एक line में
- एक Agent Skill एक folder है। SKILL.md plus optional scripts/references/assets।
- Progressive disclosure. startup पर metadata → activation पर full body → on demand references।
- एक SKILL.md frontmatter + body है। Name, description, optional metadata, फिर operational instructions।
- Skills files के रूप में travel करती हैं। वही SKILL.md Claude Code और OpenCode में बिना modification काम करती है।
- छोटी skills को filesystem handoff से compose करें जब isolation orchestration simplicity से ज़्यादा मायने रखे।
- Postgres + pgvector एक separate vector DB को हराता है लगभग सभी agent workloads के लिए। Neon branching, scale-to-zero, और एक MCP server जोड़ता है।
- पाँच tables minimum operational schema हैं: conversations, documents, embeddings, audit_log, capability_invocations; conversation turns SDK Session में रहते हैं (
SQLAlchemySessionउसी database पर)। - pgvector basics:
VECTOR(1536)+<=>cosine distance + HNSW index। दोनों सिरों पर same embedding model इस्तेमाल करें। - embedding pipeline: semantic boundaries पर chunk (~400 tokens with overlap), batch-embed, model metadata के साथ store।
- Audit logging नहीं है। हर meaningful action उसी transaction में एक row लिखता है जिस action को यह record करता है।
- MCP एक protocol है, एक service नहीं। तीन primitives (tools, resources, prompts), तीन transports (stdio, streamable HTTP, legacy SSE)।
- Neon MCP server development के लिए है। Schema design, branch-based migrations। production runtime के लिए नहीं।
- OpenAI Agents SDK में एक built-in MCP client है।
from agents.mcp import MCPServerStdio, MCPServerStreamableHttp।async withइस्तेमाल करें। production मेंlist_toolscache करें। - Custom MCP servers अपनी जगह कमाते हैं scope, isolation, और reusability के ज़रिए। एक agent द्वारा इस्तेमाल किए एक single function के लिए एक न लिखें।
- MCP under load: remote के लिए streamable HTTP, tools cache करें, connections reuse करें, server के अंदर pool करें,
_metaके ज़रिए trace context propagate करें।
जब कुछ गलत लगे
Skill not firing when it should
    → Description too vague. Rewrite with "Use when..." and specific keywords (Concept 3).

Skill firing when it shouldn't
    → Description too broad. Add explicit constraints in the description.

pgvector returning irrelevant results
    → Embedding model mismatch (insert vs. query). Verify the model column in
       the embeddings table. Re-embed if needed.

MCP tool not appearing in agent
    → Server not registered, or list_tools cache stale. Check mcp_servers=[...]
       and try cache_tools_list=False temporarily.

Audit log has gaps
    → Action and audit write are in different code paths. Move them next to
       each other, ideally same transaction.

Agent timing out on Postgres operations under load
    → MCP server's connection pool too small. Check asyncpg.create_pool(max_size=...).

MCP server hangs on startup with torch / sentence-transformers / large imports
    → Default client_session_timeout_seconds=5 is too short for servers that
       load ML models at import. Bump to 60. See Concept 13's callout.

CREATE TABLE fails: relation "notes" already exists
    → You're pointing at a database that already has tables. Use a fresh
       database or Neon project; the Quick Win's build prompt makes a fresh one.

Non-OpenAI key getting 401 against api.openai.com
    → Set OPENAI_BASE_URL to your provider's OpenAI-compatible endpoint
       (e.g., https://api.deepseek.com/v1) before running the agent.

Agent fails partway with a 401 / auth / BadRequestError
    → Wrong key, wrong provider, or expired key. Have your agent confirm
       OPENAI_API_KEY is set and test a model call before the full run; it
       fails in one second instead of four files deep.

Neon MCP server returning errors in production agent code
    → You're using it wrong. Neon's docs are explicit: development only.
       Write a custom MCP server instead (Concept 14, ~30 minutes).
Flashcards से पढ़ाई में मदद
समझ की जाँच
उन विचारों पर एक तेज़, चरणबद्ध स्व-जाँच जिनसे आप अभी गुज़रे।