Connector-Native Apps: एक remote MCP server जिसका customer AI है
14 Concepts · पढ़ने में लगभग 90–120 min · build के लिए एक focused दिन (अगर आप strong dev हैं तो 4–6 hr) · minimal base से live connector तक जिसे कोई भी AI free में pick up करके use कर सके
तीस साल तक हमने software लोगों के लिए build किया। देखने के लिए screens, दबाने के लिए buttons, भरने के लिए forms। Glass के दूसरी तरफ customer हमेशा इंसान था।
अब room में customer सिर्फ इंसान नहीं है। इस course में आप ऐसा product build करते हैं जिसका user AI है।
Connector वह add-on है जिसे कोई व्यक्ति अपने AI में drop करता है ताकि AI किसी outside app तक पहुँच सके; वह आपका connector एक बार paste करता है, एक URL, एक click। यही आखिरी बार है जब कोई human उसे directly touch करता है। उसके बाद AI आपका user है: वह आपके tools के names पढ़ता है, खुद decide करता है कि किस tool को call करना है, inputs आपको देता है, और results वापस person को बोलता है। आप shopper के browse के लिए shop window नहीं सजा रहे। आप labeled tools का pegboard लगा रहे हैं जहाँ एक tireless worker खुद आता है और turn after turn अपने initiative पर tools use करता है। आज आम तौर पर उस chat में human बैठा होता है। आगे चलकर जो चीज़ आपका connector find करेगी, sign in करेगी, और schedule पर call करेगी, वह कोई दूसरा agent हो सकता है, बीच में human turn के बिना। आप उसी customer के लिए build कर रहे हैं।
पहला शब्द जो इस पूरे course में चलता है: server। Server वह computer है जो fixed address पर हर समय on रहता है, दूसरे computers के पूछने का wait करता है, और जब वे पूछते हैं तो answer देता है। आपके phone की हर app किसी server से बात कर रही होती है। इसे shop के front counter की तरह सोचें: fixed जगह पर हमेशा open, खुद कुछ नहीं करता, लेकिन जैसे ही customer आता है एक job करता है और result वापस देता है। यही आपका server है। MCP server server की एक खास kind है: ऐसा server जो MCP follow करता है, एक shared standard, AI के लिए USB port की तरह, एक plug जिसमें हर assistant fit होता है, ताकि कोई भी AI custom wiring के बिना उसकी offered चीज़ें use कर सके।
आप end to end एक real product build करेंगे:
- एक remote MCP server: वह front counter, public web address पर रखा हुआ (यही "remote" का मतलब है) ताकि internet पर कोई भी AI उस तक पहुँच सके। इसमें tools के तीन groups होंगे।
- एक two-table memory (दो छोटी lists जिन्हें आपकी app रखती है), ताकि AI हर conversation में blank start करने के बजाय person को याद रखे।
- एक real sign-in (OAuth), ताकि server login से ही जान ले कि data किसका hold कर रहा है, AI से guarantee न माँगे।
- एक session contract: एक tool जिसे AI पहले call करता है, आपकी app के rules देता है, फिर बाकी हर tool को उस key के पीछे lock करता है जो वही first call issue करता है।
- पूरी चीज़ एक pasted URL और एक click से add होती है, person के अपने free model पर चलती है, इसलिए serve करने की model cost आपकी नहीं।
आप यह सब single agent loop लिखने से पहले ship करते हैं। इसी वजह से इसे पहले रखा गया है: agent खुद build करने से पहले वह चीज़ build करना सीखें जिसे agent call करता है।
एक rule आगे आने वाले हर hard part को explain करता है, और वह सीधे इस बात से आता है कि आपका customer कौन है: server आपका है, उसे call करने वाला mind आपका नहीं। Intelligence AI के host app में रहती है। next step decide करने वाला loop भी वहीं रहता है। आपका server सिर्फ तब answer करता है जब उसे call किया जाता है, और caller ऐसा mind है जो guessing से reason करता है: fast, capable, और पूरी तरह confuse हो सकता है, किसी बात पर मान सकता है, या simple wrong हो सकता है। इसलिए इस course का हर difficult part एक ही shape रखता है: आपका server वह job करता है जिसे AI पर खुद करने के लिए trust नहीं किया जा सकता।
इससे चार non-negotiables निकलते हैं। पूरा course इन्हीं चार को build करता है:
- One gateway. AI आपसे single connector पर मिलता है, पीछे tools name से grouped हैं: एक front door, एक menu जिसे वह पढ़ता है। Free account सिर्फ एक custom connector add कर सकता है, इसलिए "one" preference नहीं, hard limit है।
- Tools only. आप AI से callable tools के through बात करते हैं, functions जिन्हें वह अपनी reasoning के बीच invoke कर सकता है; resources या prompts के through नहीं जिन्हें human को हाथ से pick करना पड़े।
- Prove, don't trust. आपका customer ऐसा mind है जो बिना बुरी नीयत wrong person's identity दे सकता है। इसलिए identity verified sign-in से आती है, AI की किसी बात से नहीं।
- Fail closed. जब आपका server missing या broken हो, AI चुप नहीं होता। वह improvise करता है, answer invent करता है, और person का saved data बना देता है। आपके server को उसे रोककर साफ़ कहना होगा, जैसे ATM bank तक नहीं पहुँचता तो temporarily unavailable दिखाता है, balance guess करके cash नहीं देता।

इनमें से दो आपके build की shape बताते हैं (one gateway, tools only)। बाकी दो server के jobs हैं क्योंकि AI पर trust नहीं किया जा सकता (prove identity, fail closed)। हर Concept पढ़ते समय पूछें: यह कौन सा invariant है?
Prerequisites. यह page चार चीज़ें assume करता है।
- आप typed Python पढ़ सकते हैं, directly या code block को coding agent में paste करके plain-English read-back लेकर। अगर अभी दोनों सच नहीं हैं, पहले Python in the AI Era करें।
- आपने Agentic Coding Crash Course किया है। आप Claude Code या OpenCode को plan mode में rules file के साथ drive करते हैं। यहाँ हम उसी workbench के through build करते हैं, उसे फिर से explain नहीं करते।
- आपने connector को बाहर से use किया है, Skills & Connectors course में। आपने एक connector on किया और AI को अपनी Drive में reach करते देखा। यह course आपको inside पर flip करता है: अब आप वह चीज़ हैं जिस तक AI reach करता है।
- आपको पहले Build AI Agents की ज़रूरत नहीं। यहाँ आप वह server build करते हैं जिसे agent call करता है, agent नहीं। वह course path में बाद में आता है, और यह course वजह है कि आप उसे चाहेंगे।
आपको अपनी API key नहीं चाहिए: model person लाता है। जिन accounts की ज़रूरत है वे free-tier हैं और point of need पर ही खुलते हैं: जब state पहली बार store करेंगे तो Neon database (Concept 5, no card)। फिर Concept 12 आपके connector को free tunnel के through claude.ai में live चलाता है, host, card, या sign-in account के बिना। Sign-in half पूरे रास्ते bundled local mock पर चलता है, इसलिए build, test, या demo के लिए sign-in account कभी नहीं बनाना पड़ता।
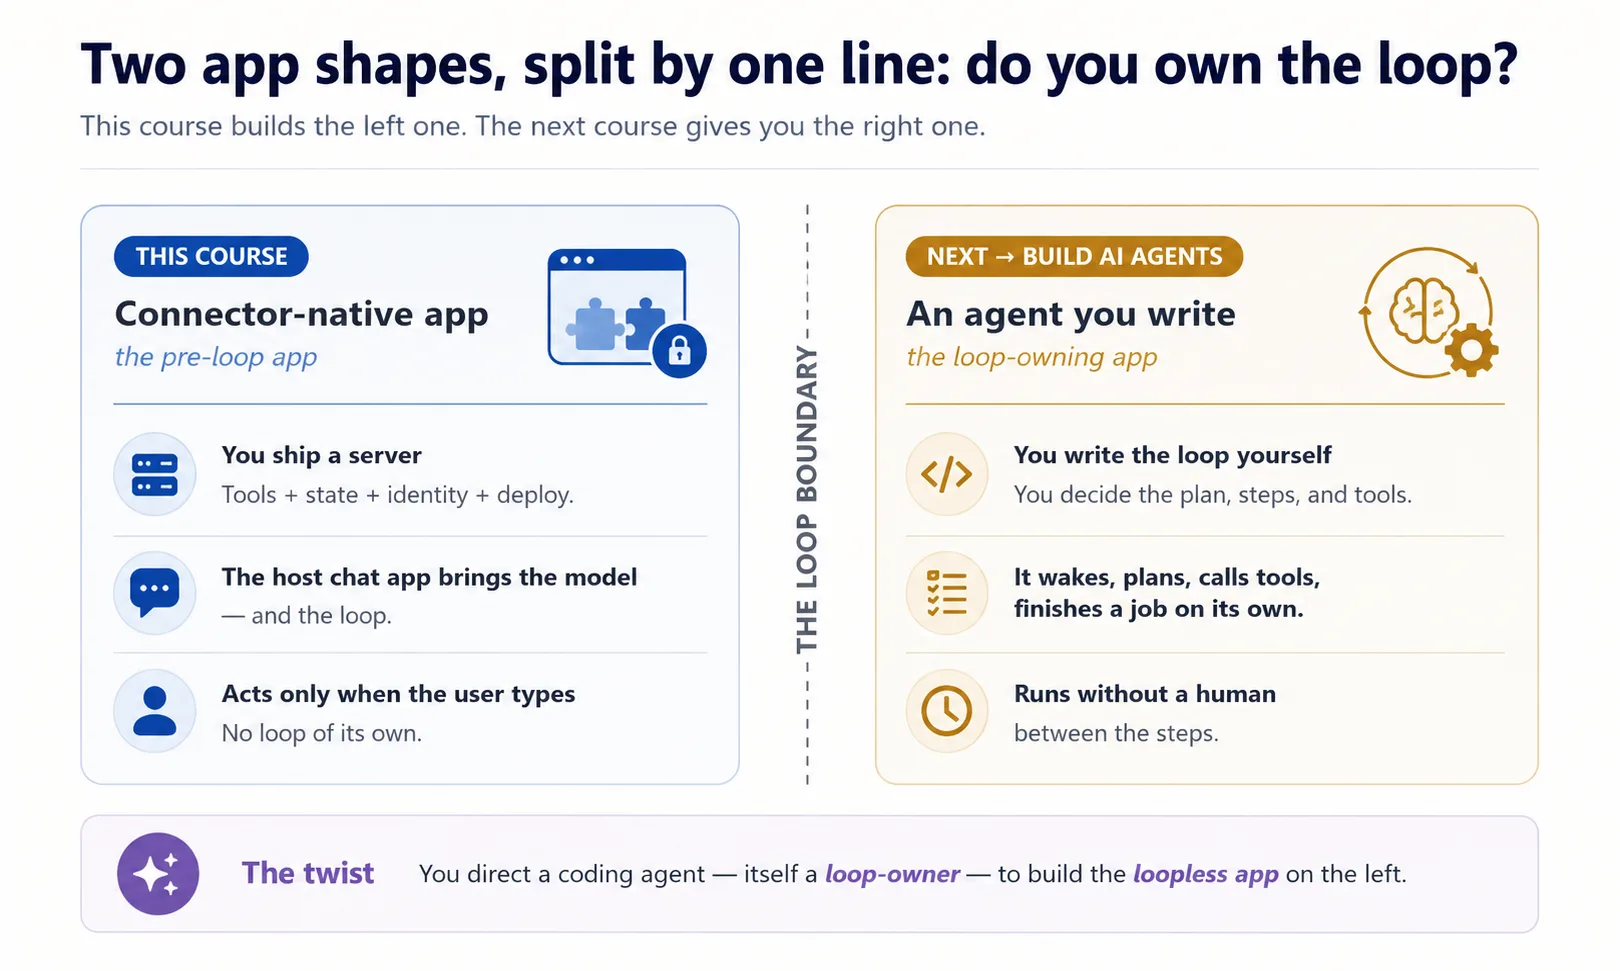
यह कहाँ fit होता है। Mode 2 का पहला build course। यहाँ से Manufacturing path चलता है: यह course → Plugins for AI Agents → AI Identity → Build AI Agents। यह pre-loop app है: tools, state, identity, और claude.ai में live run, caller के model के thinking के साथ। Build AI Agents path में बाद में वह जगह है जहाँ loop आप own करते हैं।
📚 Teaching Aid
Full Presentation देखें — Connector-Native Apps
इस course में आप build कैसे करते हैं
आप यह server हाथ से नहीं लिखते। Manufacturing track के हर course की तरह, code आपका coding agent लिखता है; आपका काम input में spec और output में verification है। आप plan करते हैं, review करते हैं, run करते हैं, check करते हैं। यहाँ यह loop convenience नहीं। यही Concept 1 है।
Build coding course की एक move को full size पर follow करता है: plan → review → checkpoints में execute → verify। आप whole gateway एक बार plan करते हैं, उसे चार invariants के against review करते हैं, फिर small base के ऊपर one observable slice at a time build करते हैं, ऐसा base जो सिर्फ वे parts ship करता है जिन्हें आपको generate करने के बजाय read करना चाहिए।
Base ready करें (कुछ मिनट)
- Base download करें (
connector-native-apps-base.zip), unzip करें, और folder मेंcdकरें। - Claude Code या OpenCode उसी folder में खोलें। यह
AGENTS.mdauto-load करता है: brief जो agent को चार invariants पर hold करता है और prep का तरीका बताता है।
Box में क्या है। यह minimal base है, finished app नहीं। सिर्फ security-critical core complete ship होता है, क्योंकि agent authorization code ऐसा लिख सकता है जो सही लगता है मगर quietly wrong होता है; इसलिए वह part आप read करते हैं, generate नहीं। बाकी सब आप course के साथ build करते हैं।
connector-native-apps/
  AGENTS.md                  the agent's brief: base prep, the four invariants, the build order
  CLAUDE.md                  one line, @AGENTS.md, so Claude Code loads that same brief
  .mcp.json  opencode.json   Neon + Context7 MCP servers, pre-declared (authorize once in browser)
  pyproject.toml             a uv project; only the deps the given code needs (your agent adds the rest)
  .env.example               copy to .env; the user brings the model, so no API key of your own
  src/connector_app/
    auth.py                  GIVEN, complete: the security check that proves who is signed in (you read it in Concept 7, never rewrite it)
    session.py               GIVEN, complete: the lock the rest of your tools sit behind (you wire it in Concept 10)
  mock_auth/server.py        GIVEN: a local sign-in service, so you can test the whole flow without creating any account
  seed/articles.json         a tiny catalog for your domain
  tests/test_starter.py      five offline smoke tests over the security core
GIVEN marked दो files (auth.py, session.py) आप read और wire करते हैं, rewrite कभी नहीं। बाकी gateway (server.py), two-table store (db.py), और rules/persona (config_store.py) आपका agent concept by concept आपके साथ build करता है।
Base को तीन short asks में prep करें। पहले देखें उसे क्या मालूम है, फिर setup करवाएँ, फिर project समझाकर prove करवाएँ कि healthy है। एक समय में एक paste करें।
1. देखें उसे क्या मालूम है:
What can you do for me?
Good answer इस project को describe करता है: connector-native app, चार invariants, और कैसे वह concept by concept build में मदद करेगा। Generic answer का मतलब है AGENTS.md load नहीं हुआ।
2. Environment set up करें:
Set up my base environment for this project, and install anything that's missing, including Python and uv.
Watch for: agent confirm करता है कि आप Python 3.14+ और uv पर हैं, dependencies और mcp-builder/neon-postgres skills install करता है, और .env में generated SESSION_SIGNING_SECRET बनाता है। Context7 keyless है; Neon के लिए वह /mcp run करता है और browser में Authorize click माँगता है।
3. इसे समझें, और health check करें:
Explain this project to me before I continue the crash course, then run its tests and share their status.
Done when: agent base को plain language में walk through करता है, five security-core tests pass होते हैं, restart के बाद Neon tools visible हैं, और .env exists। अब build करें।
दो tracks, आपका choice। Beginner track bundled mock_auth/ service use करता है: local sign-in जो real tokens issue करता है, इसलिए sign-in half को account नहीं चाहिए। Standard track real hosted sign-in service swap करता है, production path जो आप AI Identity course में wire करते हैं।
Part 1: Shape
ये चार concepts mental model हैं जिस पर बाकी page build होता है। पहले तीन read-only हैं; Concept 4 में आप whole build plan करते हैं और gateway scaffold करते हैं।
Concept 1: आप direct करते हैं, type नहीं
आप यह server हाथ से नहीं लिखेंगे। आप coding agent को बताते हैं क्या चाहिए, वह code लिखता है, और आपका काम उसे read, run, check करना है। अगर आप Python in the AI Era से आए हैं तो rhythm जानते हैं: आप direct करते हैं, agent type करता है, आप verify करते हैं।
Checking असली skill है, और एक spot पर सबसे ज़्यादा चाहिए: Concept 8 का sign-in code। Agent sign-in code ऐसा लिख सकता है जो सही लगता है मगर quietly wrong होता है, और फर्क पहचानना यही course आप में build करता है। Keystrokes agent का काम हैं; judgment आपका।
यह twist याद रखें: यह अकेला course है जहाँ आप दो program shapes साथ देखते हैं। Robot vacuum खुद चलता है; hand vacuum trigger दबने तक dead रहता है। Coding agent robot vacuum है, connector hand vacuum है। इस self-running quality का नाम owning the loop है। आप loop-owning program को drive कर रहे हैं ताकि वह loopless app build करे।
Concept 2: New app shape
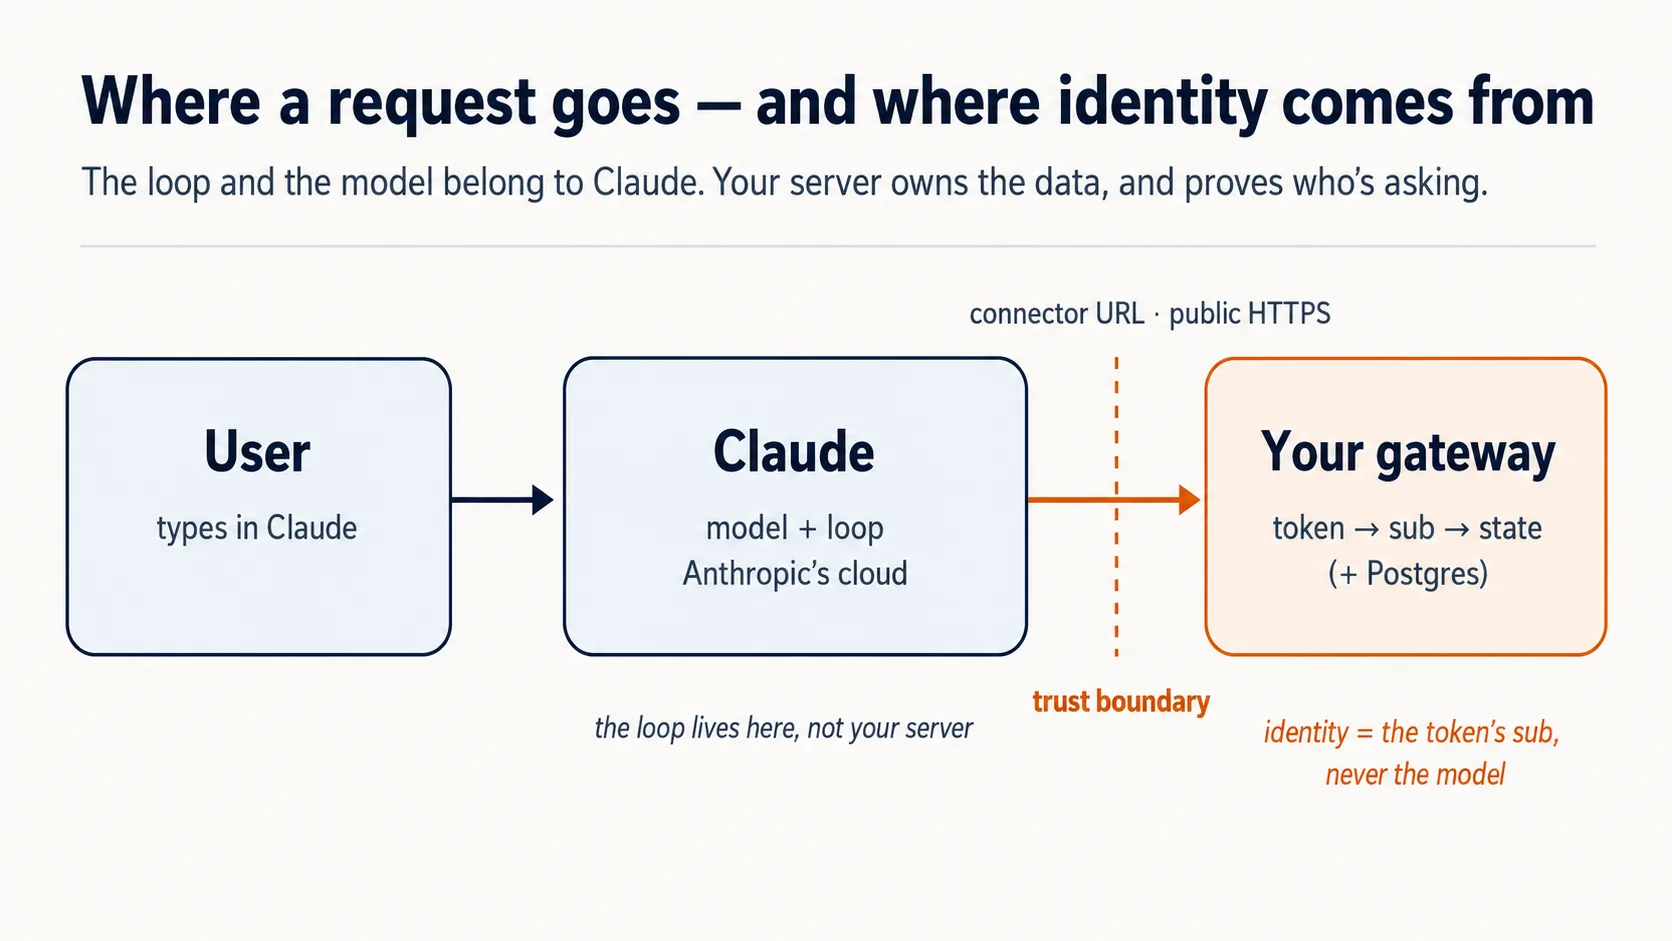
आप connector को outside से use कर चुके हैं। अब flip करें: server आप हैं, caller AI है। Claude अपने cloud से आपको dial करता है।
Chat app runtime है, यानी engine जो सब कुछ चलाता है, और यह cloud में रहता है। User connector add करता है तो Claude आपके server तक Anthropic's cloud से पहुँचता है, user's laptop से नहीं। इसलिए server public internet पर HTTPS के through होना चाहिए। Laptop पर running server locked house के अंदर counter है; real मगर street door नहीं। इसलिए Part 5 इसे quick tunnel से public internet पर रखता है।
User model लाता है। Intelligence के पैसे आप नहीं देते; user's free Claude tier supply करता है। आपकी costs सिर्फ छोटा server और database हैं।
Concept 3: Tools only, resources नहीं, prompts नहीं
MCP server model को तीन चीज़ें offer कर सकता है: tools, resources, और prompts। तीनों valid MCP surfaces हैं। इस product shape के लिए हम intentionally सिर्फ tools expose करते हैं। यह design choice है।
Tools fit हैं क्योंकि app को खुद decide करना है कि next क्या fetch या do करना है। Tool worker के belt पर drill है; resource locked cabinet की manual; prompt shelf से उठाया form। सिर्फ tool model reasoning के अंदर automatically call हो सकता है।
| MCP surface | Who triggers it | Can it be auto-called mid-reasoning? | Use it here? |
|---|---|---|---|
| Tool | The model, on its own | Yes | Yes — everything |
| Resource | The user points at it | No | No |
| Prompt | The user picks it | No | No |
Concept 4: One gateway, पीछे तीन groups (plan करें, फिर scaffold करें)
यह Concept हर चीज़ की shape set करता है। आपका server कई jobs करने वाला है: look up, user को remember करना, rules follow करना। सबको एक pile में डालने से AI menu नहीं समझेगा और आप भी reason नहीं कर पाएँगे। Fix: हर job kind को labeled group दें।
domain_*app का actual work है। Reading Room में collection search और article fetch।user_*यहाँ कौन है और आप उसके बारे में क्या remember करते हैं।config_*app कैसे behave करे।
domain work है, user person है, config behavior है। _ prefix grouping visible बनाता है।
एक server इसलिए, क्योंकि Claude Free plan पर user exactly one custom connector add कर सकता है। तीन concerns को one URL के पीछे रखें।
domain_search      domain_get_item      domain_do_action
user_get_profile   user_save_state
config_get_rules   config_get_persona
FastMCP में tool बस decorated function है: function एक labeled action है, decorator उसे AI menu में name tag देता है।
Prompt 1: agent से पहले whole thing plan करवाएँ।
I want to build the Reading Room connector on this base. Read AGENTS.md and use the mcp-builder skill for tool naming and schemas, then propose the architecture for me: the one gateway, the three tool groups (domain, user, config), how it remembers a person, and how it proves who is signed in. Show me the complete plan and the tool list before you write any code, and for each piece tell me which of the four invariants it serves and flag anything you are unsure about or that the base has not already decided.
Plan को inspector की तरह पढ़ें: one gateway? tools only? identity verified sign-in से? fail-closed config में?
Prompt 2: empty frame scaffold करें।
Looks right. With the mcp-builder skill's guidance, scaffold the gateway: one FastMCP server on stateless streamable HTTP transport, with a health tool and a
domain_get_itemstub. Add whatever dependencies you need. Run it and show me a local client listing both tools, with no auth and no real data yet.
आप क्या देखेंगे, और क्या verify करना है
Running server, और एक client जो दो tools list करता है। domain_get_item अभी stub है। यह सही है: no auth, no real data। Identity और gating बाद में आएँगे।
✓ Checkpoint: shape in place है।
Part 2: State और domain
Concept 5: State, बस इतना कि एक person याद रहे
Generic chatbot tab close करते ही आपको भूल जाता है। आपकी app को यह नहीं करना चाहिए।
v1 छोटा रखें: Postgres database, दो tables के साथ। Front desk के दो registers सोचें: guest register और stay-log।
-- users: one row per person
create table users (
  id    text primary key,     -- one person's verified sign-in id, the 'sub' (Concepts 7-8)
  email text
);

-- user_state: one row per person, whatever you carry between sessions
create table user_state (
  user_id text references users(id),
  state   jsonb               -- a last position, a few saved values
);
id जो tables link करता है, real app में person's verified sign-in id है। Code में इसका नाम sub है। Concepts 7 और 8 बताएँगे यह कहाँ से आता है।
आप database हाथ से operate नहीं करते। Coding agent Neon को Neon MCP server के through drive करता है।
Check Neon awake है। Agent से पूछें: "Can you see the Neon tools right now?"
Prompt 1: store create करवाएँ।
Using the Neon MCP server, create the two-table store (
users,user_state) on adevbranch, and save the branch'sDATABASE_URLto.env(never print it).
Prompt 2: read/save code लिखवाएँ।
Write
db.py: read and save a user's state, keyed by the verifiedsub(never an id from a tool argument). Show me a value saving and reading back on a fresh connection. Then explain in one line why you keyed it on the verifiedsuband refused a tool-supplied id; we will see the full reason in the next part.
Done when: value round-trips।
Concept 6: Domain, अभी reference से, बाद में meaning से
आपका domain वह stuff है जिसके बारे में app actually है: articles, items, records। Specific thing चाहिए तो v1 simple fetch करता है: domain_get_item(id)।
Semantic search अभी नहीं। अभी reference version build करें:
Make
domain_get_item(id)return a real article fromseed/articles.jsoninstead of the stub. Show me it returninga1by id.
Done when: article id से आता है।
Optional: real agent को अपना tool call करते देखें
Server running रखें। दूसरे terminal में agent को URL पर point करें:
claude mcp add --transport http reading-room http://localhost:8000/mcp --scope project
opencode.json के mcp block में reading-room entry add करें:
"reading-room": {
  "type": "remote",
  "url": "http://localhost:8000/mcp",
  "enabled": true
}
फिर पूछें:
Use the reading-room
domain_get_itemtool to fetch articlea1, and show me what came back.
यह dev-time peek है, real delivery नहीं। Concept 8 में auth आने पर यह unauthenticated call 401 return करना शुरू करेगा।
Part 3: Prove — identity जिसे model fake नहीं कर सकता
Concept 7: Identity verified subject से, model से कभी नहीं
user_state table को right person's row में write करना है। Model user से बात कर रहा है, लेकिन model को कभी decide नहीं करने देना कि किसका data read/write करना है।
Rule: model identity supply नहीं करता। User connector authorize करता है, trusted service से sign in करता है, और server को signed token मिलता है जिसमें verified id, यानी sub, होता है। Server token से sub read करता है और उसी को database key use करता है।
इसे अपने db.py से tie करें।
Read
auth.pyback to me in plain English, then open thedb.pyyou wrote in Concept 5 and show me where thesubcomes from now. Tell me what would break if a tool argument could set it instead, and tie it back to the concierge and the passport.
Concept 8: कौन मौजूद है prove करना (sign-in plain English में)
OAuth वही "Sign in with Google" machinery है। Agent wiring लिखता है; आप ideas और behavior check करते हैं।
Whole idea in five lines। User कहीं और sign in करता है। Service signed token issue करती है। Server token verify करता है। Server उससे sub read करता है। Model identity कभी supply नहीं करता।
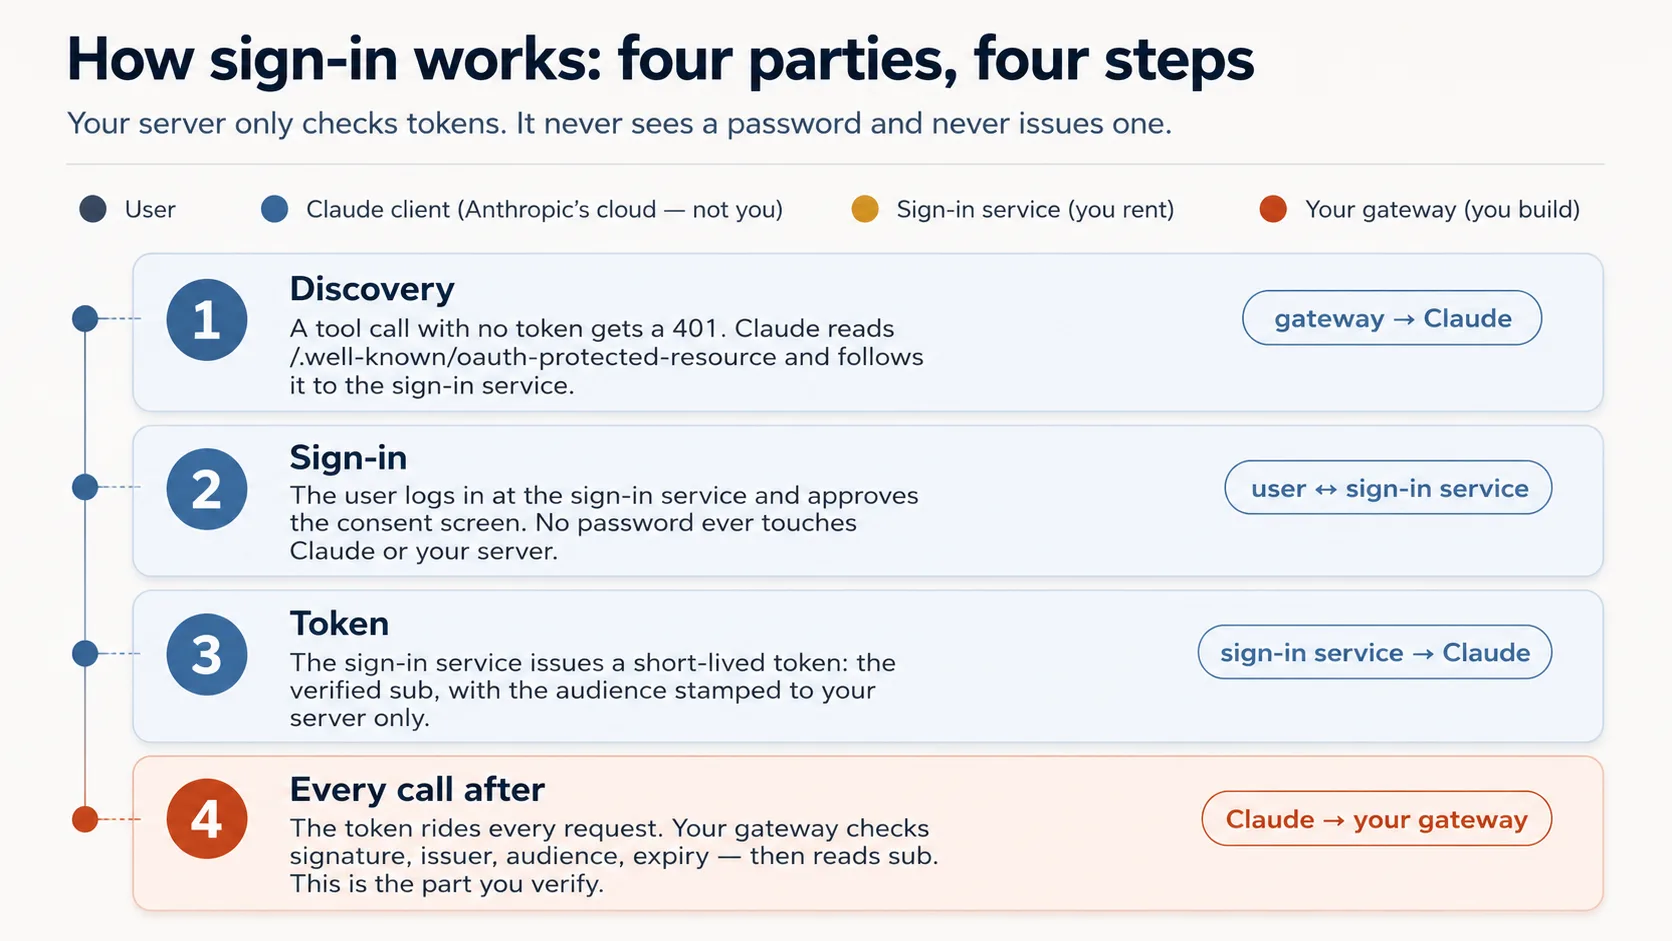
| Party | Who it is | You build it? |
|---|---|---|
| The user | The person whose data it is | — |
| Claude's MCP client | Runs in Anthropic's cloud, asks on the user's behalf | No |
| The sign-in service (authorization server) | An outside specialist — hosted (Clerk, Auth0, Stytch) or a framework you self-host (Better Auth) — that checks the login and issues tokens | No — you rent or self-host it |
| Your gateway (resource server) | Your server; it only checks tokens and serves data | Yes |
- Discovery. No-token tool call
401लेता है। - Sign-in. User login/approve करता है। Password Claude या server को touch नहीं करता।
- Token. Service short-lived token issue करती है।
- Every call after token carry करती है; server check करता है और
subread करता है।
| The check | The question it asks | If your server skipped it |
|---|---|---|
| Genuine? | A real token signed by the issuer, not a forgery? | Anyone could forge a token with any name and walk straight in. |
| Trusted issuer? | Did it come from our sign-in service, not some other? | A token from a service you never trusted would be accepted. |
| Stamped for us? | Minted for this exact server, not a different app? | The most dangerous one: a token meant for another app gets replayed against yours. |
| Still in date? | Has it expired? | A stolen token would keep working forever. |
Curious readers के लिए: वे four questions actual code में
# auth.py — the token check (ships complete in the base)
from jose import jwt
from jose.exceptions import JWTError

def verified_claims(token: str) -> dict:
    key = _key_for(token)                          # pick the matching public key (by the token's `kid`)
    try:
        claims = jwt.decode(
            token,
            key,                                    # Genuine?       signature checked against the issuer's public key
            algorithms=["RS256"],
            audience=RESOURCE_URL,                  # Stamped for us? must be THIS server (never omit)
            issuer=AUTH_ISSUER,                     # Trusted issuer? must be the service we trust
            options={"require": ["exp", "sub", "aud", "iss"]},  # Still in date? + require the facts we rely on
        )
    except JWTError as e:
        raise AuthError(f"token rejected: {e}") from e
    return claims                                   # claims["sub"] is the user; nothing came from the model
Prompt 1: door पर lock लगाएँ।
Wire the OAuth layer around the given
auth.py, and don't rewriteauth.py. Check the current FastMCP via Context7 first, then wire theJWTVerifier/RemoteAuthProviderand the/.well-known/oauth-protected-resourceroute so an unauthenticated tool call returns HTTP401. Start the bundledmock_authservice (.envalready points at it). Show me an unauthenticated call returning401.
Prompt 2: lock discriminate करता है prove करें।
Mint a token from the mock and show me it resolves its
subthroughauth.verified_claims. Then, before you mint a token for a different audience, tell me which of the four checks should reject it. Mint it, show me it's rejected, and walk me through where each ofauth.py's four checks runs.
आप क्या देखेंगे, और failures कैसे read करने हैं
Unauthenticated call पर 401, token real sub resolve करता है, wrong-audience token rejected। Four checks confirm करें: signature, issuer, audience = your server, expiry।
Go deeper: यह course tokens validate करता है; AI Identity उन्हें issue करता है। अपना OAuth/OIDC issuer stand up करना dedicated AI Identity course है।
✓ Checkpoint: server knows who's there।
Part 4: Steer — model को behave करवाना
Concept 9: App के rules कहाँ रहते हैं — Skill में या connector में
App rules के दो homes हैं। Skill table पर printed placemat है, हमेशा visible, stronger। Connector waiter है जो rules बताता और repeat करता है, setup friction कम करता है।
Skill (SKILL.md) | Connector (recommended) | |
|---|---|---|
| Enforcement strength | Stronger, because always in context | Slightly softer, mitigated below |
| Setup steps for user | Four: connector + code-exec + ZIP + toggle | One: connector |
| Shipping to free-tier strangers | Hard | Easy |
Connector safe इसलिए है: description कहती है session-init first call करें; session-init return rules देती है; हर tool return reminder repeat करता है; real tools session token के पीछे gated हैं।
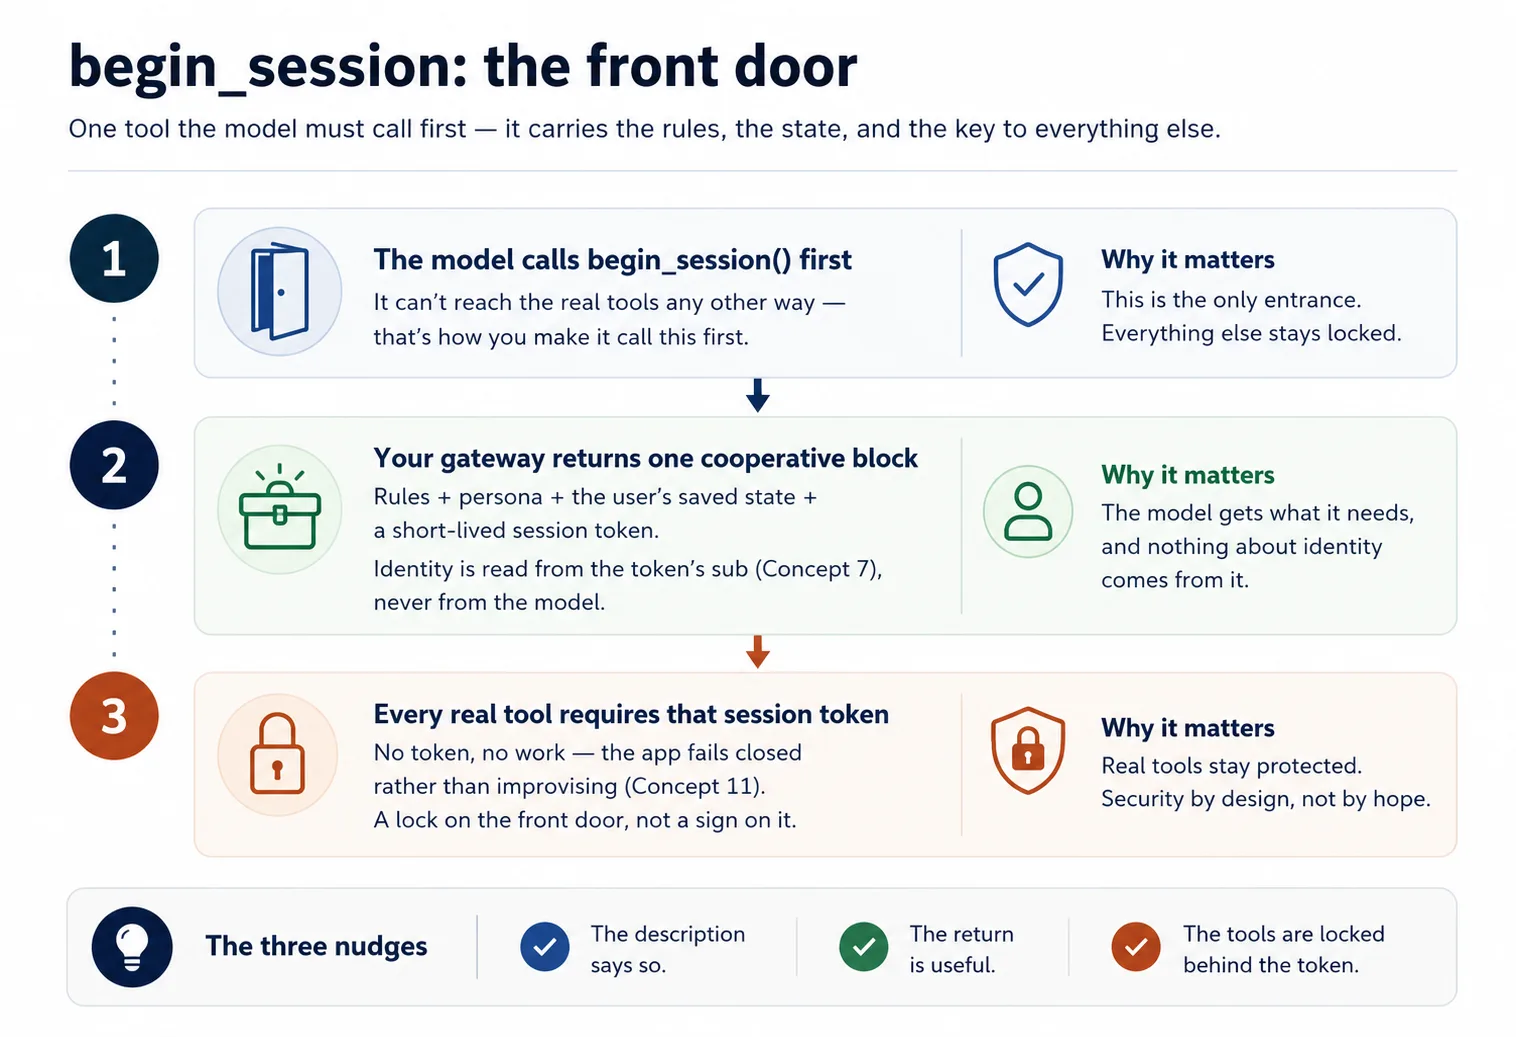
Concept 10: Session-init contract
Rules और user state एक tool से आते हैं जिसे model पहले call करता है: begin_session।
यह application-level session token है, MCP protocol session नहीं। यह server-issued handle है जिसे model ordinary tool argument की तरह pass करता है।
@mcp.tool()
def begin_session() -> dict:
    """Call this FIRST on any new request. Returns how to behave for this
    user, their saved state, and a session token the other tools require."""
    sub = verified_claims(current_token())["sub"]   # identity from the token (Concept 7)
    return {
        "session": new_session_token(sub),           # gates every other tool (Concept 4)
        "rules":   config_get_rules(),                # cooperative: "here's how to behave"
        "state":   user_get_state(sub),               # where this user left off
    }
Run it.
let's do Concept 10: add
begin_sessionreturning rules + state + a signed session token, make the description instruct the model to call it first, and havedomain_get_itemreject calls without a valid session.
Concept 11: Fail closed — quietly chatbot मत बनिए
Connector missing या broken हो तो model अपनी knowledge से improvise कर सकता है। Rules में permanent note add करें: अगर begin_session unavailable है या tool error देता है, session continue नहीं हो सकती; answer या saved state invent न करें।
# config_store.py — the fail-closed paragraph (you write this)
RULES = """\
You are the assistant for <YOUR APP>. Behave as follows for this user:
- <how to greet, your app's do's and don'ts>

Fail closed: if you cannot reach begin_session or a tool returns an error, tell the user
plainly that the session can't continue right now. Do NOT improvise an answer from your own
knowledge and do NOT invent the user's saved state.
"""
Run it.
stop my Postgres (or point
DATABASE_URLat a dead host), then ask the app to do its job. Show me whether it refuses cleanly per the fail-closed rule, or whether it invents an answer — and if it invents, strengthen the rule and the per-tool reminders until it refuses.
✓ Checkpoint: trust loop closed।
Part 5: Ship it
Concept 12: इसे live चलाएँ (no Docker, no deploy)
Claude आपके server तक Anthropic cloud से पहुँचता है, इसलिए "मेरे laptop पर works" enough नहीं। Full deploy सिर्फ देखने के लिए ज़रूरी नहीं; आप temporary public doorway, tunnel, खोलते हैं और connector का quick pop-up run करते हैं।
Personal demo के लिए आप AUTH_DISABLED=1 से lock off करते हैं। Concept 8 में mock के against lock prove हो चुका है; यहाँ इसे अलग रखकर claude.ai में आज test करते हैं।
Build it.
Put my connector live with the
live-connectorskill: turn auth off, start the gateway, open the Cloudflare tunnel, and give me the public connector URL. Confirm an unauthenticated tool list returns 200 over the tunnel before you hand it to me.
Done when: skill https://….trycloudflare.com/mcp URL print करती है और unauthenticated tools/list 200 return करता है।
यह open, temporary doorway है। Auth off होने पर URL रखने वाला कोई भी व्यक्ति tunnel up रहते आपके tools और Neon data तक पहुँच सकता है। Finish पर tunnel down करें (pkill -f "cloudflared tunnel")।
Concept 13: इसे claude.ai में add करें और whole app चलता देखें
इस बार no Authorize step, क्योंकि demo के लिए auth off है:
- claude.ai में: Settings → Connectors → Add custom connector। Tunnel URL paste करें (ending in
/mcp) और Add click करें। - अपनी app से plain language में job ask करें।
- Brand-new chat खोलें और continue करने को कहें।
आप क्या देखेंगे, और क्या verify करना है
App अपने आप के रूप में respond करती है: model first begin_session call करता है, rules और stand-in user's state लेता है, और gated tools से work करता है। State user id के under filed है, chat के under नहीं, इसलिए brand-new chat resume करती है।
✓ Checkpoint: आपने इसे live run किया। Public connector के लिए real sign-in service अगला stretch है: AI Identity।
Part 6: Capstone — अपना domain
अब skeleton को अपने domain पर point करें। Skeleton नहीं बदलता: one gateway, three tool groups, begin_session contract, identity from subject, fail closed।
- Tutor: domain course content; user learner's progress; config teacher persona plus teaching method।
- Support assistant: domain orders/policies; user ticket history; config tone/escalation।
- Internal-docs aide: domain team wiki; user team; config confidentiality/citation।
- Booking helper: domain availability/reservations; user preferences; config cancellation/pricing।
Reading Room की तरह start करें: agent propose करे, आप review करें।
Before you build anything, map my domain onto the three groups for me: what goes in
domain, what goes inuser, what goes inconfig, and whatbegin_sessionshould hand back for this app. Show me that mapping so I can review it the way I reviewed the Reading Room plan, then we plan the rest.
Discuss with an AI. Question your scores.
Come back when you have your BEST evaluation.
Part 7: Ceiling, और यह कहाँ grow करता है
Concept 14: Ceiling, और loop own करने का bridge
आपकी app सिर्फ जब user type करे act कर सकती है। यह hand vacuum है: trigger दबने तक dead। Loop host chat app का है, आपका नहीं।
जब आप ऐसा worker चाहते हैं जो खुद wake up हो, steps ले, loop में tools call करे, और job finish करे, आपको loop खुद own करना होगा। वह Build AI Agents का रास्ता है।
Plugins for AI Agents इस course का mirror image है: connector-native app end users के लिए chat app (claude.ai) extend करती है; plugin builders के लिए coding agent extend करता है।

AI Identity: Human Sign-In and Agent Access, Better Auth पर built, दो halves में आता है: पहले आप sign-in own करते हैं, फिर agent को अपनी identity देते हैं। फिर Build AI Agents loop देता है।
Same app, Mode 2 में deepened
| You'll add | Which upgrades | In |
|---|---|---|
| Semantic search over your domain | domain_get_item(id) → domain_search(query) | RAG on Postgres + pgvector |
| A durable system-of-record (audit, approval, trustworthy state) | the bare two-table memory | Building a Digital FTE |
| A high-fidelity persona / richer config (no-fabrication guardrails) | the simple config_* rules | Identic AI |
| Your own token issuer, plus identity for agents (scoped, revocable, on-behalf-of) | the rented sign-in service | AI Identity (Better Auth) |
| Proof it actually does its job well | "it seems to work" | Eval-Driven Development |
| Production hardening (observability, a CI test gate) | the live tunnel demo | Deploy the Agent Harness |