अपने AI Agent को एक Nervous System दें: एक 90-मिनट का Crash Course
15 concepts, असली उपयोग का ~80%: senses (triggers), reflexes (durable execution), और balance (flow control).
आपने एक agent बना लिया है जो काम करता है। समस्या: यह सिर्फ़ तभी काम करता है जब आप इसे देखते रहते हैं। आप Claude Code या OpenCode खोलते हैं, आप type करते हैं, यह जवाब देता है। दूर हटें और यह रुक जाता है। उस gap को बंद करना, एक ऐसे agent के बीच जिसे आप operate करते हैं और एक ऐसे worker के बीच जो ख़ुद चलता है, यही इस course का विषय है।
जो इस gap को बंद करता है वह कोई smarter agent नहीं है। आपके agent के पास पहले से वह सब है जो काम करने के लिए ज़रूरी है: सोचने के लिए एक LLM, काम करने के लिए tools और MCP servers, और उन jobs के लिए skills जिन्हें यह जानता है। जो इसके पास नहीं है वह है एक nervous system.
अपने ख़ुद के शरीर के बारे में सोचें। आपका दिमाग़ सोचता है और आपकी मांसपेशियाँ काम करती हैं। लेकिन एक दूसरा system नीचे चलता रहता है, आपके बिना: आपकी धड़कन, आपके reflexes, वे signals जो आपके सोते वक़्त भी आपको ज़िंदा रखते हैं। ध्यान देना बंद कर दें और आपका दिल धड़कता रहता है। एक agent के पास ऐसा कुछ नहीं होता। तो जिस पल आप इसे चलाना बंद करते हैं, यह रुक जाता है।
एक nervous system हर turn में किसी इंसान के बिना, ख़ुद loop को बंद करता है। यह दुनिया को महसूस करता है और जब कुछ होता है तो agent को जगाता है। जब कोई step fail होता है तो यह reflex से react करता है, और जब यह किसी इंसान या किसी slow API का इंतज़ार करता है तो घंटों तक अपनी जगह बनाए रखता है। जब पाँच सौ requests एक साथ आती हैं तो यह agent को स्थिर रखता है। यही वह फ़र्क़ है एक ऐसे agent के बीच जिसे आप operate करते हैं और एक ऐसे FTE के बीच जो ख़ुद चलता है। आप यह nervous system अपने agent में जोड़ते हैं। आप agent को दोबारा नहीं लिखते। यही एक idea है जिस पर यह पूरा course बना है।
📚 Teaching Aid
View Full Presentation — AI Agent Nervous System
इस tool का एक technical नाम है: एक durable execution engine. हम एक का इस्तेमाल करते हैं जिसका नाम Inngest है। वही patterns Temporal, Restate, और Dapr Agents में भी काम करते हैं। और यह सिर्फ़ एक teaching तस्वीर नहीं है: Day AI, AI-native companies के लिए एक CRM, Inngest को अपने product का "nervous system" कहती है। Inngest का free Hobby tier शुरू करने की सबसे आसान जगह है: कोई credit card नहीं, एक-command वाला dev server, और एक dashboard जिसे आप build करते वक़्त देख सकते हैं।
किसी भी और चीज़ से पहले, यहाँ पूरा setup एक तस्वीर के रूप में है:
  1.  an EVENT happens   (e.g. a customer emails)
              |
              v
  2.  the INNGEST ENGINE catches it
      (you do NOT build this. it runs your agent for you:
       retries, waits, remembers every step, shows a dashboard)
              |
              |  it reaches your code over a thin web wire (FastAPI)
              v
  3.  YOUR AGENT runs
      (the only part you write. it thinks and acts.)
यही पूरा model है: दो programs. engine (इसे आप नहीं लिखते) events को catch करता है और आपके agent को चलाता है (इसे आप लिखते हैं), एक thin web wire के ज़रिए इस तक पहुँचते हुए, और यही एकमात्र वजह है कि इस course में एक web server (FastAPI) कभी आता है। आप Quick Win में दोनों को start करते हैं और देखते हैं कि engine आपके agent को कैसे चलाता है।
यह example जानबूझकर छोटा है: एक customer-support agent जो कुछ sample customers को देखता है, एक reply draft करता है, और सिर्फ़ तभी एक refund issue करता है जब कोई इंसान approve कर देता है। agent मुश्किल हिस्सा नहीं है, इसलिए हम इसे छोटा रखते हैं और अपनी मेहनत इसके आसपास के nervous system पर लगाते हैं। आप इसे यहाँ scratch से बनाते हैं। यह पिछले Digital FTE course के बाद की जगह से उठाता है, हालाँकि D0 scratch से एक minimal worker set up कर देता है अगर आपने उसे छोड़ दिया था। यह inngest-py पर Python-first है: आप अपने general agent को plain English में direct करते हैं, और यह code लिखता है।
यहाँ बताया गया है कि यह course कैसे बना है, ताकि आप इसे सही तरीक़े से पढ़ें। build ही रीढ़ है. आप Quick Win में environment एक बार set up करते हैं, फिर Part 4 पूरे worker को सात छोटे prompts में बनाता है, एक बार में एक nervous-system layer. यही रास्ता है, और इसे करना ही वह तरीक़ा है जिससे model दिमाग़ में बैठता है। Parts 1-3 के पंद्रह concepts वह reference हैं जिस पर build टिकता है: हर एक idea, उस layer के नीचे का "क्यों" जिसे आप जोड़ने वाले हैं। इसमें से गुज़रने के दो अच्छे तरीक़े हैं। अगर आपको keyboard से पहले idea पसंद है तो Parts 1-3 पहले पढ़ें। या सीधे Quick Win और Part 4 पर जाएँ, और जिस पल कोई layer आपको पूछने पर मजबूर करे कि "लेकिन यह ऐसे क्यों काम करता है?" उस पल किसी concept में वापस झाँक लें। किसी भी तरह, Part 4 वही जगह है जहाँ आप build करते हैं।
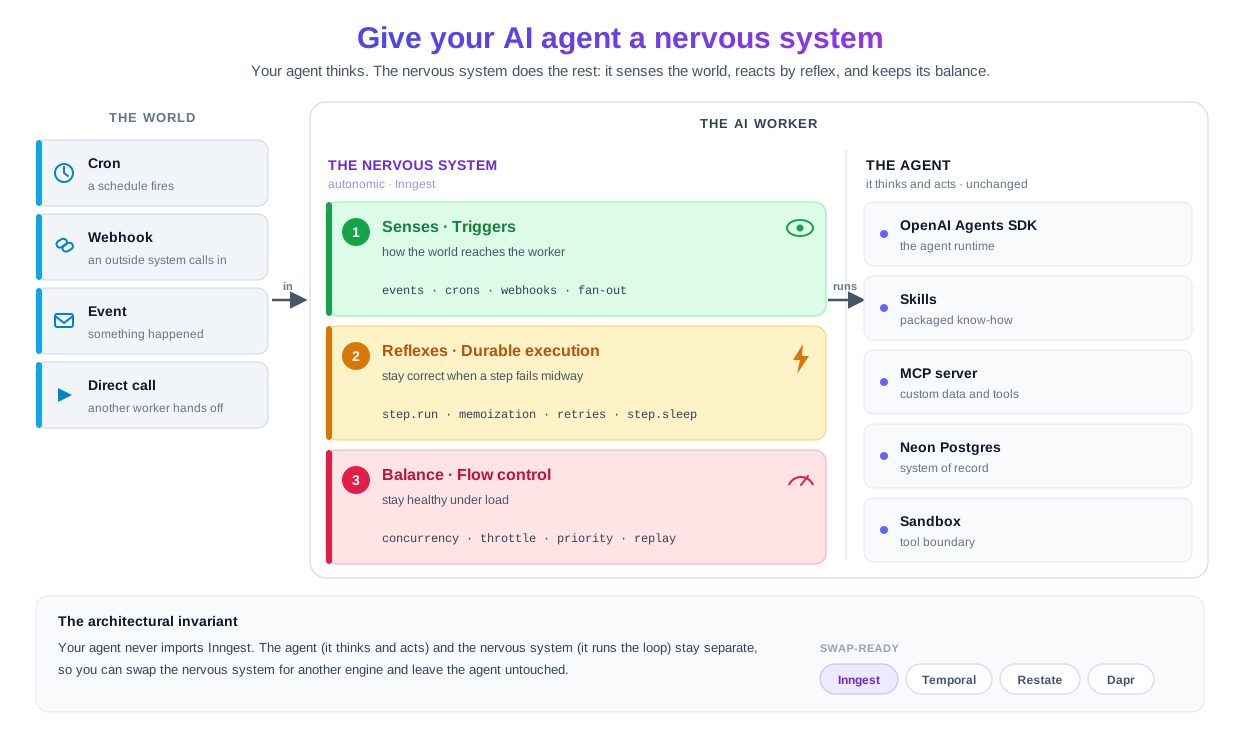
agent कभी nervous system को import नहीं करता, इसलिए आप Inngest को Temporal या Restate से बदल सकते हैं और agent को अछूता छोड़ सकते हैं। किसी task के बीच में एक अकेला agent crash परेशान करने वाला है। पचास agents का एक workforce जो customer-facing काम संभालता है, उसके नीचे एक nervous system के बिना असंभव है: या तो आप एक platform अपनाते हैं जो आपको यह देता है, या ख़ुद छह महीने में एक बदतर version बनाने में लगाते हैं। चार properties इस nervous system को agents के लिए ख़ास तौर पर ज़रूरी बनाती हैं: Day AI, AI-native companies के लिए CRM, अपने product को हर उस primitive पर चलाती है जो यह course सिखाता है: durable LLM workflows, wait-for-event coordination, failure पर replay, debounce के साथ throttle के साथ concurrency, और multi-tenant fairness. उनके दो founding engineers ख़ुद ही उसी nervous-system तस्वीर तक पहुँचे। यह production language है, curriculum branding नहीं। Agent Factory thesis उन Seven Invariants का वर्णन करती है जिन्हें किसी भी production agent system को पूरा करना ही चाहिए। जो worker आप यहाँ बनाते हैं वह Invariant 4 (एक engine) और Invariant 5 (एक system of record, यहाँ एक छोटा audit trail) को पूरा करता है। यह course इनमें दो और जोड़ता है, साथ ही Invariant 1 का एक हिस्सा:एक AI agent को nervous system की ज़रूरत क्यों है (चार properties)
step.wait_for_event (Concept 15) के बिना, आप ख़ुद एक approval queue बनाते हैं: database table, polling, timeout handling, audit trail. यह एक project है, एक feature नहीं।यह course Agent Factory thesis में कहाँ बैठता है
step.wait_for_event किसी भी platform पर सबसे साफ़ अभिव्यक्ति है: agent suspend होता है, एक इंसान awaited event emit करता है, agent फिर से चालू हो जाता है।
15 concepts, एक नज़र में। ये उन तीन jobs पर map होते हैं जो एक nervous system करता है: senses (triggers worker को जगाते हैं), reflexes (durable execution तब इसे correct रखता है जब कुछ टूटता है), और balance (flow control इसे load के नीचे स्वस्थ रखता है)। यह first-pass version है, concept के साथ एक-line का gist. जब किसी build के दौरान कुछ टूटता है, तो अंत में मौजूद Quick reference में एक symptom-to-concept diagnostic है जो आपको उसी concept की ओर वापस इशारा करता है जिससे failure जुड़ा है।हर एक के लिए 15 concepts एक line में (पूरे map के लिए expand करें)
# Concept One-line gist Senses (Triggers) दुनिया worker तक कैसे पहुँचती है 1 Events vs requests एक request sync है और कोई इंतज़ार करता है; एक event async है और दुनिया आगे बढ़ चुकी है। 2 Cron triggers एक schedule function को जगाता है। एक line: TriggerCron(cron="0 9 * * *").3 Webhook triggers एक inbound HTTP payload एक named event बन जाता है; आपका function उस नाम पर react करता है। 4 Idempotency and event semantics Event IDs और step names एक duplicate event (या retry) को no-op बना देते हैं। 5 Fan-out and sub-agent delegation एक event, N subscribing functions; या एक parent जो N child events fire करता है। Reflexes (Durable execution) जब कुछ टूटे तब worker को correct रखना 6 step.run and the durable function modelहर step.run एक checkpoint है; function steps के बीच crash होकर resume हो सकता है।7 Memoization, the mechanic underneath पूरे हो चुके steps दोबारा execute होने के बजाय stored output लौटाते हैं। 8 step.sleep and step.wait_for_eventदोनों function को durably suspend करते हैं, एक duration के लिए या एक event के लिए। 9 Retries, error handling, dead-letter Automatic backoff retries; N कोशिशों के बाद fail हुआ run replay के लिए बना रहता है। 10 step.run for AI calls in PythonOpenAI calls को step.run में wrap करें; step.ai.infer inference को offload करता है (step.ai.wrap सिर्फ़ TypeScript-only है)।Balance and recovery load के नीचे flow control, recovery, और human gate 11 Concurrency and throttling concurrency active runs को cap करता है; throttle starts-per-second को cap करता है।12 Priority and fairness Priority queue को order करता है; per-key concurrency हर tenant को fair share देता है। 13 Batching सस्ते bulk काम के लिए events को एक batched function call में जमा करें। 14 Replay and bulk cancellation नए code के साथ fail हुए runs को replay करें; जो runs अब नहीं चाहिए उन्हें bulk-cancel करें। 15 HITL gates with step.wait_for_eventfunction तब तक suspend रहता है जब तक कोई इंसान approve न कर दे, फिर निर्णय के साथ resume होता है।
Prerequisites. यह course मानता है कि आपने From Agent to Digital FTE कर लिया है। अगर आपने किया है, तो आप पहले से नीचे की हर चीज़ पूरी करते हैं और आपके पास wrap करने लायक़ एक worker है: Part 4 का nervous system सीधे उसी की ओर इशारा करता है, और आप D0 में scratch वाला setup छोड़ देते हैं। अगर आपने नहीं किया, तो पहले वह course करें, या फिर भी आगे पढ़ें: D0 scratch से एक minimal worker बनाता है ताकि बाक़ी का course अपने आप में खड़ा रहे। किसी भी तरह, आपको चार चीज़ें चाहिए।
- आप एक general agent चला सकते हैं। Claude Code या OpenCode, installed और authenticated. Plan mode, rules files, read-first-then-write workflow: अगर वह rhythm जाना-पहचाना है, तो आप तैयार हैं। अगर नहीं, तो Agentic Coding Crash Course इसे कवर करता है।
- एक
OPENAI_API_KEY(या कोई दूसरी model key जिसे आपका general agent इस्तेमाल कर सके) और worker के Postgres system of record के लिए एक Neon account. worker एक असली model चलाता है और अपने customers और audit trail को Neon में read और write करता है। Neon free है (कोई card नहीं), और आप इसे setup के दौरान एक browser click से authorize करते हैं; अगर आपके पास account नहीं है तो neon.com पर लगभग एक मिनट में sign up कर लें। Inngest dev server को ख़ुद किसी account की ज़रूरत नहीं होती।- Node.js 20+ उपलब्ध, भले ही worker Python में हो। Inngest dev server एक Node CLI के रूप में distribute होता है (
npx inngest-cli@latest dev).- "event-driven" बनाम "request/response" का एक काम-चलाऊ mental model. अगर "दुनिया एक event fire करती है और शून्य, एक, या कई functions इस पर react करते हैं" जाना-पहचाना लगता है, तो आप तैयार हैं। अगर नहीं, तो Concept 1 आपको उसका आकार देता है।
पहली बार में इस page को कैसे पढ़ें
दो passes. पहला pass nervous-system model, इसकी तीन layers, आपके दिमाग़ में बैठाता है; दूसरा pass, Part 4 में keyboard पर हाथ, वहाँ आप build करते हैं। अगर आप पहले build करना और model को साथ-साथ बनते देखना पसंद करते हैं, तो वह भी चलता है: Quick Win से शुरू करें, Part 4 चलाएँ, और हर concept को वह reference मानें जिसे आप तब खोलते हैं जब कोई layer एक "क्यों" उठाती है। "Done when" या "What to watch" लेबल वाली किसी भी चीज़ को expand करें: चलने लायक़ behavior जिसके ख़िलाफ़ अपनी भविष्यवाणियाँ जाँची जा सकें। Part 4 में आप पहली बार में load-bearing snippets पर सरसरी नज़र डाल सकते हैं; हर एक के आसपास की prose आपको बताती है कि वह layer क्या करती है, और जब आप build करते हैं तो आपका agent code लिखता है। "Try with AI" blocks optional extension prompts हैं। हर concept एक Predict (आगे पढ़ने से पहले एक जवाब पर टिकें) या एक Quick check (अभी जो नियम पढ़ा उसे test करें) के साथ बंद होता है; दोनों आपको रुकवाने के लिए हैं, grade करने के लिए नहीं। हर term वहीं context में परिभाषित है जहाँ यह पहली बार आता है।
May 2026 तक current. पूरा Part 4 build एक live Inngest dev server और एक असली model के ख़िलाफ़ end-to-end चलाया गया था, inngest 0.5.18, openai-agents 0.17.x (0.17.3 और 0.17.4 दोनों पर बनाया और फिर से verify किया गया), fastapi 0.136.3, Python 3.12, और Inngest CLI पर. Part 4 का हर snippet उसी working build से है, याद से नहीं लिखा गया। यह course जो architecture सिखाता है वह SDK के बदलने पर नहीं बदलता; SDK इस साल इसका interface भर है। एकमात्र जगह जहाँ एक छोटा openai-agents bump काट सकता है वह है D5 का resume detail (run-state serialization एक custom context को कैसे handle करता है), इसलिए वह Decision सीधे live docs से link करता है। अगर कोई live docs page और यह page किसी syntax detail पर कभी असहमत हों, तो docs जीतते हैं: अपने versions को pin करें, और build करते वक़्त Inngest Python quick start और OpenAI Agents SDK docs देख लें।
Claude Code और OpenCode के बीच जो sections अलग होते हैं उनमें एक switcher है; एक चुनें और page हर बार आने पर sync रहता है।
पंद्रह-मिनट का quick win: base set up करें, और reflex देखें
उन 15 concepts से पहले जो समझाते हैं कि यह क्यों काम करता है, वह environment set up करें जिसमें यह course चलता है और देखें कि एक task एक crash से कैसे बच निकलता है। आप यह setup एक बार करते हैं; Part 4 असली worker को इसी base पर बनाता है। अंत तक आपके पास होगा:
- आपके general agent में खुला हुआ base, जिसके skills और tools आपके लिए set up हो चुके हैं,
- एक fresh Neon database जिसमें दो tables (
customersऔरaudit_log) हैं जिन्हें आपके agent ने बनाया, - एक tiny worker चलता हुआ, एक dashboard के साथ जहाँ आप इसे देख सकते हैं,
- एक run जिसे आपने इंतज़ार करते वक़्त sleep में जाते देखा, पूरे समय zero compute जलाते हुए,
- एक run जिसे आपने जानबूझकर तोड़ा, फिर system को retry करते देखा: इसने वह काम बचाए रखा जो पहले ही पूरा हो चुका था और सिर्फ़ उस हिस्से को फिर से चलाया जो टूटा था,
- और वही function एक असली agent के साथ जो durable step के अंदर greeting लिख रहा है, ताकि आप यह देखते हुए ख़त्म करें कि एक AI worker चल रहा है, सिर्फ़ एक timer नहीं।
वे आख़िरी दो bullets ही असल बात हैं: retry वही reflex है जिसके बारे में यह पूरा course है, और इसके अंदर चलता agent वह वादा है जो वह reflex निभाता है। यह एक बैठक है, पूरा Part 4 build नहीं, इसलिए इसे कर लें, फिर concepts के लिए वापस आएँ।
अब आप opening वाले दो programs start करते हैं: आपका worker (आपका code) और Inngest dev server (इसके बग़ल में चलता engine, जिसका dashboard http://127.0.0.1:8288 पर है, जहाँ /runs हर run को list करता है)। ये एक छोटी हमेशा-चालू web layer, FastAPI, के ज़रिए जुड़ते हैं, वह दरवाज़ा जिस पर dev server एक run शुरू करने के लिए दस्तक देता है। पूरा loop एक line में: एक event आता है, dev server उस दरवाज़े के ज़रिए आपके worker तक पहुँचता है, आपका durable function एक बार में एक step चलाता है, और हर step dashboard में record हो जाता है। आपका general agent दोनों को आपके लिए लिखता और start करता है; आपका काम देखना है।
एक और boundary मायने रखती है, वही जो Digital FTE course ने खींची थी। आपका worker अपने customers और जो किया उसका record एक Neon database में रखता है, और उस database को दो अलग तरीक़ों से छुआ जाता है। जब आप build करते हैं, आपका general agent आपके लिए plain English में Neon तक पहुँचता है, tables बनाने और rows जाँचने के लिए। जब worker चलता है, यह अपने एक साधारण connection के ज़रिए उसी database से बात करता है। build-time वाला tool कभी चलते worker में wire नहीं किया जाता; Neon के अपने docs साफ़ कहते हैं कि यह build करने और inspect करने के लिए है, production के लिए नहीं। Neon एक click में free है; Inngest dev server को बिल्कुल किसी account की ज़रूरत नहीं।
Base लाएँ और इसे खोलें
base download करें और folder को अपने general agent में खोलें। agent setup ख़ुद करता है, ठीक नीचे दिए prompts से। आप इसे एक बार set up करते हैं: ai-agent-nervous-system/ पूरे course के लिए आपका folder है, Quick Win और Part 4 दोनों के लिए। आप कभी दोबारा download या unzip नहीं करते।
Download ai-agent-nervous-system-base.zip
cd ai-agent-nervous-system
claude
cd ai-agent-nervous-system
opencode
यह base एक सक्षम general agent मानता है (Claude Code, या Claude Sonnet या Opus, GPT-5, या इसी तरह चलाता OpenCode)। एक छोटा model build prompt पर भटक जाएगा; अगर इसका पहला plan specific के बजाय अस्पष्ट दिखे, तो आगे बढ़ने से पहले किसी मज़बूत model पर switch करें।
Base तैयार करें (~3 min)
base अपने rules AGENTS.md में और अपनी MCP wiring में लाता है; Skills, आपकी key, और Neon authorization आगे आते हैं। अपने agent से इसे ख़ुद set up करवाएँ। यह paste करें:
Read AGENTS.md, then get this base ready: install the Skills it lists for whichever agent you are, copy
.env.exampleto.envfor me, and tell me exactly what you need from me to bring the Neon and Context7 MCP servers online.
Watch for: agent चार Inngest Skills और neon-postgres Skill install कर रहा है (आप install runs और Installed confirmations देखते हैं), .env बना रहा है, फिर आपसे दो चीज़ें माँग रहा है: .env में paste करने के लिए आपकी OPENAI_API_KEY, और Neon को OAuth पर authorize करने के लिए एक browser click. Neon free है; अगर आपके पास अभी account नहीं है, तो neon.com पर लगभग एक मिनट में sign up कर लें, या authorization screen पर ही एक बना लें। INNGEST_DEV=1 पहले से .env में है, इसलिए SDK बिना किसी signing key के local dev mode में चलता है। जब install और wiring पूरी हो जाए, agent आपको dev server start करने (अगला step) और फिर इसे restart करने को कहता है, क्योंकि नई Skills और inngest-dev MCP session के बीच में load नहीं होतीं।
Done when: Skills installed हो जाएँ, .env में आपकी key हो, Context7 पहुँच में हो, और Neon authorized हो। inngest-dev MCP तब online आता है जब dev server चल रहा हो, जो अगला step है।
Dev server start करें, और पुष्टि करें कि agent इस तक पहुँच सकता है (~2 min)
यह course आपके agent को MCP पर पहुँचने वाली दो boundaries जोड़ता है: एक Neon database जिसे यह बनाता और inspect करता है, और चलता dev server जिसे यह events भेजता और देखता है। तो कुछ भी build करने से पहले, दोनों को ऊपर लाएँ और पुष्टि करें कि वे live हैं।
Inngest dev server को इसके अपने terminal में start करें (यह एक Node CLI है; इसे चलता छोड़ दें):
npx inngest-cli@latest dev
dashboard http://127.0.0.1:8288 पर आता है, और dev server अपना MCP endpoint /mcp पर expose करता है। अब अपने general agent को restart करें (ai-agent-nervous-system folder में exit करके relaunch करें) ताकि ताज़ा install हुई Skills और inngest-dev MCP दोनों load हो जाएँ। फिर यह paste करें:
List the Neon tools and the inngest-dev tools you can see.
Watch for: दो असली lists. Neon tools (एक project बनाना, SQL चलाना, tables describe करना, एक connection string fetch करना, वग़ैरह) database पर आपके agent का हाथ हैं। inngest-dev tools (list_functions, send_event, invoke_function, get_run_status, और बाक़ी) चलते dev server पर इसका हाथ हैं। नीचे की हर चीज़ इन दोनों पर सवार है।
Gate open: reply असली Neon tool names और असली inngest-dev tool names list करता है। अगर Neon tools ग़ायब हैं: OAuth पूरा नहीं हुआ; prep step से Neon authorization दोबारा करें। अगर inngest-dev tools ग़ायब हैं: dev server नहीं चल रहा (इसे start करें), या आपने restart छोड़ दिया (exit करें, इस folder में relaunch करें, फिर पूछें)।
Store बनाएँ, और इसका connection string पकड़ें (~3 min)
अब Neon MCP पर worker का system of record बनाएँ, फिर worker को वह एक चीज़ सौंपें जिसकी इसे बाद में पहुँच के लिए ज़रूरत होगी: एक connection string. जो worker आप Part 4 में बनाते हैं वह अपने customers यहाँ से पढ़ता है और अपना audit trail यहाँ लिखता है। यह paste करें:
Paste this to your general agent. Plan first; execute on approval.
On a fresh Neon project, create two tables:
customers(id, email, tier) andaudit_log(a record of every action the worker takes). Then call the Neon tool that returns the connection string and write that URL into my.envasDATABASE_URL. Use the Neon tools for all of it; don't write SQL for me to run.
Watch for: agent project और दो tables बनाने के लिए Neon MCP tools call कर रहा है (आप वे tool calls देखते हैं, वह SQL नहीं जो आपने type किया), फिर DATABASE_URL को .env में लिख रहा है। वह string ही handoff है: Neon MCP ने store provision किया, और आपका worker string इस्तेमाल करेगा, MCP server नहीं।
Done when: एक fresh Neon project मौजूद हो जिसमें एक customers table और एक audit_log table हो, और .env में एक DATABASE_URL हो। console.neon.tech खोलें, वह project चुनें जो agent ने अभी बनाया, और Tables खोलें: वहाँ customers और audit_log बैठे हैं, अभी के लिए ख़ाली। जब worker चलेगा तो आप D0 में rows आते देखेंगे। (एक table बस एक spreadsheet है: हर row एक चीज़, हर column एक detail.)
पहला durable function बनाएँ, और इसे अपने agent से चलाएँ (~3 min)
अब सबसे छोटा durable function बनाएँ, उन्हीं Skills का इस्तेमाल करते हुए जो आपने अभी install कीं। Inngest Skills अपने examples में TypeScript-first हैं, इसलिए आपका agent उनसे patterns लेता है (एक step क्या है, एक durable function कैसे आकार लेता है) और सटीक Python signatures docs से पुष्टि करता है (dev-server MCP के grep_docs/read_doc, या Context7 से), याद से नहीं। यह paste करें:
Using the Inngest Skills, write one tiny Inngest durable function (call it
greet-customer, triggered by ademo/greetevent) that composes a greeting in onestep.run, sleeps fifteen seconds withstep.sleep, then composes a farewell in a secondstep.runand returns both. Serve it from a FastAPI host in local dev mode, and start the host on port 8000 with auto-reload on, so edits I make later are picked up without a manual restart.
जो आकार यह लिखता है, ताकि आप इसे देखते ही पहचान लें: function plain async def है, दो step.run calls उस काम को wrap करते हैं जो memoize होना चाहिए, और इनके बीच का step.sleep run को durably suspend करता है। उस sleep के दौरान process crash, restart, या redeploy हो सकता है, और timer के fire होने पर run फिर भी अगली line पर resume हो जाता है। agent के code में पुष्टि करने लायक़ एक detail: Inngest client is_production=False के साथ बनाया गया है, या यह आपके .env में पहले से मौजूद INNGEST_DEV=1 पढ़ता है। इनमें से किसी एक के बिना, SDK चुपचाप Cloud पर default हो जाता है और आपका function कभी locally register नहीं होता।
Done when: FastAPI host (पहले वाला दरवाज़ा) port 8000 पर चल रहा हो, और dev server (पिछले step से पहले से चल रहा) ने इसे auto-discover कर लिया हो। अपने agent से inngest-dev list_functions tool के साथ पुष्टि करवाएँ (या http://127.0.0.1:8288 खोलें, Functions click करें, और greet-customer को listed देखें)। यहाँ से आप अपने agent से events भेजते हैं और dashboard में runs देखते हैं।
इसे trigger करें, और एक step को zero compute पर sleep करते देखें (आप चलाते हैं)
trigger event अपने agent से भेजें। यह paste करें:
Send a
demo/greetevent withnameSara using the inngest-devsend_eventtool.
(Dashboard पसंद है? http://127.0.0.1:8288 में, Events click करें, फिर Send event, नीचे दिया payload paste करें, और Send click करें। किसी भी तरह वही run शुरू होता है।)
{
  "name": "demo/greet",
  "data": { "name": "Sara" }
}
अब durable sleep देखें, और इसे live पकड़ने के लिए आपके पास लगभग पंद्रह सेकंड हैं। दो तरीक़े, एक चुनें:
- Agent को poll करने दें (agent-native तरीक़ा): "Poll
get_run_statuson that run until it finishes." sleep के बीच agent run को Running बताता है, अभी कोई end time नहीं, आपका host terminal पूरे समय idle; फिर यह Completed पर पलट जाता है, output dict और लगभग पंद्रह-सेकंड का start-to-end gap के साथ। वही gap sleep है। - Dashboard देखें:
http://127.0.0.1:8288→ Runs → सबसे नया run, तुरंत खोलें। पहला step हो चुका है और sleep step एक resume time के साथ Sleeping दिखाता है; पंद्रह सेकंड बाद यह ख़ुद resume होकर Completed पर पलट जाता है, लौटाया गया dict Output panel में।
किसी भी तरह, उन पंद्रह सेकंड के दौरान आपके code में कुछ नहीं चलता: dev server resume time पकड़े रहता है और host idle बैठा रहता है। यही असल बात है, एक durable wait zero compute ख़र्च करता है। (run को उसके ख़त्म होने के बाद खोलें और आप बस Completed output के साथ देखते हैं, live sleep पहले ही जा चुका; दोबारा भेजें और जल्दी देखें, या agent को poll करने दें।)
एक step तोड़ें, और retry को वह काम छोड़ते देखें जो यह पहले ही कर चुका (असल फ़ायदा)
अब जानबूझकर एक step fail करें, ताकि आप memoization को पूरे हुए काम को retry के पार ले जाते देख सकें। यह अपने agent को paste करें:
Make the farewell step raise an error on purpose, so I can watch a run fail. Keep everything else the same.
वही demo/greet event फिर से भेजें, फिर fail हो रहे run का dashboard में per-step trace पढ़ें (Runs → newest). यहाँ असल फ़ायदा है, और यह इसी एक fail हो रहे run में है: greeting step एक पूरा हुआ attempt दिखाता है, और farewell step कई Attempts दिखाता है, हर एक backoff के साथ retry हुआ (Inngest कई attempts पर default करता है) इससे पहले कि run Failed पर पहुँचे। उस attempt count के मायने पर रुकें: पूरा हुआ greeting step एक बार भुगता जाता है, हर retry पर एक बार नहीं। यह durable execution है जिसे आप अपनी आँखों से देख सकते हैं। क्यों पूरा हुआ step दोबारा चलने के बजाय तुरंत लौटता है, यह वह mechanic है जिससे आप Concept 7 में मिलेंगे; अभी के लिए, बस इसे होते देखें।
इसे चलाते वक़्त दो चीज़ों की उम्मीद रखें:
- per-step proof dashboard में है, agent में नहीं। आपका agent event fire करता है और run-level status बता सकता है, लेकिन dev-server MCP का
get_run_statusrun summarysteps: nullके साथ लौटाता है; यह per-step attempts को expand नहीं करता। जो attempt counts ही memo proof हैं (greeting एक पर, farewell चढ़ता हुआ) वे dashboard Runs view में रहते हैं। यह Quick Win में वह एक जगह है जहाँ आप browser की ओर बढ़ते हैं, agent की नहीं। - Failed तक पहुँचने में कुछ मिनट लगते हैं। default retries और exponential backoff के साथ, run farewell step को कई मिनट तक retry करता रहता है (एक असली run में लगभग साढ़े चार लगे) इससे पहले कि यह Failed पर पलटे। आपको इसका इंतज़ार नहीं करना है: memo proof पहले retry से ही दिख जाता है, greeting एक attempt पर थमा हुआ जबकि farewell और जमा करता है। कुछ attempts देखें, फिर आगे बढ़ें।
(यह dev-server build कोई अलग "memoized" badge भी नहीं दिखाता। memo ही attempt count है: पूरा हुआ step एक attempt पर बैठा हुआ जबकि टूटा step चढ़ता हुआ ठीक वही है जो "memo से लौटा, दोबारा नहीं चला" यहाँ दिखता है।)
अब इसे ठीक करें:
Now revert the farewell step to the working version.
host auto-reload करता है (यही --reload ने आपको दिलाया; अगर आपने इसे छोड़ दिया, तो host को हाथ से restart करें)। एक fresh demo/greet event भेजें और पूरा function अब ठीक किए गए code पर साफ़-साफ़ Completed तक चलता है। recovery के बारे में एक चीज़ लोगों को उलझाती है। dashboard का Rerun button आपके मौजूदा code के साथ ऊपर से एक बिल्कुल-नया run शुरू करता है, हर step scratch से दोबारा execute होता हुआ। यह incident recovery के लिए सही tool है: एक बुरे deploy ने runs का एक batch तोड़ दिया, तो आप एक fix ship करते हैं और उन्हें rerun करते हैं। लेकिन यह memo-preserving resume नहीं है। memo-preserving resume वह automatic retry है जो आपने अभी fail हो रहे run के अंदर देखा, जहाँ पूरा हुआ step टिका रहा।
इसे एक असली AI worker बनाएँ (Part 4 का पुल)
अब तक function सिर्फ़ strings को इधर-उधर करता है, और वह जानबूझकर था: कुछ और बीच में न होने पर durability को देखना आसान है। अब greeting को एक असली agent से आने दें, ताकि आप उसी nervous system को एक असली AI call संभालते देखें। एक prompt hardcoded greeting को एक tiny agent से बदल देता है; sleep, durability, और dashboard सब ठीक वैसे ही रहते हैं। यह paste करें:
Replace the hardcoded greeting with a one-line call to a minimal hello-world agent built on the OpenAI Agents SDK (it just writes the greeting), still inside the same
step.run. Keep thestep.sleepand the farewell unchanged. Then fire ademo/greetevent and show me the run.
जो एक चीज़ बदली वह है कि greeting step में क्या भरता है: एक f-string के बजाय, एक model इसे लिखता है। और क्योंकि वह call उसी step.run के अंदर बैठता है जिसे आप पहले ही durable साबित कर चुके हैं, यह बिना किसी नई wiring के memoized और crash-safe है। run को वैसे ही देखें जैसे आपने पहले देखा (agent से poll करें, या dashboard में खोलें): वही तीन-step trace और वही zero-compute sleep, बस पहले step का output अब एक agent से आया। आपकी OPENAI_API_KEY prep step से पहले ही .env में है, इसलिए set up करने को कुछ नया नहीं है।
Done when: एक demo/greet run पूरा हो और output में greeting agent से आई हो, किसी hardcoded string से नहीं। जो आप देख रहे हैं उस पर रुकें, क्योंकि यह पूरा course एक वाक्य में है: एक AI agent, एक event से जगाया गया, एक nervous system के अंदर durably चलता हुआ, एक crash से बचता हुआ। Part 4 इस hello-world agent को एक असली customer-support worker से बदल देता है और इसे पूरे nervous system में wrap करता है (एक असली event trigger, एक cron जो fan out करता है, flow control, एक human-approval gate), लेकिन अभी आपकी screen पर जो आकार है वही आकार है।
आपने अभी पूरा course environment set up किया और nervous system को अपनी आँखों से काम करते देखा: Skills installed हैं, आपका Neon store DATABASE_URL के साथ .env में provision हो चुका है, dev-server MCP live है, और आपने एक durable function चलाया, एक step को compute ख़र्च किए बिना sleep करते देखा, एक step तोड़ा और automatic retry को पूरे हुए step को memo से लौटाते देखा जबकि सिर्फ़ टूटा step फिर से चला, फिर एक असली agent को उसी durable step के अंदर greeting generate करते देखा। यही वह architecture है जिसके बारे में यह course है। बाक़ी का course इसे बड़ा करता है: असली senses (cron, webhook, fan-out), मज़बूत reflexes (step.run के अंदर agent invocation), load के नीचे असली balance, और human-approval gate जो "agent इसे बिगाड़ सकता है" को "agent draft करता है, एक इंसान approve करता है, action issue होता है" में बदल देता है।
अगर कुछ काम न करे, तो चार समस्याएँ लगभग सब कुछ कवर करती हैं:
- dev server function host तक नहीं पहुँच पाता: पुष्टि करें कि host port 8000 पर चल रहा है।
- client Cloud mode में है: agent ने
is_production=Falseछोड़ दिया और.envमेंINNGEST_DEV=1ग़ायब है, इसलिए functions कभी locally register नहीं होते। इससे एक set करवाएँ (एक explicitis_productionvalue env var पर जीतता है)। - function dashboard से ग़ायब है: host ने reload नहीं किया; इसे restart करें।
- एक run बिना error और बिना progress के लटक जाता है: एक de-synced host चुपचाप अटक जाता है; host और dev server दोनों को एक साथ restart करें, और एक host को एक dev server के ख़िलाफ़ चलाएँ। (एक सूक्ष्म वजह: अगर
:8288लिया हुआ था और dev server8289+पर ऊपर आया, तोinngest-devMCP URL को फिर से point करना काफ़ी नहीं; host अब भी:8288से बात करता है। host परINNGEST_BASE_URL=http://127.0.0.1:<port>set करें ताकि यह dev server के पीछे नए port पर चले।)
अगर आप इनमें से किसी से टकराएँ, तो universal recovery move यहाँ भी काम करता है: "Something didn't work. Read the error, tell me in plain language what you see, and propose one fix I can approve."
आपने जो बनाया, और यह कहाँ बढ़ता है
environment set up है: base खुला है, Skills installed हैं, तीनों MCP servers wire हैं (Neon, Context7, inngest-dev), आपके Neon store में इसके customers और audit_log tables हैं और .env में DATABASE_URL है, और dev server चल रहा है। आपने वह एक idea भी देखा जिस पर पूरा course टिका है, durable execution का reflex, अपनी आँखों से, और इसके अंदर एक असली agent चलते देखा। Part 4 उस hello-world agent को customer-support worker से बदल देता है, इसी base पर, इसी folder में: यह उन customers को पढ़ता है और उन audit rows को लिखता है, फिर पूरी चीज़ को पूरे nervous system में wrap करता है, एक असली event trigger, एक daily cron जो fan out करता है, flow control, और refunds पर durable human-approval gate. Part 4 इस step.run-और-step.sleep ढाँचे को एक ऐसे worker में बढ़ा देता है जो आपके Neon store पर असली काम करता है। अगर यह Quick Win काम कर गया, तो आगे के concepts समझाते हैं कि हर टुकड़ा इस तरह क्यों आकार लेता है।
Part 1: senses, दुनिया worker तक कैसे पहुँचती है
यहाँ से, Parts 1-3 build के पीछे की reference shelf हैं: पंद्रह concepts, हर एक idea, उन तीन jobs के हिसाब से समूहबद्ध जो एक nervous system करता है। आप इन्हें सीधे पढ़ सकते हैं, या जब कोई Part 4 layer आपसे पूछवाए कि यह क्यों काम करता है तब किसी एक में पहुँच सकते हैं। यह पहला समूह senses है।
एक AI agent जिसे आप हाथ से call करते हैं तब चलता है जब आप इसे call करते हैं। एक असली AI Worker के पास senses हैं: यह तब चलता है जब दुनिया इस तक पहुँचती है। एक customer email करता है, एक webhook आता है, एक cron रोज़ 09:00 पर fire होता है, एक और worker काम सौंपता है। इनमें से हर एक एक signal है जो भीतर आ रहा है, और एक trigger वह है जिससे agent इसे महसूस करता है। Part 1 के पाँच concepts वही senses हैं: event-driven mental model, तीन तरीक़े जिनसे दुनिया भीतर पहुँचती है (cron, webhook, event), वे semantics जो double-processing रोकते हैं, और fan-out patterns जो एक signal को कई workers जगाने देते हैं।
Concept 1: Events vs requests, durable mental shift
इस course में जो कुछ भी आगे आता है वह एक mental shift पर टिका है: requests से events की ओर।
एक request एक synchronous बातचीत है। कोई call करता है; आप handle करते हैं; आप return करते हैं; वे आगे बढ़ते हैं। एक connection खुला रहता है; एक इंसान या service इंतज़ार कर रही है। अगर आप crash होते हैं, तो caller को एक error मिलता है। एक agent जिससे आप prompt पर chat करते हैं वह एक request है: आपने type किया, इसने stream किया, बातचीत आपके terminal session की थी।
एक event एक asynchronous message है। दुनिया में कुछ हुआ (एक customer signed up, एक email आई, एक payment cleared हुआ), और originator उस तथ्य का एक named record emit करता है। शून्य, एक, या कई functions event पर स्वतंत्र रूप से react करते हैं। कोई connection खुला नहीं रहता। originator नहीं जानता कि कौन सुन रहा है, results का इंतज़ार नहीं करता, और block नहीं होता। दुनिया आगे बढ़ चुकी है।
# A request: I'm here, waiting, blocking
result = await agent.handle_customer_message(text=user_input)
print(result)  # I unblock when the agent finishes

# An event: I fire-and-forget
await inngest_client.send(events=[
    inngest.Event(
        name="customer/email.received",
        data={"customer_id": "c-4429", "body": email_body, "subject": subject},
    ),
])
# I return immediately. Somewhere else, one or more Inngest
# functions react to this event on their own schedule.

एक request producer को इंतज़ार करवाता है; एक event इसे आज़ाद करता है, और stored event एक crash से बच जाता है।
यह shift छोटा सुनाई देता है। यह नहीं है। एक बार आप events में सोचने लगें, तो durability और scale लगभग मुफ़्त में आ जाते हैं, क्योंकि:
- producer को consumer slow नहीं कर सकता (email-receiver agent के reply draft करने का इंतज़ार नहीं करता)।
- consumer काम खोए बिना crash होकर restart हो सकता है (event durably stored है; Inngest इसे फिर से deliver करता है)।
- नए consumers producers बदले बिना जोड़े जा सकते हैं (एक दूसरा function, मसलन एक analytics counter, email-receiver की जानकारी के बिना
customer/email.receivedको subscribe कर सकता है)। - Backpressure एक code change नहीं, एक flow-control policy बन जाती है (Inngest concurrency cap करता है; producer fire करता रहता है; events queue होते हैं)।
Predict. आपका customer-support worker एक email का जवाब देने में 8 सेकंड लेता है: agent की reasoning के लिए तीन सेकंड, दो MCP tool calls के लिए चार सेकंड, database write के लिए एक सेकंड। peak load पर आपको प्रति मिनट 50 emails मिलती हैं। अगर आप request model इस्तेमाल करें (email parser तब तक block करता है जब तक agent ख़त्म नहीं होता), तो इसका मतलब आपके email parser से कितने parallel HTTP connections हैं? अगर आप event model इस्तेमाल करें (email parser एक event fire करके तुरंत return करता है), तो कितने? Confidence 1-5.
जवाब: request model को लगभग 7 concurrent parsers चाहिए (50/min × 8 सेकंड यानी ~6.7 parallel handlers, साथ में थोड़ी जगह)। event model को एक parser चाहिए। यह event fire करके ~10ms में return करता है, event queue 50/min के spike को सोख लेता है, और Inngest functions queue को उस concurrency पर consume करते हैं जो आप अनुमति देते हैं।
वह gap ही पूरी बात है। event "दुनिया में क्या हुआ" और "worker इसके बारे में क्या करता है" के बीच एक durable boundary बन जाता है, और सब अच्छा उसी एक move से आता है: producer कभी इंतज़ार नहीं करता, एक crashed consumer stored event से retry करता है, और नए consumers producer को छुए बिना जुड़ते हैं। Events ही वह तरीक़ा हैं जिससे आप काम की timing के मालिक होना छोड़ देते हैं।Try with AI
Walk me through three scenarios. For each, classify it as REQUEST-MODEL
or EVENT-MODEL, and explain which one fits better:

A) A user clicks "Submit refund request" in the support portal and
   expects to see "Refund issued: $30" within 2 seconds.

B) A nightly cron job at 02:00 runs a customer-health-check across
   all 5,000 customers and writes a report to Slack.

C) A customer sends an email to support@; we want a draft response
   ready within 60 seconds for the on-call agent to review and send.

For each, name (a) what the human's expectation of timing is and
(b) what failure looks like if the model crashes mid-execution.
Concept 2: Cron triggers, वह काम जो समय बीतने की वजह से चलता है
सबसे सरल trigger घड़ी है। एक AI Worker जो बहुत कुछ करता है वह बाहरी events की प्रतिक्रिया नहीं है; वह scheduled काम है: daily health reports, weekly cleanups, hourly recalculations. Inngest का cron trigger code की एक line है।
import inngest

@inngest_client.create_function(
    fn_id="daily-customer-health-check",
    trigger=inngest.TriggerCron(cron="0 9 * * *"),  # 09:00 every day, UTC
)
async def daily_health_check(ctx: inngest.Context) -> dict[str, int]:
    """Run a customer-health pass for every Pro/Enterprise customer."""
    customers = await ctx.step.run("fetch-pro-customers", fetch_pro_customer_ids)

    # fan out: one event per customer, one worker run per event
    events = [
        inngest.Event(name="customer/health_check.requested", data={"customer_id": cid})
        for cid in customers
    ]
    await ctx.step.send_event("fan-out", events)

    return {"customers_scheduled": len(customers)}
ध्यान देने लायक़ तीन चीज़ें:
-
schedule बस standard cron syntax है।
0 9 * * *हर दिन 09:00 UTC है;*/15 * * * *हर 15 मिनट है;0 9 * * 1सोमवार को 09:00 है। Inngest cron को default रूप से UTC में evaluate करता है; अगर आपको कोई अलग timezone चाहिए, तो आप cron string में ही prefix लगाते हैं (मसलनTZ=Europe/Paris 0 12 * * 5), अलग argument पास नहीं करते। -
function अब भी वही durable steps इस्तेमाल करता है। Cron-triggered हो या event-triggered, function का आकार एक जैसा है: side effects के लिए
ctx.step.run, fan out के लिएctx.step.send_event. Durability एक जैसी काम करती है। Flow control एक जैसी काम करती है। trigger बस कैसे function शुरू होता है, यह है। -
cron output एक regular Inngest function run है। यह dashboard में दिखता है, इसका एक run ID है, एक trace है, replay support करता है। अगर आपका सोमवार-सुबह वाला cron run step 3 पर fail होता है, तो मंगलवार का cron सामान्य रूप से चलेगा और सोमवार की failure bug ठीक करने के बाद replay के लिए उपलब्ध रहेगी।
अगर cron के fire होते वक़्त आपकी service down हो तो क्या होता है? यही वह सवाल है जो एक durable scheduler को एक fragile scheduler से अलग करता है। Inngest के cron runs उसी पल durably record हो जाते हैं जब schedule fire होता है। अगर आपका function endpoint unreachable है, तो Inngest backoff के साथ तब तक retry करता है जब तक यह succeed न हो या retry ceiling न छू ले। 09:00 पर fired cron इसलिए "miss" नहीं होता कि आपका deploy 09:00 पर चल रहा था; run इंतज़ार करता है, आप अपना deploy पूरा करते हैं, run पूरा हो जाता है। development में cron triggers का एक quirk जानने लायक़ है: local dev server crons को सिर्फ़ तभी fire करता है जब यह चल रहा हो। Production इन्हें Inngest के infrastructure पर चलाता है, जो हमेशा चालू रहता है।
Quick check. तीन दावे। हर एक को True या False चिह्नित करें। (a) अगर एक cron function चलने में 45 मिनट लेता है और हर 15 मिनट पर scheduled है, तो किसी भी समय तीन concurrent instances चल रहे होंगे। (b) आप एक cron-triggered function के अंदर
step.sleepइस्तेमाल करके काम को पूरे दिन में फैला सकते हैं। (c) एक cron-triggered function को testing के लिए dashboard से भी manually invoke किया जा सकता है।
जवाब: (a) concurrency policy पर निर्भर है: default रूप से Inngest overlapping runs को queue कर देगा; अगर आप concurrency=1 set करें तो वे serialize होंगे; अगर concurrency=10 set करें तो वे parallelize होंगे। default समझदारी भरा है। (b) True, और यह "daily काम को घंटों में फैलाकर load smooth करने" का एक आम pattern है। (c) True: Inngest dashboard किसी भी function को testing के लिए on demand invoke करने देता है, उसके trigger के बावजूद।Try with AI
With my AI coding assistant connected to the Inngest dev server MCP,
write a cron-triggered Inngest function in Python that:

1. Runs every Monday at 09:00 UTC.
2. Queries the audit_log table for all conversations resolved in the
   prior week (status='resolved' in that window).
3. Computes per-agent metrics: total conversations resolved, average
   resolution time, count of escalations, count of refunds issued.
4. Returns the metrics as a JSON object.

After you write the function, test it now instead of waiting for
Monday: trigger it on demand from the Inngest dev dashboard (the
Invoke button), since the dev server only fires crons while it is
running. Confirm the audit query is correct by running the SQL
directly against the database and checking the rows it returns;
grep_docs can confirm your step.run pattern matches Inngest's
examples, but only running the query proves the SQL itself.
Concept 3: Webhook triggers, जब बाहरी दुनिया call करती है
पहला trigger घड़ी था। दूसरा HTTP है: आपके system के बाहर कुछ (Stripe, आपका email provider, आपकी site पर एक form, एक GitHub event) आपके worker तक पहुँचना चाहता है।
इस बारे में सटीक रहें कि कौन सा हिस्सा मुश्किल है, क्योंकि यह वह नहीं है जिसका आप अंदाज़ा लगाते। POST receive करना आसान है: FastAPI जैसा web framework आपको तीन lines में @app.post(...) देता है। मुश्किल हिस्सा POST के land होने के बाद की हर चीज़ है: call को queue करना, failure पर इसे retry करना, काम के बीच crash से बचना, redelivery को double-process करने से मना करना, agent चलाना, चार-घंटे का approval पकड़ना, dashboard से किसी भी run को replay करना। दरवाज़ा सस्ता है; उसके पीछे की रसोई ही काम है, और वह रसोई Inngest है।
तो route छोटा ही रहता है। इसका पूरा काम POST receive करना, event को Inngest को सौंपना, और जल्दी 200 reply करना है। Durable काम इसके पीछे Inngest function में चलता है। अगर आप इसके बजाय वह काम request handler के अंदर करें, तो आप classic webhook bugs से टकराएँगे: sender timeout होकर दोबारा भेजता है जबकि आप अब भी काम कर रहे हैं, एक restart job खो देता है, एक redelivery customer को दो बार refund कर देती है। (Inngest का hosted option एक सार्वजनिक inn.gs/e/... URL भी बना सकता है ताकि आप route लिखना ही छोड़ दें।)
अब वह हिस्सा जो सबको उलझाता है। आपकी app के पास दो दरवाज़े होते हैं, और वे उलटी दिशाओं में मुँह करते हैं:
  DOOR 1: the webhook door  (you write it, or use the hosted URL)
     Stripe knocks here with DATA  ->  it just calls send() and is done

  DOOR 2: /api/inngest      (auto-made by inngest.fast_api.serve)
     the ENGINE knocks here to RUN YOUR CODE, one step at a time
     it speaks Inngest's own protocol, so a raw Stripe POST here is rejected
ये दोनों कभी एक-दूसरे से सीधे बात नहीं करते। वे सिर्फ़ event के ज़रिए जुड़ते हैं: Door 1 एक event डालता है, engine इसे उठाता है और आपके function को चलाने के लिए Door 2 के ज़रिए वापस आता है। Door 2 को auto-create करना (जो Quick Win पहले ही कर चुका) Door 1 के लिए कुछ नहीं करता; वही वह है जो आप अब भी लिखते हैं।
तो webhook door असल में क्या call करता है? बस send(). पूरा route इतना ही छोटा है:
@app.post("/webhooks/stripe")
async def stripe_webhook(request: fastapi.Request):
    payload = await request.json()
    # verify the signature, reshape Stripe's envelope, then hand it off:
    await inngest_client.send(
        inngest.Event(name="stripe/charge.refund.failed", data=reshape(payload)),
    )
    return {"ok": True}  # ack Stripe in milliseconds
वह send() event को Inngest के stream में डाल देता है और route ख़त्म हो जाता है। यह आपके function को call नहीं करता, और यह /api/inngest को call नहीं करता। Inngest वह आधा हिस्सा संभालता है: यह event name को on_refund_failed से match करता है और function के steps चलाने के लिए Door 2 के ज़रिए वापस आता है। End to end:
Stripe → Door 1 (webhook) → send() → Inngest → Door 2 (/api/inngest) → your function
@inngest_client.create_function(
    fn_id="handle-stripe-refund-failed",
    trigger=inngest.TriggerEvent(event="stripe/charge.refund.failed"),
)
async def on_refund_failed(ctx: inngest.Context) -> dict[str, str]:
    """Triggered by Stripe webhook → Inngest event → this function."""
    charge_id = ctx.event.data["charge_id"]

    # Find the support ticket this refund belongs to
    ticket = await ctx.step.run(
        "find-ticket-for-refund", lookup_ticket_by_charge, charge_id,
    )

    # Hand the support worker the full context.
    # step.run takes (step_id, handler, *args): pass args positionally, not as kwargs.
    await ctx.step.run(
        "notify-support-agent",
        notify_support_agent_of_refund_failure,
        ticket["id"], charge_id,
    )

    return {"ticket": ticket["id"], "action": "notified"}
वह दरवाज़े के पीछे का function है: Inngest ने event को इससे match किया और इसे चलाया, ticket को देखते हुए और support worker को सूचित करते हुए, queue, retries, और idempotency सब आपके लिए संभाले हुए। Webhook काम लगभग हमेशा इसी तरह asynchronous होता है: function fast ack के बाद background में चलता है, request के दौरान कभी नहीं।
दो patterns नाम देने लायक़:
- Generic JSON webhooks. sender को किसी मशहूर vendor होने की ज़रूरत नहीं। किसी भी service को जो JSON POST कर सकती है उसी तरह के URL पर point करें और event name ख़ुद चुनें।
vendor/event.subtypestyle बस convention है, लेकिन जब आप इसका पालन करते हैं तो dashboard events को साफ़-सुथरा समूहबद्ध करता है। - Webhook transforms. Vendor payloads बड़े और nested होते हैं, और एक vendor अक्सर एक ही URL पर कई event types भेजता है। एक transform एक छोटा reshaping function है जो Inngest के servers पर उसी पल चलता है जब payload आता है, इससे पहले कि यह एक event बने। (यह JavaScript में लिखा जाता है भले ही आपका worker Python हो, क्योंकि यह Inngest की तरफ़ चलता है, आपकी app में नहीं।) यह दो काम करता है: आपका event name चुनना, और payload को उन कुछ fields तक चपटा करना जिन्हें आप असल में इस्तेमाल करते हैं। आपका function code vendor-specific JSON से मुक्त रहता है।
Predict. एक Stripe webhook
stripe/charge.refund.failedको ठीक उसी millisecond पर fire करता है जब आपका customer-support worker भीcustomer/refund.investigation_neededनाम का एक अलग event emit करने के लिएinngest_client.sendcall कर रहा है। दोनों events system में एक साथ आते हैं; ऊपर वाला function सिर्फ़ Stripe event पर trigger होता है। क्या function एक बार चलेगा या दो बार? Confidence 1-5.
जवाब: एक बार। एक function सिर्फ़ उसी event name के लिए fire होता है जिसके लिए यह registered है। stripe/charge.refund.failed और customer/refund.investigation_needed अलग names हैं, इसलिए वे अलग functions (या कोई नहीं) जगाते हैं, भले ही वे एक ही पल पर land हुए हों। event name ही routing key है।
यही वजह है कि naming cosmetic नहीं है। एक typo, customer/email_received जहाँ function customer/email.received के लिए सुनता है, और function चुपचाप कभी नहीं चलता। कुछ error नहीं देता; काम बस नहीं होता। dashboard आपका safety net है: जो events किसी function से match नहीं होते वे एक अलग unmatched stream में दिखते हैं जिसे आप देख सकते हैं।
Locally, paste करने को कोई URL नहीं है। ऊपर की हर चीज़ production path है। आपके laptop पर आपके पास कोई public URL नहीं है, और Stripe localhost तक नहीं पहुँच सकता। तो जब आप build करते हैं, आप ख़ुद webhook का किरदार निभाते हैं: send_event (या dev dashboard का "Send to Dev Server" button) ठीक वही event inject करता है जो एक असली webhook ने बनाया होता। यही वजह है कि नीचे का hands-on send_event से test करता है और Stripe को कभी नहीं छूता।
split पकड़े रखने लायक़ है:
| event भीतर कैसे आता है | |
|---|---|
| Production | Stripe आपके live webhook URL पर POST करता है; यह आपके stream में एक event बन जाता है |
| Local dev (आप) | आप पहले से आकार ले चुके event को send_event से inject करते हैं |
आपका function code किसी भी तरह एक जैसा है; यह सिर्फ़ event name पर react करता है और कभी नहीं जानता कि event एक असली webhook से आया या आपके send_event से।Try with AI
I need to handle three webhook sources for my customer-support worker:

A) Stripe: refund failed, charge disputed
B) Postmark (email service): bounced email, complaint
C) My internal admin UI: manual "investigate this ticket" button

For each, decide:

1. What event names you'd use (vendor/event.subtype format).
2. Whether the function reacting to it should run synchronously (the
   caller is waiting) or asynchronously (fire and continue).
3. Whether you'd write a webhook transform to reshape the payload, or
   consume it raw.

Then write the Inngest function for the Stripe refund-failed case in
Python, using the MCP's grep_docs to find the current syntax for
TriggerEvent and the dev-server MCP's send_event tool to test it.
Concept 4: Idempotency, जब वही event दो बार आता है
वही event कभी-कभी आप तक दो बार पहुँचेगा। एक customer "Issue refund" click करता है, page slow है, और click दो बार fire हो जाता है; या request चली जाती है लेकिन caller तक वापस acknowledgment खो जाता है, इसलिए caller दोबारा कोशिश करता है। किसी भी तरह आपका worker अब एक असली refund के लिए दो customer/refund.requested events देखता है। अगर यह हर एक पर refund issue करता है, तो customer को दो बार refund हो जाता है।
यह event systems की सबसे आम bug है, कोई दुर्लभ edge case नहीं। Senders तब तक retry करते रहते हैं जब तक उन्हें acknowledgment न मिल जाए (networks packets गिराते हैं, servers restart होते हैं, endpoints timeout होते हैं), इसलिए जो आपसे वादा किया गया है वह delivery at least once है, कभी exactly once नहीं। इलाज यह है कि दूसरी copy को harmless बना दिया जाए: पहली पर act करें, duplicate को पहचानें, इसे skip करें। उस property का एक नाम है। कुछ idempotent है जब इसे दो बार चलाना वही नतीजा छोड़ता है जो इसे एक बार चलाना।
Inngest इसकी दो layers built-in देता है।
Layer 1: Event ID source पर बीज बोता है। जब आप ख़ुद एक event भेजते हैं (किसी webhook से receive करने के बजाय), तो आप एक idempotency key जोड़ सकते हैं:
await inngest_client.send(events=[
    inngest.Event(
        name="customer/refund.requested",
        data={"order_id": "o-4429", "amount_cents": 5000},
        id=f"refund-request-{order_id}",  # idempotency key: identical on every retry
    ),
])
अगर वही id वाला एक दूसरा event dedup window (default 24 घंटे) के भीतर भेजा जाए, तो Inngest duplicate को गिरा देता है। वही logical event, वही id, सिर्फ़ एक function run. key को हर duplicate पर एक जैसी होना चाहिए, यही पूरी बात है। इसे request के बारे में किसी stable चीज़ से बनाएँ (यहाँ, order id), कभी किसी timestamp या random value से नहीं, जो हर send पर बदलता है और चुपचाप dedup को हरा देता है।
यही तरीक़ा है जिससे आप इस section की शुरुआत वाले retried webhook को भी क़ाबू में करते हैं। आप webhook event पर id सीधे set नहीं करते, लेकिन जो POST को event में बदलता है (hosted transform, या आपका अपना receiving route) वह इसे provider के अपने event id से set करता है। Stripe हर event पर एक unique id छापता है और retry पर इसे अनबदला फिर से भेजता है, इसलिए redelivered webhook वही id लेकर चलता है और एक self-sent event की तरह बिल्कुल dedup होता है।
Layer 2: Step-level idempotency. एक function के अंदर, हर step.run को इसके नाम से पहचाना जाता है। अगर एक function step 3 और step 4 के बीच crash होता है, तो retry function code को ऊपर से फिर चलाता है, लेकिन steps 1, 2, और 3 के लिए, Inngest step body को दोबारा execute किए बिना stored outputs लौटाता है। Step 4 पहली बार सामान्य रूप से चलता है। यही एक function को "durable" बनाता है: पूरे हो चुके steps के side effects retry पर दोबारा नहीं होते।
@inngest_client.create_function(
    fn_id="issue-customer-refund",
    trigger=inngest.TriggerEvent(event="customer/refund.requested"),
)
async def issue_refund(ctx: inngest.Context) -> dict[str, str]:
    # Step 1: look up the order. If the function retries, this returns
    # the SAME order data it computed the first time, from Inngest's memo.
    order = await ctx.step.run(
        "lookup-order", lookup_order_by_id, ctx.event.data["order_id"],
    )

    # Step 2: call Stripe. If the function retries AFTER this step
    # succeeded, the Stripe call does NOT happen again. The refund is
    # issued exactly once even if the function runs three times.
    refund = await ctx.step.run(
        "issue-stripe-refund",
        lambda: call_stripe_refund_api(
            charge_id=order["stripe_charge_id"],
            amount=ctx.event.data["amount_cents"],
        ),
    )

    # Step 3: write the audit row. Same property: runs at most once.
    await ctx.step.run(
        "audit-refund",
        lambda: write_audit_refund_issued(order_id=order["id"], refund=refund),
    )

    return {"refund_id": refund["id"]}
अगर यह function step 3 के दौरान crash होता है, तो retry step 1 में फिर से प्रवेश करता है (cached order data मिलता है, कोई DB call नहीं), step 2 में फिर से प्रवेश करता है (cached refund data मिलता है, कोई Stripe call नहीं), step 3 को असल में चलाता है, return करता है। customer का card एक बार charge होता है, भले ही function तीन बार चला हो। यही वह property है जो सबसे ज़्यादा मायने रखती है। यही Inngest को एक retry loop वाली queue से गुणात्मक रूप से अलग बनाती है।
(Step 1 अपना एक argument positionally पास करता है। Steps 2 और 3 अपने call को lambda में wrap करते हैं, क्योंकि step.run सिर्फ़ positional arguments forward करता है, इसलिए lambda ही वह तरीक़ा है जिससे आप एक step को keyword arguments इस्तेमाल करने वाला call सौंपते हैं। दोनों रूप काम करते हैं, और lambda step body को एक self-contained unit भी बनाता है जिसे Inngest memoize कर सकता है।)
Memoization function की नज़र से exactly-once step completion देता है: एक बार जब कोई step successful record हो जाता है, यह कभी दोबारा नहीं चलता। लेकिन एक संकरी खिड़की है। अगर एक step Stripe को call करता है और process उसके बाद मरता है जब Stripe charge करता है पर Inngest के result record करने से पहले, तो retry Stripe को दोबारा call करता है, क्योंकि Inngest के लिए वह step कभी ख़त्म नहीं हुआ। इसका इलाज है step memoization को provider की अपनी idempotency key से जोड़ना (Stripe की Idempotency-Key header, या जो भी dedup id आपके दूसरे providers expose करते हैं)। दोनों पूरक हैं, विकल्प नहीं: step.run आपके function के internal logic को exactly-once रखता है; provider की key external side effect को exactly-once रखती है।
Quick check. True या False. (a)
step.runstep को idempotent सिर्फ़ तभी बनाता है जब अंदर का function भी idempotent हो। (b) dedup window के बाहर एक duplicate ID वाला event एक नए event की तरह माना जाएगा। (c) अगरstep.runexecution के बीच fail होता है (step का code एक exception throw करता है), तो Inngest failure store करता है और पिछले steps को दोबारा चलाए बिना अगली attempt पर step को retry करता है।
जवाब: (a) False: step.run step को अपने आप at-most-once-on-success देता है; इसे अंदर के code के idempotent होने की ज़रूरत नहीं। एक बार जब कोई step successful record हो जाता है, तो इसका body retry पर कभी दोबारा नहीं चलता। एकमात्र अपवाद ऊपर note वाली window है: अगर Stripe के charge करने के बाद पर Inngest के step record करने से पहले process मरता है, तो retry Stripe को फिर से call करता है, यही ठीक वजह है कि एक provider idempotency key इसे backup करती है। पर आपके function का internal logic, आपको कभी हाथ से idempotent नहीं बनाना पड़ता। (b) True: Inngest का dedup window default रूप से 24 घंटे है; उस window के बाद वही ID वाले events नए माने जाते हैं। (c) True: automatic retry memoized है; Inngest जानता है कि step 3 attempt 1 पर fail हुआ और attempt 2 पर सिर्फ़ step 3 को retry करता है। पिछले successful steps दोबारा execute नहीं होते। (यह within-run retry है, dashboard Replay button नहीं, जो एक fresh run है, Concept 14.)Try with AI
Here are three scenarios. For each, decide: idempotency PROBLEM or
NO PROBLEM, and if it's a problem, what's the fix:

A) Stripe sends the same charge.refund.failed webhook three times
   in 90 seconds (because their first two attempts timed out at
   your endpoint). Your function emails the customer.

B) A customer clicks "Issue refund" three times because the page
   was slow. Your function calls Stripe and writes audit_log.

C) Your nightly cron at 09:00 sends a customer-health-check event
   to each Pro customer. If two crons fire at the same time (a deploy
   bug), what happens?

For each problem case, propose ONE specific fix: event ID seed
inside the function, idempotency key in inngest_client.send, or
function-level deduplication on the trigger.
Concept 5: Fan-out and sub-agent delegation, एक event कई workers
अक्सर एक अकेले event को कई जगहों पर काम trigger करना होता है। Stripe का charge.refund.failed event यह कर सकता है: support agent को सूचित करना, audit में लिखना, customer का risk score update करना, finance ops को alert करना, Slack पर post करना। पाँच प्रतिक्रियाएँ, सब स्वतंत्र, सब एक ही event से।
Inngest pattern: कई functions को एक ही event पर subscribe करें। कोई fan-out code नहीं; बस एक ही TriggerEvent वाले कई @inngest_client.create_function decorators. हर function स्वतंत्र रूप से चलता है, इसके अपने retries हैं, इसका अपना step trace है, बाक़ी से स्वतंत्र रूप से fail होता है।
@inngest_client.create_function(
    fn_id="refund-failed-notify-support",
    trigger=inngest.TriggerEvent(event="stripe/charge.refund.failed"),
)
async def notify_support(ctx: inngest.Context) -> dict[str, str]:
    # ... runs the customer-support worker to draft a response ...
    return {"status": "drafted"}


@inngest_client.create_function(
    fn_id="refund-failed-update-risk-score",
    trigger=inngest.TriggerEvent(event="stripe/charge.refund.failed"),
)
async def update_risk_score(ctx: inngest.Context) -> dict[str, float]:
    # ... runs the risk-scoring worker ...
    return {"new_risk_score": 0.42}


@inngest_client.create_function(
    fn_id="refund-failed-post-slack",
    trigger=inngest.TriggerEvent(event="stripe/charge.refund.failed"),
)
async def post_to_slack(ctx: inngest.Context) -> None:
    # ... posts a Slack notification ...
    return None
एक Stripe webhook आता है। Inngest एक event बनाता है। तीन functions fire होते हैं, हर एक अपने run में। अगर post_to_slack fail होता है क्योंकि Slack down है, तो बाक़ी दो अप्रभावित रहते हैं और सामान्य रूप से पूरे होते हैं। fail हुआ run Slack के recover होने पर replay के लिए dashboard में बैठा रहता है। यह multi-worker coordination का मूल है, और यह वही architectural pattern है जिसे आपका भविष्य का manager layer (एक बाद का course) scale पर compose करेगा।
दूसरा fan-out pattern: parent-fires-N-children. कभी-कभी fan-out dynamic होता है। आपके daily cron को हर Pro customer के लिए एक customer-health event fire करना है, जो हफ़्ते के हिसाब से 500 या 5,000 हो सकते हैं। parent function N events भेजता है:
async def fan_out_per_customer_events(
    ctx: inngest.Context,
    customers: list[str],
    run_day: str,  # pinned by the caller (the cron's scheduled date), never date.today()
) -> int:
    events = [
        inngest.Event(
            name="customer/health_check.requested",
            data={"customer_id": cid},
            id=f"daily-health-{cid}-{run_day}",  # stable id: identical on every retry
        )
        for cid in customers
    ]
    # ctx.step.send_event memoizes the send, so a retry of this function
    # does not re-fire the fan-out (and even if it did, the stable ids dedup).
    await ctx.step.send_event("fan-out", events)
    return len(events)
वे 5,000 events एक send_event step में जाते हैं (एक बड़ी list को परदे के पीछे कुछ batched calls में chunk किया जाता है, शब्दशः एक HTTP request नहीं)। 5,000 function runs fire होते हैं, हर एक के अपने customer_id के साथ, हर एक isolated, हर एक स्वतंत्र रूप से retryable. Flow control (Concept 11) cap करता है कि कितने concurrently चलते हैं ताकि आप अपने downstream APIs को पिघला न दें। cron function सेकंडों में return करता है; fan-out उस rate पर चलता है जो Inngest की flow-control policies अनुमति देती हैं।
Sub-agent delegation fan-out का एक ख़ास मामला है। एक worker run के अंदर, आप और events भेजकर sub-tasks को दूसरे worker types को delegate करते हैं (await ctx.step.send_event(...), ताकि delegation किसी भी दूसरे step की तरह memoized हो)। parent children का इंतज़ार नहीं करता जब तक यह explicitly step.invoke इस्तेमाल न करे (जो एक child function चलाता है और इसके result का इंतज़ार करता है) उनके results इकट्ठा करने के लिए।
Predict. आपके पास तीन functions हैं जो सब
customer/email.receivedसे trigger होते हैं: customer-support agent जो एक reply draft करता है (15 सेकंड), एक analytics counter (50ms), और एक "VIP detector" जो जाँचता है कि customer high-value है या नहीं (200ms)। जब एक email आती है, तो हर एक के लिए user-visible latency कैसी दिखती है? तीन विकल्प: (a) तीनों जुड़कर ~15 सेकंड हो जाते हैं; (b) तीनों parallel में चलते हैं, कुल latency ~15 सेकंड (सबसे slow) है; (c) हर एक बिना किसी साझा latency के स्वतंत्र रूप से चलता है। Confidence 1-5.
जवाब: (c). हर function अपना run है, अपने process slot में। customer-support agent analytics counter को block नहीं करता; VIP detector agent को block नहीं करता। बाहर से, किसी ख़ास function के लिए latency बस उस function का अपना समय है। यही वजह है कि fan-out scale करता है: consumers isolated हैं, और अगर agent crash होता है तो analytics counter अप्रभावित रहता है। एक चेतावनी, जिसे Concept 11 विकसित करता है: यह isolation अलग functions के बीच है। जब एक अकेला function ख़ुद के हज़ारों runs में fan out करता है, तो एक concurrency cap जानबूझकर बाद के runs को queue करवाता है, इसलिए वे same-function siblings अपनी बारी का इंतज़ार करते हैं। अलग functions कभी एक-दूसरे को block नहीं करते; एक ही function के कई runs कर सकते हैं।Try with AI
Design the fan-out architecture for these three scenarios. For each,
sketch the event names and the functions that subscribe:

A) New customer signs up. Need to: send welcome email, create
   Stripe customer, post to Slack #new-customers, write to
   audit_log, schedule a 7-day follow-up.

B) Customer support email arrives. Need to: draft a reply (agent),
   detect sentiment, check if VIP, update customer's "last contact"
   timestamp, attach to the right ticket thread.

C) Daily cron at 09:00 needs to run customer-health-check on
   ~5,000 Pro customers. Each check takes ~30 seconds. We want
   the whole batch to complete by 11:00 (a 2-hour window).

For each, decide: how many event types, how many subscriber
functions, what the idempotency story is, and one specific failure
mode this design protects against.
Part 2: reflexes, जब कुछ टूटता है तब क्या होता है
Part 1 इस बारे में था कि काम worker तक कैसे पहुँचता है। Part 2 इस बारे में है कि जब वह काम बीच में टूटता है तब क्या होता है।
एक असली worker के एक turn की तस्वीर देखें। यह एक agent को call करता है, agent कुछ tools call करता है, और वे tools एक database, एक payment API, और एक model को छूते हैं। यह क़तार में कई network calls हैं, और इनमें से कोई एक भी fail हो सकता है: एक timeout, एक dropped connection, एक service जो कुछ सेकंड के लिए down है। बिना सुरक्षा के, एक अकेली छोटी failure वह सब कुछ फेंक देती है जो worker ने अभी किया और पूरे turn को ऊपर से दोबारा शुरू कर देती है।
Durability इसका इलाज है, और इसे सीधे कहना सरल है: जब कुछ बीच में fail होता है, तो जो steps पहले ही पूरे हो चुके थे वे पूरे ही रहते हैं, और worker उस बिंदु से उठाता है जो टूटा, शुरू से नहीं। nervous-system तस्वीर में, यह reflex है: यह बस हो जाता है, तेज़ी से, बिना agent के सोचे।
Inngest आपको यह एक tool, step.run, और इसके नीचे काम करने वाले एक mechanism, memoization, के साथ देता है। Part 2 दोनों को कवर करता है, फिर time-based versions (step.sleep और step.wait_for_event), retries कैसे behave करते हैं, और step.ai helpers.
अगर आप skim कर रहे हैं: दो जो सबसे ज़्यादा मायने रखते हैं वे Concept 6 (
step.run) और Concept 7 (memoization) हैं। Part 2 की बाक़ी हर चीज़ इन पर बनती है, इसलिए इन दोनों को धीरे पढ़ें। एक बार ये click हो जाएँ, तो Concepts 8 से 10 जल्दी चले जाते हैं।
Concept 6: step.run और durable function model
एक सामान्य Python function एक बार चलता है, ऊपर से नीचे। अगर यह बीच में crash होता है, तो आप ऊपर से दोबारा शुरू करते हैं। अगर यह crash होने से पहले तीन API calls करता है, तो अगली attempt वे तीन calls दोबारा करती है, और उनके लिए भुगतान करती है, और संभवतः किसी को दोबारा double-charge करती है, फिर से।
एक Inngest function durable है। हर operation जिसे आप checkpoint करवाना चाहते हैं वह step.run(name, fn, ...) में wrap हो जाता है। फिर Inngest function को एक बार में एक step चलाता है। यह आपके handler को ऊपर से चलाता है, और जब यह किसी ऐसे step तक पहुँचता है जो इसने अभी तक नहीं किया, तो यह वह step चलाता है, result save करता है, और handler में ऊपर से फिर प्रवेश करता है, इस बार हर पूरे हुए step का stored output दोबारा execute करने के बजाय लौटाते हुए. function जहाँ छोड़ा वहाँ तक "पकड़" लेता है, अगला step लेता है, और दोहराता है। (तो handler body एक function के लिए कई बार चलता है, प्रति step एक बार, सिर्फ़ तभी नहीं जब कुछ fail होता है।)
handler में बिल्कुल फिर से प्रवेश क्यों, बजाय वहीं जारी रखने के जहाँ छोड़ा? opening वाले दो programs की वजह से। engine और आपका function दो अलग programs हैं। एक program दूसरे के code के बीच में रुककर अपनी जगह नहीं पकड़ सकता। तो engine आपके function को उसी एकमात्र तरीक़े से चलाता है जो यह कर सकता है: यह आपके function को web पर call करता है, इसे अगले unfinished step तक चलाता है, उस step को चलने देता है, और result वापस पाता है। फिर यह उस result को अपनी तरफ़ store करता है और अगले step के लिए आपके function को फिर call करता है, सब कुछ वापस सौंपते हुए जो यह पहले ही store कर चुका है।
  ENGINE                                   YOUR FUNCTION (host)
    |  call: run from the top  ----------->  runs to step 1, does it
    |  <----------------------------------   returns step 1's result
  stores result 1
    |  call again              ----------->  step 1 from memo, runs step 2
    |  <----------------------------------   returns step 2's result
  stores result 2
    |  call again              ----------->  steps 1-2 from memo, runs step 3
    |  ...and so on, one call per step
यही पूरा mechanic है। "ऊपर से दोबारा चलता है, पूरे हुए steps memo से" बस engine का आपके function को प्रति step एक बार call करना और results अपनी तरफ़ रखना है। और क्योंकि results engine की तरफ़ रहते हैं, एक finished step बच जाता है भले ही आपका host run के बीच crash होकर restart हो।
@inngest_client.create_function(
    fn_id="customer-support-conversation",
    trigger=inngest.TriggerEvent(event="customer/email.received"),
)
async def handle_email(ctx: inngest.Context) -> dict[str, str]:
    customer_id = ctx.event.data["customer_id"]

    # Step 1: load the customer record (one DB call)
    customer = await ctx.step.run(
        "load-customer", load_customer_by_id, customer_id,
    )

    # Step 2: load the conversation thread (one DB call)
    thread = await ctx.step.run(
        "load-thread", load_thread_for_customer, customer_id,
    )

    # Step 3: run the OpenAI Agents SDK agent (your worker).
    # step.run forwards only positional args, so a call that needs keyword
    # args is wrapped in a lambda (the step body becomes a no-arg callable).
    response = await ctx.step.run(
        "run-agent",
        lambda: run_customer_support_agent(
            customer=customer,
            thread=thread,
            email_body=ctx.event.data["body"],
        ),
    )

    # Step 4: write the draft reply to the database
    await ctx.step.run(
        "save-draft-reply",
        lambda: save_reply(customer_id=customer_id, text=response.draft),
    )

    # Step 5: notify the on-call human reviewer via Slack
    await ctx.step.run(
        "notify-reviewer",
        lambda: post_slack_for_review(response=response),
    )

    return {"status": "drafted", "reviewer_notified": True}
पाँच steps. हर एक स्वतंत्र रूप से checkpoint किया गया।
durability आपको क्या दिलाती है, तीन failures में जो ठीक इसी function को मार सकती हैं:
| अगर यह fail होता है | step.run के बिना | step.run के साथ |
|---|---|---|
| agent timeout होता है (step 3) | retry customer और thread फिर से load करता है और agent को scratch से फिर चलाता है, OpenAI tokens के लिए दो बार भुगतान करते हुए | steps 1-2 memo से वापस आते हैं; सिर्फ़ step 3 retry होता है, और Inngest transient error आपके लिए संभालता है |
| process steps 3 और 4 के बीच मारा जाता है (deploy, restart, OOM) | agent का reply खो जाता है; email तब तक अनुत्तरित रहता है जब तक कोई ध्यान न दे | restart के बाद function resume होता है: steps 1-3 millisecondों में memo से लौटते हैं, steps 4-5 चलते हैं, customer को reply मिलता है |
| Slack एक 503 लौटाता है (step 5) | आप काम खोते हैं, या सिर्फ़ Slack के लिए retry-and-backoff हाथ से लिखते हैं | Inngest step 5 को backoff के साथ तब तक retry करता है जब तक Slack recover न हो या retry budget ख़त्म न हो; steps 1-4 done रहते हैं, draft पहले ही save हो चुका |
आप कोई retry loops, कोई "क्या मैं पहले ही यह कर चुका" जाँच, या अपना कोई state machine नहीं लिखते। state machine ही step.run calls का अनुक्रम है।
step.run का एक नियम। एक step को दोबारा चलने के लिए safe होना चाहिए: अगर यह fail होता है और Inngest इसे फिर चलाता है, तो दूसरा run कुछ भी corrupt न करे।
- Pure functions अपने आप safe हैं।
- Idempotent API calls safe हैं (Stripe की
idempotency_key, आपके अपने MCP server tools): एक दोहराव no-op है। - Non-deterministic काम अब भी दोबारा चलने के लिए safe है; बस आपको retry पर एक अलग result मिल सकता है। एक fresh random ID, या default temperature पर एक LLM call, दूसरी attempt पर अलग होगा। एक agent के reply के लिए वह ठीक है (कोई भी valid draft चलेगा)। जब exact value को retries के पार stable रहना ही चाहिए, तो इसे pin करें: एक seed पास करें, या इसे एक बार अपने एक पहले के step में generate करें और वापस पढ़ें।
Quick check. True या False. (a) function body हर बार ऊपर से दोबारा execute होता है जब Inngest अगले step तक आगे बढ़ता है, सिर्फ़ retries पर नहीं, आपके
step.runcalls के बीच plain code (variable assignments, branching) फिर से चलाते हुए। (b) अगर एक step पूरा होने में 30 सेकंड लेता है, और function 25 सेकंड में crash होता है, तो retry उस step को second 25 से जारी रखता है। (c)step.runoutputs Inngest के infrastructure में store होते हैं, आपके application में नहीं।
जवाब: (a) True, और यह लोगों को चौंकाता है: Inngest हर step पर आपके handler में ऊपर से फिर प्रवेश करता है, पूरे हुए steps को memo से छोड़ते हुए। तो step.run के बाहर का code एक clean run पर कई बार चलता है, सिर्फ़ retries पर नहीं। एक step के अंदर का code एक बार चलता है, फिर memo से लौटता है। (Module-level imports एक बार load होते हैं चाहे कुछ भी हो; सिर्फ़ handler body दोबारा चलता है।) यही असल वजह है कि काम को step.run के अंदर रखें। (b) False: step.run atomic unit है; अगर एक step बाधित होता है, तो retry पूरे step को फिर से चलाता है। अगर आपका step इतना लंबा है कि इसे restart नहीं होने दिया जा सकता, तो आप इसे छोटे steps में तोड़ते हैं। (c) True: step output store Inngest का हिस्सा है, आपके DB का नहीं। यही वजह है कि आप runs को तब भी replay कर सकते हैं जब आपका database schema बदल चुका हो।Try with AI
With my AI coding assistant connected to the Inngest dev server MCP,
shape a customer-support worker into an Inngest durable function.
Take a Runner.run call that processes a customer email and wrap each
of these inside its own step.run:

1. Load the customer record
2. Load the related conversation thread
3. Run the agent (the OpenAI Agents SDK Runner)
4. Persist the draft reply
5. Notify the on-call reviewer

Use grep_docs to find the current Python SDK syntax. Use
invoke_function to test it with a synthetic email payload. Then
deliberately raise an exception in step 4 and use get_run_status
to confirm steps 1-3 don't re-execute on retry.
Concept 7: Memoization, resumability के नीचे का mechanic
Concept 6 ने कहा "जो steps पहले ही पूरे हो चुके हैं वे दोबारा execute होने के बजाय अपने stored outputs लौटाते हैं।" वह mechanism memoization है, और यह क़रीब से देखने लायक़ है क्योंकि हर दूसरा Inngest primitive इसी पर बना है।
जब आप await ctx.step.run("load-customer", load_customer_by_id, "c-4429") call करते हैं, तो Inngest (run_id, step_name) से keyed एक memo store रखता है। वही line अलग behave करती है इस पर निर्भर करते हुए कि वह key पहले से भरी है या नहीं:
- First attempt: memo ख़ाली है, इसलिए
load_customer_by_idअसल में चलता है, और Inngest result आपको वापस सौंपने से पहले जो यह लौटाता है उसे save करता है। - हर बाद का replay (Inngest अगले step पर बढ़ने पर handler में फिर प्रवेश करता है, और किसी भी retry पर फिर): memo पहले से
load-customerरखता है, इसलिएload_customer_by_idनहीं चलता, DB call कभी नहीं होता, और saved value millisecondों में वापस आती है।
यही वजह है कि retries सस्ते हैं (महँगा काम पहले से cached है), durability correct है (महँगा काम कभी दो बार नहीं होता), और "body ऊपर से नीचे दोबारा चलता है" ठीक है इसके बावजूद कि यह बेकार लगता है: steps के अंदर का काम असल में दोबारा नहीं चलता; सिर्फ़ steps के बीच का orchestration code चलता है.

पूरा हुआ step एक बार भुगता जाता है, हर retry पर एक बार नहीं।
वह निहितार्थ जो नए users को चौंकाता है। step.run के बाहर का code हर बार चलता है जब Inngest handler में फिर प्रवेश करता है, जो प्रति step एक बार है, सिर्फ़ retries पर नहीं। अगर आप यह करें:
async def handle_email(ctx: inngest.Context) -> dict[str, str]:
    # ANTI-PATTERN: this re-runs every time Inngest advances a step. Don't do this.
    expensive_thing: dict = await fetch_expensive_data(ctx.event.data["id"])

    await ctx.step.run("do-something", do_something_with, expensive_thing)
    return {"status": "done"}
fetch_expensive_data function जो भी step लेता है उस हर step पर फिर चलता है, बिना किसी failure के भी। यह एक-step वाला example एक clean run पर इसे पहले ही दो बार call करता है (प्रति handler re-entry एक बार), और आप जो भी step जोड़ते हैं वह एक और call है। तो $0.10 प्रति call पर यह कुछ टूटने से पहले ही पैसे बर्बाद कर रहा है, और एक retry इसके लिए दोबारा भुगतान करता है। इसका इलाज है महँगी चीज़ को इसके अपने step में wrap करना:
async def handle_email(ctx: inngest.Context) -> dict[str, str]:
    expensive_thing: dict = await ctx.step.run(
        "fetch-expensive-data", fetch_expensive_data, ctx.event.data["id"],
    )
    await ctx.step.run("do-something", do_something_with, expensive_thing)
    return {"status": "done"}
अब fetch_expensive_data memoized है; retries इसके लिए दोबारा भुगतान नहीं करते।
step name ही memo key है। Python SDK एक दोहराए नाम पर collide नहीं करता; यह उन्हें call order से auto-number करता है (load-customer, फिर load-customer:1, फिर load-customer:2), इसलिए हर एक को अपना memo slot मिलता है। पर इस पर मत टिकें: auto-numbers का कोई अर्थ नहीं होता, इसलिए load-customer:7 दिखाता एक dashboard trace आपको किस customer के बारे में कुछ नहीं बताता, और एक step डालना या हटाना हर बाद के number को खिसका देता है। हर call को एक stable, data-derived नाम दें, एक loop में step.run(f"load-customer-{customer_id}", ...), ताकि memo key data से बँधी हो, call order से नहीं।
Predict. आपके function के तीन steps हैं। Step 1 (
load-customer) DB calls में $0.01 ख़र्च करता है और 100ms लेता है। Step 2 (run-agent) OpenAI tokens में $0.20 ख़र्च करता है और 12 सेकंड लेता है। Step 3 (save-draft) DB calls में $0.005 ख़र्च करता है और 50ms लेता है। Step 2 OpenAI rate limits की वजह से 30% बार fail होता है; Inngest backoff के साथ retry करता है। (a) तीनों कोstep.runमें wrap करने और (b) सिर्फ़ step 2 कोstep.runमें wrap करने के बीच cost का फ़र्क़ क्या है? Confidence 1-5.
जवाब: (a) के साथ, step 2 का एक अकेला retry सिर्फ़ step 2 की cost ($0.20) ख़र्च करता है; step 1 memoized और skipped है, और step 3 अभी चला नहीं। (b) के साथ, step 1 step.run के बाहर है, इसलिए यह step 2 के हर retry पर फिर से execute होता है: लगभग $0.21 प्रति retry ($0.01 step 1 के लिए और $0.20 step 2 के लिए)। Step 3 यहाँ cost नहीं है, यह एक बार चलता है, step 2 के आख़िरकार succeed होने के बाद; बात यह है कि किसी fail हो रहे step के पहले का कोई भी काम दोबारा चलता है जब तक आप इसे wrap न करें। 30% retry rate वाली एक हज़ार emails पर, यह step-1 DB calls में लगभग $3 की बर्बादी है, और असली ख़तरा पैसे से बड़ा है: अगर step 1 का एक side effect होता (एक write, एक charge), तो इसे step.run के बाहर छोड़ना उस side effect को हर retry पर दोबारा होने देता है। जो कुछ आप दोबारा execute नहीं होने देना चाहते उसे step.run में wrap करें। mechanic समझने के बाद यह optional नहीं है।Try with AI
With my AI coding assistant: review the Inngest function we built
in Concept 6's Try-with-AI and identify any code BETWEEN step.run
calls that should be wrapped in its own step but isn't. Common
candidates:

- Computed values (timestamps, IDs, formatting) that we want to be
  stable across retries
- Calls to logging or metrics services
- Reads from Redis, environment variables, secret managers

Then propose a refactor that moves each of these into its own step
with a meaningful name. For each, explain whether the side effect
is one you want to happen once (use step.run) or every retry
(leave it outside).
Concept 8: step.sleep और step.wait_for_event, समय के ज़रिए durability
कुछ काम को इंतज़ार करना पड़ता है। एक welcome-email pipeline तुरंत एक email भेजता है, फिर तीन दिन इंतज़ार करता है, फिर एक follow-up भेजता है। एक refund-investigation को एक इंसान के approve करने का इंतज़ार करना पड़ता है। एक trial-conversion flow 7 दिनों के भीतर "user upgraded to paid" देखता है और जो देखता है उसके आधार पर एक अलग email भेजता है।
एक सामान्य Python function में, "तीन दिन इंतज़ार करो" का मतलब है एक process को तीन दिन खुला रखना। यह नामुमकिन है: आपका process restart होता है, आपका hosting आपको 72 घंटे के idle compute के लिए bill करता है, आपका timer खो जाता है। Inngest में, "तीन दिन इंतज़ार करो" एक line है:
from datetime import timedelta

@inngest_client.create_function(
    fn_id="trial-welcome-series",
    trigger=inngest.TriggerEvent(event="user/trial.started"),
)
async def welcome_series(ctx: inngest.Context) -> dict[str, str]:
    user_id = ctx.event.data["user_id"]

    await ctx.step.run("send-welcome-email", send_welcome_email, user_id)

    # Wait three days. The function gets paged out of memory. Nothing
    # is consuming compute. Three days later, Inngest pages it back in
    # and resumes execution at the next line.
    await ctx.step.sleep("wait-three-days", timedelta(days=3))

    await ctx.step.run("send-followup", send_followup_email, user_id)

    return {"status": "completed"}
step.sleep durable है, आराम पर nervous system. function suspend होता है; Inngest resume time store करता है; इंतज़ार के दौरान कुछ भी compute नहीं खाता; function सही समय पर resume होता है, सभी पिछले step outputs अब भी memoized के साथ। step.sleep (और step.sleep_until) paid plans पर एक साल तक, free Hobby plan पर सात दिन तक इंतज़ार कर सकता है (Inngest usage limits)। सात-दिन की Hobby सीमा इस course के इस्तेमाल किए हर sleep के लिए काफ़ी चौड़ी है।
ज़्यादा ताक़तवर sibling step.wait_for_event है। समय का इंतज़ार करने के बजाय, किसी और event का इंतज़ार करें। function तब तक suspend रहता है जब तक एक matching event न आए, या जब तक आपका set किया timeout expire न हो जाए। यही Inngest को HITL (Concept 15) और inter-agent coordination patterns की सबसे साफ़ अभिव्यक्ति बनाता है:
@inngest_client.create_function(
    fn_id="refund-with-approval",
    trigger=inngest.TriggerEvent(event="customer/refund.requested"),
)
async def refund_with_approval(ctx: inngest.Context) -> dict[str, str]:
    request = ctx.event.data
    request_id = request["request_id"]

    # If amount is over $100, require approval before issuing
    if request["amount_cents"] >= 10_000:
        # Notify a human via Slack/email/whatever
        await ctx.step.run("notify-approver", notify_human_approver, request)

        # Wait for an approval event. Up to 24 hours; expires otherwise.
        approval = await ctx.step.wait_for_event(
            "wait-for-approval",
            event="refund/approval.decided",
            timeout=timedelta(hours=24),
            if_exp=f"async.data.request_id == '{request_id}'",
        )

        if approval is None or not approval.data.get("approved"):
            return {"status": "rejected_or_timeout"}

    # Either it was under $100, or it was approved
    refund = await ctx.step.run(
        "issue-stripe-refund", call_stripe_refund_api, request,
    )
    return {"status": "issued", "refund_id": refund["id"]}
क्या हो रहा है, ऊपर से नीचे:
  the function reaches wait_for_event   ->  it SUSPENDS  (zero compute)
        |
        |   a human sees the Slack note, clicks Approve in your admin UI
        |   the UI sends a refund/approval.decided event
        v
  Inngest matches that event to THIS waiting run  (if_exp picks the right one)
        |
        v
  the function RESUMES, with the event as the `approval` value
        |
        v
  the refund step runs  ->  Stripe refund happens, after the human approved
एक सूक्ष्म हिस्सा बीच में match है: if_exp ही वह है जो approval event को इस request के run को जगवाता है किसी और के को नहीं।
step.sleep और step.wait_for_event ऐसे timeouts हैं जिनके लिए आप भुगतान नहीं करते। function आपके code में synchronous दिखता है ("तीन दिन इंतज़ार करो, फिर email भेजो"), लेकिन runtime semantics async और durable हैं। यह उन दो चीज़ों में से एक है जिनके लिए Inngest मशहूर है (durable retries दूसरी)। इसके बिना, विकल्प है एक queue साथ में एक state machine साथ में एक database साथ में एक poller, और आप तीन के बजाय एक हज़ार lines लिखते।
Quick check. तीन दावे। हर एक को True या False चिह्नित करें। (a) अगर
step.sleep30 दिनों के लिए set है और उन 30 दिनों में आपकी service पाँच बार redeploy होती है, तो sleep एक paid plan पर बिना रुकावट जारी रहता है। (b) अगरstep.wait_for_eventtimeout होता है, तो function एक exception raise करता है। (c) एक ही function में दोstep.wait_for_eventcalls एक साथ एक ही event का इंतज़ार कर सकते हैं।
जवाब: (a) एक paid plan पर True: sleeps Inngest के infrastructure में store होते हैं, आपकी service की memory में नहीं, इसलिए redeploys उन्हें नहीं खोते। tier सीमा नोट करें: एक 30-दिन का sleep एक paid plan पर ठीक है पर free Hobby plan की सात-दिन sleep cap से ज़्यादा है। (b) False: timeout पर, wait_for_event None लौटाता है। आपका code इसके लिए जाँचता है और तय करता है क्या करना है (rejection, escalation, default-approval, जो भी policy हो)। (c) सामान्य sequential code में False: एक function एक wait_for_event से टकराता है, suspend होता है, और अगले तक सिर्फ़ पहले के resume होने के बाद पहुँचता है, इसलिए दोनों waits क्रम में चलते हैं, और एक अकेला matching event जो भी wait अभी suspended है उसे resume करता है। वे सिर्फ़ तब overlap होते जब आप उन्हें parallel steps की तरह launch करें, एक pattern जो इस course से परे है। रोज़मर्रा का नियम: एक event एक waiting point को resume करता है।Try with AI
Build a delayed-investigation flow with my AI coding assistant.
Specification:

1. Triggered by event 'customer/refund.failed'.
2. Immediately notify the on-call human via Slack with the refund
   details and a "Investigate" button.
3. Wait for the human to click the button (which fires
   'customer/refund.investigation_started') for up to 4 hours.
4. If the click arrives in time: run the agent to draft an
   investigation summary.
5. If 4 hours pass without a click: escalate to a senior reviewer
   by firing 'customer/refund.escalated'.

Use the dev-server MCP's send_event tool to simulate the
human-click event during testing. Use get_run_status to inspect
how the suspended function shows up in the dashboard. Before
writing, use list_docs to scan the Inngest documentation tree
for the right page on wait_for_event semantics, then
read_doc on the page you find to get the exact syntax for
the if_exp filter expression.
Concept 9: Retries, error handling, dead-letter
यह reflex को क़रीब से देखना है। default रूप से, Inngest fail हुए steps को retry करता है। defaults समझदारी भरे हैं: exponential backoff के साथ ~4 retries, attempts के बीच कुछ सेकंड से कुछ मिनट तक। आख़िरी retry fail होने के बाद, run एक failed state में प्रवेश करता है और inspection और (वैकल्पिक रूप से) replay के लिए वहीं रहता है। आप इसे per function tune कर सकते हैं: retries=10, या कभी retry न करने के लिए retries=0. किसी specific failure (एक declined card, एक 401) के लिए retries skip करने के लिए, step के अंदर से inngest.NonRetriableError raise करें, जैसा नीचे का example करता है।
@inngest_client.create_function(
    fn_id="charge-customer",
    trigger=inngest.TriggerEvent(event="order/checkout.completed"),
    retries=2,  # transient Stripe errors (503, timeout) retry twice
)
async def charge_customer(ctx: inngest.Context) -> dict[str, str]:
    try:
        charge = await ctx.step.run(
            "call-stripe", call_stripe_charge, ctx.event.data,
        )
        return {"status": "charged", "charge_id": charge["id"]}
    except inngest.NonRetriableError as e:
        # call_stripe_charge raises NonRetriableError on a declined card, which
        # tells Inngest NOT to retry the step (a decline will not become an
        # approval on attempt 2). So we land here on the FIRST failure, with no
        # wasted retries, mark the order, and kick off the dunning flow.
        await ctx.step.run(
            "mark-failed",
            lambda: mark_order_failed(ctx.event.data["order_id"], reason=str(e)),
        )
        await ctx.step.run(
            "emit-dunning-event", emit_dunning, ctx.event.data["order_id"],
        )
        return {"status": "card_declined"}
तीन patterns मायने रखते हैं।
Pattern 1: Transient बनाम permanent failures. Inngest default रूप से सब कुछ retry करता है, लेकिन कुछ errors transient नहीं हैं। Stripe से एक card-declined error retry पर फिर declined होगा। आपके downstream API से एक 401-unauthorized सिर्फ़ इंतज़ार करने से 200 नहीं बन जाएगा। आपके function को इन्हें ख़ास तौर पर catch करके handle करना चाहिए: अपने DB में लिखें, एक downstream event emit करें, साफ़-सुथरे return करें, ताकि वे retry budget को निराशाजनक कोशिशों पर बर्बाद न करें। Inngest का NonRetriableError Inngest को स्पष्ट रूप से बताता है कि एक throw हुए exception के लिए retries skip करे।
Pattern 2: Step-level बनाम function-level errors. एक step जो throw करता है वह retry होता है। step-level retries ख़त्म होने के बाद, function fail होता है। कभी-कभी आप चाहते हैं कि एक function एक fail हो रहे step से बच जाए: failure log करें, काम को "partial" चिह्नित करें, जारी रखें। step.run को try/except में wrap करें। step फिर भी अपने retries पाता है; अगर सभी retries fail होते हैं, तो exception आपके catch block में propagate होता है, जहाँ आप तय कर सकते हैं क्या करना है।
Pattern 3: Dead-letter और replay. एक पूरी तरह fail हुआ function ग़ायब नहीं होता; यह अपने पूरे trace, step outputs, और exception के साथ dashboard के "failed runs" view में land होता है, एक Replay button के साथ। bug ठीक करें, इसे ship करें, replay करें, बिना कोई dead-letter handler लिखे। (Replay ऊपर से एक fresh run है, memo-preserving resume नहीं, इसलिए side-effecting steps को idempotent रखें; Concept 14 इसे पूरा कवर करता है।)
Predict. आपका function step 2 में Stripe को और step 4 में आपकी customer data service को call करता है। Stripe step 2 की पहली attempt पर 503 (service unavailable, transient) लौटाता है। Step 2 exponential backoff (~1s, ~2s, ~5s, ~12s) के साथ 4 बार retry करता है; 4th retry पर Stripe वापस आता है, charge succeed होता है। अब step 4 चलता है, और data service एक 500 के साथ down है। क्या Inngest पूरे function को retry करता है, या सिर्फ़ step 4 को? कितनी बार? Confidence 1-5.
जवाब: सिर्फ़ step 4, और इसे अपना retry budget मिलता है। Steps retries साझा नहीं करते। Step 2 के चार retries step 4 के से स्वतंत्र हैं। Inngest step 4 को retry करेगा (default ~4 बार) और अगर data service वापस आती है, तो step 4 पूरा होता है, और function succeed होता है। Step 2 का Stripe charge दोबारा issue नहीं होता, क्योंकि step 2 का output इसके successful retry के बाद memoized हुआ था। customer ठीक एक बार charge होता है भले ही function ने retries के पार 20 सेकंड बिताए।Try with AI
With my AI coding assistant: extend the customer-support worker
function from Concept 6 with explicit retry and failure handling.
Specification:

1. The OpenAI Agents SDK call should retry 3 times on transient
   failures (rate limit, timeout), but NOT retry on a content-policy
   refusal from the model.
2. The Slack notification should retry up to 10 times (Slack is
   often flaky; don't lose the notification).
3. The Postgres write should retry once; if it fails again, log the
   failure and continue (don't fail the whole function over a
   transient DB blip).

For each step, decide what's transient vs permanent and structure
the try/except accordingly. Use grep_docs to find the Python SDK's
NonRetriableError equivalent.
Concept 10: Python में AI calls के लिए step.run (step.ai.wrap सिर्फ़ TypeScript-only है)
Concepts 6-9 किसी भी side-effecting code के लिए काम करते हैं: DB writes, API calls, file writes, agent invocations, और इसमें आपके LLM calls शामिल हैं। तो यहाँ Python में AI calls के लिए headline, शुरू में ही: आप ctx.step.run इस्तेमाल करते रहते हैं। Inngest AI-specific step.ai primitives ship करता है, लेकिन Python में वे या तो unavailable हैं या niche हैं, और उनकी ओर पहुँचना वह आम ग़लत मोड़ है जिसे रोकने के लिए यह concept मौजूद है।
पहले एक ज़रूरी Python-बनाम-TypeScript नोट। Inngest के
step.aimodule में दो methods हैं, और उनका language support अलग है।step.ai.infer()TypeScript और Python दोनों में उपलब्ध है (Python SDK v0.5+): यह inference को Inngest के infrastructure को offload करता है और call को trace करता है।step.ai.wrap()सिर्फ़ TypeScript है: आज कोई Python equivalent नहीं है। Python projects (इस course के worker जैसे) के लिए, एक OpenAI Agents SDK call को wrap करने का सही patternctx.step.run(...)है, जो आपको पहले से wrapped step के inputs और outputs की पूरी durability, retries, और observability देता है। आपको बस वह LLM-specific prompt/response telemetry नहीं मिलती जो TypeScript काstep.ai.wrapजोड़ता है। (May 2026 तक AI Inference docs के ख़िलाफ़ verified.)
step.run agent run को wrap करता है, एक नंगे model call को नहीं। इस course में आपका worker एक OpenAI Agents SDK agent है, इसलिए agent LLM और tool calls करता है, आप नहीं। आप पूरे agent run को ctx.step.run(...) में wrap करते हैं। Inngest को परवाह नहीं कि step के अंदर क्या है; आपका agent बस वह function है जो आप इसे सौंपते हैं। यह step के input और agent के result को record करता है, transient failure पर step को retry करता है, और success पर इसे memoize करता है ताकि बाद के steps कभी agent की cost दोबारा न भुगतें।
@inngest_client.create_function(
    fn_id="summarize-customer-thread",
    trigger=inngest.TriggerEvent(event="customer/thread.summary_requested"),
)
async def summarize_thread(ctx: inngest.Context) -> dict[str, str]:
    thread = await ctx.step.run(
        "load-thread", load_thread, ctx.event.data["thread_id"],
    )

    # The agent makes the model and tool calls internally. You wrap the whole
    # AGENT RUN in step.run, so Inngest sees it as one step: it records the
    # input and the agent's result, retries on a transient failure, and
    # memoizes on success so later steps do not re-pay the agent's cost.
    result = await ctx.step.run(
        "run-agent",
        lambda: run_support_agent(thread=thread),
    )

    return {"summary": result.summary}
dashboard इस run को load-thread फिर run-agent के रूप में दिखाता है, हर एक अपने input और output के साथ। एकमात्र चीज़ जो आपको नहीं मिलती, TypeScript के step.ai.wrap की तुलना में, वह है dashboard के AI view में अलग की गई LLM-specific telemetry (token counts, model name); Agents SDK की अपनी tracing वह कवर करती है।
agent run एक step है। क्योंकि आपने पूरे agent को wrap किया, इसके अंदर के model और tool calls अलग Inngest steps नहीं हैं। अगर agent run बीच में fail होता है और Inngest run-agent को retry करता है, तो पूरा agent शुरू से फिर चलता है, उन tokens के लिए दोबारा भुगतान करते हुए जो इसने उस attempt पर पहले ही ख़र्च किए। यह आम तौर पर ठीक है: एक agent draft दोबारा करना सस्ता है, और कोई भी valid draft चलेगा। जब एक agent run इतना महँगा हो कि आप इसे पूरा दोबारा नहीं करना चाहते, तो काम को छोटे टुकड़ों में तोड़ें, हर एक इसका अपना step.run (load और retrieve अपने steps में, फिर एक छोटा agent call), ताकि एक retry सिर्फ़ उस टुकड़े को दोबारा करे जो fail हुआ।
क्योंकि step.run हर step के inputs और outputs को Inngest के observability store में record करता है, जो content आप एक step से गुज़ारते हैं वह store होता है और dashboard में दिखता है। अगर आपके prompt में PII (names, emails, addresses), secrets (API keys, internal tokens), contractual या financial data, या regulated content (HIPAA, GDPR-scoped data, PCI) शामिल है, तो raw content को step body में पास न करें। Redact करें, hash करें, summarize करें, या एक reference पास करें (एक customer_id और ticket_id, पूरा ticket text नहीं) और sensitive content को step body के अंदर अपने authoritative store से फिर load करें, जहाँ retention और access controls आपके configure करने को हैं। वही अनुशासन OpenAI Agents SDK की अपनी tracing पर भी लागू होता है अगर आप इसे enable करते हैं। Step traces को वैसे ही treat करें जैसे आप किसी production log को करते: default रूप से उपयोगी, policy से regulated.
step.ai.infer (Python-supported, पर niche)। आप शायद ही कभी इसकी ओर पहुँचेंगे; step.run इस course के हर AI call के लिए default है। इसका एक उद्देश्य: अपने process से OpenAI को call करने के बजाय, आप Inngest के infrastructure से call करने को कहते हैं ताकि request के बीच रहते आपका process deallocate हो सके। ऐसे serverless platforms पर जो in-flight time के लिए bill करते हैं, और लंबे inferences (Deep Research, बड़े embedding batches) के लिए, वह असली पैसे बचाता है; एक हमेशा-चालू server पर sub-second calls के लिए यह बस latency जोड़ता है। अगर आप इसे इस्तेमाल करते हैं, तो अपने version के लिए exact signature AI Inference docs से खींचें; यह experimental inngest.experimental.ai namespace में रहता है और इस course के build में इस्तेमाल नहीं हुआ।
Quick check. True या False. (a) Python में, अपने agent run को
ctx.step.run("run-agent", run_support_agent, ...)में wrap करना इसे durable, transient failures पर retried, और success पर memoized बनाता है। (b) Python में OpenAI Agents SDK के साथ Inngest इस्तेमाल करने के लिएstep.ai.inferएक कठोर आवश्यकता है। (c) एक अकेले OpenAI call के लिएstep.runकोstep.ai.inferसे बदलना function को चलाने में हमेशा सस्ता बना देगा।
जवाब: (a) True: यह अनुशंसित Python pattern है। agent run step body के अंदर जाता है; Inngest पूरे step को काम की unit मानता है। (b) False: ज़्यादातर मामलों के लिए step.run काफ़ी है। step.ai.infer serverless compute cost के लिए एक optimization है, आवश्यकता नहीं। worked example में OpenAI Agents SDK integration plain step.run इस्तेमाल करता है। (c) False: step.ai.infer पैसे सिर्फ़ तब बचाता है जब (i) आप एक ऐसे serverless platform पर हों जो in-flight time के लिए bill करता है और (ii) call इतना लंबा हो कि request-offload savings जोड़े गए orchestration overhead पर हावी हो जाएँ। हमेशा-चालू servers पर sub-second calls के लिए, plain step.run जीतता है।Try with AI
With my AI coding assistant: take a customer-support agent
invocation and produce TWO versions of the Inngest function that
calls it:

Version A: The normal pattern. Wrap the Runner.run call (the whole
agent run) in step.run: durable, retried on transient failures,
memoized, with the standard step trace.

Version B: The niche exception, for comparison. step.ai.infer can
only offload ONE model call, not a whole agent, so write a SEPARATE
small function that makes a single direct OpenAI completion via
step.ai.infer (the Python-supported primitive that hands that one
call to Inngest's infrastructure to save serverless compute cost).
This is the one place you call the model directly instead of letting
the agent do it.

For each version, explain (a) what the dashboard trace shows for a
successful run, (b) what happens when the OpenAI call hits a 429
rate limit, and (c) on which kind of deployment (always-on server
vs serverless) Version B's offload saves real money.
Part 3: balance और recovery, production scale
Parts 1 और 2 ने आपके worker को चलाया और crashes से बचाया। Part 3 इसे असली scale पर चलाने के बारे में है: एक busy worker को अपने आसपास की हर चीज़ को अभिभूत करने से रोकना, और जब कुछ thok में ग़लत हो तब तेज़ी से recover करना। पाँच concepts, सीधे शब्दों में:
- Concurrency और throttling (Concept 11): cap करें कि एक साथ कितने runs होते हैं, और नए कितनी तेज़ी से शुरू होते हैं, ताकि events की एक बाढ़ एक हज़ार database connections न खोले या एक ही सेकंड में आपकी OpenAI rate limit पार न कर जाए।
- Priority और fairness (Concept 12): सुनिश्चित करें कि 500 emails भेजता एक customer बाक़ी सबको line के पीछे न धकेल दे।
- Batching (Concept 13): 10,000 events को 10,000 अलग runs के बजाय लगभग 100 grouped runs के रूप में संभालें।
- Replay और cancellation (Concept 14): एक बुरे deploy के बाद, उन runs को फिर से चलाएँ जो fail हुए, ठीक किए गए code पर; या वह काम cancel करें जो अब आप नहीं चाहते।
- Human-approval gates (Concept 15): किसी high-stakes action से पहले, मसलन एक बड़े refund, agent को रोकें और एक इंसान का इंतज़ार करें।
मिलकर ये एक चलते worker को एक ऐसे worker में बदल देते हैं जिसे आप paying customers के सामने सुरक्षित रूप से रख सकते हैं।
Concept 11: Concurrency और throttling
आपका prototype एक मिनट में कुछ emails संभालता है और ठीक है। फिर एक busy सुबह 1,000 एक साथ भेजती है, आपका worker सब 1,000 को एक ही समय चलाने की कोशिश करता है, और यह एक ही पल में 1,000 OpenAI calls और 1,000 database connections खोलता है, दोनों को ख़त्म करते हुए। यह एक prototype और production के बीच सबसे आम gap है, और इलाज दो छोटी limits हैं, हर एक एक line:
- Concurrency यह है कि कितने runs एक ही समय execute कर सकते हैं।
- Throttling यह है कि नए runs कितनी तेज़ी से शुरू होने की अनुमति है।
from datetime import timedelta

@inngest_client.create_function(
    fn_id="customer-support-conversation",
    trigger=inngest.TriggerEvent(event="customer/email.received"),
    concurrency=[inngest.Concurrency(limit=10)],
    throttle=inngest.Throttle(limit=100, period=timedelta(minutes=1)),
)
async def handle_email(ctx: inngest.Context) -> dict[str, str]:
    ...
concurrency=10 कहता है: किसी भी पल इनमें से ज़्यादा से ज़्यादा 10 functions चल रहे हैं। 11वाँ event तब तक queue में इंतज़ार करता है जब तक 10 में से एक ख़त्म न हो। throttle=100/minute कहता है: प्रति मिनट ज़्यादा से ज़्यादा 100 नए runs शुरू होते हैं। 101वाँ event इंतज़ार करता है भले ही concurrency में जगह हो।
आप आम तौर पर दोनों क्यों चाहते हैं। Concurrency आपके downstream systems को एक साथ बहुत ज़्यादा calls से बचाता है (ऊपर की 1,000-connections वाली समस्या)। Throttle उन्हें एक burst से बचाता है: अगर 500 emails ठीक 9:00 पर land होती हैं, तो आप नहीं चाहते कि 500 runs एक ही सेकंड में शुरू हों, भले ही आपके पास concurrency में जगह हो; throttle starts को फैला देता है।
सूक्ष्म हिस्सा, और वजह कि अकेला एक concurrency cap हमेशा काफ़ी नहीं: concurrency सीमित करता है कि कितने runs उड़ान में हैं, यह नहीं कि नए कितनी तेज़ी से शुरू होते हैं। अगर आपके runs तेज़ हैं, तो एक freed slot उसी पल भर जाता है जब एक ख़त्म होता है। तो concurrency=10 फिर भी एक सेकंड में सैकड़ों starts launch कर सकता है, "30 requests प्रति मिनट" वाली limit को पार करने के लिए काफ़ी से ज़्यादा भले ही कभी सिर्फ़ 10 चलते हों। तो knob को उस limit से मिलाएँ जिसे आप बचा रहे हैं: एक count limit (एक 20-connection database pool) concurrency चाहती है; एक rate limit (OpenAI की 30 प्रति मिनट) throttle चाहती है। जब runs slow हों, concurrency एक side effect के रूप में rate को भी bound करती है और आपको throttle की ज़रूरत न पड़े; जब runs तेज़ हों, सिर्फ़ throttle rate को पकड़ता है।
Per-key concurrency. एक अकेली concurrency limit function पर globally लागू होती है। एक ज़्यादा दिलचस्प pattern है per-key concurrency: event की किसी property से सीमित करें। आप एक के बजाय caps की एक list पास करते हैं:
concurrency=[
    inngest.Concurrency(limit=10),  # global cap
    inngest.Concurrency(limit=2, key="event.data.customer_id"),  # per-customer cap
],
यह कहता है: globally ज़्यादा से ज़्यादा 10 functions चल रहे हैं, और एक समय प्रति customer ज़्यादा से ज़्यादा 2. अगर एक अकेला customer एक मिनट में 100 emails भेजता है, तो उनकी सिर्फ़ 2 emails एक साथ process होती हैं; बाक़ी 98 पीछे queue होती हैं। इस बीच, दूसरे customers की emails सामान्य रूप से बहती हैं; वे बातूनी customer से block नहीं होतीं। यह code की दो lines में multi-tenant fairness है। Concept 12 pattern को और विकसित करता है।
9am burst के नीचे पूरी policy की तस्वीर देखें: throttle slow करता है कि runs कितनी तेज़ी से शुरू होते हैं, concurrency cap पकड़ता है कि एक साथ कितने चलते हैं, और per-customer key एक बाढ़ को हर slot लेने से रोकता है, जबकि बाक़ी सब एक durable queue में इंतज़ार करता है।

कुछ नहीं गिराया जाता; काम queue होता है। तीन knobs तय करते हैं कि क्या चलता है, कितनी तेज़ी से शुरू होता है, और कौन इंतज़ार करता है।
Quick check. तीन दावे, True या False. (a) अगर आप
concurrency=10set करें और 1,000 events एक साथ आएँ, तो उनमें से 990 गिरा दिए जाते हैं। (b) Throttling और concurrency limits दोनों कुल throughput घटाती हैं। (c) Per-key concurrency को event data से deterministic एक key चाहिए।
जवाब: (a) False: events गिराए नहीं जाते; वे queue होते हैं। Inngest की queue durable है; 990 events तब तक इंतज़ार करते हैं जब तक concurrency slots नहीं खुलते। (b) False. Throttling start-rate cap करता है; concurrency in-flight runs cap करता है। न तो काम गिराते हैं; दोनों आकार देते हैं कि काम कब execute होता है। एक लंबी window पर throughput अनबदला है अगर आपका औसत load limits से नीचे है। एक peak पर throughput आकार लेता है: bursts queue द्वारा सोखे जाते हैं। (c) True: key expression event data पर evaluate होती है; इसे वही logical scope के लिए एक stable string देना ही होता है (customer_id ठीक है; current_timestamp नहीं)।Try with AI
With my AI coding assistant: design the concurrency and throttling
policy for the customer-support worker. Constraints:

- OpenAI rate limit: 30 requests per minute, hard cap.
- Postgres connection pool: 20 max connections (the worker takes 1 per run).
- Some customers send bursts of 30+ emails in a minute (an angry
  customer); these shouldn't starve other customers.
- We expect ~1,000 emails per day, with peaks around 9am and 2pm.

Propose:
1. A global concurrency value
2. A per-customer concurrency value
3. A throttle (limit and period)

For each, explain what production failure it protects against and
what the cost is (in queue latency at peak).
Concept 12: Priority और fairness, multi-tenant scaling
Concurrency limits काम करती हैं। Per-key concurrency बुनियादी fairness जोड़ती है। Production-grade multi-tenant systems को और चाहिए: priorities (Enterprise customers को उसी compute के लिए hobbyists के पीछे इंतज़ार नहीं करना चाहिए) और fair-share scheduling (कोई एक tenant अपनी concurrency cap के भीतर भी system पर एकाधिकार नहीं कर सकता)।
Priority. Inngest हर event पर एक priority expression evaluate करता है; ज़्यादा priority वाले runs कम priority वाले runs के आगे queue में कूद जाते हैं। यह Concept 11 के उसी create_function पर एक और argument है:
priority=inngest.Priority(
    # Higher number wins (range -600..600). The producer puts the tier's
    # priority on the event directly: Enterprise = 100, Pro = 0, Free = -100.
    run="event.data.tier_priority",
),
जब concurrency queue में 50 runs इंतज़ार कर रहे हों, तो Enterprise customers के runs पहले जाते हैं, फिर Pro, फिर Free. एक ही tier के अंदर, FIFO order लागू होती है। Priority concurrency या throttle limits को override नहीं करती; यह बस तय करती है कि इंतज़ार करते runs में से कौन अगला free slot पाता है। एक Enterprise customer अब भी एक slot खुलने का इंतज़ार करता है; उसे बस अगला मिलता है।
Fair-share scheduling. जब आपके पास सैकड़ों tenants एक ही global concurrency pool के लिए होड़ कर रहे हों, तो FIFO साथ में priority काफ़ी नहीं। एक अकेला tenant एक burst भेजते हुए फिर भी मिनटों तक ज़्यादातर slots पर क़ब्ज़ा कर सकता है। Fair-share scheduling, एक सोची-समझी sizing के साथ concurrency पर key parameter से लागू, हर tenant को एक guaranteed हिस्सा देती है:
concurrency=[
    inngest.Concurrency(limit=50),   # global pool
    inngest.Concurrency(limit=3, key="event.data.tenant_id"),  # max 3 per tenant
],
इसके साथ: 50 कुल slots, कोई tenant 3 से ज़्यादा नहीं लेता। अगर 20 tenants active हैं, तो वह ज़्यादा से ज़्यादा 60 slots की माँग है पर सिर्फ़ 50 उपलब्ध। Fair-share उन्हें घुमाता रहता है, हर tenant को कुछ हिस्सा मिलता है, किसी को बाहर नहीं किया जाता।
Predict. आपके पास एक customer-support function है जिसमें
concurrency=10और per-customerconcurrency=2है। आपके पास priority भी configured है: Enterprise = high, Free = low. 9:00am पर, queue में हैं: Customer A (Free) से 5 events, Customer B (Enterprise) से 5 events, और एक अकेले नए Customer C (Free, अभी अपना पहला plan ख़रीदा) से 10 events. वे किस order में execute होते हैं? Confidence 1-5.
जवाब: यह तीन passes में हल होता है, इस order में।
  1. per-customer cap (2 each)  ->  eligible pool = 2 from A, 2 from B, 2 from C   (6 runs)
  2. priority sorts the pool    ->  B's 2 first (Enterprise), then A's 2 and C's 2 (Free, FIFO)
  3. fill the 10 global slots   ->  all 6 fit, so 6 run now; the rest wait
जैसे-जैसे हर run ख़त्म होता है, उस customer का अगला queued event eligible बन जाता है (pass 1), और अगला free slot सबसे ज़्यादा-priority वाले waiter के पास जाता है (pass 2)। per-customer cap ही है जो Customer C के दस events को पूरी queue लेने से रोकता है।
Flow control इस course में वह एक जगह है जहाँ "इसे चलाओ और देखो" पूरी तरह नहीं टिकता। Concepts 11 और 12 के चार knobs में से, सिर्फ़ concurrency local dev server पर observable है: एक burst भेजें और आप सिर्फ़ N को एक साथ चलते देखेंगे। बाक़ी तीन को आप locally configure करते और उन पर reasoning करते हैं, फिर Inngest Cloud (या एक branch deploy) में effect की पुष्टि करते हैं:
- Throttle एक rate limit है जिसे dev server enforce नहीं करता, इसलिए locally आपके runs जितनी तेज़ी से चल सकते हैं चलते हैं, limit के बावजूद। config correct है; rate सिर्फ़ Cloud में काटती है।
- Priority और fair-share सिर्फ़ sustained multi-tenant contention के नीचे दिखते हैं, कई tenants की होड़ वाली एक भरी queue। मुट्ठी भर test events वह कभी नहीं बनाते, इसलिए वे locally अदृश्य रहते हैं भले ही correctly configured हों।
तो इन तीनों के लिए, "verified" का मतलब है कि config स्वीकार है और function चलता है, और आप behavior पर reasoning कर सकते हैं। एक शांत dev server से "कुछ enforce नहीं हो रहा" निष्कर्ष न निकालें; Cloud में load के नीचे असली effect की पुष्टि करें।
Try with AI
With my AI coding assistant: extend the customer-support worker
configuration with a priority and fair-share scheme. Requirements:

1. Three customer tiers: Enterprise, Pro, Free.
2. Enterprise customers should never wait more than 5 seconds at
   peak load.
3. Free tier customers should get fair access: no Free customer
   should be starved for more than 60 seconds, even when the
   global queue is full.
4. A single noisy customer (regardless of tier) should not occupy
   more than 3 slots.

Write the concurrency + priority configuration. For each line of
config, explain which requirement it satisfies.
Concept 13: Batching, cost-effective bulk processing
कुछ काम स्वाभाविक रूप से batched होता है। आप 10,000 customer conversations में से हर एक को स्वतंत्र रूप से summarize नहीं करते; आप LLM को एक बार में 50 के एक batch के साथ call करते हैं। आप 10,000 audit rows एक-एक करके नहीं लिखते; आप उन्हें एक bulk insert में लिखते हैं। Inngest का batch trigger आपको events जमा करने और batch को input के रूप में एक अकेले function के साथ invoke करने देता है।
@inngest_client.create_function(
    fn_id="batch-embed-tickets",
    trigger=inngest.TriggerEvent(event="ticket/resolved"),
    batch_events=inngest.Batch(
        max_size=50,        # invoke when 50 events accumulated, OR
        timeout=timedelta(seconds=30),  # invoke when 30 seconds pass, whichever first
    ),
)
async def batch_embed_resolved_tickets(ctx: inngest.Context) -> dict[str, int]:
    # ctx.events (plural) instead of ctx.event
    ticket_ids = [e.data["ticket_id"] for e in ctx.events]

    tickets = await ctx.step.run(
        "load-tickets", load_tickets_by_ids, ticket_ids,
    )

    # One embedding call for 50 tickets, not 50 calls for 1 ticket each
    embeddings = await ctx.step.run(
        "embed-batch", embed_texts_batch,
        [t["text"] for t in tickets],
    )

    await ctx.step.run(
        "store-embeddings", store_embeddings_batch,
        ticket_ids, embeddings,
    )

    return {"batched": len(ctx.events)}
क्या बदलता है: ctx.events एक list है, एक अकेला event नहीं। function प्रति event एक बार के बजाय प्रति batch एक बार चलता है। OpenAI embedding API को 50 single-text calls के बजाय एक 50-text batch के साथ call किया जाता है, जो नाटकीय रूप से सस्ता है (आप प्रति token भुगतान करते हैं, पर per-request overhead चला गया) और तेज़ (50 के बजाय एक API round-trip)।
Batching सही tool है जब काम स्वाभाविक रूप से bulkable हो (embeddings, bulk DB writes, bulk emails) और आप काम होने से पहले अपने timeout जितनी latency बर्दाश्त कर सकें। यह ग़लत tool है जब हर event को interactive response चाहिए या जब events के बीच ordering अप्रत्याशित तरीक़ों से मायने रखती हो।
Quick check. True या False. (a) Batched functions अब भी retries और memoization पाते हैं; batch समग्र रूप से durably memoized है। (b) अगर batch timeout सिर्फ़ 3 events जमा होने पर expire होता है, तो function तब तक नहीं चलेगा जब तक अगले 47 न आ जाएँ। (c) आप
batch_eventsकोconcurrencyके साथ मिलाकर cap कर सकते हैं कि कितने batches parallel में चलते हैं।
जवाब: (a) True: batch काम की unit है; retries पूरे batch को इसके सभी events scope में रखते हुए replay करते हैं। (b) False: यही timeout की पूरी बात है। 30 सेकंड बाद function जो भी जमा हुआ उसके साथ चलता है, भले ही वह 1 event हो। (c) True: यह production pattern है। Batch साथ में concurrency मिलकर आपके downstream load को अच्छे से cap करते हैं।Try with AI
With my AI coding assistant: write a batched Inngest function that
embeds resolved support tickets, converting a per-ticket event
handler into one batched call.

Triggers: 'ticket/resolved' event, batched at 50 events or 30 seconds.

The function should:
1. Load the ticket bodies in one query
2. Call OpenAI embeddings API with a 50-text batch (faster + cheaper)
3. Store the embeddings
4. Emit a 'ticket/embedded' event per ticket for downstream consumers

Use grep_docs to find the OpenAI batch-embedding pattern.
Concept 14: Replay और bulk cancellation, production recovery
कभी-कभी सब कुछ एक साथ ग़लत हो जाता है। आपने एक bug ship किया; पिछले छह घंटों में एक हज़ार runs fail हुए। या आपका downstream API 30 मिनट down था; उस window में इसे call करने की कोशिश करने वाली हर चीज़ मर गई। या आपने एक logic error खोजी और इसे ठीक करने के बाद एक दिन का काम दोबारा करना चाहते हैं।
पहले, वह भेद जो सबको उलझाता है। Inngest आपको दो तरीक़े देता है जिनसे एक fail हुआ step फिर चल सकता है, और वे अलग behave करते हैं:
- Automatic retry (उसी run के भीतर)। जब एक step throw करता है, तो Inngest function को backoff के साथ retry करता है, ऊपर से फिर प्रवेश करते हुए। पूरे हुए steps memo से लौटते हैं और दोबारा execute नहीं होते; सिर्फ़ fail हो रहा step फिर चलता है। यह memo-preserving resume है, वह जो आपने Quick Win में देखा, और वह जो "step 3 पर ख़र्च $0.20 दोबारा ख़र्च नहीं होता" वाली property को सच बनाता है। यह automatic है और original run के अंदर होता है।
- Replay / Rerun (dashboard button, कई runs के पार)। यह आपके मौजूदा deployed code के साथ ऊपर से एक बिल्कुल-नया run शुरू करता है, हर step scratch से दोबारा execute होता हुआ (एक rerun को एक नया run id मिलता है और यह पहले step को फिर चलाता है, पुराने का resume नहीं)। तो व्यवहार में पुराने run का memo यहाँ आपको नहीं बचाता। यह incident recovery के लिए है, पूरे हुए काम को छोड़ने के लिए नहीं।
इन्हें सीधा रखना ही पूरा concept है। memo का फ़ायदा automatic retry में रहता है; Replay एक fresh start है। नीचे की दो rows हर path के नीचे वही पाँच steps हैं:

Memo आपको एक run के भीतर बचाता है; एक idempotency key, memo नहीं, आपको reruns के पार बचाती है।
दो उलटे recovery primitives. Replay कहता है "यह काम fail हुआ, मैं चाहता हूँ यह ठीक किए code पर फिर चले।" Bulk cancellation कहता है "यह काम queued था पर मैं अब नहीं चाहता यह हो।" वही dashboard surface, उलटा इरादा। ज़्यादातर teams को असली traffic चलाने के अपने पहले तीन महीनों में दोनों चाहिए होते हैं।
Replay recovery primitive है। Fail हुए runs अपने पूरे step history, input event, और fail हुए step के exception के साथ बने रहते हैं। dashboard से आप Functions view खोलते हैं, ऐसे function तक filter करते हैं जिसके fail हुए runs हैं, एक time window और एक failure pattern चुनते हैं (कोई specific error message या बस "all failures"), और Replay click करते हैं। Inngest हर एक को अभी जो भी code deployed है उस पर ऊपर से एक fresh run के रूप में schedule करता है।
replay के बारे में तीन चीज़ें समझनी हैं।
- Replay आपके मौजूदा deployed code का इस्तेमाल करता है। अगर आपने runs के fail होने और आपके उन्हें replay करने के बीच एक fix deploy किया, तो replayed runs नए code का इस्तेमाल करते हैं। यही पूरी बात है: runs की एक आबादी लें जो एक bug पर मरी, fix ship करें, और उन सबको hands-off फिर चलाएँ।
- Replay हर step फिर execute करता है; यह पुराने run का memo दोबारा इस्तेमाल नहीं करता। एक replayed run एक नया run है, इसलिए हर step ठीक किए code पर scratch से फिर चलता है। Cost के लिहाज़ से, प्रति replayed run सिर्फ़ fail हुए step की नहीं, पूरे function की cost की योजना बनाएँ। जो चीज़ एक replay को एक दूसरा असली-दुनिया side effect (एक duplicate refund, एक duplicate email) issue करने से रोकती है वह memo नहीं है, यह उस side effect पर एक idempotency key है (Concept 4): आप request से एक stable key निकालते हैं (एक refund के लिए, कुछ ऐसा
(order_id, request_id)) और provider एक दोहराव को no-op मानता है। इस course का minimal worker संक्षिप्तता के लिए वह key छोड़ देता है, इसका refund customer पर match करता है और बिना शर्त लिखता है, इसलिए एक production version किसी असली पैसे के हिलने से पहले एक जोड़ देगा। - Replay opt-in है। Fail हुए runs तब तक dashboard में बैठते हैं जब तक आप उन पर act न करें। वे हमेशा retry नहीं करते; वे ग़ायब नहीं होते। वे आपका इंतज़ार करते हैं।
Bulk cancellation उल्टा है। कभी-कभी आपके पास हज़ारों queued या sleeping runs होते हैं जो अब आप नहीं चाहते: एक campaign cancel हो गया, एक customer churn हो गया और आप अब उसे follow-up emails नहीं भेजना चाहते, एक feature roll back हो गया। dashboard से आप एक function और एक time window या event filter चुनते हैं, और Cancel click करते हैं। matching runs साफ़-सुथरे terminate होते हैं: उनके step.sleep और step.wait_for_event calls resume नहीं होते, queued runs शुरू नहीं होते, in-flight runs cancellation के लिए जाँचते हैं और अगले step boundary पर exit करते हैं। Cancellation step boundary का सम्मान करती है; एक in-flight step.run terminate होने से पहले जिस step में है उसे ख़त्म करता है, इसलिए आपको आधे-पूरे Stripe charges या टूटे DB writes नहीं मिलते।
Replay बनाम cancellation एक निर्णय के रूप में। जब runs की एक आबादी के साथ कुछ ग़लत हुआ हो, तो एक सवाल पूछें: क्या मैं चाहता हूँ यह काम succeed हो या मैं चाहता हूँ यह न हो? अगर काम succeed होना चाहिए (bug-fix recovery), तो replay. अगर काम नहीं होना चाहिए (cancelled campaign, churned customer, rolled-back feature), तो cancel. अगर आप अनिश्चित हैं (मसलन, fail हुए runs में कुछ ऐसे हैं जिन्हें आप recover करना चाहते हैं और कुछ जिन्हें पहली जगह fire ही नहीं होना चाहिए था), तो अपनी dashboard query को और संकरा filter करें ताकि हर subset को सही treatment मिले।
व्यवहार में यह तीन patterns सक्षम करता है:
- "हमने एक bug ship किया" वाला recovery। बुरे deploy की time window में fail हुए runs खोजें, bug ठीक करें, fix ship करें, failures को replay करें। Customer experience: उनके email को एक घंटे तक reply नहीं मिला पर आख़िरकार मिल गया, बिना आपके कोई recovery code लिखे।
- "campaign cancelled" वाला rollback। एक welcome series जो 14 दिनों में तीन follow-up emails fire करती है; customer day 4 पर churn हो जाता है। आप day-7 और day-14 follow-ups नहीं भेजना चाहते। matching
wait-for-eventऔरsleepruns को bulk-cancel करें। - "schema migration" वाला replay। आपने बदला कि agent summaries कैसे format करता है; आप चाहते हैं कल के tickets नए format के साथ फिर से summarize हों। उन runs (successful हों या नहीं) को खोजें और replay करें; क्योंकि एक replay ऊपर से एक fresh run है, agent नए code पर हर step फिर चलाता है, जो ठीक वही है जो आप यहाँ चाहते हैं। अपने side-effecting steps को idempotent रखें ताकि उन्हें फिर चलाना double-charge या double-send न करे।
dev-server MCP recovery को आपके general agent को छोड़े बिना सुलभ बनाता है। development के दौरान आप AI से कह सकते हैं कि एक fail हुए run को inspect करने के लिए get_run_status इस्तेमाल करे, फिर ठीक किए code पर event को फिर fire करके काम recover करे (इसे एक नया event id दें, क्योंकि वही id के साथ फिर fire करना Concept 4 की idempotency semantics से एक no-op पर dedup हो जाता है)। dashboard Rerun button समतुल्य one-click path है। किसी भी तरह आपको मौजूदा code पर एक fresh run मिलता है, memo-preserving resume नहीं।
Quick check. True या False. (a) एक dashboard Replay काम को नए deployed code पर फिर से चलाता है। (b) एक dashboard Replay original run के successful steps को memo से लौटाता है और सिर्फ़ fail हुए को फिर चलाता है। (c) एक fail हो रहे run के अंदर automatic retry पूरे हुए steps को memo से लौटाता है और सिर्फ़ fail हो रहे step को फिर चलाता है। (d) एक in-flight function को bulk-cancel करना तेज़ी से terminate होने के लिए अभी execute हो रहे
step.runको mid-step abort कर देगा।
जवाब: (a) True: एक replay अभी जो भी deployed है उस पर ऊपर से एक fresh run है, यही वजह है कि यह bug-fix recovery का tool है। (b) False: यह जाल है। एक replay एक नया run है जो हर step ऊपर से फिर execute करता है, इसलिए पुराने run का memo साथ नहीं आता। जो एक replayed side effect को दो बार fire होने से रोकता है वह idempotency key है, memo नहीं। (c) True: यह memo-preserving path है, और वही जो आपने Quick Win में देखा। पूरा हुआ step एक attempt पर बैठा रहता है जबकि fail हो रहा step retry होता है। (d) False: cancellation step boundary का सम्मान करती है; मौजूदा step.run run के terminate होने से पहले ख़त्म होता (या fail होता) है। यह टूटे writes रोकता है।Try with AI
Walk through a recovery scenario with my AI coding assistant:

Yesterday at 14:00 we deployed a change to the worker's agent step.
A bug in the new code made the agent step throw on every run.
From 14:00 to 18:00, 47 customer-support runs failed at that step.

At 18:30 we noticed, fixed the bug, and re-deployed.

Use the dev-server MCP's grep_docs to find Inngest's replay docs,
then:

1. Outline the exact dashboard steps to identify the 47 failed runs.
2. Explain what a dashboard Replay does for one of those runs: is it
   a fresh run from the top on the fixed code, or a resume that
   reuses the old run's memo? What does that mean for the cost of
   replaying all 47?
3. Confirm whether the customers will see one reply or several if a
   replayed run re-sends the email, and name the mechanism that
   keeps it to one (hint: it is not memo).
4. Identify ONE scenario in this story where you'd prefer to
   bulk-cancel instead of replay, and explain why.
Concept 15: step.wait_for_event के साथ HITL gates, runtime में Invariant 1
कुछ actions इतने ज़रूरी हैं कि agent को उन्हें ख़ुद लेने नहीं दिया जा सकता। एक $500 refund issue करना, एक legal notice भेजना, एक account बंद करना: आप चाहते हैं agent जाँच करे और action propose करे, पर इसके असल में होने से पहले एक इंसान approve करे। एक इंसान के लिए वह रुकना एक approval gate है, और यह इस पूरे system में वह एक जगह है जहाँ worker रुकता है और किसी का इंतज़ार करता है। (Agent Factory के शब्दों में यह Invariant 1 है, इंसान ही principal है: एक high-stakes निर्णय पर, इंसान का फ़ैसला ही चलता है, agent का नहीं।)
Inngest का step.wait_for_event (Concept 8) इसे साफ़ बनाता है। agent निर्णय बिंदु तक चलता है, फिर suspend होकर एक approval event का इंतज़ार करता है। एक इंसान इसकी समीक्षा करता है (Slack, एक admin UI, या email में) और approve या reject click करता है; वह click event को fire करता है, function फ़ैसले के साथ जाग जाता है, और यह act करता है। आपका code नियंत्रित करता है कि agent को क्या करने की अनुमति है, यह नहीं कि यह कैसे reason करता है।
@inngest_client.create_function(
    fn_id="refund-with-hitl-gate",
    trigger=inngest.TriggerEvent(event="customer/refund.investigated"),
    concurrency=[inngest.Concurrency(limit=5)],
)
async def refund_with_gate(ctx: inngest.Context) -> dict[str, str]:
    request_id = ctx.event.data["request_id"]
    amount_cents = ctx.event.data["amount_cents"]

    # Step 1: the agent's analysis (your worker, run durably).
    # Keyword-arg calls are wrapped in a lambda; step.run forwards only positional args.
    analysis = await ctx.step.run(
        "agent-investigates",
        lambda: run_refund_investigation_agent(request_id=request_id),
    )

    # Step 2: if the agent thinks refund is warranted AND amount > $100,
    # gate behind human approval
    needs_approval = analysis.recommends_refund and amount_cents >= 10_000

    if needs_approval:
        await ctx.step.run(
            "notify-approver",
            lambda: send_slack_approval_request(
                request_id=request_id,
                analysis=analysis,
                amount_cents=amount_cents,
            ),
        )

        # === THE HITL GATE ===
        approval = await ctx.step.wait_for_event(
            "wait-for-human-approval",
            event="refund/approval.decided",
            timeout=timedelta(hours=24),
            if_exp=f"async.data.request_id == '{request_id}'",
        )

        if approval is None:
            # Timeout: no human responded in 24h. Escalate.
            await ctx.step.run(
                "escalate-timeout",
                lambda: escalate_to_senior_reviewer(request_id=request_id),
            )
            return {"status": "escalated_timeout"}

        if not approval.data["approved"]:
            await ctx.step.run(
                "notify-rejected",
                lambda: notify_customer_rejected(request_id=request_id),
            )
            return {"status": "rejected_by_human"}

    # Either it was approved, or it didn't need approval
    refund = await ctx.step.run(
        "issue-refund",
        lambda: call_stripe_refund(request_id=request_id, amount_cents=amount_cents),
    )

    await ctx.step.run(
        "audit-approved-refund",
        lambda: audit_refund(
            request_id=request_id,
            refund=refund,
            approved_by="human" if needs_approval else "auto",
        ),
    )

    return {"status": "issued", "refund_id": refund["id"]}
code में आप क्या देखते हैं: steps का एक अनुक्रम, बीच में एक wait_for_event के साथ। runtime पर क्या हो रहा है:
- agent चलता है (step 1, durably)।
- function तय करता है कि gate लागू होता है या नहीं (in-code logic, side effects से मुक्त)।
- अगर gated: एक Slack notification fire होता है (step 2, durable)। function 24 घंटे तक suspend होता है।
- Slack में एक इंसान Approve या Reject click करता है। admin backend
refund/approval.decidedऔरrequest_idके साथinngest_client.sendcall करता है। - Inngest event को suspended function से match करता है (
if_expfilter सुनिश्चित करता है कि सिर्फ़ matching request IDs match हों)। function अगली line पर resume होता है। - function इंसान के निर्णय का इस्तेमाल या तो refund issue करने या rejection सूचित करने के लिए करता है। दोनों paths निर्णय और approver को audit करते हैं।
यही Inngest को एक queue-plus-state-machine से गुणात्मक रूप से अलग बनाता है। HITL pattern एक primitive है। function का code ऊपर से नीचे पढ़ता है, gate inline के साथ। कोई callback नहीं, कोई state restoration नहीं, कोई if state == waiting_for_approval: ... dispatching नहीं। runtime suspend/resume mechanic संभालता है; आपका code policy व्यक्त करता है।

agent propose करता है, एक इंसान फ़ैसला करता है, और wait कुछ ख़र्च नहीं करता।
एक बाद का course Invariant 1 को architectural रूप से विकसित करता है: authored intent, spec-driven workflows, manager-of-workers layer जो तय करती है कि कौन से gates कौन से actions पर लागू होते हैं। यह course आपको runtime primitive देता है। जब वह manager layer आएगी, तो यह जो gate लागू करती है वह ठीक यही wait_for_event pattern होगा, बस fleet scale पर composed. primitive को अभी जानने का मतलब है कि architectural pattern बाद में "एक समझदार composition" के रूप में पढ़ता है, "जादू" के रूप में नहीं।
यह वह keystone है जो आप Part 4 के Decision 5 में बनाते हैं: refund approval, durable बना हुआ। यहाँ concept आकार है; worked example इसे एक असली needs_approval tool से wire करता है और साबित करता है कि refund ठीक एक बार fire होता है।
Predict. आपके पास
timeout=timedelta(hours=24)के साथ एक HITL gate set है। एक customer का refund request शुक्रवार 17:00 पर आता है। weekend में कोई इंसान online नहीं। gate का timeout शनिवार 17:00 पर fire होता है। आपका timeout handler एक blocked refund record करता है। reviewer सोमवार 9:00am पर request पढ़ता है। timeline से गुज़रें: weekend के दौरान कितने function runs active थे? Inngest ने कितने compute के लिए charge किया? Confidence 1-5.
जवाब: weekend के दौरान शून्य active function runs। function suspended था: Inngest ने इसका state store किया, function को memory से बाहर निकाला, और या तो event या timeout का इंतज़ार किया। Inngest suspended time के लिए bill नहीं करता। जब शनिवार 17:00 आया और timeout fire हुआ, तो function blocked-refund audit row लिखने में जितने सौ milliseconds लगे उतने के लिए resume हुआ, फिर पूरा हुआ। यह तथ्य कि reviewer सोमवार तक नहीं देखता worker की तरफ़ से कुछ ख़र्च नहीं करता। Inngest पर HITL workflows की economics उन polling-based queues से नाटकीय रूप से अलग है जो आपको "क्या यह अभी approved है?" वाली polling के हर सेकंड के लिए bill करती हैं।Try with AI
With my AI coding assistant: design a durable refund-approval gate.
Specification:

1. The agent investigates and decides a refund is warranted, but the
   refund tool needs human approval before it runs.
2. The gate should:
   - Notify the on-call reviewer with the agent's recommendation
   - Wait up to 4 hours for the reviewer to approve or reject
   - On approve: issue the refund.
   - On reject: do not issue; record a blocked refund.
   - On 4-hour timeout: do not issue; record a blocked refund.
3. Every branch (approve/reject/timeout) writes an audit row from a
   small fixed set of action names, capturing what was decided.

Use the dev-server MCP's send_event to simulate each branch of
the reviewer's decision during testing.
Part 4: worked example, एक customer-support AI Worker
यह course की रीढ़ है: जहाँ आप असल में build करते हैं। इससे पहले की हर चीज़ model और reference थी। यहाँ से आप असली worker assemble करते हैं। पहले worker (एक prompt), फिर इसके आसपास nervous system, प्रति prompt एक layer. हर layer उस concept को नाम देती है जिस पर यह टिकती है, इसलिए अगर कोई layer एक "क्यों" उठाती है, तो Parts 1-3 में वह concept खोलने वाला page है। आप अपने general agent को छोटे plain-English prompts में direct करते हैं और यह code लिखता है। नीचे दिखाए snippets हर layer की कुछ load-bearing lines हैं, files नहीं। पूरा implementation एक live dev server और एक असली model के ख़िलाफ़ end-to-end चलाया गया था, इसलिए जो आकार आप देखते हैं वही चलता है। अगर कोई signature अनजाना लगे, तो आपका agent मौजूदा docs जाँचता है।
पूरा flow जो आप बनाने वाले हैं, एक email end to end:
  a customer emails
        |
        v
  the INNGEST ENGINE catches the event and drives your worker,
  one step at a time, storing each result as it goes:

     1.  audit: "message received"
     2.  load the customer from Neon
     3.  YOUR AGENT drafts a reply           (the thinking part; D1 makes it durable)
     4.  is it a refund? PAUSE for a human   (waits hours, survives crashes; D5)
     5.  on approve: issue the refund; on reject: record it
     6.  audit: "reply sent"

  if a step crashes, the engine re-runs only that step, never the
  finished ones (D6). the same worker also wakes on a daily cron
  and runs under flow-control caps (D3, D4).
opening वाली वही दो-program तस्वीर, engine आपके agent को चलाते हुए, अब असली worker. आप इसे एक बार में एक layer बनाते हैं:
आकार: सात prompts, उस base पर जो आप पहले ही set up कर चुके।
- D0 worker को ख़ुद बनाता है, standalone.
- D1 agent run को durable बनाता है।
- D2 एक event को इसे जगाने देता है।
- D3 एक daily cron जोड़ता है जो fan out करता है।
- D4 flow control जोड़ता है।
- D5 keystone है: refunds पर एक durable human-approval gate.
- D6 साबित करता है कि worker एक टूटे step से बचता है: पूरे हुए काम को दोबारा किए बिना retry, फिर recover.

agent D0 के बाद कभी नहीं बदलता; हर layer nervous system है, बाहर से जोड़ी गई।
शुरू करने से पहले। आपका environment Quick Win से पहले ही set up है: वही
ai-agent-nervous-systemfolder खोलें, Inngest औरneon-postgresSkills installed के साथ, आपकीOPENAI_API_KEYऔर आपका NeonDATABASE_URL.envमें, आपकेcustomersऔरaudit_logtables provisioned, और तीनों MCP servers (Neon, Context7,inngest-dev) wired. सिर्फ़ दो reminders:
- dev server चल रहा है। अगर आपने इसे बंद कर दिया तो इसे फिर start करें: इसके अपने terminal में
npx inngest-cli@latest dev. dashboardhttp://127.0.0.1:8288पर है। (जब आप बाद में Inngest Cloud पर deploy करते हैं, free Hobby tier बिना credit card के $0 है; इसकी सीमाएँ Part 5 में हैं।)- नीचे के MCP calls के लिए एक casing नोट। dev-server tool names
snake_caseहैं (send_event,get_run_status,invoke_function), पर उनके parameterscamelCaseहैं (get_run_statusrunIdलेता है,invoke_functionfunctionIdलेता है)। Python SDK पूरी तरहsnake_caseहै; सिर्फ़ MCP call parameterscamelCaseहैं।
brief
आप एक छोटा customer-support worker बनाते हैं और इसे एक nervous system देते हैं। worker अपने sample customers को Neon customers table (id, email, tier) से पढ़ता है, एक आने वाली email का गर्मजोशी भरा reply draft करता है, सिर्फ़ human approval के साथ एक refund issue कर सकता है, और हर action के लिए Neon audit_log table में एक audit row लिखता है, action names के एक छोटे fixed set से जो यह चुनता है (एक closed set, ताकि एक typo एक silent bad row के बजाय एक loud error बन जाए)। फिर सात prompts इसके आसपास Inngest जोड़ते हैं: एक event इसे जगाता है, agent call durably चलता है, एक daily cron हर eligible customer के लिए एक health check fan out करता है, flow control concurrency और throttle cap करता है, refund एक durable human gate पर रुकता है, और एक replay path fail हुए runs को recover करता है।
आगे आने वाले prompts के बारे में एक नोट। हर एक उसी तरह लिखा है जैसे आप असल में एक general agent से कहेंगे: छोटा, सादा, इस पर भरोसा करते हुए कि यह detail संभाल लेगा। वे ठंडे pasted काम करते हैं, और और भी बेहतर अगर आप पहले agent से orient करने को कहें ("read the project and tell me what you see, then ask me anything unclear before you start") जैसे-जैसे files जमा होती हैं। prompts मंज़िल हैं; पहले orient करना on-ramp है।
D0: worker बनाएँ, standalone
आप कहाँ हैं: base खुला है, dev server चल रहा है, और आपका Neon store provisioned है, पर अभी कोई worker मौजूद नहीं। यह Decision standalone worker बनाता है; अंत तक यह एक sample email पर चलता है और Neon को एक audit row लिखता है।
base पहले से एक AGENTS.md ship करता है जिसे आपके agent ने खोलने पर पढ़ा, इसलिए यह project को जानता है। यही वजह है कि ये prompts छोटे रहते हैं। इसमें का एक नियम जो अपने दिमाग़ में रखने लायक़ है वह पूरे course का architectural invariant है: worker का अपना code कभी inngest से import नहीं करता. agent और इसके tools plain Python रहते हैं; nervous system उन्हें बाहर से wrap करता है। वह separation, agent और nervous system अलग रखे हुए, वही है जो आपको बाद में Inngest को Temporal या Restate से बदलने और worker को अछूता छोड़ने देता है।
आपका Neon system of record Quick Win से पहले ही provisioned है: customers और audit_log tables मौजूद हैं, और DATABASE_URL आपके .env में है। तो worker उस database को शुरू से ही read और write करता है। अब worker बनाएँ। यह paste करें:
Build me a minimal customer-support agent with the OpenAI Agents SDK, running in a local sandbox. It reads the sample customers from my Neon
customerstable (each row has an id, email, and tier), drafts a warm reply to an incoming customer email, and can issue a refund, but the refund tool needs human approval before it runs. When an email reports a duplicate charge, an overcharge, or a failed order, the agent must actually call the refund tool, not just promise a refund in prose. Write an audit row into my Neonaudit_logtable for every action, using a small fixed set of action names and theDATABASE_URLin.env. Seed thecustomerstable with five sample rows first if it is empty. Keep it small; it exists to be wrapped, not shipped. Then run it on a sample email and show me the reply.
worker Postgres तक DATABASE_URL के ज़रिए पहुँचता है, कभी Neon MCP से नहीं (वह सिर्फ़ आपका build-time tool है)। agent जो लिखता है उसकी एक line बाक़ी course के लिए load-bearing है, refund tool का decorator:
@function_tool(needs_approval=True)
def issue_refund(order_id: str, amount_cents: int, reason: str) -> str:
    ...
needs_approval=True agent को refund issue करने के बजाय रुकवाता है: run एक इंसान के तय करने के लिए pending refund के साथ वापस आता है। यह वह hook है जिस पर D5 keystone टँगता है। (यह floor हर refund को gate करता है ताकि keystone सरल रहे; production में आप सिर्फ़ एक threshold से ऊपर gate करते, Concept 15 का over-$100 pattern. वही wiring.) एक चीज़ factored रखें, क्योंकि D5 इस पर टिकता है: agent और इसके sandbox run-config को अलग टुकड़ों के रूप में बनाएँ, ताकि D5 agent को फिर से बना सके और resume पर sandbox फिर से supply कर सके।
Done when: agent एक sample email पर चलता है और एक छोटा reply print करता है, और Neon audit_log table में एक नई row है (इसे console में जाँचें, या अपने agent से Neon tools पर इसे वापस पढ़ने को कहें)। अगर email एक refund का वर्णन करता है, तो run refund tool पर रुकता है इसे issue करने के बजाय; वह रुकना ही पूरी बात है, और D5 इसे durable बनाता है।
इस Part के prompts एक frontier-class general agent (Claude Sonnet या Opus, एक GPT-5-class model, या Gemini 2.5 Pro) मानते हैं। आप जो Inngest architecture सीख रहे हैं (events, steps, memoization, flow control) वह SDK-level है और जो भी model आपके agent को चलाता है उसके साथ टिकती है। पर build experience मज़बूत instruction-following पर टिकता है, ख़ास तौर पर D5 keystone. एक कमज़ोर model पर, एक prompt पर एक से ज़्यादा बार iterate करने और file names spell out करने की उम्मीद रखें। architecture टूटी नहीं है; prompting को बस और scaffolding चाहिए।
D1: agent run को durable बनाएँ
आप कहाँ हैं: एक worker जो सिर्फ़ तब चलता है जब आप इसे call करें, run के बीच एक crash पर सब कुछ खोते हुए। यह Decision agent call को step.run में wrap करता है; अंत तक एक पूरा हुआ run dashboard में agent step को memoized दिखाता है।
nervous system यहाँ शुरू होता है: पूरे agent call को एक अकेले step.run में wrap करें ताकि यह durable और memoized हो। यह paste करें:
Wrap the agent run in an Inngest durable function so it survives crashes and retries transient failures. The whole agent call goes inside a single
step.runso it is memoized. Run it in local dev mode against the Inngest dev server, with a FastAPI host. Confirm a completed run shows the agent step memoized in the dashboard.
agent call महँगा हिस्सा है (model tokens, कई सेकंड)। step.run के अंदर इसका result memoized है, इसलिए जब एक बाद का step fail होता है और run retry होता है, तो agent दोबारा नहीं चलता। यही फ़र्क़ है एक ऐसे worker के बीच जो हर retry पर दोबारा भुगतान और दोबारा act करता है और एक ऐसे के बीच जो हर महँगी चीज़ एक बार करता है। agent को एक plain (non-streamed) run के साथ invoke रखें; D5 का durable resume इस पर बनता है।
यह दो processes के रूप में चलता है: FastAPI host, और इस पर pointed Inngest dev server. आपका agent दोनों को start करता है।
Done when: dashboard function को list करता है और एक पूरा हुआ run agent step दिखाता है। (आप इसे D2 में एक असली event से जगाते हैं; अभी के लिए, discoverable काफ़ी है।)
D2: इसे एक event पर trigger करें
आप कहाँ हैं: durable function मौजूद है, पर आप अब भी इसे हाथ से trigger करते हैं और कुछ record नहीं होता। यह Decision इसे एक असली event पर जगाता है और agent के हर तरफ़ एक audit row लिखता है।
यह पहली बार है जब opening की तस्वीर असल में चलती है। worker को call करने के बजाय, एक customer/email.received event आता है, engine इसे catch करता है, और engine आपके worker को चलाने के लिए call करता है। आप यह record करना भी शुरू करते हैं कि क्या हुआ: agent से ठीक पहले एक audit row, ठीक बाद एक। यह paste करें:
Make the worker wake on a
customer/email.receivedevent instead of being run by hand. Add an ingress audit step before the agent and a reply audit step after it. Send a test event and show me the run completing with both audit rows.
इसे locally test करने के लिए, event ख़ुद dev-server MCP के send_event से भेजें (email text और customer id लिए हुए एक customer/email.received event), कोई webhook नहीं चाहिए। production में आप इसके बजाय अपने email provider को एक Inngest webhook URL पर point करते, जो एक dashboard setting है, code नहीं।
Done when: एक test event एक run चलाता है जो क्रम में तीन steps (audit, agent, audit) के साथ पूरा होता है और Neon audit_log table में दो नई rows, agent से एक पहले और एक बाद।
दो steps क्यों, एक नहीं। हर audit write अपना step.run है, इसलिए हर एक अपने आप memoized है। अगर reply step fail होता है और run retry होता है, तो ingress row दो बार नहीं लिखी जाती और agent दो बार नहीं चलता, इसलिए audit trail retries के पार exactly-once रहता है (वह property जो D6 साबित करता है)।
D3: एक daily cron जो fan out करता है
आप कहाँ हैं: एक worker जिसे दुनिया एक बार में एक email जगाती है। यह Decision एक daily cron जोड़ता है जो प्रति eligible customer एक event fan out करता है; अंत तक हर एक को इसका अपना durable child run मिलता है।
scheduled काम जोड़ें: एक daily cron जो प्रति Pro और Enterprise customer एक health-check event fire करता है, हर event अपना durable run trigger करता है। यह paste करें:
Add a daily cron that fans out one
customer/health_check.requestedevent per Pro and Enterprise customer, each one idempotency-keyed so a re-delivered cron run never double-fires. Each child event triggers its own durable run that writes one audit row. Invoke the cron manually and show me one child run per eligible customer.
दो चीज़ें इस Decision को संभालती हैं। fan-out एक step के अंदर जाता है (step.send_event, एक नंगे client send नहीं), इसलिए cron का एक retry duplicates फिर से emit नहीं करता। और हर event को customer और cron tick से निकाली एक idempotency id मिलती है (कुछ ऐसा health-{customer}-{cron_run}): अगर वही tick दो बार deliver हो (एक redeploy, एक retry), तो duplicate गिर जाता है, इसलिए हर customer को उस दिन ठीक एक check मिलता है। cron को अपने agent से MCP के invoke_function के साथ invoke करें (09:00 का इंतज़ार न करें)। एक dev quirk: dev server crons को सिर्फ़ तभी fire करता है जब यह चल रहा हो; production इन्हें Inngest के हमेशा-चालू infrastructure पर चलाता है।
Done when: parent सेकंडों में पूरा होता है और dashboard प्रति eligible customer एक child run दिखाता है, standard-tier customers सही ढंग से skip किए हुए।
fan-out क्यों, एक loop नहीं। parent customers को ख़ुद process नहीं करता; यह N events भेजकर return करता है। हर child अपना run है, isolated, स्वतंत्र रूप से retryable, अपनी concurrency से capped. एक function के अंदर एक loop उन्हें couple कर देता: एक slow customer बाक़ी को रोक देता, और एक crash पूरा batch खो देता। fan-out ही वह तरीक़ा है जिससे एक scheduled wake-up N स्वतंत्र durable runs बन जाता है।
D4: flow control
पहले एक क़दम पीछे हटें: अब तक आपने एक worker assemble किया है, तीन तरीक़ों से पहुँचा हुआ, सब एक Neon store साझा करते हुए। यही वह चीज़ है जिस पर D4 caps लगाता है।
              INNGEST ENGINE   (routes events, runs functions, stores steps)
                       |
        ┌──────────────┼────────────────┐
        v              v                v
   an email        a daily cron     one run per customer
   arrives         fans out a       the cron emitted
   (D2: the        check per        (D3: each isolated,
    email worker)  customer (D3)     retryable on its own)
        └────────── all run in YOUR host ───────────┘
                       |
                 Neon Postgres  (customers + audit_log)
हर path के अंदर वही agent; सिर्फ़ यह अलग है कि दुनिया इस तक कैसे पहुँचती है। अब आप इस सबको load के नीचे स्वस्थ रखते हैं।
आप कहाँ हैं: एक worker जो हर email संभालता है पर एक burst के नीचे उन सबको एक साथ fire कर देता। यह Decision तीन flow-control policies जोड़ता है; अंत तक एक बीस-event वाला burst cap के नीचे queue होता है बिना किसी dropped या duplicated rows के।
जब पाँच सौ emails 9am पर land होती हैं, तो worker को एक साथ पाँच सौ model calls fire नहीं करने चाहिए: वह rate limit उड़ा देता है और noisy customer के पीछे सबको भूखा रखता है। एक global concurrency cap, एक per-customer cap, और एक throttle जोड़ें। यह paste करें:
Add flow control to the email handler: a global concurrency cap, a per-customer concurrency key so one noisy customer can't starve the rest, and a throttle to protect the OpenAI rate limit. Fire a burst of twenty events across five customers and show me they queue under the cap and all complete with no dropped or duplicated audit rows.
तीन knobs तीन काम करते हैं: एक global concurrency cap (एक साथ कितने runs execute होते हैं), एक per-customer concurrency key (ताकि एक noisy account ज़्यादा से ज़्यादा एक-दो slot ले और बाक़ी को कभी भूखा न रखे), और एक throttle (प्रति मिनट कितने runs शुरू होते हैं)। throttle को अपनी असली downstream limit से मिलाएँ: brief की OpenAI cap लगभग 30 प्रति मिनट है, इसलिए 30, न कि एक generic 100. (एक function ज़्यादा से ज़्यादा दो concurrency policies रखता है; global-plus-per-key जोड़ा आम आकार है।)
concurrency cap दो ceilings को बचाती है: model की rate limit और आपका Neon connection budget. आपके worker की एक अकेली चलती copy पहले से अपने database connections capped रखती है, क्योंकि इसमें हर run एक connection pool साझा करता है। concurrency cap ही है जो कुल को समझदार रखती है जब आप कई copies एक साथ चलाते हैं: 10 की limit पर दस copies यानी लगभग 100 connections, जिसे आप Neon के budget के ख़िलाफ़ size करते हैं। pool एक copy को bound करता है; cap fleet को bound करती है।
burst अपने agent से fire करें: send_event से पाँच customers के पार बीस customer/email.received events.
Done when: burst cap के नीचे queue होता है (running count global limit पर या उससे नीचे रहता है, और per-customer limit पर या उससे नीचे), हर run पूरा होता है, और audit trail में प्रति event ठीक एक row in और एक out है, बिना किसी dropped runs, बिना duplicates, और बिना किसी Neon connection errors के।
ये policy क्यों हैं, code क्यों नहीं। इसमें से कुछ भी आपके function body में नहीं रहता; यह configuration है जिसे runtime enforce करता है। caps के बिना, एक burst या तो एक downstream system को पिघला देता है या एक tenant को worker पर एकाधिकार करने देता है। वही fairness हाथ से लिखना एक queue साथ में एक scheduler साथ में एक rate limiter है, सैकड़ों lines. यहाँ यह तीन decorator arguments है।
D5: refunds पर एक durable human-approval gate (keystone)
आप कहाँ हैं: वापस D0 में आपका agent पहले से एक refund से पहले रुकता है, पर वह रुकना सिर्फ़ memory में रहता है। यह Decision इसे एक crash, एक deploy, या एक ऐसे reviewer से बचाता है जो घंटों लेता है, ताकि refund फिर भी ठीक एक बार fire हो जब वे आख़िरकार approve करें।
यहाँ किसी भी code से पहले पूरा idea है। आपका agent तय करता है कि एक refund उचित है, पर इसे तब तक issue नहीं करना जब तक एक इंसान हाँ न कहे। D0 का रुकना उस निर्णय को सिर्फ़ चलते process में रखता है, इसलिए एक crash या एक slow reviewer इसे खो देता है। D5 उस रुकने को एक durable wait में बदल देता है: function sleep में चला जाता है (कुछ ख़र्च न करते हुए) और सिर्फ़ तब जागता है जब निर्णय आता है।
  the agent decides a refund is warranted
        |
        v
  it PAUSES and asks a human   (it does NOT issue the refund yet)
        |
        v
  the function SLEEPS, waiting for the decision
  (minutes or hours; free while it waits; survives a crash,
   a deploy, a reviewer who goes to lunch)
        |
        v
  a human clicks Approve or Reject  ->  sends the decision event
        |
        v
  the function WAKES and finishes:
     approved         ->  issue the refund  (exactly once)
     rejected         ->  no refund; record it
     no answer in 4h  ->  no refund; record a timeout
यह paste करें:
Right now the agent pauses before a refund, but that pause is lost if the worker crashes or the reviewer takes hours. Make the pause survive that: when the agent stops for approval, save where it stopped, then wait up to four hours for a human's approve-or-reject for this customer. When the decision comes in, pick up exactly where the agent left off and finish, so the refund happens at most once per run. On a rejection, the reply to the customer must say the refund was declined, never that it was issued. Then prove it for me: drive a refund, show the run waiting, send an approval, and show exactly one refund row. Do it again with a rejection and show a blocked row and no refund.
वह पूरी तस्वीर code की एक line है। function wait_for_event पर रुकता है और जब निर्णय event दिखता है तब फिर शुरू होता है:
decision = await ctx.step.wait_for_event(
    "await-refund-approval",
    event="refund/approval.decided",          # what we are waiting for
    timeout=datetime.timedelta(hours=4),      # give up after 4 hours
    if_exp=f"async.data.customer_id == '{customer_id}'",  # only THIS customer's decision
)

# no decision came in 4 hours  ->  write a blocked-refund row and stop
# approved or rejected         ->  pick the agent back up and finish
वह एक call ही पूरा gate है। आप कोई queue, कोई polling loop, और हाथ से जाँचने को कोई "क्या यह अभी approved है?" flags नहीं लिखते। runtime आपके लिए रुकना पकड़े रहता है। आपका code बस कहता है कि किसका इंतज़ार करना है और जवाब के साथ क्या करना है। हालाँकि तीन चीज़ें ग़लत होना आसान हैं, और हर एक चुपचाप gate को तोड़ देती है:
if_expनिर्णय को इस customer से सहसंबंधित करता है, ताकि एक customer के लिए एक approval किसी दूसरे के run को कभी resume न करे।customer_idयहाँ काम करता है क्योंकि demo में प्रति customer ज़्यादा से ज़्यादा एक refund pending है; अगर किसी customer के एक बार में दो refunds उड़ान में हो सकते, तो एक uniquerequest_id(वह key जो Concepts 8 और 15 इस्तेमाल करते हैं) या run id पर सहसंबंधित करें, वरना एक approval ग़लत run को resume कर सकती है।- जब agent resume होता है, तो इसे वह state वापस सौंपें जो आपने save किया, एक बिल्कुल-नई बातचीत नहीं। अगर आप भूल जाएँ तो यहाँ क्या ग़लत होता है: एक fresh conversation याद नहीं रखती कि इसने पहले ही approval माँगी थी, इसलिए resumed agent refund पर फिर टकराता है, approval फिर माँगता है, और हमेशा के लिए loop करता है। agent को फिर से बनाएँ और इसका run-config फिर से supply करें, फिर इसे सिर्फ़ saved state खिलाएँ। (यही वजह है कि D0 ने agent build और इसके run-config को अलग factored रखा; यह वह एक detail है जो छूटने पर resume को fail करवा देता है।)
- state save करना चुपचाप आपके custom context को गिरा देता है, इसलिए इसे हाथ से वापस रखें। यह वह जाल है जो बिना किसी error के fail होता है। जब Agents SDK paused run को serialize करता है, तो यह एक custom run context (वह object जिससे आपका refund tool customer id और idempotency key पढ़ता है) को साथ नहीं ले जाता; यह एक ख़ाली save करता है और सिर्फ़ warn करता है। तो resume पर आपको वह context ख़ुद फिर से supply करना ही चाहिए,
RunState.from_string(agent, saved_state, context_override=your_context)के साथ। इसे छोड़ें और approved refund tool बिना context के चलता है: यह चुपचाप कोई refund row नहीं लिखता, जबकि run फिर भी success report करता है। आप देखते हैं "approved, पर कोईrefund_issuedrow नहीं" और इसे समझाने को कुछ नहीं। (openai-agents0.17.x पर verified; exact serialization rules उस तरह की beta detail हैं जो minor versions के बीच खिसकती है, इसलिए build करते वक़्त मौजूदा Agents SDK run-state docs के ख़िलाफ़ पुष्टि करें।)
इसे अपने agent से चलाएँ: एक refund-describing customer/email.received event भेजें, run को gate पर suspend होते देखें (dashboard इसे zero compute पर WAITING दिखाता है), फिर उस customer के लिए {"approved": true, ...} लिए एक refund/approval.decided send_event करें। इसे {"approved": false} के साथ फिर करें।
Done when: approval पर, suspended run resume होता है और Neon audit_log table में ठीक एक refund_issued row है। rejection पर, run resume होता है, audit में एक refund_blocked row और कोई refund_issued नहीं, और agent का reply इनकार समझाता है।
gate आपको एक अकेले run के भीतर exactly-once देता है, और boundary कहने लायक़ है। अगर वही refund दो runs से चलाया जाए (एक re-sent event, एक manual replay), तो यहाँ कुछ भी अपने आप एक दूसरे refund को नहीं रोकता; वह Concept 4 की stable idempotency key (या provider की अपनी key) का काम है, request पर keyed, ठीक वैसे जैसे वहाँ refund example ने दिखाया। minimal worker उस key को छोटा रहने के लिए छोड़ देता है, इसलिए "exactly once" को एक run के ख़िलाफ़ साबित करें, और जिस पल एक असली refund दो बार चलाया जा सकता हो उसी पल Concept 4 की key की ओर पहुँचें।
यह keystone क्यों है। हर दूसरी layer (senses, reflexes, balance) worker को अपने आप correct या स्वस्थ रखती है। यह वह है जहाँ एक high-stakes action पर human mind loop में फिर प्रवेश करता है, durably, जितना भी समय लगे उतने के लिए।
D6: साबित करें कि durability एक टूटे step से बचती है
आप कहाँ हैं: हर layer wrapped के साथ एक पूरा worker. यह Decision वह property साबित करता है जिसने इस सबको उचित ठहराया; अंत तक आपने एक टूटे run को अपने fail हो रहे step को कई बार retry करते देखा है जबकि इसका पूरा हुआ audit step ठीक एक बार चलता है, फिर काम को एक fresh run पर recover किया है।
साबित करने को आख़िरी property वही है जिसने इस सबको उचित ठहराया, Concept 7 का memoization mechanic. आपने इसे वहाँ समझा; अब इसे अपने worker में साबित करें। यह paste करें:
Deliberately break the agent step so it fails, fire an event, and show me Inngest retrying it while the earlier audit step stays memoized, so the failing run writes its ingress audit row exactly once across all the agent retries. Then fix the step and recover the work, and show me the recovery completing.
agent step को जानबूझकर तोड़ें, कुछ customer/email.received events fire करें, और हर run का trace पढ़ें। प्रमाण हर fail हो रहे run के अंदर है: ingress audit step एक पूरा हुआ attempt दिखाता है (इसकी row एक बार लिखी हुई) जबकि agent step कई attempts दिखाता है जैसे यह backoff के साथ retry होता है और फिर fail होता है, और reply step कभी नहीं चलता। audit step एक attempt पर जबकि agent step चढ़ता हुआ Concept 7 की memoization है, अब आपके अपने worker में: fail हो रहा run अपनी ingress row एक बार लिखता है, चाहे agent कितनी भी बार retry करे।
फिर break को revert करें और काम को ठीक किए code पर event फिर से fire करके recover करें (या, एक असली bad-deploy batch के लिए, dashboard Rerun button; दोनों ऊपर से एक fresh run शुरू करते हैं, Concept 14)। यहाँ वह हिस्सा है जो लोगों को चौंकाता है, और यह correct है, bug नहीं: recovery एक बिल्कुल-नया run है, इसलिए यह अपनी ख़ुद की ingress row लिखता है। एक break-then-recover के बाद, उस customer के पास जायज़ रूप से दो ingress rows हैं, एक fail हुए run से, एक recovery से। Memoization एक within-run guarantee है; यह कभी दो अलग runs में नहीं फैलती।
Done when: fail हुए run के trace में, ingress step एक attempt पर बैठा रहा और एक row लिखी जबकि agent step ने कई attempts जमा किए और fail हुआ (वह एक-attempt-N-retries-के-बावजूद ही memoization है), और recovery run फिर ठीक किए code पर पूरा होता है। diagnostic per-run है, per-customer नहीं: एक अकेले run का trace खोलें और पुष्टि करें कि ingress step एक attempt दिखाता है। दो अलग runs के पार दो ingress rows correct है; ingress step का एक run के भीतर दो बार चलना bug होगा (आम तौर पर एक non-unique step name)।
यह bright line क्यों है। एक worker जो एक bad deploy पर customer काम खो देता है वह बस एक agent है जिसे आप call करते हैं। एक worker जो वही bad deploy लेता है, ज़ोर से fail होता है, टूटे step को पहले से किए काम को दोबारा किए बिना retry करता है, और fix के बाद एक fresh run पर साफ़-सुथरे recover करता है, वह एक AI Worker है।
इस वही nervous system को minimal floor के बजाय अपने ख़ुद के SandboxAgent worker पर point करें; wrapping एक जैसी है। और यह step.wait_for_event approval उस course के optional Decision 10 की hand-rolled run-state table की जगह लेती है: जो durable gate आपने अभी बनाया वह ही persistence layer है, इसलिए आप table delete कर सकते हैं।
अभी क्या हुआ
आपने एक छोटा customer-support worker बनाया और इसे एक nervous system दिया, एक बार में एक layer. worker के internals D0 के बाद कभी नहीं बदले: वही SandboxAgent, वही दो tools, वही Neon Postgres audit trail. जो बदला वह इसके आसपास की हर चीज़ है। यह अब एक customer/email.received event पर और एक daily cron पर जागता है जो प्रति eligible customer fan out करता है, durably चलता है (step.run के अंदर agent call), flow control का सम्मान करता है (global और per-customer concurrency, एक throttle), refunds को एक durable human approval पर gate करता है (step.wait_for_event), और fail हुए runs को replay करके एक bad deploy से recover करता है, audit trail दिखाते हुए कि किसी भी अकेले run के भीतर हर step ठीक एक बार fire हुआ, चाहे वह run कितनी भी बार retry हुआ।
agent code वही है; इसकी पहुँच नहीं। आपने एक ऐसे agent से शुरू किया जिसे आप operate करते हैं, prompt करते हैं, देखते हैं, फिर prompt करते हैं। अब आपके पास एक worker है जो ख़ुद operate करता है: दुनिया इसे जगाती है, इसके reflexes इसे failures के पार ले जाते हैं, यह load के नीचे अपना balance पकड़ता है, और एक इंसान सिर्फ़ वहाँ कूदता है जहाँ दाँव माँगते हैं। यही वह रेखा है जो opening ने खींची, एक ऐसे agent के बीच जिसे आप operate करते हैं और एक ऐसे FTE के बीच जो ख़ुद operate करता है, और आपने अभी उसके पार build किया।
बाक़ी चिंताएँ हैं scale पर observability, multi-worker coordination, और वह manager layer जो तय करती है कि कौन से workers कौन सा traffic संभालते हैं। ये track में आगे आने वाले courses हैं। यह course production-ready execution की unit कवर करता है; workforce courses उन units को एक workforce में compose करते हैं।
Part 5: यह course कहाँ छोड़ता है
एक AI Worker का cost shape
दो cost surfaces मायने रखती हैं: infrastructure cost (Inngest, और जो भी store और compute पर आप worker चलाते हैं) और inference cost (model tokens)। Infrastructure load बढ़ने पर लगभग सपाट रहती है; inference linearly scale करती है। नीचे का method ही सीखने को है; कोई भी dollar figure जिस हफ़्ते ship होती है उसी हफ़्ते बासी हो जाती है, इसलिए numbers को illustrative मानें और budget में कोई number रखने से पहले मौजूदा pricing pages जाँचें।
Inngest pricing. Inngest प्रति execution charge करता है: हर function run, साथ ही हर step-level retry, एक execution गिना जाता है।
| Tier | Price | Executions / month | Concurrent steps | Notable |
|---|---|---|---|---|
| Hobby | $0 | 50,000 | 5 | 3 users, 50 realtime connections, no credit card |
| Pro | from $75 / month | 1,000,000 | 100+ | 1000+ realtime connections, 15+ users, 7-day trace retention |
| Enterprise | custom | custom | 500-50,000 | SAML / RBAC, 90-day trace retention, dedicated support |
ध्यान दें कि Inngest दो अलग चीज़ें meter करता है। एक है executions (ऊपर की table): एक function run साथ में हर step retry. दूसरा है events (जो आप भीतर भेजते हैं): प्रति दिन पहले 1-5M events शामिल हैं, और उसके ऊपर overage लगभग $0.000050 प्रति event से शुरू होता है और ज़्यादा volume पर घटता है। Pro पर, 1M-execution cap से आगे जाने पर प्रति अतिरिक्त 1M executions $50 जुड़ते हैं।
यहाँ मायने रखने वाली Hobby-tier सीमाएँ। 5-concurrent-step cap का मतलब है कि भले ही आप code में concurrency=Concurrency(limit=10) घोषित करें, platform की account-level cap आपको 5 पर पकड़ती है। आपका code production के लिए correct है; free tier पर observed concurrency 5 है। step.sleep और step.sleep_until भी tier-bounded हैं: free Hobby plan पर सात दिन तक, paid plans पर एक साल तक (Inngest usage limits)।
Inference cost हावी रहती है। एक typical customer-support run प्रति conversation कुछ हज़ार से दस हज़ार model tokens इस्तेमाल करता है। अपने per-token price को अपने tokens-per-email से अपने emails-per-day से गुणा करें और आपके पास वह line है जो मायने रखती है; ज़्यादातर workers के लिए यह बाक़ी सब पर हावी हो जाती है। यही वह है जो आप optimize करते हैं। बाक़ी सब एक rounding error है। दो सबसे ज़्यादा-value वाले levers: एक stable cached prompt prefix रखें (ताकि model दोहराए हिस्से को सस्ते cached rate पर bill करे, हर call पर full price नहीं), और आसान turns को एक सस्ते model पर route करें।
तीन Inngest-specific cost levers एक बार आप optimization zone में हों:
- Pure functions को
step.runमें wrap न करें। अगर एक function के कोई side effects नहीं, तो इसे durability की ज़रूरत नहीं; इसे wrap करना बिना किसी फ़ायदे के एक step-run charge जोड़ता है।step.runको I/O और side effects के लिए बचाएँ। - bulk paths के लिए
batch_eventsइस्तेमाल करें। एक 50-event batch एक function run है, 50 नहीं। step.sleepऔरstep.wait_for_eventके साथ सस्ते में suspend करें। Suspended functions suspension time के लिए bill नहीं करते। एक 3-दिन delayed-followup की cost एक 3-सेकंड वाले जितनी ही है।
Scale पर आकार: inference वह bill है जो traffic के साथ बढ़ती है; Inngest, आपका data store, और compute तुलनात्मक रूप से सपाट रहते हैं। यहाँ छपी किसी figure पर भरोसा करने के बजाय अपने असली volume पर वही गुणा चलाएँ।
Swap guide: nervous system invariant है, platform नहीं
यह course हर layer पर Inngest को नाम देता है। ऐसा इसलिए कि एक teaching example को ठोस जवाब चाहिए, "कोई भी orchestrator इस्तेमाल करो जो आपको पसंद हो" नहीं। पर architecture किसी भी compliant विकल्प के साथ काम करती है। पाँच swaps जिनकी course का design स्पष्ट रूप से उम्मीद करता है:
-
Trigger surface: Inngest events → Temporal signals, Restate handlers, AWS EventBridge + Lambda. हर platform के पास "यह code तब चलता है जब यह named चीज़ होती है" व्यक्त करने का एक तरीक़ा है। event names, payload shapes, और idempotency discipline सब transfer होते हैं। जो बदलता है: SDK की decorator syntax और dashboard.
-
Durable execution: Inngest
step.run→ Temporal activities, Restate handlers, custom Postgres-backed state machines. हर एक आपको "इस side-effecting call को memoize करो, transient failure पर retry करो, crash के बाद resume करो" semantics देता है। Temporal सबसे क़रीबी analog और पुराना, ज़्यादा enterprise-tested विकल्प है। Restate सबसे नया है और इसका एक ज़्यादा functional-programming स्वाद है। Custom state machines वह है जो teams तब लिखती हैं जब वे एक managed platform नहीं अपना सकतीं; आम तौर पर 1,000-10,000 lines का code जो Inngest जो मुफ़्त देता है उसका ~70% फिर से बनाता है। -
HITL primitive:
step.wait_for_event→ Temporal काawait Workflow.execute_activity(approval_signal), Restate के awakeables, custom Redis/Postgres approval queues. pattern वही है: function suspend होता है, एक external signal इसे resume करता है, audit निर्णय पकड़ता है। Inngest की अभिव्यक्ति लिखने में सबसे साफ़ है; Temporal की ज़्यादा verbose पर बड़े scale पर battle-tested है। -
Cron scheduling: Inngest cron triggers → Kubernetes CronJobs + queue, GitHub Actions schedules, AWS EventBridge schedules. Cron triggers commodity हैं। Inngest का फ़ायदा cron होना नहीं है; यह है कि cron-triggered functions को event-triggered वालों जैसी ही durability/replay/flow-control मिलती है, अपने आप। दूसरे platforms आपसे वह ख़ुद wire करवाते हैं।
-
Flow control: Inngest concurrency + throttle → Temporal task queues with worker concurrency, Redis-backed rate limiters, AWS SQS message visibility timeouts. दूसरे platforms यह कर सकते हैं; Inngest इसे उस configuration density के साथ करता है जो हमने देखी (एक decorator argument)।
Production scale पर open companion के रूप में Dapr. नाम देने लायक़ एक ज़्यादा महत्वाकांक्षी प्रतिस्थापन: Dapr Agents production scale पर Inngest के structural companion के रूप में, जिस तरह OpenCode Claude Code का है। Dapr Agents 23 March 2026 को CNCF governance के तहत v1.0 GA पर पहुँचा (CNCF announcement, Dapr Agents core concepts)। DurableAgent production-ready class है; पुराना Agent class deprecated है। Dapr तब चुनें जब Kubernetes-native deployment और multi-language SDKs Inngest के local dev experience से ज़्यादा मायने रखते हों। Inngest बेहतर learning tool है (dashboard mental model को दृश्य बनाता है); Dapr बेहतर scale tool है जब आप Inngest की tier ceilings छू चुके हों या K8s-native multi-language deployment चाहिए हो।
Inngest open source भी है (github.com/inngest/inngest; 1.0 release ने September 2024 में self-hosting support जोड़ा) और Helm + KEDA के ज़रिए self-hostable है। Scale पर मायने रखने वाले axes हैं governance, support, और maturity: Inngest एक अकेले vendor द्वारा governed है जिसकी self-hosting story नई है; Dapr CNCF-governed है जिसका production track record लंबा है।
| इस course का concept | Inngest primitive | Dapr production analogue | Teaching note |
|---|---|---|---|
| Scheduled work | TriggerCron | Cron input binding / Dapr Scheduler | वही idea: समय worker को जगाता है। Dapr को आम तौर पर component configuration चाहिए। |
| Webhook/event ingress | Inngest webhook endpoint → event | HTTP endpoint, input bindings, or pub/sub ingress | Inngest ज़्यादा plumbing छिपाता है; Dapr infrastructure control देता है। |
| Internal events | inngest_client.send() | Dapr pub/sub | वही event-driven mental model; Dapr में broker pluggable है। |
| Fan-out | One event triggers many functions | One topic/event consumed by many services | वही architecture; Dapr broker/topic/subscriber composition इस्तेमाल करता है। |
| Durable steps | step.run() + memoization | Dapr Workflows + activities | समान production उद्देश्य, अलग developer model. |
| Waiting without compute | step.sleep() | Durable workflow timers | दोनों इंतज़ार के दौरान एक process खुला रखने से बचते हैं। |
| Human approval gate | step.wait_for_event() | Workflow external events/signals, pub/sub, actors | Inngest अभिव्यक्ति सरल है; Dapr ज़्यादा composable है। |
| Retries | Function/step retries | Workflow/activity retries + resiliency policies | Dapr resiliency को workflow behavior के साथ-साथ एक runtime policy भी बनाता है। |
| Dead-letter / failed runs | Inngest dashboard failed runs + replay | Broker DLQ + workflow status/restart/manual tooling | Inngest यहाँ ज़्यादा turnkey है; Dapr ज़्यादा infrastructure-native है। |
| Flow control | Concurrency, throttling, priority, batching | Kubernetes scaling, app concurrency, broker controls, resiliency policies, bulk pub/sub | Dapr कर सकता है, पर यह एक decorator argument नहीं है। Inngest सघन है। |
| Stateful coordination | wait_for_event, event keys, step state | Actors + state store + workflows | Dapr Actors long-lived identity/stateful coordination के लिए मज़बूत हैं। |
| Agent runtime | Your agent inside Inngest function | DurableAgent / Dapr Agents v1.0 GA | Dapr Agents स्पष्ट रूप से agent को workflow-backed और resumable बनाता है। |
यह table एक translation guide है, समान APIs का दावा नहीं। Inngest production pattern को एक compact developer experience के साथ सिखाता है: triggers, steps, waits, replay, और flow control एक product surface में। Dapr वही production architecture distributed-systems building blocks के ज़रिए लागू करता है: bindings, pub/sub, workflows, actors, state, resiliency, और Kubernetes-native operations. concepts सीधे transfer होते हैं; implementation style बदलता है। May 2026 तक Dapr के bindings overview और Dapr Agents core concepts के ख़िलाफ़ verified.
Production scale पर Dapr की ओर पहुँचने के तीन कारण:
- CNCF-governed, charter से vendor-neutral: कोई अकेला vendor platform या उस पर आपकी निर्भरता को नियंत्रित नहीं करता।
- First-class Python के साथ polyglot. Dapr Agents Python-first है; वही agent code JavaScript, Go, .NET, Java, या PHP में लिखी services के साथ चल सकता है बिना किसी के दूसरा framework सीखे।
- डिज़ाइन से Kubernetes पर horizontally scalable. अपने ख़ुद के cluster में, एक managed offering (Diagrid Catalyst) में, या locally
dapr initके ज़रिए चलाएँ। scaling story हर environment में वही architecture है।
ईमानदार चेतावनी: Dapr एक getting-started platform नहीं है। इसे production में चलाने का मतलब है Kubernetes, state store, pub/sub broker, placement service, observability, YAML components, sidecars. यह बहुत सारा operational surface है जब आपका goal अब भी patterns सीखना है, यही वजह है कि यह course Inngest पर शुरू होता है: एक command, और dashboard प्रकट होता है। Dapr की ओर तब पहुँचें जब patterns बैठ चुके हों और सवाल आपके नियंत्रित infrastructure पर organizational scale पर चलाने की ओर खिसके।
पहले Inngest और OpenAI Agents SDK पर concepts सीखें: तेज़ feedback loop, न्यूनतम infrastructure, patterns पर focus. जब आप उस scale तक पहुँचें जहाँ Kubernetes governance, polyglot teams, या vendor-neutrality अनिवार्य बन जाएँ, तो वही architectural patterns ऊपर की translation table को अपनी key के रूप में लेकर Dapr पर उठ जाते हैं। patterns transfer होते हैं; substrate बदलता है; जो आपने इस course में सीखा वह load-bearing knowledge बना रहता है।
यह course (अभी) क्या कवर नहीं करता
जो worker आपने बनाया वह thesis के तय किए Seven Invariants में से चार को पूरा करता है। ख़ास तौर पर: यह एक engine पर चलता है (Invariant 4, SandboxAgent), एक system of record के ख़िलाफ़ (Invariant 5, audit trail), दुनिया के इसे call करने की क्षमता के साथ (Invariant 7, जो triggers आपने जोड़े), और एक gated निर्णय पर इंसान को principal के रूप में (Invariant 1, आंशिक: runtime mechanism यहाँ है, व्यापक architectural pattern बाद में)। बाक़ी तीन Invariants, और वह व्यापक architecture जो workers में से एक workforce बनाती है, बाद के courses हैं। हर एक एक bullet:
- Invariant 2: हर इंसान को एक delegate चाहिए। edge पर एक personal agent जो आपका context रखता है, आपके निर्णय का प्रतिनिधित्व करता है, और workforce को काम सौंपता है। thesis OpenClaw को मौजूदा रूप के रूप में नाम देती है।
- Invariant 3: workforce को एक manager चाहिए। एक orchestrator जो काम assign करता है, budgets enforce करता है, execution audit करता है, hiring को एक callable capability के रूप में expose करता है। thesis Paperclip को नाम देती है।
- Invariant 6: workforce policy के तहत expandable है। एक meta-layer जहाँ एक authorized agent एक prompt generate करता है, एक runtime provision करता है, और एक नया worker register करता है, बिना किसी इंसान को जगाए। Claude Managed Agents एक रूप है।
एक अकेला worker events पर जागता, durably चलता, और इंसानों पर gating करता वह इस course के सिखाए architecture की सबसे छोटी unit है। आगे के courses उस worker को एक workforce में बढ़ाते हैं: एक manager द्वारा coordinated कई workers, माँग पर expandable, triggers से जगाए, spec से governed. वही OpenAI Agents SDK foundation, वही audit habit, वही Inngest nervous system. architecture invariant है।
इसमें असल में अच्छा कैसे बनें
इस crash course को पढ़ना आपको AI Workers बनाने में अच्छा नहीं बनाता। इसका इस्तेमाल करना बनाता है। आप worker बनाकर शुरू करते हैं, इसे wrap करते वक़्त घर्षण महसूस करते हैं, और घर्षण के हर टुकड़े को यह सिखाने देते हैं कि यह किस concept से जुड़ा है।
इस course के लिए mapping:
- "मेरा function event के आने पर fire क्यों नहीं होता?" → event name typo या namespace mismatch (Concept 3)। अपने
TriggerEventमें event name string कीinngest_client.sendवाली से byte-for-byte तुलना करें। - "मेरा function वही logical event के लिए दो बार fire क्यों हुआ?" → missing idempotency key (Concept 4)। event में एक deterministic seed के साथ एक
id=जोड़ें। - "मेरे function ने एक deploy के बाद काम क्यों 'खो दिया'?" →
step.runके बाहर का code काम कर रहा (Concept 7)। I/O और side effects को named steps में wrap करें। - "customer दो बार charge क्यों हुआ?" → Stripe call
step.runके बाहर था, या step name unique नहीं था (Concepts 6 और 7)। call को एक namedstep.runमें ले जाएँ; step name को function के भीतर globally unique बनाएँ। - "OpenAI 9am peak पर 429 errors क्यों लौटाता है?" → missing throttle (Concept 11)।
throttle=Throttle(limit=N, period=timedelta(minutes=1))जोड़ें। - "एक customer के bursts दूसरे customers को क्यों भूखा रखते हैं?" → missing per-key concurrency (Concept 12)। एक दूसरा
Concurrency(limit=2, key="event.data.customer_id")जोड़ें। - "मेरा HITL gate weekend में चुपचाप क्यों fire हुआ?" → missing timeout handler जो audit में लिखता है (Concept 15)।
approval is Noneपर branch करें और audit row स्पष्ट रूप से लिखें।
Architecture को एक बार में एक टुकड़ा बनाएँ। यही वजह है कि Part 4 सात prompts है, एक नहीं। worker बनाएँ (D0)। agent को step.run में wrap करें (D1) और देखें क्या बदलता है जब आप जानबूझकर run के बीच crash करते हैं। इसे एक event पर जगाएँ (D2)। cron fan-out जोड़ें (D3), फिर flow control (D4) एक बार जब आप असल में एक rate limit छू चुके हों, फिर durable approval gate (D5) जब एक high-stakes action को असल में एक इंसान चाहिए। हर layer अपनी ख़ुद की सीख है। एक बड़े rewrite में मिलाकर, वे एक दीवार हैं।
यह course जो अनुशासन सिखाता है (events पर जागो, durably चलो, इंसानों पर gate करो, bugs पर replay करो) वह architectural invariant है। जो भी platform इसे लागू करे, वह four-property contract ही है जिसके लिए आप असल में प्रतिबद्ध हो रहे हैं। यह Lindy bet है: आप उन हिस्सों पर बनाते हैं जो टिके हैं, plain functions, SQL, एक typed language, एक event bus, इस season के wrapper पर नहीं। product प्रतिस्थापन योग्य है; अनुशासन नहीं।
Quick reference
narrative course और during-build reference के बीच एक separator. नीचे के sections खोजने के लिए हैं, ऊपर से नीचे पढ़ने के लिए नहीं। हर concept का एक-line gist intro की collapsed cheat sheet में है; यह section during-build diagnostic, दो decision trees, और file layout है।
Decision tree: trigger surface चुनें
जब दुनिया में एक नई चीज़ होती है, तो wake-up कहाँ से आता है?
- एक external system ने हमें एक HTTP request भेजी। → Webhook trigger. source को Inngest dashboard में configure करें; payload को transform के ज़रिए reshape करें; परिणामी event को consume करें।
- एक schedule कहता है कि समय हो गया। → Cron trigger.
TriggerCron(cron="..."). UTC इस्तेमाल करें; production crons आपकी service के mid-deploy होने पर भी fire होते हैं। - एक और Inngest function ने अपने run के दौरान एक event emit किया। → Event trigger.
TriggerEvent(event="ns/name.subtype"). एक या कई functions को एक ही name पर subscribe करें। - एक interactive user एक तत्काल response का इंतज़ार कर रहा है। → कोई Inngest trigger नहीं। request/response को अपने सामान्य web endpoint में रखें; अगर response में भारी काम शामिल हो, तो request के अंदर से एक event fire करें और तुरंत return करें, Inngest को काम asynchronously संभालने दें।
Decision tree: step primitive चुनें
मान लें एक function चल रहा है और आपको कुछ करना है, तो आप किस step.* call की ओर पहुँचते हैं?
- एक side-effecting call (API, DB, file write, agent invocation)। →
ctx.step.run("name", fn, ...). default. success पर memoized, transient failure पर retried. - एक serverless platform पर एक long-running OpenAI call जो in-flight time के लिए bill करता है। →
ctx.step.ai.infer(...). inference को Inngest के infrastructure को offload करता है ताकि आपका function process deallocate हो सके। - जारी रखने से पहले एक fixed duration इंतज़ार करें। →
ctx.step.sleep("name", timedelta(...)). durable; इंतज़ार के दौरान zero compute (free plan पर सात दिन तक, paid पर एक साल)। - एक external event का इंतज़ार करें (human approval, sibling-function completion)। →
ctx.step.wait_for_event("name", event="...", timeout=..., if_exp=...). durable; event के आने पर resume होता है या timeout परNoneलौटाता है। - Pure deterministic computation (एक string format करना, एक date compute करना)। → बस code लिखें। कोई
step.runनहीं चाहिए; कोई charge नहीं।
File-location quick-ref
एक flat project, चार files, कोई src/ nesting नहीं:
ai-agent-nervous-system/
├── .claude/
│   └── skills/                  # the four Inngest skills (installed in the Quick Win)
│       ├── inngest-setup/SKILL.md
│       ├── inngest-events/SKILL.md
│       ├── inngest-steps/SKILL.md
│       └── inngest-durable-functions/SKILL.md
├── db.py                        # Neon Postgres access: pooled asyncpg, load_customers, record (closed-vocabulary audit) (D0)
├── worker.py                    # the worker: SandboxAgent + 2 tools (D0)
├── inngest_app.py               # the nervous system: Inngest functions + FastAPI host (D1-D5)
├── .env                         # OPENAI_API_KEY, DATABASE_URL, INNGEST_DEV=1
└── AGENTS.md                    # the base's rules file (read on open)
ये filenames एक समझदार layout हैं, एक आवश्यकता नहीं; आपका agent इसके बजाय agent.py और main.py पर पहुँच सकता है, और वह ठीक है। जो मायने रखता है वह boundary है, names नहीं: worker code कभी inngest import नहीं करता, और ठीक एक file nervous system को ऊपर wire करती है। उस layout के साथ, customers और audit trail आपके Neon database में रहते हैं (Quick Win में provisioned, D0 में seeded), local files में नहीं; worker files D0 के बाद कभी नहीं बदलतीं, और हर nervous-system layer (D1 से D5) उस एक Inngest file को edit करती है।
Diagnostic table, symptom → root cause → concept
| Symptom | First suspect | Concept to re-read |
|---|---|---|
| Function never fires when expected event arrives | Event name typo, namespace mismatch | C3 (webhooks), C5 (fan-out) |
| Function fires twice for the same logical event | Missing idempotency key | C4 (idempotency) |
| Function "lost work" after deploy | Code outside step.run doing the work | C7 (memoization) |
| Cron schedule did not fire over a deploy | Local dev server only, production runs on Inngest infra | C2 (cron) |
| Customer charged twice for one refund | Stripe call outside step.run, or step name not unique | C6 (step.run), C7 (memoization) |
| OpenAI rate-limit errors during 9am peak | Missing throttle | C11 (concurrency + throttle) |
| One customer's bursts starve other customers | Missing per-key concurrency | C12 (priority + fairness) |
| Function suspended forever, never resumed | Event name in wait_for_event does not match the event being sent | C8 (wait_for_event), C15 (HITL) |
| HITL timeout fired silently over the weekend | Missing timeout handler that writes to audit | D5 (durable refund gate), C15 (HITL) |
| Yesterday's failed runs disappeared from dashboard | Runs persist until manually replayed or after retention window | C14 (replay) |
| Replay re-charged customers | Replay is a fresh run that re-executes every step; the charge had no idempotency key | C4 (idempotency), C14 (replay is a fresh run) |
| Function trace does not show OpenAI prompt | Step trace shows function inputs/outputs but no LLM-specific prompt/token telemetry | C10 (Python uses step.run; LLM-specific telemetry needs your own OpenAI client tracing; step.ai.wrap's prompt-level traces are TypeScript-only) |
Appendix: optional lineage और एक Inngest cheat sheet
Part 4 करने के लिए आपको Digital FTE course की ज़रूरत नहीं: D0 worker को scratch से बनाता है। context के लिए दो छोटे नोट।
A.1: अगर आप Digital FTE course से आ रहे हैं
From Agent to Digital FTE course एक ज़्यादा समृद्ध customer-support worker बनाता है: portable Skills, एक Postgres system of record, और एक custom MCP server. अगर आपने इसे किया, तो आपके पास पहले से disk पर एक SandboxAgent worker बैठा है, और आप D0 का minimal floor skip कर सकते हैं: nervous system (D1 आगे) को अपने worker पर point करें। wrapping एक जैसी है। एक bonus: जो durable refund gate आप D5 में बनाते हैं (step.wait_for_event) वह उस course के optional Decision 10 की hand-rolled run-state table की जगह लेता है, इसलिए आप इसे delete कर सकते हैं। अगर आपने वह course नहीं किया, तो इस सबको अनदेखा करें; D0 आपको वह सब देता है जो आपको चाहिए।
A.2: इस course के इस्तेमाल किए Inngest-specific essentials
अगर नीचे कुछ अनजाना लगे, तो Part 4 में गोता लगाने से पहले संबंधित doc page पर सरसरी नज़र डालें।
- Inngest client instantiation. प्रति Python project एक अकेला
inngest.Inngest(app_id=...)instance, एक module से export किया हुआ और जहाँ भी आप functions decorate करते हैं वहाँ import किया हुआ। Python quick start। - Function decoration.
@inngest_client.create_function(fn_id=..., trigger=...). triggerTriggerEvent,TriggerCron, या multi-trigger functions के लिए दोनों की एक list हो सकती है। ctx.step.run,ctx.step.sleep,ctx.step.wait_for_event,ctx.step.ai.infer. चार step primitives जो Python में आप जो लिखेंगे उसका 90% बनाते हैं। (TypeScript के पास एक पाँचवाँ है,step.ai.wrap, LLM-specific tracing के लिए; Python projects AI calls के लिएstep.runइस्तेमाल करते हैं।)inngest_client.send(events=[...]). अपने code में कहीं से भी events emit करें (functions के अंदर, agent tools के अंदर, CLI scripts से)। idempotency के लिए एकid=इस्तेमाल करें।- Dev server startup.
npx inngest-cli@latest dev.:8288पर चलता है। dashboardhttp://127.0.0.1:8288पर। MCPhttp://127.0.0.1:8288/mcpपर। अगर:8288लिया हुआ है तो यह8289+इस्तेमाल करता है; फिर host परINNGEST_BASE_URL=http://127.0.0.1:<port>set करें ताकि यह चले, सिर्फ़ MCP URL नहीं।
A.3: दो shifts जो असल में मुश्किल हैं
इस course के बारे में सबसे मुश्किल चीज़ Inngest की syntax नहीं है। यह है request से event का mental shift (Concept 1) और in-process execution से durable execution का (Concept 6)। एक बार वे दोनों बैठ जाएँ तो syntax mechanical है। अगर कुछ और इससे ज़्यादा मुश्किल लगे जितना होना चाहिए, तो पहले Concepts 1 और 6 दोबारा पढ़ें।
Flashcards Study Aid
Knowledge Check
जिन ideas से आप अभी गुज़रे उन पर एक त्वरित gated self-check.