Open Source LLMs: Your Laptop, Your Server/Cluster, the Cloud
One model family, three ways to run it. On your laptop with Ollama. On a serious machine with vLLM, serving fifty people at once. And in the cloud through OpenRouter, where the biggest open models live. Same tools, same idea, three scales.
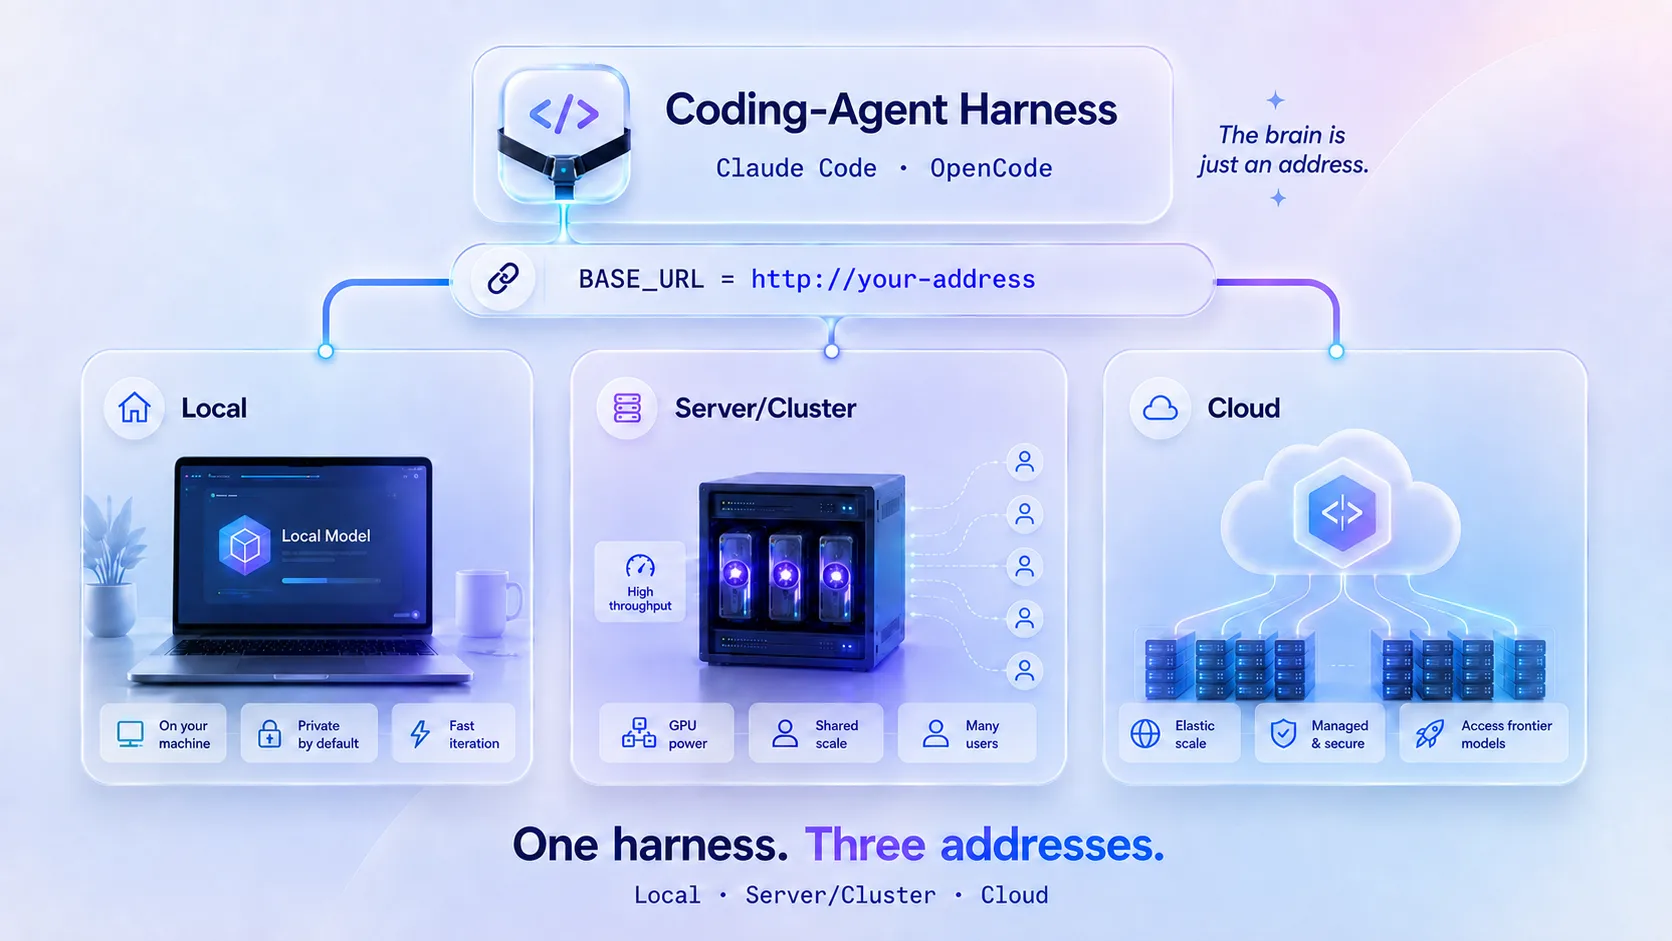
You have used AI before. You typed into a box, and it answered. That AI did not live on your computer. It lived on big machines far away, owned by a company. You were renting a small slice of its time.
This course teaches you the full range of choices you actually have. Open source models changed the game: the model weights are free to download, and anyone can run them. But "anyone can run them" hides a real question: run them where? On your laptop? On a rented machine with a serious graphics card? Or on someone else's cluster, because the model is too big for anything you could ever own?
Those are the three tiers of this course, and each one gets its own part:
| Part | Tier | Serving layer | Scale | You will… |
|---|---|---|---|---|
| 1 | Local | Ollama | One person, one laptop | Run a model on your own machine and point a coding agent at it |
| 2 | Server/Cluster | vLLM | Many users, one machine or your own cluster | Serve the same Qwen3 8B to 50 concurrent requests and measure the change |
| 3 | Cloud | OpenRouter (gateway) | Frontier models almost nobody can self-host | Drive Kimi K3 and DeepSeek V4 Pro from the same coding agents |
Three tiers, three addresses, three bills. Laptop: Ollama at http://localhost:11434, costs nothing. Server: vLLM at http://localhost:8000, costs the GPU rental, very roughly $0.50 to $2 per hour for a 24 GB card depending on provider. Cloud: OpenRouter at https://openrouter.ai/api, costs per token, from about $0.44 per million (DeepSeek V4 Pro input) to $15 per million (Kimi K3 output) as this page is written. Everything below teaches you when each address is the right one. Prices and rentals move, so check them live before budgeting.
One picture holds for the whole course. Any AI tool has two parts. One part sits on your machine and does the hands-on work: the harness. The other part is the brain that does the thinking: the model. The harness reaches the brain at an address. In Part 1 that address is your own laptop. In Part 2 it is a machine you control with a real graphics card. In Part 3 it is a cloud service standing in front of models with trillions of parameters. The harness never changes. Only the address does. Learn that once, and all three tiers become the same move.
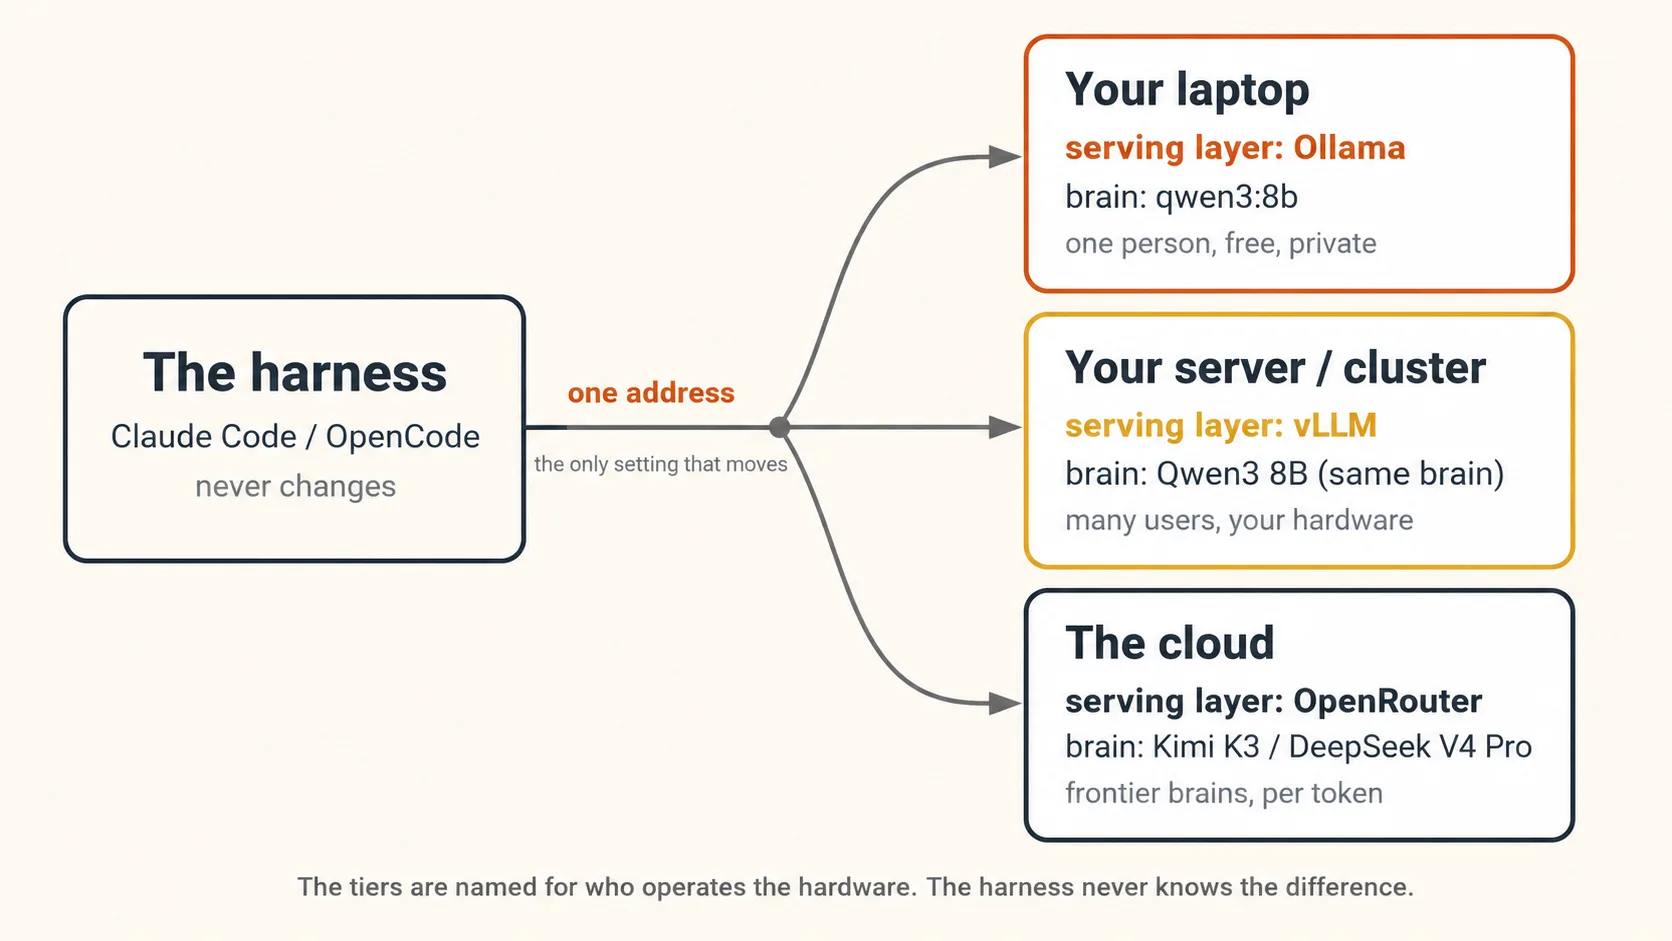
This is your first stop in General Agents, the section where you pick up the AI you will drive for the rest of the book. You start by owning the brain, because it makes the section's core idea real from day one: an agent is a harness plus a swappable brain. From here you go on to drive that agent well (Agentic Coding), direct it with a written spec (Spec-Driven Development), and hand it a loop that runs without you (Loop Engineering).
Now the honest promise, and the honest limit, in plain words. Part 1 is real, free, and private on any machine, though heavy coding work runs very slowly on a plain laptop. That slowness is not a bug in this course. Learning to see it, and know why, is a main lesson of Part 1. Part 2 needs a machine with an NVIDIA graphics card, which most students rent by the hour for a few dollars. Part 3 needs an OpenRouter account with a few dollars of credit. Each part stands on its own. Do Part 1 today and come back for the rest whenever you are ready.
- Part 1, chatting with a local model: nothing but the free Ollama install. Anyone can do this.
- Part 1, the coding half, and Parts 2 and 3: a coding agent (Claude Code or OpenCode) already installed. Do not have one yet? The Agentic Coding crash course sets one up. You can do that course before or after this one.
- Part 2 only: access to a Linux machine with an NVIDIA GPU: roughly 24 GB of GPU memory for the standard build, or about 16 GB for the compressed build on compatible hardware (Part 2 shows both paths). Renting one from a cloud GPU provider for an hour or two is normal and cheap.
- Part 3 only: a free OpenRouter account and a few dollars of credit.
From the first step on, you can follow along on your own machine. The commands on this page are Bash, for macOS, Linux, and Windows through WSL. If you use PowerShell instead, the live docs for each tool show the matching form. For any coding-agent step, work inside a small, throwaway git folder, so an agent cannot touch anything you care about. You learn more from a limit you hit yourself than from three you only read about.
Key words in plain English
Read this once now. Come back whenever a word feels unclear. Every concept below teaches these again in context, so you do not need to memorize them here.
| Term | Plain-English meaning |
|---|---|
| Model / brain | The AI that does the actual thinking. You send it words, it sends words back. |
| Ollama | A free program that downloads an AI model and runs it on your machine. Built for one person. |
| vLLM | A free program that serves an AI model to many users at once. Built for a shared machine. |
| Serving layer | The software that loads a model and answers requests. Ollama and vLLM are both serving layers. |
| OpenRouter | A cloud gateway that puts hundreds of models behind one address. The hosts behind it run the serving layers. |
| Harness / tool | The program around the brain. It reads your files, runs commands, shows you changes. Claude Code is one. |
| Coding agent | A harness that writes and edits code for you: Claude Code or OpenCode. |
localhost | An address that means "this same computer." Your machine talking to itself, so no internet is needed. |
| Address / base URL | Where the tool sends its work. Point it at localhost and the work stays on your machine. |
| Tool call | A small, exact message the model sends to say "edit this file" or "run this command." Data, not a sentence. |
| Token | The unit a model actually reads and bills by: a piece of a word, roughly three to four letters of English. |
| Context window | How many tokens the model can hold at once. Too small, and it forgets the start of the task. |
num_ctx | The Ollama setting for the context window. Its default depends on your machine and is often too small for coding agents. |
| The two walls | The two things a local coding setup must clear: a strong enough model, and fast enough hardware. |
| Concurrency | How many requests arrive at the same time. One user is concurrency 1. A classroom is concurrency 50. |
| Throughput | Total useful work per second, measured here in tokens per second across all users combined. |
| Continuous batching | vLLM's trick: it feeds many requests through the GPU together, and slots new ones in mid-stream. |
| Open-weight model | A model whose trained weights can be downloaded. Not always "open source" in the formal sense: the training data and some terms may stay closed. |
| Frontier open model | An open-weight model at the top of the charts, so large that only clusters can serve it. Kimi K3 is one. |
| API key | A secret string that proves an account is yours. In the cloud tier, it is also how you get billed. |
Two layers run through this course, and they age very differently. Remember the first. Look up the second.
- The lasting layer. A model can live at three scales: your machine, a machine you control, or a cluster you rent. Your tool reaches it at an address you can change. A serving layer built for one user queues under load, and one built for many does not. And which tier is right comes down to privacy, hardware, and cost, in ways you will feel and then name. This stays true long after every command below has changed.
- The mechanical layer. Every version number, flag, model name, price, and setting. Ollama, vLLM, OpenRouter, and the coding tools all move fast. So treat each command here as a pointer to the live docs, not a fact to memorize. Where this course and the current docs disagree, the docs are right.
What this course covers
| Concept | Part | You will… |
|---|---|---|
| 1 | 1 | Get a model running on your own machine and chat with it, in about two minutes |
| 2 | 1 | Learn the one idea that makes it all work: the brain is just an address |
| 3 | 1 | Make the model do things: point a coding agent at it with one command |
| 4 | 1 | Give it a real coding task, and feel where a local brain holds or breaks |
| 5 | 1 | Understand the two walls: a strong enough model, and fast enough hardware |
| 6 | 1 | Look inside a real tool call, the thing a weak model gets wrong |
| 7 | 1 | Decide when owning the brain is worth it |
| 8 | 2 | See why Ollama is a kitchen for one: fire 50 requests at it and watch it queue |
| 9 | 2 | Serve the same Qwen3 8B with vLLM, and learn what continuous batching means |
| 10 | 2 | Run the same 50 requests against vLLM, plot both curves, and read the difference |
| 11 | 2 | Wire Claude Code and OpenCode to your vLLM server, no translator needed |
| 12 | 2 | Decide when the server tier is worth it |
| 13 | 3 | Meet the frontier open models almost nobody can self-host: Kimi K3, DeepSeek V4 Pro |
| 14 | 3 | Drive both from Claude Code and OpenCode through OpenRouter |
| 15 | 3 | Choose between performance and price, and pick the right tier for any job |
| 16 | 3 | Put one router in front of all three tiers, and turn your tier policy into config |
| A | Appendix | Turn your Part 2 server into a shared service with keys, budgets, and one menu |
📚 Teaching Aid
View Full Presentation — Open Source LLMs: Your Laptop, Your Server/Cluster, the Cloud
Part 1: The local tier. A model on your own laptop (Ollama)
The serving layer for this part is Ollama, and the scale is one person, one machine. Everything here is free and private.
1. A brain on your own machine: start here
The fastest way to understand this is to do it once. So before any theory, let us get a model running on your machine and talk to it. You do not need to write code for this part. Anyone can do it.
The free program that does this is called Ollama. It downloads an AI model and runs it on your computer. Pick the way that matches your machine.
- The app (Mac or Windows)
- The terminal (any computer, incl. Linux)
- Go to ollama.com/download and install Ollama the normal way. This includes a small chat app.
- Open the Ollama app. It sits in your menu bar (Mac) or system tray (Windows).
- Pick a model from the selector at the top. Start with a small one, like
gemma3:4b. The first time you pick it, it downloads (a few gigabytes), which takes a few minutes. - Type a question in the box and press enter.
That is it. The answer came from a model running on your own machine.
Open a terminal and run one command. It downloads the model the first time, then drops you into a chat:
ollama run gemma3:4b
Type your question and press enter. To leave the chat, type /bye.
If you do not have Ollama yet, install it first from ollama.com/download, then run the command above.
Which model should you pick? Start small. A small model answers fast and fits a modest machine. You can try bigger ones later.
| Model | Rough download | Comfortable RAM | Good for |
|---|---|---|---|
gemma3:1b | under 1 GB | about 4 GB | tiny and quick, but weak answers |
llama3.2:3b | about 2 GB | about 8 GB | a solid, small first chat |
gemma3:4b | about 3 GB | about 8 GB | a strong small model, a good default |
qwen3:8b | about 5 GB | about 16 GB | better answers, needs more memory |
One model in that table matters beyond this part: qwen3:8b. It is the model this course holds constant across Part 1 and Part 2, so that when things change, you know exactly why. If your machine can fit it, pull it now. If not, use a smaller model here and rent the hardware in Part 2.
The exact names and sizes above change as these models get updated. Before you rely on any one tag, check it on ollama.com/library. That habit, checking the live source, is the whole "look it up" layer in action.
Concept 1 done when: you asked a question and a model running on your own machine answered. Turn off your wifi and ask again. It still works. Nothing left your computer.
That last part is worth a moment. The model runs as a small program on your machine, listening at an address called localhost. That word just means "this same computer." Your machine is talking to itself. That is why it keeps working with the internet off.
If you just wanted a private AI on your own machine, you have it. You can run this any time, offline, for free, and nothing you type leaves your computer. That alone is worth knowing.
The rest of this course makes that same local model do things: read your files, write code, edit them for you. If that interests you, read on. If not, you already got the win.
2. The one idea that makes this work: the brain is just an address
You just did the thing. Now let us name what happened, because this one idea sits under every AI tool you will ever use, and under all three tiers of this course. It is worth slowing down for.
Your AI tool has two parts:
- The harness: the program on your machine. It reads your files, runs commands, and shows you what changed. Claude Code is a harness. The Ollama chat app is a simpler one.
- The brain: the model that reads all of that and decides what to say or do.
The harness reaches the brain the same way your browser reaches a website: over an address. Think of it like a phone number. The harness dials a number, and whoever picks up does the thinking.
Normally that number points far away, to a company's machines. But it is just a setting. Change the number, and the exact same harness now talks to a different brain. In Concept 1, the new number was localhost: your own machine. So the brain answering was the one on your laptop.
Think of a food delivery app. The app on your phone is the same every day. Change the restaurant address, and the same app now orders from a different kitchen. Your AI tool is the app. The address is the phone number. The kitchen at that address is where your model does the cooking.
Here is the part that is easy to get wrong, and it matters later. The local brain is not a smaller copy of the same brain you used before. It is a different brain. It may be much weaker. Same app, different kitchen, and the new kitchen might have a less skilled cook. Remember that. It leads straight into Concept 5.
Hold onto the kitchen picture, because this course visits three kitchens. Part 1 is the kitchen in your own home. Part 2 is an industrial kitchen you run yourself, built to serve a full restaurant. Part 3 is ordering from the best restaurants in the world, because no home could ever fit their kitchen. Same app the whole way. Only the address changes.
You changed one address, and a model on your own machine answered. Which part of your AI tool changed, and which part stayed the same? The brain changed: your words now go to a model on your own machine. The harness stayed the same: the app, the buttons, the way you talk to it. You only changed the address it dials.Show answer
3. Make it do things: a coding agent on your local brain
Chatting with a local model is a good start. But an agent does more than chat. It reads your files, writes code, and runs commands for you. So let us point a coding agent at the same local brain.
This step wires a coding agent to your local model. So you need Claude Code or OpenCode already installed. If you have one, you are ready. If not, install one first (the Agentic Coding crash course walks you through it). The command below wires and launches it. It does not install it for you.
There are two ways to do this. The easy way is one command. The by-hand way shows you the wires underneath, which is worth seeing once. Pick a tab.
- Just run it
- Set it up by hand
Recent versions of Ollama can wire and launch a coding agent for you, with no settings to edit. One command:
ollama launch claude
That sets Claude Code up to use a local model and starts it. It will ask which model to use, or you can name one you already pulled:
ollama launch claude --model qwen3:8b
There is a matching command for the other tool: ollama launch opencode.
unknown command "launch"The ollama launch command needs a recent Ollama (version 0.15 or newer). If you see that error, update Ollama: re-run the installer from ollama.com/download, or update from the app. Check your version with ollama --version.
There is a small companion skill that does the whole setup and tells you the truth about your hardware before you spend time. Your agent reads it and does the work. Install it, then ask in plain words:
npx skills add panaversity/local-llm-agentic-coding --agent claude-code opencode -y
Set me up to run a coding agent on a local model. Check my hardware honestly first, then walk me through it step by step and stop for my approval before anything big.
The installer can quietly skip a name it does not recognize, so you can preview first with npx skills add panaversity/local-llm-agentic-coding --list.
The one command above just fills in a few settings for you. Here is what it fills in, so you understand the wiring and can do it anywhere. The two tools speak to the same local model in slightly different ways.
- Claude Code
- OpenCode
Claude Code talks to the local model as if it were talking to Anthropic. You point it at the local address, hand it a placeholder token, and make sure no real API key is set:
export ANTHROPIC_BASE_URL=http://localhost:11434   # the local address, bare host, no /v1
export ANTHROPIC_AUTH_TOKEN=ollama                 # any non-empty word; it is sent as "Bearer ollama"
export ANTHROPIC_API_KEY=                          # must be empty, or it overrides the line above
claude --model qwen3:8b                             # use a model tag you have pulled
A few small notes that save you trouble:
- The address is bare (just the host and port). Claude Code adds the rest of the path itself. Do not add
/v1. - You must name an Ollama model with
--model, because Claude Code otherwise looks for model names your local machine does not have. - On Windows,
localhostcan point to the wrong place, so many people usehttp://127.0.0.1:11434instead. (This is widely reported by users rather than stated in the official docs.)
To make the settings stick for every session, put them in the env block of ~/.claude/settings.json instead of typing them each time:
{
  "env": {
    "ANTHROPIC_BASE_URL": "http://localhost:11434",
    "ANTHROPIC_AUTH_TOKEN": "ollama",
    "ANTHROPIC_API_KEY": ""
  }
}
OpenCode talks to the local model as if it were talking to OpenAI. It officially supports local models, and the supported way in is describing your local server in a file called opencode.json, which is worth doing by hand once because it puts the address and the model mapping where you can see them. Note the /v1 on the end. It is required here, and it is the one thing different from Claude Code's address:
{
  "$schema": "https://opencode.ai/config.json",
  "provider": {
    "ollama": {
      "npm": "@ai-sdk/openai-compatible",
      "name": "Ollama (local)",
      "options": { "baseURL": "http://localhost:11434/v1" },
      "models": { "qwen3:8b": { "name": "Qwen3 8B (local)" } }
    }
  },
  "model": "ollama/qwen3:8b"
}
Put this in opencode.json in your project, or in ~/.config/opencode/opencode.json for every project. The model name under models must be a tag you have actually pulled. On Windows, use 127.0.0.1 in place of localhost.
Read both tool tabs and notice the shape. Same model, same machine, same port. Claude Code dials a bare address. OpenCode dials the same address with /v1 on the end. That is the whole difference between them for local models. Learn that one contrast and you can wire any tool to any local brain. You will use it again, unchanged, in Parts 2 and 3.
Concept 3 done when: your coding agent started, and the model it is using is the one on your own machine. Ask it something small. The answer came from your laptop, not from a company far away.
That is Concept 2 made real. You changed the address to localhost, and the exact same coding agent now sends its work to the brain on your machine.
4. Now push it: give it a real task, and watch
A local model answering a question is a small first step. A local model doing real coding work is the actual test. So let us run it.
Work in a small, throwaway git folder with a little real code in it, even a single script. Then, with your agent pointed at the local brain, paste something like this:
Take a look at this folder. Find one small, safe improvement, then make the change and show me what you changed.
Now watch closely. One of two things happens, and both are the lesson.
On a strong machine (a good graphics card, a mid-size model), it works. The local brain reads the files, makes a plan, edits, and shows you a clean change. In that moment, free and offline and private became real. It is your own setup, working.
On a plain laptop (no graphics card, a small model), you feel the wall. Either each step takes minutes, because the machine is slowly reading a huge amount of text. Or the run just stops partway, with an error about a bad tool call. The brain tried to say "edit this file" and got the format wrong.
Do not fix anything yet. Just notice which one you got, and roughly how it felt. Fast and clean? Or slow, or broken? That feeling is the raw material for the next concept.
If your task crawled or broke, nothing went wrong. You just met the honest limit of running a big model on a small machine. That is a real and useful thing to know before you spend money or time. The next concept explains exactly what you felt.
Concept 4 done when: you asked a local brain for a real code change and saw the result, whether it was a clean edit, a long wait, or a broken run.
5. Why it held or broke: the two walls
Now the explanation, because you have felt the thing it explains. This is the most important idea in Part 1, so here it is plainly.
A local coding agent must clear two separate walls. They are not the same wall, and the fix for one does nothing for the other.
The first wall is capability. Whenever the model acts, and in coding work that is nearly every turn, it has to write a valid tool call. That means saying "edit this file, change this line to that line" in the exact, strict format the harness expects. Small models tend to get this wrong. They skip the tool, or they mangle the format, and the run stops. A stronger model, trained for tool use, usually fixes this. Faster hardware does not: a fast machine running a tiny model still writes broken tool calls.
The second wall is throughput. Every turn, the harness sends the model a long instruction (the rules of the tool plus the definitions of everything it can do) before your task even starts. The machine has to read all of that fast. With a graphics card, that takes a moment. Without one, on the processor alone, it can take minutes per turn. A graphics card fixes this. A smarter model does not: a brilliant model on a slow machine is still painfully slow.
| Wall | What it needs | Fixed by | Not fixed by |
|---|---|---|---|
| Capability | A correct tool call whenever it acts | A stronger model, trained for tool use | Faster hardware alone |
| Throughput | Reading the long instruction in seconds | A graphics card (a GPU) | A smarter, smaller model |
One honest note on size before the table below: there is no universal parameter-count floor for reliable tool use. Tool-use training, the chat template, and harness fit matter as much as raw size, and a well-trained smaller model can beat a poorly trained larger one. Among today's common local models, though, the rough pattern holds that bigger handles multi-step tool use more reliably, and that pattern is what the tables on this page describe.
Cheap machines miss both walls at once. That is why a plain laptop is a fine place to chat with a model, but a poor place to run a coding agent: the wiring is correct, but neither wall is cleared.
Zoom inside the kitchen from Concept 2. Two things decide your meal: the cook and the stove. The cook is your model. The stove is your machine. Capability asks whether the cook is skilled enough to get the order right every time. Throughput asks whether the stove is fast enough to serve in seconds, not minutes. A great cook on a slow stove still makes you wait. A fast stove with a clumsy cook still ruins the dish. You need both.
Here is the one honest sentence about hardware. Everything on this page is the same on a rented cloud machine with a graphics card: the wiring, the settings, the two walls. Only the speed changes. A graphics card with roughly 16 to 24 GB of memory turns a local setup into a genuinely usable coding agent. That sentence is also the doorway to Part 2, where you will rent exactly that machine and do something your laptop never could.
A rough guide to which model fits which machine:
| Model | Size | Memory it needs | Ready for coding work? |
|---|---|---|---|
llama3.2:3b | 3B | about 8 GB | No. Good for chat, mangles tool calls. |
qwen3:8b | 8B | about 16 GB | Okay for simple tasks |
phi4:14b | 14B | about 12 GB | Around a practical floor in this lineup |
qwen3:30b-a3b | 30B mix | about 20 to 24 GB | The best balance: strong answers, still quick |
qwen3:32b | 32B | about 24 GB | Strong, a little slower than the mix above |
Your task ran, but each turn took four minutes. You switch to a much smarter model on the same laptop. Does it get faster? No. A slow turn is the throughput wall, and a smarter model does nothing for it. A smarter model might even be slower, because it is bigger. Throughput is fixed by a graphics card, not by model choice. Mixing up the two walls is the exact mistake this concept exists to prevent.Show answer
6. Look inside: what a tool call actually is
Concept 5 said a weak model "mangles its tool calls." That sounds vague. Let us look at a real one, because seeing it makes the whole thing clear.
A healthy tool call is not ordinary writing. It is a small piece of structured data, an exact instruction the harness can carry out. It looks like this:
{
  "type": "tool_use",
  "name": "edit_file",
  "input": { "path": "README.md", "old": "Hello", "new": "Hello, world" }
}
The harness reads that and edits the file. The model did not write the change itself. It sent a precise instruction, and the harness did the work. That is what "the model uses tools" really means. It is the moment a chat model stops being a chat box and starts being something that acts.
Now here is what a too-weak model does. It sends the input as a blob of text instead of a real object, and the harness rejects it with a validation error like:
invalid tool arguments: expected object, got string
The exact wording varies by harness. What matters is the shape of the failure: the arguments arrived with the wrong structure, so the harness refuses to act on them.
The run stops. Nothing gets edited. That single mangled message is often what ended your run in Concept 4. It is the capability wall, up close.
One more thing decides whether this works: the context window. This is how many tokens the model can hold at once (a token is a piece of a word, and it is the unit models actually count in). In Ollama it is set by num_ctx. The harness sends that long instruction every turn, and Ollama picks a default window based on your machine's graphics memory. On most laptops, with less than 24 GiB of VRAM, that default is only 4,096 tokens. A window that small quietly cuts off most of the instruction. And here is the trap: nothing errors. Ollama just trims the instruction and answers anyway. So chatting looks fine, but coding tasks fail in confusing ways, because the model never saw the part that explains how to format a tool call. A truncated window is the most common cause of this pattern, though not the only one, which is why you check it first rather than assume it.
The fix is to make the window bigger. Ollama's current guidance for agents and coding tools is at least 64,000 tokens. Once your agent is running, you can just ask it:
The context window looks too small and it is breaking tool calls. Set it to at least 64,000 and try the task again.
Going deeper: why a small window breaks things with no warning
Raising the context window to 64,000 tokens or more is the single most common fix for "my local coding agent is broken." You can set it a few ways: a slider in the Ollama app's settings, starting the server with OLLAMA_CONTEXT_LENGTH=64000, a custom model file (a Modelfile, with PARAMETER num_ctx 64000), or one session inside a chat with /set parameter num_ctx 64000. Bigger windows need more memory, and ollama ps shows the window a running model actually got. If your setup answers chat but fails real tasks, check the context window first.
Open the quick fix list
- It answers chat, but ignores instructions on real tasks. The context window is likely too small, so the instructions got cut off. Raise
num_ctxto 64,000 or more and retest before hunting other causes. - Every turn takes minutes, then times out. The machine is too slow to read the long instruction in time. You can raise the timeout with
export API_TIMEOUT_MS=1200000. If it still times out, that is the throughput wall telling you the truth. - A message about a missing key, or connectors being off. Harmless. It shows up because you set a placeholder token, and a local model does not use those features anyway.
You do not have to memorize these. Your agent can walk you through any of them.
Concept 6 done when: you have seen one real tool call as structured data, and you understand that a mangled one, or a too-small context window, is what breaks a local coding agent.
7. When owning the brain is worth it
You can run this now. The honest question is when you should.
Renting a big model in the cloud, or using a coding agent the normal way, is usually easier and often smarter. So local wins in specific cases, and it is worth being clear about them:
- Privacy. The work never leaves your machine. For sensitive or regulated work, that alone can decide it.
- Offline. No network, no account, no outage. A model on your disk keeps working on a plane or behind a locked-down firewall.
- Cost, when work runs all day. A single request is cheap on any service. But a loop that runs every few minutes, all month, is a different bill. When the work never stops, owning the brain can cost less than the cloud.
That last one matters twice in this book. In Loop Engineering, you build agents that run all day on their own, checking their own work while you sleep. That is exactly the setting where whose brain runs the loop, and what each run costs, stops being a detail and becomes the design. You just learned to own that brain.
There is one more thing to notice, and it is the quiet lesson of this whole part. If you used the companion skill, you did not set anything up by hand. You installed a skill, and your agent used it. That skill is just a folder with a SKILL.md file, the same shape you learned in the skills crash course. Which means you can package your own knowledge the same way, and share it for any agent to install. When you are ready to publish one, gh skill publish --dry-run checks it against the Agent Skills spec before you ship.
Part 1 is complete. You own a brain, you wired two coding agents to it, and you know the two walls that decide whether it is usable. But notice something about everything you built: the kitchen served exactly one customer. You. Fire ten requests at it at once and it will make you wait in line. That line, and the software that removes it, is Part 2.
Part 2: The server tier. One machine, many users (vLLM)
The serving layer for this part is vLLM, and the scale is many users on one serious machine. The model does not change. That is the whole point.
Before anything else, name the new word this part is built on: the serving layer. It is the software that loads a model into memory and answers requests for it. Ollama is a serving layer. vLLM is a serving layer. In this part you hold the brain constant, Qwen3 8B, and change only the serving layer underneath it. Hold everything else as close to fixed as practice allows, change one thing, and the difference you measure belongs overwhelmingly to that one thing. That is not just good science. It is how you will debug agent systems for the rest of your career: isolate the variable, then measure. And the honest caveat comes with it: this is a teaching experiment, not a laboratory. Small differences in model precision, runtime code, and configuration ride along, which is exactly why the claim is a pattern to expect, not a decimal to defend.
A Linux machine with an NVIDIA graphics card. For the standard full-precision build below, aim for roughly 24 GB of GPU memory, or use a 16 GB card with the compressed FP8 build instead (both paths are shown in Concept 9). Almost nobody owns such a machine, and that is fine: renting one from a cloud GPU provider for an hour or two costs a few dollars, and every command below is identical on a rented machine. If you cannot rent one right now, read this part anyway. The two curves at the end are worth understanding even before you can draw them yourself.
8. The kitchen for one: fire 50 requests at Ollama and watch
Part 1 ended with a claim: your Ollama setup serves one customer. Let us prove it with a measurement, not a slogan.
Here is the experiment. You will write one small script that fires many requests at the same time at a model server and reports two numbers: how long the whole batch took, and the total tokens per second across all requests combined. The number of requests arriving at once is called concurrency. One user is concurrency 1. A classroom of fifty students pressing enter together is concurrency 50.
Both Ollama and vLLM answer the same standard request format (the OpenAI-compatible one you met in the OpenCode config), so one script tests both. Only the address and the model name change. Save this as bench.py:
# bench.py: fire N concurrent requests at a model server and measure throughput.
# usage: python bench.py <base_url> <model> <concurrency>
import asyncio, sys, time
import httpx

BASE_URL = sys.argv[1]        # http://localhost:11434/v1 (Ollama) or http://localhost:8000/v1 (vLLM)
MODEL = sys.argv[2]           # qwen3:8b (Ollama) or Qwen/Qwen3-8B (vLLM)
N = int(sys.argv[3])          # how many requests at once

PROMPT = "Explain in about 200 words how a bank reconciliation works."

async def one_request(client):
    r = await client.post("/chat/completions", json={
        "model": MODEL,
        "messages": [{"role": "user", "content": PROMPT}],
        "max_tokens": 300,
        "temperature": 0,
    })
    r.raise_for_status()
    return r.json()["usage"]["completion_tokens"]

async def main():
    async with httpx.AsyncClient(base_url=BASE_URL, timeout=3600) as client:
        await one_request(client)   # warm-up: load the model before timing anything
        start = time.perf_counter()
        results = await asyncio.gather(*[one_request(client) for _ in range(N)],
                                       return_exceptions=True)
        wall = time.perf_counter() - start
    ok = [r for r in results if isinstance(r, int)]
    failed = len(results) - len(ok)
    total = sum(ok)
    print(f"concurrency={N}  ok={len(ok)}  failed={failed}  tokens={total}"
          f"  time={wall:.1f}s  throughput={total/wall:.1f} tok/s")

asyncio.run(main())
Install the one thing it needs (pip install httpx), make sure Ollama is running with qwen3:8b pulled, and pin one setting so your run is reproducible: Ollama's number of parallel slots varies by machine, and a fair experiment states its settings. Restart the Ollama server with OLLAMA_NUM_PARALLEL=4 ollama serve (PowerShell: $env:OLLAMA_NUM_PARALLEL=4; ollama serve), so your curve and a classmate's curve come from the same rules. Then run the sweep. Do it on the GPU machine you rented, so that Part 2's comparison is fair: same hardware for both serving layers.
python bench.py http://localhost:11434/v1 qwen3:8b 1
python bench.py http://localhost:11434/v1 qwen3:8b 5
python bench.py http://localhost:11434/v1 qwen3:8b 10
python bench.py http://localhost:11434/v1 qwen3:8b 25
python bench.py http://localhost:11434/v1 qwen3:8b 50
Run each concurrency level three times and write down the median throughput of the three, so a one-off hiccup does not become your data point. Those five medians are what you need for the plot in Concept 10.
Now read what you saw. At concurrency 1, fine. But as you climbed, total throughput barely moved, while the wall-clock time stretched and stretched. At 50, the batch likely took many minutes. What happened inside is simple: Ollama runs a small handful of requests in parallel (the OLLAMA_NUM_PARALLEL slots you just pinned to 4) and puts everyone else in a queue. Request number 40 does not start until a slot opens. The graphics card, the most expensive part of the machine, spends most of the batch waiting alongside the queue.
None of this is a flaw in Ollama. It is a design choice, and an honest one: Ollama is built to make one person's laptop pleasant. It was never built to be a restaurant.
This is a home kitchen with one cook and two burners. One dinner guest, wonderful. Fifty guests, and forty-five of them are standing in the hallway holding an order slip. The cook is not lazy and the stove is not broken. The kitchen was simply never designed for a crowd.
Concept 8 done when: you have five measured throughput numbers for Ollama at concurrency 1, 5, 10, 25, and 50, and you watched the queue happen with your own eyes.
9. The industrial kitchen: serve the same brain with vLLM
Now the other serving layer. vLLM is a free, open source program with one job: serve a model to many users at once without wasting the graphics card. It came out of research at UC Berkeley and is now the standard way companies serve open models in production. Where Ollama optimizes for one person's comfort, vLLM optimizes for total throughput.
It gets that throughput from two ideas, and both are worth knowing in plain words:
- Continuous batching. The graphics card is at its best doing many things at once. So vLLM feeds it many requests together, and here is the clever part: when one request finishes, a waiting request slides into its slot mid-stream, without stopping the others. The card never idles while there is work in the queue. Compare that to a queue, where the card serves a few, finishes, then picks up the next few.
- Paged memory (PagedAttention). Every active conversation needs working memory on the card. Older servers reserved one big block per conversation, mostly empty, so the card "filled up" long before it was really full. vLLM slices that memory into small pages and hands them out only as needed, the way an operating system manages RAM. Result: far more conversations fit on the same card at once.
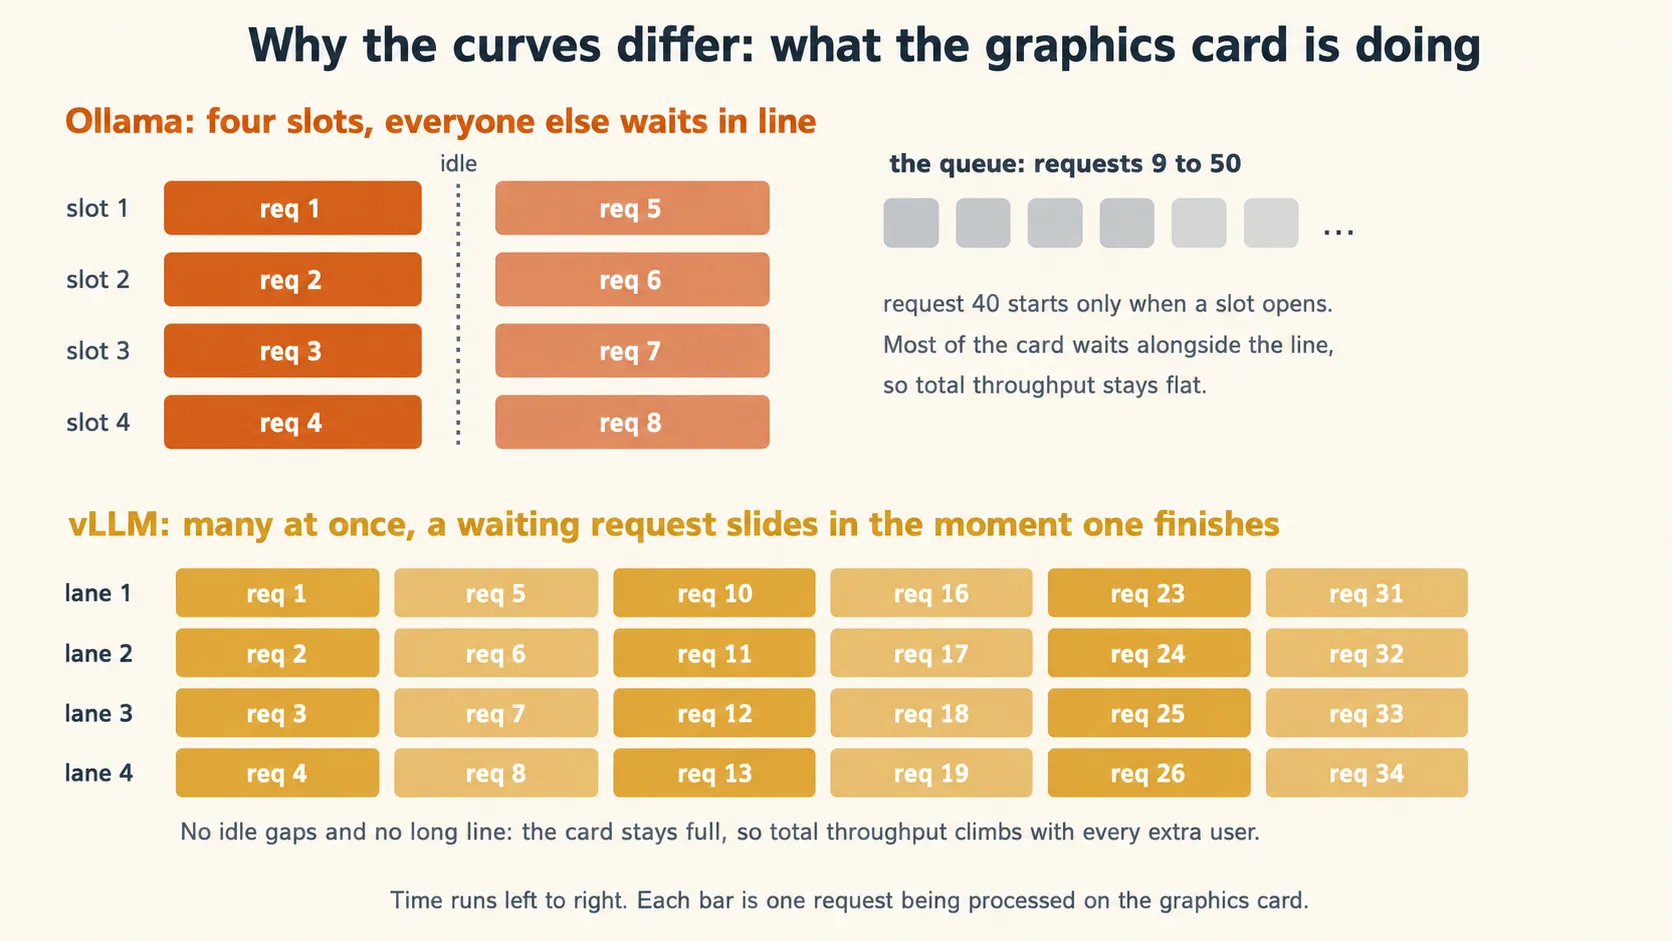
You do not have to remember the mechanism names. Remember the effect: the card stays full, so total throughput climbs as more users arrive, instead of a queue forming.
One more thing, so the tier names do not mislead you. This part runs vLLM on a single machine, but vLLM itself does not stop there: it can spread one model across many graphics cards, and across many machines working as one cluster. That is not a different product. It is the same software at a bigger scale, and it is what many of the professional hosts you will rent from in Part 3 run on their own clusters. So the tiers in this course are named for who operates the hardware, not for what the software can do. In Part 2 the vLLM operator is you, on one server. In Part 3 the operator is someone else, on sixty-four stoves, and there is a fair chance their kitchen runs vLLM too.
Now run it. On your GPU machine, install vLLM and serve the counterpart of the model you just tested. One note on names: Ollama and vLLM download models from different libraries, so the same brain has two names. qwen3:8b in Ollama's library is Qwen/Qwen3-8B on Hugging Face, where vLLM gets its models. And one honesty note, because this part promised to isolate the variable. The two copies are not byte-for-byte identical: Ollama's tag ships a compressed (quantized) copy of the weights so it fits laptops, while vLLM downloads the full-precision original. So when this course says "same brain," read it precisely: the same Qwen3 8B model, in two serving-specific builds, with Ollama's the lighter copy. That precision difference is one more variable that rides along in your numbers. It does not change the throughput pattern this experiment exists to show. If you want the closest match, serve the compressed build on the vLLM side too: vllm serve Qwen/Qwen3-8B-FP8 with the same flags.
pip install vllm

vllm serve Qwen/Qwen3-8B \
  --enable-auto-tool-choice \
  --tool-call-parser hermes \
  --reasoning-parser qwen3
One hardware note before you run it. The full-precision 8B build wants roughly 16 GB of GPU memory for the weights alone, before the working memory of your conversations, so it needs about a 24 GB card to run comfortably. On a 16 GB card, serve the compressed build instead: swap the model name for Qwen/Qwen3-8B-FP8 and keep the same flags. And if pip install vllm fights your machine over driver and CUDA versions, the official vLLM Docker image is the most reproducible install path, and the vLLM docs cover it.
The first run downloads the model, then the server comes up at http://localhost:8000. Those two tool flags matter more than they look: --enable-auto-tool-choice with a tool-call parser is what lets vLLM turn the model's output into the clean, structured tool calls you met in Concept 6. Leave them out and coding agents quietly fail, because the server never produces a tool call the harness can execute. (The right parser name varies by model family. hermes is the standard one for Qwen3 models. Check the vLLM tool calling docs when you serve anything else.)
Prove it is up with one request:
curl http://localhost:8000/v1/chat/completions \
  -H "Content-Type: application/json" \
  -d '{"model": "Qwen/Qwen3-8B", "messages": [{"role": "user", "content": "Say hello in one line."}]}'
Look at what you just typed. localhost, port 8000, /v1/chat/completions. It is the same shape of address you have used all course. The brain did not change. The kitchen behind the address did.
Concept 9 done when: vLLM is serving Qwen3 8B on your machine and answered a curl request, and you can say in one sentence each what continuous batching and paged memory buy you.
10. The reveal: same 50 requests, two curves
Everything is in place. Same machine. Same brain. Same script. Same fifty requests. Only the serving layer is different. Run the identical sweep against vLLM:
python bench.py http://localhost:8000/v1 Qwen/Qwen3-8B 1
python bench.py http://localhost:8000/v1 Qwen/Qwen3-8B 5
python bench.py http://localhost:8000/v1 Qwen/Qwen3-8B 10
python bench.py http://localhost:8000/v1 Qwen/Qwen3-8B 25
python bench.py http://localhost:8000/v1 Qwen/Qwen3-8B 50
Watch the batch at concurrency 50 in particular. The wall-clock time that stretched into many minutes under Ollama should collapse: the fifty-request batch usually completes far sooner than under the pinned Ollama configuration, with the answers arriving close together rather than in shifts.
Now draw the picture, because this picture is the single thing to carry out of Part 2. Put your ten measured numbers into this script (pip install matplotlib if needed) and run it:
# plot.py: tokens per second against concurrency, one line per serving layer.
import matplotlib.pyplot as plt

concurrency = [1, 5, 10, 25, 50]
ollama_tps = [0, 0, 0, 0, 0]   # your five Ollama numbers from Concept 8
vllm_tps = [0, 0, 0, 0, 0]     # your five vLLM numbers from this concept

plt.plot(concurrency, ollama_tps, marker="o", label="Ollama (qwen3:8b)")
plt.plot(concurrency, vllm_tps, marker="o", label="vLLM (Qwen/Qwen3-8B)")
plt.xlabel("Concurrent requests")
plt.ylabel("Total throughput (tokens/sec)")
plt.title("Same model, same machine, two serving layers")
plt.legend()
plt.savefig("two-curves.png", dpi=200)
You get two curves. Expect the Ollama line to stay roughly flat: adding users does not add throughput, it mostly lengthens the queue, so each user's share shrinks. Expect the vLLM line to climb: each new user adds throughput, steeply at first, then bending as the graphics card approaches truly full. Your exact numbers depend on your card, your versions, and your settings, and they will not match anyone else's. The shapes usually will, and the shapes are the lesson. One habit turns your run into evidence instead of an anecdote: write your card, driver, and Ollama and vLLM versions next to your numbers, so a different result on different hardware is a finding, not a mystery.
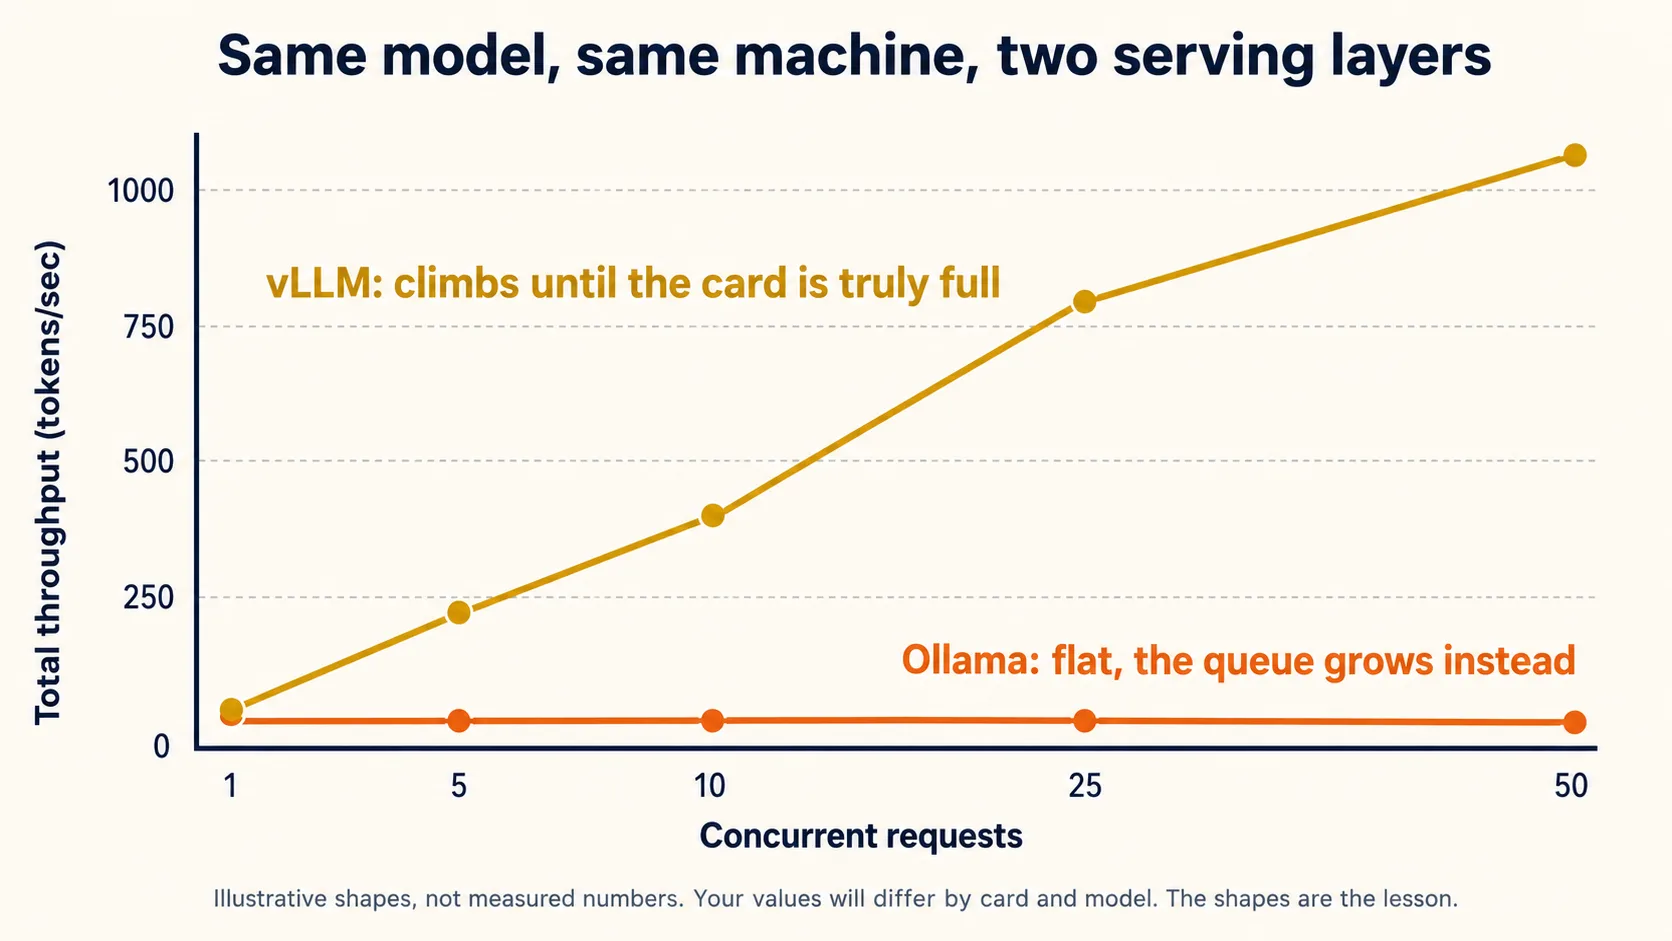
The picture above shows the shapes to expect, not real measurements. Your own chart, from your own ten numbers, is the one that counts.
And now say precisely what the gap between the curves is. It is not the hardware: same card. It is not your script: same requests. It is not the brain in any way that matters: same model family, with only the precision difference Concept 9 flagged, one more variable that rides along in the numbers. The gap belongs overwhelmingly to the serving layer. You held everything else as close to fixed as practice allows, changed one thing, and the measured effect is enormous. That is the honest claim, and it is more than strong enough.
A friend sees your chart and says: "So vLLM makes the model faster. You should use it on your laptop too." What is right and what is wrong in that sentence? Wrong on both halves, in an instructive way. vLLM does not make the model faster for one user: at concurrency 1 the two curves typically start close together, because a single request cannot use the tricks that keep a card full. vLLM makes the machine faster under load, by serving many requests at once. And it will not help a plain laptop, because continuous batching needs a graphics card to batch onto. vLLM shines exactly where Ollama was never designed to go: one strong machine, many users.Show answer
Concept 10 done when: your chart exists, one curve flat and one climbing, and you can explain in one sentence why the gap belongs overwhelmingly to the serving layer.
11. Wire your coding agents to your server
A fast server is only interesting if your tools can use it. So repeat the Part 1 move, third address of the course: point Claude Code and OpenCode at vLLM.
Here is the part that should feel almost suspicious by now: it is the same wiring. vLLM speaks both request formats your two agents use. It has the OpenAI-style address OpenCode wants, and it also implements the Anthropic Messages format Claude Code speaks natively, so no translator sits in between.
- Claude Code
- OpenCode
Same three settings as Part 1, new port, plus one addition: you tell Claude Code that every model tier maps to your served model.
export ANTHROPIC_BASE_URL=http://localhost:8000      # bare address again, no /v1
export ANTHROPIC_AUTH_TOKEN=dummy
export ANTHROPIC_API_KEY=dummy
export ANTHROPIC_DEFAULT_OPUS_MODEL=Qwen/Qwen3-8B
export ANTHROPIC_DEFAULT_SONNET_MODEL=Qwen/Qwen3-8B
export ANTHROPIC_DEFAULT_HAIKU_MODEL=Qwen/Qwen3-8B
claude
The model tier lines exist because Claude Code normally switches between big and small Anthropic models by name. Mapping all three tiers to your served model means whatever it asks for, it gets your Qwen3 8B. (These variables come from vLLM's own Claude Code guide, which is the live source to check when this drifts.)
Copy your Part 1 opencode.json and change two strings: the port and the model name.
{
  "$schema": "https://opencode.ai/config.json",
  "provider": {
    "vllm": {
      "npm": "@ai-sdk/openai-compatible",
      "name": "vLLM (server)",
      "options": { "baseURL": "http://localhost:8000/v1" },
      "models": { "Qwen/Qwen3-8B": { "name": "Qwen3 8B (vLLM)" } }
    }
  },
  "model": "vllm/Qwen/Qwen3-8B"
}
Note the /v1 survives: OpenCode still speaks OpenAI style, and vLLM answers it. The bare-versus-/v1 contrast from Part 1 carried over without a single change.
Then run the exact task from Concept 4 in your throwaway folder:
Take a look at this folder. Find one small, safe improvement, then make the change and show me what you changed.
If your laptop crawled or broke in Part 1, this run is your payoff. Same model, same task, but a real graphics card behind a serving layer built for work: the throughput wall from Concept 5 is gone, and the tool calls flow because you started vLLM with the tool-parser flags.
One honest note about sharing. The moment your vLLM machine serves anyone besides you, localhost becomes the machine's real address, and an open model server on the internet is an open door. At minimum start vLLM with --api-key set to a real secret and give that key to your users, and keep the machine behind your network's usual protections. The vLLM docs cover serving safely. Read them before a classroom does.
Concept 11 done when: at least one coding agent completed a real task through your vLLM server, and you can name the one thing that changed since Part 1 (the address) and the one thing that did not (everything else).
12. When the server tier is worth it
You now hold both measured curves, so this decision can be honest instead of fashionable.
The server tier wins when one strong machine can serve many mouths:
- A team or a classroom. Fifty students on fifty laptops all hit the two walls of Part 1. Fifty students pointed at one vLLM machine share a single cleared wall. This is how a lab, a company, or a PIAIC classroom gives everyone a capable agent for the price of one GPU.
- Loops that run all day. The Loop Engineering agents you will build later fire requests every few minutes, forever. On a per-token bill that never stops adding up. On your own GPU, once it is already busy, one more request costs you almost nothing extra, and your climbing curve is exactly the picture of why: throughput rises with load, so a busy machine is a cheap machine per token.
- Privacy at team scale. Part 1's privacy argument, but for a whole organization: the data stays on a machine you control, while everyone still gets served.
And the honest limit, which is the bridge to Part 3. vLLM moved one wall: throughput. It did nothing to the other. Qwen3 8B behind vLLM answers fifty people quickly, and it is essentially as smart as it was on your laptop, because it is the same brain underneath. If the task itself is too hard for an 8B model, no serving layer will save it. The capability wall is cleared by a bigger brain, and the biggest open brains in the world do not fit on your rented machine, or on any machine you will ever own. For those, you change the address one more time.
Your all-day agent loop keeps producing wrong answers on hard refactoring tasks. A colleague suggests moving from Ollama to vLLM to fix it. Will it? No. Wrong answers on hard tasks are the capability wall, and the serving layer does not touch it: vLLM serves the same brain faster, not a smarter brain. Moving to vLLM fixes queues and slowness (throughput). Fixing wrong answers takes a stronger model, which is what the cloud tier in Part 3 is for. This is Concept 5's table, one tier up.Show answer
Concept 12 done when: you can name a situation where the server tier beats both a laptop and the cloud, and you can say which of the two walls vLLM moves and which it cannot.
Part 3: The cloud tier. Frontier open models almost nobody can self-host (OpenRouter)
The serving layer for this part is someone else's cluster, reached through OpenRouter. The scale is models so large that "self-host" stops being a real option, for you, and for almost every company on earth.
13. Open weights you cannot lift: Kimi K3 and DeepSeek V4 Pro
Part 2 ended on an honest limit: the capability wall is cleared by a bigger brain. So let us look at the biggest open brains that exist right now, and be honest about what "open" means at that size.
This course uses two of them, as of this writing in July 2026, chosen for two different reasons:
- Kimi K3, from Moonshot AI, chosen for performance. Released in July 2026, it is a 2.8 trillion parameter model with a one million token context window, and at release it ranked as the strongest open-weight model yet on the major capability indexes, within reach of the very best closed models. Rankings move monthly, so treat that as a dated snapshot and check the current leaderboards before you repeat it. The weights are genuinely open. You can download every one of them.
- DeepSeek V4 Pro, from DeepSeek, chosen for price performance. A 1.6 trillion parameter model (about 49 billion active per token) with the same one million token context window, released under the MIT license. It is a step below K3 on raw capability and dramatically cheaper to use, and that trade is the whole reason it is here.
And here is a detail that ties the tiers together: when Moonshot released K3, they contributed serving code for its new attention design directly to vLLM, so that hosts everywhere could run it. The industrial kitchen you learned in Part 2 and the frontier kitchens of this part are, in many cases, the same software at two very different scales.
Now the honest arithmetic. "Open weights" means you may run these yourself. It does not mean you can. Moonshot recommends serving K3 on configurations of 64 or more accelerator chips working as one machine. DeepSeek V4 Pro is the small one, and self-hosting it still takes a cluster of 8 to 16 datacenter GPUs, hardware costing more than a house. Your Part 2 skills scale up to models like Qwen3 32B or a 100B-class mixture on a rented multi-GPU box. They do not scale to this, and outside serious infrastructure teams, almost no one's skills do. For frontier open models, everyone rents.
So what does "open" buy you, if you rent anyway? Three real things. No lock-in: no single company can take the model away, reprice it alone, or silently change it, because anyone with a cluster can serve the same weights, and competitors do. Choice of landlord: many companies host the same weights, and they compete on price and speed. A floor under your future: if it ever truly matters, you or your country or your company can stand up the hardware. Open weights at this scale are less "run it at home" and more "no one owns the tap."
That competition between hosts creates a practical problem: dozens of hosting companies, each with its own accounts, keys, and billing. OpenRouter solves it the way this whole course taught you to expect: with one address. Be precise about what it is, because the tier table simplifies: OpenRouter is a gateway, a router that receives your request and forwards it to one of the hosts actually serving the model. The host operates the serving layer, often vLLM itself. OpenRouter operates the front door: a single account, a single API key, and a single billing page across hundreds of models. Sign up at openrouter.ai, add a few dollars of credit, create a key, and set a monthly spend limit before anything else. That key is a secret and a wallet in one string: never paste it into code you commit or share.
Part 1 was cooking at home. Part 2 was running your own industrial kitchen. Part 3 is the world's great restaurants: kitchens with sixty-four stoves and a brigade of cooks. You will never build one in your house, and you do not need to. OpenRouter is the delivery app that has every one of those restaurants on a single menu, with one login and one bill. Same app on your phone the entire time.
Concept 13 done when: you have an OpenRouter account, a key, and a spend limit set, and you can explain in one sentence why "open weights" and "you can self-host it" stopped being the same claim at this scale.
14. Drive frontier brains from the same two agents
Third tier, same move. You are about to point the exact harnesses from Parts 1 and 2 at the strongest open models on earth, and the wiring will look almost embarrassingly familiar.
- Claude Code
- OpenCode
OpenRouter speaks Claude Code's native format directly (it calls this its Anthropic-compatible endpoint), so the setup is the same three variables from Part 1 with a real key in the middle:
export ANTHROPIC_BASE_URL=https://openrouter.ai/api   # bare, one more time: no /v1
export ANTHROPIC_AUTH_TOKEN=sk-or-...                 # your OpenRouter key
export ANTHROPIC_API_KEY=                             # must be empty
claude --model moonshotai/kimi-k3
One hygiene note before you persist this anywhere. That key is a wallet. Shell exports last one session, which is the safe place to start. If you move the variables into a settings file, use ~/.claude/settings.json in your home folder, never a project's committed settings file, because a key pushed to a git repository is a key spent by strangers.
Model names on OpenRouter follow a maker/model shape, and the exact string matters: moonshotai/kimi-k3 for Kimi K3, deepseek/deepseek-v4-pro for DeepSeek V4 Pro. One wrong character returns a bare "model not found," so copy slugs from the model's page on openrouter.ai rather than typing them.
Claude Code's harness is built and tested against Anthropic's own models, and OpenRouter guarantees full Claude Code compatibility only with the Anthropic first-party provider. Kimi K3 and DeepSeek V4 Pro speak the compatible format, and many people drive them this way successfully, but a tool call can still land oddly in ways that are the harness-model fit, not your setup. Treat this pairing as experimental. If you want the fully supported path for this exercise, use the OpenCode tab: OpenRouter is a native OpenCode provider with no compatibility asterisk. And if you want to keep Claude Code and smooth these edges, the community built a tool for exactly this job: Claude Code Router, covered in Concept 16.
Two habits that save people an evening:
- Verify where your words are going with
/status. It should show the OpenRouter address on theAnthropic base URLline, and your token as the active credential. Trust the check, not the assumption. - Per Claude Code's current docs,
ANTHROPIC_AUTH_TOKENtakes precedence over a saved Anthropic login, so a past login should not hijack your requests. But a stale login can still trigger an auth-conflict warning at startup, and older guides report it interfering. If/statusshows the wrong endpoint or a conflict warning names two credential sources, run/logoutonce, restart, and check again.
OpenCode knows OpenRouter out of the box, so for once there is no provider block to write. Inside OpenCode, run the /connect command, pick OpenRouter, and paste your key (older versions use opencode auth login from the shell). Many OpenRouter models are preloaded, so you can then pick one with /models, or pin it in opencode.json:
{
  "$schema": "https://opencode.ai/config.json",
  "model": "openrouter/deepseek/deepseek-v4-pro"
}
Swap in openrouter/moonshotai/kimi-k3 to drive the other one. That is the entire configuration.
Now run the same Concept 4 task a final time, in the same throwaway folder, once with each model:
Take a look at this folder. Find one small, safe improvement, then make the change and show me what you changed.
Feel the difference from every earlier run. Expect no queue, no crawl, and clean tool calls: frontier models clear the capability wall with room to spare, and the throughput wall is now someone else's sixty-four stoves. Both walls, cleared at once, by changing an address. If a run still stumbles, the cause has moved too: investigate the model's fit with your harness, the provider, the routing, or the prompt, not your local hardware.
And notice what you gave up, because the trade is the lesson. For the first time since Concept 1, your words left your machine, and for the first time in the course, tokens cost money as they flow. Watch your OpenRouter activity page after the task and see the request appear with its price attached. Private and free were Part 1. This is powerful and metered.
Your agent now completes tasks quickly through OpenRouter. Compared to Concept 1, name the two things you gave up, and the one habit that tells you the truth about where your words are going. You gave up privacy (your words leave your machine and pass through a provider) and free (every token is metered against your credit). The habit is checking, not assuming: Show answer
/status in Claude Code, or the model picker in OpenCode, shows exactly which address your requests go to. The course's rule from Part 1 still holds at every tier: trust the setting you can see, not the setup you remember doing.
Concept 14 done when: both K3 and V4 Pro have each completed a real coding task through your agent, /status (or the OpenCode model picker) confirms where requests go, and you have seen a real request with a real price on your activity page.
15. Performance or price: choosing a model, choosing a tier
You just drove both frontier models. They did not cost the same, and picking between them is your first real taste of a decision you will make constantly from now on.
As this page is written, the list prices are roughly: Kimi K3 at $3 per million input tokens and $15 per million output tokens, and DeepSeek V4 Pro at about $0.44 in and $0.87 out. Read that gap slowly: on output, the price-performance pick is roughly seventeen times cheaper than the performance pick. Prices move fast, so treat these numbers as this course treats every version number: a snapshot to reason with, and something to check live on the models' OpenRouter pages before you budget anything.
So when is K3 worth seventeen times more? When the task is hard enough that V4 Pro fails it, and the cost of failure is your time. One long agentic run that succeeds beats five cheap runs you have to untangle. The working rule most teams land on: default to the price-performance model, escalate to the performance model when the cheap one proves insufficient, and let real failures, not vibes, trigger the escalation. And one number changes this whole calculation for agents specifically: cached input. An agent resends the same instructions and the same repository context every turn, and both providers charge a tiny fraction of the input price when that repeated prefix hits their cache. For loop-style workloads, the effective bill is often far below the list-price math. The pricing pages explain each provider's caching rules. For agent work, read that section first, not last.
Now zoom all the way out, because you have earned the full picture. One harness, one idea, three tiers:
| Tier | Serving layer | Brain in this course | The address | Who pays for compute | Wins on |
|---|---|---|---|---|---|
| Local | Ollama | Qwen3 8B | your localhost | you already did (laptop) | privacy, offline, free, learning |
| Server | vLLM | Qwen3 8B, serving-specific build | a machine you control | you, per hour of GPU | many users, all-day loops, team data |
| Cloud | OpenRouter (gateway) | Kimi K3, DeepSeek V4 Pro | openrouter.ai | you, per token | hardest tasks, zero setup, frontier |
And the decision procedure, in the order the questions should be asked. First, may the data leave? If no, the cloud tier is out, and you choose between local and server by how many people need serving. Second, is the task within a mid-size open model's reach? If yes, the tier is about economics: laptop for one, vLLM machine for many or for loops. Third, if the task needs a frontier brain, go to the cloud tier and apply this concept's rule: cheap model by default, expensive model on proven failure. Three questions, and every deployment conversation you will ever have about open models fits inside them.
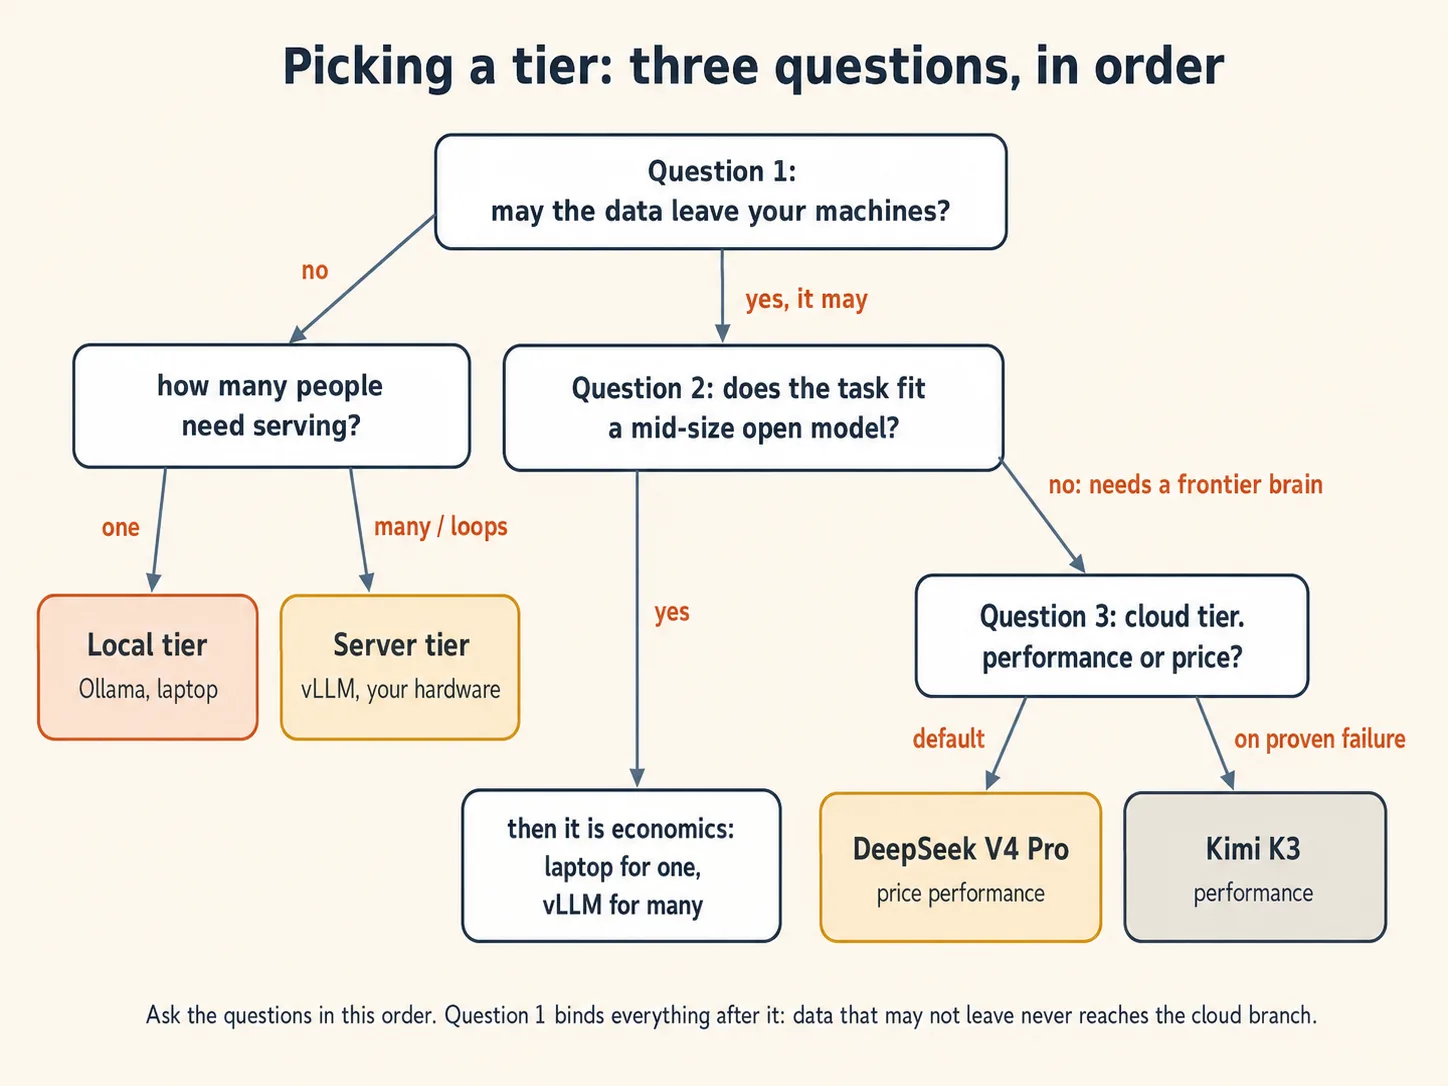
A firm wants an agent that reviews confidential client contracts all day, every day. The tasks are moderately hard but well within a strong mid-size model's reach. Which tier, and why is each of the other two wrong? The server tier. Question one rules out the cloud: confidential contracts should not leave machines the firm controls. The laptop tier fails on two counts, how many people it must serve and how much of the day it must run: an all-day loop for a team hits the throughput wall immediately. A vLLM machine inside the firm's network clears throughput, keeps the data home, and makes the all-day loop cheap per token. If the tasks later prove too hard for the model, the firm's real choice is a bigger open model on a bigger rented box, not the public cloud, because question one still binds.Show answer
Concept 15 done when: you can state the three questions in order, and defend a tier choice for a scenario nobody gave you the answer to.
16. One router across all three tiers: Claude Code Router
Everything in this course rested on one idea: the brain is just an address. There is a natural last step, and a popular community tool takes it. What if the address did not point at one brain, but at a decision?
Claude Code Router (CCR) is an open source tool by musistudio, one of the most-starred projects in the Claude Code ecosystem. It runs a small server on your own machine that speaks Claude Code's native format on one side and many providers on the other, translating in between. You point Claude Code at it once, and then a config file decides, request by request, which brain answers. Three things make it worth knowing at the end of this course:
- It routes by task type. Its
Routerblock maps Claude Code's different kinds of work to different models:defaultfor ordinary work,backgroundfor cheap housekeeping tasks,thinkfor hard reasoning,longContextfor requests past a token threshold. Read that list again slowly. It is Concept 15's rule, default to the price-performance model and escalate for the hard cases, written as configuration instead of discipline. - It spans every tier you just learned. A provider in its config is just a name, an address, and a model list. So one file can hold your Ollama laptop, your vLLM server, and OpenRouter side by side, and route between them.
- It smooths the rough edges. Its transformers (
openrouter,tooluse,enhancetool, and others) adapt requests and responses per provider, including adding error tolerance to tool calls from models that format them loosely. This is the community's working answer to the compatibility caution in Concept 14.
Set it up in three steps. Install it next to Claude Code:
npm install -g @musistudio/claude-code-router
Then create ~/.claude-code-router/config.json. Here is one config that holds this entire course, all three tiers behind one address:
{
  "OPENROUTER_API_KEY": "$OPENROUTER_API_KEY",
  "Providers": [
    {
      "name": "ollama",
      "api_base_url": "http://localhost:11434/v1/chat/completions",
      "api_key": "ollama",
      "models": ["qwen3:8b"]
    },
    {
      "name": "vllm",
      "api_base_url": "http://localhost:8000/v1/chat/completions",
      "api_key": "dummy",
      "models": ["Qwen/Qwen3-8B"]
    },
    {
      "name": "openrouter",
      "api_base_url": "https://openrouter.ai/api/v1/chat/completions",
      "api_key": "$OPENROUTER_API_KEY",
      "models": ["deepseek/deepseek-v4-pro", "moonshotai/kimi-k3"],
      "transformer": { "use": ["openrouter"] }
    }
  ],
  "Router": {
    "default": "openrouter,deepseek/deepseek-v4-pro",
    "background": "ollama,qwen3:8b",
    "think": "openrouter,moonshotai/kimi-k3",
    "longContext": "openrouter,moonshotai/kimi-k3",
    "longContextThreshold": 60000
  }
}
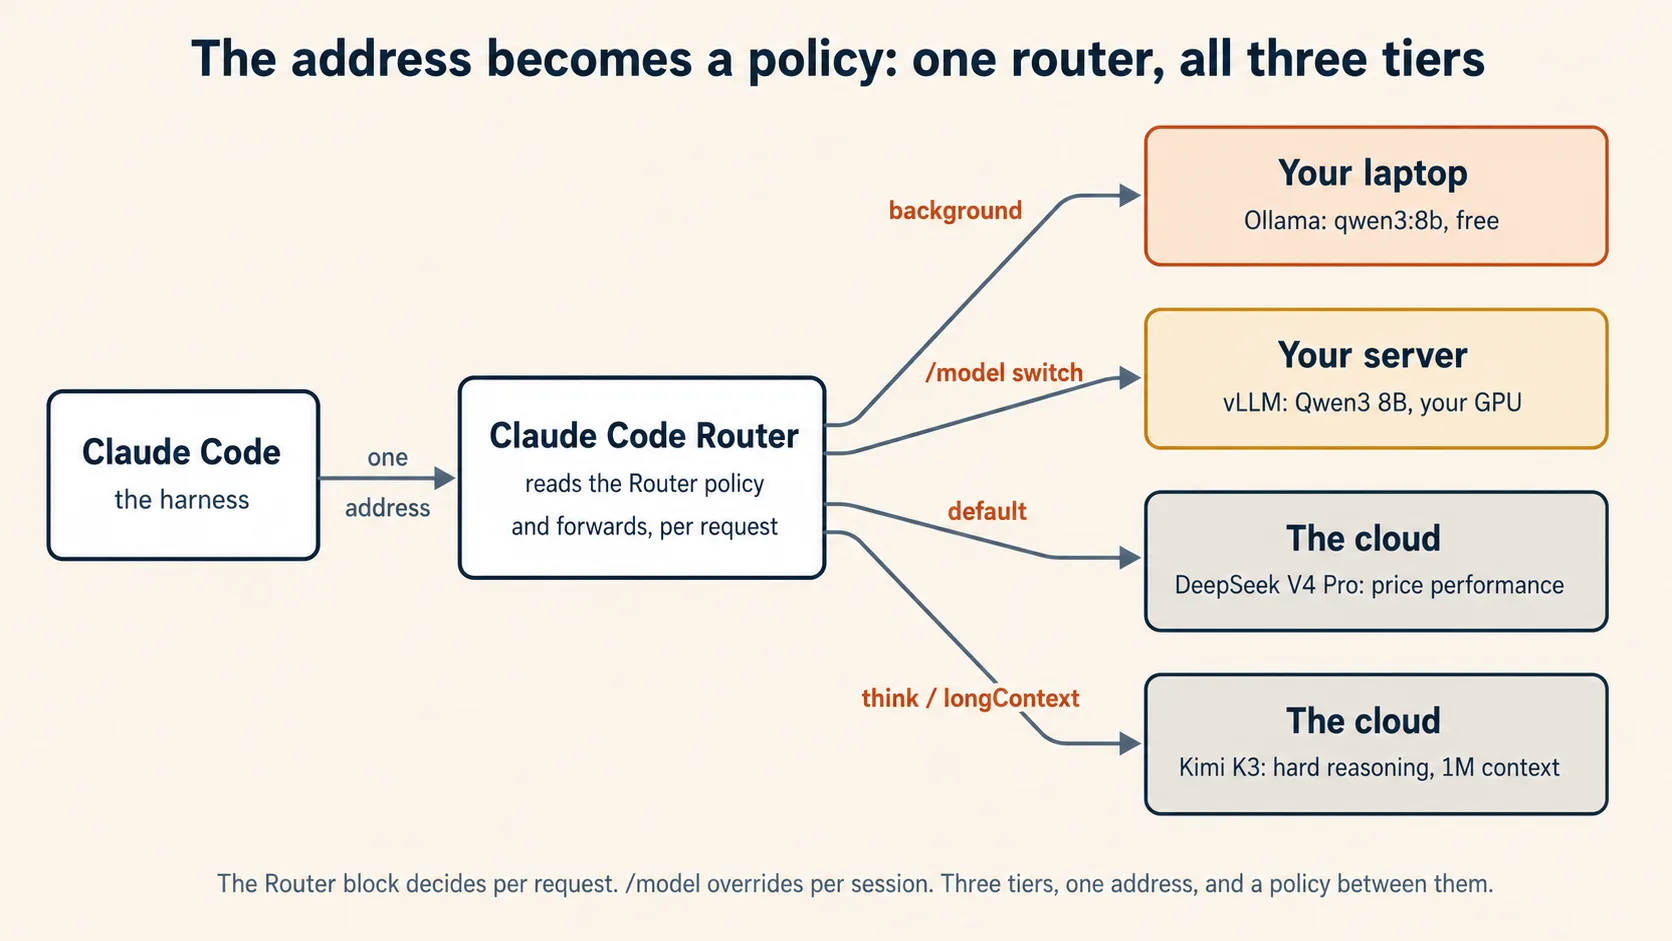
Read the Router block as a policy, because that is what it is. Ordinary work goes to the price-performance frontier model. Cheap background chores stay free on your own laptop. Hard reasoning and huge contexts escalate to Kimi K3, whose one million token window earns the longContext slot. The $OPENROUTER_API_KEY syntax pulls your key from the environment, so the secret never sits in the file.
Then start Claude Code through the router:
ccr code
A few mechanics that save time: after editing the config, run ccr restart so changes take effect. Inside Claude Code, switch brains mid-session with /model provider,model, for example /model ollama,qwen3:8b. And ccr ui opens a web page for editing the config if you prefer that to JSON.
Two honest notes to close it. First, CCR is a community project, not a product from Anthropic or any provider: it moves fast, its transformers are working fixes rather than guarantees, and every request now flows through one more piece of software you should update and read release notes for. Second, do not add it where it is not needed: your vLLM server from Part 2 already speaks Claude Code's format natively, so a router in front of it alone buys nothing. CCR earns its place when you want one Claude Code pointed at many brains at once, routed by task. Which, after this course, is exactly the setup you know how to reason about: three tiers, one address, and now a policy deciding between them.
Concept 16 done when: Claude Code runs through the router, at least two tiers answer from one session (switch with /model provider,model and watch where each reply comes from), and you can read your own Router block back as the tier policy it encodes.
Try it at your scale today, then keep going
Do the smallest real version today. Install Ollama, run a model, and chat with it: that alone is a private AI on your own machine, and it takes two minutes. If you write code, wire a coding agent to it and feel which wall you hit. When you can rent a GPU for an afternoon, run the fifty-request experiment and draw your own two curves: few exercises in this book will teach you more per hour. And when a task defeats every brain you can host, change the address one last time and borrow a frontier one for pennies or dollars. And when other people need what you built, Appendix A turns your server into a service they can share.
Then carry the mental model forward, because the section builds on it in order. Your tool is a harness plus a swappable brain, and the brain is just an address. The address can point at your laptop, at your server, or at the world's biggest open models, and the harness never knows the difference. Two walls decide what a setup can do: the serving layer and hardware move throughput, and only a bigger brain moves capability. From here you go on to drive this agent well in Agentic Coding, direct it with a written spec in Spec-Driven Development, and hand it a loop that runs all day without you in Loop Engineering. By the time you reach that last one, you will know exactly whose brain should run the loop, at which tier, and what it costs to keep it running.
The one-line summary
Open source models run at three scales, and your tool reaches all three the same way: through an address. Ollama for one person, vLLM for many, OpenRouter for the frontier brains almost nobody can self-host. Measure the difference once, with your own two curves, and you will choose the right tier for the rest of your career.
Appendix A: Build a mini LLM cloud
Part 2 gave you an industrial kitchen. A kitchen is not a restaurant. This appendix adds the front door, the menu, the table numbers, and the bill, so a machine that serves one person well can serve a whole class safely.
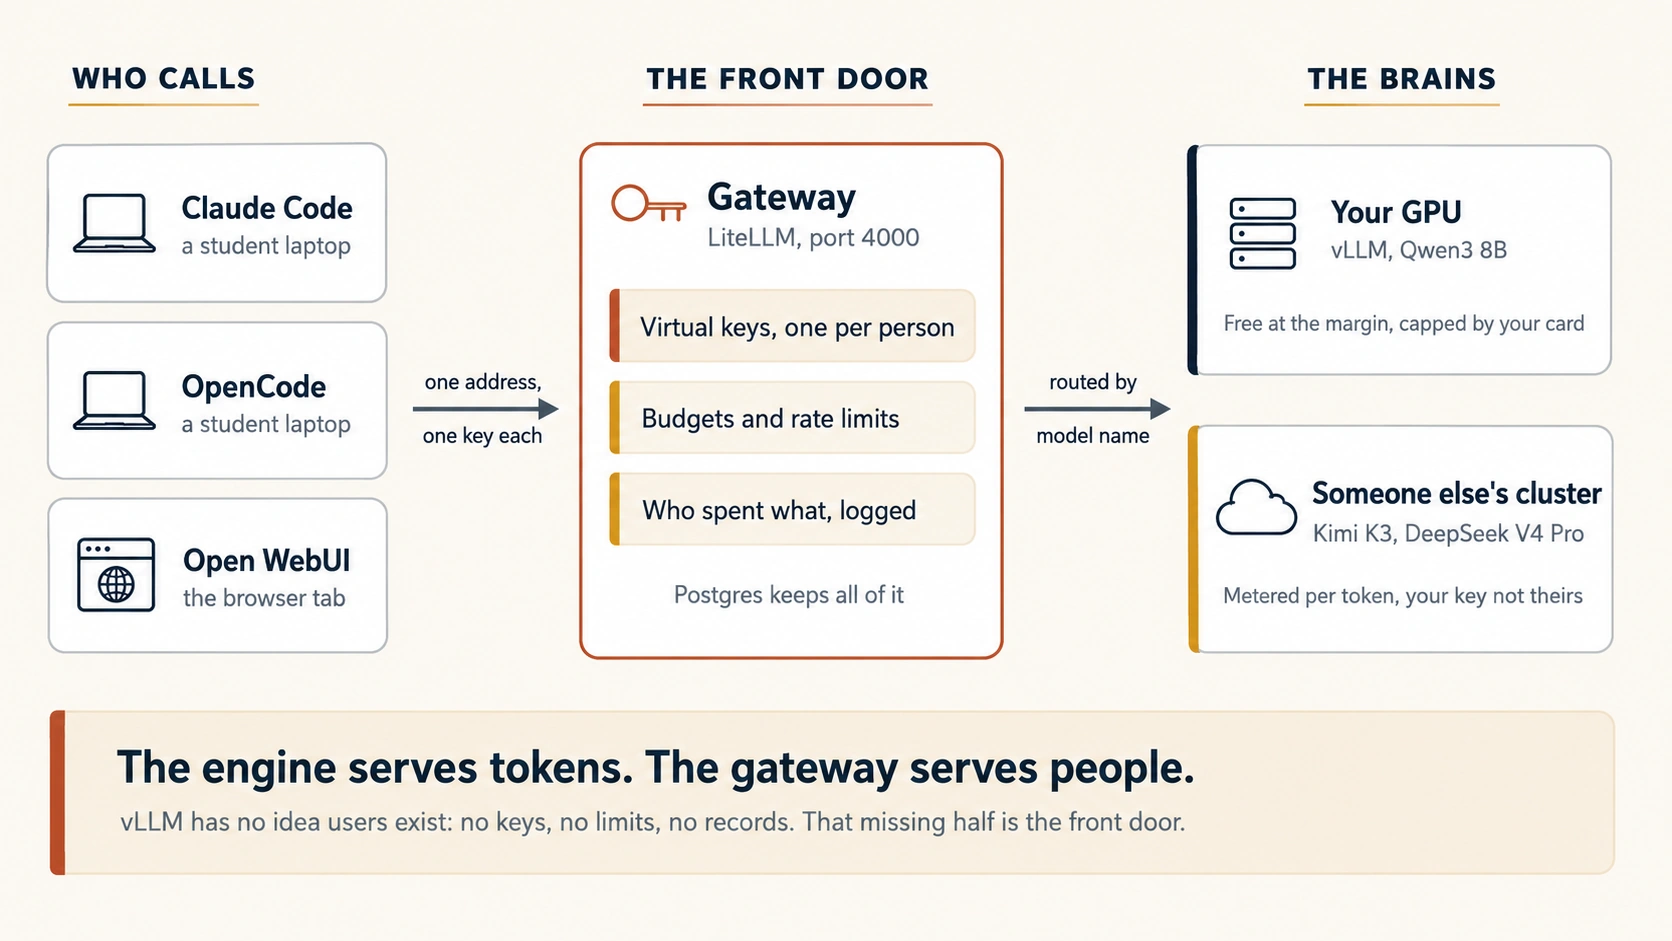
Here is the gap this appendix closes. At the end of Part 2 you had vLLM serving Qwen3 8B, and your fifty-request curve climbing where Ollama's went flat. That is a real achievement, and it is also not a service yet. Try to hand it to a class and the questions start immediately. Who is allowed to use it? What stops one student's runaway loop from eating the whole machine for a week? Who spent what? How does a student reach a frontier brain when Qwen3 8B is not enough, without you handing your own OpenRouter key to two hundred people?
None of those questions is about serving tokens, and that is exactly why vLLM does not answer them. An inference engine loads a model and answers requests. It has no idea that users exist. It has no keys, no quotas, no spending records, and no way to say no. That missing half has a name, and building it is what this appendix is about.
The course's one idea carries all the way here. The brain is just an address. In Part 1 the address was your laptop. In Part 2 it was a machine you control. In Part 3 it was someone else's cluster. In this appendix you become the address: you build the thing other people point their agents at.
Everything Part 2 needed, plus Docker and Docker Compose on the same GPU machine. If you did Part 3, keep your OpenRouter key handy for Concept A5. You can read the whole appendix without running anything, and Concepts A1, A2, and A7 are worth reading even if you never build the stack.
Two programs, not one. vLLM serves the tokens. A gateway sits in front of it and handles everything vLLM does not: user keys, spending limits, model routing, and logs. The gateway used here is LiteLLM. Add Postgres so the keys and spending survive a restart, and Open WebUI so people who do not use a terminal can still use your cloud. Four containers, one file, one afternoon.
New words for this appendix
| Term | Plain-English meaning |
|---|---|
| Inference engine | The program that loads a model and answers requests. vLLM is one. It knows about tokens, not about people. |
| Gateway / proxy | The program in front of the engine. It knows about people: who is calling, what they may use, and what it costs. |
| Virtual key | A per-person API key your gateway issues and can revoke, with its own limits attached. |
| Budget | A spending cap on a key. When it runs out, the gateway refuses the request instead of the bill growing. |
| Rate limit | A cap on requests per minute, so one busy user cannot crowd out everyone else. |
| Multi-tenancy | Serving many separate users from shared hardware, without them affecting each other. |
| Fallback | A rule that says "if this model fails or is full, try that one instead." |
A1. A kitchen is not a restaurant
Take the metaphor this course has used since Concept 8 and push it one step. Ollama was a home kitchen with two burners. vLLM was an industrial kitchen that keeps every burner lit. Both of those are the back of the house.
A restaurant needs a front of house too. Someone at the door who knows whether you have a reservation. A menu that says what is available today. A table number, so the kitchen knows where each dish goes. A bill at the end. None of that is cooking, and a brilliant kitchen with no front of house is not a restaurant. It is a kitchen that strangers wander into.
That is precisely the state of a bare vLLM server. Anyone who can reach the port can use it, for free, forever. Here is what it does not do, and it is worth reading slowly, because every item is something you would otherwise have to build yourself:
| What you need | Does vLLM do it? |
|---|---|
| Serve tokens fast to many users at once | Yes. This is its whole job, and it is excellent. |
| Know who is calling | No. |
| Cut someone off at a spending limit | No. |
| Stop one user from crowding out the rest | Partly, through queueing, but not per user. |
| Offer more than one model at one address | No. One server, one model. |
| Fall back to another model when this fails | No. |
| Record who spent what | No. |
| Reach a cloud model when the local one fails | No. |
Every "no" in that table is the gateway's job.
The kitchen cooks. The front of house decides who eats, what is on the menu, and who pays. You have built a very good kitchen. Now you need a door.
A fair question at this point: is there one program that does both? Almost, and the honest answer matters. Serving is an infrastructure problem, and the open source world has solved it very well. Metering, quotas, and billing is a product problem, and it is what inference companies actually sell. So the open tools give you the engine and the meter as separate pieces, and you assemble them. The saving grace is that every layer here speaks the same OpenAI-compatible request shape you have used since Part 1, so assembly means configuration, not translation work.
Concept A1 done when: you can name three things a bare vLLM server cannot do that a class of fifty students would need on day one.
A2. The gateway: one address, many brains, real users
A gateway is a small program that sits in front of one or more model servers. Requests arrive at the gateway, the gateway decides what to do with them, and then it forwards them on. It is the front door.
You have already used one. OpenRouter, from Part 3, is a gateway: one address, one key, one bill, hundreds of models behind it, with the actual serving done by hosts you never contact directly. This appendix builds the same shape at your own scale, on your own machine, with you as the operator instead of a company.
The tool for that job here is LiteLLM, an open source proxy that speaks the OpenAI-compatible shape to your users and translates outward to a long list of providers, your own vLLM server among them. Four things make it the right piece:
- Virtual keys. You issue each student their own key. You can attach limits to it, see what it spent, and revoke it the moment a semester ends or a laptop is lost.
- Budgets and rate limits. A key can carry a spending cap and a per-minute limit. When a runaway loop hits the cap, the gateway refuses the next request. Your bill stops growing at a number you chose in advance.
- A menu of models at one address. Your local Qwen3 8B and a frontier cloud model can both appear on the same gateway, reached by the same students with the same key.
- Records. Every request is logged against a user, so "who spent what" is a query, not an investigation.
Notice the shape of this. The gateway does not make anything faster. It changes nothing about tokens per second, and it adds a few milliseconds of its own. It is not a performance tool at all. It is a control tool, and control is what turns a server into a service.
A student says the gateway is pointless because "vLLM already gives me an OpenAI-compatible address, so I can just use that." What is the strongest reply? They are right about the address and wrong about the service. vLLM's address works fine for one trusted person, which is exactly why Concept 11 could stop there. The gateway exists for everything that appears the moment there are many people: separate keys, spending caps, rate limits, a menu of more than one model, fallbacks, and a record of who used what. None of those are speed features, which is why the comparison feels empty until the day a runaway loop runs all weekend and nobody can say whose it was.Show answer
Concept A2 done when: you can say in one sentence what a gateway adds that an inference engine never will, and why it is not a speed feature.
A3. Stand it up: the whole stack in one file
Four containers. One machine. One file.
| Container | Job |
|---|---|
| vllm | Serves Qwen3 8B on your GPU. The same server as Concept 9, now with a door in front of it. |
| litellm | The gateway. The only thing your users ever touch. |
| postgres | Stores keys, users, budgets, and spending, so a restart does not wipe your class. |
| open-webui | A chat page for the people in your class who do not live in a terminal. |
Start with the gateway's own config. Save it as litellm-config.yaml:
model_list:
  # Your own GPU, from Part 2. Students see the name on the left.
  - model_name: qwen3-8b
    litellm_params:
      model: hosted_vllm/Qwen/Qwen3-8B
      api_base: http://vllm:8000/v1
      api_key: "not-needed"

general_settings:
  master_key: os.environ/LITELLM_MASTER_KEY
  database_url: os.environ/DATABASE_URL

litellm_settings:
  drop_params: true
Two details there are worth naming. model_name is the name your users type, and it does not have to match the real model name underneath: that indirection is what lets you swap the brain later without telling anyone. And the master_key is your admin password for the whole cloud. It is not a student key. It never leaves your machine.
Now the stack. Save this as docker-compose.yml:
services:
  vllm:
    image: vllm/vllm-openai:latest
    command: >
      --model Qwen/Qwen3-8B
      --enable-auto-tool-choice
      --tool-call-parser hermes
      --reasoning-parser qwen3
    volumes:
      - ./hf-cache:/root/.cache/huggingface
    deploy:
      resources:
        reservations:
          devices:
            - driver: nvidia
              count: all
              capabilities: [gpu]

  postgres:
    image: postgres:16
    environment:
      POSTGRES_DB: litellm
      POSTGRES_USER: litellm
      POSTGRES_PASSWORD: ${POSTGRES_PASSWORD}
    volumes:
      - ./pgdata:/var/lib/postgresql/data

  litellm:
    # Pin the version. Read the security note below before you change this.
    image: ghcr.io/berriai/litellm:main-v1.80.5
    depends_on: [vllm, postgres]
    ports:
      - "4000:4000"
    environment:
      LITELLM_MASTER_KEY: ${LITELLM_MASTER_KEY}
      DATABASE_URL: postgresql://litellm:${POSTGRES_PASSWORD}@postgres:5432/litellm
    volumes:
      - ./litellm-config.yaml:/app/config.yaml
    command: ["--config", "/app/config.yaml", "--port", "4000"]

  open-webui:
    image: ghcr.io/open-webui/open-webui:main
    depends_on: [litellm]
    ports:
      - "3000:8080"
    environment:
      OPENAI_API_BASE_URL: http://litellm:4000/v1
      OPENAI_API_KEY: ${LITELLM_MASTER_KEY}
    volumes:
      - ./webui-data:/app/backend/data
Put your two secrets in a .env file next to it, never in the compose file itself:
LITELLM_MASTER_KEY=sk-choose-a-long-random-string
POSTGRES_PASSWORD=choose-another-long-random-string
Then bring it up and prove it works:
docker compose up -d

curl http://localhost:4000/v1/chat/completions \
  -H "Authorization: Bearer $LITELLM_MASTER_KEY" \
  -H "Content-Type: application/json" \
  -d '{"model": "qwen3-8b", "messages": [{"role": "user", "content": "Say hello in one line."}]}'
Look at that request next to the one in Concept 9. Same shape, same /v1/chat/completions, one new line: an Authorization header. That single header is the whole difference between a server and a service. Somebody now has to say who they are.
In March 2026 the LiteLLM package was hit by a supply chain attack, and malicious releases went out before they were pulled. Your gateway holds every key and every spending record in your cloud, which makes it the highest-value target in the stack. So: pin an exact version tag, never track latest, read the release notes before you move, and keep the gateway off the public internet until you have done both. This is not a LiteLLM-specific warning. It is what running any credential-holding service means.
Driver and CUDA mismatches are the usual cause, and they are why this compose file uses the official image instead of pip install. You also need the NVIDIA Container Toolkit installed on the host, or the GPU is invisible inside Docker. And if you are on a 16 GB card, swap the model line for Qwen/Qwen3-8B-FP8, exactly as in Concept 9.
Concept A3 done when: docker compose up -d brings four containers up, your curl through port 4000 returns an answer, and the same request without the Authorization header is refused.
A4. Hand out keys: budgets, limits, and who spent what
This is the concept that makes it a cloud. Everything before it was plumbing.
Generate a key for one student:
curl -X POST http://localhost:4000/key/generate \
  -H "Authorization: Bearer $LITELLM_MASTER_KEY" \
  -H "Content-Type: application/json" \
  -d '{
    "user_id": "student-0417",
    "models": ["qwen3-8b"],
    "max_budget": 2.00,
    "budget_duration": "30d",
    "rpm_limit": 20
  }'
Read the four settings, because each one is a decision you are making on purpose:
user_idties every future request and every logged dollar to a person. Without it, your usage report is one big anonymous number.modelsis the menu this key can order from. A key listing onlyqwen3-8bcannot reach anything else, no matter what the student types.max_budgetwithbudget_durationis the cap. Two dollars a month, then the gateway starts refusing. The runaway loop stops on its own, at night, without waking you.rpm_limitstops one enthusiastic student from filling the queue for everybody else.
The response comes back with a key starting sk-. That string is what the student gets. Nothing else.
Now the moment this whole appendix exists for. The student uses your cloud exactly the way Part 3 used OpenRouter. Same two settings, new address:
# OpenCode, or anything speaking the OpenAI shape
export OPENAI_BASE_URL="http://your-server:4000/v1"
export OPENAI_API_KEY="sk-the-students-key"
The harness never learns anything changed. It is still a harness plus a brain plus an address, and the address now happens to be a machine in your own building.
For Claude Code specifically, LiteLLM also exposes an Anthropic-format endpoint, which would let you point ANTHROPIC_BASE_URL at your gateway directly, the same bare-address move you have made three times already. That surface moves faster than this page can track, so check the live LiteLLM docs before relying on it. If it does not work on the version you pinned, Claude Code Router from Concept 16 gets you there with one more hop, and your gateway simply becomes another provider in its config.
Two commands you will use constantly once the class is live:
# What has this key spent?
curl -X GET "http://localhost:4000/key/info?key=sk-the-students-key" \
  -H "Authorization: Bearer $LITELLM_MASTER_KEY"

# Semester over, or laptop lost.
curl -X POST http://localhost:4000/key/delete \
  -H "Authorization: Bearer $LITELLM_MASTER_KEY" \
  -H "Content-Type: application/json" \
  -d '{"keys": ["sk-the-students-key"]}'
Every diner gets their own table number with a spending limit attached. The kitchen has not changed at all. But now you know who is eating, you can stop one table ordering the entire menu, and when someone leaves you take their table back.
You issue two hundred student keys, each capped at two dollars a month, all pointed at your own GPU. A colleague asks why you bothered with budgets when the local model costs nothing per token. What is the real answer? Two answers, and the second is the important one. First, "free" is wrong even locally: your GPU has a fixed throughput, exactly as your Part 2 curve showed once the card filled, so one student's endless loop is spending everyone else's capacity even when no money moves. The budget rations a shared resource. Second, and this is where Concept A5 goes, the moment you add a cloud model to the menu, real money flows through those same keys. Setting the budget habit while it is free means you are not building it in a panic on the day it stops being free.Show answer
Concept A4 done when: a second person on a different machine ran a real task through your gateway using their own key, you looked up what they spent, and you revoked the key afterwards.
A5. Put all three tiers behind one door
Your cloud currently offers one brain. Now add the other two tiers of this course to the same menu, so a student picks a tier by changing a model name and nothing else.
Extend litellm-config.yaml:
model_list:
  # Tier 2: your own GPU. Free at the margin, capped by your hardware.
  - model_name: qwen3-8b
    litellm_params:
      model: hosted_vllm/Qwen/Qwen3-8B
      api_base: http://vllm:8000/v1
      api_key: "not-needed"

  # Tier 3: a frontier brain, rented. Your key, never theirs.
  - model_name: frontier
    litellm_params:
      model: openrouter/moonshotai/kimi-k3
      api_key: os.environ/OPENROUTER_API_KEY

  # Tier 3, the cheap end. The right default for high-volume work.
  - model_name: frontier-cheap
    litellm_params:
      model: openrouter/deepseek/deepseek-v4-pro
      api_key: os.environ/OPENROUTER_API_KEY

router_settings:
  fallbacks:
    - qwen3-8b: ["frontier-cheap"]
Three things just happened, and each deserves a sentence.
Your OpenRouter key never leaves the machine. Two hundred students can now reach Kimi K3, and not one of them holds a credential that could be pasted into a public repository. They hold your gateway key, which you can revoke in one command, and which cannot spend past its cap. Concept 14 warned that an OpenRouter key is a secret and a wallet in one string. This is how you share the wallet without handing over the string.
Tier choice became a model name. A student who needs a frontier brain for one hard refactor types frontier instead of qwen3-8b. That is Concept 15's three-question procedure turned into something a person can actually do mid-task.
The fallback line is a policy. If your GPU is down or full, requests for qwen3-8b quietly go to frontier-cheap instead of failing. That is a real trade you are choosing on purpose: availability bought with money. Write it down somewhere your future self will find it, because a fallback you forgot about is a bill you will not understand.
Now give the frontier menu different limits, because it costs real money:
curl -X POST http://localhost:4000/key/generate \
  -H "Authorization: Bearer $LITELLM_MASTER_KEY" \
  -H "Content-Type: application/json" \
  -d '{
    "user_id": "student-0417-frontier",
    "models": ["qwen3-8b", "frontier-cheap", "frontier"],
    "max_budget": 5.00,
    "budget_duration": "30d"
  }'
Stand back and look at what you built. One address. Behind it, a model on hardware you own and models on clusters nobody in the room could ever own, offered on the same menu, billed against the same caps, reached by the same two settings. Concept 2 taught you that the brain is just an address. This is that sentence read backwards: an address can hide any number of brains, and choosing between them is now somebody's config file. Yours.
Your fallback sends failed Every request that would have been free ran on a paid cloud model for roughly sixty hours, and the service kept working perfectly, which is exactly why nobody noticed. Fallbacks trade money for availability silently, and silence is the danger. Add two things: an alert when the vLLM container is unhealthy, and a spending alert on the gateway. The fix is not to remove the fallback. It is to make sure a fallback lasting more than a few minutes tells somebody.qwen3-8b requests to frontier-cheap. Your GPU machine reboots for a driver update on a Friday evening and nobody notices until Monday. What happened over the weekend, and what should you add?Show answer
Concept A5 done when: one key reaches both your local model and a frontier model by name, and you can explain what your fallback rule buys and what it costs.
A6. Watch it: three numbers that tell you if it is healthy
A service nobody is watching is a service that fails quietly. vLLM publishes its own numbers at http://localhost:8000/metrics, in the format Prometheus reads, and the standard picture is Prometheus collecting them with Grafana drawing them.
You do not need that on day one. You do need to know which three numbers matter, because they tell you what is wrong before a student does:
- Queue depth: how many requests are waiting. This is the single most useful number you have, and it is your Part 2 experiment turned into a live gauge. Near zero means the machine is coasting. Climbing and staying up means you have run out of GPU, and it is time for a second card, a smaller model, or an honest limit on the class.
- Time to first token: how long a user waits before anything appears. Throughput can look wonderful while every individual person has a miserable time. This is the number your students actually feel, and it is exactly what a total tokens-per-second figure hides.
- GPU memory in use. Memory fills before compute does, and when it fills, performance falls off before anything looks broken. A model quietly consuming all the memory on a node degrades everyone's experience while every container still reports healthy.
Two things sit alongside those. The gateway's own spending dashboard, which is where you catch an unexpected bill early rather than at month end. And a plain health check on both containers, because "is it up" is a question you want answered by a machine at three in the morning, not by a message from a student.
Queue depth is the line at the door. Time to first token is how long each diner waits for their food. GPU memory is how full the kitchen is. A restaurant owner watching only total meals served is the last person to learn the place is falling apart.
Concept A6 done when: you have loaded /metrics on your vLLM container with your own eyes, and you can name which of the three numbers you would check first when a student says "it feels slow today."
A7. When it is worth it, and when to graduate
The honest accounting, in the same spirit as Concepts 7, 12, and 15.
Build a mini cloud when:
- You have many users and one budget. A classroom, a bootcamp, a department, a small company. One GPU serving fifty people is the cheapest capable setup any of them will ever get, and the gateway is what makes "fifty people" safe rather than chaotic.
- The data must not leave. Concept 15's first question, answered at organizational scale, with one extra piece that matters to an institution: an audit trail showing who accessed what.
- You want one stable address in front of a moving world. Models, prices, and providers change every few weeks. If your students point at your gateway, you absorb that churn in a config file instead of asking two hundred people to change their settings.
- Loops run all day. The Loop Engineering agents you meet later fire requests forever. On a per-token bill that never stops adding. On a GPU you already own and have already saturated, one more request costs almost nothing extra.
Do not build one when:
- You are one person. You are the entire front of house. Use vLLM directly, exactly as Concept 11 showed, and skip this appendix.
- Your traffic is small and occasional. Idle GPUs cost the same as busy ones. Below a real volume of daily traffic, renting through Part 3 wins on both money and your weekends, and it wins by a lot.
- Nobody owns it. This is the failure nobody plans for. A mini cloud is a service, and services need a person who is responsible when they break. If that person does not exist, the thing dies the first time it goes down on a holiday, and everyone loses trust in it.
When to graduate past Docker Compose. The compose stack above is a real service and it will carry a surprising number of students, but it is one machine with one of everything. It has no autoscaling and no second copy of anything. When you outgrow it, you do not rewrite: you move the same pieces onto Kubernetes. Two paths are worth knowing by name. The vLLM production stack ships a Helm chart with metrics, dashboards, and cache reuse already wired. KubeAI goes further and manages models as Kubernetes resources, running vLLM and Ollama underneath and bundling a chat UI, so most of this appendix collapses into two Helm installs. Neither replaces the gateway, because neither does per-user keys and budgets. That layer stays exactly where you put it.
The honest limit, and it is the same one Part 2 ended on. A gateway moves neither wall. It does not improve throughput and it does not make the brain smarter. It makes a fast brain shareable, which is a different kind of win, and often the one that decides whether a room full of people gets to use AI at all.
A department wants a private AI service for forty staff. Someone proposes going straight to Kubernetes with autoscaling and multi-node serving, "so we do not have to redo it later." What is the argument against? Forty users sit comfortably inside what one GPU behind Docker Compose can serve, so Kubernetes buys nothing today while costing weeks of setup and a permanent operational burden. The upgrade path is not a rewrite either: the same containers, the same gateway config, and the same model move onto Helm charts when the load justifies it. Build the thing that works this month, measure your real traffic, and let the measurement decide when to graduate. The right question is not "will we outgrow this" but "who is on call when it breaks."Show answer
Concept A7 done when: you can argue both sides for your own situation, and you can name the one thing a gateway does not improve.
Appendix A in one line
An inference engine serves tokens and a gateway serves people, and a mini LLM cloud is just those two programs plus a place to keep the keys. Build it when many mouths share one budget. And notice what you have really done: for everyone pointed at your address, you are now the cloud.
References
These are the primary sources for the commands on this page. They move fast, so check the live docs before you rely on any specific flag, price, or version.
Part 1: Local (Ollama)
- Ollama, the desktop app (download and chat with a model, no terminal). https://ollama.com/blog/new-app and https://ollama.com/download
- Ollama,
ollama launch(one command to wire and launch a coding agent on a local model). https://ollama.com/blog/launch and https://docs.ollama.com/integrations/claude-code - Ollama, Anthropic API compatibility (the native endpoint that makes the no-proxy setup possible). https://ollama.com/blog/claude
- Ollama, context length and
num_ctx, for the VRAM-based defaults and the 64K guidance for coding agents. https://docs.ollama.com/context-length - Claude Code, Environment variables, for
ANTHROPIC_BASE_URL,ANTHROPIC_AUTH_TOKEN, andAPI_TIMEOUT_MS. https://code.claude.com/docs/en/env-vars - OpenCode, Providers, for the
opencode.jsonprovider block and the OpenAI-compatible endpoint. https://opencode.ai/docs/providers/ - The skills installer and the GitHub CLI
gh skillcommands, for installing and publishing skills. https://skills.sh/docs
Part 2: Server (vLLM)
- vLLM, documentation home (installing,
vllm serve, and the OpenAI-compatible server). https://docs.vllm.ai - vLLM, Tool calling, for
--enable-auto-tool-choiceand the tool-call parser per model family. https://docs.vllm.ai/en/latest/features/tool_calling/ - vLLM, Claude Code integration, for the Anthropic Messages support and the
ANTHROPIC_DEFAULT_*_MODELvariables. https://docs.vllm.ai/en/latest/serving/integrations/claude_code/ - Qwen, vLLM deployment guide, for serving Qwen3 models and the recommended parsers. https://qwen.readthedocs.io/en/latest/deployment/vllm.html
Part 3: Cloud (OpenRouter)
- OpenRouter, Claude Code integration, for the environment variables and the Anthropic-compatible endpoint. https://openrouter.ai/docs/cookbook/coding-agents/claude-code-integration
- OpenRouter, Kimi K3 model page, for the live slug, price, and providers. https://openrouter.ai/moonshotai/kimi-k3
- OpenRouter, DeepSeek V4 Pro model page, for the live slug, price, and providers. https://openrouter.ai/deepseek/deepseek-v4-pro
- Moonshot AI, Kimi K3 technical blog, for the architecture, context window, and serving recommendations. https://www.kimi.com/blog/kimi-k3
- DeepSeek, API pricing, for current V4 Pro rates and cache-hit pricing. https://api-docs.deepseek.com
Concept 16: Claude Code Router
- Claude Code Router, for installing the router, the
ProvidersandRouterconfig, transformers, and theccrcommands. https://github.com/musistudio/claude-code-router
Appendix A: Mini LLM cloud
- LiteLLM, proxy server documentation, for the config file, virtual keys, budgets, and rate limits. https://docs.litellm.ai/docs/simple_proxy
- LiteLLM, virtual keys, for
/key/generate,/key/info,/key/delete, and per-key model access. https://docs.litellm.ai/docs/proxy/virtual_keys - LiteLLM, budgets and rate limits, for
max_budget,budget_duration, andrpm_limit. https://docs.litellm.ai/docs/proxy/users - LiteLLM, reliability and fallbacks, for the
router_settingsfallback rules. https://docs.litellm.ai/docs/proxy/reliability - vLLM, Docker deployment, for the official
vllm/vllm-openaiimage and the GPU runtime flags. https://docs.vllm.ai/en/latest/deployment/docker.html - vLLM, production metrics, for the Prometheus endpoint, queue depth, and time to first token. https://docs.vllm.ai/en/latest/serving/metrics.html
- vLLM, production stack, the Helm chart with routing, metrics, and dashboards for the Kubernetes upgrade path. https://github.com/vllm-project/production-stack
- KubeAI, AI inference operator for Kubernetes, for managing models as Kubernetes resources over vLLM and Ollama. https://www.kubeai.org
- Open WebUI, documentation, for the chat interface and connecting it to an OpenAI-compatible endpoint. https://docs.openwebui.com
- NVIDIA, Container Toolkit installation guide, required for GPU access inside Docker. https://docs.nvidia.com/datacenter/cloud-native/container-toolkit/latest/install-guide.html