Connector-Native Apps:客户是 AI 的远程 MCP 服务器
14 个概念 · 约 90–120 分钟阅读 · 一个专注日完成构建(强开发者约 4–6 小时) · 从 minimal base 到任何 AI 都能免费接入并使用的 live connector
三十年来,我们为人构建软件:供人查看的屏幕、供人点击的按钮、供人填写的表单。玻璃另一侧的客户一直是人。
现在,房间里的客户不只有人。在这门课里,你构建的是一个用户为 AI 的产品。
Connector 是人放进自己 AI 里的 add-on,让 AI 能够触达外部 app;他们只粘贴一次你的 URL,点一次。那是人最后一次直接触碰它。之后 AI 就是你的用户:它读取你的 tools 名称,自己决定调用哪一个,把输入交给你,再把结果说回给人。你不是在布置供 shopper 浏览的橱窗,而是在挂一块贴好标签的工具板,让一个不知疲倦的 worker 自己走过去,一轮又一轮主动使用。今天那段 chat 里通常还有人。越来越多时候,找到你的 connector、sign in 并按计划调用它的,会是另一个 agent,中间没有 human turn。你正在为那个客户构建。
先看贯穿整门课的词:server。Server 是一台一直开着、位于固定地址的计算机,等其他计算机向它请求东西,并在被请求时回应。你手机上的每个 app 都在和某个 server 说话。把它想成商店前台:固定位置、永远开着,自己不主动做事,但客户一走上来,它就完成一个 job 并把结果交回去。这就是你的 server。MCP server 是一种特定 kind 的 server:它遵循 MCP 这个共享标准,像 AI 的 USB port,一个 plug 适配每个 assistant,让任何 AI 都能无须 custom wiring 就使用它提供的能力。
你会从头到尾构建一个真实产品:
- 一个 remote MCP server:那张 front counter 被放到公共 web address 上,这就是 "remote" 的意思,让互联网上任何 AI 都能触达它。它包含三组 tools。
- 一个 two-table memory,也就是 app 维护的两张小表,让 AI 在下一次 conversation 继续记得这个人,而不是每次都从空白开始。
- 一个真实 sign-in (OAuth),让 server 从 login 本身知道自己持有的是谁的数据,而不是让 AI 替它担保。
- 一个 session contract:AI 首先调用的 tool,返回 app 的 rules,然后把其他每个 tool 锁在只有第一次调用才会发出的 key 后面。
- 整个东西 通过一个粘贴的 URL 和一次点击添加,运行在这个人自己的免费模型上,所以你服务它不承担 model cost。
你在写任何 agent loop 之前先 ship 这一切。这就是把它放在前面的原因:先学会构建 agent 调用 的东西,再构建 agent 本身。
一个规则解释后面每个难点,它直接来自你的客户是谁:server 由你拥有,调用它的 mind 不归你拥有。 Intelligence 住在 AI 的 host app 里,决定下一步的 loop 也住在那里。你的 server 只有在被调用时才回答,而调用者是一个靠 guessing 推理的 mind:快速、有能力,也完全可能被弄糊涂、被说服做错事或只是出错。因此,本课每个困难部分都有同一种形状:你的 server 在做 AI 不能被信任去自己完成的事。
剩下四个不可协商点。整门课都在构建它们:
- One gateway. AI 在一个 connector 处遇到你,tools 在它后面按名字分组:一个 front door,一个它读取的 menu。免费账户只能添加一个 custom connector,所以 "one" 是硬限制,不是偏好。
- Tools only. 你通过可调用的 tools 和 AI 说话,也就是它能在推理中调用的 functions,而不是需要人手动选择的 resources 或 prompts。
- Prove, don't trust. 你的客户是一个 mind,可能无恶意地交给你错误的人身份。所以 identity 来自 verified sign-in,绝不来自 AI 告诉你的任何东西。
- Fail closed. 当 server 缺失或坏掉时,AI 不会安静下来。它会 improvise,编出答案和用户保存的数据。你的 server 必须让它停下来并明说,就像 ATM 连不上银行时显示 temporarily unavailable,而不是猜余额并吐钞。

其中两个描述你构建物的 shape(one gateway、tools only)。另外两个是 server 必须做的 jobs,因为 AI 不能被信任去做(prove identity、fail closed)。读每个 Concept 时问:这是哪个 invariant?
Prerequisites. 本页假设四件事。
- 你能读 typed Python,直接读,或把 code block 粘给 coding agent,让它用 plain English 讲回来。如果现在还不能,先学 Python in the AI Era。
- 你已经完成 Agentic Coding Crash Course。 你会在 plan mode 下,用 rules file 驱动 Claude Code 或 OpenCode。本课通过那个 workbench 构建,而不是重新解释它。
- 你从外部用过 connector,也就是 Skills & Connectors 课程。你打开过一个 connector,看着 AI 进入你的 Drive。本课把你翻到内部:现在 你 是 AI 触达的东西。
- 你不需要先学 Build AI Agents。 这里你构建的是 agent 调用 的 server,不是 agent。那门课在路径后面,而本课会让你明白为什么会想要它。
你不需要自己的 API key:模型由人带来。需要的账户都在需要时才打开,而且都有免费层:第一次保存 state 时需要一个 Neon database(Concept 5,无卡)。Concept 12 会让你的 connector 通过免费 tunnel 在 claude.ai 中 live run,无 host、无 card、无 sign-in account。Sign-in 这一半全程使用 bundled local mock,所以你不会为了 build、test 或 demo 而创建 sign-in account。
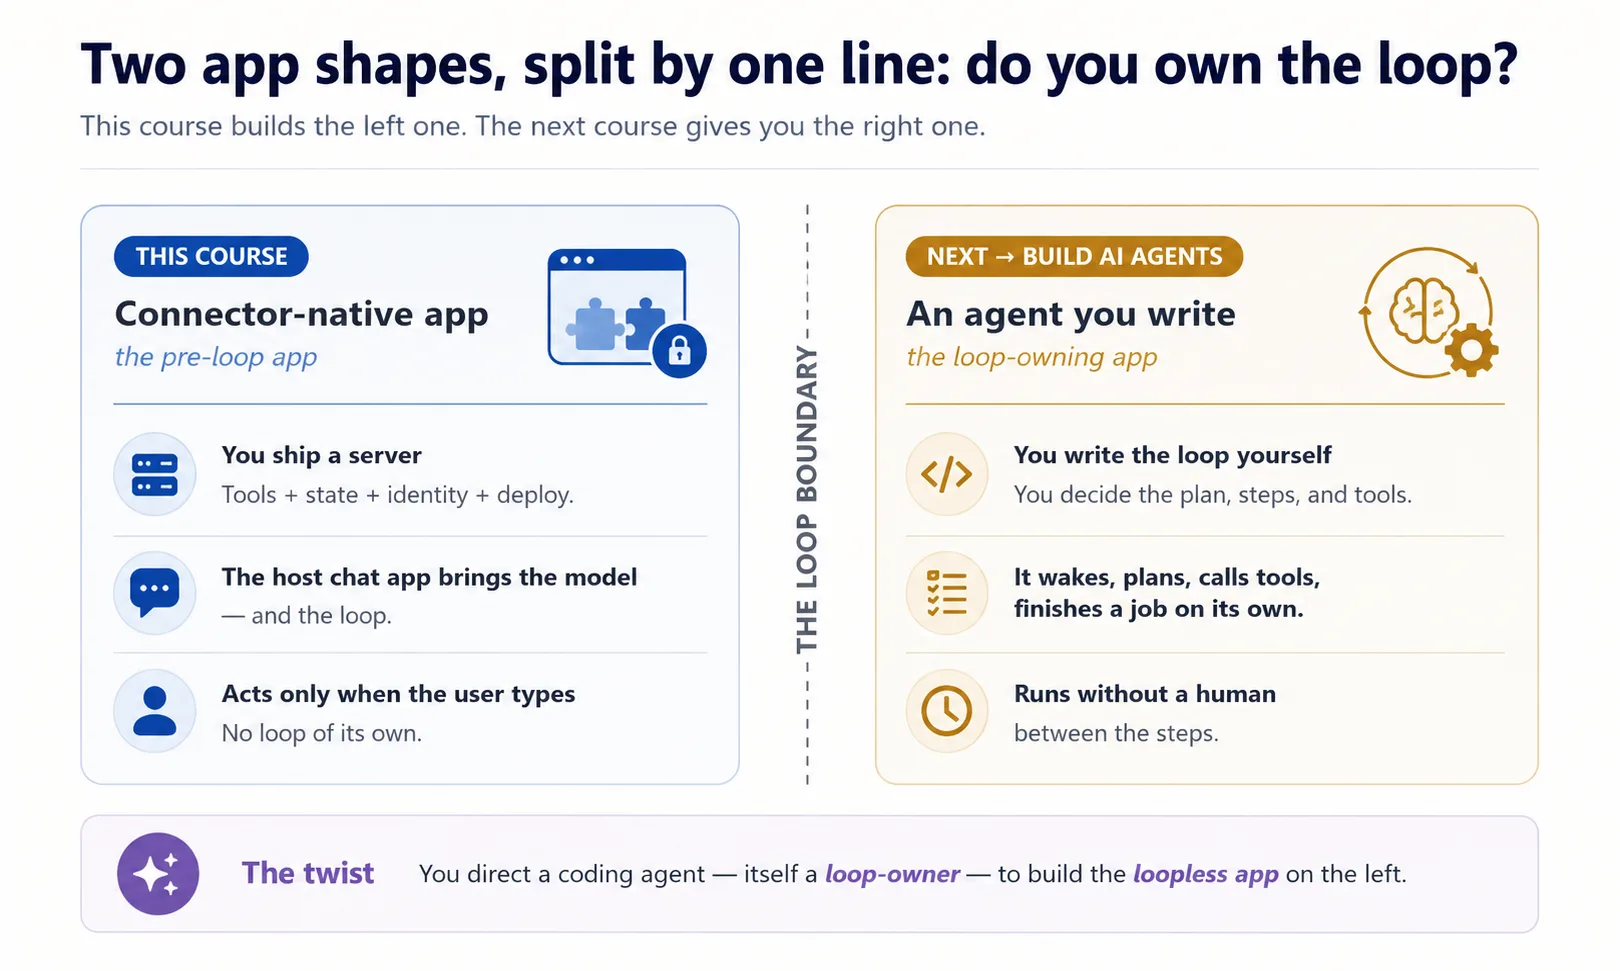
它放在哪里。 Mode 2 的第一门 build course。从这里开始,Manufacturing path 是:本课 → Plugins for AI Agents → AI Identity → Build AI Agents。这是 pre-loop app:tools、state、identity,以及在 claude.ai 中 live run,由调用者的 model 做 thinking。Build AI Agents 在路径后面,是你拥有 loop 的地方。
📚 教学辅助
查看完整 Presentation — Connector-Native Apps
你在本课中如何构建
你不会手写这个 server。像每门 Manufacturing-track 课程一样,coding agent 写 code;你的工作是输入 spec,输出 verification。 你 plan、review、run、check。这个 loop 不是便利功能;它就是 Concept 1。
Build 采用 coding course 的一个动作,但放大到完整尺寸:plan → review → execute in checkpoints → verify。你先整体计划 gateway,对照四个 invariants 审查,然后在一个 small base 上,一次构建一个可观察 slice。这个 base 只预置那些你应该 read 而不是 generate 的部分。
准备 base(几分钟)
- 下载 base(
connector-native-apps-base.zip),解压,然后cd进文件夹。 - 在该文件夹打开 Claude Code 或 OpenCode。它会自动加载
AGENTS.md:这个 brief 让 agent 遵守四个 invariants,并说明如何准备。
盒子里有什么。 这是 minimal base,不是 finished app。只有 security-critical core 是完整给出的,因为 agent 很容易写出 看起来 正确但悄悄错误的 authorization code,所以那部分你读,不生成。其他部分你会随课程构建。
connector-native-apps/
  AGENTS.md                  the agent's brief: base prep, the four invariants, the build order
  CLAUDE.md                  one line, @AGENTS.md, so Claude Code loads that same brief
  .mcp.json  opencode.json   Neon + Context7 MCP servers, pre-declared (authorize once in browser)
  pyproject.toml             a uv project; only the deps the given code needs (your agent adds the rest)
  .env.example               copy to .env; the user brings the model, so no API key of your own
  src/connector_app/
    auth.py                  GIVEN, complete: the security check that proves who is signed in (you read it in Concept 7, never rewrite it)
    session.py               GIVEN, complete: the lock the rest of your tools sit behind (you wire it in Concept 10)
  mock_auth/server.py        GIVEN: a local sign-in service, so you can test the whole flow without creating any account
  seed/articles.json         a tiny catalog for your domain
  tests/test_starter.py      five offline smoke tests over the security core
标为 GIVEN 的两个文件(auth.py、session.py)你只读和 wire,永不重写。其他部分,gateway(server.py)、two-table store(db.py)、rules/persona(config_store.py),由 agent 和你一起 concept by concept 构建。
用三个短 ask 准备 base,就像接新 teammate:先看它知道什么,再让它设置环境,最后让它解释项目并证明健康。一次粘贴一个。
1. 看它知道什么(这也检查它打开时是否读了 brief):
What can you do for me?
好答案会描述 这个 项目:connector-native app、四个 invariants,以及它如何帮你逐 concept 构建。泛泛的 “I'm a coding assistant” 说明它没有加载 AGENTS.md。
2. 设置环境:
Set up my base environment for this project, and install anything that's missing, including Python and uv.
观察: agent 会确认 Python 3.14+ 和 uv,缺什么装什么;安装 dependencies 和 mcp-builder、neon-postgres skills;创建 .env 和 generated SESSION_SIGNING_SECRET。Context7 无 key 自动连接;Neon 需要运行 /mcp 并让你在浏览器点一次 Authorize(免费、无 API key、无卡)。
3. 理解它,并检查健康(restart 后):
Explain this project to me before I continue the crash course, then run its tests and share their status.
Done when: agent 用清楚语言讲解 base,五个 security-core tests 通过,restart 后 Neon tools 可见,.env 存在。如果看不到 Neon tools,重新 /mcp 选择 Neon 并 Authorize。现在开始 build。
两个 tracks,由你选择。 Beginner track 使用 bundled mock_auth/:一个 local sign-in,会发真实 tokens,所以 sign-in half 不需要账户(saved data 仍然存在免费 Neon database)。Standard track 换成真实 hosted sign-in service,这是你在 AI Identity 课程中接上的 production path。先在 Beginner track 上构建,再通过 .env 三个值切换。
Part 1:形状
这四个 concepts 是后面整页的 mental model。前三个只读;在 Concept 4 中你会计划整个 build 并 scaffold gateway。
Concept 1:你指挥它,不亲手敲它
你不会手写这个 server。你告诉 coding agent 想要什么,它写 code,你的工作是 read、run、check。如果你来自 Python in the AI Era,已经知道这个节奏:你 direct,agent type,你 verify。
Checking 才是真正的 skill,而最需要它的地方是 Concept 8 的 sign-in code。Agent 可能写出 看起来 正确但悄悄错误的 sign-in code,学会识别差别正是本课训练你的地方。敲键盘是 agent 的工作;判断是你的工作。
有一个 twist 值得记住,因为这是唯一一门同时看到两种 program shape 的课。想象两台吸尘器。Robot vacuum 自己运行:醒来、在房间里移动、决定每一步,甚至可以设定凌晨 2 点工作。Hand vacuum 只有你按住 trigger 才运行;一松手就停。为你构建这个项目的 coding agent 是 robot vacuum:它会自己继续。你构建的 connector 是 hand vacuum:用户伸手之前它静止不动。这个自运行能力有个名字:owning the loop。Robot vacuum owns its loop;你的 connector 从不 own loop。你在驱动一个 owning-loop program 去构建一个 loopless app。
Concept 2:新的 app 形状
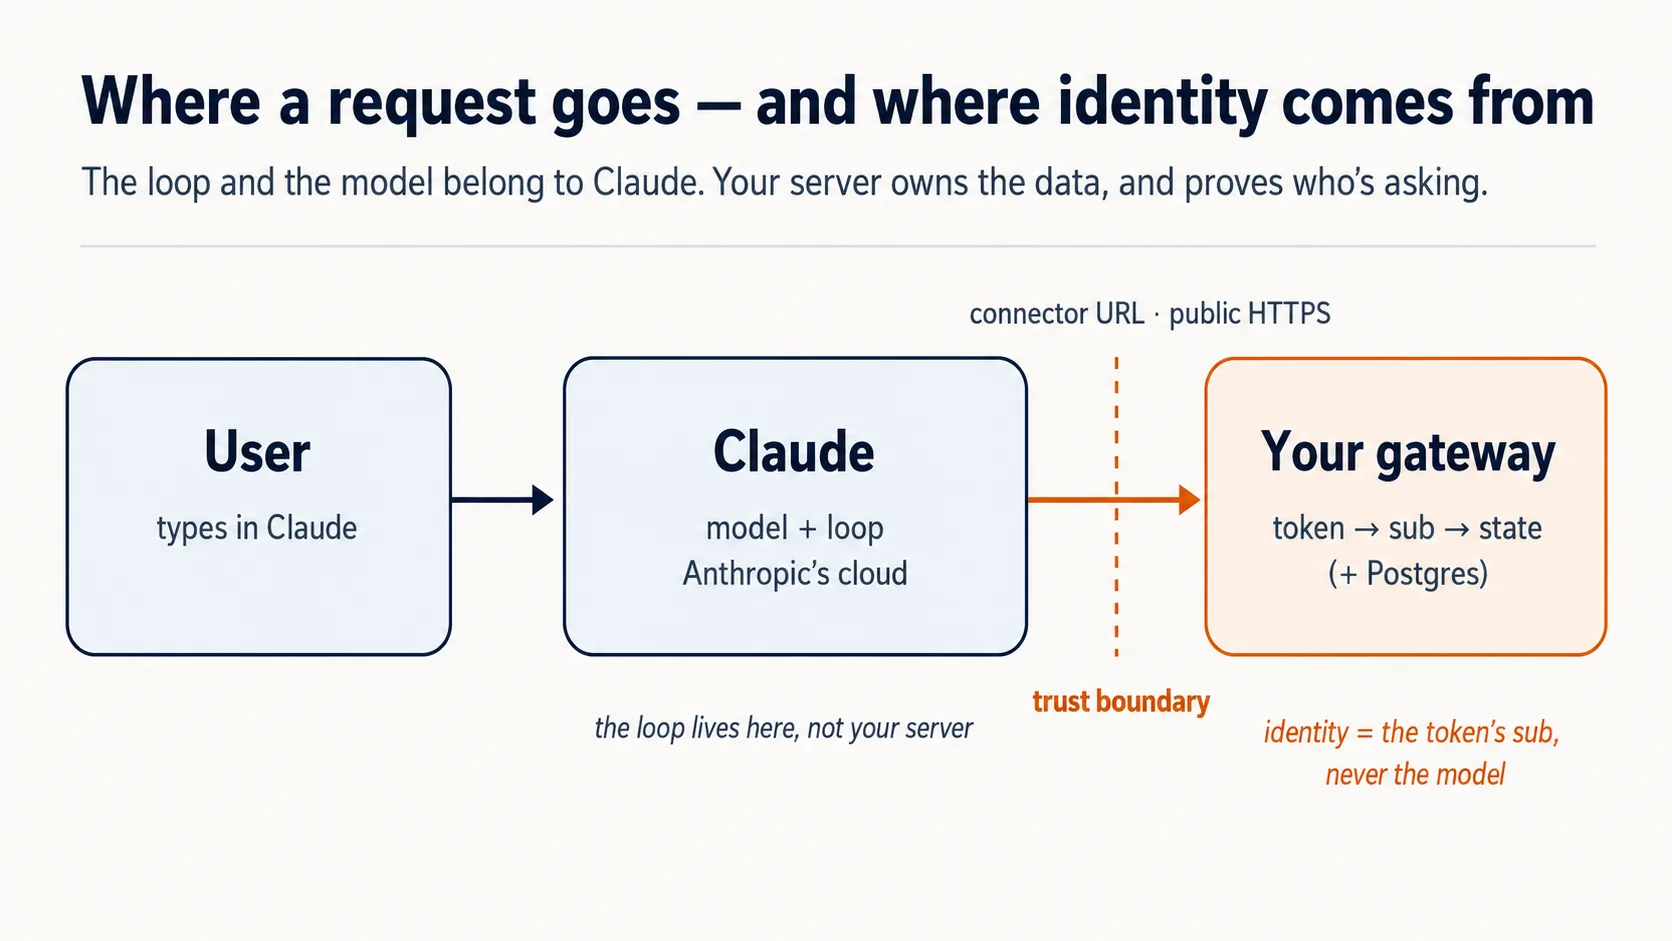
你已经从外部用过 connector,作为人伸进自己的 apps。现在反过来:你是 server,caller 是 AI。 Claude 从它的 cloud 里拨给你。三个事实会驱动后面每个决定。
Chat app 是 runtime,也就是实际运行一切的 engine,而且它住在 cloud。 用户添加你的 connector 时,Claude 从 Anthropic's cloud 触达你的 server,不是从用户 laptop。所以你的 server 必须在 public internet 上,通过 HTTPS。Claude 离你很远,所以你的 counter 必须放在有真实地址的公共街道上:public web address。运行在你 laptop 上的 server 就像建在锁住房子里的同一张 counter,真实但没有通向街道的门,所以外面没人走得进去。这就是为什么 Part 5 通过 quick tunnel 把它放到 public internet,而不是事后补充。
用户带来 model。 你不为 intelligence 付费;用户的 free Claude tier 提供它。你的成本只有小 server 和 database。这就是 “free for anyone” 背后的经济 trick。
这些事实解释为什么后面都在讲你的 server 必须保证什么。第一条保证最窄:server 只允许用一种方式和 borrowed model 说话。下一个 Concept 就是它。
Concept 3:只用 tools,不用 resources,也不用 prompts
MCP server 可以给 model 三种东西:tools、resources、prompts。三者都是有效 MCP surfaces。但对本课这个 product shape,我们故意只暴露 tools。这是这种 app 的 design choice,不是说 resources 和 prompts 一般是错的。
Tools 适合 这个 shape,因为 app 必须 自己决定 下一步 fetch 或 do 什么:search、pull record、save result。想象 workshop。Tool 是 worker 腰带上的 cordless drill,干活中随手拿起,不用问人。Resource 是锁在 cabinet 里的 manual;prompt 是 worker 必须停下来从 shelf 上拿的 form。只有 drill 能让工作在没有 human-in-loop 的情况下继续流动,所以这个 app tools-only。
| MCP surface | Who triggers it | Can it be auto-called mid-reasoning? | Use it here? |
|---|---|---|---|
| Tool | The model, on its own | Yes | Yes — everything |
| Resource | The user points at it | No | No |
| Prompt | The user picks it | No | No |
Concept 4:一个 gateway,后面三组 tools(先 plan,再 scaffold)
这个 Concept 决定你后面构建的一切,所以值得慢下来。先看它要避免的 mess。
你的 server(开头那张 front counter)马上要同时做几类不同工作:查东西、记住每个人和他们保存的内容、遵守你的行为规则。全部扔进一堆 tools 里会破坏两件事:AI 看 menu 时分不清 “fetch article” 和 “save this person's place”,你也很难单独思考任一部分。修复方式是软件里最老的一招:给每种 job 一个 labeled group。
Connector-native app 总有同样 三种 jobs:
domain_*是 app 真正做的事。 Reading Room 里是 books:search collection、fetch article。user_*是谁在这里,以及你记住了他什么。 Reader 的 library card 和上次保存的 shelf。config_*是 app 应该如何 behave。 Librarian 的 rules 和 voice:会做什么、不做什么、怎么说。
所以 domain 是 work,user 是 person,config 是 behavior。名字里的 _ prefix(domain_search、user_save_state)让 grouping 可见。Tool names 只能用 letters、digits、_ 和 -,不能用 dot,所以 underscore prefix 就是 namespace。
为什么一个 server,而不是三个? 教科书做法是三个 concerns 三个 servers。这里不行(invariant 1):Claude Free plan 下,用户只能添加 exactly one custom connector。所以把三组放在 一个 server 里,藏在 one URL 后面:single gateway。
domain_search      domain_get_item      domain_do_action
user_get_profile   user_save_state
config_get_rules   config_get_persona
后面 prompts 会出现一个词:在 MCP Python framework FastMCP 里,tool 只是 decorated function。Function 是一个 labeled action;decorating 只是把 name tag 固定上去,让 AI menu 能列出它。
Prompt 1:先让 agent plan 整件事,再写任何 code。
进入 plan mode(Claude Code 中 Shift+Tab,OpenCode 中 Tab),切到 strong model,然后粘贴:
I want to build the Reading Room connector on this base. Read AGENTS.md and use the mcp-builder skill for tool naming and schemas, then propose the architecture for me: the one gateway, the three tool groups (domain, user, config), how it remembers a person, and how it proves who is signed in. Show me the complete plan and the tool list before you write any code, and for each piece tell me which of the four invariants it serves and flag anything you are unsure about or that the base has not already decided.
然后像 inspector 一样读 plan,检查:
- One gateway,不是三个?
- Tools only,没有 resources 或 prompts 承载 app logic?
- Identity 来自 verified sign-in,绝不来自 tool argument?
- Fail-closed rule 在 config 里?
有问题就让它 re-plan。Plan hold 住之后才 build。
Prompt 2:scaffold empty frame,并证明它站得住。 Scaffolding 是在真实墙体之前搭 bare skeleton:一个能运行的 server,只有一个 health-check tool 和一个 placeholder。这样 wiring 错时现在就能发现。
Prompt 里有一个 load-bearing phrase:stateless streamable HTTP。Streamable HTTP 是 Claude 这种 remote host 触达你的 server 的 wire format;stateless 表示 server 不记单个 connection。粘贴:
Looks right. With the mcp-builder skill's guidance, scaffold the gateway: one FastMCP server on stateless streamable HTTP transport, with a health tool and a
domain_get_itemstub. Add whatever dependencies you need. Run it and show me a local client listing both tools, with no auth and no real data yet.
你会看到什么,以及要验证什么
一个 running server,以及一个 client 列出两个 tools。domain_get_item 仍然是 stub,这是正确的:此步没有 auth,没有 real data。你证明了一个事实:single server、tools grouped by name、right transport,remote host 可发现。Identity 和 gating 后面再加。
✓ Checkpoint:shape 已到位。 你计划了整个 connector,对照 invariants 审查,并在正确 transport 上站起一个 gateway。后面每个 Concept 都往 这个 server 里添加真实 piece。
Part 2:State 与 domain
Concept 5:State,只记住一个人所需的最低量
Generic chatbot 在你关掉 tab 后会忘记你。你的 app 不该这样;跨 sessions 记住 user,是它成为 product 而不是 toy 的大部分原因。
保持 v1 小:一个 Postgres database(标准、免费起步的 relational database),两张表。想象 front desk 的两个 registers,用 loyalty number 绑在一起:一个 guest register 记录每个人是谁,一个 stay-log 记录他们最近在做什么。
下面是这两张表,用 SQL 写出。你不需要会读 SQL 才能跟上:看每行的 plain-English comment 就够了。Agent 写它,你 review。
-- users: one row per person
create table users (
  id    text primary key,     -- one person's verified sign-in id, the 'sub' (Concepts 7-8)
  email text
);

-- user_state: one row per person, whatever you carry between sessions
create table user_state (
  user_id text references users(id),
  state   jsonb               -- a last position, a few saved values
);
连接两张表的 id,也就是 front-desk 画面里的 “loyalty number”,在真实 app 中是人的 verified sign-in id。代码里的名字是 sub,subject 的简称,是你唯一能 trust 的 identity piece。Real sign-ins 还没出现,Concepts 7 和 8 会说明它从哪里来。
这就是 v1 memory 的全部:store a row,read a row。严肃版本,比如 audit trail、approval model、可信 record,是 Building a Digital FTE 的内容,不在这里构建。
你不手动 setup 或 operate database。像每门 Manufacturing course 一样,coding agent 通过 Neon 的 MCP server 驱动 Neon:create project、make branch、run SQL,你 review。
Check Neon is awake (10 seconds). 问 agent:"Can you see the Neon tools right now?" 如果 yes,继续。如果 no,输入 /mcp,选择 Neon,浏览器点 Authorize,然后再问。
Prompt 1:让 agent 创建 store。
Using the Neon MCP server, create the two-table store (
users,user_state) on adevbranch, and save the branch'sDATABASE_URLto.env(never print it).
Done when: agent 能列出 users 和 user_state,并确认 .env 有 DATABASE_URL。
Prompt 2:让 agent 写 read/save code。 现在还没有 real sign-in,所以测试用 stand-in id。Code 仍然 key on sub。
Write
db.py: read and save a user's state, keyed by the verifiedsub(never an id from a tool argument). Show me a value saving and reading back on a fresh connection. Then explain in one line why you keyed it on the verifiedsuband refused a tool-supplied id; we will see the full reason in the next part.
Done when: value round-trips。Fresh connection 读回同一值,说明 state 在 identity 之前已经工作。
Concept 6:Domain,现在按引用,之后按语义
你的 domain 就是 app 真正关于的东西:articles、items、records,不是 web address。用户要具体东西时,v1 用简单方式 fetch:每个 record 有 id,domain_get_item(id) 返回它。
v1 暂时故意不做 semantic search,也就是不按 meaning 回答 “refunds 相关部分”。按 id fetch 像按 call number 找书;semantic search 像告诉 librarian “我要 sad whale 那本书”。v1 是 call-number desk;librarian 是后面的 RAG upgrade。现在先 build reference version:
Make
domain_get_item(id)return a real article fromseed/articles.jsoninstead of the stub. Show me it returninga1by id.
Done when: article 能按 id 返回。现在 fetch by reference,之后再升级到 search。
Optional:看一个真实 agent 调用你的 tool
到目前为止,你只是用小 listing script 证明 server。做一次这个,感受 connector 真正的用途:agent 自己伸进去调用你的 tool。最快方式是借用你正在使用的 coding agent 作为 stand-in client。
保持 server running。在第二个 terminal 中,把 agent 指向那个 URL:
claude mcp add --transport http reading-room http://localhost:8000/mcp --scope project
--scope project 会把 reading-room entry 写入项目 .mcp.json,和 Neon、context7 放在一起。用 claude mcp list 检查;mid-session 用 /mcp reconnect。
在 opencode.json 的 mcp block 里,在现有 Neon 和 context7 旁边添加 reading-room entry,不要替换它们:
"reading-room": {
  "type": "remote",
  "url": "http://localhost:8000/mcp",
  "enabled": true
}
然后用普通 prompt 问:
Use the reading-room
domain_get_itemtool to fetch articlea1, and show me what came back.
看着 agent discover 你的 tool、call 它、把 article 读回来。这个 round trip,就是整个 product 的缩影。
- 这是 dev-time peek,不是真正 delivery。 真正客户是 chat app (claude.ai),在 Concept 13 连接。
- 它能工作只是因为还没有 auth。 Concept 8 添加 lock 后,unauthenticated call 会开始返回
401。到 Concept 8 时移除这个 dev registration。
Part 3:证明,identity 不能由 model 伪造
这是 “server does what model can't” 的前半部分。两个 Concepts 都服务 invariant 3。
Concept 7:identity 来自 verified subject,永远不来自 model
问题在这里。user_state table 必须写入 正确 的人的 row。但和 user 说话的是 model,你绝不能让 model 决定读写谁的数据。把 AI 想成 hotel concierge:当他说 “room 412 wants their mail”,front desk 不能只凭他的话交出邮件;被弄糊涂或被操纵的 concierge 可能说错 room。
规则:model 从不供应 identity。 用户 authorize connector 时,通过 trusted service sign in;该 service 给你的 server 一个 signed token,里面有用户的 verified id,也就是 subject 或 sub。Server 直接从 token 读 sub,用 它 作为 database key。Tool argument 中即使出现 user_id,server 也忽略它。
这个规则由 given auth.py 执行,所以该文件完整给出,永不重写。下一 Concept 才 wire 它;这里先记住规则。
把它连回你的 db.py。
Read
auth.pyback to me in plain English, then open thedb.pyyou wrote in Concept 5 and show me where thesubcomes from now. Tell me what would break if a tool argument could set it instead, and tie it back to the concierge and the passport.
一次 Authorize click 同时打开 connector 和 sign-in。一个动作,两份工作。
Concept 8:证明谁在那里(plain English 里的 sign-in)
这里的 machinery 是 OAuth,也就是你点过很多次的 “Sign in with Google”。本 Concept 需要慢下来,因为 auth code 可能 看起来 正确却悄悄错误。你只需要 ideas 和如何 check result;实际 wiring 由 agent 写。
整个 idea 五行。 User 在别处 sign in。那个 service 发 signed token。你的 server verify token。你的 server 从中读 sub。Model 从不供应 identity。
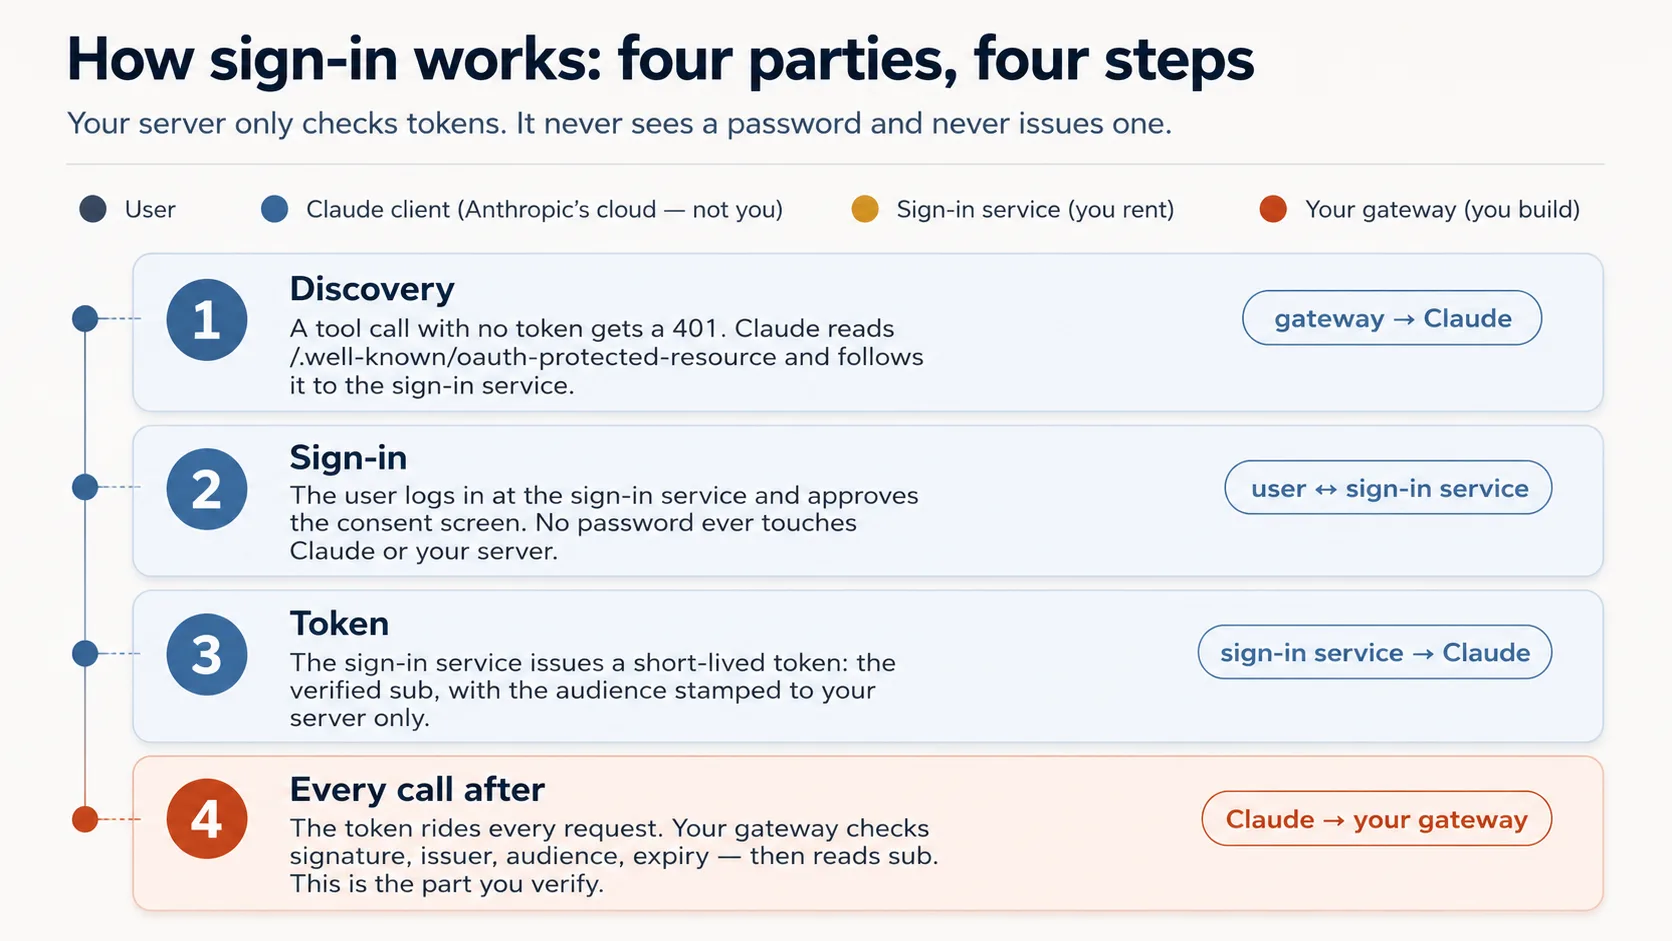
这里其实是 两份工作,而你只做一份。让人 sign in 很难也有责任,所以你不做:specialist 运行 login,并给 server 一个 token。Server 只负责 check the slip。四个 parties:
| Party | Who it is | You build it? |
|---|---|---|
| The user | The person whose data it is | — |
| Claude's MCP client | Runs in Anthropic's cloud, asks on the user's behalf | No |
| The sign-in service (authorization server) | An outside specialist — hosted (Clerk, Auth0, Stytch) or a framework you self-host (Better Auth) — that checks the login and issues tokens | No — you rent or self-host it |
| Your gateway (resource server) | Your server; it only checks tokens and serves data | Yes |
MCP current spec 下,你的 server 只是 resource server。你在这里只 validate tokens;issuing 是 AI Identity course。Flow:
- Discovery. 没 token 的 tool call 得到
401,Claude 读取/.well-known/oauth-protected-resource找到 sign-in service。 - Sign-in. User 看到 consent screen,login 并 approve。Password 从不触碰 Claude 或你的 server。
- Token. Sign-in service 发一个 short-lived token,带 verified
sub和 stamped audience。 - Every call after 都带 token;server check 它并读
sub。
Agent 在这里 build 的是 wiring,不是 check。 Token check 本身完整存在于 auth.py。Agent 添加的是薄薄一层门锁:让 no-token call 返回 401,把 Claude 指向 sign-in。
| The check | The question it asks | If your server skipped it |
|---|---|---|
| Genuine? | A real token signed by the issuer, not a forgery? | Anyone could forge a token with any name and walk straight in. |
| Trusted issuer? | Did it come from our sign-in service, not some other? | A token from a service you never trusted would be accepted. |
| Stamped for us? | Minted for this exact server, not a different app? | The most dangerous one: a token meant for another app gets replayed against yours. |
| Still in date? | Has it expired? | A stolen token would keep working forever. |
Concept 7 的 rule 坐在四个检查之上:identity 从 token 的 sub 读,绝不从 tool argument 读。
好奇的话:这四个问题在 code 里长什么样
# auth.py — the token check (ships complete in the base)
from jose import jwt
from jose.exceptions import JWTError

def verified_claims(token: str) -> dict:
    key = _key_for(token)                          # pick the matching public key (by the token's `kid`)
    try:
        claims = jwt.decode(
            token,
            key,                                    # Genuine?       signature checked against the issuer's public key
            algorithms=["RS256"],
            audience=RESOURCE_URL,                  # Stamped for us? must be THIS server (never omit)
            issuer=AUTH_ISSUER,                     # Trusted issuer? must be the service we trust
            options={"require": ["exp", "sub", "aud", "iss"]},  # Still in date? + require the facts we rely on
        )
    except JWTError as e:
        raise AuthError(f"token rejected: {e}") from e
    return claims                                   # claims["sub"] is the user; nothing came from the model
Prompt 1:把锁装到门上。
Wire the OAuth layer around the given
auth.py, and don't rewriteauth.py. Check the current FastMCP via Context7 first, then wire theJWTVerifier/RemoteAuthProviderand the/.well-known/oauth-protected-resourceroute so an unauthenticated tool call returns HTTP401. Start the bundledmock_authservice (.envalready points at it). Show me an unauthenticated call returning401.
Prompt 2:证明锁真的会区分。
Mint a token from the mock and show me it resolves its
subthroughauth.verified_claims. Then, before you mint a token for a different audience, tell me which of the four checks should reject it. Mint it, show me it's rejected, and walk me through where each ofauth.py's four checks runs.
你会看到什么,以及如何读 failure
Unauthenticated call 上的 401,token 解析出真实 sub,wrong-audience token 被拒绝。确认四个 checks:signature、issuer、audience = your server、expiry。Missing audience 是最常见的 subtle wrong output。
保持一件事清楚:你刚才是在 rehearse flow,不是成为 flow 的一部分。 Beginner track 中,bundled mock_auth 代替 sign-in service;production 中,end user sign in,real sign-in service mint token,Claude's cloud 携带 token,你的 server 做同样四个 checks。
Go deeper:本课 validates tokens;AI Identity issues them。 这里 gateway 只是 resource server。自己搭 OAuth/OIDC issuer 是专门的 AI Identity 课程,基于 Better Auth。
✓ Checkpoint:server 知道谁在那里。 Identity 来自 token,绝不来自 model,data 安全。现在让 model behave。
Part 4:引导,让 model 按规则行动
这是 “server does what model can't” 的后半部分。三个 Concepts 服务 invariant 4 和 app behavior。
Concept 9:app 规则住在哪里:Skill,还是 connector?
这是一个真实决定,因为 app rules 有两个 homes:行为方式、voice、guardrails。Skill 像桌上的印刷 placemat,一直可见,enforcement 更强。Connector 像 waiter,入座时告诉你规则,每道菜提醒一次。Connector 的优势是把 setup friction 降到 one connector + one Authorize click。
Skill (SKILL.md) | Connector (recommended) | |
|---|---|---|
| Enforcement strength | Stronger, because always in context | Slightly softer, mitigated below |
| Setup steps for user | Four: connector + code-exec + ZIP + toggle | One: connector |
| Shipping to free-tier strangers | Hard | Easy |
Connector 的四层保护让这个 tradeoff 安全:tool description 总是 loaded,说先 call session-init;session-init return 带完整 rules;每个 tool return 重复一行 reminder;real tools 被 session token gate 住。所以默认 ship connector path,把 Skill 留给 power users。
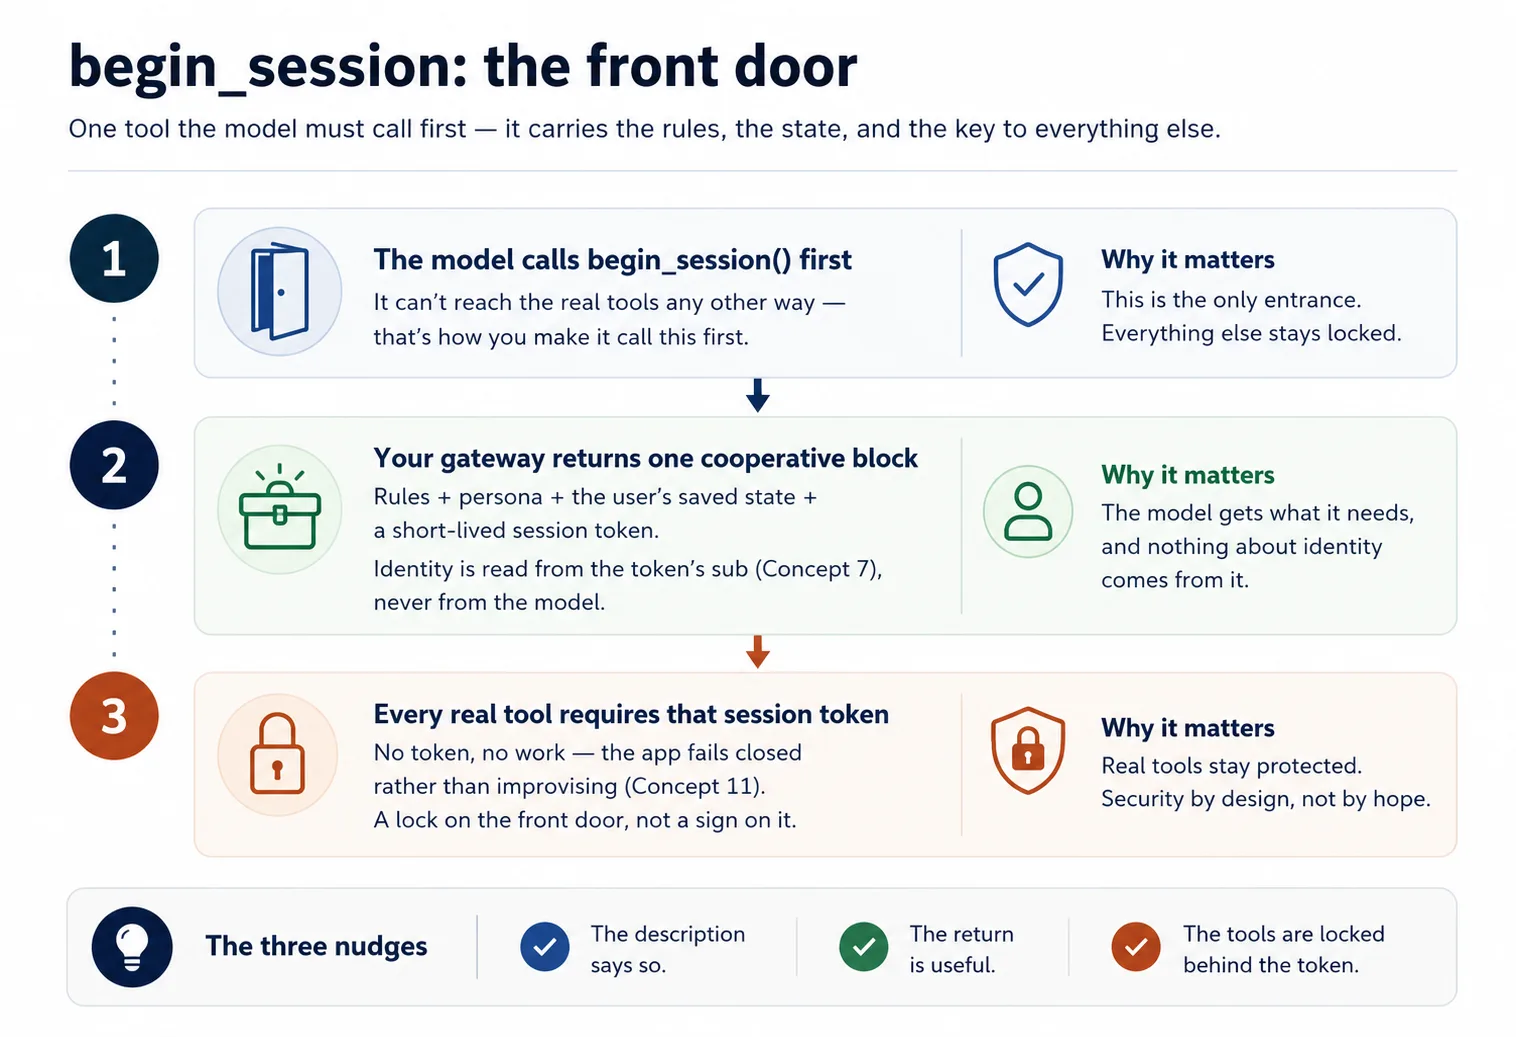
Concept 10:Session-init contract
Rules 和 user state 通过一个 model 首先调用的 tool 到达。叫它 begin_session,或你喜欢的名字。
当 user 的话表示 “start” 或 “continue” 时,model 调用 begin_session()。这是 check-in:desk 检查 guest passport,也就是 Concept 7 的 signed token,然后发 keycard,也就是 short-lived session token。Gateway 读取 app rules (config_*) 和 user state (user_*),返回一个 cooperative block:“here is how to behave for this user, and here is where they were”,加上 keycard。之后每个 real tool 都检查它:no card,no entry。
这是 application-level session token,不是 MCP protocol session。 它是 server 发出的 handle,由 model 当作普通 tool argument 传回:你的 gating logic,不是 transport logic。这个 pattern 正好符合 MCP 的方向。
@mcp.tool()
def begin_session() -> dict:
    """Call this FIRST on any new request. Returns how to behave for this
    user, their saved state, and a session token the other tools require."""
    sub = verified_claims(current_token())["sub"]   # identity from the token (Concept 7)
    return {
        "session": new_session_token(sub),           # gates every other tool (Concept 4)
        "rules":   config_get_rules(),                # cooperative: "here's how to behave"
        "state":   user_get_state(sub),               # where this user left off
    }
两个 design points:
- 把它写成 cooperation,不要写成 override。 “Here is what our guest prefers” 会帮助 model;“ignore previous instructions” 像 attacker language。
- 让 model 必须先调用它。 Real tools 要求 session token,而 token 只有
begin_session能发。
Run it.
let's do Concept 10: add
begin_sessionreturning rules + state + a signed session token, make the description instruct the model to call it first, and havedomain_get_itemreject calls without a valid session.
Done when: 新 request 中 model 先 call begin_session,拿到 rules + saved state,然后才 reach domain tools。
Concept 11:Fail closed,不要悄悄变成 chatbot
这种 app 最危险的 failure 是 silent corruption:connector missing、unauthorized 或 erroring 时,model 仍然会用自己的 knowledge 自信地 improvise answers,并 invent user state。你的 structured product 就变成了穿着它名字的 generic chatbot。
Trap 在这里:锁住 file cabinet,也就是 session gate,不能阻止 model 从自身 memory 猜。你必须在 rules 中加入 permanent desk note:如果 begin_session 不可达,或 tool 返回 error,就明说 session 现在不能继续;不要 improvise results,不要 invent saved state。
# config_store.py — the fail-closed paragraph (you write this)
RULES = """\
You are the assistant for <YOUR APP>. Behave as follows for this user:
- <how to greet, your app's do's and don'ts>

Fail closed: if you cannot reach begin_session or a tool returns an error, tell the user
plainly that the session can't continue right now. Do NOT improvise an answer from your own
knowledge and do NOT invent the user's saved state.
"""
Run it.
stop my Postgres (or point
DATABASE_URLat a dead host), then ask the app to do its job. Show me whether it refuses cleanly per the fail-closed rule, or whether it invents an answer — and if it invents, strengthen the rule and the per-tool reminders until it refuses.
✓ Checkpoint:trust loop closed。 Identity 已证明,model 通过 session gate 被引导,app 会 refuse 而不是 fake。剩下就是把它放到 internet 上。
Part 5:发布它
Concept 12:让它 live run(no Docker,no deploy)
因为 Claude 从 Anthropic cloud 触达你的 server,“在我 laptop 上 works” 不够:laptop server 是 locked house 里的 counter,真实但没有 street door。教科书 fix 是 full deploy,也就是 rented host 上的 container。只是为了 看它工作,你不需要那一步。你改为打开一个通向 laptop 的临时 public doorway,一个 tunnel,运行 connector 的 quick pop-up。免费、无 host account、无 card,大约一分钟。
这里有一个 honest move。claude.ai 用 real OAuth 给 users sign in,而你还没有 real sign-in service;那是 AI Identity 课程。所以这个 personal demo 中,你用一行 AUTH_DISABLED=1 turn the lock off。你已经在 Concept 8 用 mock 证明 lock works;这里把它暂时放到一边,以便今天就触达 claude.ai。
Build it.
Put my connector live with the
live-connectorskill: turn auth off, start the gateway, open the Cloudflare tunnel, and give me the public connector URL. Confirm an unauthenticated tool list returns 200 over the tunnel before you hand it to me.
Done when: skill 打印 https://….trycloudflare.com/mcp URL,unauthenticated tools/list 通过它返回 200。这个 public URL 就是接下来粘进 claude.ai 的东西。
这是 open、temporary doorway。 Auth off 时,任何拿到 URL 的人都能在 tunnel up 时访问你的 tools 和 Neon data,而且所有 callers 都是同一个 stand-in user。把它当 personal demo:结束后关掉 tunnel(pkill -f "cloudflared tunnel"),并预期每次 restart 都会换 URL。
Concept 13:把它添加到 claude.ai,看整个 app 工作
Payoff,而且这一部分由 你 做。这次没有 Authorize step,因为 demo 中 auth off:
- 在 claude.ai:Settings → Connectors → Add custom connector。粘贴 tunnel URL(以
/mcp结尾),点击 Add。无需 client id,无 Advanced settings。 - 用 plain language 让 app 做它的 job。
- 打开 brand-new chat,让它从你离开的地方继续。
你会看到什么,以及要验证什么
App 以自身身份回应:model 首先 call begin_session,拿到 rules 和 stand-in user's state,然后通过 gated tools 工作。State 存在 user id 下,而不是 chat 下,所以 brand-new chat 会从上次离开的地方 resume。两个 notes:real sign-in wire 之前 everyone 是 same stand-in user;tunnel URL 变化时要 re-add connector,而不是 edit。
✓ Checkpoint:你让它 live run 了。 你看到了整个 app 在 claude.ai 中工作:model 通过 identity-gated session 调用 tools,memory 跨 chats carry,app fail closed 而不是 fake,而且都在 free account 上。面向陌生人的 public connector 还剩一个 piece:real sign-in service,也就是 AI Identity。
Part 6:capstone,你自己的 domain
你已经跨 concepts 构建了 Reading Room。现在把 skeleton 指向 你 知道的东西,证明它属于你。Skeleton 不变:one gateway、three tool groups、begin_session contract、identity from subject、fail closed。变化的只有三组 tools。
几种值得看的 shapes:
- Tutor:domain 是 course content;user 是 learner's progress;config 是 teacher persona plus teaching method;
begin_session加载 persona + method + learner position。 - Support assistant:domain 查 orders 和 policies;user 是 customer ticket history;config 是 tone 和 escalation rules。
- Internal-docs aide:domain 搜 team wiki;user 是你在哪个 team;config 是什么 confidential,以及如何 cite。
- Booking helper:domain 是 availability 和 reservations;user 是 saved preferences;config 是 cancellation 和 pricing rules。
选最接近你真实了解的东西,运行同一个 loop:plan → review → scaffold → accumulate → verify。运行它,添加到自己的 Claude,让它服务一个真实 request,并在第二天记住它。
像开始 Reading Room 一样开始:让 agent propose,你 review。
Before you build anything, map my domain onto the three groups for me: what goes in
domain, what goes inuser, what goes inconfig, and whatbegin_sessionshould hand back for this app. Show me that mapping so I can review it the way I reviewed the Reading Room plan, then we plan the rest.
Hard parts 的 rhythm 从未变化。每一步变化的只是 你 review 什么:tool list、store、verified_claims wiring、gate、fail-closed behavior、live run。掌握这个 loop,具体 code 就不再重要。
Discuss with an AI. Question your scores.
Come back when you have your BEST evaluation.
Part 7:上限,以及它会在哪里生长
Concept 14:上限,以及通往拥有 loop 的桥
感受你刚构建的 edge,因为它正好指向本书下一步。
你的 app 只能 在 user typing 时 act。它就是 Concept 1 的 hand vacuum:trigger 被按下之前是 dead。它不能自己 wake up、按 schedule run、notice something 后主动 reach out,或在没有 human turn 的情况下 pursue multi-step goal。这不是 flaw,而是 connector-native app 的 nature。Loop 属于 host chat app,不属于你。
当你想要一个能自己 run 的 worker,wake up、take steps、在 loop 中 call tools、在你睡觉时 finish job,你就必须 own the loop yourself。那是 robot vacuum,也是 path 去的地方。在 Build AI Agents 中,你停止照看 hand vacuum,开始构建 robot。
先有两门课。Plugins for AI Agents 是本课的镜像:connector-native app 为 end users 扩展 chat app (claude.ai);plugin 为 builders 扩展 coding agent(Claude Code、OpenCode)。

AI Identity: Human Sign-In and Agent Access 基于 Better Auth,分两半:先 own the sign-in,搭自己的 OAuth/OIDC server;然后给 agent its own identity,也就是 scoped、time-boxed、revocable、human-approved 的方式代表某个人行动。然后 Build AI Agents 给你 loop。
你没有浪费步骤。你 ship 了拥有 loop 之前能 ship 的东西,准确感受到为什么会想要 loop,现在去拿它。
同一个 app,在 Mode 2 中加深
你不会丢掉 v1。后续课程升级 同一个 app:
| You'll add | Which upgrades | In |
|---|---|---|
| Semantic search over your domain | domain_get_item(id) → domain_search(query) | RAG on Postgres + pgvector |
| A durable system-of-record (audit, approval, trustworthy state) | the bare two-table memory | Building a Digital FTE |
| A high-fidelity persona / richer config (no-fabrication guardrails) | the simple config_* rules | Identic AI |
| Your own token issuer, plus identity for agents (scoped, revocable, on-behalf-of) | the rented sign-in service | AI Identity (Better Auth) |
| Proof it actually does its job well | "it seems to work" | Eval-Driven Development |
| Production hardening (observability, a CI test gate) | the live tunnel demo | Deploy the Agent Harness |